NISSAN ALTIMA 1997 U13 / 1.G Owners Manual
Manufacturer: NISSAN, Model Year: 1997, Model line: ALTIMA, Model: NISSAN ALTIMA 1997 U13 / 1.GPages: 203, PDF Size: 1.64 MB
Page 181 of 203

Selecting the correct oil filter
Your new vehicle is equipped with a high-
quality genuine NISSAN oil filter. When
replacing, use the genuine oil filter or its
equivalent for the reason described in
``Change intervals''.
Change intervals
The oil and oil filter change intervals for your
engine are based on the use of the specified
quality oils and filters. Oil and filter other
than the specified quality, or oil and filter
change intervals longer than recommended
could reduce engine life. Damage to en-
gines caused by improper maintenance or
use of incorrect oil and filter quality and/or
viscosity is not covered by the new NISSAN
vehicle warranties.
Your engine was filled with a high quality
engine oil when it was built. You do not have
to change the oil before the first recom-
mended change interval. Oil and filter
change intervals depend upon how you use
your vehicle. Operation under the following
conditions may require more frequent oil
and filter changes:
Ð repeated short distance driving at cold
outside temperatures,Ð driving in dusty conditions,
Ð extensive idling,
Ð towing a trailer.
RECOMMENDED SAE
VISCOSITY NUMBER
cSAE 5W-30 viscosity oil is preferred
for all temperatures. SAE 10W-30 vis-
cosity oil may be used if the ambient
temperature is above 0ÉF (-18ÉC).
ATI0509
9-6
ZX
Page 182 of 203
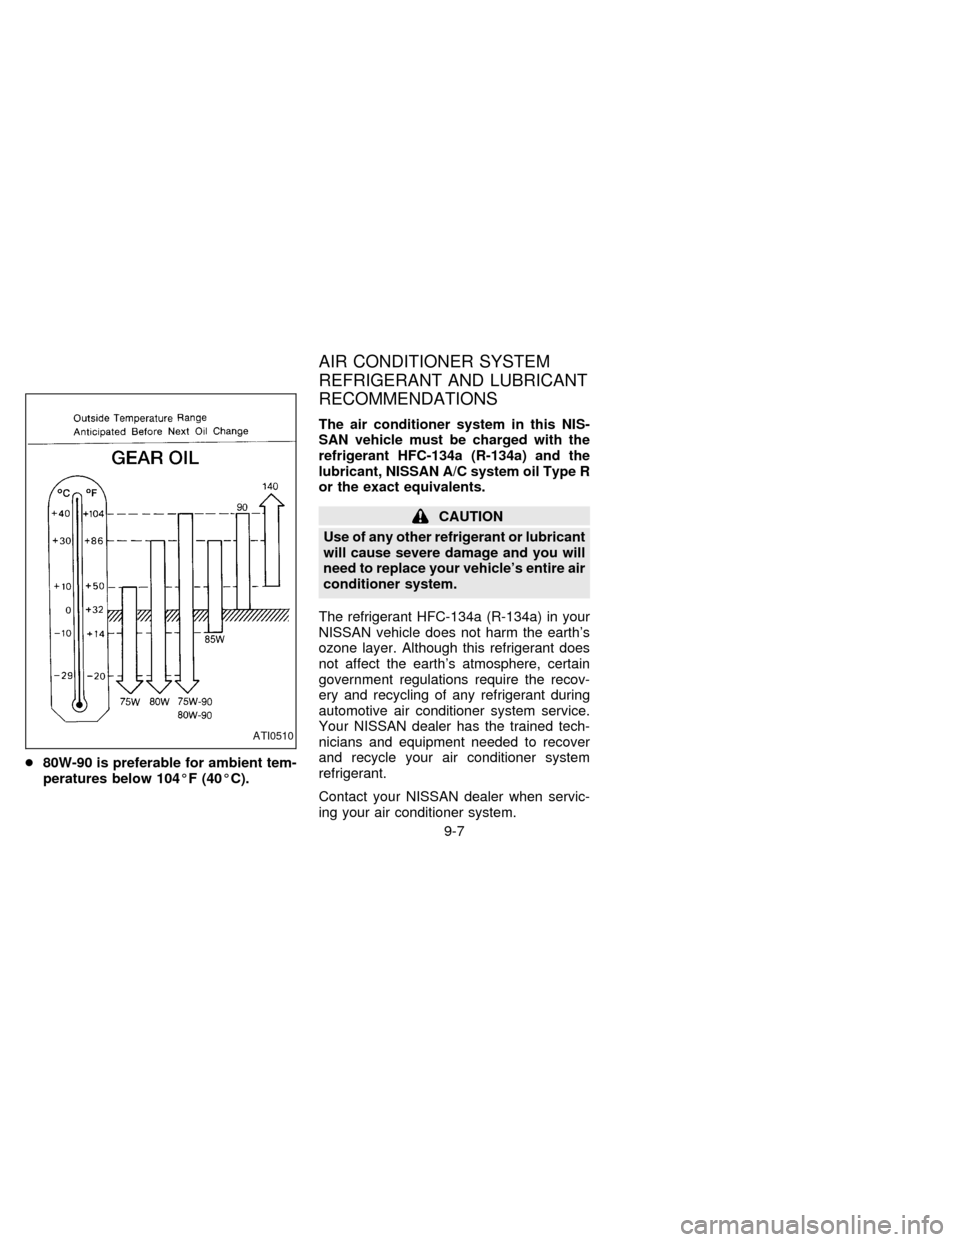
c80W-90 is preferable for ambient tem-
peratures below 104ÉF (40ÉC).
AIR CONDITIONER SYSTEM
REFRIGERANT AND LUBRICANT
RECOMMENDATIONS
The air conditioner system in this NIS-
SAN vehicle must be charged with the
refrigerant HFC-134a (R-134a) and the
lubricant, NISSAN A/C system oil Type R
or the exact equivalents.
CAUTION
Use of any other refrigerant or lubricant
will cause severe damage and you will
need to replace your vehicle's entire air
conditioner system.
The refrigerant HFC-134a (R-134a) in your
NISSAN vehicle does not harm the earth's
ozone layer. Although this refrigerant does
not affect the earth's atmosphere, certain
government regulations require the recov-
ery and recycling of any refrigerant during
automotive air conditioner system service.
Your NISSAN dealer has the trained tech-
nicians and equipment needed to recover
and recycle your air conditioner system
refrigerant.
Contact your NISSAN dealer when servic-
ing your air conditioner system.
ATI0510
9-7
ZX
Page 183 of 203
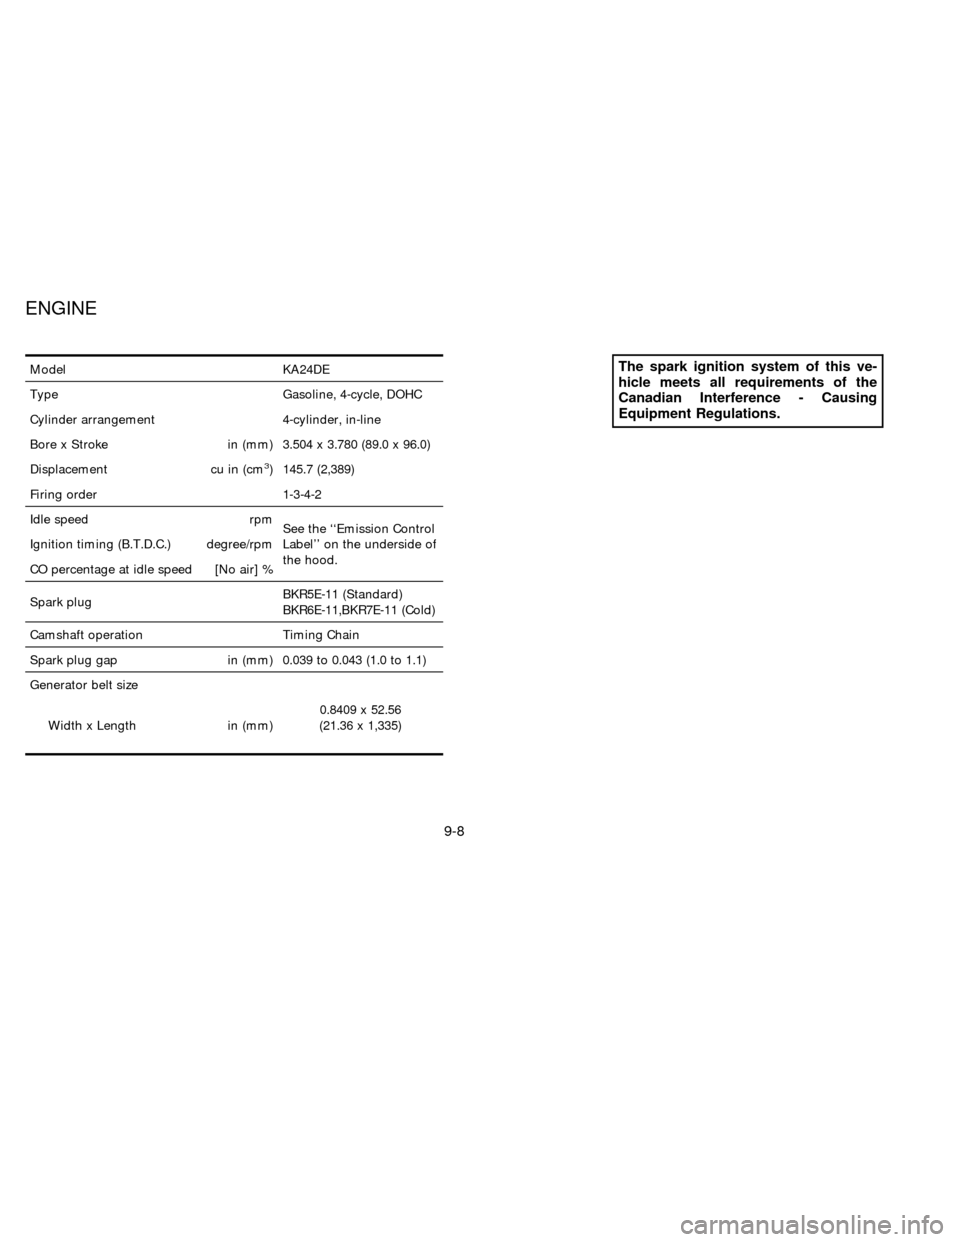
Model KA24DE
Type Gasoline, 4-cycle, DOHC
Cylinder arrangement 4-cylinder, in-line
Bore x Stroke in (mm) 3.504 x 3.780 (89.0 x 96.0)
Displacement cu in (cm
3) 145.7 (2,389)
Firing order 1-3-4-2
Idle speed rpm
See the ``Emission Control
Label'' on the underside of
the hood. Ignition timing (B.T.D.C.) degree/rpm
CO percentage at idle speed [No air] %
Spark plugBKR5E-11 (Standard)
BKR6E-11,BKR7E-11 (Cold)
Camshaft operation Timing Chain
Spark plug gap in (mm) 0.039 to 0.043 (1.0 to 1.1)
Generator belt size
Width x Length in (mm)0.8409 x 52.56
(21.36 x 1,335)
The spark ignition system of this ve-
hicle meets all requirements of the
Canadian Interference - Causing
Equipment Regulations.
ENGINE
9-8
ZX
Page 184 of 203
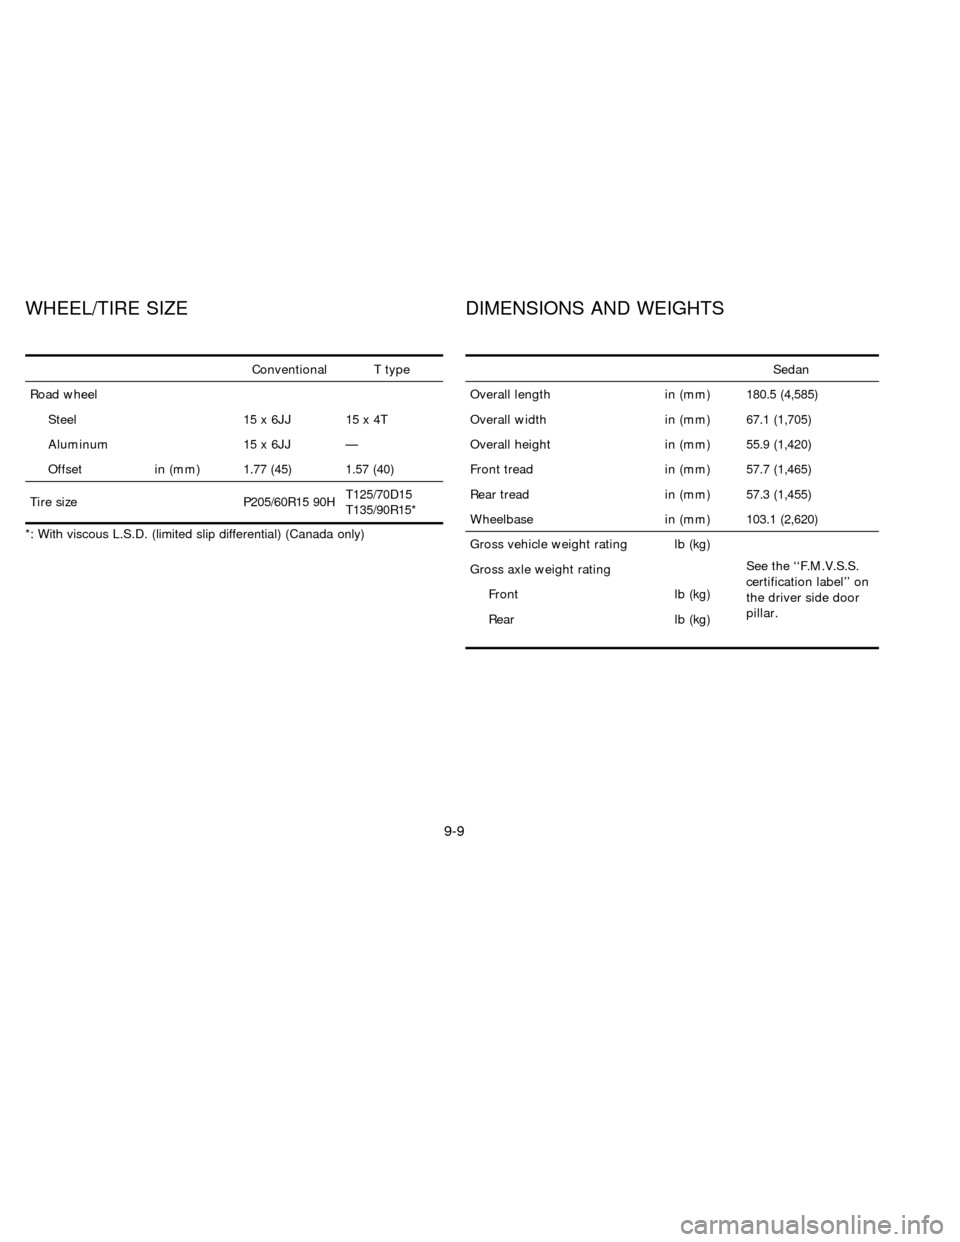
Conventional T type
Road wheel
Steel 15 x 6JJ 15 x 4T
Aluminum 15 x 6JJ Ð
Offset in (mm) 1.77 (45) 1.57 (40)
Tire size P205/60R15 90HT125/70D15
T135/90R15*
*: With viscous L.S.D. (limited slip differential) (Canada only)Sedan
Overall length in (mm) 180.5 (4,585)
Overall width in (mm) 67.1 (1,705)
Overall height in (mm) 55.9 (1,420)
Front tread in (mm) 57.7 (1,465)
Rear tread in (mm) 57.3 (1,455)
Wheelbase in (mm) 103.1 (2,620)
Gross vehicle weight rating lb (kg)
See the ``F.M.V.S.S.
certification label'' on
the driver side door
pillar. Gross axle weight rating
Front lb (kg)
Rear lb (kg)
WHEEL/TIRE SIZE DIMENSIONS AND WEIGHTS
9-9
ZX
Page 185 of 203

When planning to travel in another coun-
try,you should first find out if the fuel
available is suitable for your vehicle's en-
gine.
Using fuel with an octane rating that is too
low may cause engine damage. All gasoline
vehicles must be operated with unleaded
gasoline. Therefore, avoid taking your ve-
hicle to areas where appropriate fuel is not
available.
When transferring the registration of
your vehicle to another country, state,
province or district,it may be necessary to
modify the vehicle to meet local laws and
regulations.
The laws and regulations for motor vehicle
emission control and safety standards vary
according to the country, state, province or
district; therefore, vehicle specifications
may differ.
When any vehicle is to be taken into
another country, state, province or dis-
trict and registered, its modifications,
transportation, and registration are the
responsibility of the user. NISSAN is not
responsible for any inconvenience that
may result.
VEHICLE IDENTIFICATION
NUMBER PLATE
The vehicle identification number plate is
attached as shown. This number is the
identification for your vehicle and is used in
the vehicle registration.
VEHICLE IDENTIFICATION
NUMBER (Chassis number)
The number is stamped as shown.
ATI0020ATI0500
REGISTERING YOUR VEHICLE
IN ANOTHER COUNTRYVEHICLE IDENTIFICATION
9-10
ZX
Page 186 of 203

ENGINE SERIAL NUMBER
The number is stamped on the engine as
shown.
F.M.V.S.S. CERTIFICATION
LABEL
The Federal Motor Vehicle Safety Stan-
dards (F.M.V.S.S.) certification label is af-
fixed as shown. This label contains valuable
vehicle information, such as: Gross Vehicle
Weight Ratings (GVWR), Gross Axle
Weight Rating (GAWR), month and year of
manufacture, Vehicle Identification Number,
(VIN), etc. Review it carefully.
ATI0022TI1068
9-11
ZX
Page 187 of 203

EMISSION CONTROL
INFORMATION LABEL
The emission control information label is
attached as shown.
TIRE PLACARD
The cold tire pressure is shown on the tire
placard affixed to the center console lid.
AIR CONDITIONER
SPECIFICATION LABEL
The air conditioner specification label is
affixed as shown.
ATI0502ATI0501ATI0506
9-12
ZX
Page 188 of 203

1. Insert J-bolts into the U-shaped grooves.
2. Temporarily place the bracket in position
on the front bumper.Be sure to align
the curve of the bracket with the curve
in the bumper.cTo determine where to drill the hole, shift
the bracket to the right and use a felt-tip
pen to draw an arc along the right side of
each mounting hole. Next, shift the
bracket to the left and draw an arc along
the left side of each mounting hole.cRemove the bracket and connect the
arcs to form ovals. Mark the point in the
center of each oval. These are the ``pilot''
drilling locations.
3. Carefully drill two ``pilot'' holes using a
1/8 inch (3 mm) drill bit at the marked
locations.Be sure that the drill only
goes through the fascia, or damage to
the nut may occur.
cCheck to be sure that the holes are
aligned with the nuts located behind the
fascia. If you are satisfied that the holes
are properly placed, use a 5/16 inch (8
mm) drill bit to enlarge the holes. Use
care to only drill through the fascia.
4. Install the bracket. Install the license
plate with bolts that are no longer than
0.55 inch (14 mm). The bolts used to
fasten the license plate to the bracket are
not included in the attaching hardware
that comes with the bracket.
ATI0503
INSTALLING FRONT LICENSE
PLATE
9-13
ZX
Page 189 of 203
WARNING
cIt is extremely dangerous to ride in a
cargo area inside of a vehicle. In a
collision, people riding in these ar-
eas are more likely to be seriously
injured or killed.
cDo not allow people to ride in any
area of your vehicle that is not
equipped with seats and seat belts.
c
Be sure everyone in your vehicle is in
a seat and using a seat belt properly.
Terms
It is important to familiarize yourself with the
following terms before loading your vehicle:
cCurb Weight (actual weight of your ve-
hicle) - vehicle weight including: standard
and optional equipment, fluids, emer-
gency tools, and spare tire assembly.
This weightdoes notinclude passen-
gers and cargo.
cGVW (Gross Vehicle Weight) - curb
weight plus the combined weight of pas-
sengers and cargo.
cGVWR (Gross Vehicle Weight Rating) -maximum total weight (load) limit speci-
fied for the vehicle.
cGAWR (Gross Axle Weight Rating) -
maximum weight (load) limit specified for
the front or rear axle.
Determining Vehicle Load Capacity
The load capacity of this vehicle is determined
by weight, not by available cargo space. For
example, a luggage rack, bike carrier, cartop
carrier or similar equipment does not increase
load carrying capacity of your vehicle.
To determine vehicle load capacity:
Vehicle weight can be determined by using
a commercial-grade scale, found at places
such as a truck stop, gravel quarry, grain
elevator, or a scrap metal recycling facility.
1)
Determine the curb weight of your vehicle.
2) Compare the curb weight amount to the
GVWR specified for your vehicle to de-
termine how much more weight your
vehicle can carry.
3) After loading (cargo and passengers),
re-weigh your vehicle to determine if
either GVWR or GAWR for your vehicle
is exceeded. If GVWR is exceeded, re-
move cargo as necessary. If either thefront or rear GAWR is exceeded, shift the
load or remove cargo as necessary.
Loading Tips
cThe GVW must not exceed GVWR or
GAWR as specified on the FMVSS Cer-
tification Label.
cDo not load the front and rear axle to the
GAWR. Doing so will exceed the GVWR.
WARNING
c
Properly secure all cargo to help pre-
vent it from sliding or shifting. Do not
place cargo higher than the seat-
backs. In a sudden stop or collision,
unsecured cargo could cause per-
sonal injury.
cDo not load your vehicle any heavier
than the GVWR or the maximum
front and rear GAWRs. If you do,
parts on your vehicle can break, or it
can change the way your vehicle
handles. This could result in loss of
control and cause personal injury.
cOverloading can shorten the life of
your vehicle. Failures caused by
overloading are not covered by your
warranty.
VEHICLE LOADING
INFORMATION
9-14
ZX
Page 190 of 203
Your new vehicle was designed to be used
primarily to carry passengers and cargo.
Remember that towing a trailer will place
additional loads on your vehicle's engine,
drive train, steering, braking and other sys-
tems.
Information on trailer towing ability and the
special equipment required should be ob-
tained from your NISSAN dealer. He can
obtain aNissan Trailer Towing Guidefor
you.
Maximum load limits
Maximum trailer loads:
Never allow the total trailer load to exceed
1,000 lb (454 kg). The total trailer load
equals trailer weight plus its cargo weight.
Towing loads greater than 1,000 lb (454 kg)
or using improper towing equipment could
adversely affect vehicle handling, braking
and performance.
WARNING
Vehicle damage and/or personal injury
resulting from improper towing proce-
dures is not covered by NISSAN warran-
ties. Information on trailer towing and
required towing equipment should be ob-
tained from dealers who specialize in pro-
viding trailers or other towing equipment.
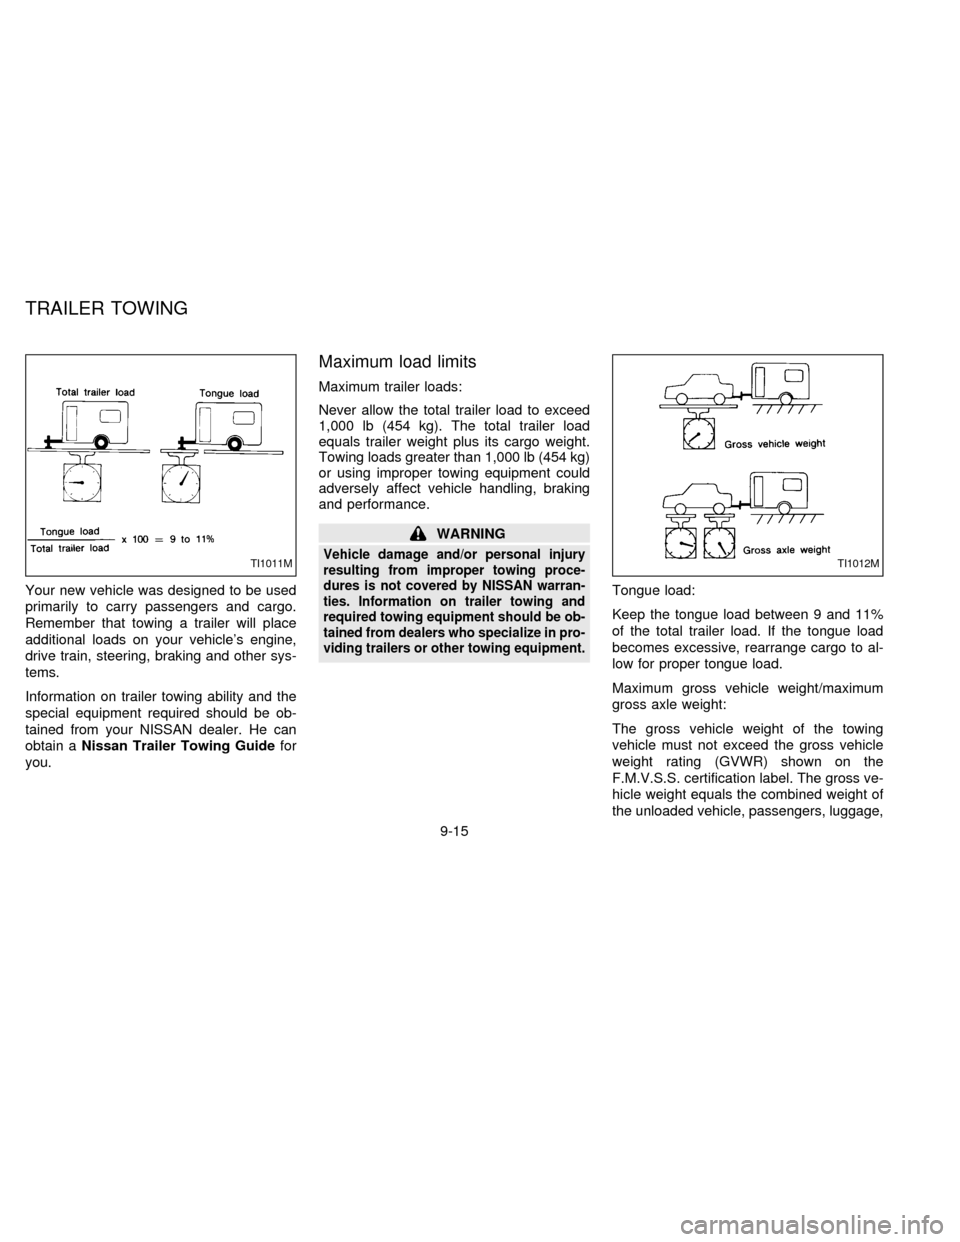
Tongue load:
Keep the tongue load between 9 and 11%
of the total trailer load. If the tongue load
becomes excessive, rearrange cargo to al-
low for proper tongue load.
Maximum gross vehicle weight/maximum
gross axle weight:
The gross vehicle weight of the towing
vehicle must not exceed the gross vehicle
weight rating (GVWR) shown on the
F.M.V.S.S. certification label. The gross ve-
hicle weight equals the combined weight of
the unloaded vehicle, passengers, luggage,
TI1011MTI1012M
TRAILER TOWING
9-15
ZX