check oil NISSAN ALTIMA 2002 L31 / 3.G Owners Manual
[x] Cancel search | Manufacturer: NISSAN, Model Year: 2002, Model line: ALTIMA, Model: NISSAN ALTIMA 2002 L31 / 3.GPages: 249, PDF Size: 2.02 MB
Page 57 of 249

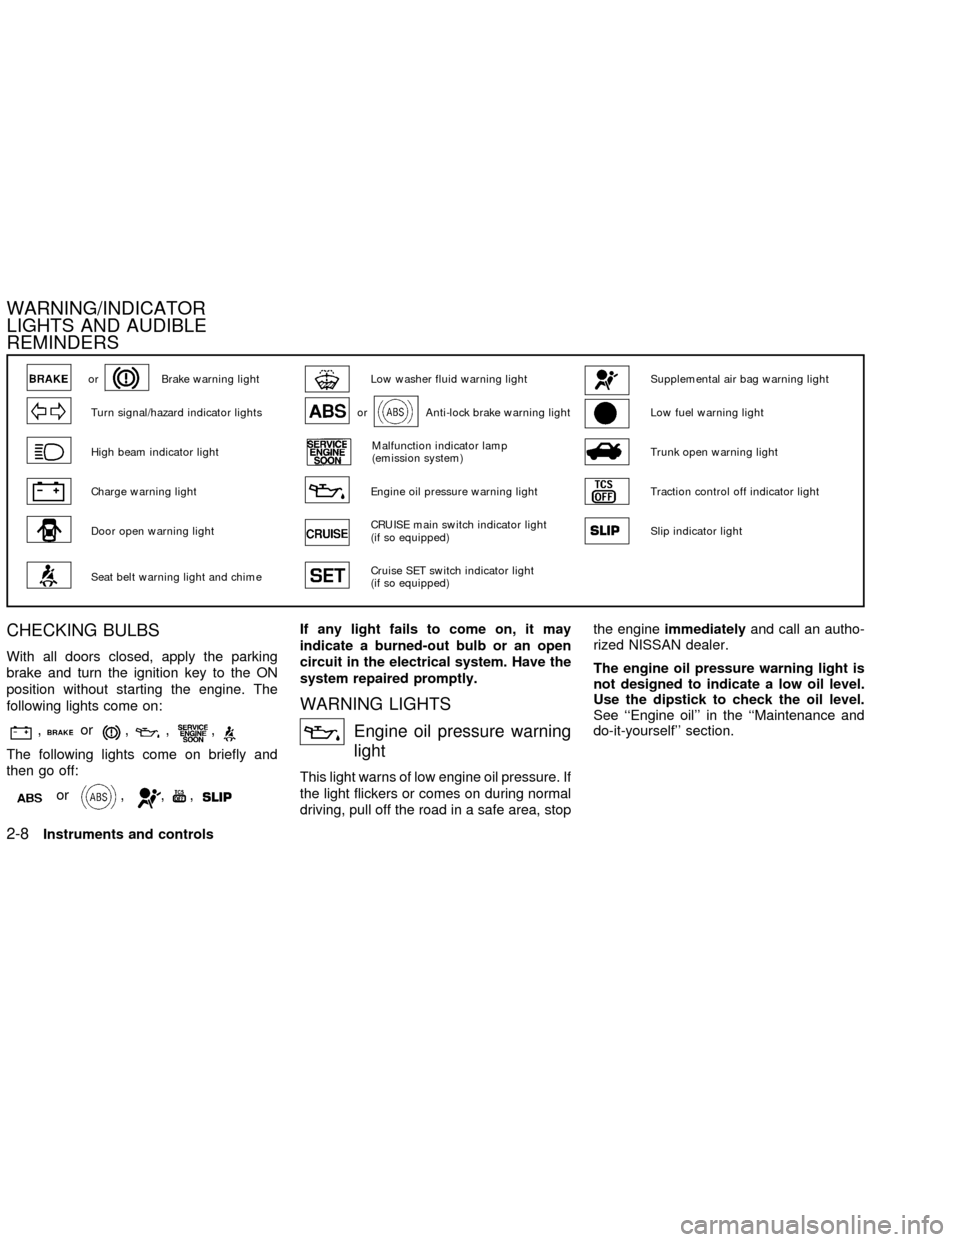
CHECKING BULBS
With all doors closed, apply the parking
brake and turn the ignition key to the ON
position without starting the engine. The
following lights come on:
,or,,,
The following lights come on briefly and
then go off:
or,,,
If any light fails to come on, it may
indicate a burned-out bulb or an open
circuit in the electrical system. Have the
system repaired promptly.
WARNING LIGHTS
Engine oil pressure warning
light
This light warns of low engine oil pressure. If
the light flickers or comes on during normal
driving, pull off the road in a safe area, stopthe engineimmediatelyand call an autho-
rized NISSAN dealer.
The engine oil pressure warning light is
not designed to indicate a low oil level.
Use the dipstick to check the oil level.
See ``Engine oil'' in the ``Maintenance and
do-it-yourself'' section.
orBrake warning lightLow washer fluid warning lightSupplemental air bag warning light
Turn signal/hazard indicator lightsorAnti-lock brake warning lightLow fuel warning light
High beam indicator lightMalfunction indicator lamp
(emission system)Trunk open warning light
Charge warning lightEngine oil pressure warning lightTraction control off indicator light
Door open warning lightCRUISE main switch indicator light
(if so equipped)Slip indicator light
Seat belt warning light and chimeCruise SET switch indicator light
(if so equipped)
WARNING/INDICATOR
LIGHTS AND AUDIBLE
REMINDERS
2-8Instruments and controls
ZX
Page 58 of 249

CAUTION
Running the engine with the engine oil
pressure warning light on could cause
serious damage to the engine almost
immediately. Such damage is not cov-
ered by warranty. Turn off the engine as
soon as it is safe to do so.
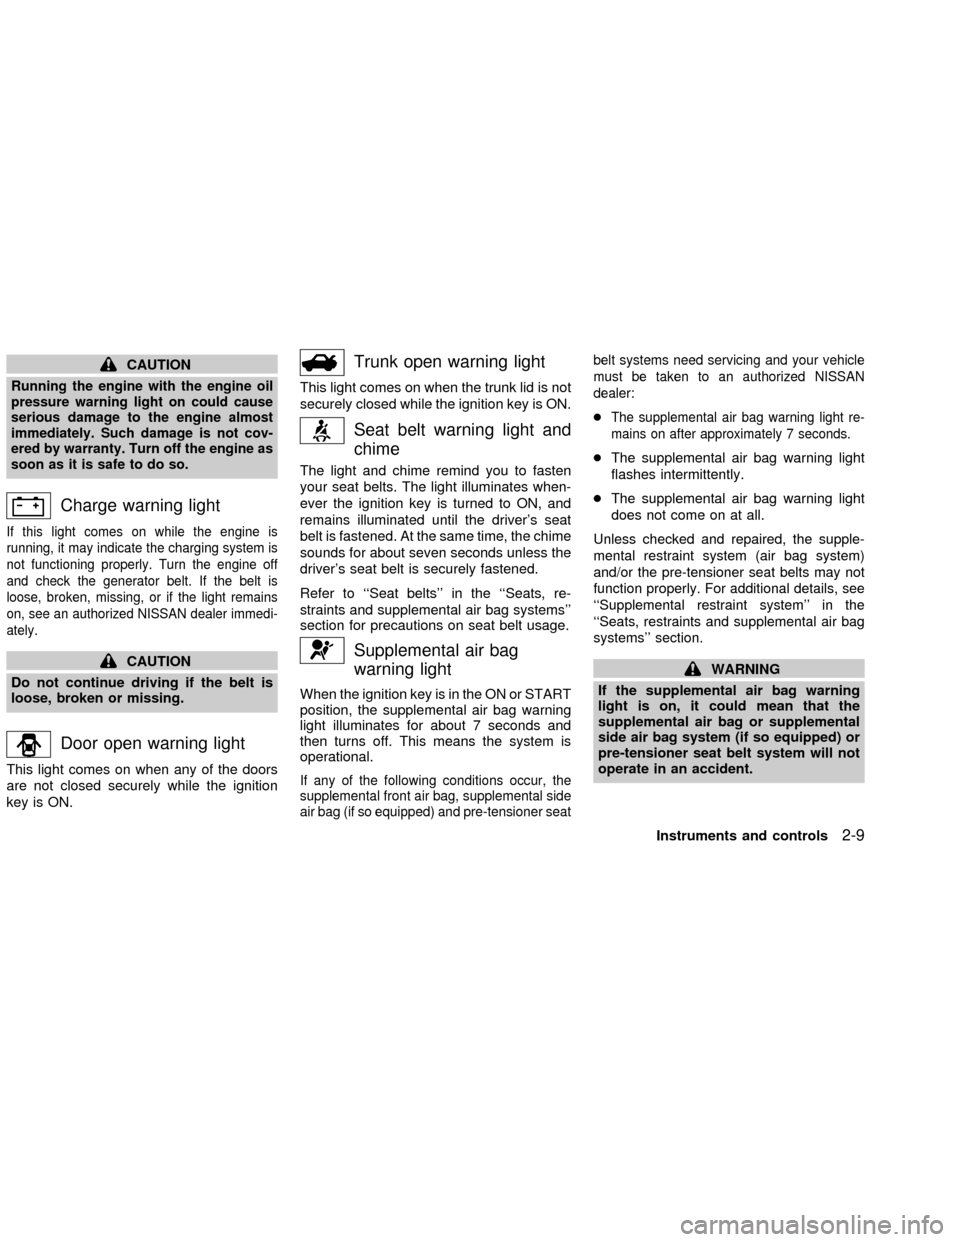
Charge warning light
If this light comes on while the engine is
running, it may indicate the charging system is
not functioning properly. Turn the engine off
and check the generator belt. If the belt is
loose, broken, missing, or if the light remains
on, see an authorized NISSAN dealer immedi-
ately.
CAUTION
Do not continue driving if the belt is
loose, broken or missing.
Door open warning light
This light comes on when any of the doors
are not closed securely while the ignition
key is ON.
Trunk open warning light
This light comes on when the trunk lid is not
securely closed while the ignition key is ON.
Seat belt warning light and
chime
The light and chime remind you to fasten
your seat belts. The light illuminates when-
ever the ignition key is turned to ON, and
remains illuminated until the driver's seat
belt is fastened. At the same time, the chime
sounds for about seven seconds unless the
driver's seat belt is securely fastened.
Refer to ``Seat belts'' in the ``Seats, re-
straints and supplemental air bag systems''
section for precautions on seat belt usage.
Supplemental air bag
warning light
When the ignition key is in the ON or START
position, the supplemental air bag warning
light illuminates for about 7 seconds and
then turns off. This means the system is
operational.
If any of the following conditions occur, the
supplemental front air bag, supplemental side
air bag (if so equipped) and pre-tensioner seatbelt systems need servicing and your vehicle
must be taken to an authorized NISSAN
dealer:
cThe supplemental air bag warning light re-
mains on after approximately 7 seconds.
cThe supplemental air bag warning light
flashes intermittently.
cThe supplemental air bag warning light
does not come on at all.
Unless checked and repaired, the supple-
mental restraint system (air bag system)
and/or the pre-tensioner seat belts may not
function properly. For additional details, see
``Supplemental restraint system'' in the
``Seats, restraints and supplemental air bag
systems'' section.
WARNING
If the supplemental air bag warning
light is on, it could mean that the
supplemental air bag or supplemental
side air bag system (if so equipped) or
pre-tensioner seat belt system will not
operate in an accident.
Instruments and controls
2-9
ZX
Page 139 of 249

START (4)
This position activates the starter motor,
which starts the engine.
NISSAN VEHICLE IMMOBILIZER
SYSTEM (NVIS)
The Nissan Vehicle Immobilizer System
(NVIS) will not allow the engine to run
without the use of the registered NVIS key.
If the engine fails to run using the registered
NVIS key, it may be due to interference
caused by another NVIS key, an automated
toll road device or automated payment de-
vice on the key ring. Restart the engine
using the following procedures:
1. Leave the ignition switch in the ON posi-
tion for approximately 5 seconds.
2. Turn the ignition switch to the OFF or
LOCK position and wait approximately 5
seconds.
3. Repeat step 1 and 2 again.
4. Restart the engine while holding the de-
vice (which may have caused the inter-
ference) separate from the registered
NVIS key.If this procedure allows the engine to run,
NISSAN recommends placing the regis-
tered NVIS key on a separate key ring to
avoid interference from other devices.cMake sure the area around the vehicle is
clear.
cMaintenance items listed here should be
checked periodically, for example, each
time you check engine oil.
cCheck that all windows and lights are
clean.
cVisually inspect tires for their appearance
and condition. Also check tires for proper
inflation.
cLock all doors.
cPosition seat and adjust head restraints.
cAdjust inside and outside mirrors.
cFasten seat belts and ask all passengers
to do likewise.
cCheck the operation of warning lights
when key is turned to the ON (3) position.
See ``Warning/Indicator lights and au-
dible reminders'' in the ``Instruments and
controls'' section.
BEFORE STARTING THE
ENGINE
5-6Starting and driving
ZX
Page 172 of 249

choosing the proper product.
cWax your vehicle only after a thorough
washing. Follow the instructions supplied
with the wax.
cDo not use a wax containing any abra-
sives, cutting compounds or cleaners
that may damage the vehicle finish.
cIf the surface does not polish easily, use
a ªroad tarº remover and wax again.
Machine compounding or aggressive pol-
ishing on a base coat/clear coat paint finish
may dull the finish or leave swirl marks.
REMOVING SPOTS
Remove tar and oil spots, industrial dust,
insects, and tree sap as quickly as possible
from the surface of the paint to avoid lasting
damage or staining. Special cleaning prod-
ucts are available at an authorized NISSAN
dealer or any automotive accessory store.
UNDERBODY
In areas where road salt is used in winter,
the underbody must be cleaned regularly.
This will prevent dirt and salt from building
up and causing the acceleration of corro-
sion on the underbody and suspension.Before winter and again in the spring, the
underseal must be checked and, if neces-
sary, retreated.
GLASS
When cleaning the rear window, it may be
easier to clean if the high-mounted stop light
is removed first.
Be careful when removing the high-
mounted stop light to reduce the risk of
damaging the high-mounted stop light
wires.
The high-mounted stop light must be prop-
erly reinstalled before driving your vehicle.
Use glass cleaner to remove smoke and
dust film from the glass surfaces. It is nor-
mal for glass to become coated with a film
AAI1001
Appearance and care7-3
ZX
Page 177 of 249

8 Maintenance and do-it-yourself
Maintenance requirements .....................................8-2
General maintenance .............................................8-3
Explanation of general maintenance
items ..................................................................8-3
Maintenance precautions .......................................8-5
Engine compartment check locations QR
engine .....................................................................8-7
Engine compartment check locations VQ
engine .....................................................................8-8
Engine cooling system ...........................................8-9
Checking engine coolant level ..........................8-9
Changing engine coolant ................................8-10
Engine oil .............................................................8-10
Checking engine oil level ................................8-10
Changing engine oil ........................................8-11
Changing engine oil filter.................................8-13
Automatic transmission fluid ................................8-14
Temperature conditions for checking ..............8-14
Power steering fluid..............................................8-15
Brake and clutch fluid...........................................8-16
Brake fluid........................................................8-16
Clutch fluid .......................................................8-16Window washer fluid ............................................8-17
Battery ..................................................................8-17
Jump starting ...................................................8-18
Drive belts ............................................................8-19
Spark plugs ..........................................................8-20
Replacing spark plugs (QR25DE) ...................8-20
Replacing spark plugs (VQ35DE) ...................8-20
Air cleaner ............................................................8-21
Cabin air filter (if so equipped) ........................8-21
Windshield wiper blades ......................................8-24
Cleaning ..........................................................8-24
Replacing .........................................................8-24
Parking brake and brake pedal ............................8-25
Checking parking brake...................................8-25
Checking brake pedal .....................................8-25
Brake booster ..................................................8-26
Clutch pedal .........................................................8-26
Checking clutch pedal .....................................8-26
Fuses ....................................................................8-27
Engine compartment .......................................8-27
Passenger compartment .................................8-28
Keyfob battery replacement .................................8-29
ZX
Page 181 of 249

Steering wheelCheck for changes in the
steering conditions, such as excessive free-
play, hard steering or strange noises.
SeatsCheck seat position controls such as
seat adjusters, seatback recliner, etc. to
ensure they operate smoothly and all
latches lock securely in every position.
Check that the head restraints move up and
down smoothly and the locks (if so
equipped) hold securely in all latched posi-
tions.
Seat beltsCheck that all parts of the seat
belt system (e.g., buckles, anchors, adjust-
ers and retractors) operate properly and
smoothly, and are installed securely. Check
the belt webbing for cuts, fraying, wear or
damage.
Accelerator pedalCheck the pedal for
smooth operation and make sure the pedal
does not catch or require uneven effort.
Keep the floor mat away from the pedal.
Clutch pedal*Make sure the pedal oper-
ates smoothly and check that it has the
proper free travel.
BrakesCheck that the brakes do not pull
the vehicle to one side when applied.Brake pedal and booster*Check the pedal
for smooth operation and make sure it has
the proper distance under it when de-
pressed fully. Check the brake booster func-
tion. Be certain to keep the floor mat away
from the pedal.
Parking brake*Check that the lever has
the proper travel and confirm that your
vehicle is held securely on a fairly steep hill
with only the parking brake applied.
Automatic transmission P (Park) posi-
tion mechanismCheck that the lock re-
lease button on the selector lever operates
properly and smoothly. On a fairly steep hill
check that your vehicle is held securely with
the selector lever in the P position without
applying any brakes.
Under the hood and vehicle
The maintenance items listed here should
be checked periodically (e.g., each time you
check the engine oil or refuel).
Windshield washer fluid*Check that there
is adequate fluid in the reservoir.
Engine oil level*Check the level after
parking the vehicle on a level surface with
the engine off. Wait more than 10 minutesfor the oil to drain back into the oil pan.
Brake and clutch fluid levels*Make sure
that the brake and clutch fluid level is be-
tween the MIN and MAX lines on the reser-
voir.
Power steering fluid level* and lines
Check the level when the fluid is cold, with
the engine off. Check the lines for proper
attachment, leaks, cracks, etc.
Automatic transmission fluid level*
Check the level after putting the selector
lever in P with the engine idling at operating
temperature.
Engine coolant level*Check the coolant
level when the engine is cold.
Radiator and hosesCheck the front of the
radiator and clean off any dirt, insects,
leaves, etc., that may have accumulated.
Make sure the hoses have no cracks, de-
formation, rot or loose connections.
Engine drive belts*Make sure the drive
belts are not frayed, worn, cracked or oily.
Battery*Check the fluid level in each cell. It
should be between the MAX and MIN lines.
Vehicles operated in high temperatures or
under severe conditions require frequent
8-4Maintenance and do-it-yourself
ZX
Page 182 of 249

checks of the battery fluid level.
Exhaust systemMake sure there are no
loose supports, cracks or holes. If the sound
of the exhaust seems unusual or there is a
smell of exhaust fumes, immediately have
the exhaust system inspected by an autho-
rized NISSAN dealer. See the carbon mon-
oxide warning in the ``Starting and driving''
section of this manual.
UnderbodyThe underbody is frequently
exposed to corrosive substances such as
those used on icy roads or to control dust. It
is very important to remove these sub-
stances from the underbody, otherwise rust
may form on the floor pan, frame, fuel lines
and exhaust system. At the end of winter,
the underbody should be thoroughly flushed
with plain water, in those areas where mud
and dirt may have accumulated. See the
``Appearance and care'' section of this
manual.
Fluid leaksCheck under the vehicle for
fuel, oil, water or other fluid leaks after the
vehicle has been parked for a while. Water
dripping from the air conditioner after use is
normal. If you should notice any leaks or if
gasoline fumes are evident, check for the
cause and have it corrected immediately.When performing any inspection or mainte-
nance work on your vehicle, always take
care to prevent serious accidental injury to
yourself or damage to the vehicle. The
following are general precautions which
should be closely observed.
WARNING
cPark the vehicle on a level surface,
apply the parking brake securely and
block the wheels to prevent the ve-
hicle from moving. For manual trans-
mission models, move the shift lever
to (N) Neutral. For an automatic
transmission models, move the shift
selector lever to P (Park).
cBe sure the ignition key is in the OFF
or LOCK position when performing
any parts replacement or repairs.
cYour vehicle is equipped with an
automatic engine cooling fan. It may
come on at any time without warn-
ing, even if the ignition key is in the
OFF position and the engine is not
running. To avoid injury, always dis-
connect the negative battery cable
before working near the fan.c
If you must work with the engine run-
ning, keep your hands, clothing, hair
and tools away from moving fans,
belts and any other moving parts.
cIt is advisable to secure or remove
any loose clothing and remove any
jewelry, such as rings, watches, etc.
before working on your vehicle.
cAlways wear eye protection when-
ever you work on your vehicle.
cIf you must run the engine in an
enclosed space such as a garage, be
sure there is proper ventilation for
exhaust gases to escape.
cNever get under the vehicle while it
is supported only by a jack. If it is
necessary to work under the vehicle,
support it with safety stands.
c
Keep smoking materials, flame and
sparks away from the fuel tank and
battery.
cOn gasoline engine models with the
multiport fuel injection (MFI) system,
the fuel filter or fuel lines should be
serviced by an authorized NISSAN
MAINTENANCE
PRECAUTIONS
Maintenance and do-it-yourself8-5
ZX
Page 184 of 249

1. Power steering fluid reservoir
2. Spark plug caps
3. Brake fluid reservoir
4. Clutch fluid reservoir (M/T models)
5. Air cleaner
6. Battery
7. Fuse/fusible link box
8. Transmission dipstick (A/T models)
9. Engine oil dipstick
10. Radiator cap
11. Fuse block
12. Windshield washer fluid reservoir
13. Coolant reservoir
14. Engine oil filler cap
NOTE: Engine cover removed for clarity
LDI0073
ENGINE COMPARTMENT
CHECK LOCATIONS QR
ENGINE
Maintenance and do-it-yourself8-7
ZX
Page 185 of 249

1. Power steering fluid reservoir
2. Engine oil filler cap
3. Brake fluid reservoir
4. Clutch fluid reservoir (M/T models)
5. Air cleaner
6. Battery
7. Fuse/fusible link box
8. Transmission dipstick (A/T models)
9. Engine oil dipstick
10. Radiator cap
11. Fuse block
12. Windshield washer fluid reservoir
13. Coolant reservoir
NOTE: Engine cover removed for clarity
LDI0074
ENGINE COMPARTMENT
CHECK LOCATIONS VQ
ENGINE
8-8Maintenance and do-it-yourself
ZX
Page 187 of 249

CHANGING ENGINE COOLANT
An authorized NISSAN dealer can change
the engine coolant. The service procedure
is found in NISSAN's Service Manual.
Improper servicing can result in reduced
heater performance and engine over-
heating.
WARNING
cTo avoid the danger of being
scalded, never change the coolant
when the engine is hot.
cNever remove the radiator cap when
the engine is hot. Serious burns
could be caused by high pressure
fluid escaping from the radiator.
cAvoid direct skin contact with used
coolant. If skin contact is made,
wash thoroughly with soap or hand
cleaner as soon as possible.
cKeep coolant out of reach of children
and pets.
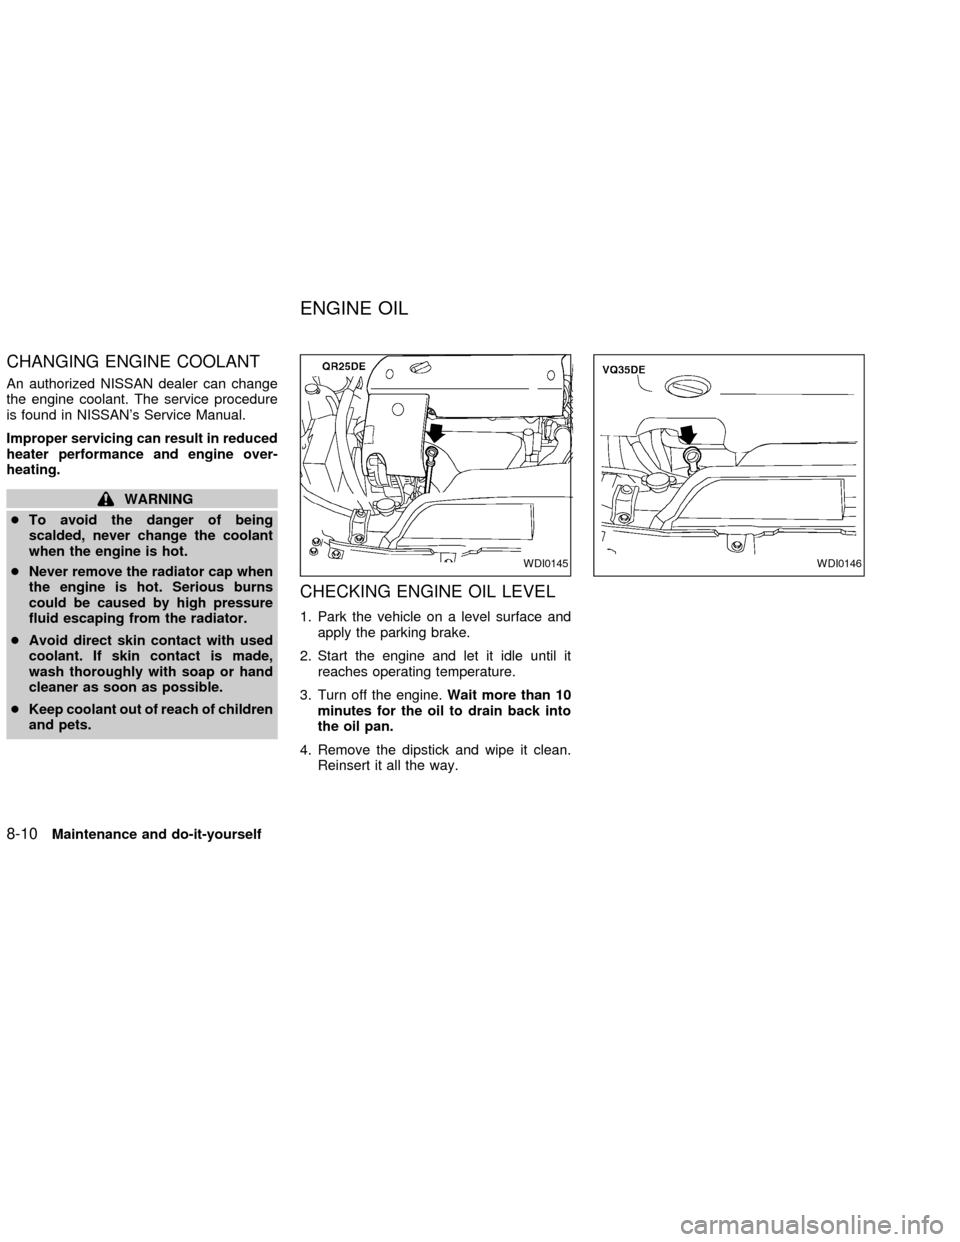
CHECKING ENGINE OIL LEVEL
1. Park the vehicle on a level surface and
apply the parking brake.
2. Start the engine and let it idle until it
reaches operating temperature.
3. Turn off the engine.Wait more than 10
minutes for the oil to drain back into
the oil pan.
4. Remove the dipstick and wipe it clean.
Reinsert it all the way.
WDI0145WDI0146
ENGINE OIL
8-10Maintenance and do-it-yourself
ZX