air conditioning NISSAN ARMADA 2020 Owner´s Manual
[x] Cancel search | Manufacturer: NISSAN, Model Year: 2020, Model line: ARMADA, Model: NISSAN ARMADA 2020Pages: 528, PDF Size: 2.1 MB
Page 13 of 528

JVC1211X
1. Cargo light (P.2-70)
2. Cup holders (3rd row seat) (P.2-54)
3. Rear ventilators (P.4-34)
4. Coat hooks (P.2-59)
5. Rear personal lights (P.2-68)
6. Tray (P.2-58)
7. Door armrest— Power window controls (P.2-63)
— Power door lock switch (P.3-5)
— Outside mirror remote control switch
(driver’s side) (P.3-38)
8. Automatic drive positioner switch (if so equipped) (P.3-40)
9. Sun visors (P.3-30) 10. Map lights (P.2-68)
11. Moonroof switch (if so equipped) (P.2-65)
12. SOS call switch (if so equipped) (See
NissanConnect® Owner’s Manual)
13. Sunglasses holder (P.2-55)
14. Inside mirror (P.3-31) — Intelligent Rear View Mirror (if so
equipped) (P.3-32)
— HomeLink® universal transceiver (if so
equipped) (P.2-70, P.2-74)
15. Cargo area — Power outlet (P.2-50)
— Cargo floor box (P.2-60)
— Luggage hooks (P.2-59)
— Jacking tools (P.6-5)
16. Rear console box (if so equipped) (P.2-57) — Cup holders (2nd row seat) (P.2-53)
— Pocket (P.2-57)
17. Cup holders (2nd row seat) (if so equipped) (P.2-53)
18. Mobile Entertainment System (MES) (if so equipped) (See NissanConnect® Owner’s
Manual)
19. Console box (P.2-56) — Power outlet (P.2-50)
— USB charging connector (P.2-52)
— Rear Media Interface (See NissanCon-
nect® Owner’s Manual)
— Rear automatic air conditioning sys-
tem (if so equipped) (P.4-39)
20. Front cup holders (P.2-53)/Tray (P.2-58)
Illustrated table of contents0-5
PASSENGER COMPARTMENT
Page 213 of 528

4 Monitor, heater, air conditioner, audio,phone and voice recognition systems
NissanConnect® Owner’s Manual .................................... 4-2
Safety note ........................................................................\
................ 4-2
RearView Monitor (if so equipped) ................................. 4-3
RearView Monitor system operation ..................... 4-4
How to read the displayed lines ................................ 4-4
Difference between predictive and actual
distances ........................................................................\
............... 4-5
How to park with predictive course lines .......... 4-6
Sonar indicator ........................................................................\
4-7
Adjusting the screen ........................................................... 4-8
Predictive course line settings .................................... 4-8
RearView Monitor system limitations .................... 4-8
System maintenance .......................................................... 4-9
Intelligent Around View Monitor
(if so equipped) ........................................................................\
.... 4-10 Intelligent Around View Monitor system
operation ........................................................................\
........... 4-12
How to adjust the screen view ................................ 4-19
Intelligent Around View Monitor settings ....... 4-20
Intelligent Around View Monitor
system limitations .............................................................. 4-22
System maintenance ....................................................... 4-24
Camera aiding sonar function (models with
Intelligent Around View Monitor) .................................. 4-25 Sonar system operation ................................................ 4-25 Turning on and off the sonar function .......... 4-26
Sonar system limitations ........................................... 4-27
System temporarily unavailable ........................... 4-28
System maintenance .................................................... 4-28
Moving Object Detection (MOD) ................................... 4-29 MOD system operation ................................................ 4-30
Turning on and off the MOD system ............... 4-31
MOD system limitations .............................................. 4-32
System maintenance .................................................... 4-33
Ventilators ........................................................................\
.............. 4-34
Center ventilators ............................................................ 4-34
Side ventilators .................................................................. 4-34
Rear ventilators .................................................................. 4-34
Heater and air conditioner ................................................ 4-35 Automatic air conditioner ......................................... 4-36
Rear automatic air conditioning system ....... 4-39
Operating tips ..................................................................... 4-43
Linking Intelligent Key (if so equipped) ........... 4-43
In-cabin microfilter .......................................................... 4-43
Servicing air conditioner ............................................. 4-43
Antenna ........................................................................\
.................... 4-43 Window antenna ............................................................... 4-43
Satellite antenna ............................................................... 4-44
Car phone or CB radio ......................................................... 4-44
Page 247 of 528

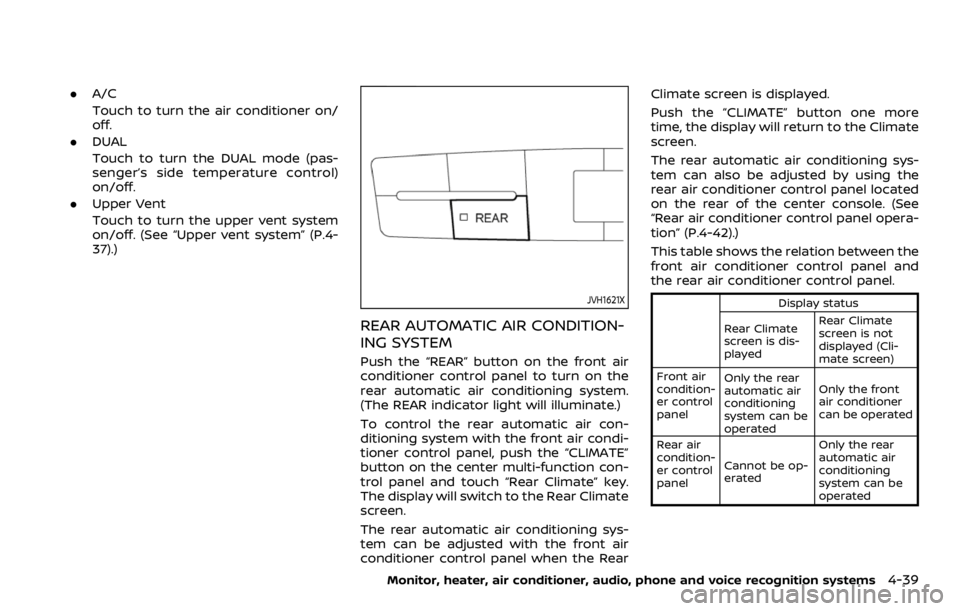
SAA3055
Adjust the air flow direction of the venti-
lators by moving the center knob (up/
down, left/right) until the desired position
is achieved.
WARNING
.The air conditioner cooling func-
tion operates only when the en-
gine is running.
. Do not leave children or adults
who would normally require the
support of others alone in your
vehicle. Pets should not be left
alone either. On hot, sunny days,
temperatures in a closed vehicle
could quickly become high en-
ough to cause severe or possibly
fatal injuries to people or animals.
. Do not use the recirculation mode
for long periods as it may cause
the interior air to become stale
and the windows to fog up.
. Do not adjust the heating and air
conditioning controls while driv-
ing so that full attention may be
given to vehicle operation.
Start the engine and operate the heater
and air conditioner system.
NOTE:
. Odors from inside and outside the
vehicle can build up in the air condi-
tioner unit. Odor can enter the pas-
senger compartment through the vents.
. When parking, set the heater and air
conditioner controls to turn off air
recirculation to allow fresh air into
the passenger compartment. This
should help reduce odors inside the
vehicle.
Monitor, heater, air conditioner, audio, phone and voice recognition systems4-35
HEATER AND AIR CONDITIONER
Page 251 of 528

.A/C
Touch to turn the air conditioner on/
off.
. DUAL
Touch to turn the DUAL mode (pas-
senger’s side temperature control)
on/off.
. Upper Vent
Touch to turn the upper vent system
on/off. (See “Upper vent system” (P.4-
37).)
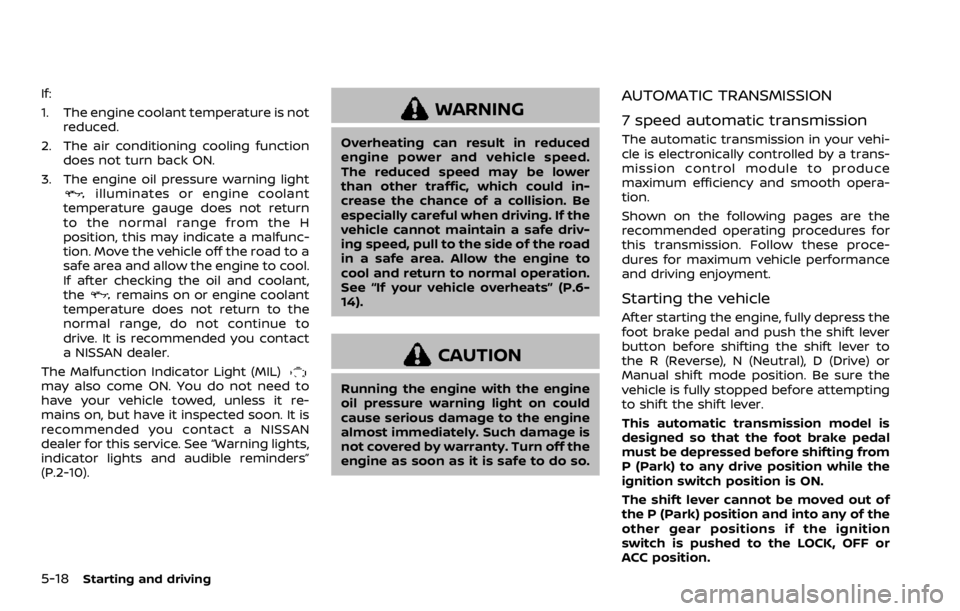
JVH1621X
REAR AUTOMATIC AIR CONDITION-
ING SYSTEM
Push the “REAR” button on the front air
conditioner control panel to turn on the
rear automatic air conditioning system.
(The REAR indicator light will illuminate.)
To control the rear automatic air con-
ditioning system with the front air condi-
tioner control panel, push the “CLIMATE”
button on the center multi-function con-
trol panel and touch “Rear Climate” key.
The display will switch to the Rear Climate
screen.
The rear automatic air conditioning sys-
tem can be adjusted with the front air
conditioner control panel when the Rear Climate screen is displayed.
Push the “CLIMATE” button one more
time, the display will return to the Climate
screen.
The rear automatic air conditioning sys-
tem can also be adjusted by using the
rear air conditioner control panel located
on the rear of the center console. (See
“Rear air conditioner control panel opera-
tion” (P.4-42).)
This table shows the relation between the
front air conditioner control panel and
the rear air conditioner control panel.
Display status
Rear Climate
screen is dis-
played Rear Climate
screen is not
displayed (Cli-
mate screen)
Front air
condition-
er control
panel Only the rear
automatic air
conditioning
system can be
operated Only the front
air conditioner
can be operated
Rear air
condition-
er control
panel Cannot be op-
erated Only the rear
automatic air
conditioning
system can be
operated
Monitor, heater, air conditioner, audio, phone and voice recognition systems4-39
Page 252 of 528

4-40Monitor, heater, air conditioner, audio, phone and voice recognition systems
Front air conditioner control panel
operation
Automatic operation:
1. Push the “REAR” button to turn on rearautomatic air conditioning system.
Push the “CLIMATE” button on the
center multi-function control panel
and select the “Rear Climate” key to
display the Rear Climate screen.
2. Push the “AUTO” button. (The AUTO indicator light will illuminate and
“AUTO” will appear on the display.)
3. Turn the temperature control dial (driver’s side) to set the desired tem-
perature.
Cooling and dehumidified heating:
1. Push the “REAR” button to turn on the rear automatic air conditioning sys-
tem. Push the “CLIMATE” button on
the center multi-function control pa-
nel and touch “Rear Climate” key to
display the Rear Climate screen.
2. Turn the temperature control dial (driver’s side) to set the desired tem-
perature.
3. Switch the air flow mode to
by
pushing the “MODE” button.
4. Push the “CLIMATE” button on the center multi-function control panel
one more time to return to the Climate screen. If the A/C indicator
light does not illuminate, push the
“A/C” button. (The A/C indicator light
will turn on.)
NOTE:
When the front air conditioner is off, the
rear automatic air conditioning system
only operates the fan. When you would
like to use the air conditioner, be sure to
push the “A/C” button on the front air
conditioner control panel to turn on the
A/C indicator light.
Manual operation:
. Temperature control
Turn the temperature control dial
(driver’s side) to set the desired tem-
perature.
. Fan speed control
Push the fan speed control “
”
button or “” button to manually
control the fan speed.
. Air flow control
Push the “MODE” button to change the
air flow mode.
: The air outlet is fixed at foot level.
: The air outlet is fixed at both the head
and foot levels.
: The air outlet is fixed at the head level.
Touch panel operation
The rear automatic air conditioning sys-
tem can also be controlled on the Rear
Climate screen.
Touch the “Rear Climate” key on the
Climate screen to display the Rear Cli-
mate screen.
Page 253 of 528

JVH1719X
Rear Climate screen
Available items:
.Temp Down
Touch to decrease the temperature
setting.
. Temp Up
Touch to increase the temperature
setting.
. ON/OFF
Touch to turn the rear automatic air
conditioning system on/off.
. Fan Down
The fan speed of the air from the
ventilators can be decreased. .
Fan Up
The fan speed of the air from the
ventilators can be increased.
. Auto
Touch to turn the auto mode on/off.
. Mode
Touch to select different air flow
mode.
SAA3327
1. “OFF” button
2. Fan speed control button
3. “AUTO” button
4. Display
5. “MODE” button
6. “TEMP” button
Monitor, heater, air conditioner, audio, phone and voice recognition systems4-41
Page 254 of 528

4-42Monitor, heater, air conditioner, audio, phone and voice recognition systems
Rear air conditioner control panel
operation
Rear control buttons:
The rear seat passengers can adjust the
rear automatic air conditioning system
using the control switches on the rear of
the center console.
The rear control buttons do not function
when the Rear Climate screen is shown
on the front display. To activate the rear
control buttons, push the “CLIMATE” but-
ton on the center multi-function control
panel and switch the screen to the
Climate screen.
.“OFF” button:
Rear automatic air conditioning sys-
tem off.
. “
” button:
Rear fan speed control up/down
. “AUTO” button:
Rear automatic air conditioning sys-
tem on, AUTO mode on
. “MODE” button:
Rear air flow control change
. “TEMP” button:
Rear temperature control up/down
Turning the system off
Use the following methods to turn the
rear automatic air conditioning system
off.
.Operating the front air conditioner
control panel:
Push the “OFF” button on the front air
conditioner control panel when the
Rear Climate screen is displayed.
. Operating the Rear Climate screen:
Touch the “ON/OFF” key on the Rear
Climate screen when the rear auto-
matic air conditioning system is on.
. Operating the rear air conditioner
control panel:
Push the “OFF” button on the rear air
conditioner control panel when the
Rear Climate screen is not displayed.
SAA3088
SAA3058
Page 273 of 528

fuel cut mode.
5. To stop the engine, shift the shift lever to the P (Park) position and push the
ignition switch to the OFF position.
In preparation for the next engine start,
the engine may have a slightly delayed
shutoff after placing the ignition switch in
the OFF position, depending on the driv-
ing conditions.
NOTE:
Care should be taken to avoid situations
that can lead to potential battery dis-
charge and potential no-start condi-
tions such as:
1. Installation or extended use of elec-
tronic accessories that consume
battery power when the engine is
not running (Phone chargers, GPS,
DVD players, etc.)
2. Vehicle is not driven regularly and/
or only driven short distances.
In these cases, the battery may need to
be charged to maintain battery health.
REMOTE ENGINE START (if so
equipped)
Vehicles started with the remote engine
start function require the ignition switch
to be placed in the ON position before the
shift lever can be moved from the P (Park)
position. To place the ignition switch in the ON position, perform the following
steps:
1. Make sure that the Intelligent Key is
on you.
2. Firmly depress the brake pedal.
3. Push the ignition switch once to the ON position.
For additional information about the
remote engine start function, see “Re-
mote engine start” (P.3-19).
ENGINE PROTECTION MODE
The engine has an engine protection
mode to reduce the chance of damage
if the coolant temperature becomes too
high (for example, when climbing steep
grades in high temperature with heavy
loads, such as when towing a trailer).
When the engine temperature reaches a
certain level:
. The engine coolant temperature
gauge will move toward the H posi-
tion.
. Engine power may be reduced.
. The air conditioning cooling function
may be automatically turned OFF for a
short time (the blower will continue to
operate).
Engine power and, under some condi-
tions, vehicle speed will decrease. Vehicle
speed can be controlled with the accel-
erator pedal, but the vehicle may not
accelerate at the desired speed. The
transmission will downshift or upshift as
it reaches prescribed shift points. You can
also shift manually.
As driving conditions change and engine
coolant temperature is reduced, vehicle
speed can be increased using the accel-
erator pedal, and air conditioning cooling
function will automatically be turned
back ON.
Starting and driving5-17
DRIVING THE VEHICLE
Page 274 of 528

5-18Starting and driving
If:
1. The engine coolant temperature is notreduced.
2. The air conditioning cooling function does not turn back ON.
3. The engine oil pressure warning light
illuminates or engine coolant
temperature gauge does not return
to the normal range from the H
position, this may indicate a malfunc-
tion. Move the vehicle off the road to a
safe area and allow the engine to cool.
If after checking the oil and coolant,
the
remains on or engine coolant
temperature does not return to the
normal range, do not continue to
drive. It is recommended you contact
a NISSAN dealer.
The Malfunction Indicator Light (MIL)
may also come ON. You do not need to
have your vehicle towed, unless it re-
mains on, but have it inspected soon. It is
recommended you contact a NISSAN
dealer for this service. See “Warning lights,
indicator lights and audible reminders”
(P.2-10).
WARNING
Overheating can result in reduced
engine power and vehicle speed.
The reduced speed may be lower
than other traffic, which could in-
crease the chance of a collision. Be
especially careful when driving. If the
vehicle cannot maintain a safe driv-
ing speed, pull to the side of the road
in a safe area. Allow the engine to
cool and return to normal operation.
See “If your vehicle overheats” (P.6-
14).
CAUTION
Running the engine with the engine
oil pressure warning light on could
cause serious damage to the engine
almost immediately. Such damage is
not covered by warranty. Turn off the
engine as soon as it is safe to do so.
AUTOMATIC TRANSMISSION
7 speed automatic transmission
The automatic transmission in your vehi-
cle is electronically controlled by a trans-
mission control module to produce
maximum efficiency and smooth opera-
tion.
Shown on the following pages are the
recommended operating procedures for
this transmission. Follow these proce-
dures for maximum vehicle performance
and driving enjoyment.
Starting the vehicle
After starting the engine, fully depress the
foot brake pedal and push the shift lever
button before shifting the shift lever to
the R (Reverse), N (Neutral), D (Drive) or
Manual shift mode position. Be sure the
vehicle is fully stopped before attempting
to shift the shift lever.
This automatic transmission model is
designed so that the foot brake pedal
must be depressed before shifting from
P (Park) to any drive position while the
ignition switch position is ON.
The shift lever cannot be moved out of
the P (Park) position and into any of the
other gear positions if the ignition
switch is pushed to the LOCK, OFF or
ACC position.
Page 371 of 528

CAUTION
During the first 1,200 miles (2,000
km), follow these recommendations
to obtain maximum engine perfor-
mance and ensure the future relia-
bility and economy of your new
vehicle.
Failure to follow these recommenda-
tions may result in shortened engine
life and reduced engine perfor-
mance.
. Avoid driving for long periods at con-
stant speed, either fast or slow. Do not
run the engine over 4,000 rpm.
. Do not accelerate at full throttle in any
gear.
. Avoid quick starts.
. Avoid hard braking as much as possi-
ble.
. Do not tow a trailer for the first 500
miles (805 km). Follow these easy-to-use Fuel Efficient
Driving Tips to help you achieve the most
fuel economy from your vehicle.
1. Use smooth accelerator and brake
pedal application.
.Avoid rapid starts and stops..Use smooth, gentle accelerator andbrake application whenever possi-
ble.
.Maintain constant speed whilecommuting and coast whenever
possible.
2. Maintain constant speed.
.Look ahead to try and anticipate and minimize stops.
.Synchronizing your speed with traf-fic lights allows you to reduce your
number of stops.
.Maintaining a steady speed canminimize red light stops and im-
prove fuel efficiency.
3. Use air conditioning (A/C) at higher vehicle speeds.
.Below 40 MPH (64 km/h), it is moreefficient to open windows to cool
the vehicle due to reduced engine
load.
.Above 40 MPH (64 km/h), it is more
efficient to use A/C to cool the
vehicle due to increased aerody-
namic drag.
.Recirculating the cool air in thecabin when the A/C is on reduces
cooling load.
4. Drive at economical speeds and dis- tances.
.Observing the speed limit and notexceeding 60 MPH (97 km/h)
(where legally allowed) can improve
fuel efficiency due to reduced aero-
dynamic drag.
.Maintaining a safe following dis-tance behind other vehicles re-
duces unnecessary braking.
.Safely monitoring traffic to antici- pate changes in speed permits
reduced braking and smooth accel-
eration changes.
.Select a gear range suitable to roadconditions.
5. Use cruise control.
.Using cruise control during highway driving helps maintain a steady
speed.
.Cruise control is particularly effec-tive in providing fuel savings when
driving on flat terrains.
6. Plan for the shortest route.
.Utilize a map or navigation system to determine the best route to save
time.
Starting and driving5-115
BREAK-IN SCHEDULE FUEL EFFICIENT DRIVING TIPS