transmission NISSAN ARMADA 2022 Owner´s Manual
[x] Cancel search | Manufacturer: NISSAN, Model Year: 2022, Model line: ARMADA, Model: NISSAN ARMADA 2022Pages: 604, PDF Size: 2.97 MB
Page 18 of 604
0-10Illustrated table of contents
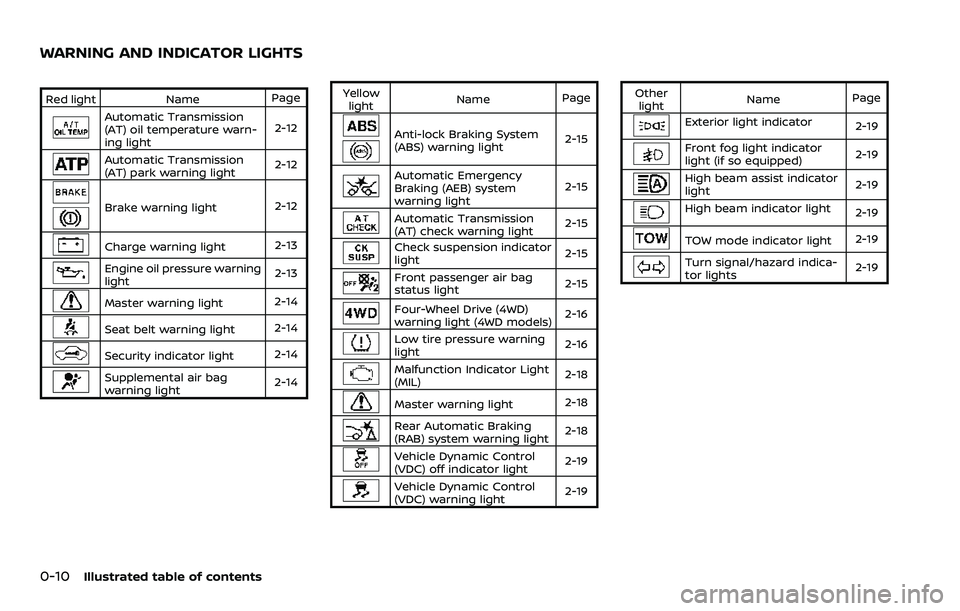
Red lightNamePage
Automatic Transmission
(AT) oil temperature warn-
ing light 2-12
Automatic Transmission
(AT) park warning light
2-12
Brake warning light
2-12
Charge warning light2-13
Engine oil pressure warning
light2-13
Master warning light
2-14
Seat belt warning light
2-14
Security indicator light2-14
Supplemental air bag
warning light2-14Yellow
light Name
Page
Anti-lock Braking System
(ABS) warning light 2-15
Automatic Emergency
Braking (AEB) system
warning light2-15
Automatic Transmission
(AT) check warning light
2-15
Check suspension indicator
light
2-15
Front passenger air bag
status light
2-15
Four-Wheel Drive (4WD)
warning light (4WD models)2-16
Low tire pressure warning
light
2-16
Malfunction Indicator Light
(MIL)2-18
Master warning light
2-18
Rear Automatic Braking
(RAB) system warning light2-18
Vehicle Dynamic Control
(VDC) off indicator light
2-19
Vehicle Dynamic Control
(VDC) warning light2-19Other
light Name
Page
Exterior light indicator
2-19
Front fog light indicator
light (if so equipped)2-19
High beam assist indicator
light2-19
High beam indicator light
2-19
TOW mode indicator light2-19
Turn signal/hazard indica-
tor lights2-19
WARNING AND INDICATOR LIGHTS
Page 22 of 604
1-4Safety — seats, seat belts and supplemental restraint system
FRONT SEATS
Front power seat adjustment
Operating tips:
.The power seat motor has an auto-
reset overload protection circuit. If the
motor stops during operation, wait 30
seconds, then reactivate the switch.
. Do not operate the power seat switch
for a long period of time when the
engine is off. This will discharge the
battery.
See “Memory seat” (P.3-40) for the seat
position memory function.
CAUTION
When adjusting the seat positions,
be sure not to contact any moving
parts to avoid possible injuries and/
or damages.
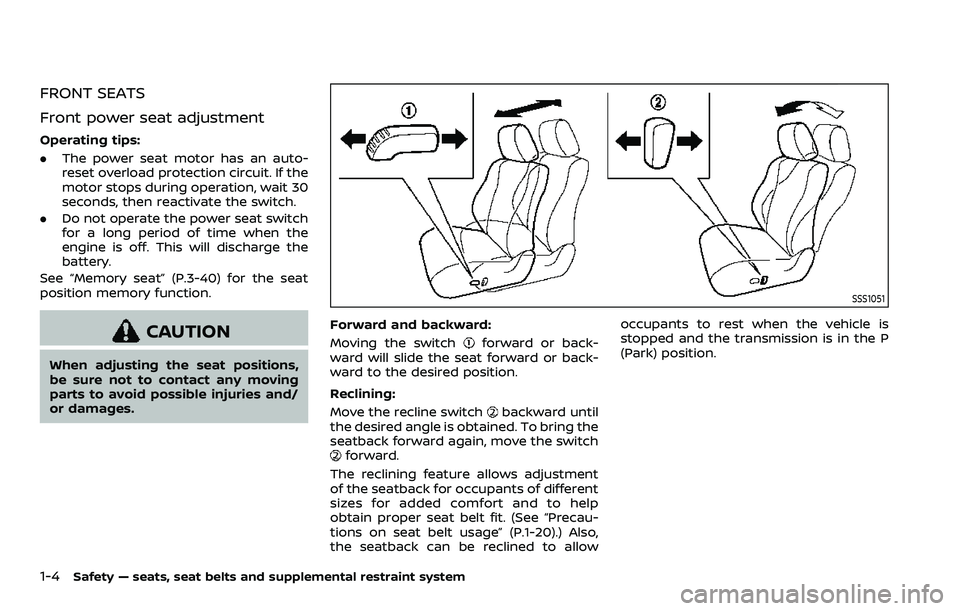
SSS1051
Forward and backward:
Moving the switch
forward or back-
ward will slide the seat forward or back-
ward to the desired position.
Reclining:
Move the recline switch
backward until
the desired angle is obtained. To bring the
seatback forward again, move the switch
forward.
The reclining feature allows adjustment
of the seatback for occupants of different
sizes for added comfort and to help
obtain proper seat belt fit. (See “Precau-
tions on seat belt usage” (P.1-20).) Also,
the seatback can be reclined to allow occupants to rest when the vehicle is
stopped and the transmission is in the P
(Park) position.
Page 29 of 604
CAUTION
.When operating the rear power
seatback return, make sure that
the vehicle is stopped and the
transmission is in the P (Park)
position.
. The auto reverse function may
not operate depending on the
shape or position of obstacles.
WARNING
.Never allow anyone to ride in the
cargo area or on the rear seat
when it is in the fold-down posi-
tion. Use of these areas by pas-
sengers without proper restraints
could result in serious injury in an
accident or sudden stop.
. When returning the seatbacks to
the upright position, be certain
they are completely secured in
the latched position. If they are
not completely secured, passen-
gers may be injured in an acci-
dent or sudden stop. .
Properly secure all cargo to help
prevent it from sliding or shifting.
Do not place cargo higher than
the seatbacks. In a sudden stop
or collision, unsecured cargo
could cause personal injury.
. Do not fold down the rear seats
when occupants are in the rear
seat area or any cargo is on the
rear seats.
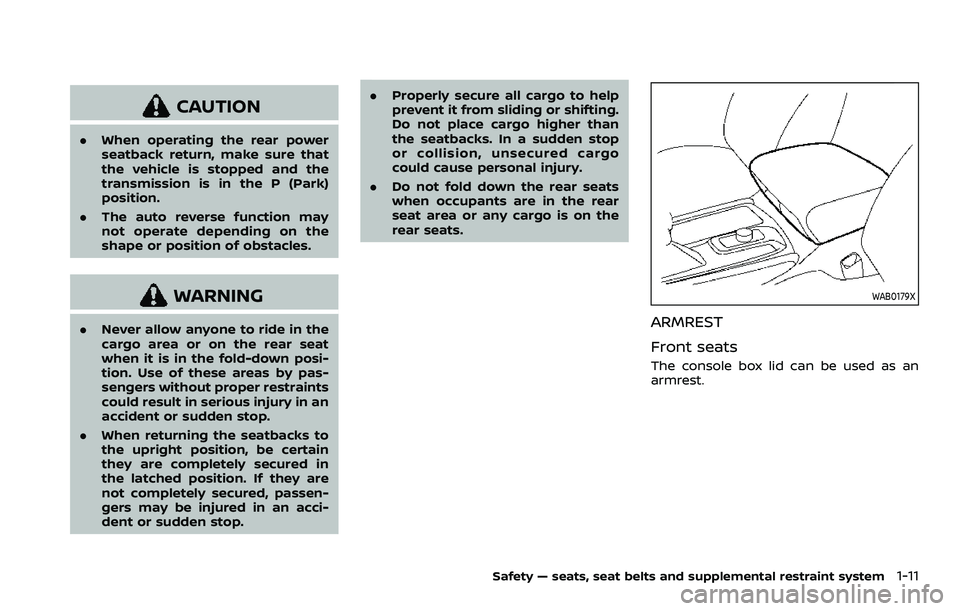
WAB0179X
ARMREST
Front seats
The console box lid can be used as an
armrest.
Safety — seats, seat belts and supplemental restraint system1-11
Page 105 of 604
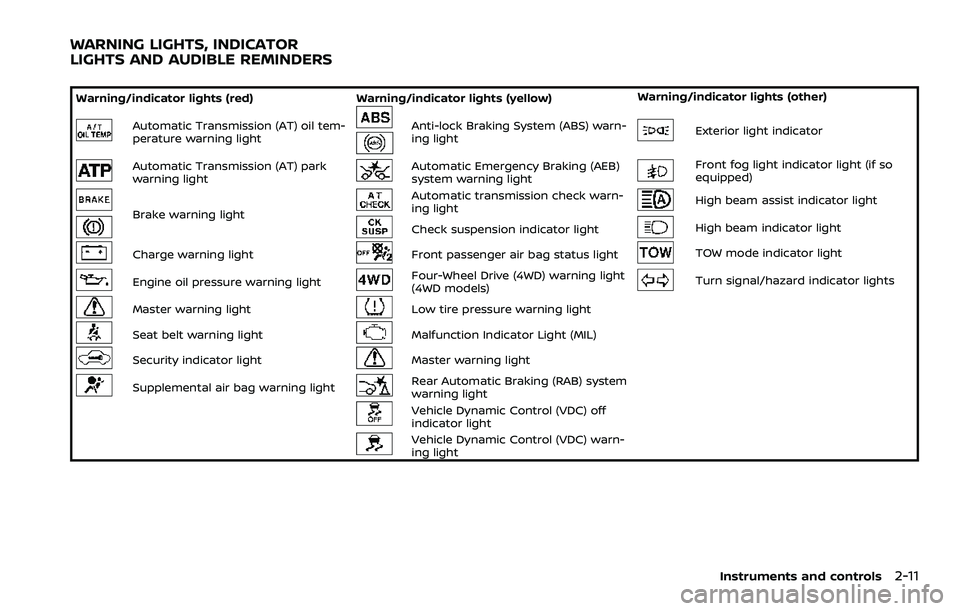
Warning/indicator lights (red)Warning/indicator lights (yellow) Warning/indicator lights (other)
Automatic Transmission (AT) oil tem-
perature warning lightAnti-lock Braking System (ABS) warn-
ing lightExterior light indicator
Automatic Transmission (AT) park
warning lightAutomatic Emergency Braking (AEB)
system warning lightFront fog light indicator light (if so
equipped)
Brake warning light
Automatic transmission check warn-
ing lightHigh beam assist indicator light
Check suspension indicator lightHigh beam indicator light
Charge warning lightFront passenger air bag status lightTOW mode indicator light
Engine oil pressure warning lightFour-Wheel Drive (4WD) warning light
(4WD models)Turn signal/hazard indicator lights
Master warning lightLow tire pressure warning light
Seat belt warning lightMalfunction Indicator Light (MIL)
Security indicator lightMaster warning light
Supplemental air bag warning lightRear Automatic Braking (RAB) system
warning light
Vehicle Dynamic Control (VDC) off
indicator light
Vehicle Dynamic Control (VDC) warn-
ing light
Instruments and controls2-11
WARNING LIGHTS, INDICATOR
LIGHTS AND AUDIBLE REMINDERS
Page 106 of 604
2-12Instruments and controls
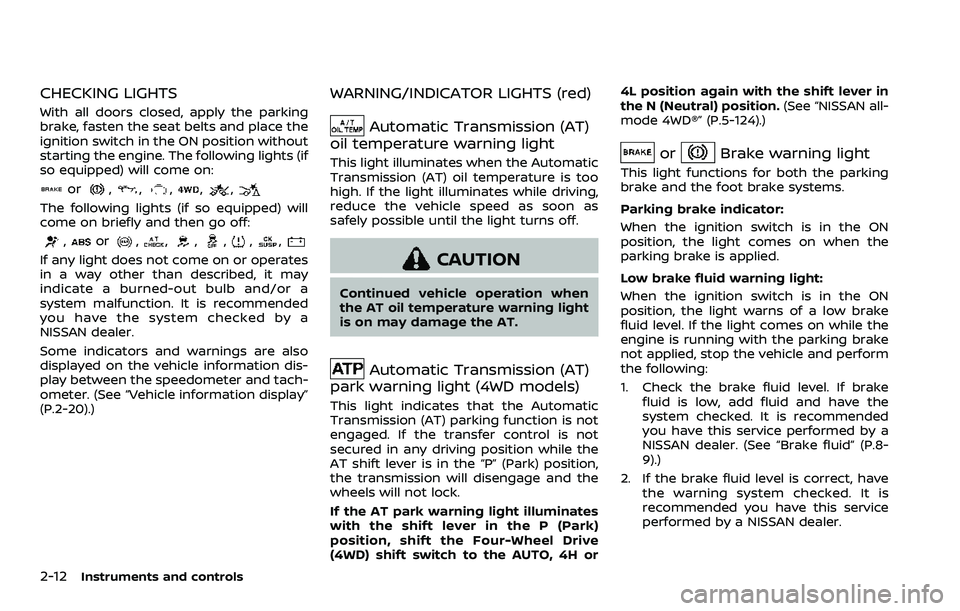
CHECKING LIGHTS
With all doors closed, apply the parking
brake, fasten the seat belts and place the
ignition switch in the ON position without
starting the engine. The following lights (if
so equipped) will come on:
or,,,,,
The following lights (if so equipped) will
come on briefly and then go off:
,or,,,,,,
If any light does not come on or operates
in a way other than described, it may
indicate a burned-out bulb and/or a
system malfunction. It is recommended
you have the system checked by a
NISSAN dealer.
Some indicators and warnings are also
displayed on the vehicle information dis-
play between the speedometer and tach-
ometer. (See “Vehicle information display”
(P.2-20).)
WARNING/INDICATOR LIGHTS (red)
Automatic Transmission (AT)
oil temperature warning light
This light illuminates when the Automatic
Transmission (AT) oil temperature is too
high. If the light illuminates while driving,
reduce the vehicle speed as soon as
safely possible until the light turns off.
CAUTION
Continued vehicle operation when
the AT oil temperature warning light
is on may damage the AT.
Automatic Transmission (AT)
park warning light (4WD models)
This light indicates that the Automatic
Transmission (AT) parking function is not
engaged. If the transfer control is not
secured in any driving position while the
AT shift lever is in the “P” (Park) position,
the transmission will disengage and the
wheels will not lock.
If the AT park warning light illuminates
with the shift lever in the P (Park)
position, shift the Four-Wheel Drive
(4WD) shift switch to the AUTO, 4H or 4L position again with the shift lever in
the N (Neutral) position.
(See “NISSAN all-
mode 4WD®” (P.5-124).)
orBrake warning light
This light functions for both the parking
brake and the foot brake systems.
Parking brake indicator:
When the ignition switch is in the ON
position, the light comes on when the
parking brake is applied.
Low brake fluid warning light:
When the ignition switch is in the ON
position, the light warns of a low brake
fluid level. If the light comes on while the
engine is running with the parking brake
not applied, stop the vehicle and perform
the following:
1. Check the brake fluid level. If brake fluid is low, add fluid and have the
system checked. It is recommended
you have this service performed by a
NISSAN dealer. (See “Brake fluid” (P.8-
9).)
2. If the brake fluid level is correct, have the warning system checked. It is
recommended you have this service
performed by a NISSAN dealer.
Page 109 of 604
dealer for these services.
Unless checked and repaired, the supple-
mental restraint system (air bag system)
and/or the pretensioners may not func-
tion properly.
For additional information, see “Supple-
mental restraint system” (P.1-54).
WARNING
If the supplemental air bag warning
light is on, it could mean that the
front air bag, side air bag, curtain air
bag systems and/or pretensioner
systems will not operate in an acci-
dent. To help avoid injury to yourself
or others, have your vehicle checked.
It is recommended you visit a NISSAN
dealer for this service.
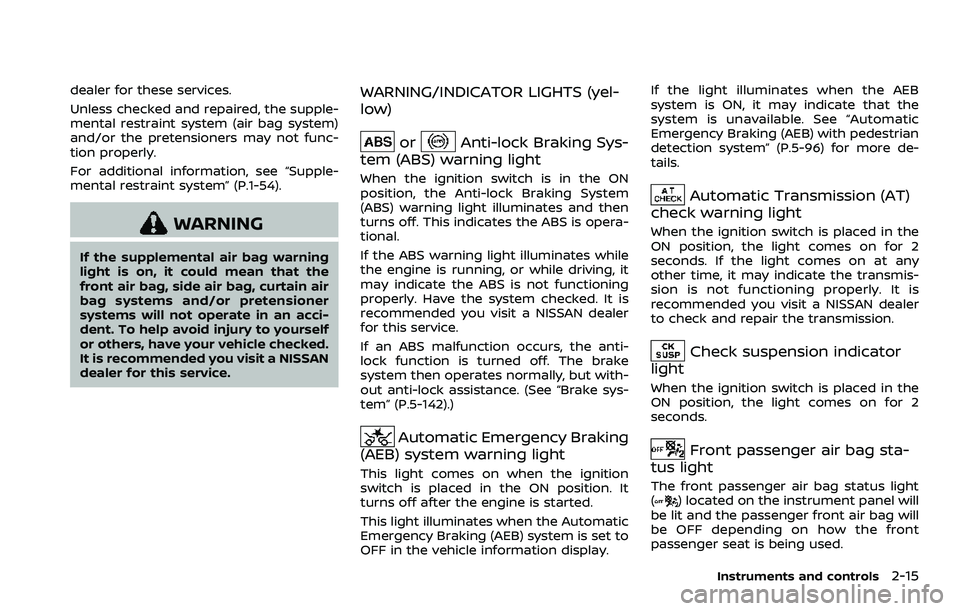
WARNING/INDICATOR LIGHTS (yel-
low)
orAnti-lock Braking Sys-
tem (ABS) warning light
When the ignition switch is in the ON
position, the Anti-lock Braking System
(ABS) warning light illuminates and then
turns off. This indicates the ABS is opera-
tional.
If the ABS warning light illuminates while
the engine is running, or while driving, it
may indicate the ABS is not functioning
properly. Have the system checked. It is
recommended you visit a NISSAN dealer
for this service.
If an ABS malfunction occurs, the anti-
lock function is turned off. The brake
system then operates normally, but with-
out anti-lock assistance. (See “Brake sys-
tem” (P.5-142).)
Automatic Emergency Braking
(AEB) system warning light
This light comes on when the ignition
switch is placed in the ON position. It
turns off after the engine is started.
This light illuminates when the Automatic
Emergency Braking (AEB) system is set to
OFF in the vehicle information display. If the light illuminates when the AEB
system is ON, it may indicate that the
system is unavailable. See “Automatic
Emergency Braking (AEB) with pedestrian
detection system” (P.5-96) for more de-
tails.
Automatic Transmission (AT)
check warning light
When the ignition switch is placed in the
ON position, the light comes on for 2
seconds. If the light comes on at any
other time, it may indicate the transmis-
sion is not functioning properly. It is
recommended you visit a NISSAN dealer
to check and repair the transmission.
Check suspension indicator
light
When the ignition switch is placed in the
ON position, the light comes on for 2
seconds.
Front passenger air bag sta-
tus light
The front passenger air bag status light
() located on the instrument panel will
be lit and the passenger front air bag will
be OFF depending on how the front
passenger seat is being used.
Instruments and controls2-15
Page 114 of 604
2-20Instruments and controls
AUDIBLE REMINDERS
Door lock warning chime
When the chime sounds, be sure to check
both the vehicle and the Intelligent Key.
(See “Troubleshooting guide” (P.3-13).)
Light reminder chime
A chime will sound when the driver side
door is opened with the headlight switch
in the
orposition and the ignition
switch in the ACC, OFF or LOCK position.
Turn the headlight switch to the OFF (if so
equipped) or the AUTO position when you
leave the vehicle.
Parking brake reminder chime
The chime will sound if the vehicle is
driven at more than 4 MPH (7 km/h) with
the parking brake applied. Stop the vehi-
cle and release the parking brake.
Brake pad wear warning
The disc brake pads have audible wear
warnings. When a brake pad requires
replacement, it will make a high pitched
scraping sound when the vehicle is in
motion. This scraping sound will first
occur only when the brake pedal is
depressed. After more wear of the brake
pad, the sound will always be heard even
if the brake pedal is not depressed. Have the brakes checked as soon as possible if
the warning sound is heard.
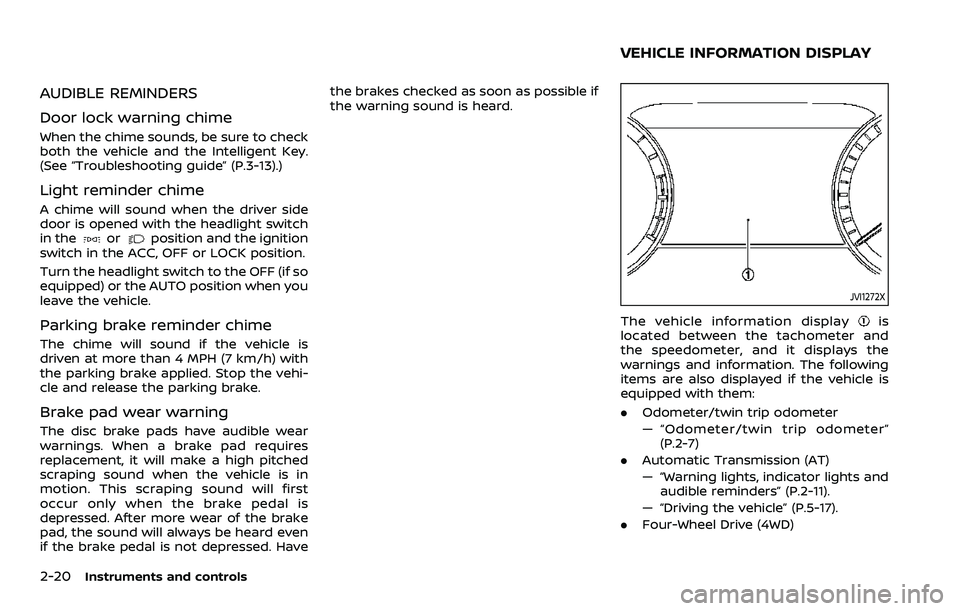
JVI1272X
The vehicle information displayis
located between the tachometer and
the speedometer, and it displays the
warnings and information. The following
items are also displayed if the vehicle is
equipped with them:
. Odometer/twin trip odometer
— “Odometer/twin trip odometer”
(P.2-7)
. Automatic Transmission (AT)
— “Warning lights, indicator lights and
audible reminders” (P.2-11).
— “Driving the vehicle” (P.5-17).
. Four-Wheel Drive (4WD)
VEHICLE INFORMATION DISPLAY
Page 128 of 604
2-34Instruments and controls
35. Shipping Mode On Push Storage
Fuse (if so equipped)
This warning may appear if the extended
storage fuse switch is not pushed in
(switched on). When this warning ap-
pears, push in (switch on) the extended
storage fuse switch to turn off the warn-
ing. For more information, see “Extended
storage fuse switch” (P.8-21).
36. Headlight System Error
This warning appears if the LED head-
lights are malfunctioning. It is recom-
mended you have the system checked
by a NISSAN dealer.
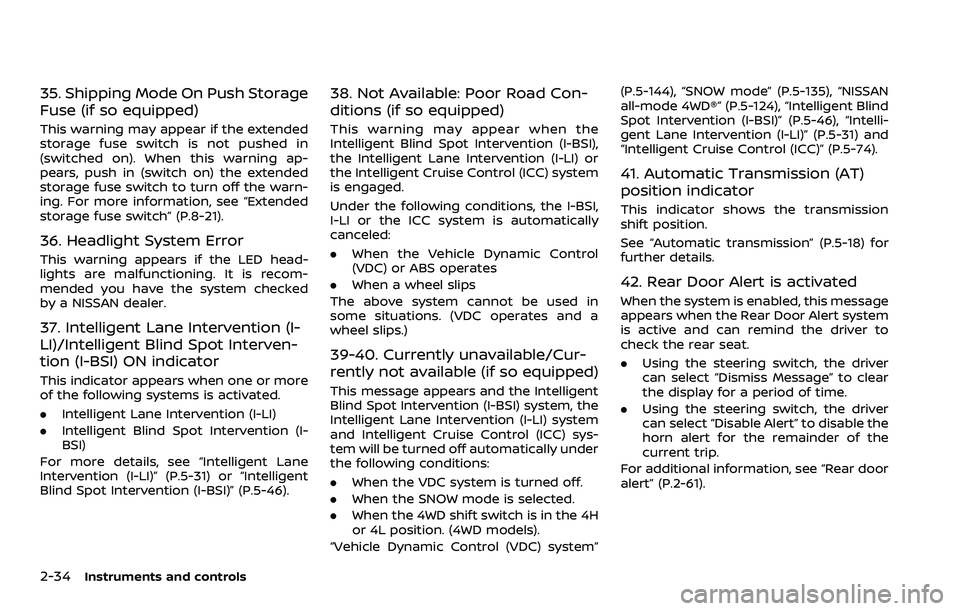
37. Intelligent Lane Intervention (I-
LI)/Intelligent Blind Spot Interven-
tion (I-BSI) ON indicator
This indicator appears when one or more
of the following systems is activated.
.Intelligent Lane Intervention (I-LI)
. Intelligent Blind Spot Intervention (I-
BSI)
For more details, see “Intelligent Lane
Intervention (I-LI)” (P.5-31) or “Intelligent
Blind Spot Intervention (I-BSI)” (P.5-46).
38. Not Available: Poor Road Con-
ditions (if so equipped)
This warning may appear when the
Intelligent Blind Spot Intervention (I-BSI),
the Intelligent Lane Intervention (I-LI) or
the Intelligent Cruise Control (ICC) system
is engaged.
Under the following conditions, the I-BSI,
I-LI or the ICC system is automatically
canceled:
. When the Vehicle Dynamic Control
(VDC) or ABS operates
. When a wheel slips
The above system cannot be used in
some situations. (VDC operates and a
wheel slips.)
39-40. Currently unavailable/Cur-
rently not available (if so equipped)
This message appears and the Intelligent
Blind Spot Intervention (I-BSI) system, the
Intelligent Lane Intervention (I-LI) system
and Intelligent Cruise Control (ICC) sys-
tem will be turned off automatically under
the following conditions:
. When the VDC system is turned off.
. When the SNOW mode is selected.
. When the 4WD shift switch is in the 4H
or 4L position. (4WD models).
“Vehicle Dynamic Control (VDC) system” (P.5-144), “SNOW mode” (P.5-135), “NISSAN
all-mode 4WD®” (P.5-124), “Intelligent Blind
Spot Intervention (I-BSI)” (P.5-46), “Intelli-
gent Lane Intervention (I-LI)” (P.5-31) and
“Intelligent Cruise Control (ICC)” (P.5-74).
41. Automatic Transmission (AT)
position indicator
This indicator shows the transmission
shift position.
See “Automatic transmission” (P.5-18) for
further details.
42. Rear Door Alert is activated
When the system is enabled, this message
appears when the Rear Door Alert system
is active and can remind the driver to
check the rear seat.
.
Using the steering switch, the driver
can select “Dismiss Message” to clear
the display for a period of time.
. Using the steering switch, the driver
can select “Disable Alert” to disable the
horn alert for the remainder of the
current trip.
For additional information, see “Rear door
alert” (P.2-61).
Page 179 of 604
JVI0429X
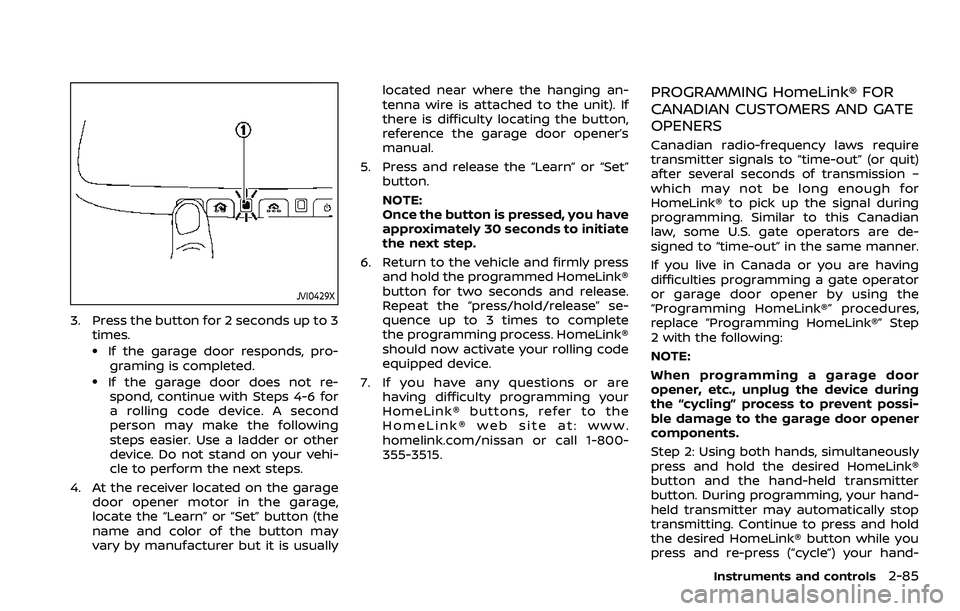
3. Press the button for 2 seconds up to 3times.
.If the garage door responds, pro-graming is completed.
.If the garage door does not re-spond, continue with Steps 4-6 for
a rolling code device. A second
person may make the following
steps easier. Use a ladder or other
device. Do not stand on your vehi-
cle to perform the next steps.
4. At the receiver located on the garage door opener motor in the garage,
locate the “Learn” or “Set” button (the
name and color of the button may
vary by manufacturer but it is usually located near where the hanging an-
tenna wire is attached to the unit). If
there is difficulty locating the button,
reference the garage door opener’s
manual.
5. Press and release the “Learn” or “Set” button.
NOTE:
Once the button is pressed, you have
approximately 30 seconds to initiate
the next step.
6. Return to the vehicle and firmly press and hold the programmed HomeLink®
button for two seconds and release.
Repeat the “press/hold/release” se-
quence up to 3 times to complete
the programming process. HomeLink®
should now activate your rolling code
equipped device.
7. If you have any questions or are having difficulty programming your
HomeLink® buttons, refer to the
HomeLink® web site at: www.
homelink.com/nissan or call 1-800-
355-3515.
PROGRAMMING HomeLink® FOR
CANADIAN CUSTOMERS AND GATE
OPENERS
Canadian radio-frequency laws require
transmitter signals to “time-out” (or quit)
after several seconds of transmission –
which may not be long enough for
HomeLink® to pick up the signal during
programming. Similar to this Canadian
law, some U.S. gate operators are de-
signed to “time-out” in the same manner.
If you live in Canada or you are having
difficulties programming a gate operator
or garage door opener by using the
“Programming HomeLink®” procedures,
replace “Programming HomeLink®” Step
2 with the following:
NOTE:
When programming a garage door
opener, etc., unplug the device during
the “cycling” process to prevent possi-
ble damage to the garage door opener
components.
Step 2: Using both hands, simultaneously
press and hold the desired HomeLink®
button and the hand-held transmitter
button. During programming, your hand-
held transmitter may automatically stop
transmitting. Continue to press and hold
the desired HomeLink® button while you
press and re-press (“cycle”) your hand-
Instruments and controls2-85
Page 185 of 604
USING THE GARAGE DOOR TWO-
WAY COMMUNICATION
HomeLink® has the function of commu-
nicating with garage door opener sys-
tems. If your garage door openers are
compatible with HomeLink®, the
HomeLink® can:
.receive and display “closing” or “open-
ing” status from your garage door
opener.
. recall and display the garage door
being “closed” or “opened”.
HomeLink® can receive the status from a
garage door opener at a range up to 820
ft (250 m), but it varies depending on the
environment. You may need to reduce
vehicle speed to successfully receive the
garage door opener communication.
WAC0379X
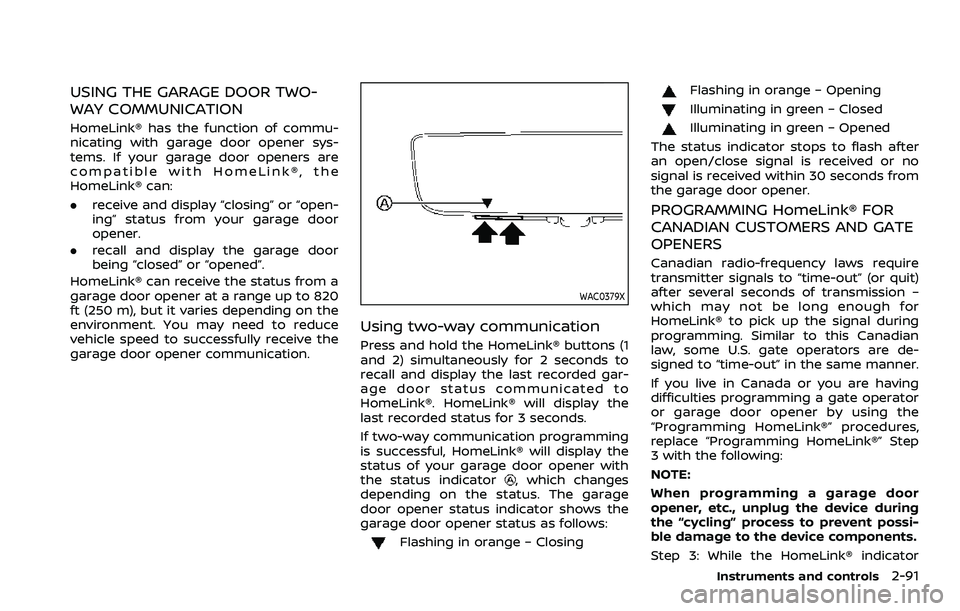
Using two-way communication
Press and hold the HomeLink® buttons (1
and 2) simultaneously for 2 seconds to
recall and display the last recorded gar-
age door status communicated to
HomeLink®. HomeLink® will display the
last recorded status for 3 seconds.
If two-way communication programming
is successful, HomeLink® will display the
status of your garage door opener with
the status indicator
, which changes
depending on the status. The garage
door opener status indicator shows the
garage door opener status as follows:
Flashing in orange – Closing
Flashing in orange – Opening
Illuminating in green – Closed
Illuminating in green – Opened
The status indicator stops to flash after
an open/close signal is received or no
signal is received within 30 seconds from
the garage door opener.
PROGRAMMING HomeLink® FOR
CANADIAN CUSTOMERS AND GATE
OPENERS
Canadian radio-frequency laws require
transmitter signals to “time-out” (or quit)
after several seconds of transmission –
which may not be long enough for
HomeLink® to pick up the signal during
programming. Similar to this Canadian
law, some U.S. gate operators are de-
signed to “time-out” in the same manner.
If you live in Canada or you are having
difficulties programming a gate operator
or garage door opener by using the
“Programming HomeLink®” procedures,
replace “Programming HomeLink®” Step
3 with the following:
NOTE:
When programming a garage door
opener, etc., unplug the device during
the “cycling” process to prevent possi-
ble damage to the device components.
Step 3: While the HomeLink® indicator
Instruments and controls2-91