display NISSAN CUBE 2010 3.G User Guide
[x] Cancel search | Manufacturer: NISSAN, Model Year: 2010, Model line: CUBE, Model: NISSAN CUBE 2010 3.GPages: 329, PDF Size: 2.86 MB
Page 103 of 329
Black plate (103,1)
Model "Z12-D" EDITED: 2009/ 9/ 17
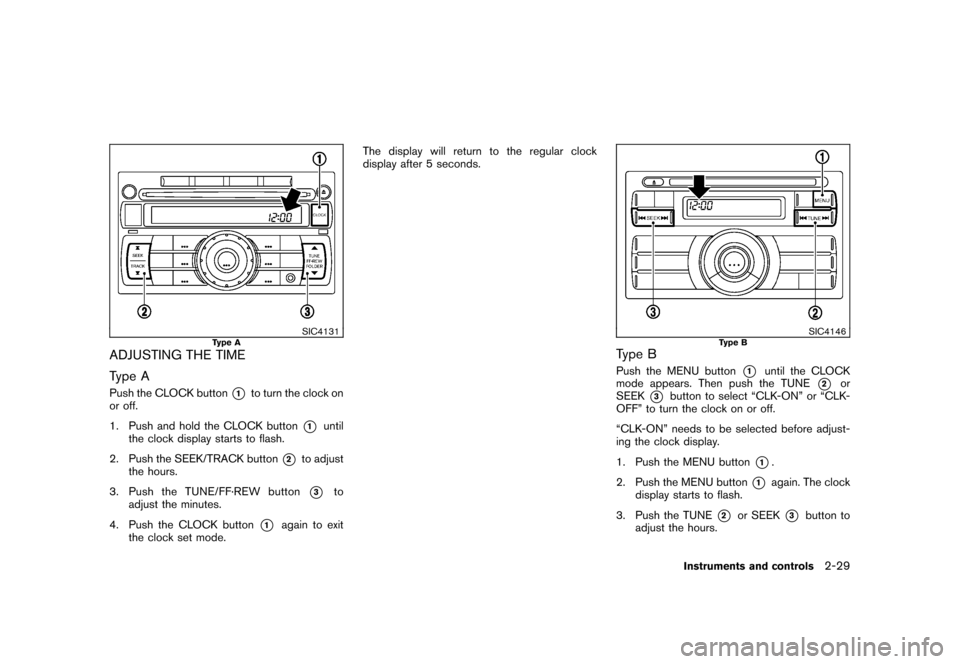
SIC4131
Type A
ADJUSTING THE TIME
Type APush the CLOCK button
*1
to turn the clock on
or off.
1. Push and hold the CLOCK button
*1
until
the clock display starts to flash.
2. Push the SEEK/TRACK button
*2
to adjust
the hours.
3. Push the TUNE/ FF·REW button*3
to
adjust the minutes.
4. Push the CLOCK button
*1
again to exit
the clock set mode. The display will return to the regular clock
display after 5 seconds.
SIC4146
Type B
Type BPush the MENU button
*1
until the CLOCK
mode appears. Then push the TUNE
*2
or
SEEK
*3
button to select “CLK-ON” or “CLK-
OFF” to turn the clock on or off.
“CLK-ON” needs to be selected before adjust-
ing the clock display.
1. Push the MENU button
*1.
2. Push the MENU button
*1
again. The clock
display starts to flash.
3. Push the TUNE
*2
or SEEK
*3
button to
adjust the hours.
Instruments and controls
2-29
Page 104 of 329
Black plate (104,1)
Model "Z12-D" EDITED: 2009/ 9/ 17
4. Push the MENU button
*1
again. The
display will switch to the minute adjustment
mode.
5. Push the TUNE or SEEK button to adjust the minutes.
6. Push the MENU button again to exit the clock mode.
The display will return to the regular clock
display after 5 seconds.
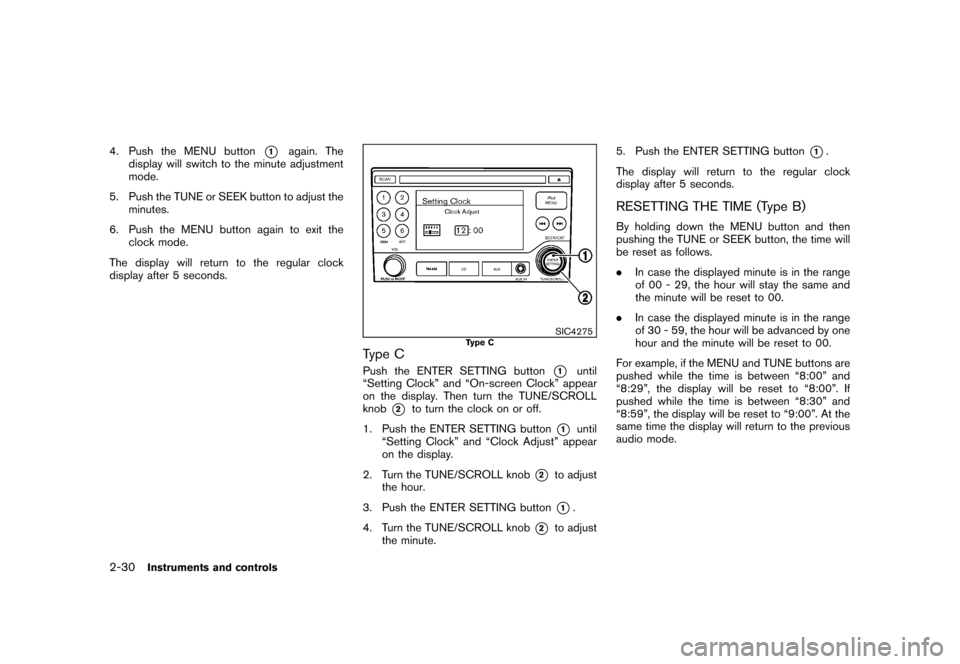
SIC4275
Type C
Type CPush the ENTER SETTING button
*1
until
“Setting Clock” and “On-screen Clock” appear
on the display. Then turn the TUNE/SCROLL
knob
*2
to turn the clock on or off.
1. Push the ENTER SETTING button
*1
until
“Setting Clock” and “Clock Adjust” appear
on the display.
2. Turn the TUNE/SCROLL knob
*2
to adjust
the hour.
3. Push the ENTER SETTING button*1.
4. Turn the TUNE/SCROLL knob
*2
to adjust
the minute. 5. Push the ENTER SETTING button
*1.
The display will return to the regular clock
display after 5 seconds.
RESETTING THE TIME (Type B)By holding down the MENU button and then
pushing the TUNE or SEEK button, the time will
be reset as follows.
. In case the displayed minute is in the range
of 00 - 29, the hour will stay the same and
the minute will be reset to 00.
. In case the displayed minute is in the range
of 30 - 59, the hour will be advanced by one
hour and the minute will be reset to 00.
For example, if the MENU and TUNE buttons are
pushed while the time is between “8:00” and
“8:29”, the display will be reset to “8:00”. If
pushed while the time is between “8:30” and
“8:59”, the display will be reset to “9:00”. At the
same time the display will return to the previous
audio mode.
2-30
Instruments and controls
Page 143 of 329
Black plate (13,1)
4 Heater, air conditioner, audio and phonesystems
Model "Z12-D" EDITED: 2009/ 9/ 17
Safety note ....................................................... 4-2
RearView monitor (if so equipped) ......................... 4-2
How to read the displayed lines ......................... 4-3
How to adjust the screen ................................. 4-4
Operating tips ............................................... 4-4
Ventilators ........................................................ 4-5
Center ventilators ........................................... 4-5
Side ventilators .............................................. 4-5
Heater and air conditioner .................................... 4-6
Manual air conditioner (if so equipped) ................ 4-6
Automatic air conditioner (if so equipped) .......... 4-10
Operating tips ............................................. 4-12
In-cabin microfilter ........................................ 4-12
Servicing air conditioner ................................ 4-12
Audio system .................................................. 4-13
Audio operation precautions ........................... 4-13
FM-AM radio with Compact Disc (CD) player
(Type A)..................................................... 4-25 FM-AM radio with Compact Disc (CD) player
(Type B)..................................................... 4-29
FM-AM-SAT radio with Compact Disc (CD)
player
........................................................ 4-35
CD care and cleaning ................................... 4-41
Steering wheel switch for audio control
(if so equipped) ........................................... 4-41
Antenna ..................................................... 4-42
Car phone or CB radio ...................................... 4-44
Bluetooth
®Hands-Free Phone System
(if so equipped) ............................................... 4-44
Regulatory information ................................... 4-46
Using the system ......................................... 4-46
Control buttons ........................................... 4-48
Getting started ............................................ 4-49
List of voice commands ................................. 4-50
Speaker Adaptation (SA) mode ....................... 4-54
Troubleshooting guide ................................... 4-56
Page 144 of 329
Black plate (148,1)
Model "Z12-D" EDITED: 2009/ 9/ 17
WARNING
.Do not disassemble or modify this
system. If you do, it may result in
accidents, fire, or electric shock.
. Do not use this system if you notice
any abnormality, such as a frozen
screen or lack of sound. Continued
use of the system may result in
accident, fire or electric shock.
. In case you notice any foreign
object in the system hardware, spill
liquid on it, or notice smoke or smell
coming from it, stop using the
system immediately and contact
your nearest NISSAN dealer. Ignor-
ing such conditions may lead to
accidents, fire, or electric shock.
Do not attempt to operate the system in
extreme temperature conditions [below
� 48F( �208 C) and above 158 8F(70 8C)].
Operating this system under these condi-
tions may result in system malfunctions. When the selector lever is shifted into the R
(Reverse) position, the monitor display shows
the view to the rear of the vehicle.
The system is designed as an aid to the driver in
detecting large stationary objects to help avoid
damaging the vehicle. The system will not detect
small objects below the bumper and may not
detect objects close to the bumper or on the
ground.
WARNING
.
The rear view camera is a conve-
nience but it is not a substitute for
proper backing up. Always turn and
check that it is safe to do so before
backing up. Always back up slowly.
. Objects viewed in the RearView
Monitor differ from actual distance
because a wide-angle lens is used.
Objects in the RearView Monitor
will appear visually opposite than
when viewed in the rear view and
outside mirrors.
. Make sure that the back door is
securely closed when backing up.
. Underneath the bumper and the
corner areas of the bumper cannot
be viewed on the RearView Monitor because of its monitoring range
limitation.
. Do not put anything on the rear view
camera.
. When washing the vehicle with
high-pressure water, be sure not to
spray it around the camera. Other-
wise, water may enter the camera
unit causing water condensation on
the lens, a malfunction, fire or an
electric shock.
. Do not strike the camera. It is a
precision instrument. Otherwise, it
may malfunction or cause damage
resulting in a fire or an electric
shock.
CAUTION
Do not scratch the camera lens when
cleaning dirt or snow from the lens.
SAFETY NOTE REARVIEW MONITOR (if so
equipped)4-2
Heater, air conditioner, audio and phone systems
Page 145 of 329
Black plate (149,1)
Model "Z12-D" EDITED: 2009/ 9/ 17
SAA2776
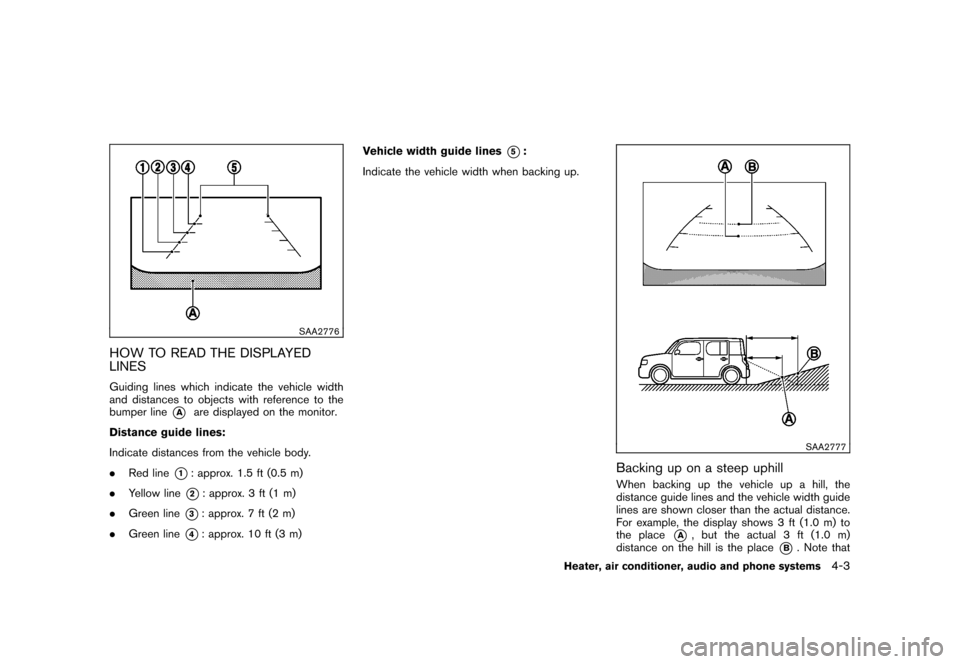
HOW TO READ THE DISPLAYED
LINESGuiding lines which indicate the vehicle width
and distances to objects with reference to the
bumper line
*A
are displayed on the monitor.
Distance guide lines:
Indicate distances from the vehicle body.
. Red line
*1: approx. 1.5 ft (0.5 m)
. Yellow line*2: approx. 3 ft (1 m)
. Green line
*3: approx. 7 ft (2 m)
. Green line
*4: approx. 10 ft (3 m) Vehicle width guide lines
*5:
Indicate the vehicle width when backing up.
SAA2777
Backing up on a steep uphillWhen backing up the vehicle up a hill, the
distance guide lines and the vehicle width guide
lines are shown closer than the actual distance.
For example, the display shows 3 ft (1.0 m) to
the place
*A
, but the actual 3 ft (1.0 m)
distance on the hill is the place
*B. Note that
Heater, air conditioner, audio and phone systems
4-3
Page 146 of 329
Black plate (150,1)
Model "Z12-D" EDITED: 2009/ 9/ 17
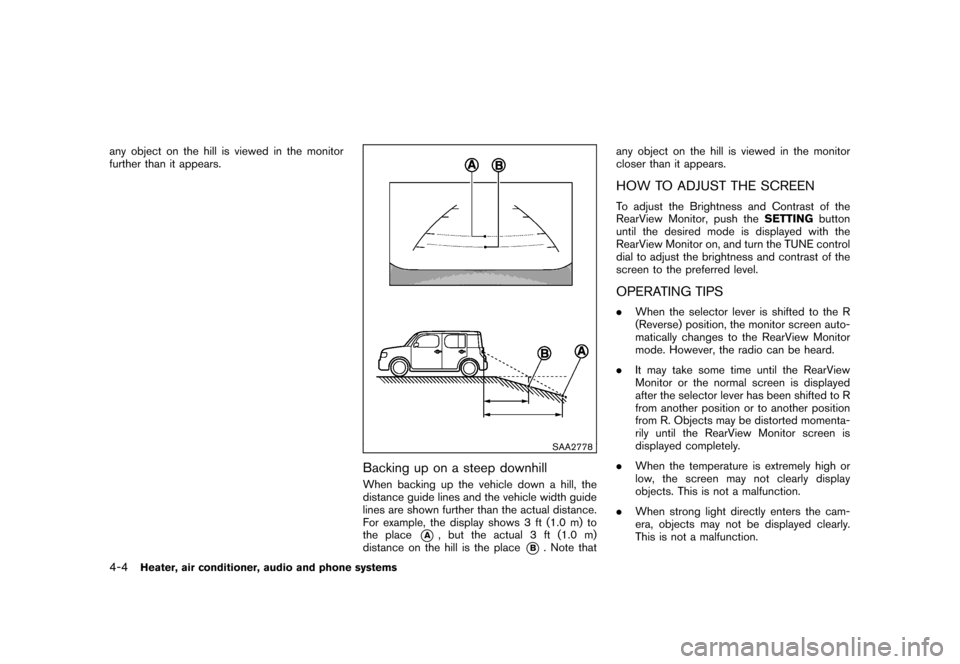
any object on the hill is viewed in the monitor
further than it appears.
SAA2778
Backing up on a steep downhillWhen backing up the vehicle down a hill, the
distance guide lines and the vehicle width guide
lines are shown further than the actual distance.
For example, the display shows 3 ft (1.0 m) to
the place
*A
, but the actual 3 ft (1.0 m)
distance on the hill is the place
*B. Note that any object on the hill is viewed in the monitor
closer than it appears.
HOW TO ADJUST THE SCREENTo adjust the Brightness and Contrast of the
RearView Monitor, push the
SETTINGbutton
until the desired mode is displayed with the
RearView Monitor on, and turn the TUNE control
dial to adjust the brightness and contrast of the
screen to the preferred level.OPERATING TIPS. When the selector lever is shifted to the R
(Reverse) position, the monitor screen auto-
matically changes to the RearView Monitor
mode. However, the radio can be heard.
. It may take some time until the RearView
Monitor or the normal screen is displayed
after the selector lever has been shifted to R
from another position or to another position
from R. Objects may be distorted momenta-
rily until the RearView Monitor screen is
displayed completely.
. When the temperature is extremely high or
low, the screen may not clearly display
objects. This is not a malfunction.
. When strong light directly enters the cam-
era, objects may not be displayed clearly.
This is not a malfunction.
4-4
Heater, air conditioner, audio and phone systems
Page 152 of 329
Black plate (156,1)
Model "Z12-D" EDITED: 2009/ 9/ 17
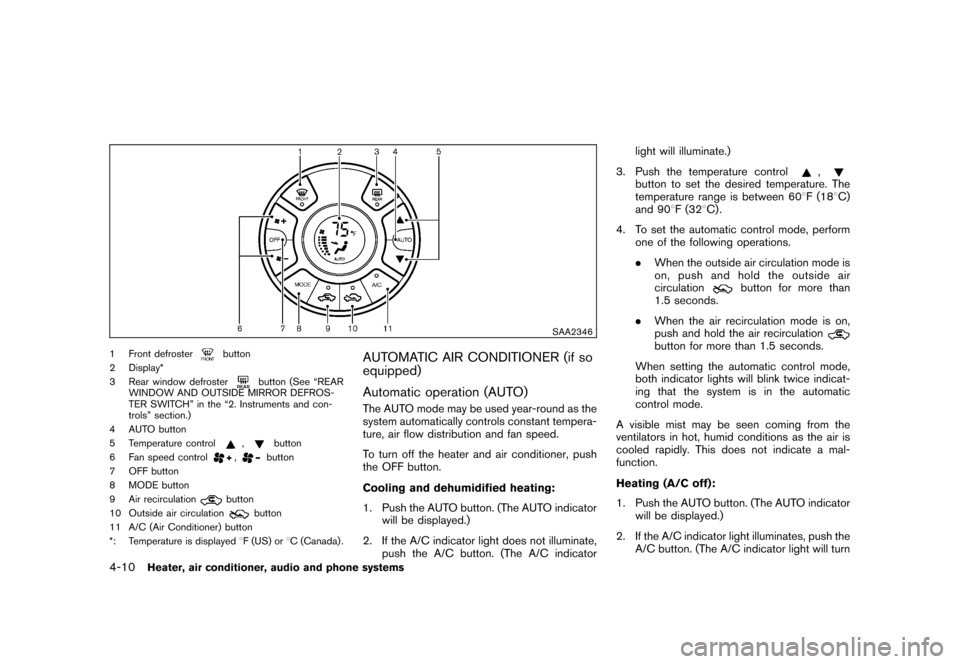
SAA2346
1 Front defroster
button
2 Display*
3 Rear window defroster
button (See “REAR
WINDOW AND OUTSIDE MIRROR DEFROS-
TER SWITCH” in the “2. Instruments and con-
trols” section.)
4 AUTO button
5 Temperature control
,
button
6 Fan speed control
,
button
7 OFF button
8 MODE button
9 Air recirculation
button
10 Outside air circulation
button
11 A/C (Air Conditioner) button
*: Temperature is displayed 8F (US) or 8C (Canada) .
AUTOMATIC AIR CONDITIONER (if so
equipped)
Automatic operation (AUTO)The AUTO mode may be used year-round as the
system automatically controls constant tempera-
ture, air flow distribution and fan speed.
To turn off the heater and air conditioner, push
the OFF button.
Cooling and dehumidified heating:
1. Push the AUTO button. (The AUTO indicator
will be displayed.)
2. If the A/C indicator light does not illuminate, push the A/C button. (The A/C indicator light will illuminate.)
3. Push the temperature control
,
button to set the desired temperature. The
temperature range is between 60 8F (18 8C)
and 90 8F (32 8C) .
4. To set the automatic control mode, perform one of the following operations.
.When the outside air circulation mode is
on, push and hold the outside air
circulation
button for more than
1.5 seconds.
. When the air recirculation mode is on,
push and hold the air recirculation
button for more than 1.5 seconds.
When setting the automatic control mode,
both indicator lights will blink twice indicat-
ing that the system is in the automatic
control mode.
A visible mist may be seen coming from the
ventilators in hot, humid conditions as the air is
cooled rapidly. This does not indicate a mal-
function.
Heating (A/C off):
1. Push the AUTO button. (The AUTO indicator will be displayed.)
2. If the A/C indicator light illuminates, push the A/C button. (The A/C indicator light will turn
4-10
Heater, air conditioner, audio and phone systems
Page 157 of 329
Black plate (161,1)
Model "Z12-D" EDITED: 2009/ 9/ 17
humidity. If this occurs, remove the CD
and dehumidify or ventilate the player
completely.
. The player may skip while driving on
rough roads.
. The CD player sometimes cannot func-
tion when the passenger compartment
temperature is extremely high. De-
crease the temperature before use.
. Only use high quality 4.7 in (12 cm)
round discs that have the “COMPACT
disc DIGITAL AUDIO” logo on the disc
or packaging.
. Do not expose the CD to direct sun-
light.
. CDs that are of poor quality, dirty,
scratched, covered with fingerprints,
or that have pin holes may not work
properly.
. The following CDs may not work prop-
erly:
— Copy control compact discs (CCCD)
— Recordable compact discs (CD-R)
— Rewritable compact discs (CD-RW)
. Do not use the following CDs as they
may cause the CD player to malfunc- tion.
— 3.1 in (8 cm) discs
— CDs that are not round
— CDs with a paper label
— CDs that are warped, scratched, or
have abnormal edges
. This audio system can only play pre-
recorded CDs. It has no capabilities to
record or burn CDs.
. If the CD cannot be played, one of the
following messages will be displayed.
Check Disc:
— Confirm that the CD is inserted
correctly (the label side is facing up,
etc.) .
— Confirm that the CD is not bent or
warped and it is free of scratches.
Push Eject:
This is an error due to the temperature
inside the player is too high. Remove
the CD by pushing the EJECT button,
and after a short time reinsert the CD.
The CD can be played when the tem-
perature of the player returns to nor-
mal. Unplayable Track:
The file is unplayable in this audio
system (only MP3 or WMA CD) .
Interface System for iPod
®(vehicles
without USB port) (if so equipped)
. Some characters used in other languages
(Chinese, Japanese, etc.) are not displayed
properly on the vehicle audio display. We
recommend using English language char-
acters with an iPod
®.
. Large video podcast files cause slow
responses in the iPod®. The vehicle audio
display may momentarily black out, but it will
soon recover.
. If the iPod
®automatically selects large video
podcast files while in the shuffle mode, the
vehicle audio display may momentarily black
out, but it will soon recover.
. Improperly plugging in the iPod
®may cause
a checkmark to be displayed on and off
(flickering) . Always make sure that the iPod
®
is connected properly.
. The iPod nano
®(2nd Generation) will
continue to fast forward or rewind if it is
disconnected during a seek operation.
. An incorrect song title may appear when the
Play Mode is changed while using the iPod
nano
®(2nd Generation) .
Heater, air conditioner, audio and phone systems
4-15
Page 159 of 329
Black plate (163,1)
Model "Z12-D" EDITED: 2009/ 9/ 17
.Sampling frequency — Sampling frequency
is the rate at which the samples of a signal
are converted from analog to digital (A/D
conversion) per second.
. Multisession — Multisession is one of the
methods for writing data to media. Writing
data once to the media is called a single
session, and writing more than once is
called a multisession.
. ID3/WMA Tag — The ID3/WMA tag is the
part of the encoded MP3 or WMA file that
contains information about the digital music
file such as song title, artist, album title,
encoding bit rate, track time duration, etc.
ID3 tag information is displayed on the
Album/Artist/Track title line on the display.
* Windows
®and Windows Media
®are regis-
tered trademarks or trademarks of Microsoft
Corporation in the United States of America
and other countries of Microsoft Corporation
of the USA.
USB (Universal Serial Bus) (if so
equipped)This system supports various USB memory
sticks, USB hard drives and iPod
®players.
There are some USB devices which may not
be supported with this system.
. Make sure that the USB device is connected
correctly into the USB connector. .
Do not force the memory stick or USB cable
into the USB connector. This could damage
the connector.
. During cold weather or rainy days, the player
may malfunction due to humidity. If this
occurs, remove the USB device and dehu-
midify or ventilate the USB player comple-
tely.
. The USB player sometimes cannot function
when the passenger compartment tempera-
ture is extremely high. Decrease the tem-
perature before use.
. Do not leave USB memory in a place prone
to static electricity or where the air condi-
tioner blows directly. The data in the USB
memory may be damaged.
. The vehicle is not equipped with a USB
memory stick.
. A USB device cannot be formatted with this
system. To format a USB device, use a
personal computer.
. Partitioned USB devices may not be played
correctly.
. Some characters used in other languages
(Chinese, Japanese, etc.) are not displayed
properly on the vehicle center screen. Using
English language characters with a USB
device is recommended. .
Do not connect a USB device if a connector
or cable is wet. Allow the cable and/or
connectors to dry completely before con-
necting the USB device. If the connector is
exposed to fluids other than water, evapora-
tive residue may cause a short between the
connector pins.
. Large video podcast files cause slow
responses in an iPod
®. The vehicle center
display may momentarily black out, but it will
soon recover.
. If an iPod
®automatically selects large video
podcast files while in the shuffle mode, the
vehicle center display may momentarily
black out, but it will soon recover.
. Audiobooks may not play in the same order
as they appear on an iPod
®.
. An iPod nano
®(1st Generation) may remain
in fast forward or rewind mode if it is
connected during a seek operation. In this
case, please manually reset the iPod
®.
. An iPod nano
®(2nd Generation) will con-
tinue to fast forward or rewind if it is
disconnected during a seek operation.
. An incorrect song title may appear when the
Play Mode is changed while using the iPod
nano
®(2nd Generation)
iPod
®is a trademark of Apple Inc., registered in
Heater, air conditioner, audio and phone systems
4-17
Page 160 of 329
Black plate (164,1)
Model "Z12-D" EDITED: 2009/ 9/ 17
the U.S. and other countries.Compressed Audio Files (MP3/WMA/
AAC) (if so equipped)Explanation of terms:
.MP3 — MP3 is short for Moving Pictures
Experts Group Audio Layer 3. MP3 is the
most well known compressed digital audio
file format. This format allows for near “CD
quality” sound, but at a fraction of the size of
normal audio files. MP3 conversion of an
audio track can reduce the file size by
approximately a 10:1 ratio (Sampling: 44.1
kHz, Bit rate: 128 kbps) with virtually no
perceptible loss in quality. The compression
reduces certain parts of sound that seem
inaudible to most people.
. WMA — Windows Media Audio (WMA) is a
compressed audio format created by Micro-
soft as an alternative to MP3. The WMA
codec offers greater file compression than
the MP3 codec, enabling storage of more
digital audio tracks in the same amount of
space when compared to MP3s at the same
level of quality.
. AAC/M4A — Advanced Audio Coding
(AAC) is a lossy audio compression format.
Audio files that have been encoded with
AAC are generally smaller in size and deliver
a higher quality of sound than MP3. .
Bit rate — Bit rate denotes the number of
bits per second used by a digital music file.
The size and quality of a compressed digital
audio file is determined by the bit rate used
when encoding the file.
. Sampling frequency — Sampling frequency
is the rate at which the samples of a signal
are converted from analog to digital (A/D
conversion) per second.
. Multisession — Multisession is one of the
methods for writing data to media. Writing
data once to the media is called a single
session, and writing more than once is
called a multisession.
. ID3/WMA Tag — The ID3/WMA tag is the
part of the encoded MP3 or WMA file that
contains information about the digital music
file such as song title, artist, album title,
encoding bit rate, track time duration, etc.
ID3 tag information is displayed on the
Album/Artist/Track title line on the display.
* Windows
®and Windows Media
®are regis-
tered trademarks or trademarks of Microsoft
Corporation in the United States of America
and/or other countries.
SAA1025
Playback order chart
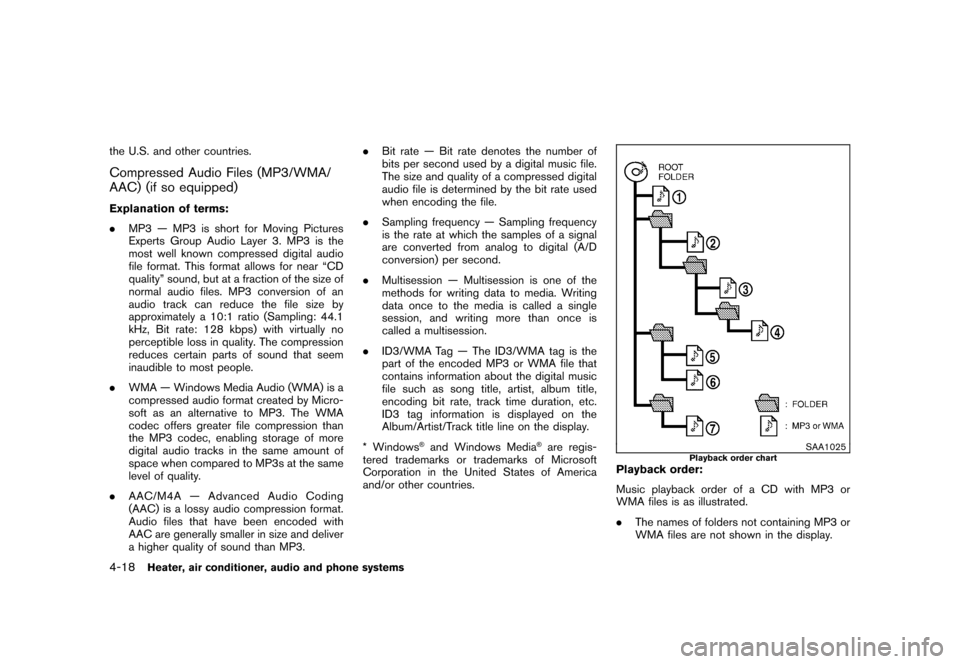
Playback order:
Music playback order of a CD with MP3 or
WMA files is as illustrated.
. The names of folders not containing MP3 or
WMA files are not shown in the display.
4-18
Heater, air conditioner, audio and phone systems