ECO mode NISSAN CUBE 2012 3.G User Guide
[x] Cancel search | Manufacturer: NISSAN, Model Year: 2012, Model line: CUBE, Model: NISSAN CUBE 2012 3.GPages: 331, PDF Size: 2.55 MB
Page 97 of 331
SIC3669
Autolight system (if so equipped)
The autolight system allows the headlights to be
set so they turn on and off automatically.
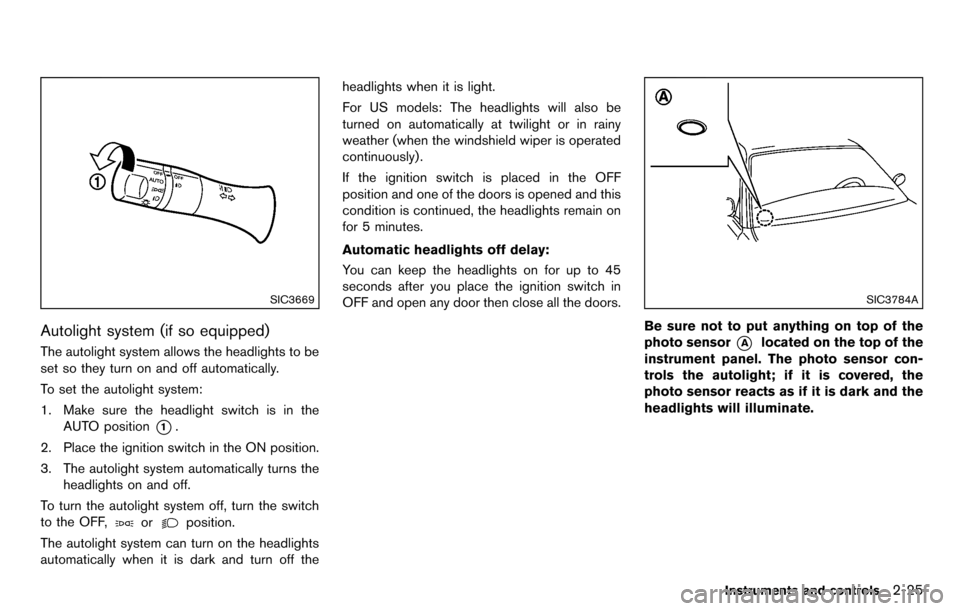
To set the autolight system:
1. Make sure the headlight switch is in theAUTO position
*1.
2. Place the ignition switch in the ON position.
3. The autolight system automatically turns the headlights on and off.
To turn the autolight system off, turn the switch
to the OFF,
orposition.
The autolight system can turn on the headlights
automatically when it is dark and turn off the headlights when it is light.
For US models: The headlights will also be
turned on automatically at twilight or in rainy
weather (when the windshield wiper is operated
continuously) .
If the ignition switch is placed in the OFF
position and one of the doors is opened and this
condition is continued, the headlights remain on
for 5 minutes.
Automatic headlights off delay:
You can keep the headlights on for up to 45
seconds after you place the ignition switch in
OFF and open any door then close all the doors.
SIC3784A
Be sure not to put anything on top of the
photo sensor
*Alocated on the top of the
instrument panel. The photo sensor con-
trols the autolight; if it is covered, the
photo sensor reacts as if it is dark and the
headlights will illuminate.
Instruments and controls2-25
Page 111 of 331
SIC4573
MAP LIGHT CONTROL SWITCH (if so
equipped)
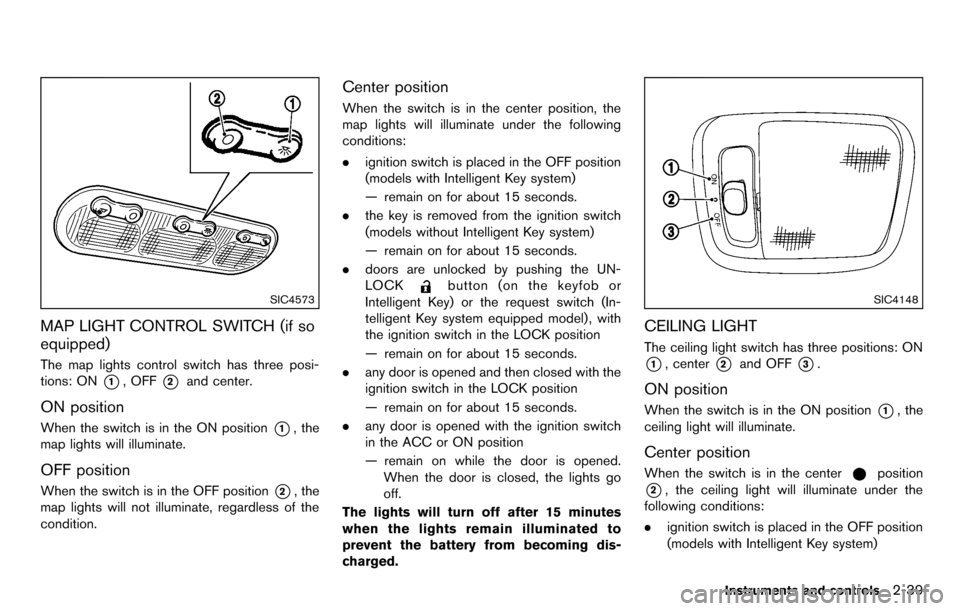
The map lights control switch has three posi-
tions: ON
*1, OFF*2and center.
ON position
When the switch is in the ON position*1, the
map lights will illuminate.
OFF position
When the switch is in the OFF position*2, the
map lights will not illuminate, regardless of the
condition.
Center position
When the switch is in the center position, the
map lights will illuminate under the following
conditions:
. ignition switch is placed in the OFF position
(models with Intelligent Key system)
— remain on for about 15 seconds.
. the key is removed from the ignition switch
(models without Intelligent Key system)
— remain on for about 15 seconds.
. doors are unlocked by pushing the UN-
LOCK
button (on the keyfob or
Intelligent Key) or the request switch (In-
telligent Key system equipped model) , with
the ignition switch in the LOCK position
— remain on for about 15 seconds.
. any door is opened and then closed with the
ignition switch in the LOCK position
— remain on for about 15 seconds.
. any door is opened with the ignition switch
in the ACC or ON position
— remain on while the door is opened.
When the door is closed, the lights go
off.
The lights will turn off after 15 minutes
when the lights remain illuminated to
prevent the battery from becoming dis-
charged.SIC4148
CEILING LIGHT
The ceiling light switch has three positions: ON
*1, center*2and OFF*3.
ON position
When the switch is in the ON position*1, the
ceiling light will illuminate.
Center position
When the switch is in the centerposition
*2, the ceiling light will illuminate under the
following conditions:
. ignition switch is placed in the OFF position
(models with Intelligent Key system)
Instruments and controls2-39
Page 112 of 331
2-40Instruments and controls
— remain on for about 15 seconds.
. the key is removed from the ignition switch
(models without Intelligent Key system)
— remain on for about 15 seconds.
. doors are unlocked by pushing the UN-
LOCK
button (on the keyfob or
Intelligent Key) or the request switch (In-
telligent Key system equipped model) , with
the ignition switch in the LOCK position
— remain on for about 15 seconds.
. any door is opened and then closed with the
ignition switch in the LOCK position
— remain on for about 15 seconds.
. any door is opened with the ignition switch
in the ACC or ON position
— remain on while the door is opened.
When the door is closed, the lights go
off.
The light will turn off after 15 minutes
when the lights remain illuminated to
prevent the battery from becoming dis-
charged.
OFF position
When the switch is in the OFF position*3, the
ceiling light will not illuminate, regardless of the
condition.
JVI0358X
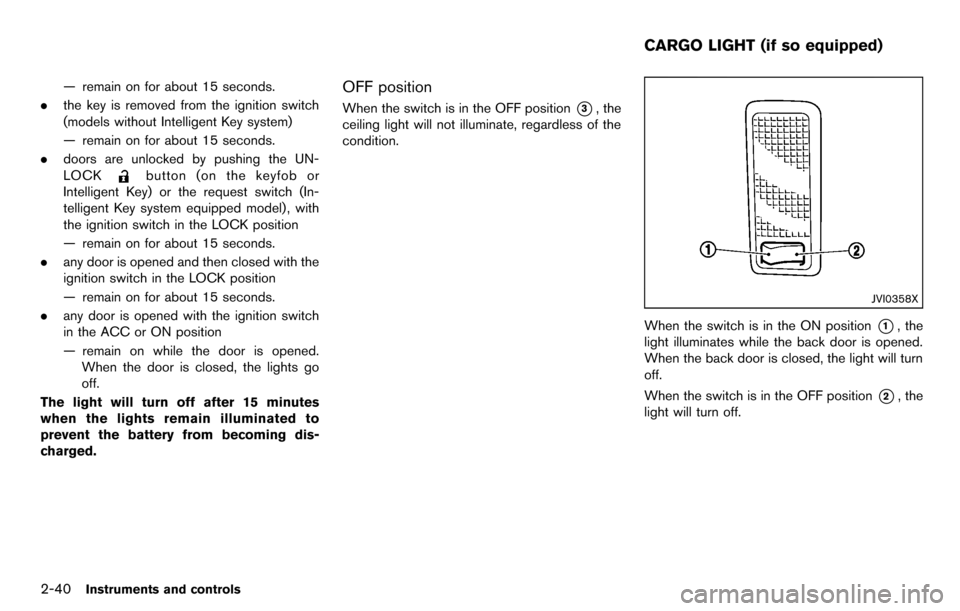
When the switch is in the ON position*1, the
light illuminates while the back door is opened.
When the back door is closed, the light will turn
off.
When the switch is in the OFF position
*2, the
light will turn off.
CARGO LIGHT (if so equipped)
Page 118 of 331
3-6Pre-driving checks and adjustments
Lockout protection
Lockout protection function helps to prevent the
keys from being accidentally locked inside the
vehicle.
For models with Intelligent Key system:
.When the power door lock switch (driver’s
or front passenger’s) is moved to the lock
position with the ignition switch placed in
the ACC or ON position and any door open,
all doors will lock and then unlock auto-
matically.
. When the power door lock switch is moved
to the lock position with the Intelligent Key
left in the vehicle and any door open, all
doors will unlock automatically and a chime
will sound after the door is closed.
For models without Intelligent Key system:
When the power door lock switch is moved to
the lock position with the key in the ignition
switch and any door open, all doors will lock and
then unlock automatically.
AUTOMATIC DOOR LOCKS
. All doors lock automatically when the vehicle
speed reaches 15 MPH (24 km/h) .
. All doors unlock automatically when the
ignition switch is placed in the OFF position
(models with Intelligent Key system) . .
All doors unlock automatically when the key
is removed from the ignition switch (models
without Intelligent Key system) .
The automatic unlock function can be
deactivated or activated.
To deactivate or activate the automatic door
unlock system, perform the following procedure.
1. Close all doors.
2. Place the ignition switch in the ON position.
3. Within 20 seconds of performing step 2.
.Push and hold the power door lock switch to the
(UNLOCK) position
for more than 5 seconds.
4. When activated, the hazard warning lights will flash twice. When deactivated, the
hazard warning lights will flash once.
5. The ignition switch must be placed in the OFF and ON position again between each
setting change.
When the automatic door unlock system is
deactivated, the doors do not unlock when the
ignition is placed in the OFF position. To unlock
the door manually, use the inside lock knob or
the power door lock switch (driver’s or front
passenger’s side).SPA2604
CHILD SAFETY REAR DOOR LOCK
Child safety rear door locks help prevent the rear
doors from being opened accidentally, espe-
cially when small children are in the vehicle.
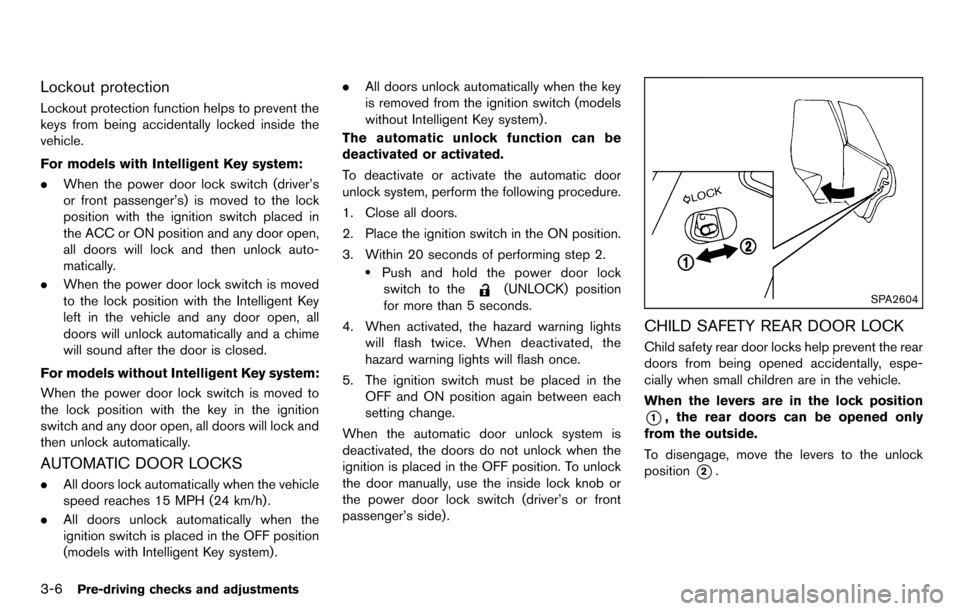
When the levers are in the lock position
*1, the rear doors can be opened only
from the outside.
To disengage, move the levers to the unlock
position
*2.
Page 120 of 331
3-8Pre-driving checks and adjustments
SPA2416
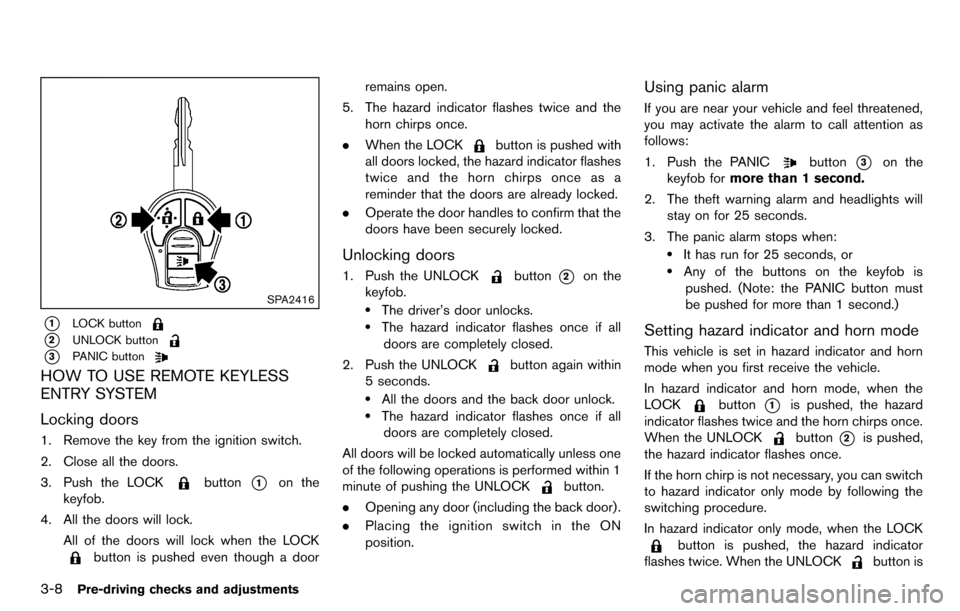
*1LOCK button
*2UNLOCK button
*3PANIC button
HOW TO USE REMOTE KEYLESS
ENTRY SYSTEM
Locking doors
1. Remove the key from the ignition switch.
2. Close all the doors.
3. Push the LOCK
button*1on the
keyfob.
4. All the doors will lock.
All of the doors will lock when the LOCK
button is pushed even though a door remains open.
5. The hazard indicator flashes twice and the horn chirps once.
. When the LOCK
button is pushed with
all doors locked, the hazard indicator flashes
twice and the horn chirps once as a
reminder that the doors are already locked.
. Operate the door handles to confirm that the
doors have been securely locked.
Unlocking doors
1. Push the UNLOCKbutton*2on the
keyfob.
.The driver’s door unlocks..The hazard indicator flashes once if all
doors are completely closed.
2. Push the UNLOCK
button again within
5 seconds.
.All the doors and the back door unlock..The hazard indicator flashes once if all doors are completely closed.
All doors will be locked automatically unless one
of the following operations is performed within 1
minute of pushing the UNLOCK
button.
. Opening any door (including the back door) .
. Placing the ignition switch in the ON
position.
Using panic alarm
If you are near your vehicle and feel threatened,
you may activate the alarm to call attention as
follows:
1. Push the PANIC
button*3on the
keyfob for more than 1 second.
2. The theft warning alarm and headlights will stay on for 25 seconds.
3. The panic alarm stops when:
.It has run for 25 seconds, or.Any of the buttons on the keyfob is pushed. (Note: the PANIC button must
be pushed for more than 1 second.)
Setting hazard indicator and horn mode
This vehicle is set in hazard indicator and horn
mode when you first receive the vehicle.
In hazard indicator and horn mode, when the
LOCK
button*1is pushed, the hazard
indicator flashes twice and the horn chirps once.
When the UNLOCK
button*2is pushed,
the hazard indicator flashes once.
If the horn chirp is not necessary, you can switch
to hazard indicator only mode by following the
switching procedure.
In hazard indicator only mode, when the LOCK
button is pushed, the hazard indicator
flashes twice. When the UNLOCK
button is
Page 121 of 331
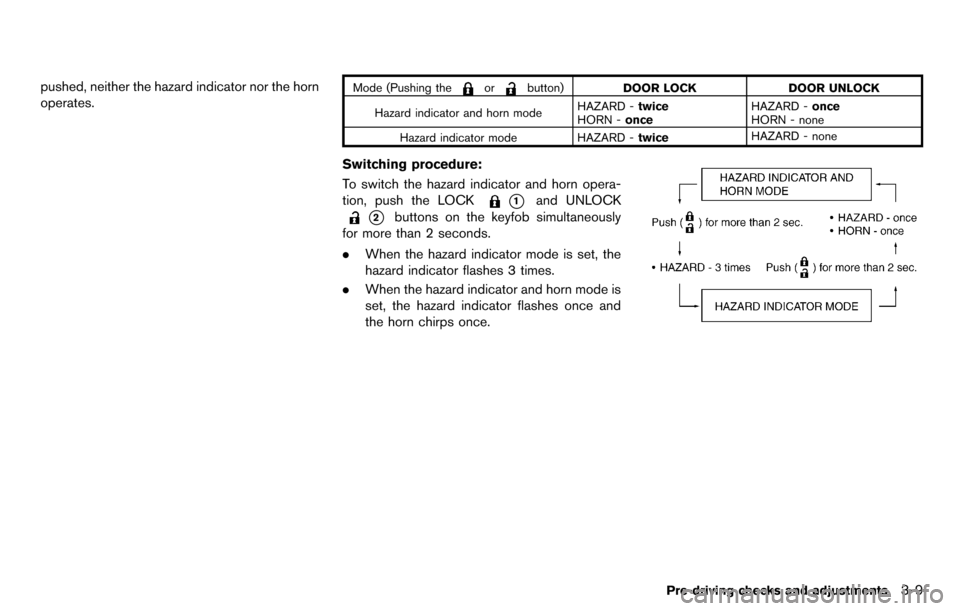
pushed, neither the hazard indicator nor the horn
operates.Mode (Pushing theorbutton)DOOR LOCK DOOR UNLOCK
Hazard indicator and horn mode HAZARD -
twice
HORN - once HAZARD -
once
HORN - none
Hazard indicator mode HAZARD - twiceHAZARD - none
Switching procedure:
To switch the hazard indicator and horn opera-
tion, push the LOCK
*1and UNLOCK
*2buttons on the keyfob simultaneously
for more than 2 seconds.
. When the hazard indicator mode is set, the
hazard indicator flashes 3 times.
. When the hazard indicator and horn mode is
set, the hazard indicator flashes once and
the horn chirps once.
Pre-driving checks and adjustments3-9
Page 129 of 331
SPA2252
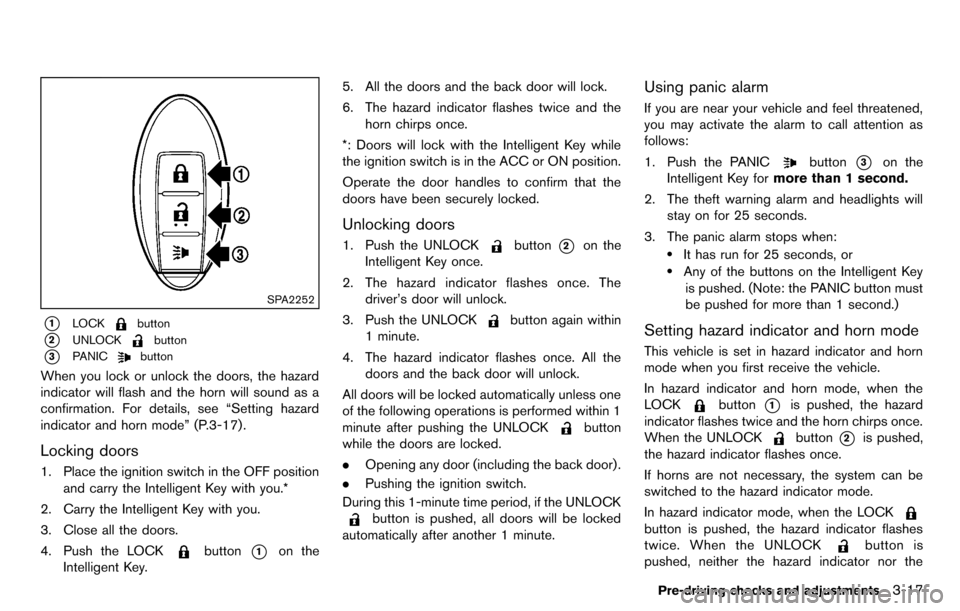
*1LOCKbutton
*2UNLOCKbutton
*3PANICbutton
When you lock or unlock the doors, the hazard
indicator will flash and the horn will sound as a
confirmation. For details, see “Setting hazard
indicator and horn mode” (P.3-17) .
Locking doors
1. Place the ignition switch in the OFF positionand carry the Intelligent Key with you.*
2. Carry the Intelligent Key with you.
3. Close all the doors.
4. Push the LOCK
button*1on the
Intelligent Key. 5. All the doors and the back door will lock.
6. The hazard indicator flashes twice and the
horn chirps once.
*: Doors will lock with the Intelligent Key while
the ignition switch is in the ACC or ON position.
Operate the door handles to confirm that the
doors have been securely locked.
Unlocking doors
1. Push the UNLOCKbutton*2on the
Intelligent Key once.
2. The hazard indicator flashes once. The driver’s door will unlock.
3. Push the UNLOCK
button again within
1 minute.
4. The hazard indicator flashes once. All the doors and the back door will unlock.
All doors will be locked automatically unless one
of the following operations is performed within 1
minute after pushing the UNLOCK
button
while the doors are locked.
. Opening any door (including the back door) .
. Pushing the ignition switch.
During this 1-minute time period, if the UNLOCK
button is pushed, all doors will be locked
automatically after another 1 minute.
Using panic alarm
If you are near your vehicle and feel threatened,
you may activate the alarm to call attention as
follows:
1. Push the PANIC
button*3on the
Intelligent Key for more than 1 second.
2. The theft warning alarm and headlights will stay on for 25 seconds.
3. The panic alarm stops when:
.It has run for 25 seconds, or.Any of the buttons on the Intelligent Key is pushed. (Note: the PANIC button must
be pushed for more than 1 second.)
Setting hazard indicator and horn mode
This vehicle is set in hazard indicator and horn
mode when you first receive the vehicle.
In hazard indicator and horn mode, when the
LOCK
button*1is pushed, the hazard
indicator flashes twice and the horn chirps once.
When the UNLOCK
button*2is pushed,
the hazard indicator flashes once.
If horns are not necessary, the system can be
switched to the hazard indicator mode.
In hazard indicator mode, when the LOCK
button is pushed, the hazard indicator flashes
twice. When the UNLOCK
button is
pushed, neither the hazard indicator nor the
Pre-driving checks and adjustments3-17
Page 130 of 331
3-18Pre-driving checks and adjustments
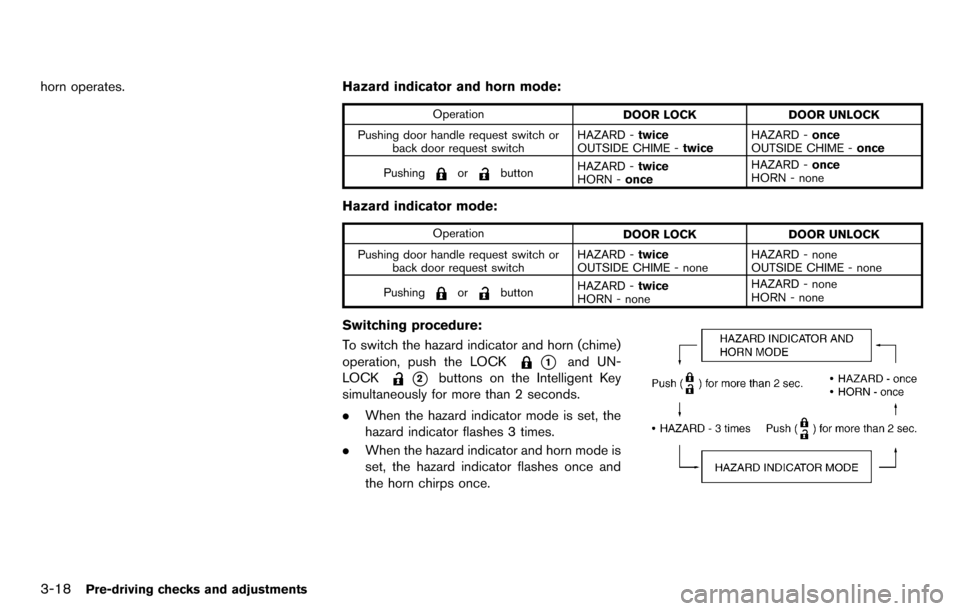
horn operates.Hazard indicator and horn mode:
Operation
DOOR LOCK DOOR UNLOCK
Pushing door handle request switch or back door request switch HAZARD -
twice
OUTSIDE CHIME - twiceHAZARD -
once
OUTSIDE CHIME - once
Pushing
orbutton HAZARD -
twice
HORN - once HAZARD -
once
HORN - none
Hazard indicator mode:
Operation DOOR LOCKDOOR UNLOCK
Pushing door handle request switch or back door request switch HAZARD -
twice
OUTSIDE CHIME - none HAZARD - none
OUTSIDE CHIME - none
Pushing
orbutton HAZARD -
twice
HORN - none HAZARD - none
HORN - none
Switching procedure:
To switch the hazard indicator and horn (chime)
operation, push the LOCK
*1and UN-
LOCK
*2buttons on the Intelligent Key
simultaneously for more than 2 seconds.
. When the hazard indicator mode is set, the
hazard indicator flashes 3 times.
. When the hazard indicator and horn mode is
set, the hazard indicator flashes once and
the horn chirps once.
Page 134 of 331
3-22Pre-driving checks and adjustments
.Do not fill a portable fuel container
in the vehicle or trailer. Static elec-
tricity can cause an explosion of
flammable liquid, vapor or gas in
any vehicle or trailer. To reduce the
risk of serious injury or death when
filling portable fuel containers:
— Always place the container on
the ground when filling.
— Do not use electronic devices when filling.
— Keep the pump nozzle in contact with the container while you are
filling it.
— Use only approved portable fuel containers for flammable liquid.
CAUTION
. The LOOSE FUEL CAP warning
message will be displayed if the
fuel-filler cap is not properly tigh-
tened. It may take a few driving trips
for the message to be displayed.
Failure to tighten the fuel-filler cap
properly after the LOOSE FUEL CAP
warning message is displayed may cause the
Malfunction Indicator
Light (MIL) to illuminate.
. Failure to tighten the fuel-filler cap
properly may cause the
mal-
function indicator light (MIL) to
illuminate. If the
light illumi-
nates because the fuel-filler cap is
loose or missing, tighten or install
the cap and continue to drive the
vehicle. The
light should turn off
after a few driving trips. If the
light does not turn off after a few
driving trips, have the vehicle in-
spected by a NISSAN dealer.
For additional information, see
“Malfunction Indicator Light (MIL)”
(P.2-17) .
. If fuel is spilled on the vehicle body,
flush it away with water to avoid
paint damage.
SIC4712
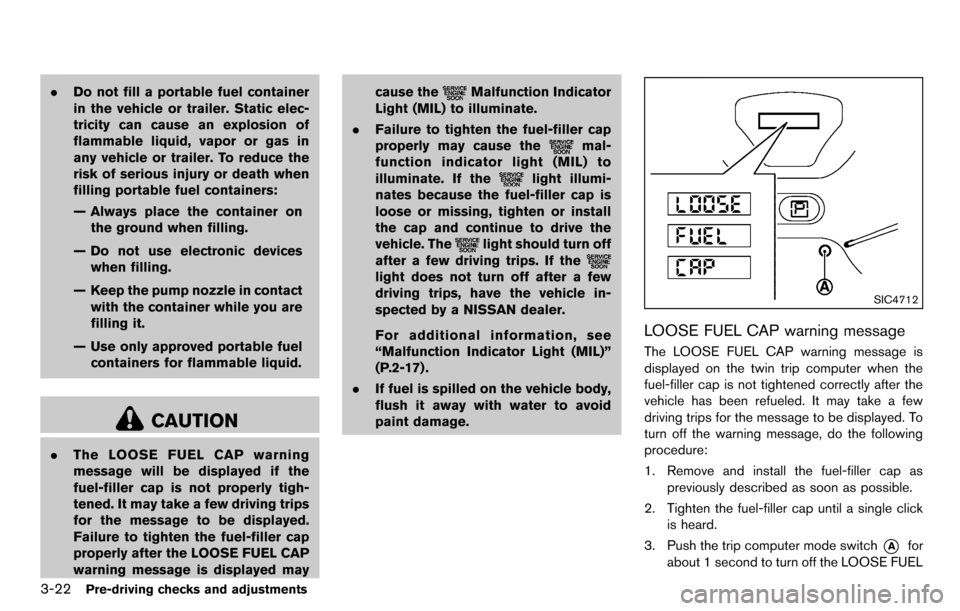
LOOSE FUEL CAP warning message
The LOOSE FUEL CAP warning message is
displayed on the twin trip computer when the
fuel-filler cap is not tightened correctly after the
vehicle has been refueled. It may take a few
driving trips for the message to be displayed. To
turn off the warning message, do the following
procedure:
1. Remove and install the fuel-filler cap as
previously described as soon as possible.
2. Tighten the fuel-filler cap until a single click is heard.
3. Push the trip computer mode switch
*Afor
about 1 second to turn off the LOOSE FUEL
Page 145 of 331
.OK:
Completes the character input.
Touch screen maintenance
If you clean the display screen, use a dry, soft
cloth. If additional cleaning is necessary, use a
small amount of neutral detergent with a soft
cloth. Never spray the screen with water or
detergent. Dampen the cloth first and then wipe
the screen.
HOW TO USE THE BACK BUTTON
Push theBACK button to return to the
previous screen.
HOW TO USE BRIGHTNESS CON-
TROL AND DISPLAY ON/OFF BUTTON
To change the display brightness, push the
button. Pushing the button again will change the
display to the day or the night display.
If no operation is performed within 5 seconds,
the display will return to the previous display.
Push and hold the
button for more than two
seconds to turn the display off. Push the button
again to turn the display on.
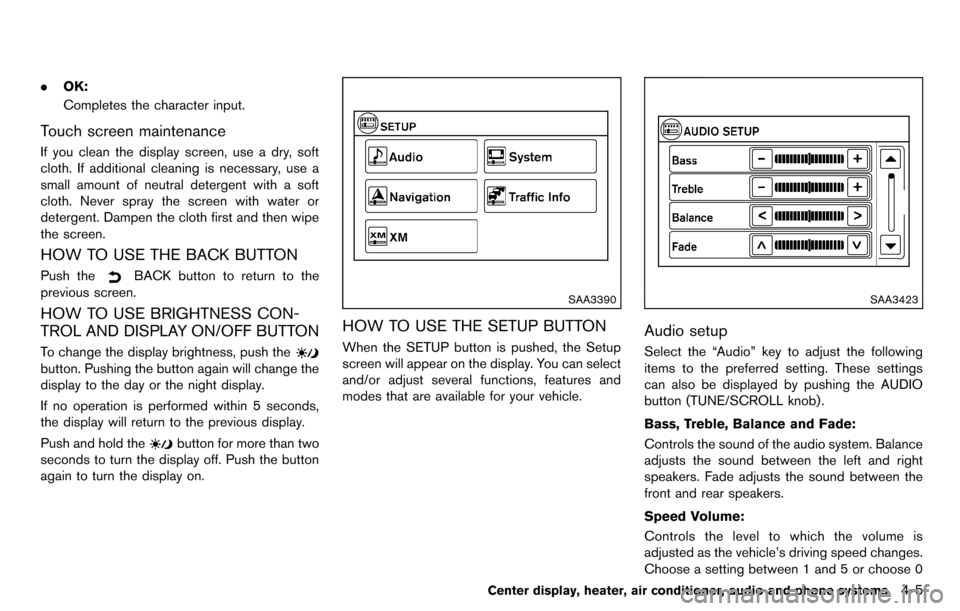
SAA3390
HOW TO USE THE SETUP BUTTON
When the SETUP button is pushed, the Setup
screen will appear on the display. You can select
and/or adjust several functions, features and
modes that are available for your vehicle.
SAA3423
Audio setup
Select the “Audio” key to adjust the following
items to the preferred setting. These settings
can also be displayed by pushing the AUDIO
button (TUNE/SCROLL knob).
Bass, Treble, Balance and Fade:
Controls the sound of the audio system. Balance
adjusts the sound between the left and right
speakers. Fade adjusts the sound between the
front and rear speakers.
Speed Volume:
Controls the level to which the volume is
adjusted as the vehicle’s driving speed changes.
Choose a setting between 1 and 5 or choose 0
Center display, heater, air conditioner, audio and phone systems4-5