ECO mode NISSAN CUBE 2012 3.G Workshop Manual
[x] Cancel search | Manufacturer: NISSAN, Model Year: 2012, Model line: CUBE, Model: NISSAN CUBE 2012 3.GPages: 331, PDF Size: 2.55 MB
Page 213 of 331
SSD0503
MANUAL TRANSMISSION (MT)
The ignition switch includes a device that helps
prevent accidental removal of the key while
driving.
The key can only be removed when the ignition
switch is in the LOCK position.
To turn the ignition switch to the LOCK position
from the ACC or ON position, turn the key to the
OFF position, push the key in, then turn the key
to the LOCK position.
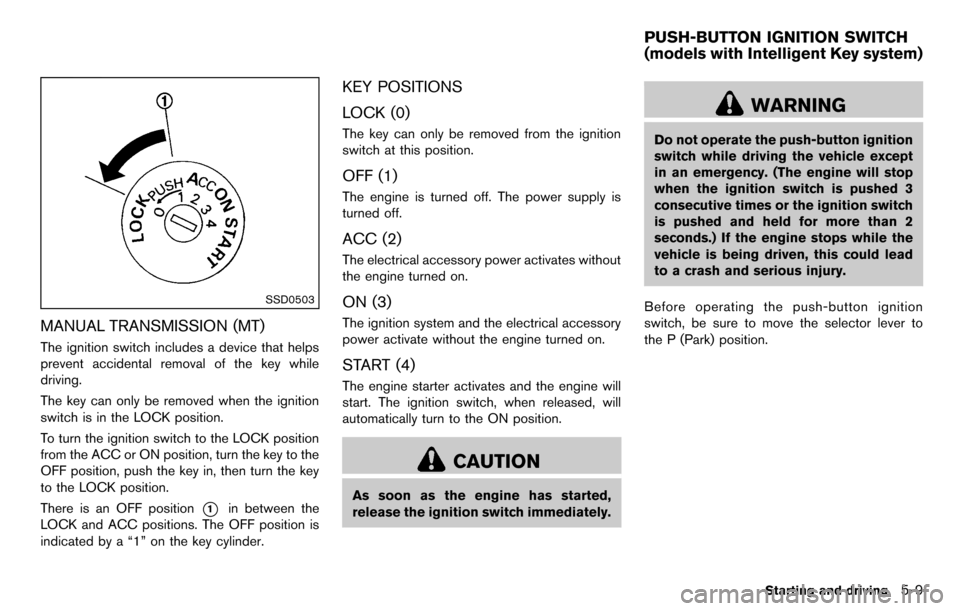
There is an OFF position
*1in between the
LOCK and ACC positions. The OFF position is
indicated by a “1” on the key cylinder.
KEY POSITIONS
LOCK (0)
The key can only be removed from the ignition
switch at this position.
OFF (1)
The engine is turned off. The power supply is
turned off.
ACC (2)
The electrical accessory power activates without
the engine turned on.
ON (3)
The ignition system and the electrical accessory
power activate without the engine turned on.
START (4)
The engine starter activates and the engine will
start. The ignition switch, when released, will
automatically turn to the ON position.
CAUTION
As soon as the engine has started,
release the ignition switch immediately.
WARNING
Do not operate the push-button ignition
switch while driving the vehicle except
in an emergency. (The engine will stop
when the ignition switch is pushed 3
consecutive times or the ignition switch
is pushed and held for more than 2
seconds.) If the engine stops while the
vehicle is being driven, this could lead
to a crash and serious injury.
Before operating the push-button ignition
switch, be sure to move the selector lever to
the P (Park) position.
Starting and driving5-9
PUSH-BUTTON IGNITION SWITCH
(models with Intelligent Key system)
Page 217 of 331
MODELS WITHOUT INTELLIGENT KEY
SYSTEM
1. Apply the parking brake.
2.Continuously Variable Transmission
(CVT) models:
Move the selector lever to the P (Park) or N
(Neutral) position. (P is recommended.)
The starter is designed so that it does not
operate unless the selector lever is in either
of the above positions.
Manual Transmission (MT) models:
Move the shift lever to the N (Neutral)
position. Depress the clutch pedal fully to
the floor.
The starter is designed not to operate unless
the clutch pedal is fully depressed.
3. Crank the engine with your foot off the
accelerator pedal by turning the ignition
switch to START. Release the switch when
the engine starts. If the engine starts, but
fails to run, repeat the above procedure.
.If the engine is very hard to start in
extremely cold weather or when restart-
ing, depress the accelerator pedal a little
(approximately 1/3 to the floor) and hold
it and then crank the engine. Release the
accelerator pedal when the engine starts.
.If the engine is very hard to start becauseit is flooded, depress the accelerator
pedal all the way to the floor and hold it.
Crank the engine for 5 - 6 seconds. After
cranking the engine, release the accel-
erator pedal. Crank the engine with your
foot off the accelerator pedal by
turning the ignition switch to START.
Release the ignition switch when the
engine starts. If the engine starts, but fails
to run, repeat the above procedure.
CAUTION
Do not operate the starter for more
than 15 seconds at a time. If the engine
does not start, turn the ignition switch
off and wait 10 seconds before cranking
again, otherwise the starter could be
damaged.
4. Warm-up
Allow the engine to idle for at least 30
seconds after starting. Do not race the
engine while warming it up. Drive at
moderate speed for a short distance first,
especially in cold weather. In cold weather,
keep the engine running for a minimum of 2 -
3 minutes before shutting it off. Starting and stopping the engine over a short period of
time may make the vehicle more difficult to
start.
5. To stop the engine, move the selector lever to the P (Park) position (CVT model) or move
the shift lever to the N (Neutral) position (MT
model) , and turn the ignition switch to the
OFF position.
MODELS WITH INTELLIGENT KEY
SYSTEM
1. Apply the parking brake.
2. Move the selector lever to the P (Park) or N(Neutral) position. (P is recommended.)
The starter is designed not to operate unless
the selector lever is in either of the above
positions.
The Intelligent Key must be carried
when operating the ignition switch.
3. Push the ignition switch to the ON position. Depress the brake pedal and push the
ignition switch to start the engine.
To start the engine immediately, push and
release the ignition switch while depressing
the brake pedal with the ignition switch in
any position.
.If the engine is very hard to start inextremely cold weather or when restart-
ing, depress the accelerator pedal a little
Starting and driving5-13
STARTING THE ENGINE
Page 218 of 331
5-14Starting and driving
(approximately 1/3 to the floor) and while
holding, crank the engine. Release the
accelerator pedal when the engine starts.
.If the engine is very hard to start becauseit is flooded, depress the accelerator
pedal all the way to the floor and hold it.
Push the ignition switch to the ON
position to start cranking the engine.
After 5 or 6 seconds, stop cranking by
pushing the ignition switch to OFF. After
cranking the engine, release the accel-
erator pedal. Crank the engine with your
foot off the accelerator pedal by
depressing the brake pedal and pushing
the push-button ignition switch to start
the engine. If the engine starts, but fails
to run, repeat the above procedure.
CAUTION
Do not operate the starter for more
than 15 seconds at a time. If the engine
does not start, push the ignition switch
to OFF and wait 10 seconds before
cranking again, otherwise the starter
could be damaged.
4. Warm-up
Allow the engine to idle for at least 30 seconds after starting. Do not race the
engine while warming it up. Drive at
moderate speed for a short distance first,
especially in cold weather. In cold weather,
keep the engine running for a minimum of 2 -
3 minutes before shutting it off. Starting and
stopping the engine over a short period of
time may make the vehicle more difficult to
start.
When racing the engine up to 4,000 rpm or
more under no load condition, the engine
will enter the fuel cut mode.
5. To stop the engine, move the selector lever to the P (Park) position, and push the
ignition switch to the OFF position.
CONTINUOUSLY VARIABLE TRANS-
MISSION (CVT)
The Continuously Variable Transmission (CVT)
in your vehicle is electronically controlled to
produce maximum power and smooth operation.
The recommended operating procedures for this
transmission are shown on the following pages.
Follow these procedures for maximum vehicle
performance and driving enjoyment.
Engine power may be automatically re-
duced to protect the CVT if the engine
speed increases quickly when driving on
slippery roads or while being tested on
some dynamometers.
Starting the vehicle
1. After starting the engine, fully depress the
foot brake pedal before moving the selector
lever out of the P (Park) position.
This CVT is designed so that the foot
brake pedal must be depressed before
shifting from P (Park) to any driving
position while the ignition switch is in
the ON position.
The selector lever cannot be moved out
of the P (Park) position and into any of
the other positions if the ignition
switch is placed in the LOCK, OFF or
ACC position or if the key is removed.
DRIVING THE VEHICLE
Page 221 of 331
SSD0863
Overdrive (O/D) OFF switch (if so
equipped)
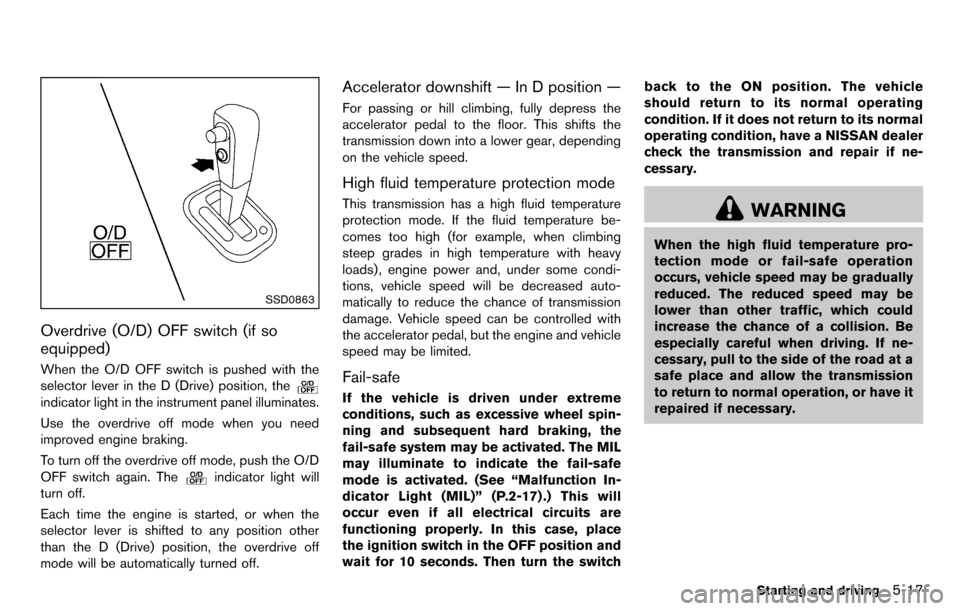
When the O/D OFF switch is pushed with the
selector lever in the D (Drive) position, the
indicator light in the instrument panel illuminates.
Use the overdrive off mode when you need
improved engine braking.
To turn off the overdrive off mode, push the O/D
OFF switch again. The
indicator light will
turn off.
Each time the engine is started, or when the
selector lever is shifted to any position other
than the D (Drive) position, the overdrive off
mode will be automatically turned off.
Accelerator downshift — In D position —
For passing or hill climbing, fully depress the
accelerator pedal to the floor. This shifts the
transmission down into a lower gear, depending
on the vehicle speed.
High fluid temperature protection mode
This transmission has a high fluid temperature
protection mode. If the fluid temperature be-
comes too high (for example, when climbing
steep grades in high temperature with heavy
loads), engine power and, under some condi-
tions, vehicle speed will be decreased auto-
matically to reduce the chance of transmission
damage. Vehicle speed can be controlled with
the accelerator pedal, but the engine and vehicle
speed may be limited.
Fail-safe
If the vehicle is driven under extreme
conditions, such as excessive wheel spin-
ning and subsequent hard braking, the
fail-safe system may be activated. The MIL
may illuminate to indicate the fail-safe
mode is activated. (See “Malfunction In-
dicator Light (MIL)” (P.2-17) .) This will
occur even if all electrical circuits are
functioning properly. In this case, place
the ignition switch in the OFF position and
wait for 10 seconds. Then turn the switch back to the ON position. The vehicle
should return to its normal operating
condition. If it does not return to its normal
operating condition, have a NISSAN dealer
check the transmission and repair if ne-
cessary.
WARNING
When the high fluid temperature pro-
tection mode or fail-safe operation
occurs, vehicle speed may be gradually
reduced. The reduced speed may be
lower than other traffic, which could
increase the chance of a collision. Be
especially careful when driving. If ne-
cessary, pull to the side of the road at a
safe place and allow the transmission
to return to normal operation, or have it
repaired if necessary.
Starting and driving5-17
Page 225 of 331
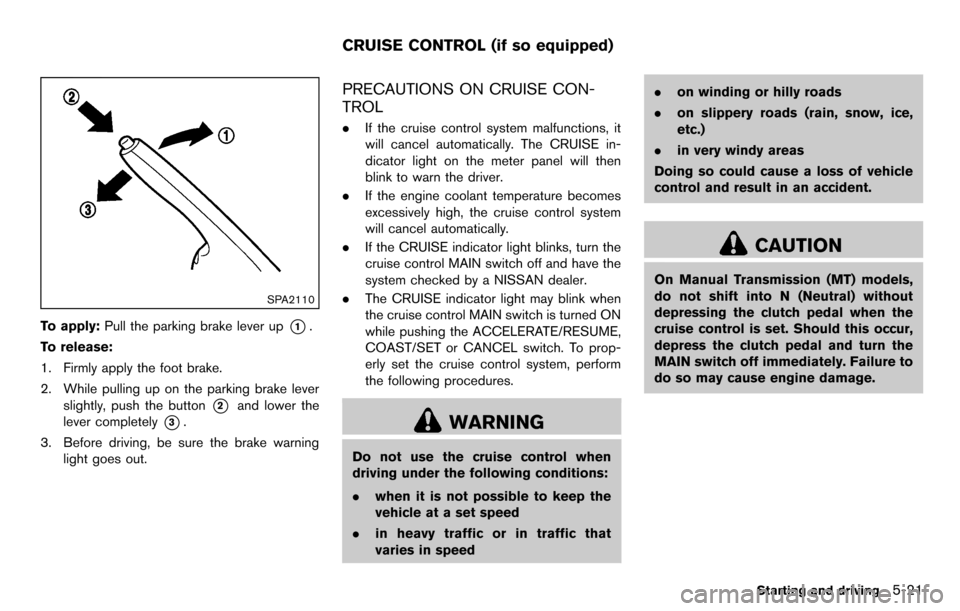
SPA2110
To apply:Pull the parking brake lever up*1.
To release:
1. Firmly apply the foot brake.
2. While pulling up on the parking brake lever slightly, push the button
*2and lower the
lever completely
*3.
3. Before driving, be sure the brake warning light goes out.
PRECAUTIONS ON CRUISE CON-
TROL
.If the cruise control system malfunctions, it
will cancel automatically. The CRUISE in-
dicator light on the meter panel will then
blink to warn the driver.
. If the engine coolant temperature becomes
excessively high, the cruise control system
will cancel automatically.
. If the CRUISE indicator light blinks, turn the
cruise control MAIN switch off and have the
system checked by a NISSAN dealer.
. The CRUISE indicator light may blink when
the cruise control MAIN switch is turned ON
while pushing the ACCELERATE/RESUME,
COAST/SET or CANCEL switch. To prop-
erly set the cruise control system, perform
the following procedures.
WARNING
Do not use the cruise control when
driving under the following conditions:
.when it is not possible to keep the
vehicle at a set speed
. in heavy traffic or in traffic that
varies in speed .
on winding or hilly roads
. on slippery roads (rain, snow, ice,
etc.)
. in very windy areas
Doing so could cause a loss of vehicle
control and result in an accident.
CAUTION
On Manual Transmission (MT) models,
do not shift into N (Neutral) without
depressing the clutch pedal when the
cruise control is set. Should this occur,
depress the clutch pedal and turn the
MAIN switch off immediately. Failure to
do so may cause engine damage.
Starting and driving5-21
CRUISE CONTROL (if so equipped)
Page 227 of 331
CAUTION
During the first 1,200 miles (2,000 km) ,
follow these recommendations to ob-
tain maximum engine performance and
ensure the future reliability and econo-
my of your new vehicle. Failure to
follow these recommendations may
result in shortened engine life and
reduced engine performance.
. Avoid driving for long periods at constant
speed, either fast or slow. Do not run the
engine over 4,000 rpm.
. Do not accelerate at full throttle in any gear.
. Avoid quick starts.
. Avoid hard braking as much as possible. .
Accelerate slowly and smoothly. Maintain
cruising speeds with a constant accelerator
position.
. Drive at moderate speeds on the highway.
Driving at high speed lowers fuel economy.
. Avoid unnecessary stopping and braking.
Keep a safe distance behind other vehicles.
. Select a gear range suitable to road condi-
tions.
. Avoid unnecessary engine idling.
. Keep your engine tuned up.
. Follow the recommended periodic mainte-
nance schedule.
. Keep the tires inflated to the correct
pressure. Low tire pressure increases tire
wear and lowers fuel economy.
. Keep the wheels in correct alignment.
Improper alignment increases tire wear and
lowers fuel economy.
. Air conditioner operation lowers fuel econ-
omy. Use the air conditioner only when
necessary.
. When cruising at highway speeds, it is more
economical to use the air conditioner and
leave the windows closed to reduce drag.
. Use the recommended viscosity engine oil.
(See “Engine oil and oil filter recommenda-
tion” (P.9-5) .)
Starting and driving5-23
BREAK-IN SCHEDULE INCREASING FUEL ECONOMY
Page 228 of 331
5-24Starting and driving
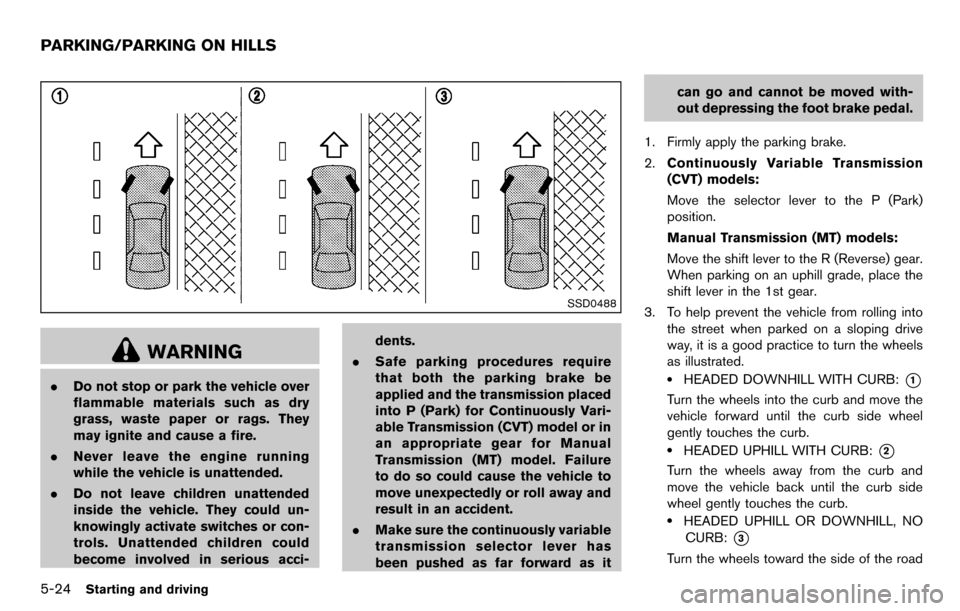
SSD0488
WARNING
.Do not stop or park the vehicle over
flammable materials such as dry
grass, waste paper or rags. They
may ignite and cause a fire.
. Never leave the engine running
while the vehicle is unattended.
. Do not leave children unattended
inside the vehicle. They could un-
knowingly activate switches or con-
trols. Unattended children could
become involved in serious acci- dents.
. Safe parking procedures require
that both the parking brake be
applied and the transmission placed
into P (Park) for Continuously Vari-
able Transmission (CVT) model or in
an appropriate gear for Manual
Transmission (MT) model. Failure
to do so could cause the vehicle to
move unexpectedly or roll away and
result in an accident.
. Make sure the continuously variable
transmission selector lever has
been pushed as far forward as it can go and cannot be moved with-
out depressing the foot brake pedal.
1. Firmly apply the parking brake.
2. Continuously Variable Transmission
(CVT) models:
Move the selector lever to the P (Park)
position.
Manual Transmission (MT) models:
Move the shift lever to the R (Reverse) gear.
When parking on an uphill grade, place the
shift lever in the 1st gear.
3. To help prevent the vehicle from rolling into the street when parked on a sloping drive
way, it is a good practice to turn the wheels
as illustrated..HEADED DOWNHILL WITH CURB:*1
Turn the wheels into the curb and move the
vehicle forward until the curb side wheel
gently touches the curb.
.HEADED UPHILL WITH CURB:*2
Turn the wheels away from the curb and
move the vehicle back until the curb side
wheel gently touches the curb.
.HEADED UPHILL OR DOWNHILL, NOCURB:
*3
Turn the wheels toward the side of the road
PARKING/PARKING ON HILLS
Page 229 of 331
so the vehicle will move away from the
center of the road if it moves.
4. Models with Intelligent Key system:
Place the ignition switch in the OFF position.
Models without Intelligent Key system:
Place the ignition switch in the LOCK
position and remove the key.
WARNING
.If the engine is not running or is
turned off while driving, the power
assist for the steering will not work.
Steering will be harder to operate.
. When the electric power steering
warning light illuminates with the
engine running, the power assist for
the steering will cease operation.
You will still have control of the
vehicle but the steering will be
harder to operate.
The electric power steering system is designed
to provide power assist while driving to operate
the steering wheel with light force.
When the steering wheel is operated repeatedly
or continuously while parking or driving at a very
low speed, the power assist for the steering
wheel will be reduced. This is to prevent
overheating of the electric power steering
system and protect it from getting damaged.
While the power assist is reduced, steering
wheel operation will become heavy. When the
temperature of the electric power steering
system goes down, the power assist level will
return to normal. Avoid repeating such steering wheel operations that could cause the electric
power steering system to overheat.
You may hear a sound when the steering wheel
is operated quickly. However, this is not a
malfunction.
If the electric power steering warning light
illuminates while the engine is running, it may
indicate the electric power steering system is
not functioning properly and may need servicing.
Have the electric power steering system
checked by a NISSAN dealer. (See “Electric
power steering warning light” (P.2-13) .)
When the electric power steering warning light
illuminates with the engine running, the power
assist for the steering will cease operation. You
will still have control of the vehicle. However,
greater steering effort is needed, especially in
sharp turns and at low speeds.
Starting and driving5-25
ELECTRIC POWER STEERING
SYSTEM
Page 237 of 331
6 In case of emergency
Emergency engine shut off (models with Intelligent
Key system) ........................................................................\
........ 6-2
Flat tire ........................................................................\
................. 6-2
Tire Pressure Monitoring System (TPMS) .................... 6-2
Changing a flat tire ............................................................. 6-3
Jump starting ........................................................................\
...... 6-9 Push starting ........................................................................\
... 6-11
If your vehicle overheats ...................................................... 6-11
Towing your vehicle .............................................................. 6-12
Towing recommended by NISSAN ........................... 6-13
Vehicle recovery (freeing a stuck vehicle) ............... 6-15
Page 238 of 331
6-2In case of emergency
To shut off the engine in an emergency situation
while driving, perform the following procedure:
.Rapidly push the push-button ignition switch
3 consecutive times in less than 1.5
seconds, or
. Push and hold the push-button ignition
switch for more than 2 seconds.TIRE PRESSURE MONITORING SYS-
TEM (TPMS)
This vehicle is equipped with the Tire Pressure
Monitoring System (TPMS) . It monitors tire
pressure of all tires except the spare. When
the low tire pressure warning light is lit, and the
CHECK TIRE PRES (pressure) warning mes-
sage is displayed in the vehicle information
display, one or more of your tires is significantly
under-inflated. If the vehicle is being driven with
low tire pressure, the TPMS will activate and
warn you of it by the low tire pressure warning
light. This system will activate only when the
vehicle is driven at speeds above 16 MPH (25
km/h). For more details, see “Warning/indicator
lights and audible reminders” (P.2-11) and “Tire
Pressure Monitoring System (TPMS)” (P.5-3) .
WARNING
.If the low tire pressure warning light
illuminates while driving, avoid sud-
den steering maneuvers or abrupt
braking, reduce vehicle speed, pull
off the road to a safe location and
stop the vehicle as soon as possi-
ble. Driving with under-inflated tires
may permanently damage the tires
and increase the likelihood of tire failure. Serious vehicle damage
could occur and may lead to an
accident and could result in serious
personal injury. Check the tire pres-
sure for all four tires. Adjust the tire
pressure to the recommended COLD
tire pressure shown on the Tire and
Loading Information label to turn
the low tire pressure warning light
OFF. If you have a flat tire, replace it
with a spare tire as soon as possi-
ble.
. When a spare tire is mounted or a
wheel is replaced, the TPMS will not
function and the low tire pressure
warning light will flash for approxi-
mately 1 minute. The light will
remain on after 1 minute. Contact
your NISSAN dealer as soon as
possible for tire replacement and/
or system resetting.
. Replacing tires with those not ori-
ginally specified by NISSAN could
affect the proper operation of the
TPMS.
. Do not inject any tire liquid or
aerosol tire sealant into the tires,
as this may cause a malfunction of
EMERGENCY ENGINE SHUT OFF
(models with Intelligent Key system) FLAT TIRE