key NISSAN CUBE 2012 3.G Quick Reference Guide
[x] Cancel search | Manufacturer: NISSAN, Model Year: 2012, Model line: CUBE, Model: NISSAN CUBE 2012 3.GPages: 20, PDF Size: 1.58 MB
Page 6 of 20

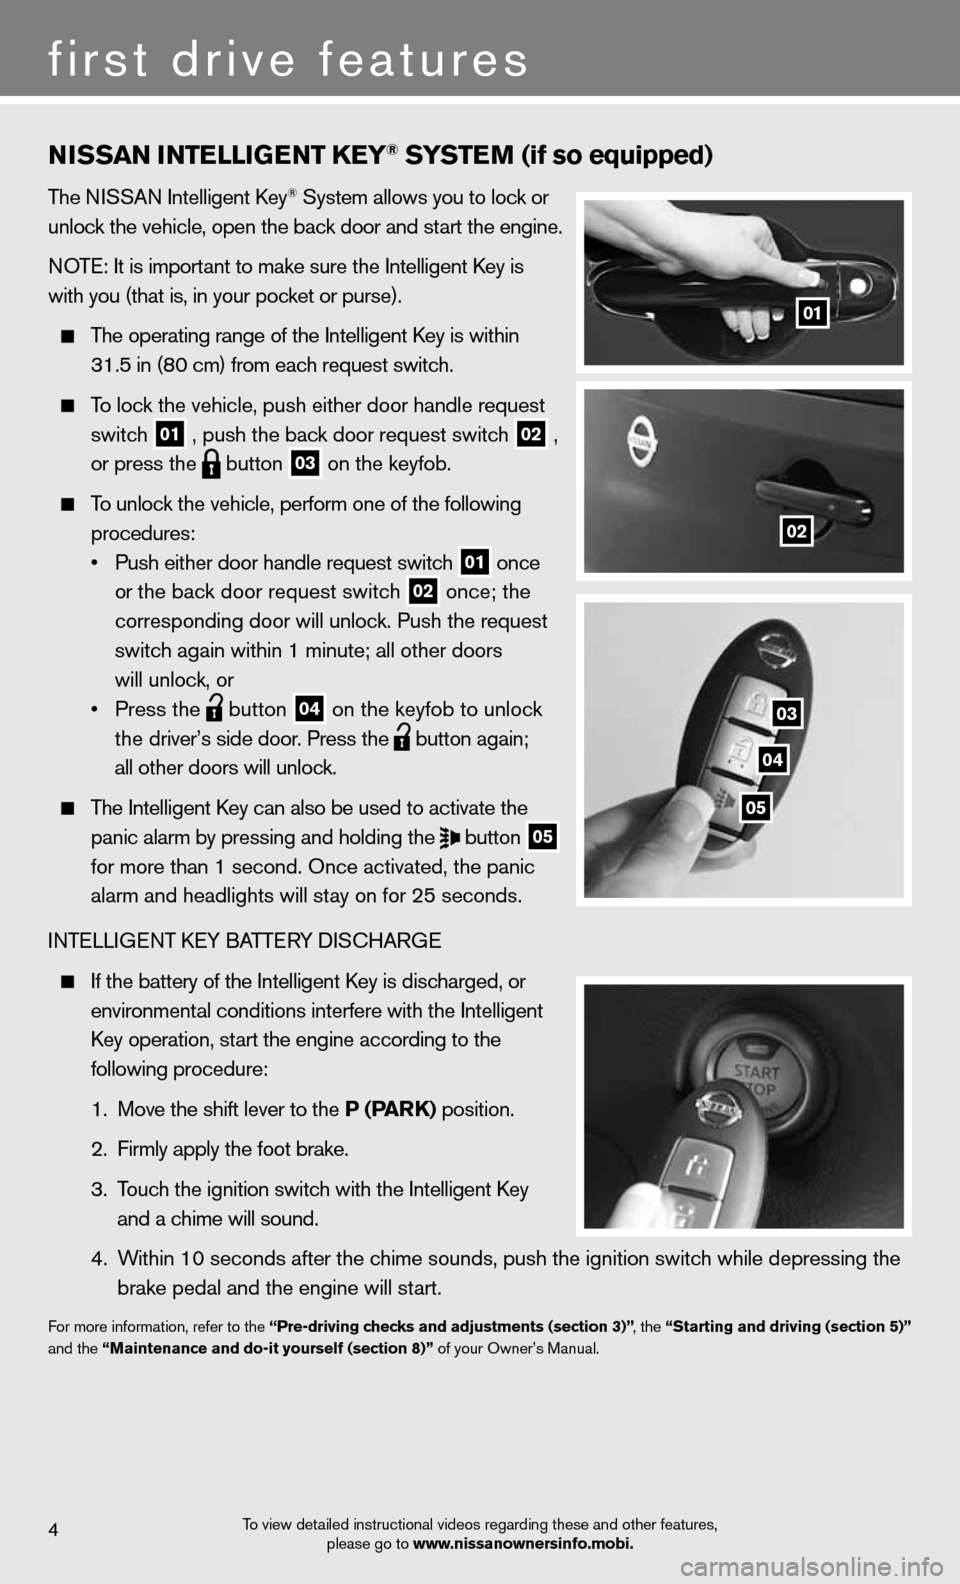
NISSaN INTeLLIGeNT K eY® SYSTe M (if so equipped)
The niSSAn intelligent k ey® System allows you to lock or
unlock the vehicle, open the back door and start the engine.
n OTe: it is important to make sure the intelligent k ey is
with you (that is, in your pocket or purse).
The operating range of the intelligent k ey is within
31.5 in (80 cm) from each request switch.
To lock the vehicle, push either door handle request
switch
01 , push the back door request switch
02 ,
or press the
button
03 on the keyfob.
To unlock the vehicle, perform one of the following
procedures:
• Push either door handle request switch
01 once
or the back door request switch
02 once; the
corresponding door will unlock. Push the request
switch again within 1 minute; all other doors
will unlock, or
• Press the
button
04 on the keyfob to unlock
the driver’s side door. Press the
button again;
all other doors will unlock.
The intelligent k ey can also be used to activate the
panic alarm by pressing and holding the
button
05
for more than 1 second. Once activated, the panic
alarm and headlights will stay on for 25 seconds.
inTe LLiGenT keY BATTe RY diSc HARG e
if the battery of the intelligent k ey is discharged, or
environmental conditions interfere with the intelligent
k ey operation, start the engine according to the
following procedure:
1. Move the shift lever to the P (P arK) position.
2. firmly apply the foot brake.
3. Touch the ignition switch with the intelligent k ey
and a chime will sound.
4. Within 10 seconds after the chime sounds, push the ignition switch while depressing the
brake pedal and the engine will start.
for more information, refer to the “Pre-driving checks and adjustments (section 3)” , the “Starting and driving (section 5)”
and the “Maintenance and do-it yourself (section 8)” of your Owner’s Manual.
4
first drive features
01
02
03
04
05
To view detailed instructional videos regarding these and other features, please go to www.nissanownersinfo.mobi.
Page 7 of 20

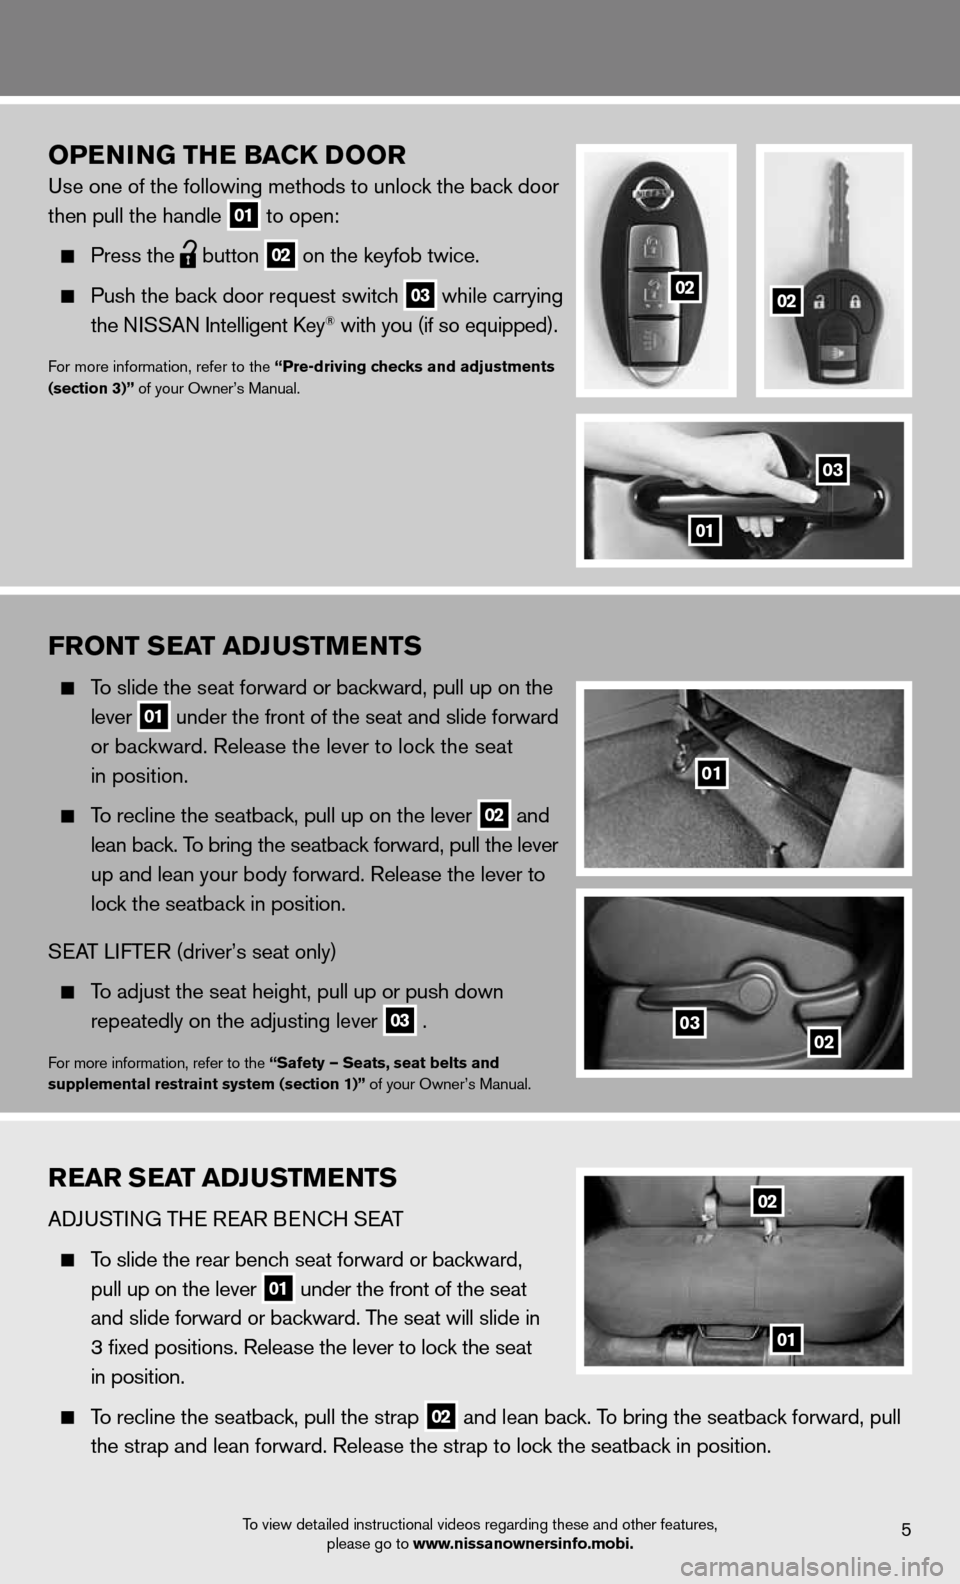
OPeNING TH e BaCK DOOr
use one of the following methods to unlock the back door
then pull the handle
01 to open:
Press the
button
02 on the keyfob twice.
Push the back door request switch
03 while carrying
the ni SSAn intelligent k ey® with you (if so equipped).
for more information, refer to the “Pre-driving checks and adjustments
(section 3)” of your Owner’s Manual.
03
01
5
0203
01
0202
Fr ONT S eaT aDJ uSTM eNTS
To slide the seat forward or backward, pull up on the
lever
01 under the front of the seat and slide forward
or backward. Release the lever to lock the seat
in position.
To recline the seatback, pull up on the lever 02 and
lean back. To bring the seatback forward, pull the lever
up and lean your body forward. Release the lever to
lock the seatback in position.
SeAT LifTe R (driver’s seat only)
To adjust the seat height, pull up or push down
repeatedly on the adjusting lever
03 .
f
or more information, refer to the “Safety — Seats, seat belts and
supplemental restraint system (section 1)” of your Owner’s Manual.
rear S eaT aDJ uSTM eNTS
Ad Ju STin G TH e ReAR B encH SeAT
To slide the rear bench seat forward or backward,
pull up on the lever
01 under the front of the seat
and slide forward or backward. The seat will slide in
3 fixed positions. Release the lever to lock the seat
in position.
To recline the seatback, pull the strap
02 and lean back. To bring the seatback forward, pull
the strap and lean forward. Release the strap to lock the seatback in position.
To view detailed instructional videos regarding these and other features,
please go to www.nissanownersinfo.mobi.
01
02
Page 8 of 20

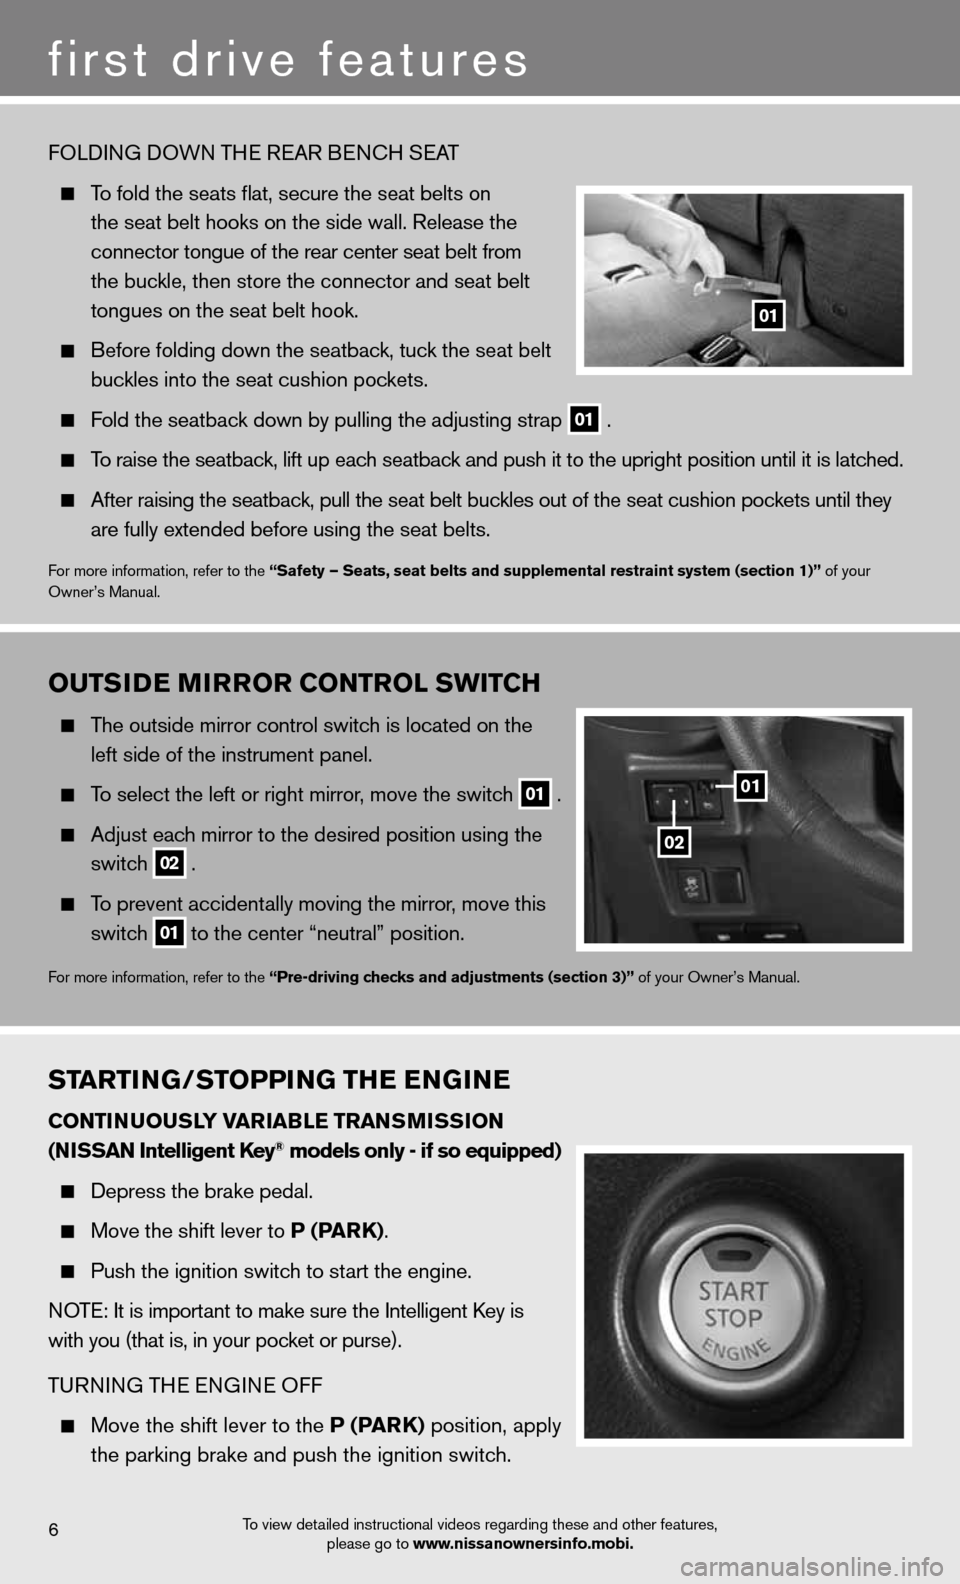
OuTSIDe MIrrOr CONTr OL SwITCH
The outside mirror control switch is located on the
left side of the instrument panel.
To select the left or right mirror, move the switch
01 .
Adjust each mirror to the desired position using the
switch
02 .
To prevent accidentally moving the mirror, move this
switch
01 to the center “neutral” position.
f
or more information, refer to the “Pre-driving checks and adjustments (section 3)” of your Owner’s Manual.
6
first drive features
fOLdinG dOWn TH e ReAR B encH SeAT
To fold the seats flat, secure the seat belts on
the seat belt hooks on the side wall. Release the
connector tongue of the rear center seat belt from
the buckle, then store the connector and seat belt
tongues on the seat belt hook.
Before folding down the seatback, tuck the seat belt
buckles into the seat cushion pockets.
fold the seatback down by pulling the adjusting strap
01 .
To raise the seatback, lift up each seatback and push it to the upright position until it is latched.
After raising the seatback, pull the seat belt buckles out of the seat cushion pockets until they
are fully extended before using the seat belts.
for more information, refer to the “Safety — Seats, seat belts and supplemental restraint system (section 1)” of your
Owner’s Manual.
01
02
01
ST arTING/STOPPING TH e eNGIN e
CONTIN uOu SLY V arIaBLe TraNSMISSION
(NISSaN Intelligent Key® models only - if so equipped)
depress the brake pedal.
Move the shift lever to P (P arK).
Push the ignition switch to start the engine.
n OTe: it is important to make sure the intelligent k ey is
with you (that is, in your pocket or purse).
T uRnin G THe enGine Off
Move the shift lever to the P (P arK) position, apply
the parking brake and push the ignition switch.
To view detailed instructional videos regarding these and other features,
please go to www.nissanownersinfo.mobi.
Page 17 of 20

To interrupt the system voice and give a command quickly, press the
button.
When speaking Phonebook names, please be aware some phones require the la\
st name to be
spoken before the first name. f or example, “Michael Smith” may be spoken as “Smith Michael”.
To increase or decrease the volume of the voice prompts, push the volume \
control switches
or
on the steering wheel or turn the VOL/ON•OFF control knob on the audio
system while the system is responding.
if the Voice Recognition system does not recognize your voice commands, train th\
e system
using the Speaker Adaptation Mode. See your Owner’s Manual for detailed information.
Some commands are not available while the vehicle is in motion.
The “Help” command can be used to hear a list of available commands\
at any time.
Please refer to the cellular phone manufacturer’s Owner’s Manual f\
or detailed information
regarding your Bluetooth phone.
for recommended phones and detailed instructions, please visit
www.nissanusa.com/bluetooth.
cOnnec TinG PROcedu Re
n OTe: The vehicle must be stationary when connecting the phone.
1. Press the
button
on the steering wheel. The system announces the available commands.
2. Say: “connect phone”. The system acknowledges the command and announces the next set
of available commands.
3. Say: “Add phone”. The system acknowledges the command and asks you to initiate
connecting from the phone handset.
4. initiate connecting from the phone:
The connecting procedure varies according to each cellular phone model. f or detailed
connecting instructions and compatible phones, please visit
www.nissanusa.com/bluetooth.
When prompted for a Passkey code, enter “1234” from the handset. (The Passkey code is
assigned by ni SSAn and cannot be changed.)
5. Say a name for the phone when the system asks you to provide one. You can give the phone
a name of your choice.
PHOne BOOk SeTu P
depending on your cell phone, the system may automatically download your \
cell phone’s
entire phonebook to the vehicle’s Bluetooth system.
if the phonebook does not download automatically, 40 entries can be individually downloaded.
To manually download entries:
1. Push the
button on the steering wheel.
2. After the tone, say “Phonebook”.
To view detailed instructional videos regarding these and other features,
please go to www.nissanownersinfo.mobi.15