NISSAN FRONTIER 1999 D22 / 1.G Owners Manual
Manufacturer: NISSAN, Model Year: 1999, Model line: FRONTIER, Model: NISSAN FRONTIER 1999 D22 / 1.GPages: 247, PDF Size: 1.89 MB
Page 221 of 247

Unit: in (mm)
4x2 4x4
Regular Cab King Cab Regular Cab King Cab
Overall length*1 184.3 (4,681.2) 196.1 (4,980.9) 184.3 (4,681.2) 196.1 (4,980.9)
Overall width 66.5 (1,689.1) 66.5 (1,689.1) 71.9 (1,826.3) 71.9 (1,826.3)
Overall height 62.8 (1,595.1) 62.6 (1,590.0) 66.1 (1,678.9) 65.9 (1,673.9)
Front tread 54.9 (1,394.5) 54.9 (1,394.5) 60.0 (1,524.0) 60.0 (1,524.0)
Rear tread 54.7 (1,389.4) 54.7 (1,389.4) 59.3 (1,506.2) 59.3 (1,506.2)
Wheelbase 104.3 (2,649.2) 116.1 (2,948.9) 104.3 (2,649.2) 116.1 (2,948.9)
Gross vehicle weight rating
lb (kg)
See the ``F.M.V.S.S. certification label'' on the driver side lock pillar. Gross axle weight rating
Front lb (kg)
Rear lb (kg)
*1: On step bumper equipped models, the bumper adds 6.6 in (168 mm) to the overall length.
DIMENSIONS AND WEIGHTS
Technical and consumer information10-11
ZX
Page 222 of 247
When planning to drive your NISSAN
vehicle in another country,you should
first find out if the fuel available is suitable
for your vehicle's engine.
Using fuel with too low an octane rating may
cause engine damage. All gasoline vehicles
can be operated with unleaded gasoline.
Therefore, avoid driving your vehicle in ar-
eas where appropriate fuel is not available.
When transferring the registration of
your vehicle to another country, state,
province or district,it may be necessary to
modify the vehicle to meet local laws and
regulations.
The laws and regulations for motor vehicle
emission control and safety standards vary
according to the country, state, province or
district; therefore, vehicle specifications
may differ.
When any vehicle is to be taken into
another country, state, province or dis-
trict and registered, its modifications,
transportation and registration are the
responsibility of the user. NISSAN is not
responsible for any inconvenience that
may result.
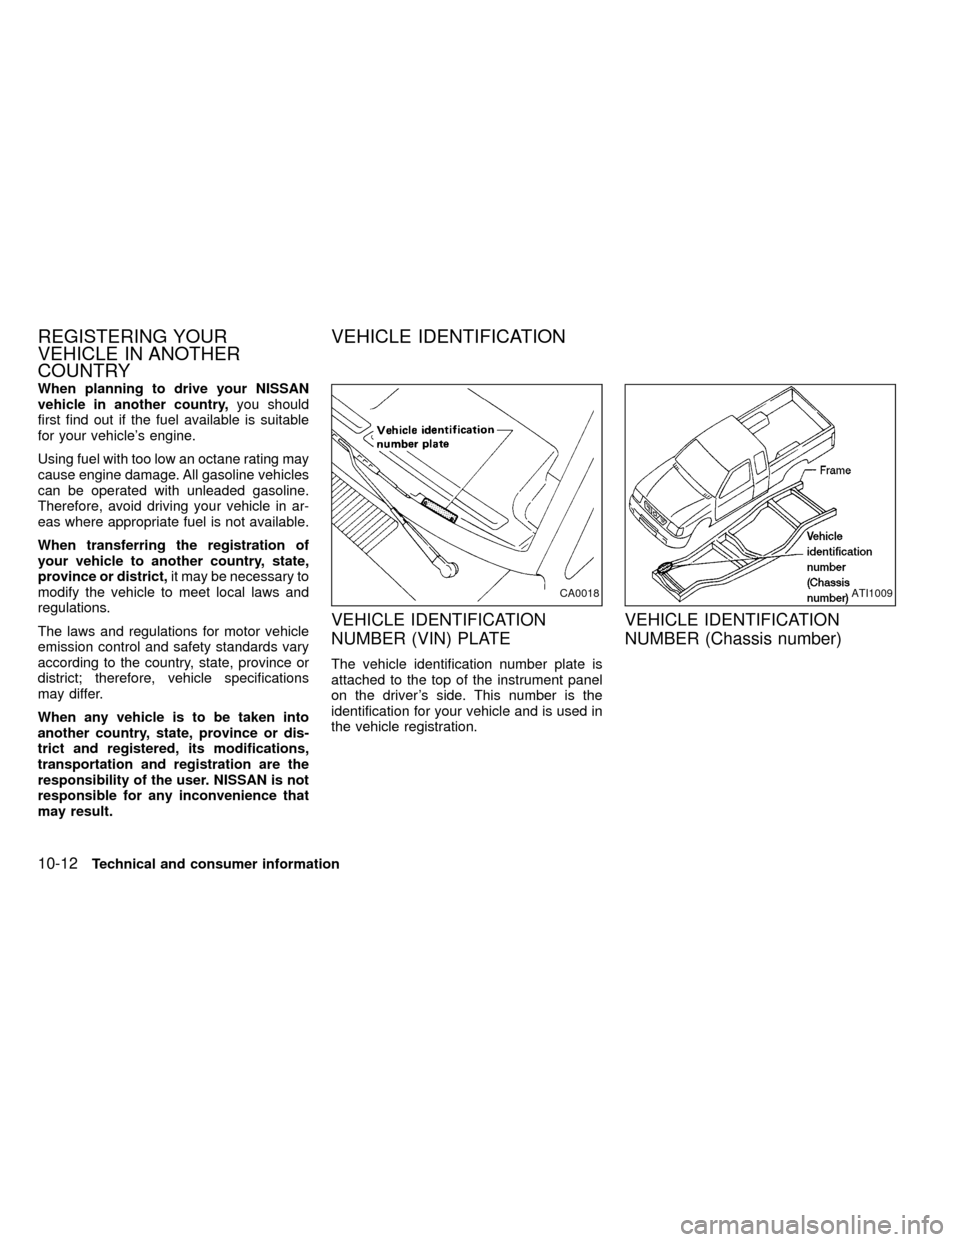
VEHICLE IDENTIFICATION
NUMBER (VIN) PLATE
The vehicle identification number plate is
attached to the top of the instrument panel
on the driver's side. This number is the
identification for your vehicle and is used in
the vehicle registration.
VEHICLE IDENTIFICATION
NUMBER (Chassis number)
CA0018ATI1009
REGISTERING YOUR
VEHICLE IN ANOTHER
COUNTRYVEHICLE IDENTIFICATION
10-12Technical and consumer information
ZX
Page 223 of 247
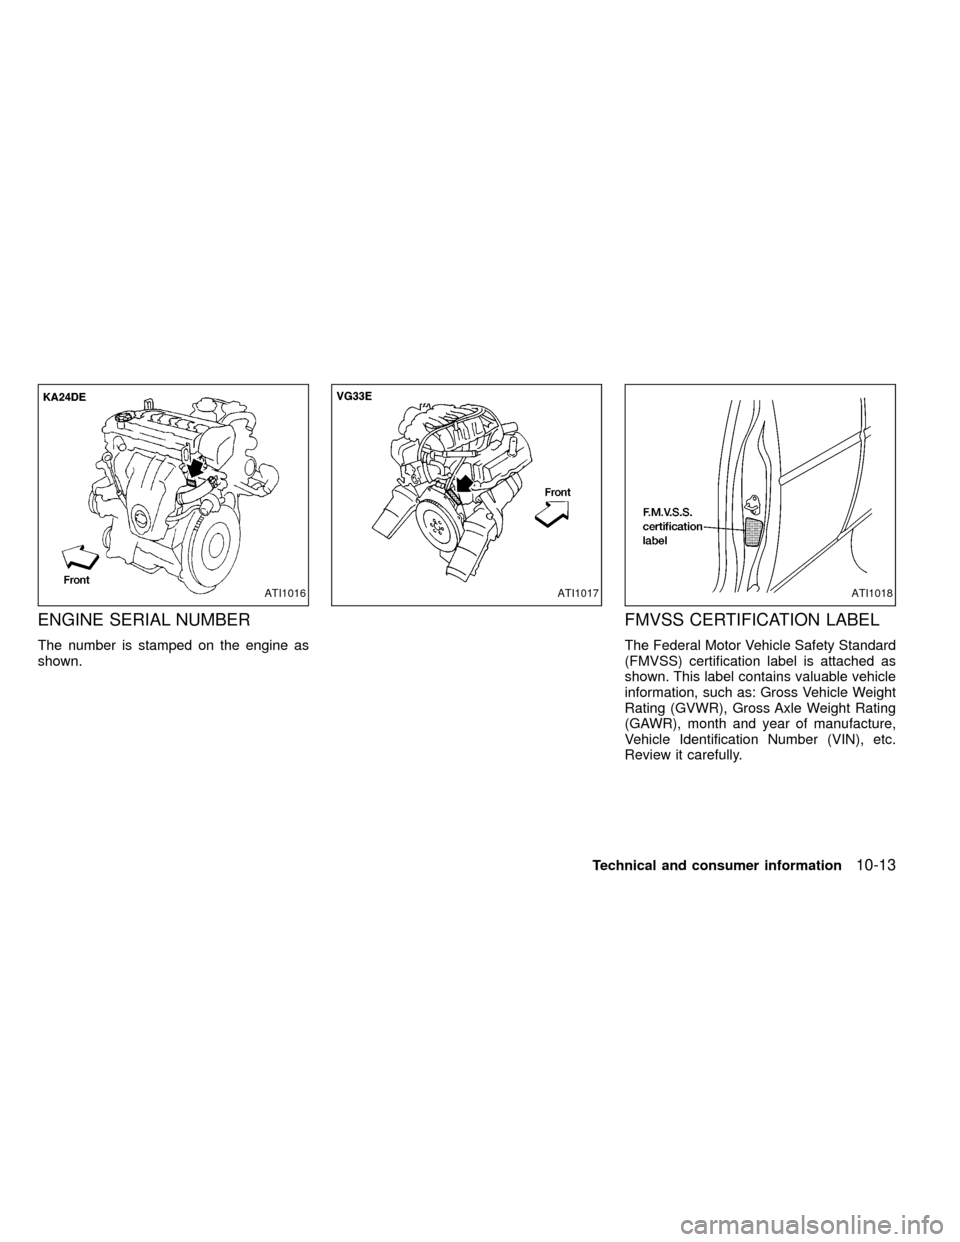
ENGINE SERIAL NUMBER
The number is stamped on the engine as
shown.
FMVSS CERTIFICATION LABEL
The Federal Motor Vehicle Safety Standard
(FMVSS) certification label is attached as
shown. This label contains valuable vehicle
information, such as: Gross Vehicle Weight
Rating (GVWR), Gross Axle Weight Rating
(GAWR), month and year of manufacture,
Vehicle Identification Number (VIN), etc.
Review it carefully.
ATI1016ATI1017ATI1018
Technical and consumer information10-13
ZX
Page 224 of 247
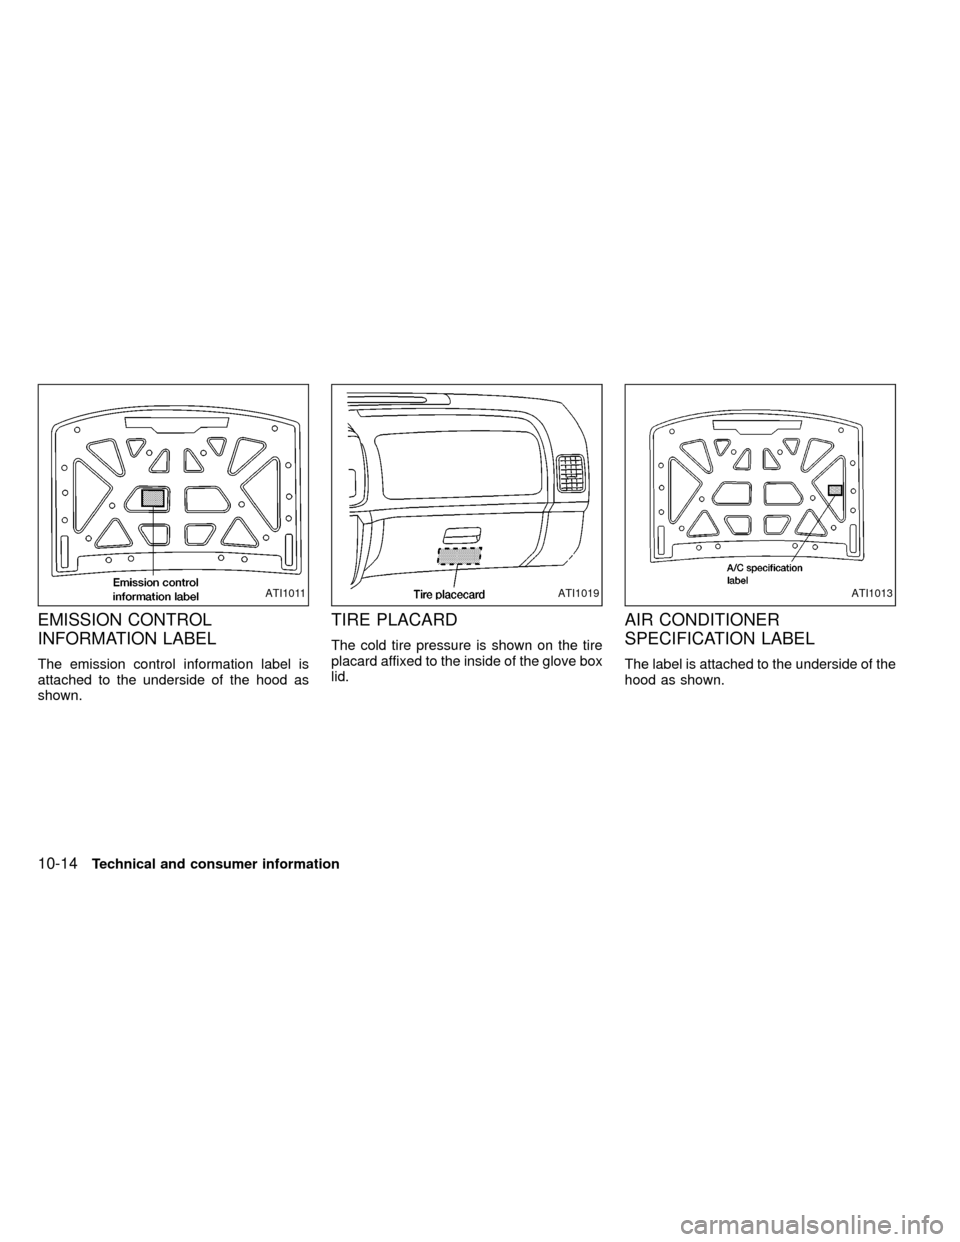
EMISSION CONTROL
INFORMATION LABEL
The emission control information label is
attached to the underside of the hood as
shown.
TIRE PLACARD
The cold tire pressure is shown on the tire
placard affixed to the inside of the glove box
lid.
AIR CONDITIONER
SPECIFICATION LABEL
The label is attached to the underside of the
hood as shown.
ATI1011ATI1019ATI1013
10-14Technical and consumer information
ZX
Page 225 of 247
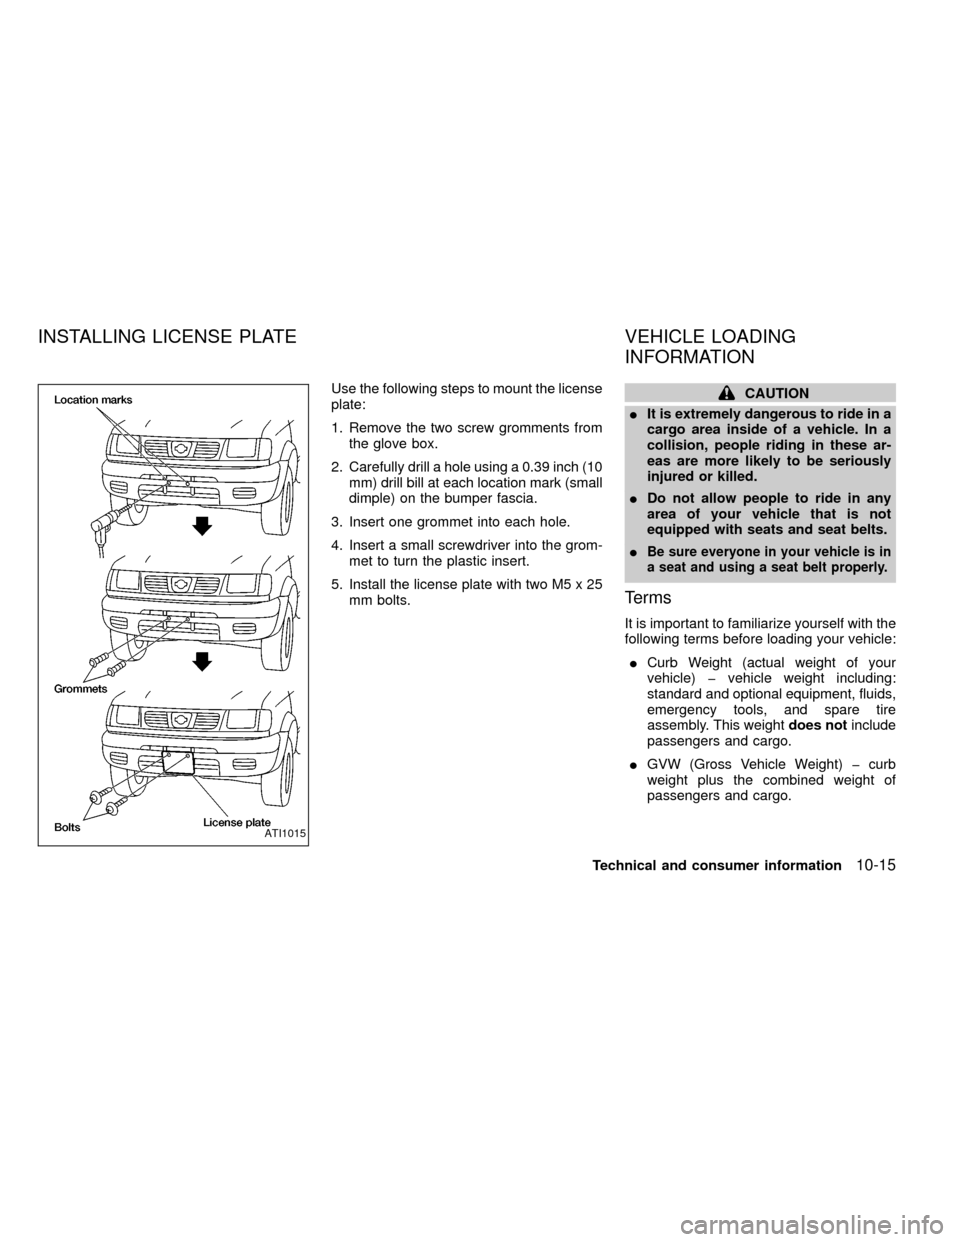
Use the following steps to mount the license
plate:
1. Remove the two screw gromments from
the glove box.
2. Carefully drill a hole using a 0.39 inch (10
mm) drill bill at each location mark (small
dimple) on the bumper fascia.
3. Insert one grommet into each hole.
4. Insert a small screwdriver into the grom-
met to turn the plastic insert.
5. Install the license plate with two M5 x 25
mm bolts.CAUTION
IIt is extremely dangerous to ride in a
cargo area inside of a vehicle. In a
collision, people riding in these ar-
eas are more likely to be seriously
injured or killed.
IDo not allow people to ride in any
area of your vehicle that is not
equipped with seats and seat belts.
I
Be sure everyone in your vehicle is in
a seat and using a seat belt properly.
Terms
It is important to familiarize yourself with the
following terms before loading your vehicle:
ICurb Weight (actual weight of your
vehicle) þ vehicle weight including:
standard and optional equipment, fluids,
emergency tools, and spare tire
assembly. This weightdoes notinclude
passengers and cargo.
IGVW (Gross Vehicle Weight) þ curb
weight plus the combined weight of
passengers and cargo.
ATI1015
INSTALLING LICENSE PLATE VEHICLE LOADING
INFORMATION
Technical and consumer information10-15
ZX
Page 226 of 247
IGVWR (Gross Vehicle Weight Rating) þ
maximum total weight (load) limit speci-
fied for the vehicle.
IGAWR (Gross Axle Weight Rating) þ
maximum weight (load) limit specified
for the front or rear axle.
Determining Vehicle Load Capacity
The load capacity of this vehicle is deter-
mined by weight, not by available cargo
space. For example, a luggage rack, bike
carrier, cartop carrier or similar equipment
does not increase load carrying capacity of
your vehicle.
To determine vehicle load capacity:
Vehicle weight can be determined by using
a commercial-grade scale, found at places
such as a truck stop, gravel quarry, grain
elevator, or a scrap metal recycling facility.
1) Determine the curb weight of your ve-
hicle.
2) Compare the curb weight amount to the
GVWR specified for your vehicle to de-
termine how much more weight your
vehicle can carry.
3) After loading (cargo and passengers),reweigh your vehicle to determine if ei-
ther GVWR or GAWR for your vehicle is
exceeded. If GVWR is exceeded, re-
move cargo as necessary. If either the
front or rear GAWR is exceeded, shift the
load or remove cargo as necessary.
Loading Tips
IThe GVW must not exceed GVWR or
GAWR as specified on the FMVSS Cer-
tification Label.
IDo not load the front and rear axle to the
GAWR. Doing so will exceed the GVWR.
ILoads should be spread out, and cargo
should be properly secured. Large or
heavy objects should be placed toward
the front of the trunk box to help prevent
sliding or shifting.
SECURING THE LOAD
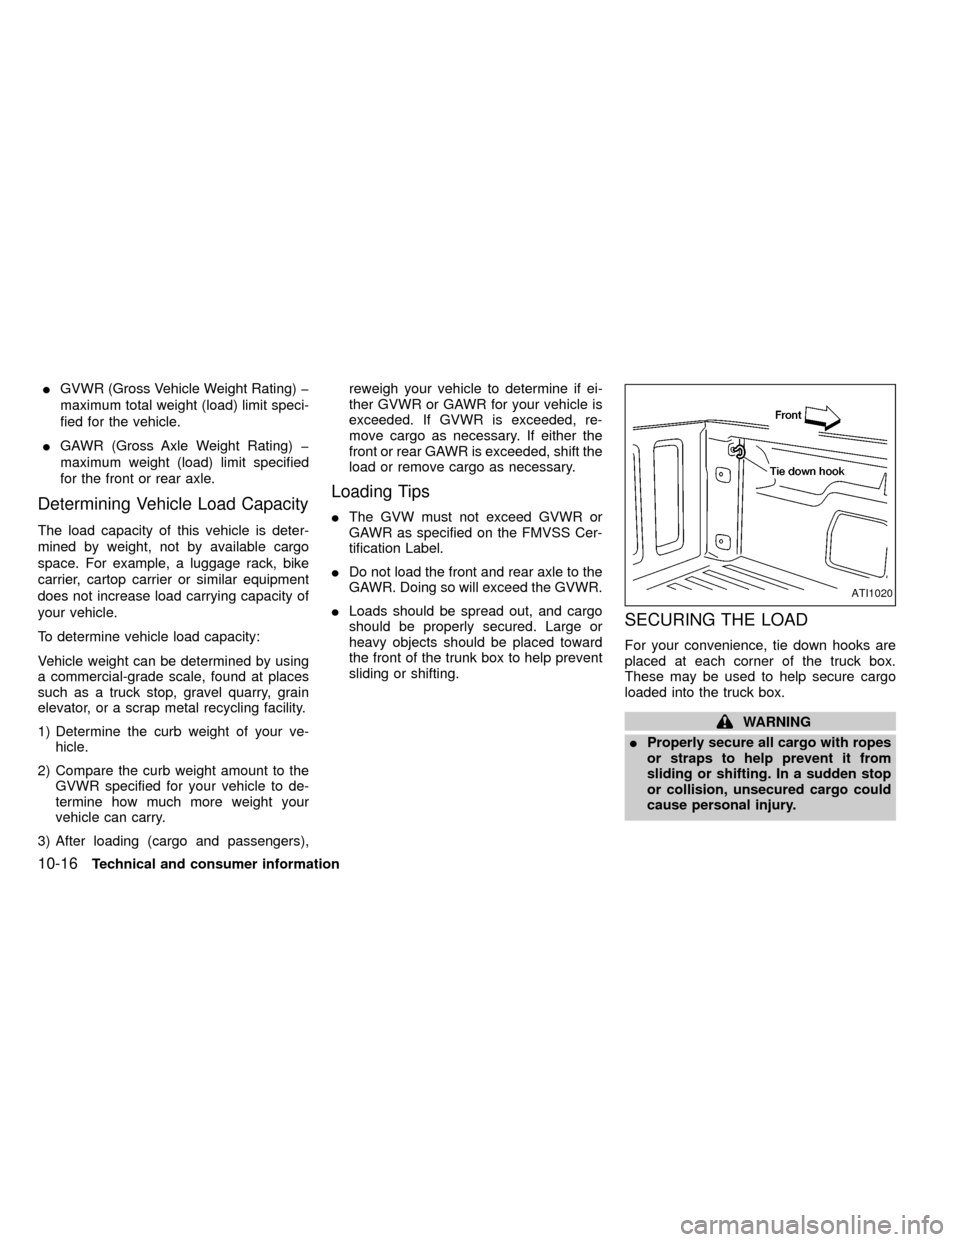
For your convenience, tie down hooks are
placed at each corner of the truck box.
These may be used to help secure cargo
loaded into the truck box.
WARNING
IProperly secure all cargo with ropes
or straps to help prevent it from
sliding or shifting. In a sudden stop
or collision, unsecured cargo could
cause personal injury.
ATI1020
10-16Technical and consumer information
ZX
Page 227 of 247
IDo not place cargo higher than the
seatbacks. In a sudden stop or colli-
sion, unsecured cargo could cause
personal injury.
IDo not load your vehicle any heavier
than the GVWR or the maximum
front and rear GAWR's. If you do,
parts on your vehicle can break, or it
can change the way your vehicle
handles. This could result in loss of
control and cause personal injury.
CAUTION
Overloading can shorten the life of your
vehicle. Failures caused by overloading
are not covered by your warranty.
This information is provided for you to prop-
erly install a slide-in camper and is based on
the National Highway Traffic Safety Admin-
istration regulations. It is recommended
that, before installing the camper, you care-
fully read the following information and en-
sure that the camper meets the specifica-
tions.
This information may not apply to some
Canada model vehicles.
Special body vehicles
Some vehicles are equipped with commer-
cial or camper bodies. However, this Own-
er's Manual does not cover these options.
For further information, please refer to the
body manufacturer's instruction manual.
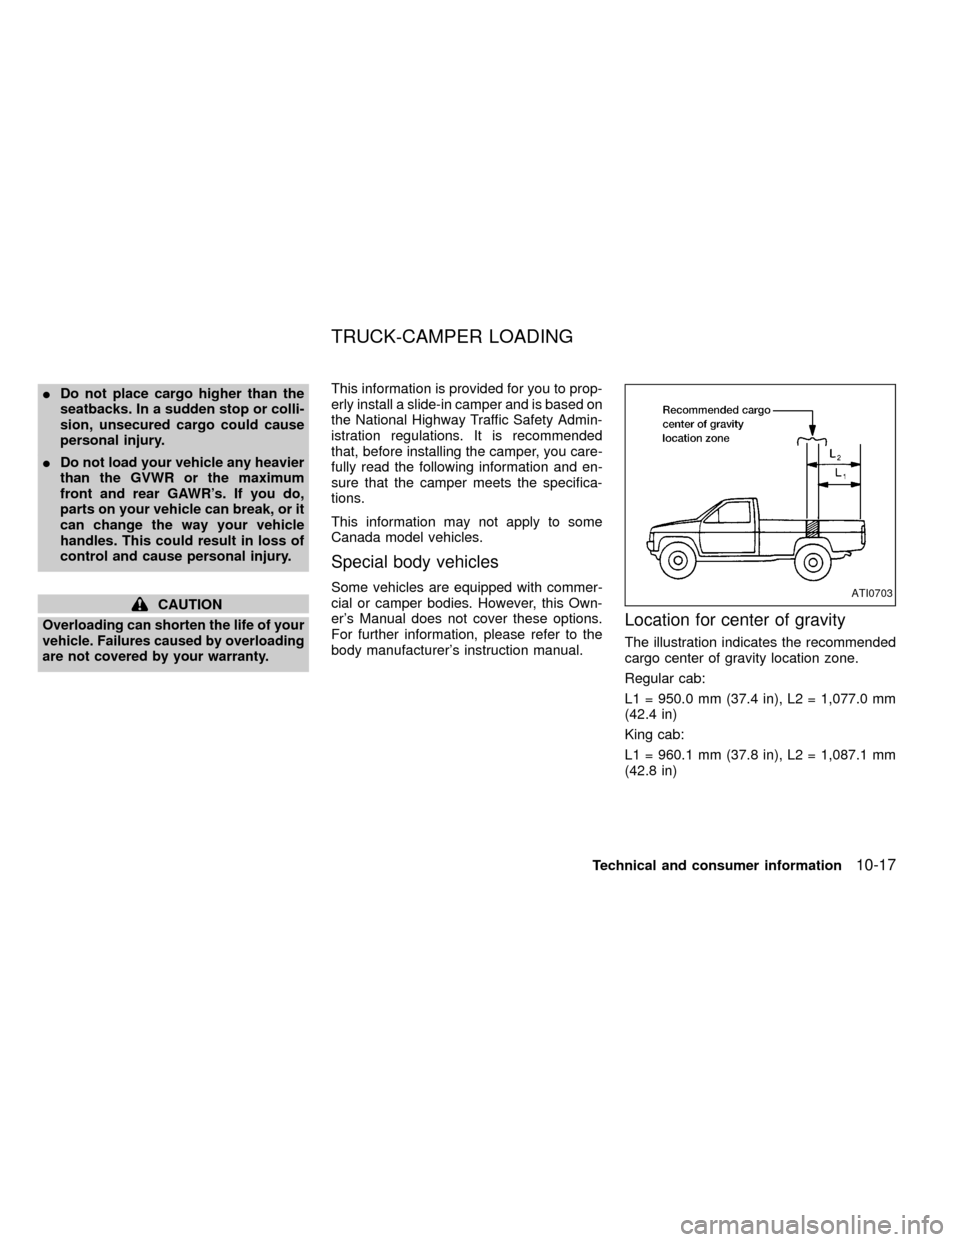
Location for center of gravity
The illustration indicates the recommended
cargo center of gravity location zone.
Regular cab:
L1 = 950.0 mm (37.4 in), L2 = 1,077.0 mm
(42.4 in)
King cab:
L1 = 960.1 mm (37.8 in), L2 = 1,087.1 mm
(42.8 in)
ATI0703
TRUCK-CAMPER LOADING
Technical and consumer information10-17
ZX
Page 228 of 247
WARNING
Improper loading may be dangerous. If
a load is too far back, it can affect
handling characteristics. If a load is too
far forward, the front axle may be over-
loaded.
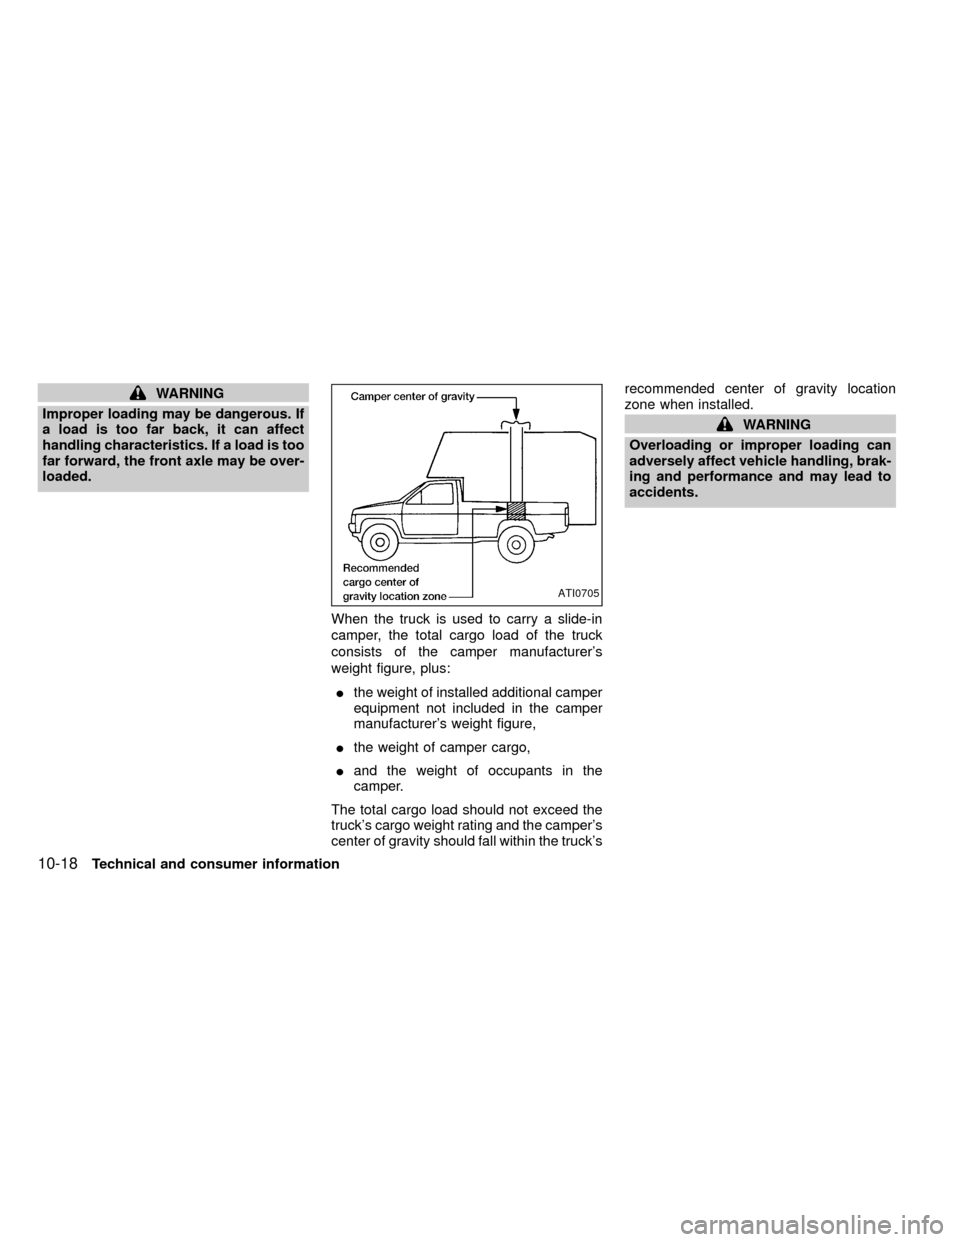
When the truck is used to carry a slide-in
camper, the total cargo load of the truck
consists of the camper manufacturer's
weight figure, plus:
Ithe weight of installed additional camper
equipment not included in the camper
manufacturer's weight figure,
Ithe weight of camper cargo,
Iand the weight of occupants in the
camper.
The total cargo load should not exceed the
truck's cargo weight rating and the camper's
center of gravity should fall within the truck'srecommended center of gravity location
zone when installed.
WARNING
Overloading or improper loading can
adversely affect vehicle handling, brak-
ing and performance and may lead to
accidents.
ATI0705
10-18Technical and consumer information
ZX
Page 229 of 247
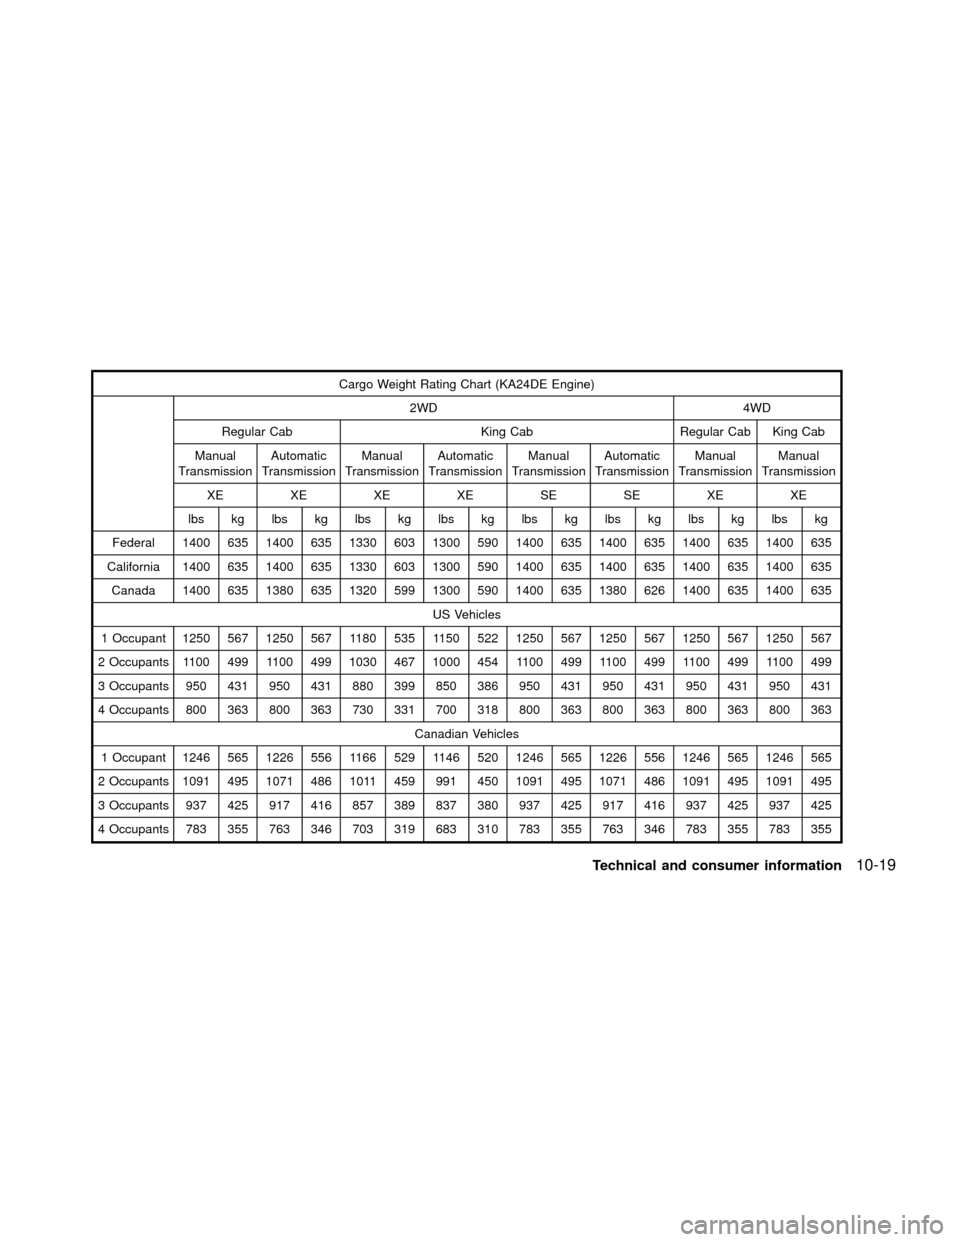
Cargo Weight Rating Chart (KA24DE Engine)
2WD 4WD
Regular Cab King Cab Regular Cab King Cab
Manual
TransmissionAutomatic
TransmissionManual
TransmissionAutomatic
TransmissionManual
TransmissionAutomatic
TransmissionManual
TransmissionManual
Transmission
XE XE XE XE SE SE XE XE
lbs kg lbs kg lbs kg lbs kg lbs kg lbs kg lbs kg lbs kg
Federal 1400 635 1400 635 1330 603 1300 590 1400 635 1400 635 1400 635 1400 635
California 1400 635 1400 635 1330 603 1300 590 1400 635 1400 635 1400 635 1400 635
Canada 1400 635 1380 635 1320 599 1300 590 1400 635 1380 626 1400 635 1400 635
US Vehicles
1 Occupant 1250 567 1250 567 1180 535 1150 522 1250 567 1250 567 1250 567 1250 567
2 Occupants 1100 499 1100 499 1030 467 1000 454 1100 499 1100 499 1100 499 1100 499
3 Occupants 950 431 950 431 880 399 850 386 950 431 950 431 950 431 950 431
4 Occupants 800 363 800 363 730 331 700 318 800 363 800 363 800 363 800 363
Canadian Vehicles
1 Occupant 1246 565 1226 556 1166 529 1146 520 1246 565 1226 556 1246 565 1246 565
2 Occupants 1091 495 1071 486 1011 459 991 450 1091 495 1071 486 1091 495 1091 495
3 Occupants 937 425 917 416 857 389 837 380 937 425 917 416 937 425 937 425
4 Occupants 783 355 763 346 703 319 683 310 783 355 763 346 783 355 783 355
Technical and consumer information10-19
ZX
Page 230 of 247

Cargo Weight Rating Chart (VG33E Engine)
4WD
King Cab
Manual
TransmissionAutomatic
TransmissionManual
TransmissionAutomatic
Transmission
XE XE SE SE
lbs kg lbs kg lbs kg lbs kg
Federal 1288 585 1269 575 1235 560 1213 550
California 1275 580 1256 570 1222 554 1200 544
Canada 1275 580 1256 570 1190 540 1168 530
Federal Vehicles
1 Occupant 1138 517 1119 509 1085 493 1063 483
2 Occupants 988 449 969 441 935 425 913 415
3 Occupants 838 381 819 372 785 357 763 347
4 Occupants 688 313 669 304 635 288 613 278
California Vehicles
1 Occupant 1125 511 1106 503 1072 487 1050 477
2 Occupants 975 443 956 435 922 419 900 409
3 Occupants 825 375 806 367 772 351 750 341
4 Occupants 675 307 656 298 622 283 600 273
Canadian Vehicles
1 Occupant 1125 511 1106 503 1040 473 1018 463
2 Occupants 975 443 956 435 890 405 868 395
3 Occupants 825 375 806 367 740 337 718 326
4 Occupants 675 307 656 298 590 268 568 258Measurement of weights
Secure loose items to prevent weight shifts
that could affect the balance of your vehicle.
When the truck camper is loaded, drive to a
scale and weigh the front and the rear
wheels separately to determine axle loads.
Individual axle loads should not exceed
either of the gross axle weight ratings
(GAWR). The total of the axle loads should
not exceed the gross vehicle weight rating
(GVWR). These ratings are given on the
vehicle certification label that is located on
the driver's door lock pillar. If weight ratings
are exceeded, move or remove items to
bring all weights below the ratings.
10-20Technical and consumer information
ZX