NISSAN FRONTIER 2003 D22 / 1.G Owners Manual
Manufacturer: NISSAN, Model Year: 2003, Model line: FRONTIER, Model: NISSAN FRONTIER 2003 D22 / 1.GPages: 272, PDF Size: 3.67 MB
Page 91 of 272

twice and the horn beeps once as a re-
minder that the doors are already locked.
The horn may or may not beep once.
Refer to “Silencing the horn beep fea-
ture” later in this section for details.
cIf a door is open and you push
the
button, the doors will lock
but the horn will not beep and the hazard
lights will not flash.
Unlocking doors
Push thebutton on the keyfob once.
cOnly the driver’s door unlocks.
cThe interior lights illuminate for 30 seconds
when the interior light switch is in O or DOOR
position.
Push the
button on the keyfob again with 5
seconds.
cAll doors unlock.
The interior lights can be turned off without wait-
ing 30 seconds by inserting the key into the
ignition and turning to the ON or START position,locking the doors with the keyfob or pushing the
interior light switch to the OFF position.
Auto relock
When thebutton on the keyfob is pushed,
all doors will lock automatically within 5 minutes
unless one of the following operations is per-
formed:
cAny door is opened.
cA key is inserted into the ignition switch and
the key is turned from OFF to ON.
WPD0158
Pre-driving checks and adjustments3-5
ZREVIEW COPY:Ð2003 Truck/Frontier(d22)
Owners Manual(owners)ÐUSA English(nna)
01/15/03Ðarosenma
X
Page 92 of 272

Using the panic alarm
If you are near your vehicle and feel threatened,
you may activate the panic alarm to call attention
by pushing and holding the
button on the
keyfob forlonger than 0.5 second.
The panic alarm and headlights will stay on for 30
seconds.
The panic alarm stops when:
cit has run for 30 seconds, or
cthe
orbutton is pushed on the
keyfob.
Silencing the horn beep feature
If desired, the horn beep feature can be deacti-
vated using the keyfob.
To deactivate:Press and hold the
andbuttonsfor at least 2 seconds.
The hazard lights will flash three times to confirm
that the horn beep feature has been deactivated.
To activate:Press and hold the
andbuttonsfor at least 2 seconds
once more.The hazard lights will flash once and the horn will
sound once to confirm that the horn beep feature
has been reactivated.
Deactivating the horn beep feature does not si-
lence the horn if the alarm is triggered.
WPD0159WIC0325
3-6Pre-driving checks and adjustments
ZREVIEW COPY:Ð2003 Truck/Frontier(d22)
Owners Manual(owners)ÐUSA English(nna)
01/15/03Ðarosenma
X
Page 93 of 272

BATTERY REPLACEMENT
Replace the battery in the keyfob as follows:
s1Open the lid using a coin.
s2Remove the battery.
s3Install a new battery with the “+” facing
down.
Recommended battery: Toshiba CR2025 or
equivalent.
s4Close the lid securely.5. Press the
button, then thebutton two or three times to check the key-
fob operation.
If the battery is removed for any reason
other than replacement, perform step 5.
cAn improperly disposed battery can hurt
the environment. Always confirm local
regulations for battery disposal.
cThe keyfob is water-resistant; however,
if it does get wet, immediately wipe com-
pletely dry.
cThe operational range of the keyfob ex-
tends to approximately 33 ft (10 m) from
the vehicle. This range may vary with
conditions.
FCC Notice:
Changes or modifications not expressly ap-
proved by the manufacturer for compliance
could void the user’s authority to operate
the equipment.
This device complies with Part 15 of the FCC
Rules and RSS-210 of Industry Canada.
Operation is subject to the following two
conditions: (1) This device may not cause
harmful interference, and (2) this device
must accept any interference received, in-
cluding interference that may cause undes-
ired operation of the device.
WPD0160
Pre-driving checks and adjustments3-7
ZREVIEW COPY:Ð2003 Truck/Frontier(d22)
Owners Manual(owners)ÐUSA English(nna)
01/15/03Ðarosenma
X
Page 94 of 272
WARNING
cMake sure the hood is completely
closed and latched before driving. Fail-
ure to do so could cause the hood to fly
open and result in an accident.
cIf you see steam or smoke coming from
the engine compartment, to avoid injury
do not open the hood.
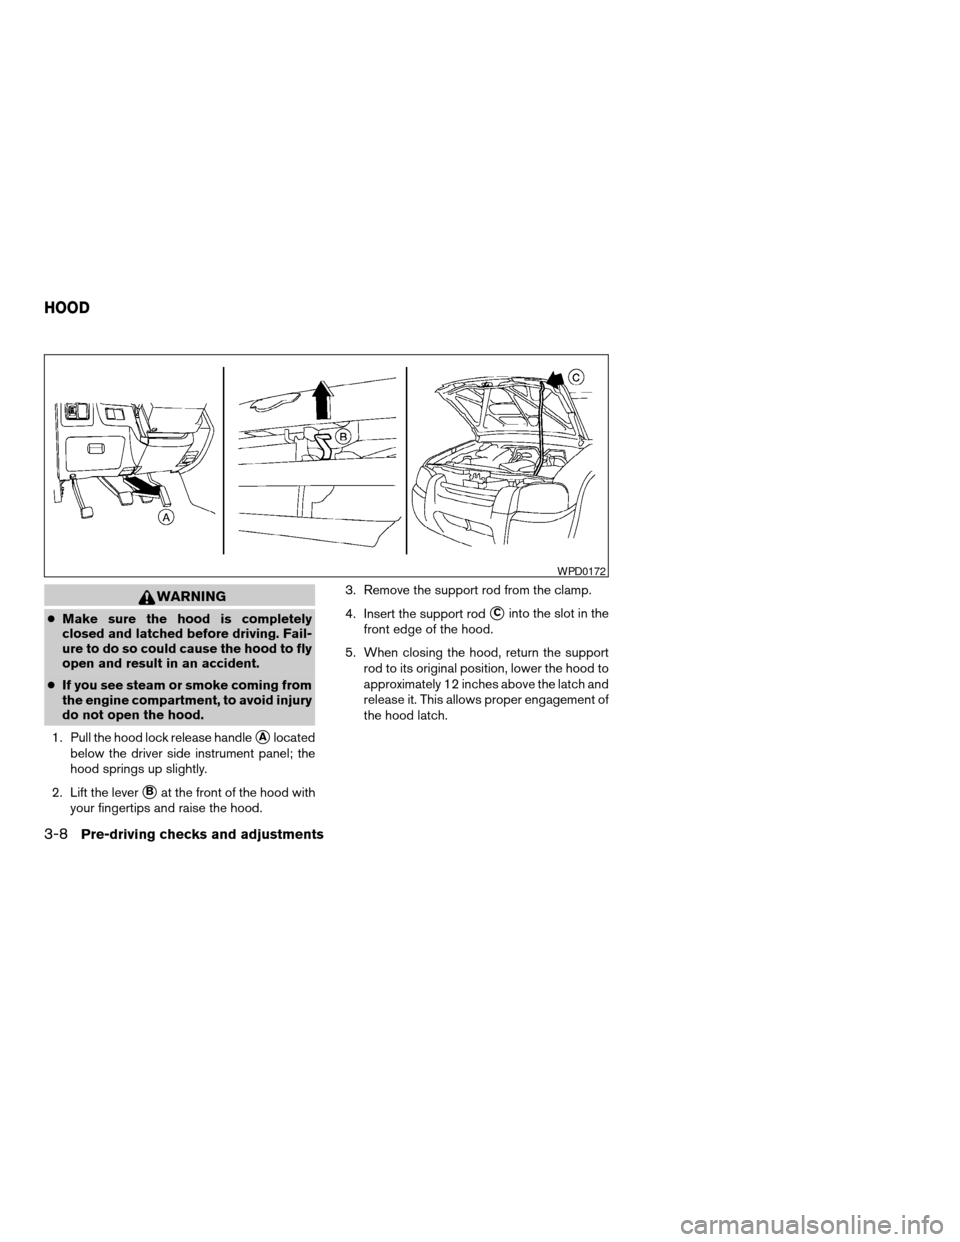
1. Pull the hood lock release handle
sAlocated
below the driver side instrument panel; the
hood springs up slightly.
2. Lift the lever
sBat the front of the hood with
your fingertips and raise the hood.3. Remove the support rod from the clamp.
4. Insert the support rod
sCinto the slot in the
front edge of the hood.
5. When closing the hood, return the support
rod to its original position, lower the hood to
approximately 12 inches above the latch and
release it. This allows proper engagement of
the hood latch.
WPD0172
HOOD
3-8Pre-driving checks and adjustments
ZREVIEW COPY:Ð2003 Truck/Frontier(d22)
Owners Manual(owners)ÐUSA English(nna)
01/15/03Ðarosenma
X
Page 95 of 272
0
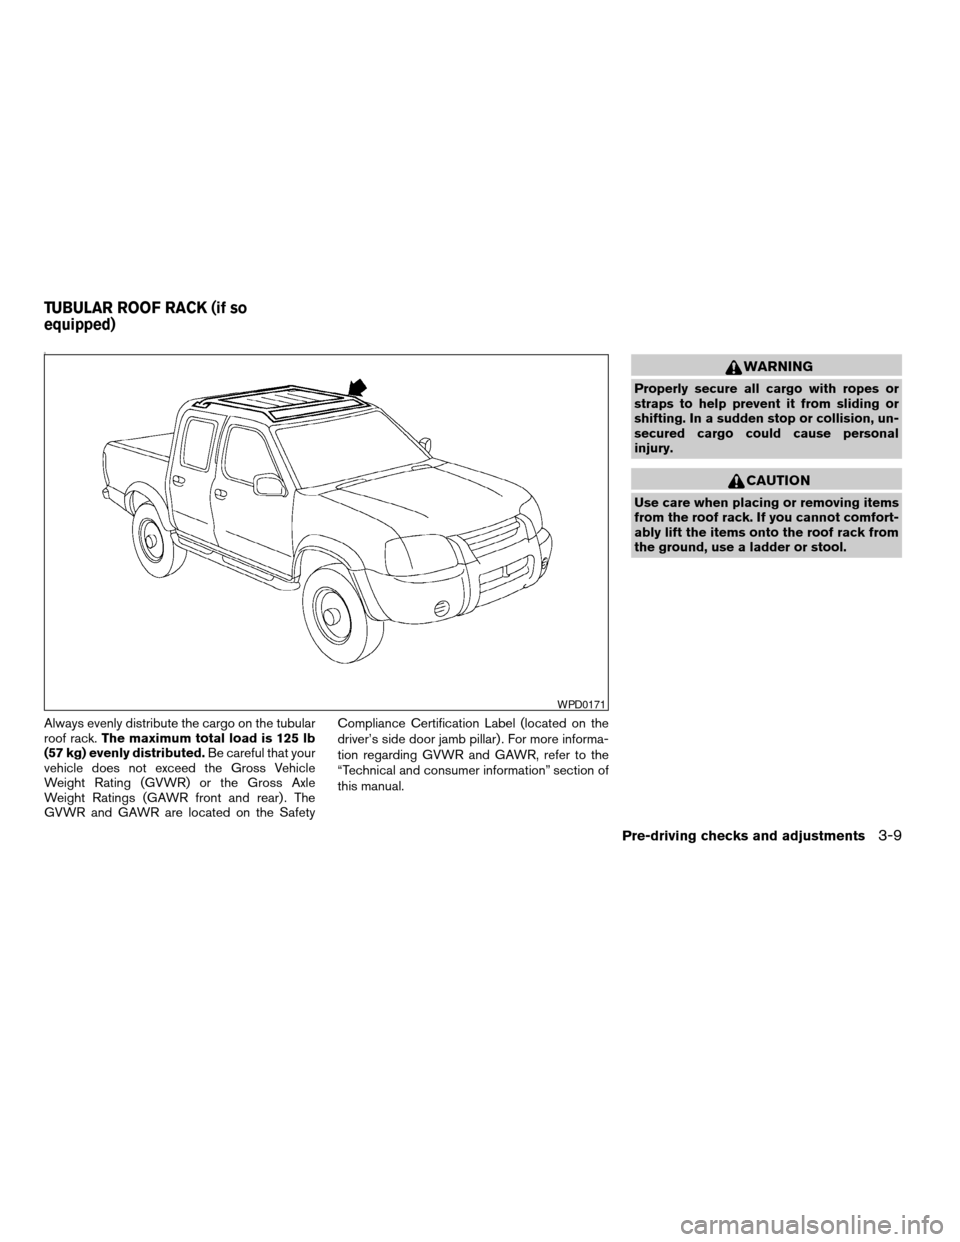
Always evenly distribute the cargo on the tubular
roof rack.The maximum total load is 125 lb
(57 kg) evenly distributed.Be careful that your
vehicle does not exceed the Gross Vehicle
Weight Rating (GVWR) or the Gross Axle
Weight Ratings (GAWR front and rear) . The
GVWR and GAWR are located on the SafetyCompliance Certification Label (located on the
driver’s side door jamb pillar) . For more informa-
tion regarding GVWR and GAWR, refer to the
“Technical and consumer information” section of
this manual.
WARNING
Properly secure all cargo with ropes or
straps to help prevent it from sliding or
shifting. In a sudden stop or collision, un-
secured cargo could cause personal
injury.
CAUTION
Use care when placing or removing items
from the roof rack. If you cannot comfort-
ably lift the items onto the roof rack from
the ground, use a ladder or stool.
WPD0171
TUBULAR ROOF RACK (if so
equipped)
Pre-driving checks and adjustments3-9
ZREVIEW COPY:Ð2003 Truck/Frontier(d22)
Owners Manual(owners)ÐUSA English(nna)
01/15/03Ðarosenma
X
Page 96 of 272

Tubular roof rack crossbar adjustment
The front and rear crossbars can be adjusted
forward, backward, or be removed. Use the
torxdriver located in the tool kit to loosen both
crossbar adjusting screws.To adjust:
1. Loosen the adjusting screws with the
torxdriver by turning counterclockwise.2. When the clamp is loosened, move the
crossbars so the cargo can be positioned
between the crossbars.
3. Tighten the crossbar adjusting screws with
the torxdriver by turning clockwise.
4. Secure the cargo with rope.
5. Always check the tightness of the crossbar
adjusting screws.
To remove:
1. Loosen the adjusting screws with the
torxdriver by turning counterclockwise.
2. Rotate the clamps.
3. Remove the crossbars.
4. Reverse to install.
5. Always check the tightness of the crossbar
adjusting screws.
If you hear wind noise coming from the roof rack
while driving, adjust the roof rack crossbars to the
most rearward position.
AIC1147
3-10Pre-driving checks and adjustments
ZREVIEW COPY:Ð2003 Truck/Frontier(d22)
Owners Manual(owners)ÐUSA English(nna)
01/15/03Ðarosenma
X
Page 97 of 272
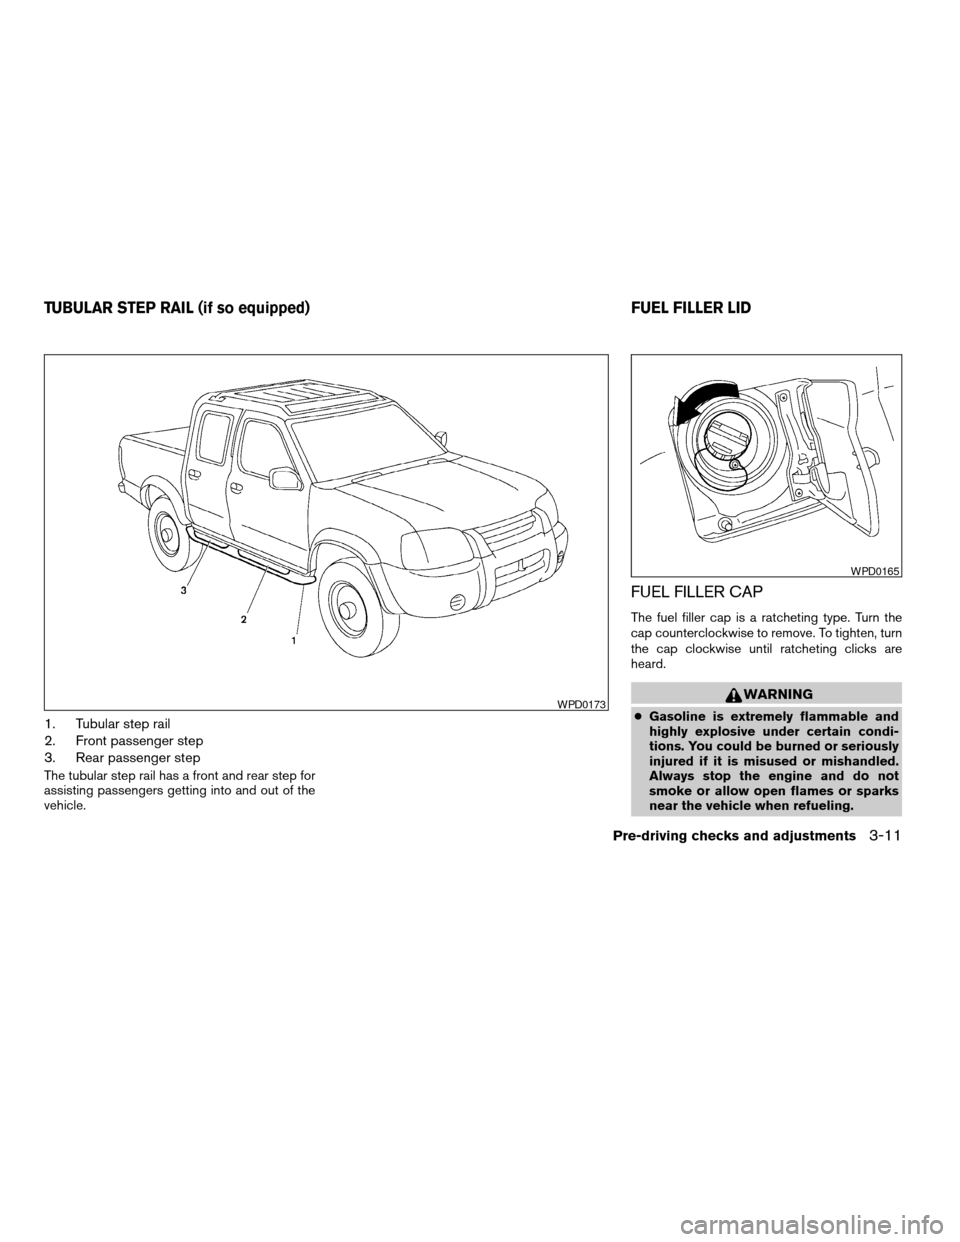
1. Tubular step rail
2. Front passenger step
3. Rear passenger step
The tubular step rail has a front and rear step for
assisting passengers getting into and out of the
vehicle.
FUEL FILLER CAP
The fuel filler cap is a ratcheting type. Turn the
cap counterclockwise to remove. To tighten, turn
the cap clockwise until ratcheting clicks are
heard.
WARNING
cGasoline is extremely flammable and
highly explosive under certain condi-
tions. You could be burned or seriously
injured if it is misused or mishandled.
Always stop the engine and do not
smoke or allow open flames or sparks
near the vehicle when refueling.WPD0173
WPD0165
TUBULAR STEP RAIL (if so equipped) FUEL FILLER LID
Pre-driving checks and adjustments3-11
ZREVIEW COPY:Ð2003 Truck/Frontier(d22)
Owners Manual(owners)ÐUSA English(nna)
01/15/03Ðarosenma
X
Page 98 of 272
cFuel may be under pressure. Turn the
cap a third turn, and wait for any “hiss-
ing” sound to stop to prevent fuel from
spraying out and possibly causing per-
sonal injury. Then remove the cap.
cDo not attempt to top off the fuel tank
after the fuel pump nozzle shuts off
automatically. Continued refueling may
cause fuel overflow, resulting in fuel
spray and possibly a fire.
cUse only an original equipment type
fuel filler cap as a replacement. It has a
built-in safety valve needed for proper
operation of the fuel system and emis-
sion control system. An incorrect cap
can result in a serious malfunction and
possible injury. It could also cause the
malfunction indicator lamp to come on.
cNever pour fuel into the throttle body to
attempt to start your vehicle.cDo not fill a portable fuel container on a
truck bed liner, rubber truck bed mad,
or other insulating material. Static elec-
tricity can cause an explosion of flam-
mable liquid, vapor or gas in any vehicle
or trailer. To reduce the risk of serious
injury or death when filling portable fuel
containers:
– Always place the container on the
ground when filling.
– Do not use electronic devices when
filling.
– Keep the pump nozzle in contact
with the container while you are fill-
ing it.
– Use only approved portable fuel con-
tainers for flammable liquid.
CAUTION
cIf fuel is spilled on the vehicle body,
flush it away with water to avoid paint
damage.cTighten until the fuel filler cap clicks.
Failure to tighten the fuel filler cap
properly may cause the
mal-
function indicator lamp (MIL) to illumi-
nate. If the
lamp illuminates be-
cause the fuel filler cap is loose or
missing, tighten or install the cap and
continue to drive the vehicle.
The
lamp should turn off after a
few driving trips. If the
lamp
does not turn off after a few driving
trips, have the vehicle inspected by a
NISSAN dealer.
cFor additional information, see the
“Malfunction indicator lamp (MIL)” in
the “Instruments and Controls” section
earlier in this manual.
3-12Pre-driving checks and adjustments
ZREVIEW COPY:Ð2003 Truck/Frontier(d22)
Owners Manual(owners)ÐUSA English(nna)
01/15/03Ðarosenma
X
Page 99 of 272
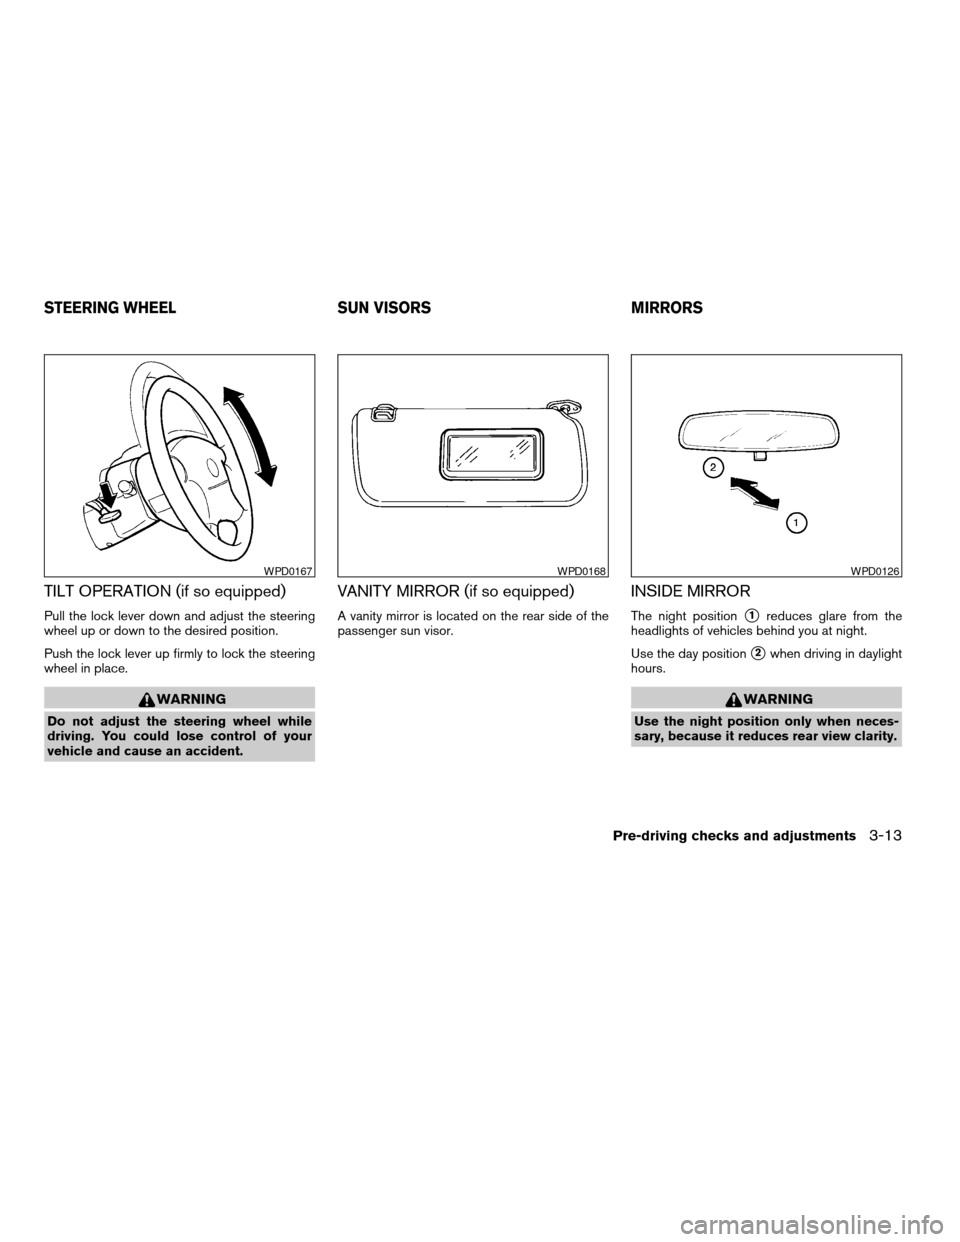
TILT OPERATION (if so equipped)
Pull the lock lever down and adjust the steering
wheel up or down to the desired position.
Push the lock lever up firmly to lock the steering
wheel in place.
WARNING
Do not adjust the steering wheel while
driving. You could lose control of your
vehicle and cause an accident.
VANITY MIRROR (if so equipped)
A vanity mirror is located on the rear side of the
passenger sun visor.
INSIDE MIRROR
The night positions1reduces glare from the
headlights of vehicles behind you at night.
Use the day position
s2when driving in daylight
hours.
WARNING
Use the night position only when neces-
sary, because it reduces rear view clarity.
WPD0167WPD0168WPD0126
STEERING WHEEL SUN VISORS MIRRORS
Pre-driving checks and adjustments3-13
ZREVIEW COPY:Ð2003 Truck/Frontier(d22)
Owners Manual(owners)ÐUSA English(nna)
01/15/03Ðarosenma
X
Page 100 of 272

OUTSIDE MIRRORS
The outside mirrors can be moved in any direc-
tion for a better rear view.
Type A: Adjust to the desired position by moving
the entire mirror assembly.
Type B: Adjust to the desired position by press-
ing directly on the mirror surface.
Foldable outside mirrors
Push the mirrors backward to fold them.
Type A
WPD0169
Type B
WPD0170WPD0056
3-14Pre-driving checks and adjustments
ZREVIEW COPY:Ð2003 Truck/Frontier(d22)
Owners Manual(owners)ÐUSA English(nna)
01/15/03Ðarosenma
X