headlamp NISSAN GT-R 1998 Service Manual
[x] Cancel search | Manufacturer: NISSAN, Model Year: 1998, Model line: GT-R, Model: NISSAN GT-R 1998Pages: 230, PDF Size: 12.66 MB
Page 20 of 230

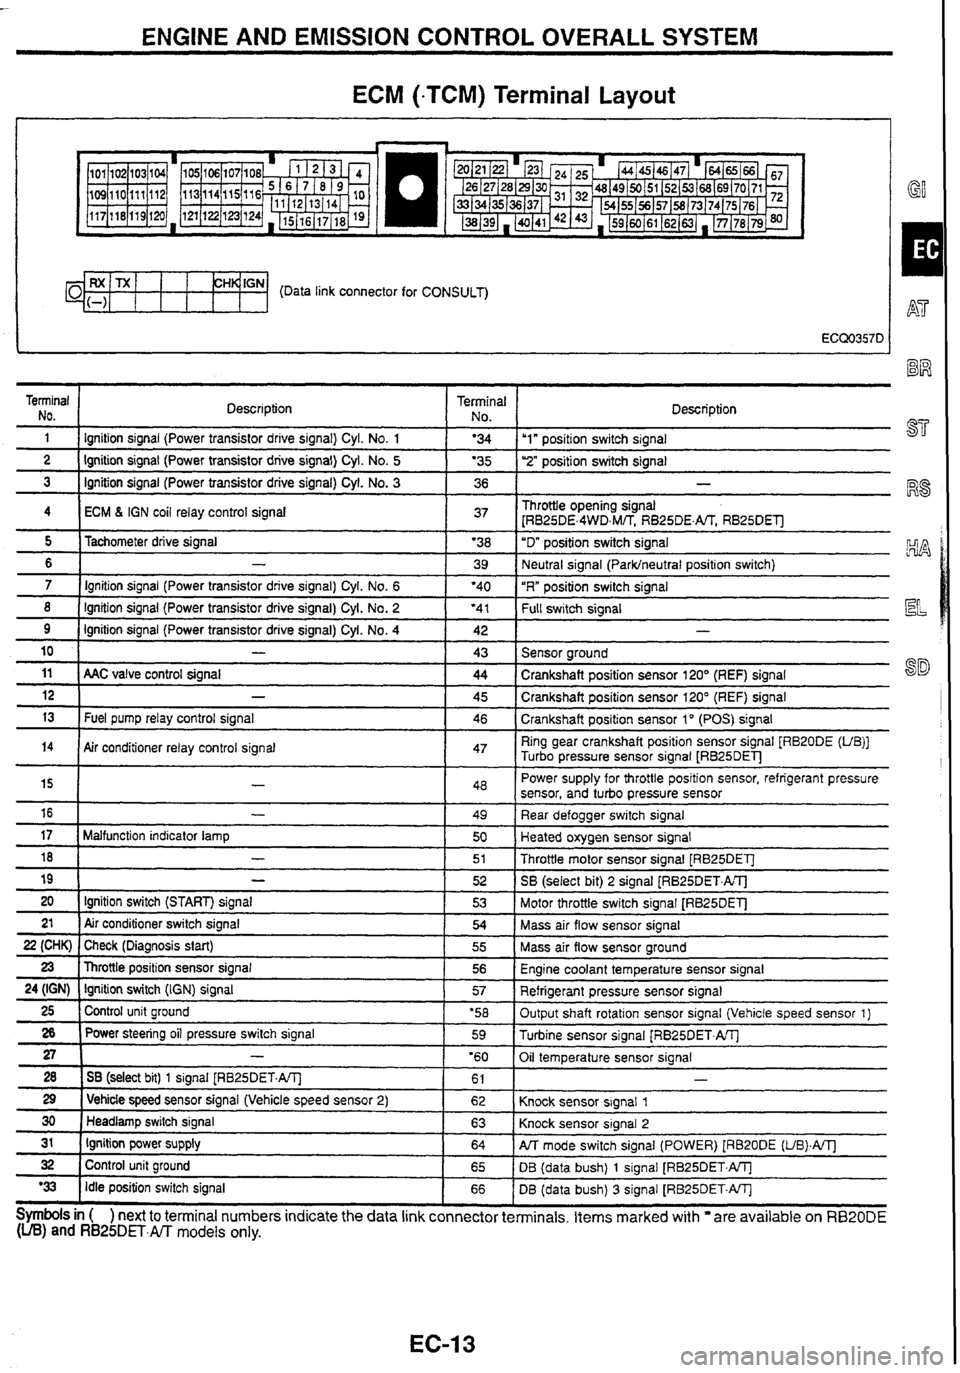
ENGINE AND EMISSION CONTROL OVERALL SYSTEM
ECM (-TCM) Terminal Layout
I GY
CH~'GN- (Data link connector for CONSULT)
Terminal NO.
1 Description Terminal 1 No I Description - - 1 I lgnition
signal (Power transistor drrve signal) Cyl. No. 1 1 '34 Iu1" positron switch signal -- ---- 2 1 Ignition signal (Power transistor drive signal) Cyl. No. 5 1 '35 1 ''2" posifion switch signal - - 3 1 Ignition signal (Power transistor drive signal) Cyl. No. 3 1 36 1 -
4 I ECM 6 IGN coil relay control signal 1 37 1 Throttle opening signal
[RB25DE.4WD,M/TS RB25DE.m RB25DEll
- - - -- - - - - 8 ( Ignition signal (Power transistor drive signal) Cyl. No. 2 ( '41 1 f-k swltch signal
5
6
7
11 ( AAC valve control signal ( 44 1 Crankshaft position sensor 120' (REF) signal
Tachometer
drive signal
-
Ignition signal (Power transistor drive signal) Cyl. No. 6
9
10
'38
39
'40
Ignition signal (Power transistor drive signal)
Cyl.
No. 4
-
12
13
"D" position switch signal
Neutral signal
(Parklneutral position switch)
"R" position switch signal
14
Symbols in ( ) next to terminal numbers indicate the data link connector terminals. Items marked with are available on RB20DE (UB) and RB25DET.m models only.
42
43
-
Fuel pump relay control signal
15
16
17
18
19
20 21
22 (CHK)
23
24 (IGN)
25
26
27
28
29
30
31
32
'33
- -
Sensor around
Air conditioner relay control signal 45
46
-
-
Malfunction indicator lamp
-
-
Ignition switch (START) signal
Air conditioner switch signal
Check (Diagnosis start)
Throttle position sensor signal
Ignition switch
(IGN) signal
Control unit ground
Power steering oil pressure switch signal
-
1 SB (select bit) 1 signal [RB25DET.A/Tl
1 Vehicle speed sensor signal (Vehicle speed sensor 2)
Headlamp switch signal
Ignition power supply
Control unit ground
Idle position switch signal Crankshaft
position sensor 120" (REF) signal
Crankshaft position sensor 1
" (POS) signal
47 Ring gear crankshaft position sensor signal [RB20DE (UB)]
Turbo pressure sensor signal
LRB25DEl-J
48
49
50
51
52
53
54
55
56
57
'58 59
'60 61
62
63
64
65
66 Power
supply for throttle position sensor, refrigerant pressure
sensor, and turbo pressure sensor
Rear defogger switch signal
Heated oxygen sensor signal
Throttle motor sensor signal [RB25DET]
SB
(select bit)
2 signal (RB25DET.ATJ
Motor throttle switch signal
[RB25DET]
Mass air flow sensor signal
Mass air flow sensor ground
Engine coolant temperature sensor signal
Refrigerant pressure sensor signal
Output shaft rotation sensor signal (Vehicle speed sensor 1)
Turbine sensor signal
[RB25DET.AlTj
Oil temperature sensor signal
Knock sensor signal
1
Knock sensor signal 2
PJT mode switch signal (POWER) [RB20DE (UB).A/Tl
DB (data bush) 1 signal [RB25DET.W
DB (data bush)
3 signal [RB25DET.W
Page 165 of 230

ELECTRICAL SYSTEM
SECTION EL
CONTENTS
CENTRAL DOOR LOCK SYSTEM ................................. 2
Component Parts Location .......................................... 2
Circuit Diagram ............................................................ 2
Combination Meter (meter control unit) Input/
Output Signal Specifications
........................................ 2
Inspection before Trouble Diagnoses ......................... -3
Trouble Diagnoses ....................................................... 3
REMOTE CONTROL ENTRY SYSTEM .......................... 4
Component Parts Location .......................................... 4
Circuit Diagram ............................................................ 4
Remote Control Entry Control Unit Input/Output
Signal Specifications
.................................................... 5
System Check ............................................................. -5
Inspection before Trouble Diagnoses .......................... 6
Trouble Diagnoses ....................................................... 6
Component Parts inspection ....................................... 6
ID Code Entry Procedure ............................................ 7
POWER WINDOW SYSTEM ........................................... 8
System Description ..................................................... -8
Precautions ................................................................. -8
Component Parts Location .......................................... 8
Circuit Diagram ............................................................ 9
Power Window Main Switch Input/Output Signal
Specifications
............................................................... 9
Inspection before Trouble Diagnoses ........................ 11
Trouble Diagnoses .................................................... 11
SUNROOF SYSTEM ...................................................... 12
Component Parts Location ........................................ 12
Circuit Diagram .......................................................... 12
Sunroof Switch and Sunroof Motor Assembly
lnputiOutput Signal Specifications
............................. 12
AUTO LIGHT SYSTEM ................................................. 1 3
Component Parts Location ........................................ 13
Auto Light Control Unit Input/Output Signal
Specifications
............................................................. 13
Circuit Diagram ........................................................ 14
Trouble Diagnoses .................................................. I 4
..................................... XENON HEADLAMP SYSTEM 15
Trouble Diagnoses ..................................................... 15
IGNITION KEY-OPERATED ILLUMINATION
SYSTEM
................................................................... 7
Component Parts Location ........................................ 17
.......................................................... Circuit Diagram 17
Meter Control Unit InputlOutput Signal
....................................................... Specifications 1 7
METER ........................................................................\
18
Corn bination Meter .................................................... 18
Triple Meter ................................................................ 20
................................................ COMBINATION METER 21
.................................................... System Description 21
........................................ Component Parts Location 21
Diagnosis Function .................................................... 21
................................... Meter-related Circuit Diagram 22
..................................................... Trouble Diagnoses 23
Combination Meter InpuVOutput Signal
Specifications
............................................................ -25
..................................... Component Parts Inspection 26
TRIPLE METER ............................................................. 29
Special Service Tool ................................................... 29
........................................ Component Parts Location 29
Circuit Diagram .......................................................... 29
Triple Meter InputfOutput Signal Specifications ........ 30
Component Parts Inspection ..................................... 30
IGNITION KEY WARNING BUZZER AND LIGHT
WARNING BUZZER
...................................................... 31
Component Parts Location ........................................ 31
Circuit Diagram .......................................................... 31
Meter Control Unit InpuVOutput Signal
Specifications
............................................................. 31
FRONT WIPER .............................................................. 32
Component Parts Location ........................................ 32
Circuit Diagram .......................................................... 32
Front Wiper Input/Output Signal Specifications ........ 32
Page 178 of 230

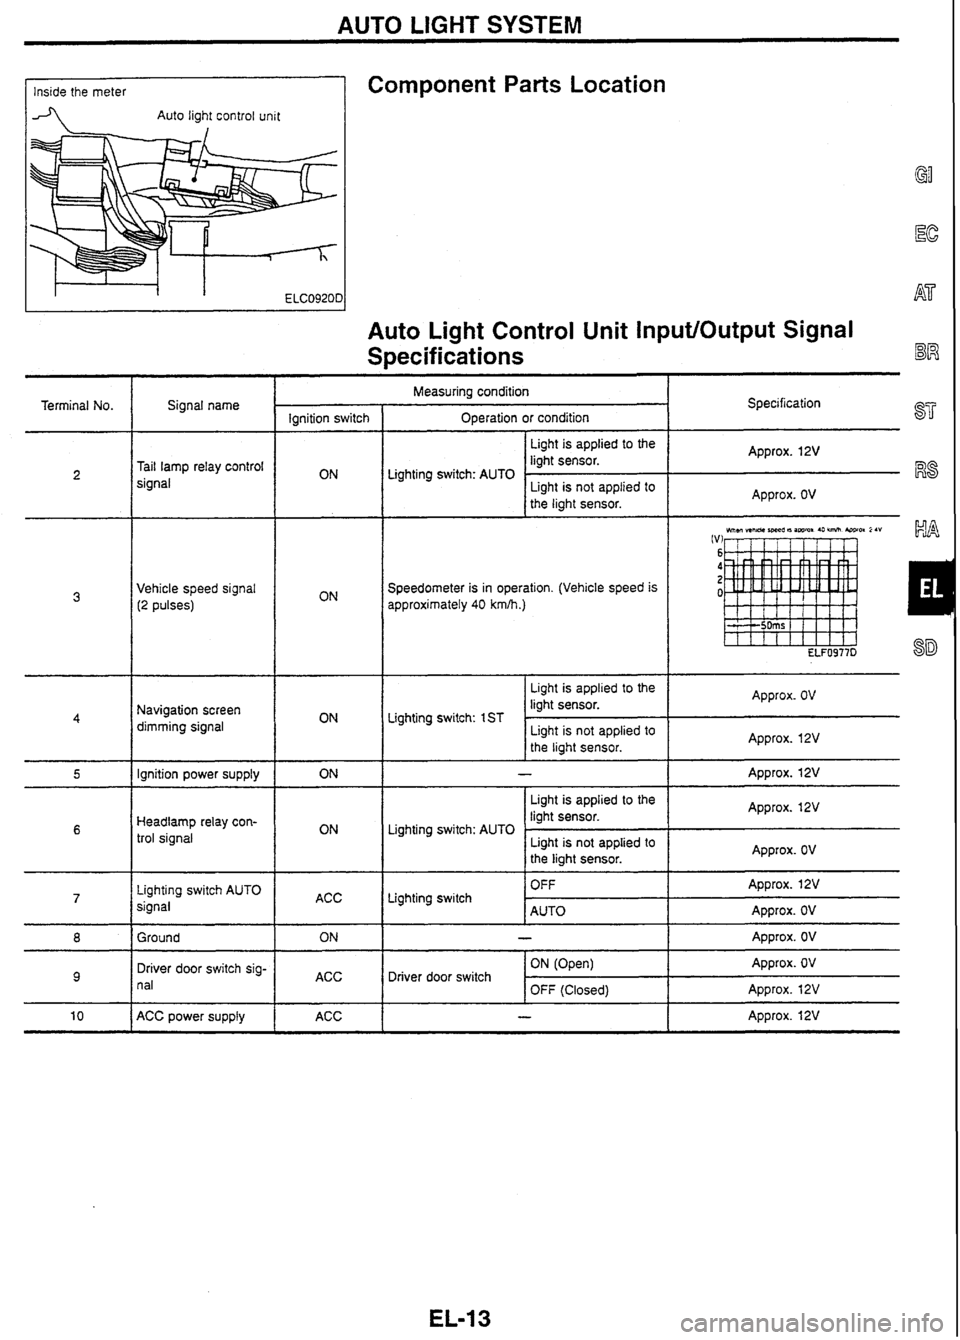
AUTO LIGHT SYSTEM
Component
Parts Location Inside the meter
-4 Auto light control unit
Auto Light Control Unit InputlOutput Signal
Specifications
Terminal No. Measuring
condition
Operation or condition
I
Signal name Specification
Ignition switch
I Light is applied to the I Approx. 12V
liaht sensor.
Tail lamp relay control
signal
Speedometer is in operation. (Vehicle speed is
approximately 40
kmlh.)
Lighting switch: AUTO
Vehicle speed signal (2 pulses)
Light is applied to the
liaht
sensor.
I
4
Light is not applied to
the light sensor.
Approx. OV
Approx.
OV
Navigation screen
dimming signal Liahtina
switch: 1 ST
- I I
I
Light is not applied to
the light sensor.
ignition power supply Approx. 12V
I - I
I Light
is applied to the I Approx. 12V
liaht sensor. Approx. 12V
Headlamp
relay con-
trol signal Lighting
switch: AUTO
Lighting switch AUTO
signal Lighting switch
ACC -
Light is not applied to
the light sensor.
Ground Approx.
OV
OFF
AUTO Approx. 12V
Approx. OV
Driver door switch sig-
n
al
ACC Approx.
OV
Approx.
OV
Approx. 12V
-
ACC power supply Driver
door switch
ACC ON
(Open)
OFF (Closed)
- I Approx. 12V
Page 179 of 230

AUTO LIGHT SYSTEM
Circuit Diagram
Xenon
headlamp
relay
To clearance
lamp and
tail lamp
I---- I : High-voltage parts ----- EL-2163D
Trouble Diagnoses
SYMPTOM CHART
Symptom I Possible cause
I a Faulty auto light control unit power supply or ground harnesi
I Faulty auto light control unit
When outside
is dark, neither small lamps nor headlamps
tum
ON
by
auto light operation. [Lighting switch
(1ST
and 2ND)
is normal.]
When outside is dark, small lamps turn ON but headlamps do not turn
Faulty lighting switch to auto light control unit harness
ON by auto light operation. [Lighting switch (1 ST and 2ND) is normal.] Faulty auto light control unit
0 Faulty lighting switch Faulty lighting switch to auto light control unit harness a Faulty lighting switch ground harness
When outside is dark, headlamps turn ON but small lamps do not turn
ON by auto light operation. [Lighting switch
(1ST
and 2ND) is normal.]
Faulty lighting switch to auto light control unit hamess Faulty auto light control unit
a Neither headlamps nor small lamps turn OFF when the driver door is
opened with the ignition switch at ACC. a Headlamps and small lamps turn OFF when the ignition switch is
turned to ACC with the driver door closed.
0 While the vehicle is driven at night, headlamps go off momentarily
~~- - - pp a Faulty door switch a Faulty door switch to auto light control unit harness a Faulty door switch ground harness 0 Faulty auto light control unit
when it passes under street lamps.
0 While the vehicle is driven in the early morning or evening, headlamps
turn ON momentarily when it passes under an overpass or through a Faulty speedometer to auto light control unit harness a Faulty auto light control unit
building shadows.
During the day, neither small lamps nor headlamps turn OFF. During the day, headlamps tum OFF but small lamps do not turn OFF. a Faulty auto light control unit
Page 180 of 230

XENON HEADLAMP SYSTEM
Trouble Diagnoses
DESCRIPTION
Problems with xenon headlamps are as follows:
They do not light up.
They blink.
GD
They are not bright enough.
In most cases the problems above are caused by faulty xenon bulbs.
There might be the possibility that the problems are caused by faulty HID control unit or lamp sockets.
ec
Follow the diagnostic procedure to determine what causes the problem.
PRECAUTIONS AT
Connect or disconnect connectors with the lighting switch OFF.
Do not touch harnesses, HID control unit, internal lamp, or metal part of the lamp while the lamps are
ON B2
(Lighting switch is ON).
Before verifying that the lamps are ON, install the parts to the vehicle temporarily and connect the battery
cable with
the connector on the vehicle. ST
If the electrical system is suspected to be the cause of the symptom, check for blown fuse or fusible link,
broken connectors, disconnected terminals, or faulty engagement.
Do not use wet hands when performing the trouble diagnoses.
F@
CIRCUIT DIAGRAM
, MA Xenon
headlamp
relay
To clearance
JJ$Rkj
lamp and
tail lamp
Headlamp
1 -- - -1 : High-voltage parts
Driver door SM
CAUTION:
0 Do not use a tester to diagnose the HID control unit circuit.
0 Do not disassemble the HID control unit and harnesses (bulb socket harness and control unit har-
ness).
0 Immediately after the headlamps turn ON, brightness and emission color vary. This is a normal
condition.
When a bulb has reached the end of its life, the brightness becomes extremely low, the bulb con-
tinues to blink, or the light looks reddish.
Page 181 of 230

XENON HEADLAMP SYSTEM
Trouble Diagnoses (Cont'd)
DIAGNOSTIC PROCEDURE
I
FUSE, FUSIBLE LINK, AND XENON Fuse, fusible link, or xenon
HEADLAMP RELAY CHECK headlamp relay is faulty.
CONNECTOR CHECK ON THE VEHICLE Harness on the vehicle is
FOR BATTERY VOLTAGE faulty.
With lighting switch ON, check HID control
unit connector on the vehicle for battery
I voltage. I
OK
XENON HEADLAMP BULB REPLACE- Xenon bulb is faulty.
MENT
Replace the xenon headiamp bulb with a
known
good bulb and check for proper
operation.
HID CONTROL UNIT REPLACEMENT HID control unit is faulty.
Install a known good
HID control unit to
I
the xenon headlarnp and check for proper
operation.
NG
XENON HEADLAMP HOUSING ASSEM- OK, BLY REPLACEMENT
Install a known good xenon headlamp
housing assembly to the xenon
headlamp
and check for proper operation.
---
Starter in xenon headlamp
housing (boost circuit) is
faulty. (Xenon
headlamp housing
assembly
is faulty.)