NISSAN GT-R 2016 R35 Quick Reference Guide
Manufacturer: NISSAN, Model Year: 2016, Model line: GT-R, Model: NISSAN GT-R 2016 R35Pages: 24, PDF Size: 1.35 MB
Page 1 of 24

2 016
QUICK REFERENCE GUIDE
1852879_16a_GTR_QRG_Cover_123014.indd 312/30/14 11:39 AM
Page 2 of 24

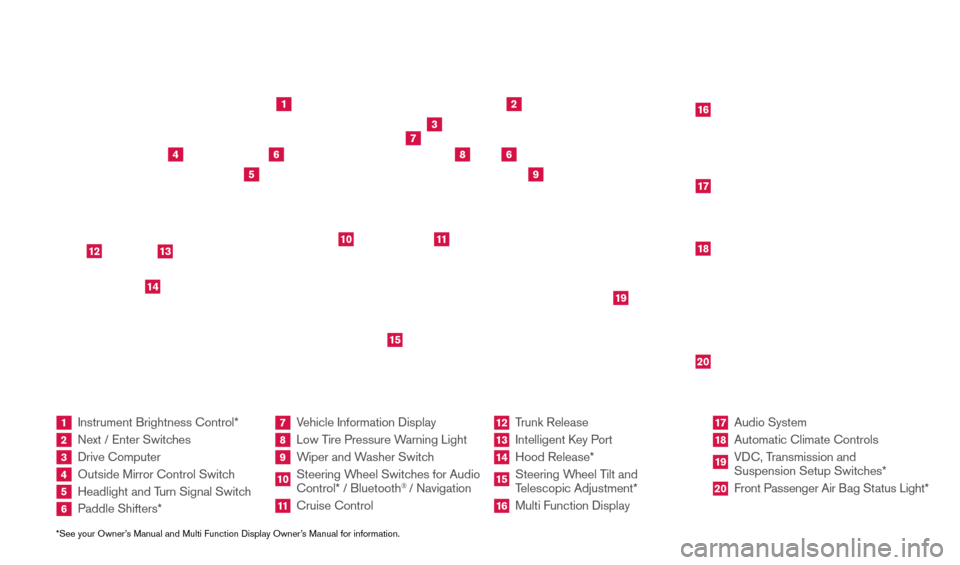
*See your Owner’s Manual and Multi Function Display Owner’s Manual for information.1 Instrument Brightness Control*2 Next / Enter Switches3 Drive Computer 4 Outside Mirror Control Switch5 Headlight and Turn Signal Switch6 Paddle Shifters*
7 Vehicle Information Display8 Low Tire Pressure Warning Light9 Wiper and Washer Switch10 Steering W heel Switches for Audio
Control* / Bluetooth
® / Navigation
11 Cruise Control
12 Trunk Release
13 Intelligent K ey Port14 Hood Release*
15 Steering Wheel Tilt and
Telescopic Adjustment*16 Multi Function Display
17 Audio System
18 Automatic Climate Controls
19 VDC, Transmission and
Suspension Setup Switches*20 Front Passenger Air B ag Status Light*
1
2
3
4
5
9
6
6
7
8
15
161718
19
20
10
11
14
12
13
Behind and under
steering wheel
1852879_16a_GTR_QRG_Cover_123014.indd 412/30/14 11:39 AM
Page 3 of 24

TAB LE OF CONTE NTS
Additional information about your vehicle is also available in your Owne\
r’s Manual, Multi Function Display
Owner’s Manual and at www.nissanusa.com.
NEW SYSTEM FEATURES
RearView Monitor ........................................................................\
...........................................................2
USB (Universal Serial Bus) Connection Port/Aux Jack and iPod® Interface ........................... 2
NavTraffic and NavWeather
........................................................................\
......................................... 2
ESSENTIAL INFORMATION
Tire Pressure Monitoring System (TPMS) ........................................................................\
...............3
Fuel-filler Door/Cap ........................................................................\
....................................................... 4
Unique Noises
........................................................................\
................................................................ 4
Vehicle Modifications
........................................................................\
.................................................... 4
Vehicle Dynamic Control (VDC)
........................................................................\
................................. 4
Matte Paint Care (if so equipped)
........................................................................\
.............................. 5
Carbon-based Parts (if so equipped)
........................................................................\
....................... 5
Clock Set/Adjustment
........................................................................\
................................................... 5
FIRST DRIVE FEATURES
NISSAN Intelligent Key® System ........................................................................\
...............................6
Trunk Lid Release
........................................................................\
........................................................... 7
Seat Adjustments
........................................................................\
........................................................... 7
Outside Mirror Control Switch
........................................................................\
.................................... 8
Starting/Stopping the Engine
........................................................................\
..................................... 8
Headlight Control Switch
........................................................................\
............................................. 8
Wiper and Washer Switch
........................................................................\
........................................... 9
Automatic Climate Controls
........................................................................\
...................................... 10
AM/FM/SiriusXM
® Satellite Radio with CD Player ..................................................................... 11
Cruise Control
........................................................................\
.............................................................. 12
SYSTEM GUIDE
Drive Computer ........................................................................\
............................................................13
Bluetooth® Streaming Audio ........................................................................\
..................................... 14
Bluetooth® Hands-free Phone System ........................................................................\
................... 15
• System Operating Tips
............................................................................................................... 16
Navigation System
........................................................................\
....................................................... 18
HomeLink
® Universal Transceiver ........................................................................\
............................ 20
Please see your Owner’s Manual for impor tant safety information and system operation limitations.
•
A c
ellular telephone should not be used for any purpose while driving so full attention may be
given to vehicle operation.
•
A
lways wear your seat belt.
•
S
upplemental air bags do not replace proper seat belt usage.
•
C
hildren 12 and under should always ride in the rear seat properly secured in child restraints
or seat belts according to their age and weight.
•
D
o not drink and drive.
For more information, refer to the “ Bluetooth
® Hands-Free Phone System (section 4) ” of the Multi Function
Display Owner’s Manual and the “ Safety — Seats, seat belts and supplemental restraint system (section 1) ”
and the “ Starting and driving (section 5) ” of your Owner’s Manual.
1852879_16a_GTR_QRG_Guts_123014.indd 112/30/14 11:37 AM
Page 4 of 24

2
REARVIEW MONITOR
When the shift lever is moved to the R (REVERSE) position, the Multi Function
Display will automatically change to show
the area directly behind the vehicle.
The colored lines on the display screen indicate the approximate distances to objects:
•
Red 1
.5 ft (0.5 m); Yellow 3 ft (1 m); Green 7 ft
(2 m) and 10 ft (3 m).
For more information, refer to the “Monitor system (section 9)” of your Multi Function Display Owner’s Manual.
NEW SYSTEM FEATURES
NAVTRAFFIC* AND NAVWEATHER*
Your vehicle’s Navigation System is equipped
with NavTraffic and NavWeather capabilities.
NavTraffic enables your vehicle’s Navigation System to display real-time traffic conditions,
such as accidents or road construction, and may
provide a detour to help avoid congestion.
NavWeather tracks nationwide weather information, provides real-time weather reports
and automatically alerts you to severe weather
conditions around your current vehicle location.
*These features, SiriusXM® Satellite Radio, NavTraffic and NavWeather,
require an active subscription. Multiple subscriptions may be necessary to
activate the various features.
For more information, refer to the “Navigation (section 2)” of your Multi Function Display Owner’s Manual.
USB (Universal Serial Bus) CONNECTION PORT/AUX JACK AND
iPOD® INTERFACE
The USB port is located in the center console
under the arm rest.
When a compatible USB memory device or iPod®
is plugged into the USB port, compatible audio
or video files stored on the device can be played
through the vehicle’s audio system.
The device can be operated using the vehicle’s audio system, the touch-screen or the steering
wheel controls while it is connected to the vehicle.
For more information, refer to the “Audio system (section 3)” of your Multi Function Display Owner’s Manual.
1852879_16a_GTR_QRG_Guts_123014.indd 212/30/14 11:37 AM
To view detailed instructional videos regarding these and other features, please go to www.nissanownersinfo.mobi.
Page 5 of 24

3
TIRE PRESSURE MONITORING SYSTEM (TPMS)
A TIRE LOW PRESSURE VISIT DEALER
warning message will appear in the vehicle
information display
1 and the low tire pressure
warning light 2 will illuminate when one or more
tires are low in pressure and air is needed.
•
T
he tire pressures should be checked when the
tires are cold. The tires are considered cold after
the vehicle has been parked for 3 hours or more or
driven less than 1 mi (1.6 km) at moderate speeds.
After tire pressures are adjusted, drive the vehicle
at speeds above 16 mph (25 km/h). The TIRE
LOW PRESSURE VISIT DEALER warning
message and low tire pressure warning light will extinguish.
Tire pressure rises and falls depending on the heat caused by the vehicle’s operation and the outside temperature. Low outside temperature can lower the
temperature of the air inside the tire, which can cause a lower tire inflation pressure. This
may cause the low tire pressure warning light to illuminate. If the warn\
ing light illuminates,
check the tire pressure in your tires.
•
Chec
k the tire pressure often and always prior to long distance trips.
NISSAN recommends refilling with nitrogen for maximum tire performance. I\
f nitrogen is not available, compressed air may be safely used under normal driving conditions.
The Tire and Loading Information label contains valuable information. Please refer to the “Technical and consumer information (section 9)” in your Owner’s Manual for the location
of the Tire and Loading Information label.
For more information, refer to the “Instruments and controls (section 2)”, the “Starting and driving (section 5)” and
the “Maintenance and do-it-yourself (section 8)” of your Owner’s Manual.
2
1
ESSE NTIAL I N FOR MATION
1852879_16a_GTR_QRG_Guts_123014.indd 312/30/14 11:37 AM
To view detailed instructional videos regarding these and other features, please go to www.nissanownersinfo.mobi.
Page 6 of 24

4
VEHICLE MODIFICATIONS
Do not modify the vehicle with aftermarket parts or accessories.
To maintain your vehicle’s performance, only use genuine GT-R specific components.
For more information, refer to the “GT-R Overview (section GTR)” of your Owner’s Manual.
VEHICLE DYNAMIC CONTROL (VDC)
Always make sure that the VDC is ON before driving the vehicle.
The VDC OFF mode should ONLY be used briefly to help free the vehicle if it is stuck in
snow or mud.
For more information, refer to the “GT-R Overview (section GTR)”, the “Instruments and controls (section 2)” and
the “Starting and driving (section 5)” of your Owner’s Manual.
FUEL-FILLER DOOR/CAP
The fuel-filler door is located on the passenger’s
side toward the rear of the vehicle.
When the doors of the vehicle are locked or unlocked, the fuel-filler door is automatically locked
or unlocked at the same time.
Push one of the power door loc k switches to
unlock the fuel-filler door from inside the vehicle, or push the door handle request switch
to unlock the fuel-filler door from outside the vehicle.
To open the fuel-filler door, press the left side of the door to release the door lock then pull the door open.
To tighten, turn the fuel-filler cap clockwise until a single click is heard. If the cap is not fully
tightened, the Malfunction Indicator Light (MIL)
may illuminate.
If the
light illuminates because the fuel-filler
cap is loose or missing, tighten or reinstall the
cap. The
light should extinguish after a few driving trips.
For more information, refer to the “Instruments and controls (section 2)” and the
“Pre-driving checks and
adjustments (section 3)” of your Owner’s Manual.
UNIQUE NOISES
The GT-R is a high-performance vehicle that has unique operating characteristics.
You will hear more noises emitted from this vehicle than from a conventio\
nal
passenger car.
For more information, refer to the “GT-R Overview (section GTR)” and the “Starting and driving (section 5)” of
your Owner’s Manual.
ESSE NTIAL I N FOR MATION
1852879_16a_GTR_QRG_Guts_123014.indd 412/30/14 11:37 AM
To view detailed instructional videos regarding these and other features, please go to www.nissanownersinfo.mobi.
Page 7 of 24

5
CARBON-BASED PARTS (if so equipped)
Do not wax carbon parts, suc h as the rear diffuser or the optional dry carbon fiber
rear spoiler.
Waxing speeds up deterioration by allowing water under the carbon layer.
For more information, refer to the “GT-R Overview (section GTR)” and the “Appearance and care (section 7)” of
your Owner’s Manual.
MATTE PAINT CARE (if so equipped)
Your vehicle is equipped with matte paint, and special care is necessary to maintain the appearance.
For more information on special care instructions, refer to the “Appearance and care (section 7)” of your
Owner’s Manual.
CLOCK SET/ADJUSTMENT
Press the SETTING button 1, select the “Clock”
key using the control knob
2 and press the ENTER
button to access the following clock settings:
On-screen Cloc
k – When this feature is ON,
a clock is always displayed in the upper right
corner of the Multi Function Display. The clock is
automatically adjusted by the GPS system.
Clock Format – Choose either the 12-hour clock display or the 24-hour clock display.
Offset (hour) – T he time can be adjusted by increasing or decreasing per hour.
Offset (min) – The time can be adjusted by increasing or decreasing per minute.
Daylight Savings Time – Turn this item to ON for daylight savings time application.
Time Zone – Choose the time zone.
For more information, refer to the “Other settings (section 7)” of your Multi Function Display Owner’s Manual.
12
1852879_16a_GTR_QRG_Guts_123014.indd 512/30/14 11:37 AM
To view detailed instructional videos regarding these and other features, please go to www.nissanownersinfo.mobi.
Page 8 of 24

6
NISSAN INTELLIGENT KEY® SYSTE M
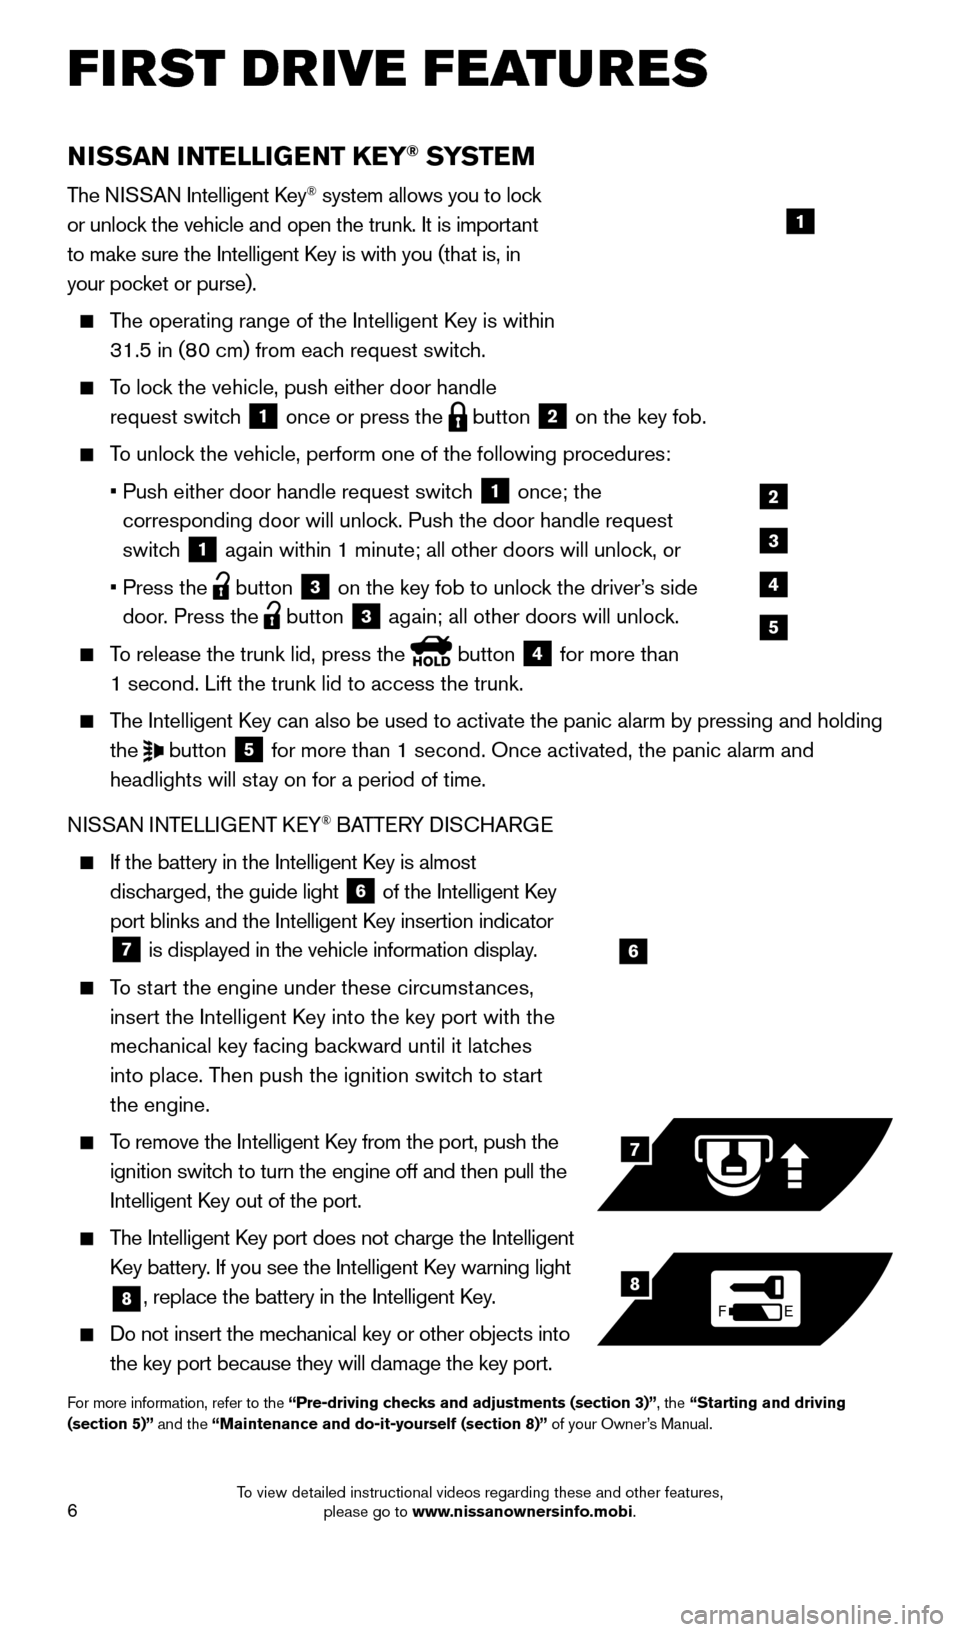
The NISSAN Intelligent Key® system allows you to lock
or unlock the vehicle and open the trunk. It is important
to make sure the Intelligent Key is with you (that is, in
your pocket or purse).
The operating range of the Intelligent Key is within
31.5 in (80 cm) from each request switch.
To lock the vehicle, push either door handle request switch
1 once or press the
button
2 on the key fob.
To unlock the vehicle, perform one of the following procedures:
•
Push either door handle request switc
h
1 once; the
corresponding door will unlock. Push the door handle request
switch
1 again within 1 minute; all other doors will unlock, or
•
Press the button
3 on the key fob to unlock the driver’s side
door. Press the button 3 again; all other doors will unlock.
To release the trunk lid, press the
button
4 for more than
1 second. Lift the trunk lid to access the trunk.
The Intelligent Key can also be used to activate the panic alarm by pressing and holding the
button
5 for more than 1 second. Once activated, the panic alarm and
headlights will stay on for a period of time.
NISSAN INTELLIGENT KEY
® BATTERY DISCHARGE
If the battery in the Intelligent K ey is almost
discharged, the guide light
6 of the Intelligent Key
port blinks and the Intelligent Key insertion indicator
7 is displayed in the vehicle information display.
To start the engine under these circumstances,
insert the Intelligent Key into the key port with the
mechanical key facing backward until it latches
into place. Then push the ignition switch to start
the engine.
To remove the Intelligent Key from the port, push the
ignition switch to turn the engine off and then pull the
Intelligent Key out of the port.
The Intelligent Key port does not charge the Intelligent
Key battery. If you see the Intelligent Key warning light
8, replace the battery in the Intelligent Key.
Do not insert the mechanical key or other objects into
the key port because they will damage the key port.
For more information, refer to the “Pre-driving checks and adjustments (section 3)”, the “Starting and driving
(section 5)” and the “Maintenance and do-it-yourself (section 8)” of your Owner’s Manual.
6
FE
7
8
FIRST DRIVE FEATURES
1
2
3
4
5
1852879_16a_GTR_QRG_Guts_123014.indd 612/30/14 11:37 AM
To view detailed instructional videos regarding these and other features, please go to www.nissanownersinfo.mobi.
Page 9 of 24

7
TRUNK LID RELEASE
Use one of the following methods to unlatch the trunk
then raise the trunk lid to open:
Push the trunk open request switc h
1 under the
trunk handle for more than 1 second.
Press the trunk button HOLD on the NISSAN
Intelligent Key® for more than 1 second.
From inside the vehicle, push down on the trunk
lid release switch
2 located on the left side of
the instrument panel.
For more information, refer to the “Pre-driving checks and
adjustments (section 3)” of your Owner’s Manual.
1
SEAT ADJUSTMENTS
To slide the seat forward or backward, push the control switch
1 forward or backward. To adjust
the angle of the seatback, rotate the knob 1
forward or backward.
SEAT LIFTER (driver’s seat)
To raise or lower the rear portion of the seat, move the control switch
1 up or down. To raise or
lower the front portion of the seat, push the top or
bottom of the switch
2.
REAR SEAT ENTRY
Lift the lever 3 and tilt the seatback forward.
Push the seat adjustment control switch 1
forward to the desired position. To return the seat
to its original position, tilt the seatback rearward
and push the seat adjustment control switch
1
backward or forward.
HEATED SEATS
Your vehicle’s front seats have built-in heaters that are
operated by a switch found on the side of the seats.
With the ignition ON, push the HI 4 or LO 5
position on the switch, and the seat heater will turn
on and the indicator light will illuminate.
To turn off the seat heater, push the switch to the level (neutral) position.
For more information, refer to the “Safety — Seats, seat belts and supplemental restraint system (se\
ction 1)” of
your Owner’s Manual.
3
2
4
5
2
1
1852879_16a_GTR_QRG_Guts_123014.indd 712/30/14 11:37 AM
To view detailed instructional videos regarding these and other features, please go to www.nissanownersinfo.mobi.
Page 10 of 24

8
OUTSIDE MIRROR CONTROL SWITCH
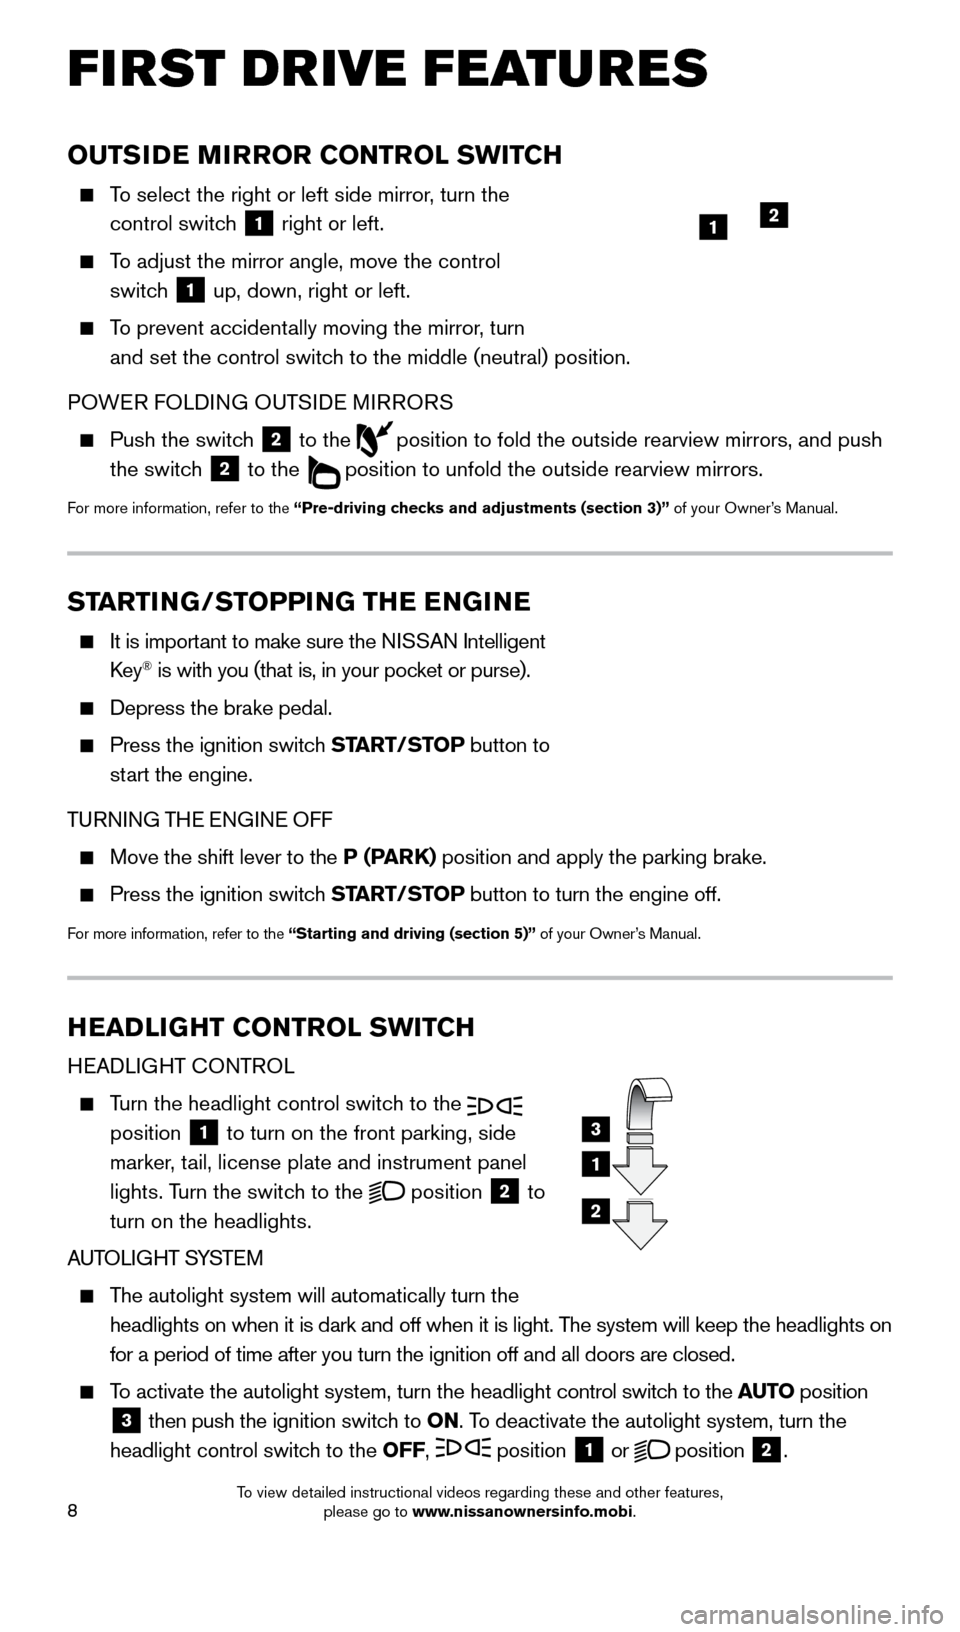
To select the right or left side mirror, turn the control switch
1 right or left.
To adjust the mirror angle, move the control
switch
1 up, down, right or left.
To prevent accidentally moving the mirror, turn
and set the control switch to the middle (neutral) position.
POWER FOLDING OUTSIDE MIRRORS
Push the switc h
2 to the
position to fold the outside rearview mirrors, and push
the switch
2 to the
position to unfold the outside rearview mirrors.
For more information, refer to the “Pre-driving checks and adjustments (section 3)” of your Owner’s Manual.
HEADLIGHT CONTROL SWITCH
HEADLIGHT CONTROL
Turn the headlight control switch to the
position 1 to turn on the front parking, side
marker, tail, license plate and instrument panel
lights. Turn the switch to the
position
2 to
turn on the headlights.
AUTOLIGHT SYSTEM
The autolight system will automatically turn the
headlights on when it is dark and off when it is light. The system will keep the headlights on
for a period of time after you turn the ignition off and all doors are c\
losed.
To activate the autolight system, turn the headlight control switch to the AUTO position
3 then push the ignition switch to
ON. To deactivate the autolight system, turn the
headlight control switch to the OFF, position 1 or
position
2.
3
1
2
FIRST DRIVE FEATURES
1
STARTING/STOPPING THE ENGINE
It is import ant to make sure the NISSAN Intelligent
Key® is with you (that is, in your pocket or purse).
Depress the brake pedal.
Press the ignition switc h START/STOP button to
start the engine.
TURNING THE ENGINE OFF
Move the shift lever to the P (PARK) position and apply the parking brake.
Press the ignition switch START/STOP button to turn the engine off.
For more information, refer to the “Starting and driving (section 5)” of your Owner’s Manual.
2
1852879_16a_GTR_QRG_Guts_123014.indd 812/30/14 11:37 AM
To view detailed instructional videos regarding these and other features, please go to www.nissanownersinfo.mobi.