ad blue NISSAN GT-R 2017 R35 Multi Function Display Owner's Manual
[x] Cancel search | Manufacturer: NISSAN, Model Year: 2017, Model line: GT-R, Model: NISSAN GT-R 2017 R35Pages: 248, PDF Size: 1.72 MB
Page 84 of 248
![NISSAN GT-R 2017 R35 Multi Function Display Owners Manual 4. Hands-Free Phone
Available
ItemsAction
[Play] Play the recorded voice tag.
[Store] Touch to record a voice tag for the phone number.
[Replace] Touch to rerecord the voice tag.
[Delete] Touch to del NISSAN GT-R 2017 R35 Multi Function Display Owners Manual 4. Hands-Free Phone
Available
ItemsAction
[Play] Play the recorded voice tag.
[Store] Touch to record a voice tag for the phone number.
[Replace] Touch to rerecord the voice tag.
[Delete] Touch to del](/img/5/524/w960_524-83.png)
4. Hands-Free Phone
Available
ItemsAction
[Play] Play the recorded voice tag.
[Store] Touch to record a voice tag for the phone number.
[Replace] Touch to rerecord the voice tag.
[Delete] Touch to delete the voice tag.
BLUETOOTH�ŠSETTING
The Bluetooth�Šsetting can be changed.
1. Touch [Settings] on the Launch Bar.
2. Touch [Bluetooth].
Available item Action
[Bluetooth] If this setting is turned off, the connection between the Bluetooth�Šdevices and the in-vehicle Bluetooth�Š
module will be canceled.
[Connect Device] Connects to the Bluetooth�Šdevice. Up to 5 devices can be registered.
[Select BT Device] [Phone]Registered devices are shown on the list. Select a Bluetooth�Šdevice from the list.
Information of the selected device can be edited and the device can also be deleted from the device list.
[Audio Player]
[Edit Bluetooth Information] [OK] Touch to apply the changes after editing the Bluetooth
�Šinformation.
[PIN] PIN code can be checked and changed.
[Device Name] Device Name can be checked and changed.
[Device Address] Device Address can be checked.
4-12
Page 92 of 248
5. Information
your compatible phone’s application download
source and then log into the application.
For more information about this technology, visit
the website or contact NissanConnect
SMMobile
Apps Customer Service.
For U.S. customers:
Website:
www.nissanusa.com/connect
For Canadian customers: Website:
www.nissan.ca/nissanconnect (English)
www.nissan.ca/nissanconnect/fr (French)
CONNECTING PHONE
To use this feature, a compatible smartphone
must be connected via Bluetooth�Šor USB to the
vehicle.
“Connecting Bluetooth�Šdevice”
(page 2-21)
“USB (Universal Serial Bus) Connection
Ports and AUX (auxiliary) input jack”
(page 2-7)
INFO:
. For Apple iPhone
�Š, NissanConnectSMMo-
bile Apps REQUIRES the phone to be
connected via USB after the Bluetooth
�Š
connection is established.
. For Android phones, NissanConnect
SMMo-
bile Apps REQUIRES the phone to be paired
via Bluetooth
�Š.
APPLICATION DOWNLOAD
Once connected, the NissanConnectSMApp will
search your phone to determine which compa-
tible applications are currently installed. The
vehicle will then download the in-vehicle inter-
face for each of these compatible applications.
Once downloaded, the user can access many
smartphone Applications through the vehicle
touch screen display with the following opera-
tion.
1. Touch [Info] on the Launch Bar.
2. Touch [NissanConnect Apps].
For more information on application availability
visit the NissanConnect
SMwebsite or contact
NissanConnectSMMobile Apps Customer Ser-
vice. For U.S. customers:
Website:
www.nissanusa.com/connect
For Canadian customers: Website:
www.nissan.ca/nissanconnect (English)
www.nissan.ca/nissanconnect/fr (French)
5-8
Page 96 of 248
5. Information
.Send to Car:
Customers can access turn-by-turn naviga-
tion provided by Google maps and sent
directly to the NissanConnect
SMvehicle.
. Journey Planner:
Customers can create a multiple way-point
route via Journey Planner on the NissanCon-
nect
SMServices website and send the de-
tails directly to their vehicle.
. Destination Download:
Customers can search for different locations
via the NissanConnect
SMServices website
and send them directly to their vehicle.
. Connected Search:
Customers can access Internet search en-
gines directly from the vehicle to find exact
destinations to navigate to.
. Assisted Search:
Customers can use Assisted Search to get
further destination assistance via operator
service or live Response Specialist for more
detailed information.
“Searching by using Voice Menu but-
ton on map” (page 6-25)
. Stolen Vehicle Locator:
In the event that the customer’s vehicle is
stolen, after filing a police report the custo- mer can contact NissanConnect
SMServices
via phone and report the vehicle stolen. At
that point, NissanConnect
SMServices emer-
gency support staff will work with authorities
to attempt to recover the vehicle.
. Valet Alert:
Customers will be notified if their vehicle is
driven more than 0.2 miles once they activate
Valet Alert via the NissanConnect
SMSer-
vices website or Companion App.
Notice to Bluetooth�ŠHands-Free
Phone users
The Bluetooth�ŠHands-Free Phone System will
be disabled and not be able to take phone calls
while the vehicle is connected to the Nissan-
Connect
SMServices Response Specialists or
the emergency support staff at the NissanCon-
nect
SMService Response Center. This is to
avoid various services by NissanConnectSM
Services Response Specialists (such as As-
sisted Search) and NissanConnectSMServices
emergency support staff being interrupted by
incoming calls. Incoming phone calls received
while the vehicle is connected to the Service
Center will not be listed in the call history of the
Bluetooth
�ŠHands-free phone system. However
those incoming calls may be listed in the call
history of your mobile phone, depending on its capabilities. After disconnecting communication
with the NissanConnect
SMServices Response
Specialist or NissanConnectSMServices emer-
gency support staff, check the incoming call
history on your mobile phone when it is safe to do
so.
Service application
A separately purchased NissanConnectSMSer-
vices subscription is required. For more details,
refer to the NissanConnect
SMServices website
or contact the NissanConnectSMServices sup-
port line.
NissanConnect
SMServices website:
For U.S.
www.nissanusa.com/connect
For Canada
www.nissan.ca/nissanconnect (English)
www.nissan.ca/nissanconnect/fr (French)
NissanConnect
SMServices support
line:
1-855-426-6628
5-12
Page 110 of 248
6. Navigation
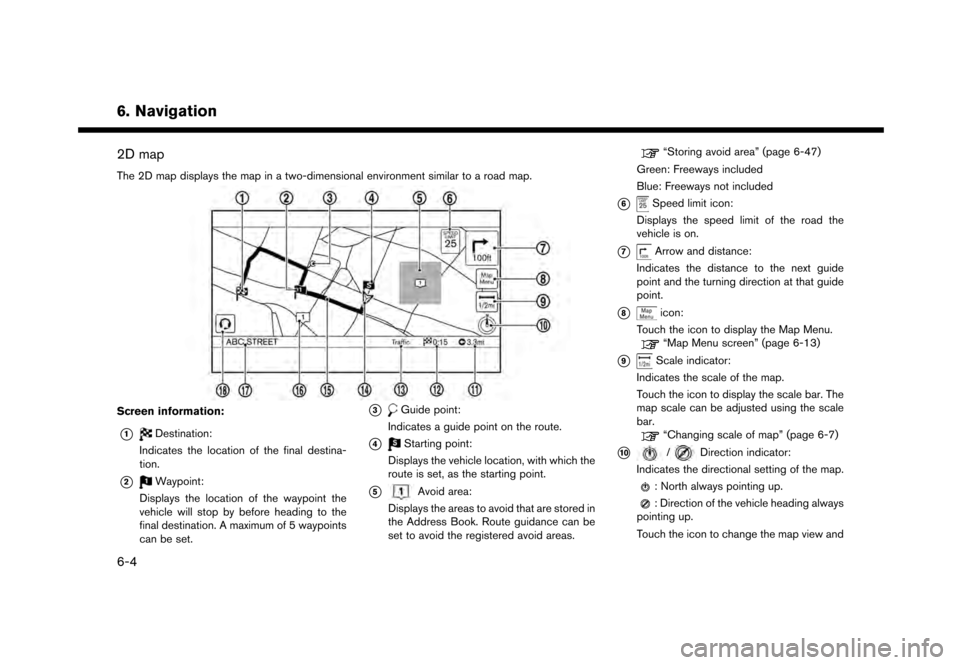
2D map
The 2D map displays the map in a two-dimensional environment similar to a road map.
Screen information:
*1Destination:
Indicates the location of the final destina-
tion.
*2Waypoint:
Displays the location of the waypoint the
vehicle will stop by before heading to the
final destination. A maximum of 5 waypoints
can be set.
*3Guide point:
Indicates a guide point on the route.
*4Starting point:
Displays the vehicle location, with which the
route is set, as the starting point.
*5Avoid area:
Displays the areas to avoid that are stored in
the Address Book. Route guidance can be
set to avoid the registered avoid areas.
“Storing avoid area” (page 6-47)
Green: Freeways included
Blue: Freeways not included
*6Speed limit icon:
Displays the speed limit of the road the
vehicle is on.
*7Arrow and distance:
Indicates the distance to the next guide
point and the turning direction at that guide
point.
*8icon:
Touch the icon to display the Map Menu.
“Map Menu screen” (page 6-13)
*9Scale indicator:
Indicates the scale of the map.
Touch the icon to display the scale bar. The
map scale can be adjusted using the scale
bar.
“Changing scale of map” (page 6-7)
*10/Direction indicator:
Indicates the directional setting of the map.
: North always pointing up.
: Direction of the vehicle heading always
pointing up.
Touch the icon to change the map view and
6-4
Page 111 of 248
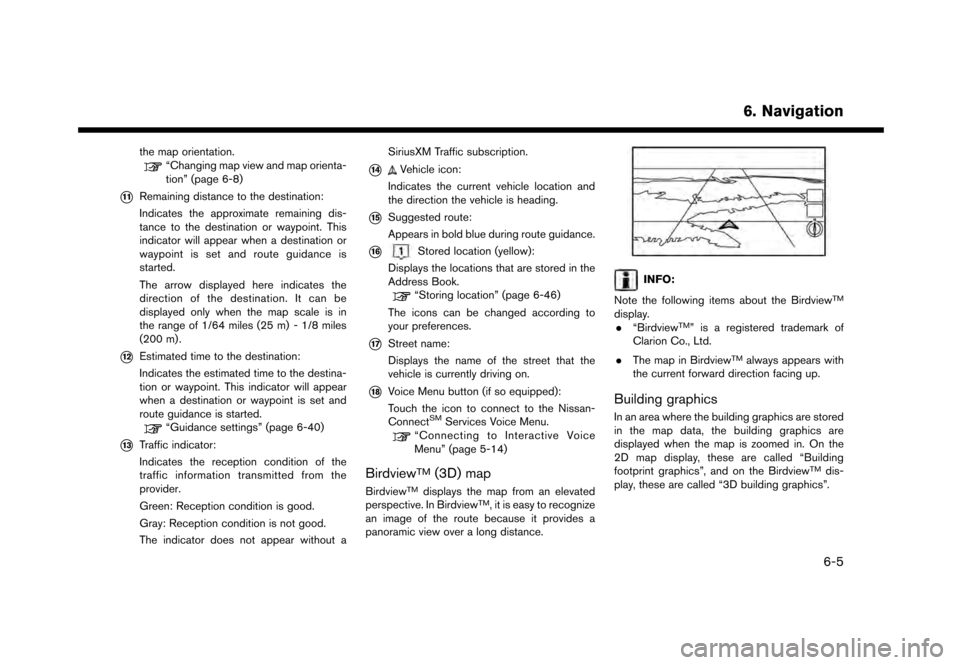
the map orientation.“Changing map view and map orienta-
tion” (page 6-8)
*11Remaining distance to the destination:
Indicates the approximate remaining dis-
tance to the destination or waypoint. This
indicator will appear when a destination or
waypoint is set and route guidance is
started.
The arrow displayed here indicates the
direction of the destination. It can be
displayed only when the map scale is in
the range of 1/64 miles (25 m) - 1/8 miles
(200 m) .
*12Estimated time to the destination:
Indicates the estimated time to the destina-
tion or waypoint. This indicator will appear
when a destination or waypoint is set and
route guidance is started.
“Guidance settings” (page 6-40)
*13Traffic indicator:
Indicates the reception condition of the
traffic information transmitted from the
provider.
Green: Reception condition is good.
Gray: Reception condition is not good.
The indicator does not appear without aSiriusXM Traffic subscription.
*14Vehicle icon:
Indicates the current vehicle location and
the direction the vehicle is heading.
*15Suggested route:
Appears in bold blue during route guidance.
*16Stored location (yellow):
Displays the locations that are stored in the
Address Book.
“Storing location” (page 6-46)
The icons can be changed according to
your preferences.
*17Street name:
Displays the name of the street that the
vehicle is currently driving on.
*18Voice Menu button (if so equipped):
Touch the icon to connect to the Nissan-
Connect
SMServices Voice Menu.“Connecting to Interactive Voice
Menu” (page 5-14)
BirdviewTM(3D) map
BirdviewTMdisplays the map from an elevated
perspective. In BirdviewTM, it is easy to recognize
an image of the route because it provides a
panoramic view over a long distance.
INFO:
Note the following items about the Birdview
TM
display. . “BirdviewTM” is a registered trademark of
Clarion Co., Ltd.
. The map in Birdview
TMalways appears with
the current forward direction facing up.
Building graphics
In an area where the building graphics are stored
in the map data, the building graphics are
displayed when the map is zoomed in. On the
2D map display, these are called “Building
footprint graphics”, and on the Birdview
TMdis-
play, these are called “3D building graphics”.
6. Navigation
6-5
Page 144 of 248
![NISSAN GT-R 2017 R35 Multi Function Display Owners Manual 6. Navigation
2. Touch [Edit/Add to Route].
3. Touch a destination or waypoint that isalready set.
4. Touch [Change Order].
5. Touch a preferred destination or waypoint to replace the previously selec NISSAN GT-R 2017 R35 Multi Function Display Owners Manual 6. Navigation
2. Touch [Edit/Add to Route].
3. Touch a destination or waypoint that isalready set.
4. Touch [Change Order].
5. Touch a preferred destination or waypoint to replace the previously selec](/img/5/524/w960_524-143.png)
6. Navigation
2. Touch [Edit/Add to Route].
3. Touch a destination or waypoint that isalready set.
4. Touch [Change Order].
5. Touch a preferred destination or waypoint to replace the previously selected destination
or waypoint.
6. Touch [Calculate] to apply the change.
RECALCULATING ROUTE
A route can be manually searched again after
changing the search conditions, etc.
1. Touch [Navi] on the Launch Bar.
2. Touch [Recalculate]. A message is displayed and the route is recalculated.
3. Touch [Start] or conduct other operations as necessary.
“Options before starting the route
guidance” (page 6-26)
INFO:
. When a waypoint has been set on the route,
the system will search for only one route,
even if route recalculation is performed.
. When the vehicle deviates from the sug-
gested route, the route from the current
location to the destination is automatically searched again by the Auto Reroute func-
tion.
“Route Settings” (page 6-41)
SEARCHING FOR DETOUR ROUTE
USING TRAFFIC INFORMATION
When a serious traffic event occurs on the route,
or if the system finds a faster route, a detour alert
will display automatically. If the automatic alert is
not noticed, a detour can also be searched for
manually.
1. Touch [Navi] on the Launch Bar.
2. Touch [Traffic Detour].
3. When the detour search is successful,
detailed information about the detour route
and the comparison screen of the two routes
are displayed.
*1Original route (blue)
*2Detour route (purple)
*3The change of distance and estimated
travel time to destination when the
detour route is taken.
4. To accept the suggested detour route, touch [Yes].
INFO:
. Without a subscription to SiriusXM Traffic, it
will not be possible to receive traffic detour
information or apply settings for functions
related to traffic information. A message
appears when a related menu item is
selected.
“Notes on SiriusXM Traffic information”
(page 5-21)
. If no route is set, or [Use Real Time Traffic
Information] is turned off, this function cannot
be operated.
“Route Settings” (page 6-41)
. If a detour route is not selected and no
further action is performed, the detour route
will be automatically canceled.
. The detour suggestion can be retrieved even
after the message disappears by manually
selecting [Traffic Detour]. The system will
6-38
Page 157 of 248
![NISSAN GT-R 2017 R35 Multi Function Display Owners Manual Editing stored route
1. Touch [Settings] on the Launch Bar.
2. Touch [Navigation] and touch [AddressBook].
3. Touch [Stored Routes].
4. Touch the preferred stored route from the list.
Setting item Act NISSAN GT-R 2017 R35 Multi Function Display Owners Manual Editing stored route
1. Touch [Settings] on the Launch Bar.
2. Touch [Navigation] and touch [AddressBook].
3. Touch [Stored Routes].
4. Touch the preferred stored route from the list.
Setting item Act](/img/5/524/w960_524-156.png)
Editing stored route
1. Touch [Settings] on the Launch Bar.
2. Touch [Navigation] and touch [AddressBook].
3. Touch [Stored Routes].
4. Touch the preferred stored route from the list.
Setting item Action
[Rename] Changes the stored route
name.
[Replace] Overwrites the stored tracked route to the current tracked
route.
[Delete] Deletes the stored route.
[OK] Applies the edited settings.
Editing avoid area
1. Touch [Settings] on the Launch Bar and
touch [Navigation].
2. Touch [Address Book] and then touch [Avoid Area].
3. Touch a preferred Avoid Area from the list. Avoid Area editing screen will be displayed.
Setting item Action
[Rename] Changes the name of an Avoid
Area.
[Move Loca-
tion] Display the Avoid Area on the
touch screen display, and ad-
justs the location of the Avoid
Area.
[Resize Area] Adjusts the range of the Avoid Area.
[FWY] Sets the route to include or not include freeways.
On the map, the Avoid Area will
be displayed in green if it
includes a freeway or in blue if it
does not include a freeway.
[Delete] Delete an Avoid Area.
[OK] Applies the edited setting.
DELETING STORED ITEM
The locations and routes in the Address Book
can be deleted. Two deletion methods are
available: deleting an individual item and deleting
all stored items.
INFO:
. Deleted items cannot be restored. Before
deleting an item, always make sure that the
item is no longer needed.
6. Navigation
6-51
Page 181 of 248
![NISSAN GT-R 2017 R35 Multi Function Display Owners Manual Phone Command
1st Command 2nd Command 3rd Command 4th Command Action
PhonePhonebook <phonebook name>
Makes a call to a contact that is stored in the mobile phone. You can select the type
from [Mobile] NISSAN GT-R 2017 R35 Multi Function Display Owners Manual Phone Command
1st Command 2nd Command 3rd Command 4th Command Action
PhonePhonebook <phonebook name>
Makes a call to a contact that is stored in the mobile phone. You can select the type
from [Mobile]](/img/5/524/w960_524-180.png)
Phone Command
1st Command 2nd Command 3rd Command 4th Command Action
PhonePhonebook
Makes a call to a contact that is stored in the mobile phone. You can select the type
from [Mobile], [Home], [Office], [Main] or [Other].
Call History Incoming Calls Displays an Incoming Call list.
Outgoing Calls Displays an Outgoing Call list.
Missed Calls Displays a Missed Call list.
Dial <#> Dial Makes a call to a spoken phone number.
Change Number Change a spoken phone number.
International Call
You may need to include the international call prefixes and country codes.
Redial Makes a call to the last outgoing phone number.
Add Phone Use this command to connect a compatible Bluetooth
�Šdevice to system. Follow
the on-screen instructions to complete the pairing process from your handset.
Select Phone <1 - 5> Use this command to select a phone from a list of the registered devices.
Quick Dial
<1 - 5>
Call
Call
Send Text
stored in the mobile phone.
7. Voice recognition
7-7
Page 187 of 248
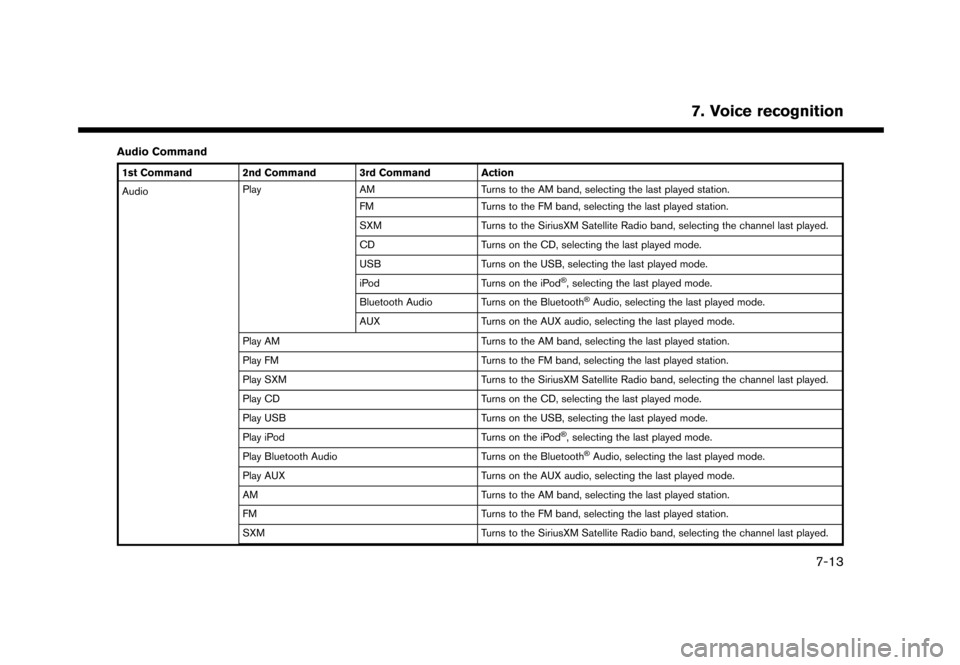
Audio Command
1st Command 2nd Command 3rd Command Action
AudioPlay
AM Turns to the AM band, selecting the last played station.
FM Turns to the FM band, selecting the last played station.
SXM Turns to the SiriusXM Satellite Radio band, selecting the channel last played.
CD Turns on the CD, selecting the last played mode.
USB Turns on the USB, selecting the last played mode.
iPod Turns on the iPod
�Š, selecting the last played mode.
Bluetooth Audio Turns on the Bluetooth
�ŠAudio, selecting the last played mode.
AUX Turns on the AUX audio, selecting the last played mode.
Play AM Turns to the AM band, selecting the last played station.
Play FM Turns to the FM band, selecting the last played station.
Play SXM Turns to the SiriusXM Satellite Radio band, selecting the channel last played.
Play CD Turns on the CD, selecting the last played mode.
Play USB Turns on the USB, selecting the last played mode.
Play iPod Turns on the iPod
�Š, selecting the last played mode.
Play Bluetooth Audio Turns on the Bluetooth
�ŠAudio, selecting the last played mode.
Play AUX Turns on the AUX audio, selecting the last played mode.
AM Turns to the AM band, selecting the last played station.
FM Turns to the FM band, selecting the last played station.
SXM Turns to the SiriusXM Satellite Radio band, selecting the channel last played.
7. Voice recognition
7-13
Page 188 of 248

7. Voice recognition
1st Command 2nd Command 3rd Command ActionCD Turns on the CD, selecting the last played mode.
USB Turns on the USB, selecting the last played mode.
iPod Turns on the iPod
�Š, selecting the last played mode.
Bluetooth Audio Turns on the Bluetooth
�ŠAudio, selecting the last played mode.
AUX Turns on the AUX audio, selecting the last played mode.
AM
AM Preset <1-6> Plays the spoken AM preset station.
FM
FM Preset <1-12> Plays the spoken FM preset station.
SXM
SXM
SXM Preset <1-18> Plays the spoken SXM preset channel.
USB Show Folders Displays folders in the USB memory device.
USB Play Folder
USB Play File
iPod Play Artist
�Š, selecting the artist.
iPod Play Album
�Š, selecting the album.
iPod Play Song
�Š, selecting the track. You can speak the commands
successively.
iPod Play Playlist
�Š, playing the playlist that you spoke.
7-14