change time NISSAN GT-R 2017 R35 Multi Function Display Owners Manual
[x] Cancel search | Manufacturer: NISSAN, Model Year: 2017, Model line: GT-R, Model: NISSAN GT-R 2017 R35Pages: 248, PDF Size: 1.72 MB
Page 3 of 248
FOREWORD
Thank you for purchasing a NISSAN vehicle.
This user’s manual is for NissanConnectSMwith
Navigation, Mobile Apps and Services offered in
your NISSAN vehicle.
Operation instructions for the following systems
are included in this manual.
. Audio
. Hands-Free Phone
. NissanConnect
SMMobile Apps
. NissanConnect
SMServices
. Navigation
. Voice recognition
. Information and settings viewable on Nis-
sanConnect
SM
.Multi function meter
Please read this manual carefully to ensure safe
operation of NissanConnect
SMwith Navigation,
Mobile Apps and Services.
. Because of possible specification changes
and optional equipment, some sections of
this manual may not apply to your vehicle. .
All information, specifications and illustra-
tions in this manual are those in effect at the
time of printing. NISSAN reserves the right to
change specifications or design at any time
without notice.
. Do not remove this manual from the vehicle
when selling this vehicle. The next user of the
system may need the manual.
Page 22 of 248
2. Getting started
.The screen may become distorted by strong
magnetic fields.
Maintenance of display
NOTICE
.To clean the display, stop the vehicle
in a safe location.
. Clean the display with the ignition
switch in the OFF position. If the
display is cleaned while the ignition
switch is placed in the ON position,
unintentional operation may occur.
. To clean the display, never use a
rough cloth, alcohol, benzine, thinner
or any kind of solvent or paper towel
with a chemical cleaning agent. They
will scratch or deteriorate the panel.
. Do not splash any liquid such as
water or car fragrance on the display.
Contact with liquid will cause the
system to malfunction.
To clean the display screen, use a dry, soft cloth.
If additional cleaning is necessary, use a small
amount of neutral detergent with a soft cloth.
Never spray the screen with water or detergent.
Dampen the cloth first, then wipe the screen.
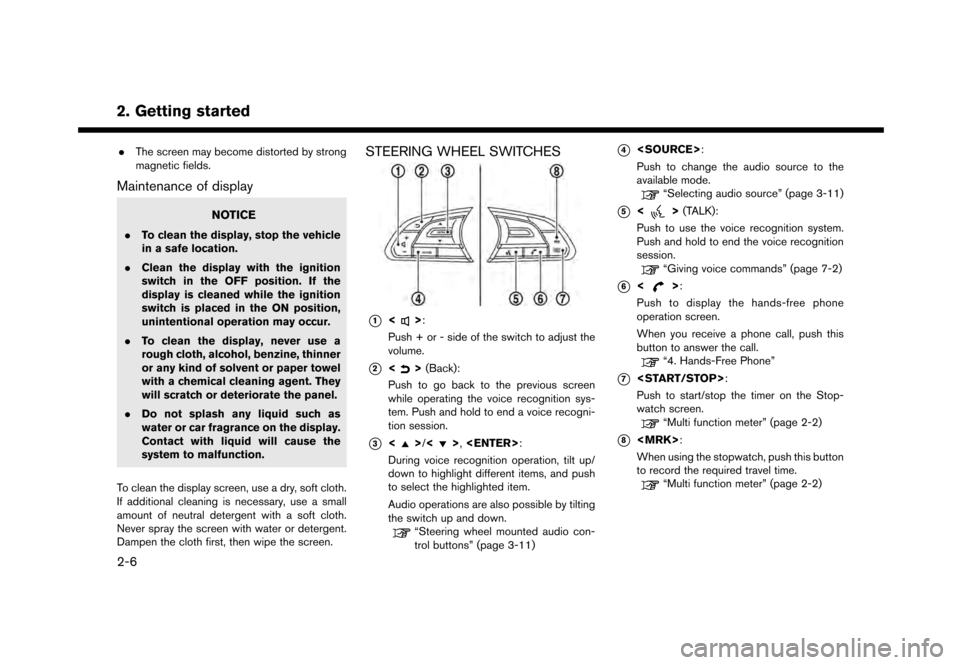
STEERING WHEEL SWITCHES
*1<>:
Push + or - side of the switch to adjust the
volume.
*2<> (Back):
Push to go back to the previous screen
while operating the voice recognition sys-
tem. Push and hold to end a voice recogni-
tion session.
*3<>/<>,
During voice recognition operation, tilt up/
down to highlight different items, and push
to select the highlighted item.
Audio operations are also possible by tilting
the switch up and down.
“Steering wheel mounted audio con-
trol buttons” (page 3-11)
*4
Push to change the audio source to the
available mode.
“Selecting audio source” (page 3-11)
*5<> (TALK):
Push to use the voice recognition system.
Push and hold to end the voice recognition
session.
“Giving voice commands” (page 7-2)
*6<>:
Push to display the hands-free phone
operation screen.
When you receive a phone call, push this
button to answer the call.
“4. Hands-Free Phone”
*7
Push to start/stop the timer on the Stop-
watch screen.
“Multi function meter” (page 2-2)
*8
When using the stopwatch, push this button
to record the required travel time.
“Multi function meter” (page 2-2)
2-6
Page 29 of 248
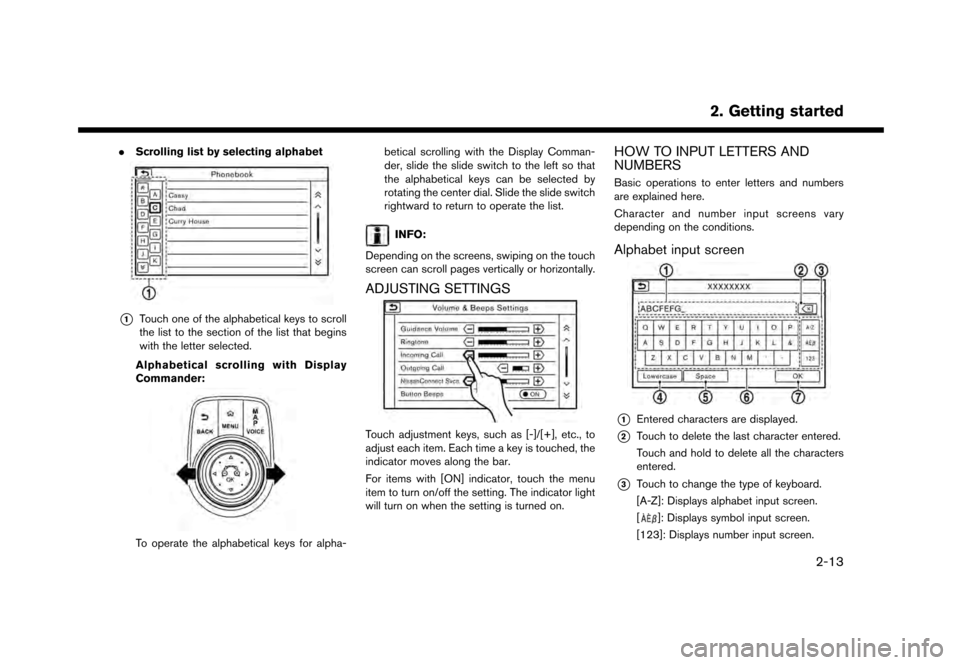
.Scrolling list by selecting alphabet
*1Touch one of the alphabetical keys to scroll
the list to the section of the list that begins
with the letter selected.
Alphabetical scrolling with Display
Commander:
To operate the alphabetical keys for alpha- betical scrolling with the Display Comman-
der, slide the slide switch to the left so that
the alphabetical keys can be selected by
rotating the center dial. Slide the slide switch
rightward to return to operate the list.
INFO:
Depending on the screens, swiping on the touch
screen can scroll pages vertically or horizontally.
ADJUSTING SETTINGS
Touch adjustment keys, such as [-]/[+], etc., to
adjust each item. Each time a key is touched, the
indicator moves along the bar.
For items with [ON] indicator, touch the menu
item to turn on/off the setting. The indicator light
will turn on when the setting is turned on.
HOW TO INPUT LETTERS AND
NUMBERS
Basic operations to enter letters and numbers
are explained here.
Character and number input screens vary
depending on the conditions.
Alphabet input screen
*1Entered characters are displayed.
*2Touch to delete the last character entered.
Touch and hold to delete all the characters
entered.
*3Touch to change the type of keyboard.
[A-Z]: Displays alphabet input screen.
[
]: Displays symbol input screen.
[123]: Displays number input screen.
2. Getting started
2-13
Page 33 of 248
To ensure safe driving, some functions cannot be
operated or have limited operation while the
vehicle is in motion.
The on-screen text and keys for these restricted
functions will be “grayed-out” or muted and
cannot be selected while driving. In some cases,
a screen message will appear indicating a
restricted function.
Restricted functions while driving include:. Character (letter and number) input screen
. Scrolling and viewing of certain list screens
. Displaying detail information and touching
item on some information screen
. Adding/editing home location, address book
entries and current route
. Registering cellular phones
. Connecting Bluetooth
�Šdevices for the first
time
. Making a call by dial number and handset
phonebook
. Setting phone, NissanConnect
SMServices
(if so equipped) , Bluetooth�Šfunctions, etc.
. Various other settings
These functions will become available again
when the vehicle speed is not in motion. Some of the destination setting functions that
become unavailable while driving can be oper-
ated by voice recognition system. Available voice
commands may differ depending on the lan-
guage setting.
SYSTEM SETTINGS
The system settings can be changed for
convenience.
Available setting items may vary depending on
models and specifications.
SETTINGS MENU
Touch [Settings] on the Launch Bar and touch a
setting item you wish to adjust.
2. Getting started
2-17
Page 37 of 248
![NISSAN GT-R 2017 R35 Multi Function Display Owners Manual CLOCK SETTINGS
Clock settings of the system can be changed.
1. Touch [Settings] on the Launch Bar.
2. Touch [Clock].
Available setting items
Setting item Action
[On-screen
Clock]Sets the clock display NISSAN GT-R 2017 R35 Multi Function Display Owners Manual CLOCK SETTINGS
Clock settings of the system can be changed.
1. Touch [Settings] on the Launch Bar.
2. Touch [Clock].
Available setting items
Setting item Action
[On-screen
Clock]Sets the clock display](/img/5/524/w960_524-36.png)
CLOCK SETTINGS
Clock settings of the system can be changed.
1. Touch [Settings] on the Launch Bar.
2. Touch [Clock].
Available setting items
Setting item Action
[On-screen
Clock]Sets the clock display on/off.
When this item is on, the clock
display appears.
[Clock Format
(24h)] Turns on/off the 24-hour display
mode. When turned off, the
clock is set to the 12-hour
mode.
[Offset (hour)] Adjusts the offset value (hour).
[Offset (min)] Adjusts the offset value (min- utes) .
[Daylight Sav-
ings Time] Turns on/off the daylight saving
time setting.
[Time Zone] Select an appropriate time zone from the list. When selecting
[Auto], the system selects the
time zone automatically.
CONNECTING BLUETOOTH�ŠDE-
VICE
Your vehicle is equipped with the Bluetooth�Š
Hands-Free Phone System and Bluetooth�Š
audio device. If you are an owner of a compatible
Bluetooth�Šenabled cellular phone or Bluetooth�Š
audio device, you can set up the wireless
connection between your cellular phone and
the in-vehicle phone module or Bluetooth
�Šaudio
and in-vehicle audio module. With Bluetooth�Š
wireless technology, you can make or receive a
telephone call with your cellular phone in your
pocket and listen to Bluetooth
�Šaudio.
Connecting cellular phone/audio de-
vice
To use the Bluetooth�Šdevice with the in-vehicle
system for the first time, the device connection
operation is required.
1. Touch [Settings] on the Launch Bar.
2. Touch [Bluetooth] and touch [Connect De- vice]. A message is displayed.
3. Touch [Yes] to connect a cellular phone. Touch [No] to connect an audio device and
operate as guided by the system. (Opera-
tions may differ depending on the device.)
NOTE:
Some cellular phones or other devices may
cause interference or a buzzing noise to
come from the audio system speakers.
Storing the device in a different location
may reduce or eliminate the noise.
INFO:
. Up to 5 Bluetooth
�Šdevices can be con-
nected. If 5 devices are already connected,
one of the devices must first be deleted
before another device can be connected.
“Bluetooth�Šsettings” (page 2-21)
. The pairing procedure of the cellular phone
varies according to each cellular phone. See
the cellular phone Owner’s Manual for the
details.
. Visit www.nissanusa.com/bluetooth/ for a
recommended Bluetooth
�Šdevice.
Bluetooth�Šsettings
The Bluetooth�Šsettings can be changed ac-
cording to your preference.
1. Touch [Settings] on the Launch Bar.
2. Touch [Bluetooth].
2. Getting started
2-21
Page 40 of 248
3. Audio system
AUDIO OPERATION PRECAU-
TIONS
NOTICE
.Operate the audio system only when
the vehicle engine is running. Oper-
ating the audio system for extended
periods of time with the engine
turned off can discharge the vehicle
battery.
. Do not allow the system to get wet.
Excessive moisture such as spilled
liquids may cause the system to
malfunction.
RADIO
Place the ignition switch in the ACC or ON
position before turning on the radio. If you listen
to the radio with the engine not running, the
ignition switch should be placed in the ACC
position.
Radio reception is affected by station signal
strength, distance from radio transmitter, build-
ings, bridges, mountains and other external
influences. Intermittent changes in reception
quality normally are caused by these external
influences. Using a cellular phone in or near the vehicle
may influence radio reception quality.
Radio reception
Your radio system is equipped with state-of-the-
art electronic circuits to enhance radio reception.
These circuits are designed to extend reception
range, and to enhance the quality of that
reception.
However there are some general characteristics
of both FM and AM radio signals that can affect
radio reception quality in a moving vehicle, even
when the finest equipment is used. These
characteristics are completely normal in a given
reception area, and do not indicate any malfunc-
tion in your radio system.
Reception conditions will constantly change
because of vehicle movement. Buildings, terrain,
signal distance and interference from other
vehicles can work against ideal reception.
Described below are some of the factors that
can affect your radio reception.
Some cellular phones or other devices may
cause interference or a buzzing noise to come
from the audio system speakers. Storing the
device in a different location may reduce or
eliminate the noise.
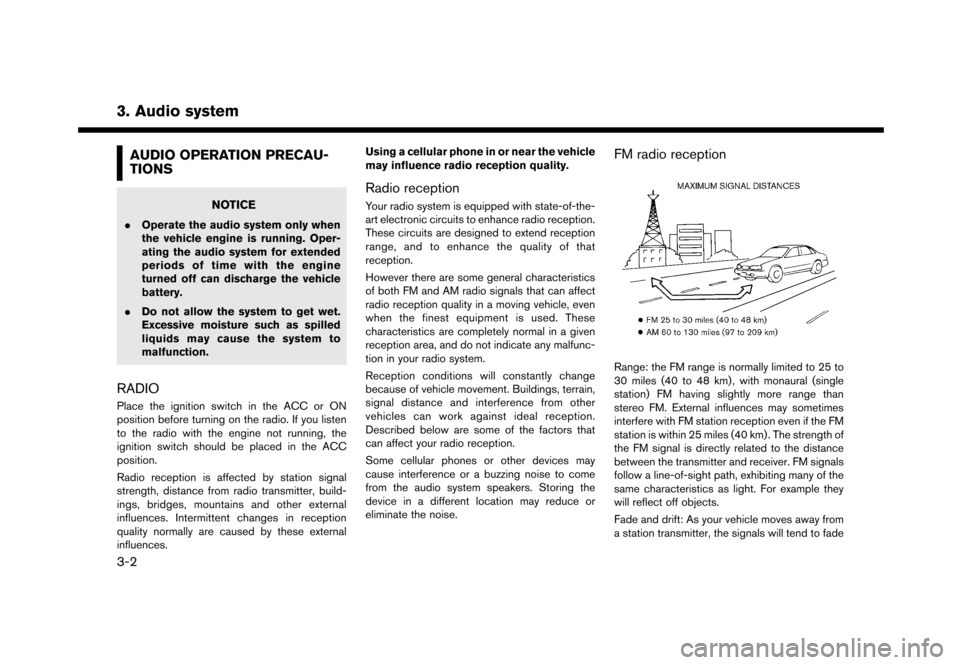
FM radio reception
Range: the FM range is normally limited to 25 to
30 miles (40 to 48 km) , with monaural (single
station) FM having slightly more range than
stereo FM. External influences may sometimes
interfere with FM station reception even if the FM
station is within 25 miles (40 km) . The strength of
the FM signal is directly related to the distance
between the transmitter and receiver. FM signals
follow a line-of-sight path, exhibiting many of the
same characteristics as light. For example they
will reflect off objects.
Fade and drift: As your vehicle moves away from
a station transmitter, the signals will tend to fade
3-2
Page 54 of 248
3. Audio system
*: The default passcode is “1234”.
INFO:
. SiriusXM services require a subscription after trial period and are sold separately or as a package. The satellite service is available only in the 48
contiguous USA and DC. SiriusXM satellite service is also available in Canada; see www.siriusxm.ca.
. It may take some time to receive the activation signal after the initiation of the SiriusXM Satellite Radio subscription. After receiving the activation signal,
an available channel list will automatically be updated in the radio. Change the position of the ignition switch from LOCK to ACC to update the SiriusXM
channel list.
3-16
Page 56 of 248
![NISSAN GT-R 2017 R35 Multi Function Display Owners Manual 3. Audio system
[] Each time [] is touched, the
repeat mode changes.
“Changing play mode”
(page 3-18)
[
] Touch once to return to the begin- ning of the current track. Touch again
to select the pr NISSAN GT-R 2017 R35 Multi Function Display Owners Manual 3. Audio system
[] Each time [] is touched, the
repeat mode changes.
“Changing play mode”
(page 3-18)
[
] Touch once to return to the begin- ning of the current track. Touch again
to select the pr](/img/5/524/w960_524-55.png)
3. Audio system
[] Each time [] is touched, the
repeat mode changes.
“Changing play mode”
(page 3-18)
[
] Touch once to return to the begin- ning of the current track. Touch again
to select the previous track. Touch
and hold to rewind the current track.
[
] Touch to play the track.
[
] Touch to pause the track.
[
] Touch to select the next track. Touch and hold to fast-forward the track.
[
] Each time [] is touched, the
random mode changes.
“Changing play mode”
(page 3-18)
*8Track and folder number:
Indicates the track number and the folder
number.
*9Data type indicator:
Indicates the type of data currently playing.
CD player operation
Loading:
Insert a CD into the slot with the label side facing
up. The CD will be guided automatically into the
slot and start playing.
After loading the CD, the CD screen will appear
on the display.
Activation and playing:
The CD mode can be also selected from the
source list with a CD loaded.
“Selecting audio source” (page 3-11)
Skipping tracks:
To skip the tracks, push <
>/<>, touch
[]/[] on the screen, or tilt up/down
<>/<> on the steering wheel repeatedly
until preferred track is selected.
INFO:
Depending on the condition, skipping to the
previous track may require pushing the button or
touching the key twice. Pushing the button or
touching the key once may only restart the
currently track from the beginning. Changing folders:
To change folders, touch [CD Menu] and touch
[Folder List].
“CD Menu” (page 3-19)
Turn
different folders. If no folders are found, tracks
will be skipped.
Fast-forwarding/rewinding:
The following operation methods are available for
rewinding and fast-forwarding the track.
Control panel operation:
. Push and hold <
>/<>.
. Touch and hold [
]/[].
Steering wheel switch operation: . Tilt and hold <
>/<>on the steering
wheel.
Changing play mode:
Repeat mode
Touch [
] on the CD screen to change the
repeat mode as follows.
. CD:
[Disc] ⇔[1 Track]
. CD with compressed audio files:
[All] ?[1 Track] ?[1 Folder] ?[All]
3-18
Page 60 of 248
![NISSAN GT-R 2017 R35 Multi Function Display Owners Manual 3. Audio system
*7USB operation keys:
Touch an icon for operations.
[] Each time [] is touched, the
repeat mode changes.
“Changing play mode”
(page 3-22)
[
] Touch to return to the beginning of th NISSAN GT-R 2017 R35 Multi Function Display Owners Manual 3. Audio system
*7USB operation keys:
Touch an icon for operations.
[] Each time [] is touched, the
repeat mode changes.
“Changing play mode”
(page 3-22)
[
] Touch to return to the beginning of th](/img/5/524/w960_524-59.png)
3. Audio system
*7USB operation keys:
Touch an icon for operations.
[] Each time [] is touched, the
repeat mode changes.
“Changing play mode”
(page 3-22)
[
] Touch to return to the beginning of the current track. Touch again to
select the previous track. Touch and
hold to rewind the current track.
[
] Touch to play the track.
[
] Touch to pause the track.
[
] Touch to select the next track. Touch and hold to fast-forward the track.
[
] Each time [] is touched, the
random mode changes.
“Changing play mode”
(page 3-22)
*8Track and folder number:
Indicates the track number and the folder
number.
*9Data type indicator:
Indicates the type of data currently playing.
USB memory device player operation
Activation and playing:
Connecting the USB memory device into the
port will activate the USB mode.
USB memory device can also be played by
selecting the source on the audio source menu
screen.
“Selecting audio source” (page 3-11)
To pause playing the USB memory device, touch
[
]. To resume playing, touch [].
Skipping tracks:
To skip the tracks, push <
>/<>, touch
[]/[] on the screen, or tilt up/down
<
>/<> on the steering wheel repeatedly
until preferred track is selected.
INFO:
Depending on the condition, skipping to the
previous track may require pushing the button or
touching the key twice. Pushing the button or
touching the key once may only restart the
current track from the beginning.
Changing folders:
To change folders, touch [USB Menu] and touch
[Folder List].
“USB Menu” (page 3-22)
Turn
different folders. If no folders are found, tracks
will be skipped.
Fast-forwarding/rewinding:
To rewind or fast-forward the track, push and
hold <
>/<>, touch and hold []/[],
or tilt and hold <>/<>on the steering
wheel.
Changing play mode:
Repeat mode
Touch [
] on the screen to change the repeat
mode as follows.
[All] ?[1 Track] ?[1 Folder] ?[All]
Random mode
Touch [
] on the screen to change the random
mode as follows.
(off) ?[1 Folder] ?[All] ?(off)
USB Menu
Touch [USB Menu] on the USB screen to display
the USB Menu screen.
The following items are available.
3-22
Page 64 of 248
![NISSAN GT-R 2017 R35 Multi Function Display Owners Manual 3. Audio system
[] Each time [] is touched, the
mode changes.
“Changing play mode”
(page 3-26)
[
] Touch to return to the beginning of the current track. Touch again to
select the previous track. NISSAN GT-R 2017 R35 Multi Function Display Owners Manual 3. Audio system
[] Each time [] is touched, the
mode changes.
“Changing play mode”
(page 3-26)
[
] Touch to return to the beginning of the current track. Touch again to
select the previous track.](/img/5/524/w960_524-63.png)
3. Audio system
[] Each time [] is touched, the
mode changes.
“Changing play mode”
(page 3-26)
[
] Touch to return to the beginning of the current track. Touch again to
select the previous track. Touch and
hold to rewind the current track.
[
] Touch to play the track.
[
] Touch to pause the track.
[
] Touch to select the next track. Touch and hold to fast-forward the track.
[
] Each time [] is touched, the
mode changes.
“Changing play mode”
(page 3-26)
*8Track number:
Indicates the track number and the total
number of tracks.
iPod�Šplayer operation
Activation and playing:
Connecting iPod
�Što the vehicle via USB cable
will activate the iPod�Šmode.
The iPod�Šcan also be played by selecting the
source on the audio source menu screen.
“Selecting audio source” (page 3-11) Selecting search method:
A list of search methods is displayed in the iPod
�Š
menu.
Touch [iPod Menu] to display the iPod�Šmenu.
Touch and select an item to play the iPod�Šin your
preferred settings.
Skipping tracks:
To skip the tracks, push <
>/<>, touch
[]/[] on the screen, or tilt up/down
<>/<> on the steering wheel repeatedly
until preferred track is selected.
INFO:
Depending on the condition, skipping to the
previous track may require pushing the button or
touching the key twice. Pushing the button or
touching the key once may only restart the
current track from the beginning.
Turning
track is playing will also skip the tracks.
Skipping items:
Touch [iPod Menu] to display the item list. Turn
items on the list. Fast-forwarding/rewinding:
To fast-forward or rewind the track, push and
hold
<
>/<>, touch and hold []/[],
or tilt and hold <>/<>on the steering
wheel.
Changing play mode:
Repeat mode
Touch [
] on the screen to change the repeat
mode as follows.
(off) ?[One] ?[All] ?(off)
Random mode
Touch [
] on the screen to change the random
mode as follows.
(off) ?[Songs] ?[Albums] ?(off)
INFO:
Even when iPod
�Šor iPhone�Šare inserted into
both of the two USB ports, the system recog-
nizes only one connected iPod
�Šor iPhone�Šat a
time.
3-26