manual transmission NISSAN JUKE 2014 F15 / 1.G Owner's Manual
[x] Cancel search | Manufacturer: NISSAN, Model Year: 2014, Model line: JUKE, Model: NISSAN JUKE 2014 F15 / 1.GPages: 402, PDF Size: 1.96 MB
Page 290 of 402
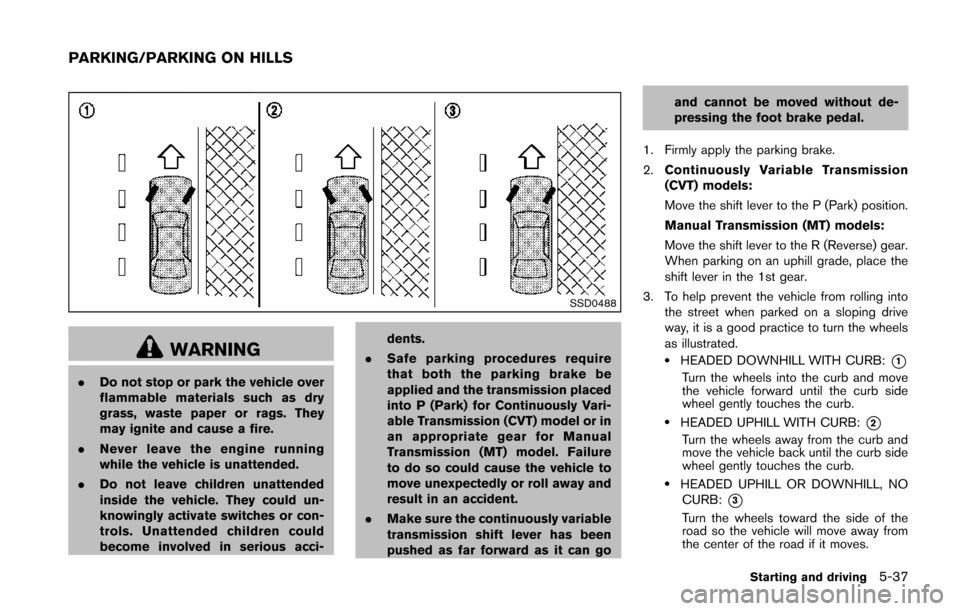
SSD0488
WARNING
.Do not stop or park the vehicle over
flammable materials such as dry
grass, waste paper or rags. They
may ignite and cause a fire.
. Never leave the engine running
while the vehicle is unattended.
. Do not leave children unattended
inside the vehicle. They could un-
knowingly activate switches or con-
trols. Unattended children could
become involved in serious acci- dents.
. Safe parking procedures require
that both the parking brake be
applied and the transmission placed
into P (Park) for Continuously Vari-
able Transmission (CVT) model or in
an appropriate gear for Manual
Transmission (MT) model. Failure
to do so could cause the vehicle to
move unexpectedly or roll away and
result in an accident.
. Make sure the continuously variable
transmission shift lever has been
pushed as far forward as it can go and cannot be moved without de-
pressing the foot brake pedal.
1. Firmly apply the parking brake.
2. Continuously Variable Transmission
(CVT) models:
Move the shift lever to the P (Park) position.
Manual Transmission (MT) models:
Move the shift lever to the R (Reverse) gear.
When parking on an uphill grade, place the
shift lever in the 1st gear.
3. To help prevent the vehicle from rolling into the street when parked on a sloping drive
way, it is a good practice to turn the wheels
as illustrated.
.HEADED DOWNHILL WITH CURB:*1
Turn the wheels into the curb and move
the vehicle forward until the curb side
wheel gently touches the curb.
.HEADED UPHILL WITH CURB:*2
Turn the wheels away from the curb and
move the vehicle back until the curb side
wheel gently touches the curb.
.HEADED UPHILL OR DOWNHILL, NOCURB:
*3
Turn the wheels toward the side of the
road so the vehicle will move away from
the center of the road if it moves.
Starting and driving5-37
PARKING/PARKING ON HILLS
Page 300 of 402
TIRE PRESSURE MONITORING SYS-
TEM (TPMS)
This vehicle is equipped with the Tire Pressure
Monitoring System (TPMS) . It monitors tire
pressure of all tires except the spare. When
the low tire pressure warning light is lit, and the
CHECK TIRE PRES (pressure) warning mes-
sage is displayed in the vehicle information
display, one or more of your tires is significantly
under-inflated. If the vehicle is being driven with
low tire pressure, the TPMS will activate and
warn you of it by the low tire pressure warning
light. This system will activate only when the
vehicle is driven at speeds above 16 MPH (25
km/h). For more details, see “Warning/indicator
lights and audible reminders” (P.2-12) and “Tire
Pressure Monitoring System (TPMS)” (P.5-4) .
WARNING
.If the low tire pressure warning light
illuminates while driving, avoid sud-
den steering maneuvers or abrupt
braking, reduce vehicle speed, pull
off the road to a safe location and
stop the vehicle as soon as possi-
ble. Driving with under-inflated tires
may permanently damage the tires
and increase the likelihood of tire failure. Serious vehicle damage
could occur and may lead to an
accident and could result in serious
personal injury. Check the tire pres-
sure for all four tires. Adjust the tire
pressure to the recommended COLD
tire pressure shown on the Tire and
Loading Information label to turn
the low tire pressure warning light
OFF. If you have a flat tire, replace it
with a spare tire as soon as possi-
ble.
. When a spare tire is mounted or a
wheel is replaced, the TPMS will not
function and the low tire pressure
warning light will flash for approxi-
mately 1 minute. The light will
remain on after 1 minute. Contact
your NISSAN dealer as soon as
possible for tire replacement and/
or system resetting.
. Replacing tires with those not ori-
ginally specified by NISSAN could
affect the proper operation of the
TPMS.
. Do not inject any tire liquid or
aerosol tire sealant into the tires,
as this may cause a malfunction of the tire pressure sensors.
CHANGING A FLAT TIRE
If you have a flat tire, follow the instructions
below.
Stopping the vehicle
1. Safely move the vehicle off the road and
away from traffic.
2. Turn on the hazard warning flashers.
3. Park on a level surface and apply the parking brake.
4. Continuously Variable Transmission
(CVT) models:
Move the shift lever to the P (Park) position.
Manual Transmission (MT) models:
Move the shift lever to the R (Reverse)
position.
5. Turn off the engine.
6. Raise the hood to warn other traffic, and to signal professional road assistance person-
nel that you need assistance.
7. Have all passengers get out of the vehicle and stand in a safe place, away from traffic
and clear of the vehicle.
In case of emergency6-3
FLAT TIRE
Page 301 of 402
6-4In case of emergency
WARNING
.Make sure the parking brake is
securely applied and the Manual
Transmission is shifted into R (Re-
verse) , or the Continuously Variable
Transmission into P (Park) .
. Never change tires when the vehicle
is on a slope, ice or slippery areas.
This is hazardous.
. Never change tires if oncoming
traffic is close to your vehicle. Wait
for professional road assistance.
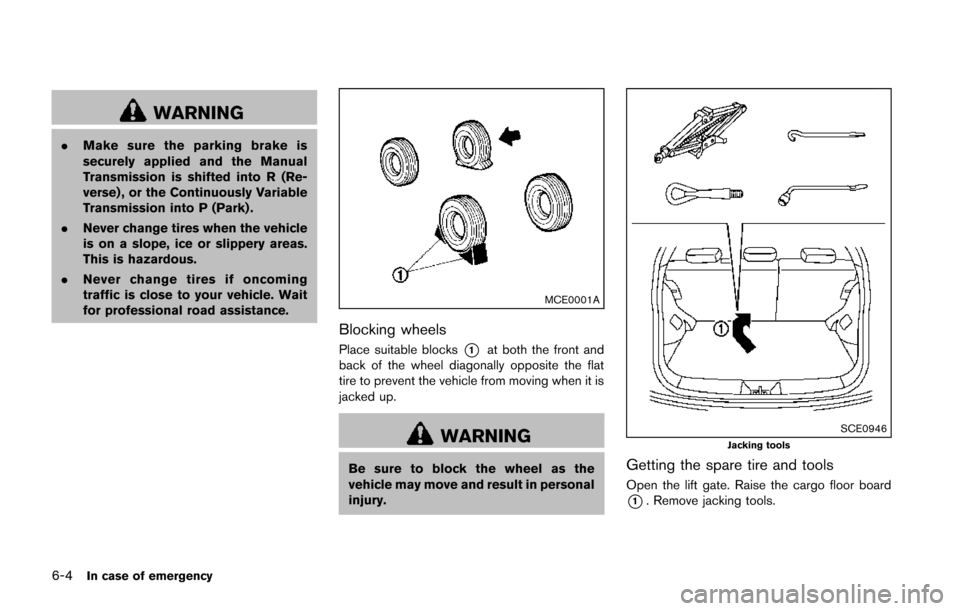
MCE0001A
Blocking wheels
Place suitable blocks*1at both the front and
back of the wheel diagonally opposite the flat
tire to prevent the vehicle from moving when it is
jacked up.
WARNING
Be sure to block the wheel as the
vehicle may move and result in personal
injury.
SCE0946Jacking tools
Getting the spare tire and tools
Open the lift gate. Raise the cargo floor board
*1. Remove jacking tools.
Page 306 of 402
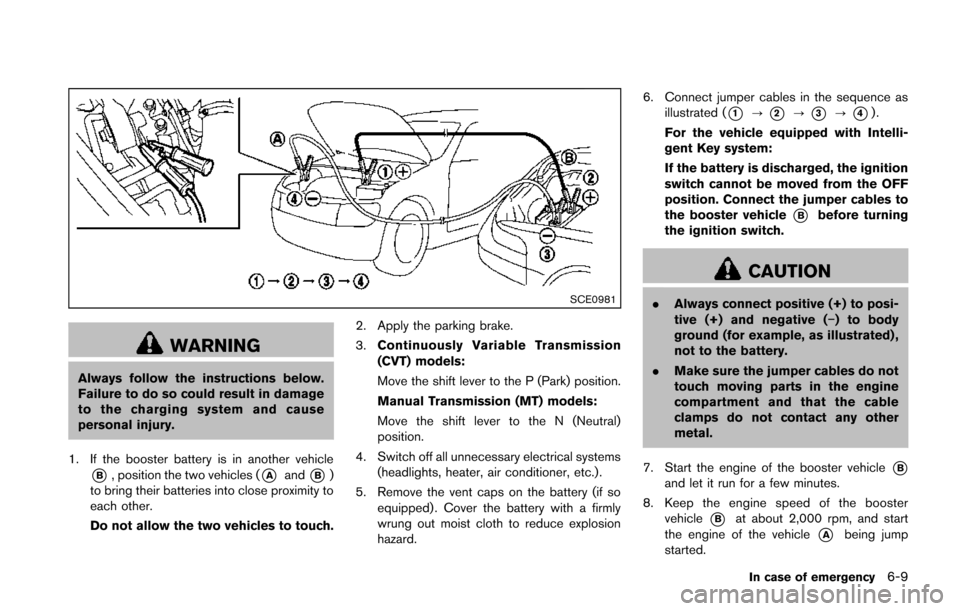
SCE0981
WARNING
Always follow the instructions below.
Failure to do so could result in damage
to the charging system and cause
personal injury.
1. If the booster battery is in another vehicle
*B, position the two vehicles (*Aand*B)
to bring their batteries into close proximity to
each other.
Do not allow the two vehicles to touch. 2. Apply the parking brake.
3.
Continuously Variable Transmission
(CVT) models:
Move the shift lever to the P (Park) position.
Manual Transmission (MT) models:
Move the shift lever to the N (Neutral)
position.
4. Switch off all unnecessary electrical systems (headlights, heater, air conditioner, etc.).
5. Remove the vent caps on the battery (if so equipped) . Cover the battery with a firmly
wrung out moist cloth to reduce explosion
hazard. 6. Connect jumper cables in the sequence as
illustrated (
*1?*2?*3?*4).
For the vehicle equipped with Intelli-
gent Key system:
If the battery is discharged, the ignition
switch cannot be moved from the OFF
position. Connect the jumper cables to
the booster vehicle
*Bbefore turning
the ignition switch.
CAUTION
. Always connect positive (+) to posi-
tive (+) and negative (−) to body
ground (for example, as illustrated) ,
not to the battery.
. Make sure the jumper cables do not
touch moving parts in the engine
compartment and that the cable
clamps do not contact any other
metal.
7. Start the engine of the booster vehicle
*Band let it run for a few minutes.
8. Keep the engine speed of the booster vehicle
*Bat about 2,000 rpm, and start
the engine of the vehicle
*Abeing jump
started.
In case of emergency6-9
Page 307 of 402
6-10In case of emergency
CAUTION
Do not keep the starter motor engaged
for more than 10 seconds. If the engine
does not start right away, place the
ignition switch in the OFF position and
wait 10 seconds before trying again.
9. After starting your engine, carefully discon- nect the negative cable and then the positive
cable (
*4?*3?*2?*1).
10. Replace the vent caps (if so equipped). Be sure to dispose of the cloth used to cover
the vent holes as it may be contaminated
with corrosive acid. Do not attempt to start the engine by pushing.
CAUTION
.
Continuously Variable Transmission
(CVT) models cannot be push-
started or tow-started. Attempting
to do so may cause transmission
damage.
. Three-way catalyst equipped mod-
els should not be started by pushing
since the three way catalyst may be
damaged.
. Never try to start the vehicle by
towing it; when the engine starts,
the forward surge could cause the
vehicle to collide with the tow
vehicle.
CAUTION
. Do not continue to drive if your
vehicle overheats. Doing so could
cause engine damage or a vehicle
fire.
. To avoid the danger of being
scalded, never remove the radiator
cap while the engine is still hot.
When the radiator cap is removed,
pressurized hot water will spurt out,
possibly causing serious injury.
. Do not open the hood if steam is
coming out.
If your vehicle is overheating (indicated by an
extremely high temperature gauge reading) , or if
you feel a lack of engine power, detect abnormal
noise, etc., take the following steps:
1. Move the vehicle safely off the road and apply the parking brake.
2. Continuously Variable Transmission
(CVT) models:
Move the shift lever to the P (Park) position.
Manual Transmission (MT) models:
Move the shift lever to the N (Neutral)
position.
PUSH STARTING IF YOUR VEHICLE OVERHEATS
Page 309 of 402
6-12In case of emergency
When towing your vehicle, all State (Provincial in
Canada) and local regulations for towing must
be followed. Incorrect towing equipment could
damage your vehicle. Towing instructions are
available from a NISSAN dealer. Local service
operators are familiar with the applicable laws
and procedures for towing. To assure proper
towing and to prevent accidental damage to
your vehicle, NISSAN recommends that you
have a service operator tow your vehicle. It is
advisable to have the service operator carefully
read the following precautions.
WARNING
.Never ride in a vehicle that is being
towed.
. Never get under your vehicle after it
has been lifted by a tow truck.
CAUTION
.When towing, make sure that the
transmission, axles, steering system
and powertrain are in working con-
dition. If any unit is damaged, dol-
lies must be used. .
Always attach safety chains before
towing.
For information about towing your vehicle behind
a recreational vehicle (RV), see “Flat towing”
(P.9-17) of this manual.
TOWING YOUR VEHICLE
Page 313 of 402
6-16In case of emergency
.Never tow a vehicle using the vehi-
cle tie down hook or recovery hook.
. Always pull the cable straight out
from the front of the vehicle. Never
pull on the vehicle at an angle.
. Pulling devices should be routed so
they do not touch any part of the
suspension, steering, brake or cool-
ing systems.
. Pulling devices such as ropes or
canvas straps are not recommended
for use in vehicle towing or recov-
ery.
Rocking a stuck vehicle
If your vehicle is stuck in sand, snow, mud, etc.,
use the following procedure:
1. Turn off the Vehicle Dynamic Control (VDC)
system.
2. Make sure the area in front and behind the vehicle is clear of obstructions.
3. Turn the steering wheel right and left to clear an area around the front tires.
4. Slowly rock the vehicle forward and back- ward.
.Shift back and forth between R (Reverse)and D (Drive) (Continuously Variable Transmission models) or 1st and R
(Reverse) (Manual Transmission models) .
.Apply the accelerator as little as possible
to maintain the rocking motion.
.Release the accelerator pedal beforeshifting between R and D (Continuously
Variable Transmission models) or 1st and
R (Manual Transmission models).
.Do not spin the tires above 35 MPH (55
km/h).
5. If the vehicle cannot be freed after a few tries, contact a professional towing service
to remove the vehicle.
Page 327 of 402
8-6Maintenance and do-it-yourself
improper servicing may result in operating
difficulties or excessive emissions, and could
affect your warranty coverage.If in doubt
about any servicing, we recommend that
it be done by a NISSAN dealer.
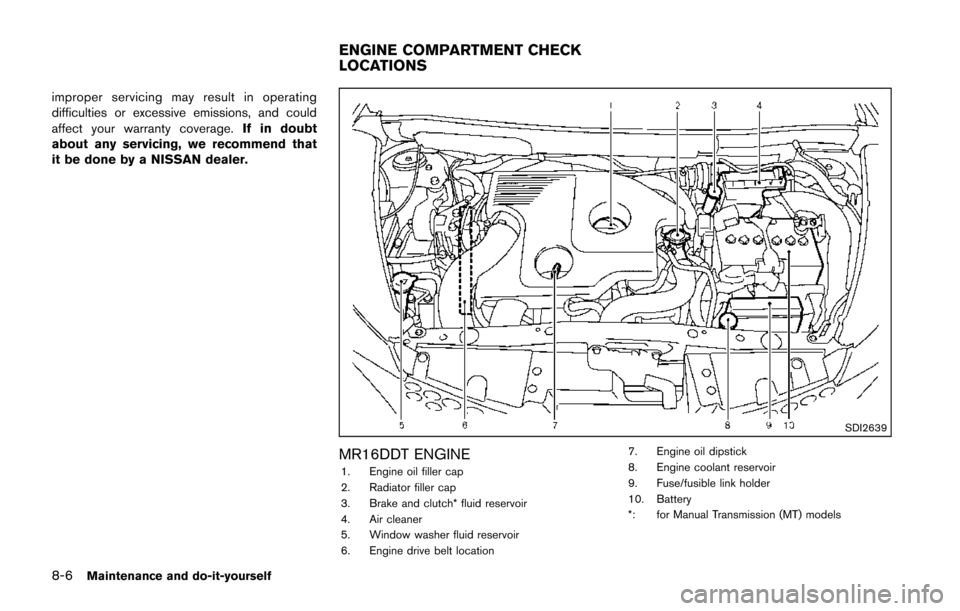
SDI2639
MR16DDT ENGINE1. Engine oil filler cap
2. Radiator filler cap
3. Brake and clutch* fluid reservoir
4. Air cleaner
5. Window washer fluid reservoir
6. Engine drive belt location 7. Engine oil dipstick
8. Engine coolant reservoir
9. Fuse/fusible link holder
10. Battery
*: for Manual Transmission (MT) models
ENGINE COMPARTMENT CHECK
LOCATIONS
Page 328 of 402
The engine cooling system is filled at the factory
with a pre-diluted mixture of 50% Genuine
NISSAN Long Life Antifreeze/Coolant (blue) and
50% water to provide year-round anti-freeze
and coolant protection. The anti-freeze solution
contains rust and corrosion inhibitors. Additional
engine cooling system additives are not neces-
sary.
WARNING
.Never remove the radiator or cool-
ant reservoir cap when the engine is
hot. Wait until the engine and
radiator cool down. Serious burns
could be caused by high pressure
fluid escaping from the radiator.
See precautions in “If your vehicle
overheats” (P.6-10) of this manual.
. The radiator is equipped with a
pressure type radiator cap. To pre-
vent engine damage, use only a
genuine NISSAN radiator cap.
. If the engine was stopped soon
when the engine is hot, the cooling
fan may operate for approximately
10 minutes after the engine was
stopped to cool the components in
the engine compartment. When the cooling fan is operating, be sure
that hands or other items do not get
caught in it.
CAUTION
.
Never use any cooling system ad-
ditives such as radiator sealer. Ad-
ditives may clog the cooling system
and cause damage to the engine,
transmission and/or cooling sys-
tem.
. When adding or replacing coolant,
be sure to use only Genuine
NISSAN Long Life Antifreeze/Cool-
ant (blue) or equivalent. Genuine
NISSAN Long Life Antifreeze/Cool-
ant (blue) is pre-diluted to provide
antifreeze protection to -348 F
(-378C) . If additional freeze protec-
tion is needed due to weather where
you operate your vehicle, add Gen-
uine NISSAN Long Life Antifreeze/
Coolant (blue) concentrate follow-
ing the directions on the container.
If an equivalent coolant other than
Genuine NISSAN Long Life Anti-
freeze/Coolant (blue) is used, fol- low the coolant manufacture’s
instructions to maintain minimum
antifreeze protection to -348
F
(-378C) . The use of other types of
coolant solutions other than Genu-
ine NISSAN Long Life Antifreeze/
Coolant (blue) or equivalent may
damage the engine cooling system.
. The life expectancy of the factory-fill
coolant is 105,000 miles (168,000
km) or 7 years. Mixing any other
type of coolant other than Genuine
NISSAN Long Life Antifreeze/Cool-
ant (blue) , including Genuine
NISSAN Long Life Antifreeze/Cool-
ant (green) , or the use of non-
distilled water will reduce the life
expectancy of the factory-fill cool-
ant. Refer to the NISSAN Service
and Maintenance Guide for more
details.
Maintenance and do-it-yourself8-7
ENGINE COOLING SYSTEM
Page 332 of 402
When checking or replacement is required, we
recommend a NISSAN dealer for servicing.
CAUTION
.Use only Genuine NISSAN CVT Fluid
NS-2. Do not mix with other fluids.
. Using transmission fluid other than
Genuine NISSAN CVT Fluid NS-2
will damage the CVT, which is not
covered by the NISSAN new vehicle
limited warranty. For additional brake and clutch fluid information,
see “Capacities and recommended fuel/lubri-
cants” (P.9-2) of this manual.WARNING
.
Use only new fluid from a sealed
container. Old, inferior or contami-
nated fluid may damage the brake
and clutch systems. The use of
improper fluids can damage the
brake and clutch systems, and affect
the vehicle’s stopping ability.
. Clean the filler cap before removing.
. Brake and clutch fluid is poisonous
and should be stored carefully in
marked containers out of the reach
of children.
CAUTION
Do not spill the fluid on any painted
surfaces. This will damage the paint. If
fluid is spilled, immediately wash the
surface with water.
SDI2655
Check the fluid level in the reservoir. If the fluid is
below the MIN line
*2or the brake warning
light comes on, add Genuine NISSAN Super
Heavy Duty Brake Fluid or equivalent DOT 3
fluid up to the MAX line
*1. If fluid must be
added frequently, the system should be checked
by a NISSAN dealer.
Maintenance and do-it-yourself8-11
CONTINUOUSLY VARIABLE
TRANSMISSION (CVT) FLUID BRAKE AND CLUTCH (if so
equipped) FLUID