NISSAN JUKE 2017 F15 / 1.G Owners Manual
Manufacturer: NISSAN, Model Year: 2017, Model line: JUKE, Model: NISSAN JUKE 2017 F15 / 1.GPages: 416, PDF Size: 2.62 MB
Page 181 of 416

4-22Heater, air conditioner, audio and phone systems
the monitor*2.
JVH1053X
System temporarily unavailable
When the “” icon is displayed on the screen,
there will be abnormal conditions in the Around
View
�ŠMonitor. This will not hinder normal
driving operation but the system should be
inspected. It is recommended you visit a
NISSAN dealer.
JVH1054X
When the “” icon is displayed on the
screen, the camera image may be receiving
temporary electronic disturbances from sur-
rounding devices. This will not hinder normal
driving operation but the system should be
inspected. It is recommended you visit a
NISSAN dealer.
Page 182 of 416
JVH1224X
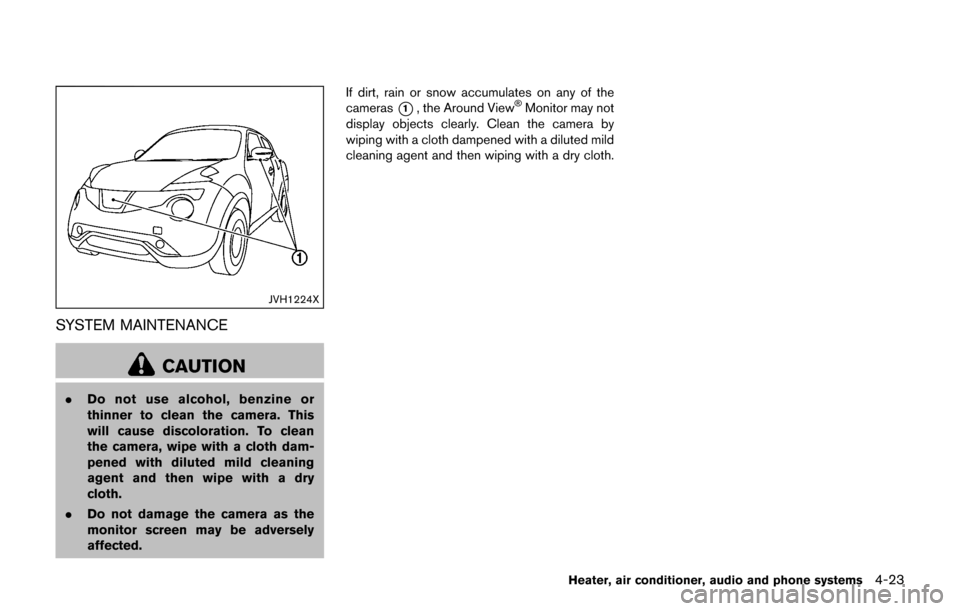
SYSTEM MAINTENANCE
CAUTION
.Do not use alcohol, benzine or
thinner to clean the camera. This
will cause discoloration. To clean
the camera, wipe with a cloth dam-
pened with diluted mild cleaning
agent and then wipe with a dry
cloth.
. Do not damage the camera as the
monitor screen may be adversely
affected. If dirt, rain or snow accumulates on any of the
cameras
*1, the Around View�ŠMonitor may not
display objects clearly. Clean the camera by
wiping with a cloth dampened with a diluted mild
cleaning agent and then wiping with a dry cloth.
Heater, air conditioner, audio and phone systems4-23
Page 183 of 416
4-24Heater, air conditioner, audio and phone systems
JVH1223X
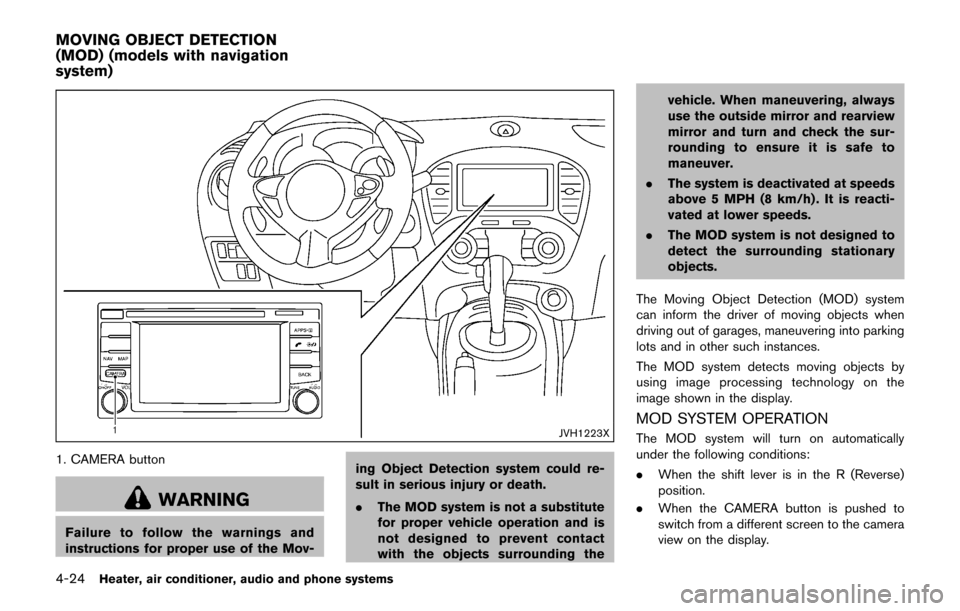
1. CAMERA button
WARNING
Failure to follow the warnings and
instructions for proper use of the Mov-ing Object Detection system could re-
sult in serious injury or death.
.
The MOD system is not a substitute
for proper vehicle operation and is
not designed to prevent contact
with the objects surrounding the vehicle. When maneuvering, always
use the outside mirror and rearview
mirror and turn and check the sur-
rounding to ensure it is safe to
maneuver.
. The system is deactivated at speeds
above 5 MPH (8 km/h) . It is reacti-
vated at lower speeds.
. The MOD system is not designed to
detect the surrounding stationary
objects.
The Moving Object Detection (MOD) system
can inform the driver of moving objects when
driving out of garages, maneuvering into parking
lots and in other such instances.
The MOD system detects moving objects by
using image processing technology on the
image shown in the display.
MOD SYSTEM OPERATION
The MOD system will turn on automatically
under the following conditions:
. When the shift lever is in the R (Reverse)
position.
. When the CAMERA button is pushed to
switch from a different screen to the camera
view on the display.
MOVING OBJECT DETECTION
(MOD) (models with navigation
system)
Page 184 of 416

.When vehicle speed decreases below
approximately 5 MPH (8 km/h) .
The MOD system operates in the following
conditions when the camera view is displayed:
. When the shift lever is in the P (Park) or N
(Neutral) position (CVT model) or the shift
lever is out of the R (Reverse) position (MT
model) and the vehicle is stopped, the MOD
system detects the moving objects in the
bird’s-eye view. The MOD system will not
operate if the outside mirrors are moving in
or out or if either door is opened.
. When the shift lever is in the D (Drive)
position (CVT model) or the shift lever is out
of the R (Reverse) position (MT model) , and
the vehicle speed is below approximately 5
MPH (8 km/h) , the MOD system detects
moving objects in the front view.
. When the shift lever is in the R (Reverse)
position and the vehicle speed is below
approximately 5 MPH (8 km/h) , the MOD
system detects moving objects in the rear
view. The MOD system will not operate if the
liftgate is open.
. When the ignition switch is placed in the
“OFF” position and then back to the “ON”
position.
The MOD system does not detect moving
objects in the front-side view. The MOD icon is not displayed on the screen when in this view.
When the MOD system detects a moving object
near the vehicle, the yellow frame will be
displayed on the view where the objects are
detected and a chime will sound once. While the
MOD system continues to detect moving
objects, the yellow frame continues to be
displayed.
JVH1256X
Front and bird’s-eye views
JVH0872XRear and bird’s-eye views
Heater, air conditioner, audio and phone systems4-25
Page 185 of 416
4-26Heater, air conditioner, audio and phone systems
JVH1257X
Rear and front-side views
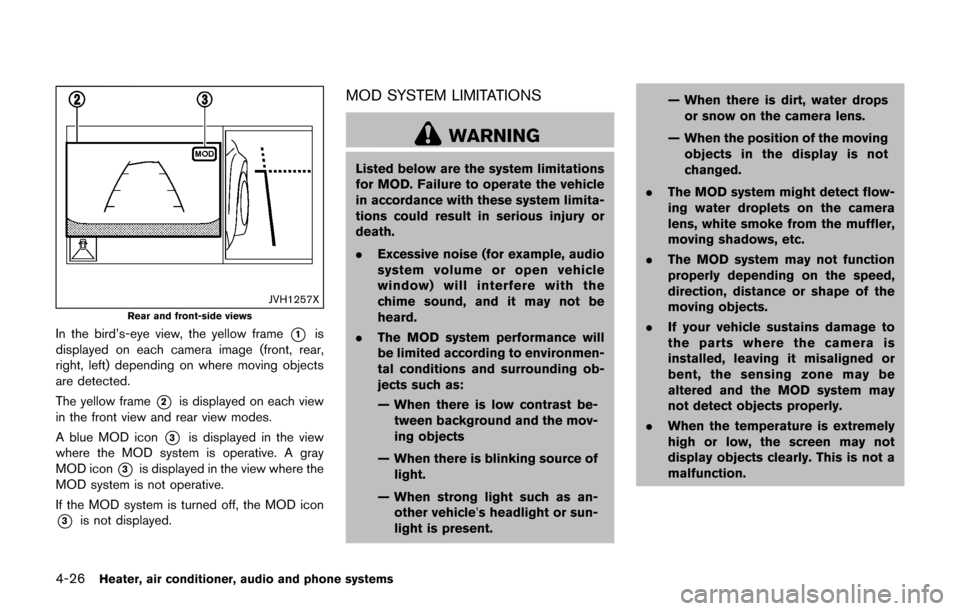
In the bird’s-eye view, the yellow frame*1is
displayed on each camera image (front, rear,
right, left) depending on where moving objects
are detected.
The yellow frame
*2is displayed on each view
in the front view and rear view modes.
A blue MOD icon
*3is displayed in the view
where the MOD system is operative. A gray
MOD icon
*3is displayed in the view where the
MOD system is not operative.
If the MOD system is turned off, the MOD icon
*3is not displayed.
MOD SYSTEM LIMITATIONS
WARNING
Listed below are the system limitations
for MOD. Failure to operate the vehicle
in accordance with these system limita-
tions could result in serious injury or
death.
. Excessive noise (for example, audio
system volume or open vehicle
window) will interfere with the
chime sound, and it may not be
heard.
. The MOD system performance will
be limited according to environmen-
tal conditions and surrounding ob-
jects such as:
— When there is low contrast be-
tween background and the mov-
ing objects
— When there is blinking source of light.
— When strong light such as an- other vehicle’s headlight or sun-
light is present. — When there is dirt, water drops
or snow on the camera lens.
— When the position of the moving objects in the display is not
changed.
. The MOD system might detect flow-
ing water droplets on the camera
lens, white smoke from the muffler,
moving shadows, etc.
. The MOD system may not function
properly depending on the speed,
direction, distance or shape of the
moving objects.
. If your vehicle sustains damage to
the parts where the camera is
installed, leaving it misaligned or
bent, the sensing zone may be
altered and the MOD system may
not detect objects properly.
. When the temperature is extremely
high or low, the screen may not
display objects clearly. This is not a
malfunction.
Page 186 of 416
JVH1224X
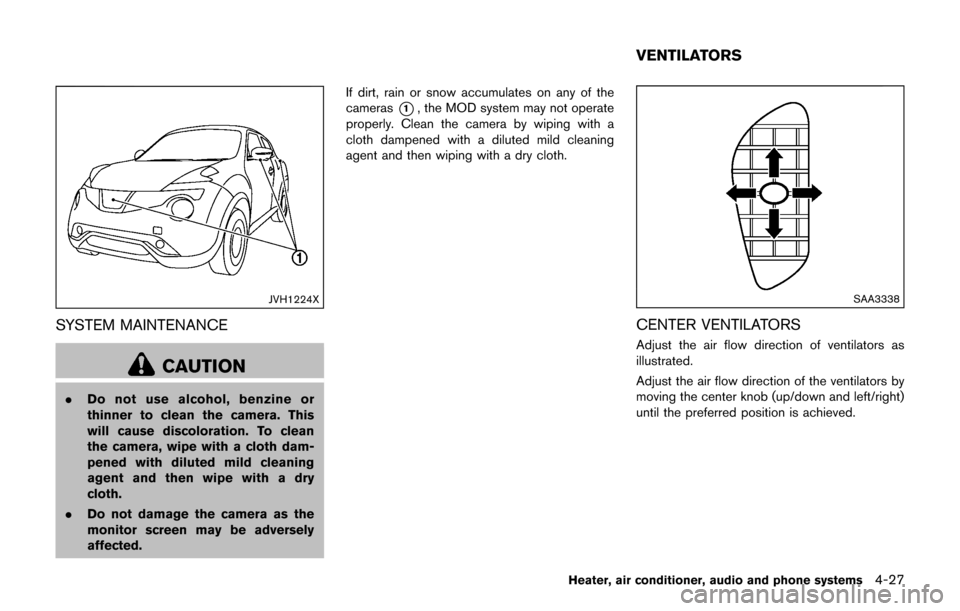
SYSTEM MAINTENANCE
CAUTION
.Do not use alcohol, benzine or
thinner to clean the camera. This
will cause discoloration. To clean
the camera, wipe with a cloth dam-
pened with diluted mild cleaning
agent and then wipe with a dry
cloth.
. Do not damage the camera as the
monitor screen may be adversely
affected. If dirt, rain or snow accumulates on any of the
cameras
*1, the MOD system may not operate
properly. Clean the camera by wiping with a
cloth dampened with a diluted mild cleaning
agent and then wiping with a dry cloth.
SAA3338
CENTER VENTILATORS
Adjust the air flow direction of ventilators as
illustrated.
Adjust the air flow direction of the ventilators by
moving the center knob (up/down and left/right)
until the preferred position is achieved.
Heater, air conditioner, audio and phone systems4-27
VENTILATORS
Page 187 of 416
4-28Heater, air conditioner, audio and phone systems
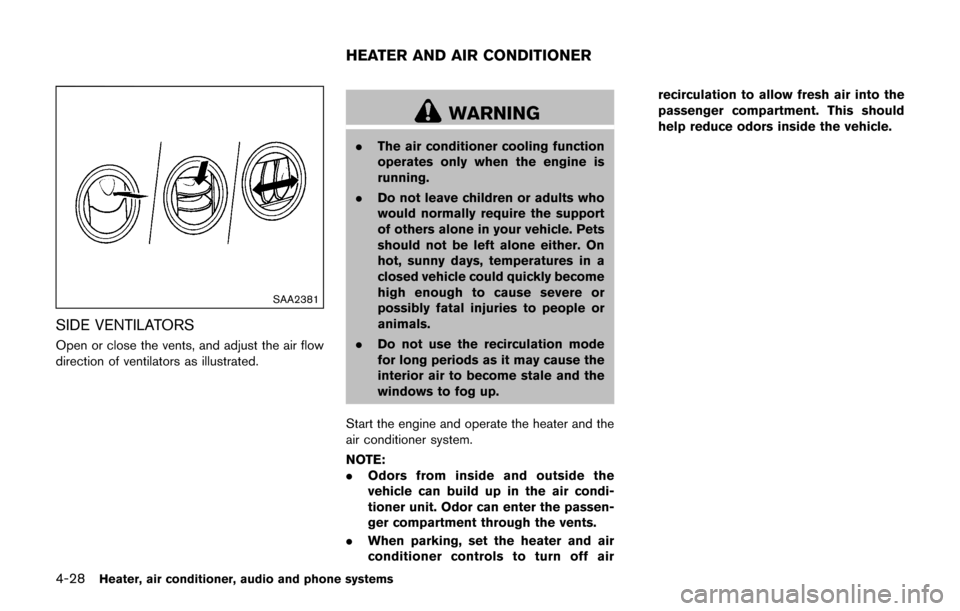
SAA2381
SIDE VENTILATORS
Open or close the vents, and adjust the air flow
direction of ventilators as illustrated.
WARNING
.The air conditioner cooling function
operates only when the engine is
running.
. Do not leave children or adults who
would normally require the support
of others alone in your vehicle. Pets
should not be left alone either. On
hot, sunny days, temperatures in a
closed vehicle could quickly become
high enough to cause severe or
possibly fatal injuries to people or
animals.
. Do not use the recirculation mode
for long periods as it may cause the
interior air to become stale and the
windows to fog up.
Start the engine and operate the heater and the
air conditioner system.
NOTE:
. Odors from inside and outside the
vehicle can build up in the air condi-
tioner unit. Odor can enter the passen-
ger compartment through the vents.
. When parking, set the heater and air
conditioner controls to turn off air recirculation to allow fresh air into the
passenger compartment. This should
help reduce odors inside the vehicle.
HEATER AND AIR CONDITIONER
Page 188 of 416

SAA3447
1. Air intake lever (Outside air circulation/Air
recirculation)
2. Air flow control dial
3. Fan speed control
dial
4. A/C (Air Conditioner) button
5. Temperature control dial
6. Rear window defroster
button (See “Rear
window and outside mirror defroster switch”
(P.2-38) .)
MANUAL AIR CONDITIONER (if so
equipped)
To turn off the heater and air conditioner, turn the
fan speed controldial to the OFF (0)
position.
Controls
Outside air circulation:
Move the air intake lever to the
position. The
air flow is drawn from outside the vehicle.
Air recirculation:
Move the air intake lever to the
position. The
air flow is circulated inside the vehicle.
Air flow control:
Turn the air flow control dial to change the air
flow mode.
— Air flows from the center and side ventilators.
— Air flows from the center and sideventilators and foot outlets.
— Air flows mainly from the foot outlets.
— Air flows from the defroster and footoutlets.
— Air flows mainly from the defroster outlets.
.When theorposition is selected,
the air conditioner will automatically turn on.
This will dehumidify the air and help to defog
the windows.
Heater, air conditioner, audio and phone systems4-29
Page 189 of 416

4-30Heater, air conditioner, audio and phone systems
Fan speed control:
Turn the fan speed control
dial clockwise to
increase the fan speed.
Turn the fan speed control
dial counter-
clockwise to decrease the fan speed.
A/C (Air Conditioner) operation:
Push the A/C button to turn on or off the air
conditioner. When the air conditioner is on, the
A/C indicator light on the button illuminates.
Temperature control:
Turn the temperature control dial to set the
desired temperature. Turn the dial between the
middle and the right position to select the hot
temperature. Turn the dial between the middle
and the left position to select the cool tempera-
ture.
Heater operation
Heating:
This mode is used to direct heated air to the foot
outlets.
1. Move the air intake lever to the
position.
2. Turn the air flow control dial to the
position.
3. Turn the fan speed control
dial to the
desired position. 4. Turn the temperature control dial to the
desired position between the middle and the
hot (right) position.
Ventilation:
This mode directs outside air to the side and
center ventilators.
1. Move the air intake lever to the
position.
2. Turn the air flow control dial to the
position.
3. Turn the fan speed control
dial to the
desired position.
Defrosting or defogging:
This mode directs the air to the defroster outlets
to defrost/defog the windows.
1. Move the air intake lever to the
position.
2. Turn the air flow control dial to the
position.
3. Turn the fan speed control
dial to the
desired position.
4. Turn the temperature control dial to the desired position between the middle and the
hot (right) position.
. To remove frost from the outside surface of
the windshield quickly, turn the temperature
control dial to the maximum hot position and
the fan speed control
dial to the
maximum position. .
When the
position is selected, the air
conditioner will automatically turn on. This
will dehumidify the air and help to defog the
windows.
Bi-level heating:
This mode directs cool air from the side and
center vents and warm air from the foot outlets.
When the temperature control dial is turned to
the maximum hot or cool position, the air
between the ventilators and the foot outlets is
the same temperature.
1. Move the air intake lever to the
position.
2. Turn the air flow control dial to the
position.
3. Turn the fan speed control
dial to the
desired position.
4. Turn the temperature control dial to the desired position.
Heating and defogging:
This mode heats the interior and defogs the
windows.
1. Move the air intake lever to the
position.
2. Turn the air flow control dial to the
position.
3. Turn the fan speed control
dial to the
desired position.
Page 190 of 416

4. Turn the temperature control dial to thedesired position.
When the
position is selected, the air
conditioner will automatically turn on. This will
dehumidify the air and help to defog the
windows.
Air conditioner operation
The air conditioner system should be operated
for approximately 10 minutes at least once a
month. This helps prevent damage to the air
conditioner system due to the lack of lubrication.
Cooling:
This mode is used to cool and dehumidify the air.
1. Move the air intake lever to the
position.
2. Turn the air flow control dial to the
position.
3. Turn the fan speed control
dial to the
desired position.
4. Push the A/C button on. (The A/C indicator light will illuminate.)
5. Turn the temperature control dial to the desired position between the middle and the
cool (left) position.
. For quick cooling when the outside tem-
perature is high, move the air intake lever to
the
position. Be sure to move the air
intake lever to theposition for normal cooling.
. A visible mist may be seen coming from the
ventilators in hot, humid conditions as the air
is cooled rapidly. This does not indicate a
malfunction.
Dehumidified heating:
This mode is used to heat and dehumidify the
air.
1. Move the air intake lever to the
position.
2. Turn the air flow control dial to the
position.
3. Turn the fan speed control
dial to the
desired position.
4. Push the A/C button on. (The A/C indicator light will illuminate.)
5. Turn the temperature control dial to the desired position between the middle and the
hot (right) position.
Dehumidified defogging:
This mode is used to defog the windows and
dehumidify the air.
1. Move the air intake lever to the
position.
2. Turn the air flow control dial to the
position.
3. Turn the fan speed control
dial to the
desired position. 4. Turn the temperature control dial to the
desired position.
When the
position is selected, the air
conditioner will automatically turn on. This will
dehumidify the air and help to defog the
windows.
Heater, air conditioner, audio and phone systems4-31