door NISSAN KICKS 2022 User Guide
[x] Cancel search | Manufacturer: NISSAN, Model Year: 2022, Model line: KICKS, Model: NISSAN KICKS 2022Pages: 500, PDF Size: 3.24 MB
Page 77 of 500
inflate in higher severity side collisions, al-
though they may inflate if the forces in an-
other type of collision are similar to those of
a higher severity impact. They are de-
signed to inflate on the side where the ve-
hicle is impacted. They may not inflate in
certain side collisions.
Curtain air bags are also designed to inflate
in certain types of rollover collisions or near
rollovers. As a result, certain vehicle move-
ments (for example, during severe off-
roading) may cause the curtain air bags to
inflate.
Vehicle damage (or lack of it) is not always
an indication of proper side air bag and
curtain air bag operation.
When the side air bags and curtain air bags
inflate, a fairly loud noise may be heard,
followed by the release of smoke. This
smoke is not harmful and does not indi-
cate a fire. Care should be taken not to
inhale it, as it may cause irritation and
choking. Those with a history of a breath-
ing condition should get fresh air promptly.
Side air bags, along with the use of seat
belts, help to cushion the impact force on
the chest and pelvic area of the front and
rear outboard occupants. Curtain air bags
help to cushion the impact force to thehead of occupants in the front and rear
outboard seating positions. They can help
save lives and reduce serious injuries. How-
ever, an inflating side air bag and curtain air
bag may cause abrasions or other injuries.
Side air bags and curtain air bags do not
provide restraint to the lower body.
The seat belts should be correctly worn
and the driver, front passenger and rear
outboard occupants seated upright as far
as practical away from the side air bag.
Rear seat passengers should be seated as
far away as practical from the door finish-
ers and side roof rails. The side air bags and
curtain air bags inflate quickly in order to
help protect the occupants. Because of
this, the force of the side air bag and curtain
air bag inflating can increase the risk of
injury if the occupant is too close to, or is
against, these air bag modules during in-
flation. The side air bag will deflate quickly
af ter the collision is over.
The curtain air bag will remain inflated for a
short time.
The side air bags and curtain air bags
operate only when the ignition switch is
placed in the ON position.
Af ter placing the ignition switch in the
ON position, the supplemental air bagwarning light illuminates. The supple-
mental air bag warning light will turn off
af ter about 7 seconds if the system is
operational.
WARNING
• Do not place any objects near the
seatback of the front and rear seats.
Also, do not place any objects (an
umbrella, bag, etc.) between the front
and rear door finisher and the front
and rear seat. Such objects may be-
come dangerous projectiles and
cause injury if a side air bag inflate.
• Right af ter inflation, several side air
bag and curtain air bag system com-
ponents will be hot. Do not touch
them; you may severely burn
yourself.
• No unauthorized changes should be
made to any components or wiring
of the side air bag and curtain air bag
systems. This is to prevent damage
to or accidental inflation of the side
air bag and curtain air bag or dam-
age to the side air bag and curtain air
bag systems.
Safety-Seats, seat belts and supplemental restraint system1-57
Page 84 of 500
2 Instruments and controls
Instrument panel................................2-2
Meters and gauges .............................2-4
Speedometer and odometer .................2-5
Tachometer .................................. 2-7
Fuel gauge ...................................2-8
Distance To Empty (DTE) .....................2-8
Trip computer (if so equipped) ................2-9
Warning lights, indicator lights and audible
reminders ....................................... 2-11
Checking lights .............................. 2-12
Warning lights ............................... 2-12
Indicator lights .............................. 2-19
Audible reminders ........................... 2-22
Vehicle information display (if so equipped) .....2-23
How to use the vehicle information
display ...................................... 2-23
Startup display .............................. 2-24
Settings ..................................... 2-24
Vehicle information display warnings
and indicators ............................... 2-31
Security systems (if so equipped) ...............2-38
Vehicle security system .....................2-38
NISSAN Anti-Thef t System (NATS)
(if so equipped) .............................. 2-39
NISSAN Vehicle Immobilizer System
(if so equipped) .............................. 2-40Wiper and washer switch
.......................2-41
Switch operation ............................ 2-41
Rear switch operation .......................2-43
Rear window and outside mirror
(if so equipped) defroster switch ...............2-44
Headlight and turn signal switch ...............2-44
Headlight control switch ....................2-44
Daytime Running Lights (DRL) system
(Type A) (if so equipped) .....................2-49
Instrument brightness control ..............2-50
Turn signal switch ........................... 2-51
Fog light switch (if so equipped) .............2-51
Horn ........................................... 2-52
Heated seat switches (if so equipped) ..........2-52
Blind Spot Warning (BSW) switch
(if so equipped) ................................. 2-53
Drive Systems OFF switch (if so equipped) ......2-53
Lane Departure Warning (LDW) switch
(if
so equipped) ................................. 2-54
Rear Sonar System (RSS) OFF switch
(if so equipped) ................................. 2-55
Vehicle Dynamic Control (VDC) OFF switch
(if so equipped) ................................. 2-55
Rear Door Alert (if so equipped) .................2-56
Power outlets .................................. 2-57
Page 87 of 500
17. Bluetooth® Hands-Free Phone System(P. 4-2, 4-67)
Cruise control switches (P. 5-52)
18. Driver supplemental knee air bag
(P. 1-42)
19. Tilt and telescopic steering wheel lock
lever (P. 3-26)
20. Hood release (P. 3-21) Fuel-filler door release (P. 3-25)
21. Steering wheel switches for audio con-
trol (P. 4-2, 4-63)
Control panel and vehicle information
display switches (if so equipped)
(P. 2-23)
22. Blind Spot Warning (BSW) switch
(if so equipped) (P. 2-53)
Drive Systems OFF switch
(if so equipped) (P. 2-53)
Lane Departure Warning (LDW) switch
(if so equipped) (P. 2-54)
Rear Sonar System (RSS) OFF switch
(if so equipped) (P. 2-55)
Vehicle Dynamic Control (VDC) OFF
switch (if so equipped) (P. 2-55)
Instrument panel pocket (if so
equipped) (P. 2-59)
Enter/select switch for trip computer (if
so equipped) (P. 2-9)
* Refer to the separate NissanConnect®
Owner's Manual (if so equipped). Refer to the page number indicated in
parentheses for operating details.
Instruments and controls2-3
Page 92 of 500
FUEL GAUGE
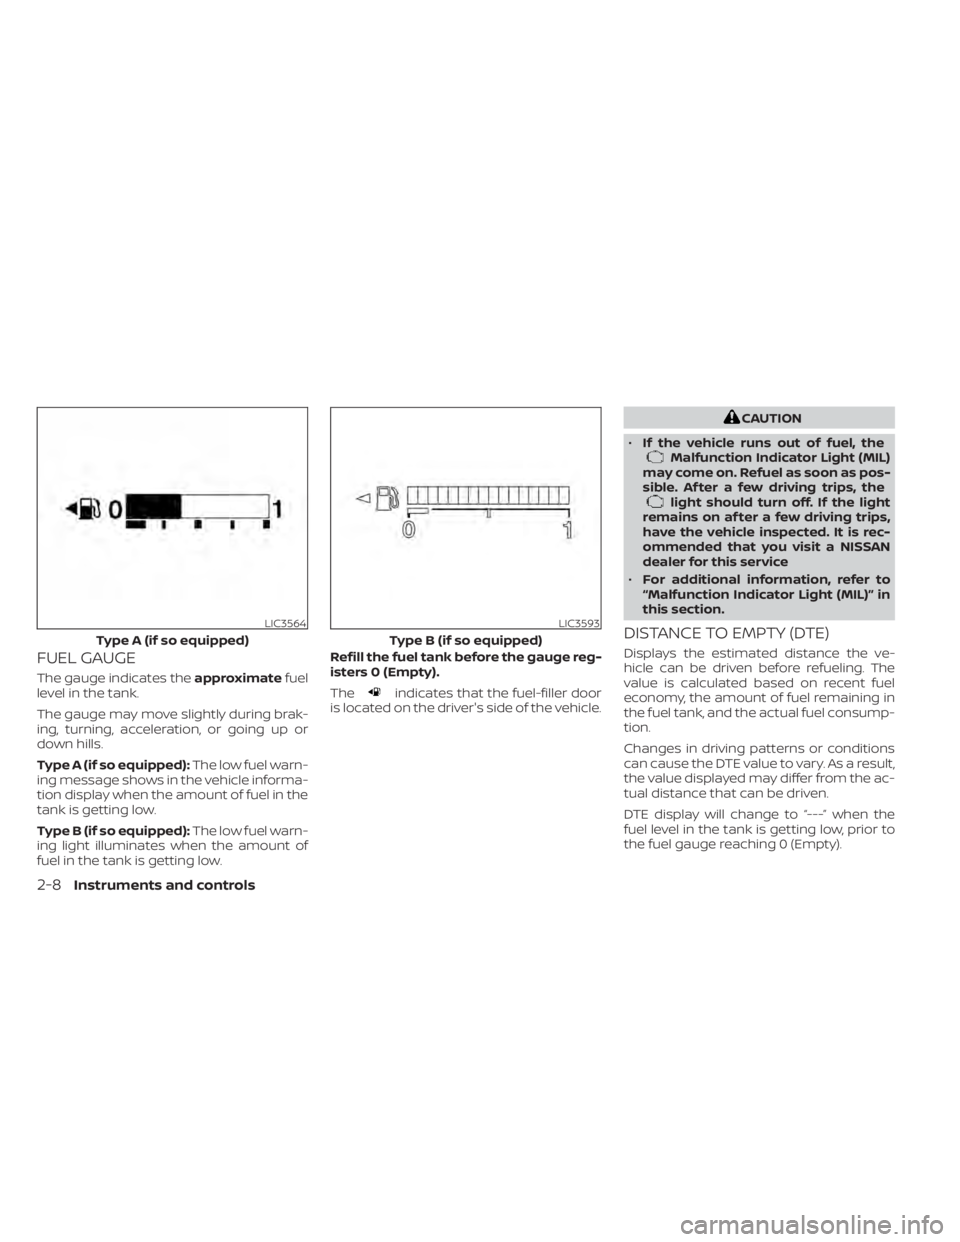
The gauge indicates theapproximatefuel
level in the tank.
The gauge may move slightly during brak-
ing, turning, acceleration, or going up or
down hills.
Type A (if so equipped): The low fuel warn-
ing message shows in the vehicle informa-
tion display when the amount of fuel in the
tank is getting low.
Type B (if so equipped): The low fuel warn-
ing light illuminates when the amount of
fuel in the tank is getting low. Refill the fuel tank before the gauge reg-
isters 0 (Empty).
Theindicates that the fuel-filler door
is located on the driver's side of the vehicle.
Malfunction Indicator Light (MIL)
may come on. Refuel as soon as pos-
sible. Af ter a few driving trips, the
light should turn off. If the light
remains on af ter a few driving trips,
have the vehicle inspected. It is rec-
ommended that you visit a NISSAN
dealer for this service
• For additional information, refer to
“Malfunction Indicator Light (MIL)” in
this section.
DISTANCE TO EMPTY (DTE)
Displays the estimated distance the ve-
hicle can be driven before refueling. The
value is calculated based on recent fuel
economy, the amount of fuel remaining in
the fuel tank, and the actual fuel consump-
tion.
Changes in driving patterns or conditions
can cause the DTE value to vary. As a result,
the value displayed may differ from the ac-
tual distance that can be driven.
DTE display will change to “---” when the
fuel level in the tank is getting low, prior to
the fuel gauge reaching 0 (Empty).
LIC3564
Type A (if so equipped)
Page 95 of 500
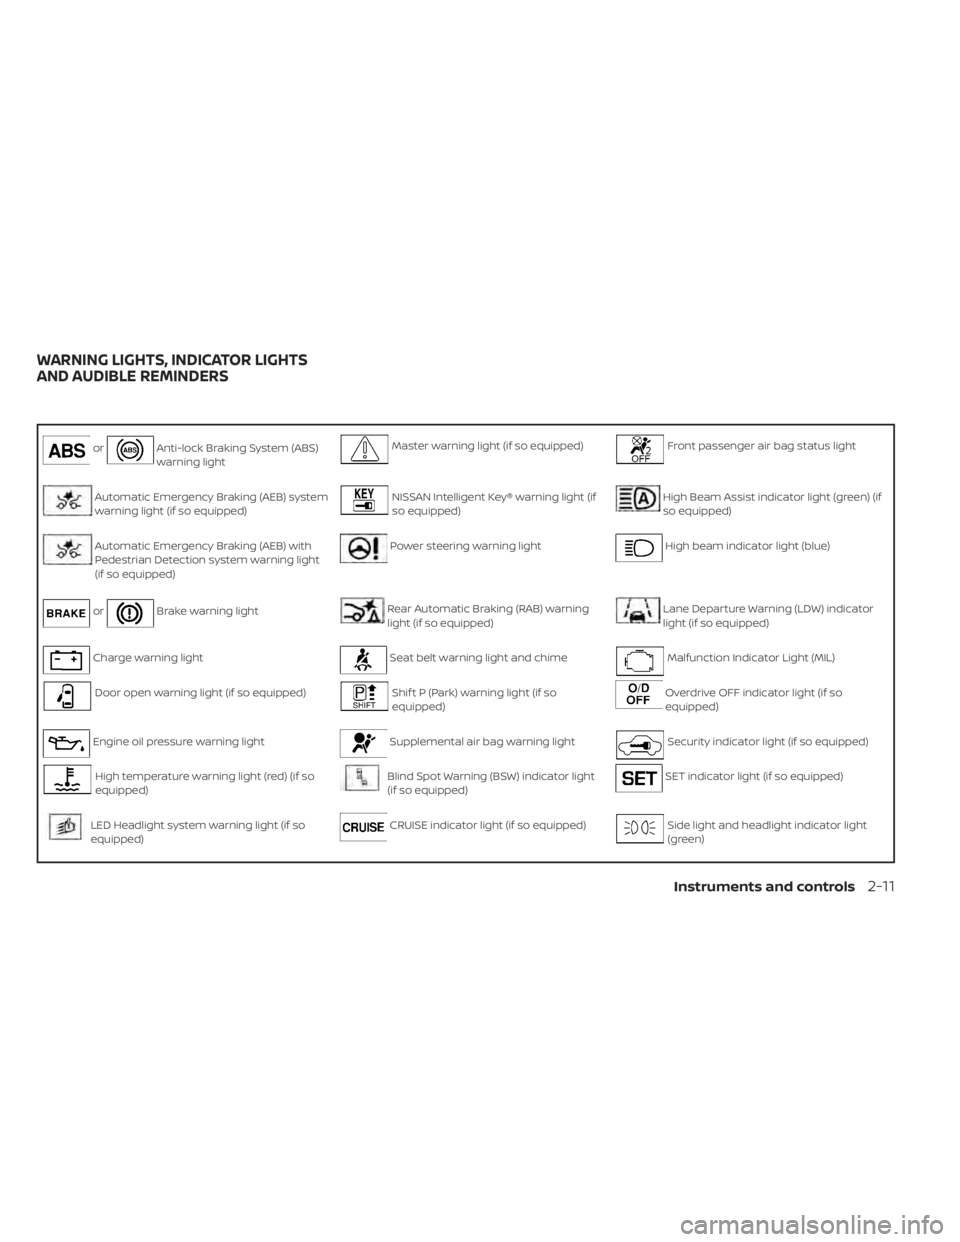
orAnti-lock Braking System (ABS)
warning lightMaster warning light (if so equipped)Front passenger air bag status light
Automatic Emergency Braking (AEB) system
warning light (if so equipped)NISSAN Intelligent Key® warning light (if
so equipped)High Beam Assist indicator light (green) (if
so equipped)
Automatic Emergency Braking (AEB) with
Pedestrian Detection system warning light
(if so equipped)Power steering warning lightHigh beam indicator light (blue)
orBrake warning lightRear Automatic Braking (RAB) warning
light (if so equipped)Lane Departure Warning (LDW) indicator
light (if so equipped)
Charge warning lightSeat belt warning light and chimeMalfunction Indicator Light (MIL)
Door open warning light (if so equipped)Shif t P (Park) warning light (if so
equipped)Overdrive OFF indicator light (if so
equipped)
Engine oil pressure warning lightSupplemental air bag warning lightSecurity indicator light (if so equipped)
High temperature warning light (red) (if so
equipped)Blind Spot Warning (BSW) indicator light
(if so equipped)SET indicator light (if so equipped)
LED Headlight system warning light (if so
equipped)CRUISE indicator light (if so equipped)Side light and headlight indicator light
(green)
WARNING LIGHTS, INDICATOR LIGHTS
AND AUDIBLE REMINDERS
Instruments and controls2-11
Page 96 of 500
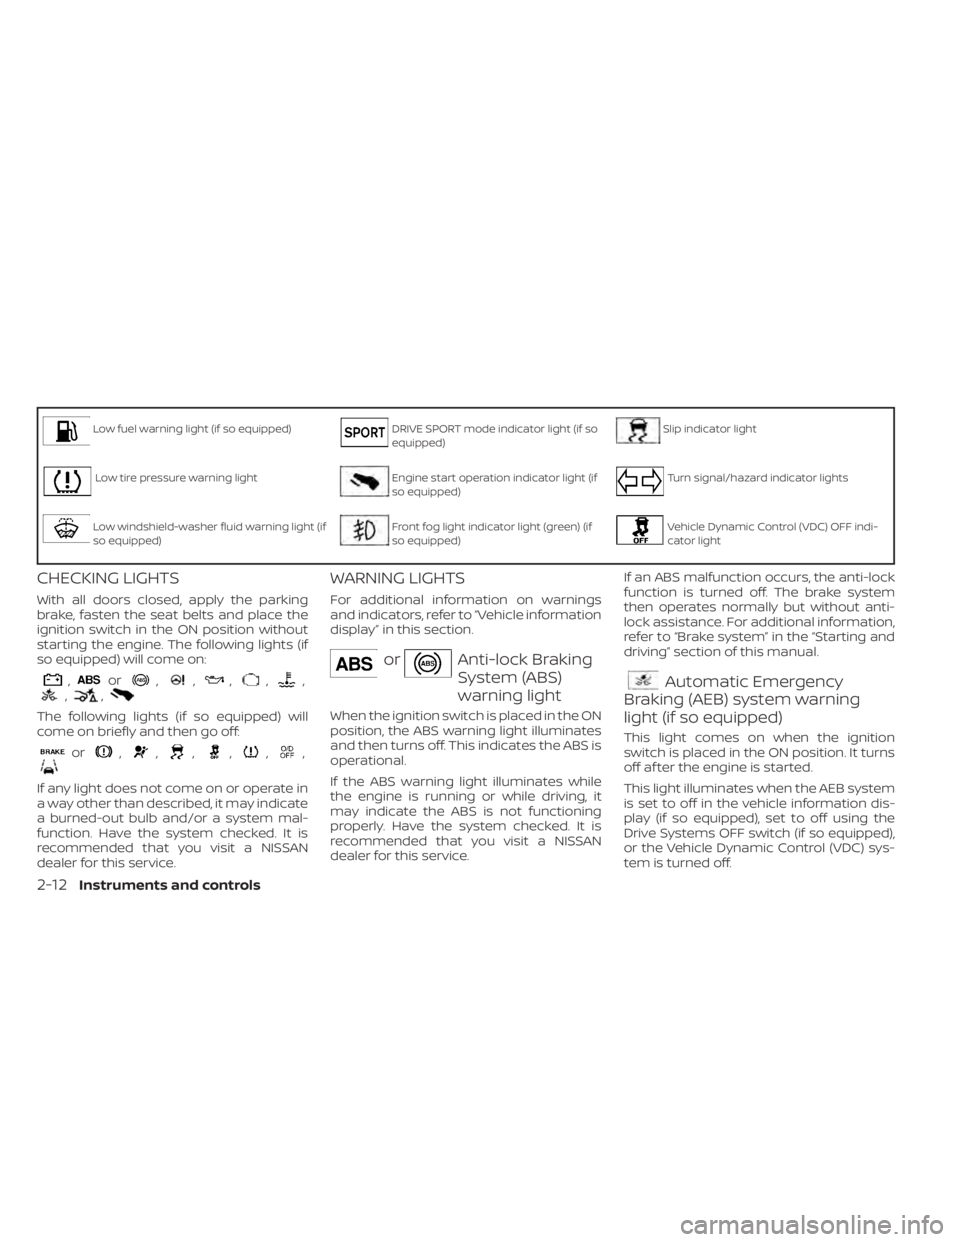
Low fuel warning light (if so equipped)DRIVE SPORT mode indicator light (if so
equipped)Slip indicator light
Low tire pressure warning lightEngine start operation indicator light (if
so equipped)Turn signal/hazard indicator lights
Low windshield-washer fluid warning light (if
so equipped)Front fog light indicator light (green) (if
so equipped)Vehicle Dynamic Control (VDC) OFF indi-
cator light
CHECKING LIGHTS
With all doors closed, apply the parking
brake, fasten the seat belts and place the
ignition switch in the ON position without
starting the engine. The following lights (if
so equipped) will come on:
,or,,,,,,,
The following lights (if so equipped) will
come on briefly and then go off:
or,,,,,,
If any light does not come on or operate in
a way other than described, it may indicate
a burned-out bulb and/or a system mal-
function. Have the system checked. It is
recommended that you visit a NISSAN
dealer for this service.
WARNING LIGHTS
For additional information on warnings
and indicators, refer to “Vehicle information
display” in this section.
orAnti-lock Braking
System (ABS)
warning light
When the ignition switch is placed in the ON
position, the ABS warning light illuminates
and then turns off. This indicates the ABS is
operational.
If the ABS warning light illuminates while
the engine is running or while driving, it
may indicate the ABS is not functioning
properly. Have the system checked. It is
recommended that you visit a NISSAN
dealer for this service.If an ABS malfunction occurs, the anti-lock
function is turned off. The brake system
then operates normally but without anti-
lock assistance. For additional information,
refer to “Brake system” in the “Starting and
driving” section of this manual.
Automatic Emergency
Braking (AEB) system warning
light (if so equipped)
This light comes on when the ignition
switch is placed in the ON position. It turns
off af ter the engine is started.
This light illuminates when the AEB system
is set to off in the vehicle information dis-
play (if so equipped), set to off using the
Drive Systems OFF switch (if so equipped),
or the Vehicle Dynamic Control (VDC) sys-
tem is turned off.
2-12Instruments and controls
Page 100 of 500
WARNING
• Radio waves could adversely affect
electric medical equipment. Those
who use a pacemaker should contact
the electric medical equipment
manufacturer for the possible influ-
ences before use.
• If the light does not illuminate with
the ignition switch placed in the ON
position, have the vehicle checked as
soon as possible. It is recommended
that you visit a NISSAN dealer for this
service.
• If the light illuminates while driving,
avoid sudden steering maneuvers or
abrupt braking, reduce vehicle
speed, pull off the road to a safe loca-
tion and stop the vehicle as soon as
possible. Driving with under-inflated
tires may permanently damage the
tires and increase the likelihood of
tire failure. Serious vehicle damage
could occur and may lead to an acci-
dent and could result in serious per-
sonal injury or death. Check the tire
pressure for all four tires. Adjust the
tire pressure to the recommended COLD tire pressure show on the Tire
and Loading Information label lo-
cated in the driver’s door opening to
turn the low tire pressure warning
light off. If the light still illuminates
while driving af ter adjusting the tire
pressure, a tire may be flat or the
TPMS may be malfunctioning. If you
have a flat tire, replace it with a spare
tire as soon as possible. If no tire is
flat and all tires are properly inflated,
have the vehicle checked. It is recom-
mended that you visit a NISSAN
dealer for this service.
• When replacing a wheel without the
TPMS such as the spare tire, the TPMS
will not function and the low tire
pressure warning light will flash for
approximately 1 minute. The light will
remain on af ter 1 minute. Have your
tires replaced and/or TPMS system
reset as soon as possible. It is recom-
mended that you visit a NISSAN
dealer for these services.
• Replacing tires with those not origi-
nally specified by NISSAN could af-
fect the proper operation of the
TPMS.CAUTION
• The TPMS is not a substitute for the
regular tire pressure check. Be sure
to check the tire pressure regularly.
• If the vehicle is being driven at
speeds of less than 16 mph (25 km/h),
the TPMS may not operate correctly.
• Be sure to install the specified size of
tires to the four wheels correctly.
Master warning light (if so
equipped)
This light illuminates when various vehicle
information display warnings appear.
•Nokey
• I-Key system warning
• Low washer fluid
• Door open
• Parking brake release
2-16Instruments and controls
Page 101 of 500
For additional information, refer to “Vehicle
information display” in this section.
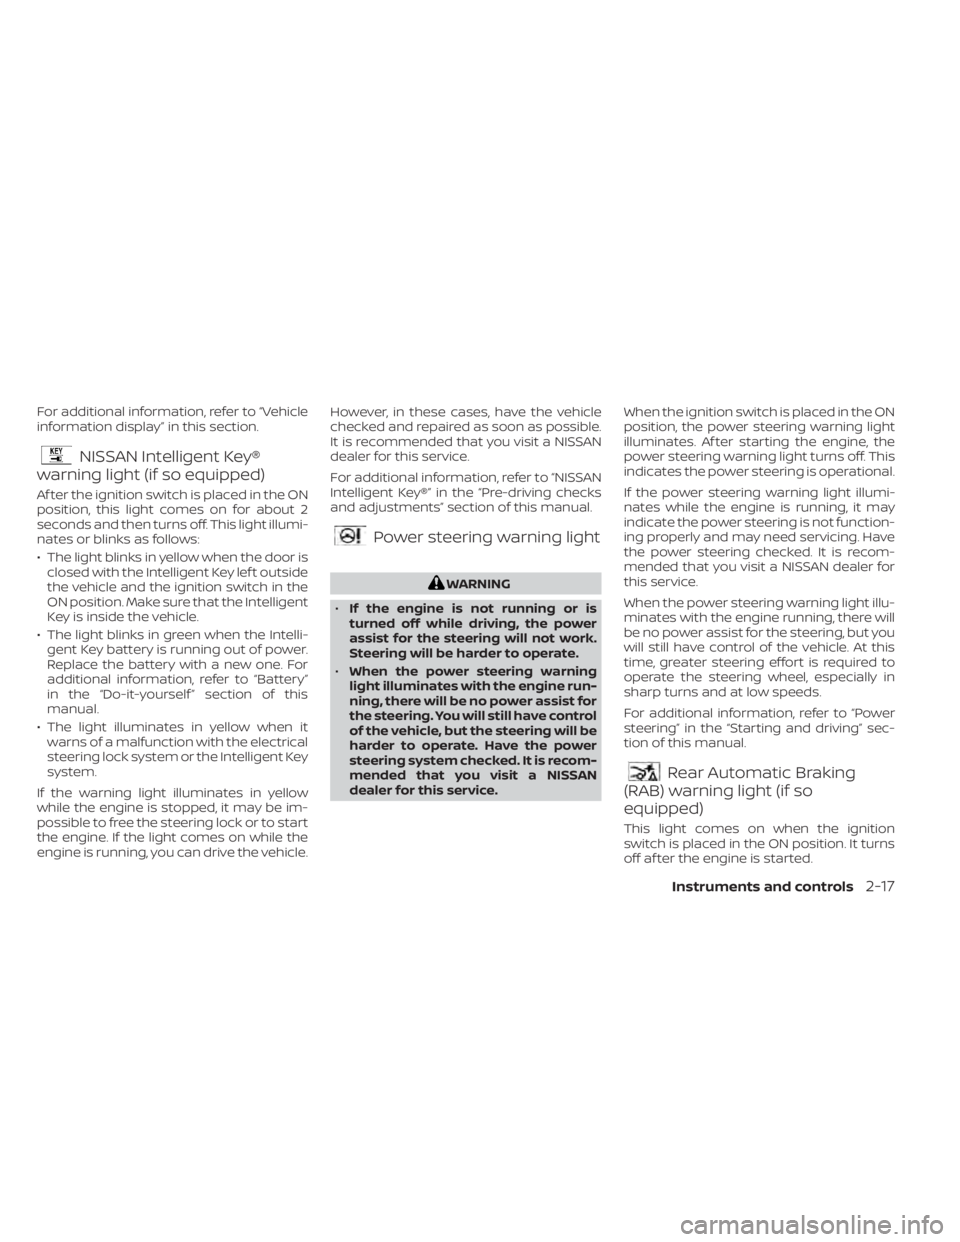
NISSAN Intelligent Key®
warning light (if so equipped)
Af ter the ignition switch is placed in the ON
position, this light comes on for about 2
seconds and then turns off. This light illumi-
nates or blinks as follows:
• The light blinks in yellow when the door is
closed with the Intelligent Key lef t outside
the vehicle and the ignition switch in the
ON position. Make sure that the Intelligent
Key is inside the vehicle.
• The light blinks in green when the Intelli- gent Key battery is running out of power.
Replace the battery with a new one. For
additional information, refer to “Battery”
in the “Do-it-yourself ” section of this
manual.
• The light illuminates in yellow when it warns of a malfunction with the electrical
steering lock system or the Intelligent Key
system.
If the warning light illuminates in yellow
while the engine is stopped, it may be im-
possible to free the steering lock or to start
the engine. If the light comes on while the
engine is running, you can drive the vehicle. However, in these cases, have the vehicle
checked and repaired as soon as possible.
It is recommended that you visit a NISSAN
dealer for this service.
For additional information, refer to “NISSAN
Intelligent Key®” in the “Pre-driving checks
and adjustments” section of this manual.
Power steering warning light
Rear Automatic Braking
(RAB) warning light (if so
equipped)
This light comes on when the ignition
switch is placed in the ON position. It turns
off af ter the engine is started.
Instruments and controls2-17
Page 112 of 500
Menu itemResult
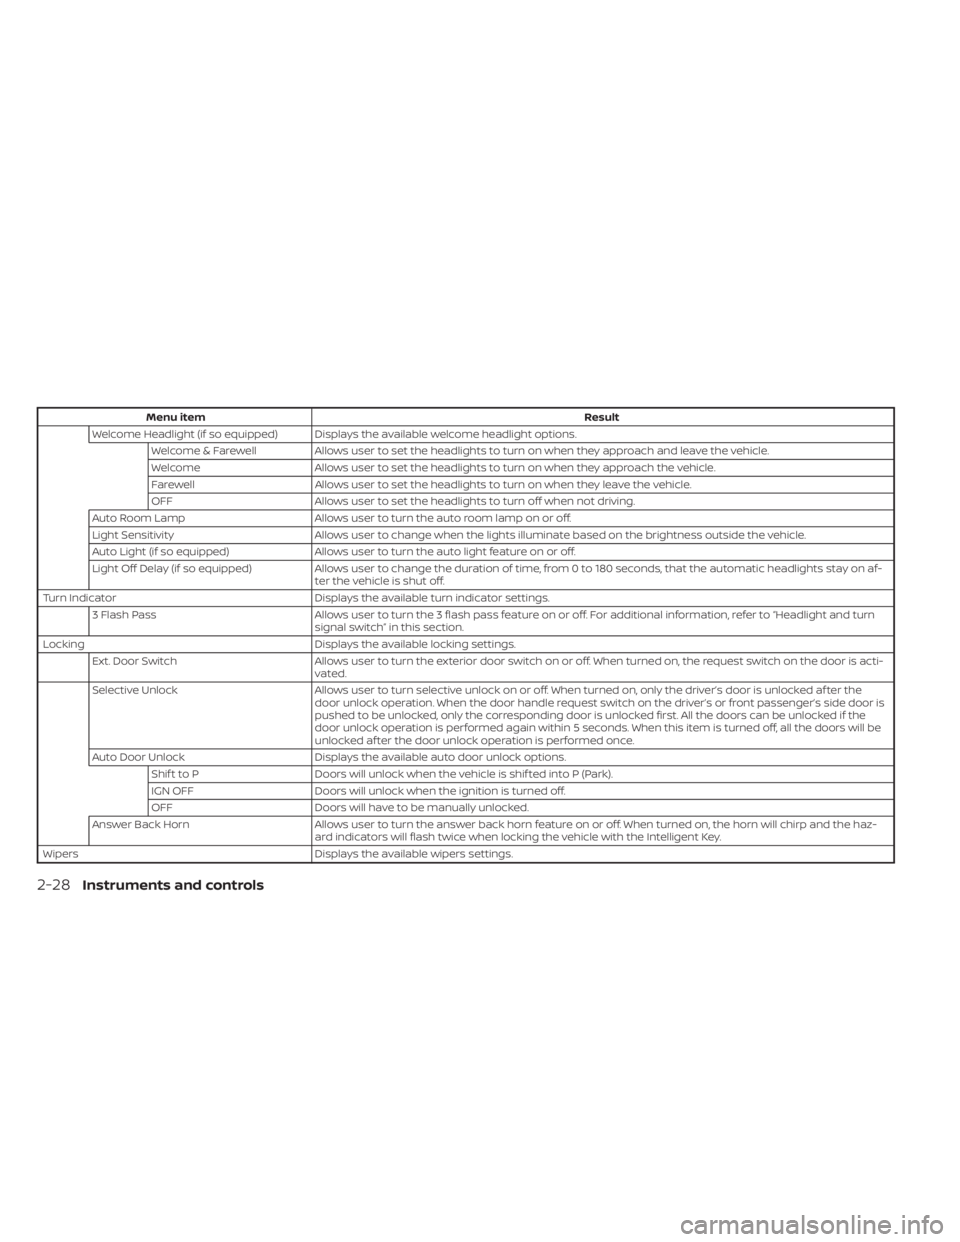
Welcome Headlight (if so equipped) Displays the available welcome headlight options. Welcome & Farewell Allows user to set the headlights to turn on when they approach and leave the vehicle.
Welcome Allows user to set the headlights to turn on when they approach the vehicle.
Farewell Allows user to set the headlights to turn on when they leave the vehicle.
OFF Allows user to set the headlights to turn off when not driving.
Auto Room Lamp Allows user to turn the auto room lamp on or off.
Light Sensitivity Allows user to change when the lights illuminate based on the brightness outside the vehicle.
Auto Light (if so equipped) Allows user to turn the auto light feature on or off.
Light Off Delay (if so equipped) Allows user to change the duration of time, from 0 to 180 seconds, that the automatic headlights stay on af-
ter the vehicle is shut off.
Turn Indicator Displays the available turn indicator settings.
3 Flash Pass Allows user to turn the 3 flash pass feature on or off. For additional information, refer to “Headlight and turn
signal switch” in this section.
Locking Displays the available locking settings.
Ext. Door Switch Allows user to turn the exterior door switch on or off. When turned on, the request switch on the door is acti-
vated.
Selective Unlock Allows user to turn selective unlock on or off. When turned on, only the driver’s door is unlocked af ter the
door unlock operation. When the door handle request switch on the driver’s or front passenger’s side door is
pushed to be unlocked, only the corresponding door is unlocked first. All the doors can be unlocked if the
door unlock operation is performed again within 5 seconds. When this item is turned off, all the doors will be
unlocked af ter the door unlock operation is performed once.
Auto Door Unlock Displays the available auto door unlock options.
Shif t to P Doors will unlock when the vehicle is shif ted into P (Park).
IGN OFF Doors will unlock when the ignition is turned off.
OFF Doors will have to be manually unlocked.
Answer Back Horn Allows user to turn the answer back horn feature on or off. When turned on, the horn will chirp and the haz-
ard indicators will flash twice when locking the vehicle with the Intelligent Key.
Wipers Displays the available wipers settings.
2-28Instruments and controls
Page 116 of 500
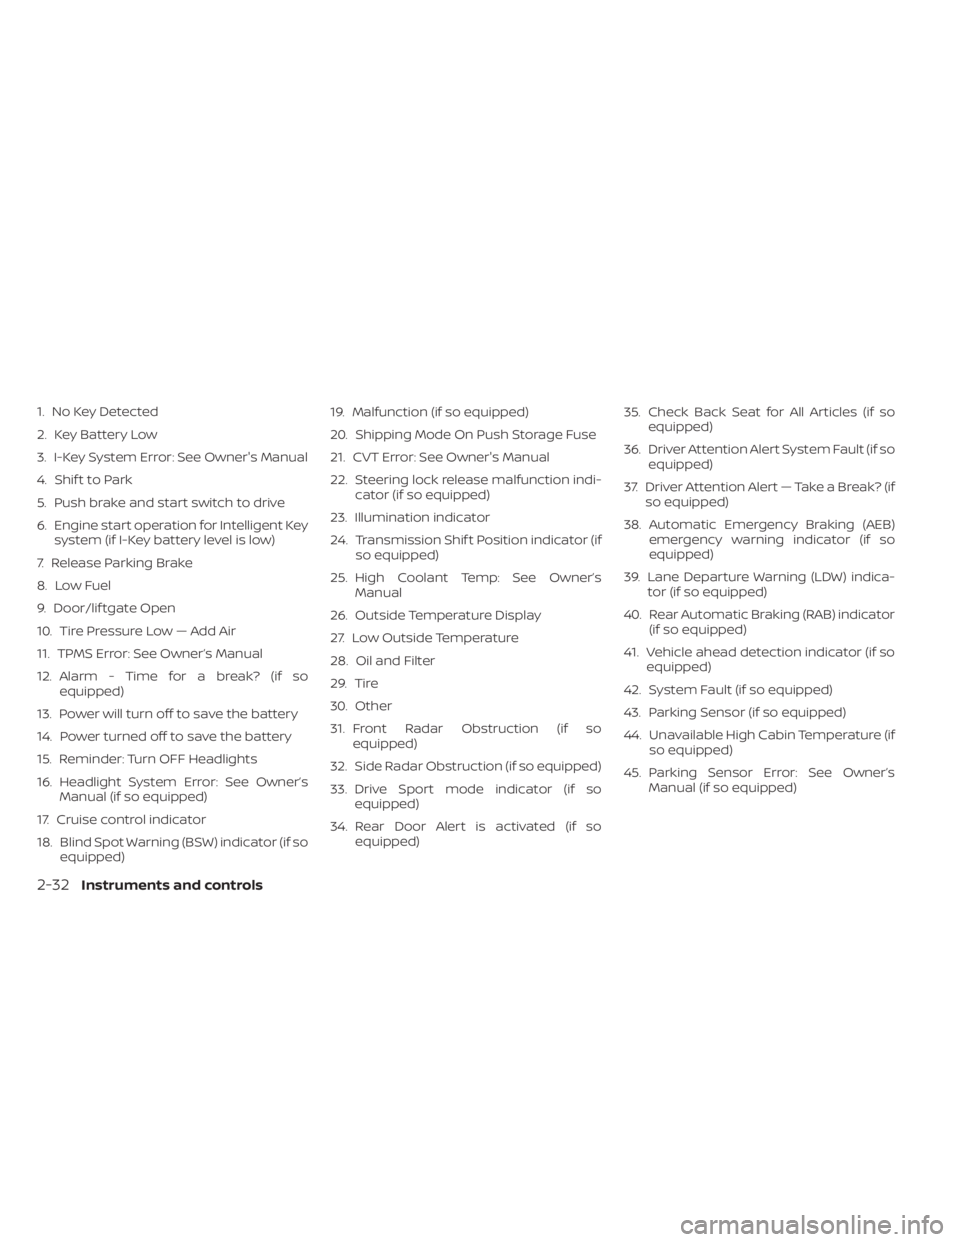
1. No Key Detected
2. Key Battery Low
3. I-Key System Error: See Owner's Manual
4. Shif t to Park
5. Push brake and start switch to drive
6. Engine start operation for Intelligent Keysystem (if I-Key battery level is low)
7. Release Parking Brake
8. Low Fuel
9. Door/lif tgate Open
10. Tire Pressure Low — Add Air
11. TPMS Error: See Owner’s Manual
12. Alarm - Time for a break? (if so equipped)
13. Power will turn off to save the battery
14. Power turned off to save the battery
15. Reminder: Turn OFF Headlights
16. Headlight System Error: See Owner’s Manual (if so equipped)
17. Cruise control indicator
18. Blind Spot Warning (BSW) indicator (if so equipped) 19. Malfunction (if so equipped)
20. Shipping Mode On Push Storage Fuse
21. CVT Error: See Owner's Manual
22. Steering lock release malfunction indi-
cator (if so equipped)
23. Illumination indicator
24. Transmission Shif t Position indicator (if so equipped)
25. High Coolant Temp: See Owner’s Manual
26. Outside Temperature Display
27. Low Outside Temperature
28. Oil and Filter
29. Tire
30. Other
31. Front Radar Obstruction (if so equipped)
32. Side Radar Obstruction (if so equipped)
33. Drive Sport mode indicator (if so equipped)
34. Rear Door Alert is activated (if so equipped) 35. Check Back Seat for All Articles (if so
equipped)
36. Driver Attention Alert System Fault (if so equipped)
37. Driver Attention Alert — Take a Break? (if so equipped)
38. Automatic Emergency Braking (AEB) emergency warning indicator (if so
equipped)
39. Lane Departure Warning (LDW) indica- tor (if so equipped)
40. Rear Automatic Braking (RAB) indicator (if so equipped)
41. Vehicle ahead detection indicator (if so equipped)
42. System Fault (if so equipped)
43. Parking Sensor (if so equipped)
44. Unavailable High Cabin Temperature (if so equipped)
45. Parking Sensor Error: See Owner’s Manual (if so equipped)
2-32Instruments and controls