NISSAN LATIO 2009 Service Repair Manual
Manufacturer: NISSAN, Model Year: 2009, Model line: LATIO, Model: NISSAN LATIO 2009Pages: 4331, PDF Size: 58.04 MB
Page 1121 of 4331
![NISSAN LATIO 2009 Service Repair Manual KEY INTERLOCK CABLE
CVT-177
< SERVICE INFORMATION >
[RE0F08A] D
E
F
G H
I
J
K L
M A
B CVT
N
O P
KEY INTERLOCK CABLE
Removal and Installation INFOID:0000000004667113
COMPONENTS
REMOVAL Refer to the fig NISSAN LATIO 2009 Service Repair Manual KEY INTERLOCK CABLE
CVT-177
< SERVICE INFORMATION >
[RE0F08A] D
E
F
G H
I
J
K L
M A
B CVT
N
O P
KEY INTERLOCK CABLE
Removal and Installation INFOID:0000000004667113
COMPONENTS
REMOVAL Refer to the fig](/img/5/57359/w960_57359-1120.png)
KEY INTERLOCK CABLE
CVT-177
< SERVICE INFORMATION >
[RE0F08A] D
E
F
G H
I
J
K L
M A
B CVT
N
O P
KEY INTERLOCK CABLE
Removal and Installation INFOID:0000000004667113
COMPONENTS
REMOVAL Refer to the figure for key interlock cable removal procedure.
CAUTION:
Make sure that parking brake is a pplied before removal/installation.
1. Place the selector lever in the “N” position.
2. Remove the selector lever knob. Refer to CVT-174, " Selector Lever Knob Removal and Installation " .
3. Remove the center console assembly. Refer to IP-11 .
1. Key interlock cable 2. Key cylinder 3. Control device assembly
A. Lock plate B. Holder C. Clip
D. Slider E. Key interlock rod F. Adjust holder
G. Casing cap WCIA0621E
Page 1122 of 4331
![NISSAN LATIO 2009 Service Repair Manual CVT-178< SERVICE INFORMATION >
[RE0F08A]
KEY INTERLOCK CABLE
4. Slide the slider (A) toward the casing cap (B) while pressing tabs (C) on the slider to separate the slider (A) from the adjust holder
( NISSAN LATIO 2009 Service Repair Manual CVT-178< SERVICE INFORMATION >
[RE0F08A]
KEY INTERLOCK CABLE
4. Slide the slider (A) toward the casing cap (B) while pressing tabs (C) on the slider to separate the slider (A) from the adjust holder
(](/img/5/57359/w960_57359-1121.png)
CVT-178< SERVICE INFORMATION >
[RE0F08A]
KEY INTERLOCK CABLE
4. Slide the slider (A) toward the casing cap (B) while pressing tabs (C) on the slider to separate the slider (A) from the adjust holder
(D).
5. Remove the casing cap (B) from the cable bracket on the control
device assembly.
6. Remove the key interlock cable from the key interlock rod (E).
7. Remove steering column cover (upper and lower) and instru- ment lower finisher. Refer to IP-11 .
8. Pull out the lock plate (A) from the holder (B).
9. Remove the key interlock cable (1) from the key cylinder (2).
10. Remove the clip (A), and then remove the key interlock cable (1).
INSTALLATION
CAUTION:
• Install key interlock cable in such a way that it will not be damaged by sharp bends, twists or interfer-
ence with adjacent parts.
• After installing key interlock cable to contro l device assembly, make sure that casing cap and
bracket are firmly secured in their positions.
1. Place the selector lever in the “P” position.
2. Turn ignition switch to “ACC” or “ON” position.
3. Set the key interlock cable (1) to the key cylinder (2).
4. Install the lock plate (A) to the holder (B).
5. Turn ignition switch to “LOCK” position. SCIA6975E
SCIA6976E
SCIA6973E
SCIA6976E
Page 1123 of 4331
![NISSAN LATIO 2009 Service Repair Manual KEY INTERLOCK CABLE
CVT-179
< SERVICE INFORMATION >
[RE0F08A] D
E
F
G H
I
J
K L
M A
B CVT
N
O P
6. Temporarily install the adjust holder (A) to the key interlock rod
(B).
7. Install the casi NISSAN LATIO 2009 Service Repair Manual KEY INTERLOCK CABLE
CVT-179
< SERVICE INFORMATION >
[RE0F08A] D
E
F
G H
I
J
K L
M A
B CVT
N
O P
6. Temporarily install the adjust holder (A) to the key interlock rod
(B).
7. Install the casi](/img/5/57359/w960_57359-1122.png)
KEY INTERLOCK CABLE
CVT-179
< SERVICE INFORMATION >
[RE0F08A] D
E
F
G H
I
J
K L
M A
B CVT
N
O P
6. Temporarily install the adjust holder (A) to the key interlock rod
(B).
7. Install the casing cap (C) to the cable bracket (D) on the control device assembly.
CAUTION:
• Do not bend or twist key interlock cable excessively when
installing.
• After installing key interlo ck cable to cable bracket (D) on
control device assembly, make sure casing caps (C) is
firmly secured in cable bracket (D) on control device
assembly.
• If casing cap (C) is loose [less than 39.2 N (4.0 kg, 8.8 lb)
removing force], replace key interlock cable.
8. Slide the slider (A) toward the key interlock rod (D) while press- ing the pull lock (B) down to securely connect the adjust holder
(C) with the key interlock rod (D).
CAUTION:
• Do not press tabs when holding slider (A).
• Do not apply any side to side force to key interlock rod (D)
when sliding slider (A).
9. Secure the key interlock cable (1) with the clip (A).
10. Install steering column cover (upper and lower) and instrument lower finisher. Refer to IP-11 .
11. Install the center console assembly. Refer to IP-11 .
12. Install the selector lever knob. Refer to CVT-174, " Selector
Lever Knob Removal and Installation " .
13. Check shift lock system. Refer to CVT-165, " Description " . SCIA6188E
SCIA6978E
SCIA6973E
Page 1124 of 4331

.
2. Remove air breather hose.
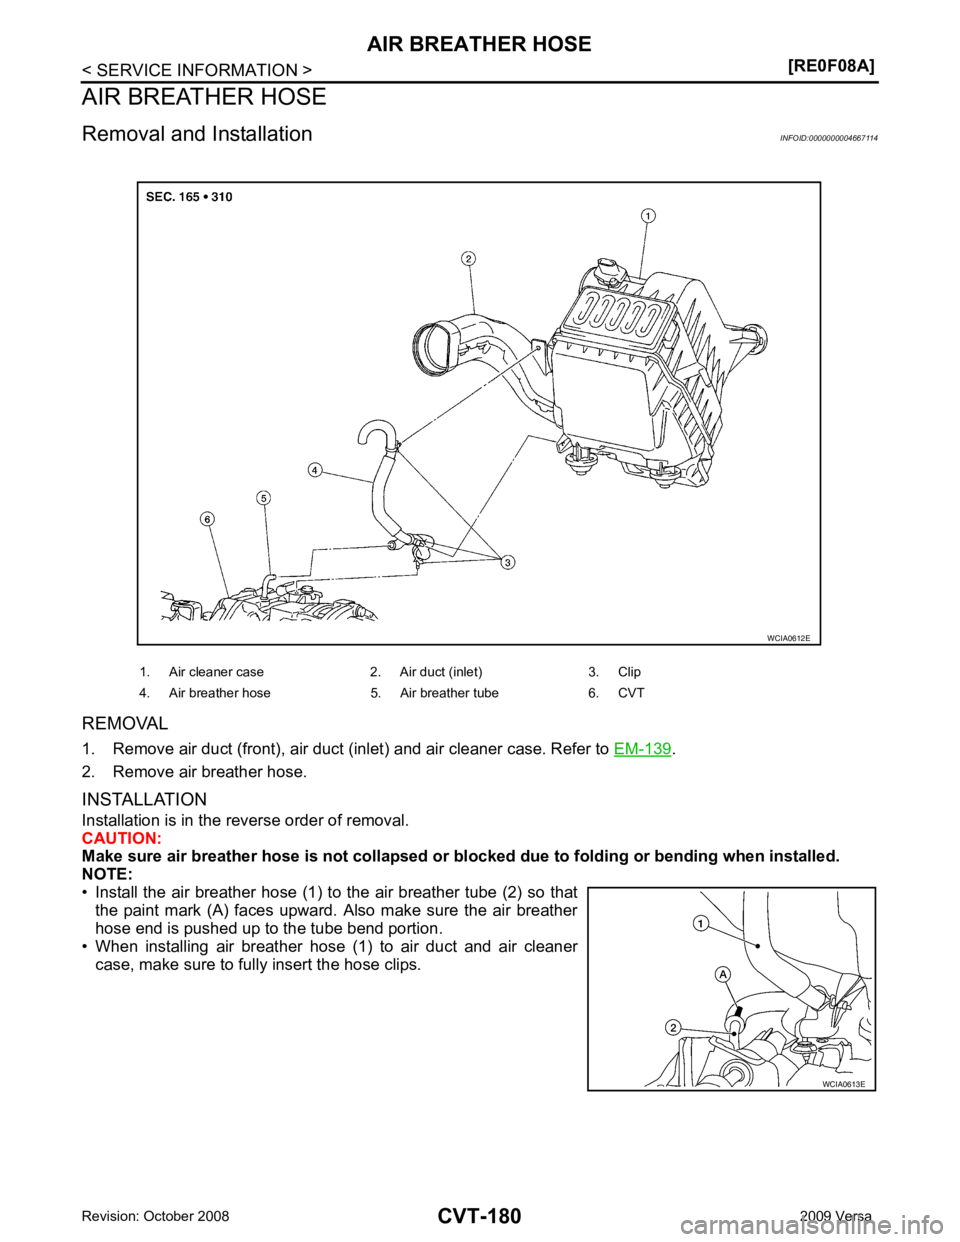
INSTALLATION
Installation is in the reverse order of removal.
CAUTION:
Make sure air breather hose is not collapsed or bl ocked due to folding or bending when installed.
NOTE:
• Install the air breather hose (1) to the air breather tube (2) so that the paint mark (A) faces upward. Also make sure the air breather
hose end is pushed up to the tube bend portion.
• When installing air breather hose (1) to air duct and air cleaner case, make sure to fully insert the hose clips. 1. Air cleaner case 2. Air duct (inlet) 3. Clip
4. Air breather hose 5. Air breather tube 6. CVT WCIA0613E
Page 1125 of 4331

CVT
N
O P
DIFFERENTIAL SIDE OIL SEAL
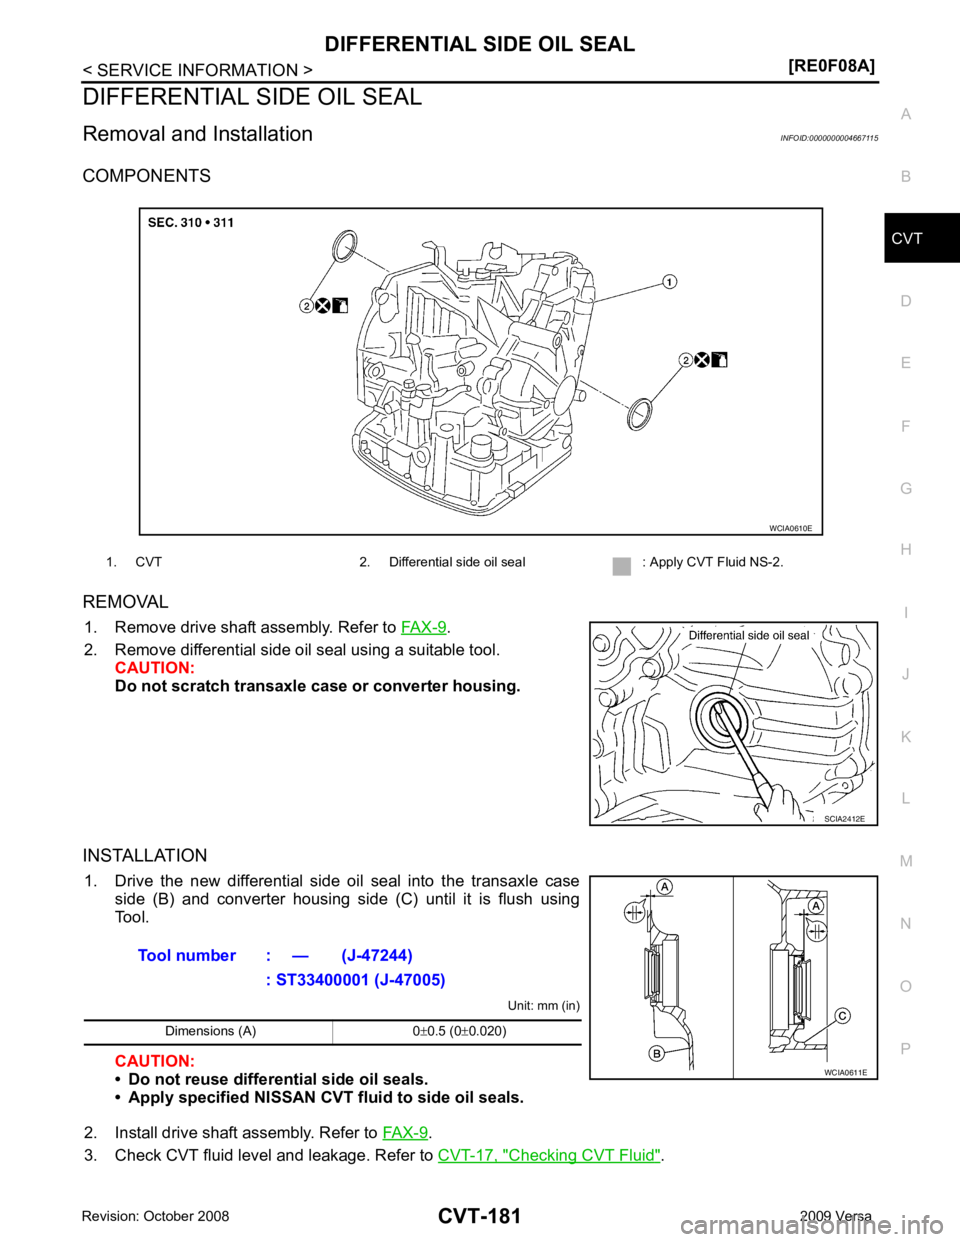
Removal and Installation INFOID:0000000004667115
COMPONENTS
REMOVAL 1. Remove drive shaft assembly. Refer to FAX-9 .
2. Remove differential side oil seal using a suitable tool. CAUTION:
Do not scratch transaxle case or converter housing.
INSTALLATION 1. Drive the new differential side oil seal into the transaxle case side (B) and converter housing side (C) until it is flush using
Tool.
Unit: mm (in)
CAUTION:
• Do not reuse differential side oil seals.
• Apply specified NISSAN CVT fluid to side oil seals.
2. Install drive shaft assembly. Refer to FAX-9 .
3. Check CVT fluid level and leakage. Refer to CVT-17, " Checking CVT Fluid " .
1. CVT 2. Differential side oil seal : Apply CVT Fluid NS-2.
Page 1126 of 4331

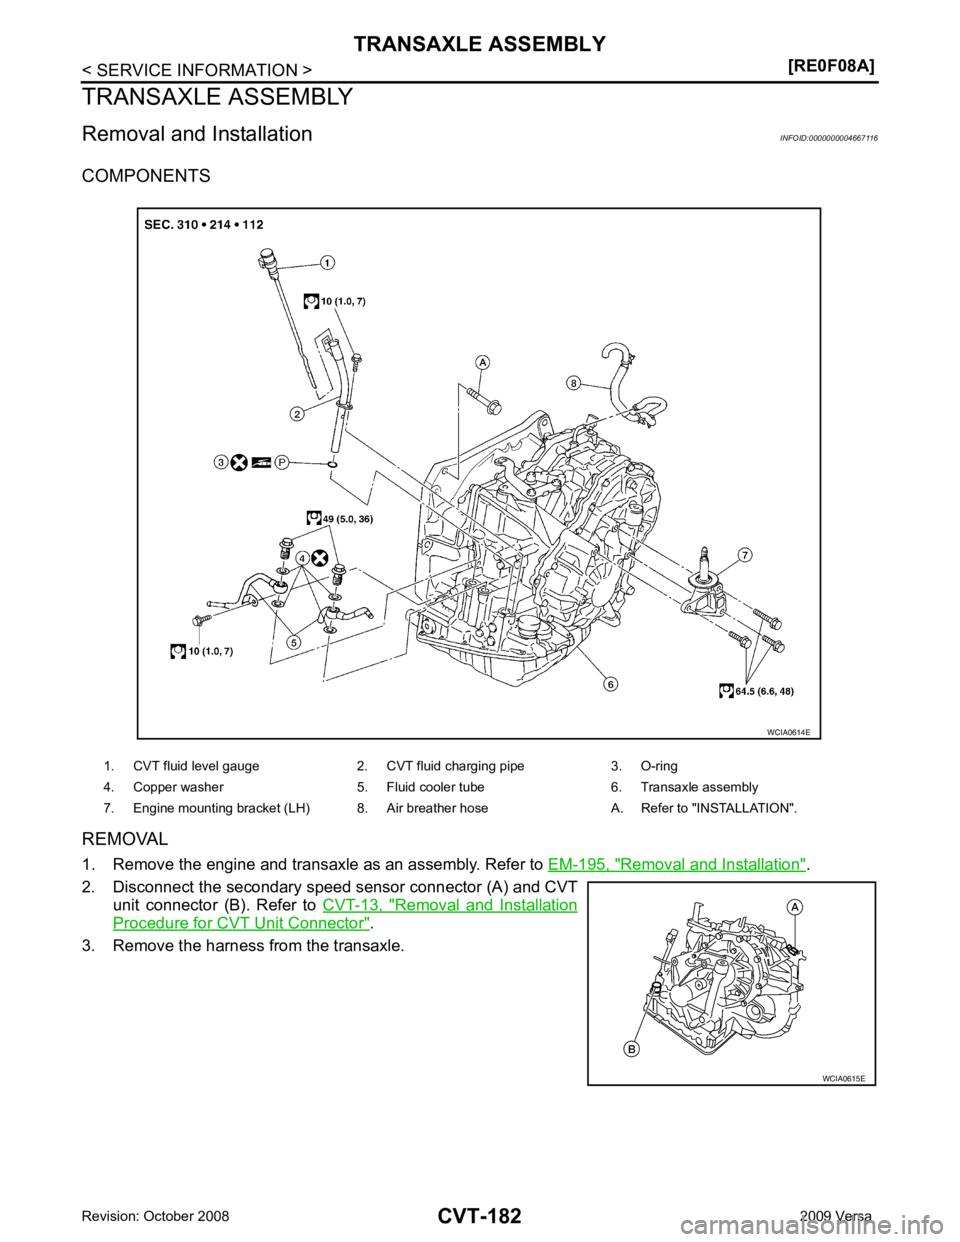
Removal and Installation " .
2. Disconnect the secondary speed sensor connector (A) and CVT unit connector (B). Refer to CVT-13, " Removal and Installation
Procedure for CVT Unit Connector " .
3. Remove the harness from the transaxle. 1. CVT fluid level gauge 2. CVT fluid charging pipe 3. O-ring
4. Copper washer 5. Fluid cooler tube 6. Transaxle assembly
7. Engine mounting bracket (LH) 8. Air breather hose A. Refer to "INSTALLATION". WCIA0615E
Page 1127 of 4331
![NISSAN LATIO 2009 Service Repair Manual TRANSAXLE ASSEMBLY
CVT-183
< SERVICE INFORMATION >
[RE0F08A] D
E
F
G H
I
J
K L
M A
B CVT
N
O P
4. Remove the four drive plate to torque converter nuts.
NOTE:
Rotate the crankshaft clockwise as vi NISSAN LATIO 2009 Service Repair Manual TRANSAXLE ASSEMBLY
CVT-183
< SERVICE INFORMATION >
[RE0F08A] D
E
F
G H
I
J
K L
M A
B CVT
N
O P
4. Remove the four drive plate to torque converter nuts.
NOTE:
Rotate the crankshaft clockwise as vi](/img/5/57359/w960_57359-1126.png)
TRANSAXLE ASSEMBLY
CVT-183
< SERVICE INFORMATION >
[RE0F08A] D
E
F
G H
I
J
K L
M A
B CVT
N
O P
4. Remove the four drive plate to torque converter nuts.
NOTE:
Rotate the crankshaft clockwise as viewed from front of engine
for access to drive plate to torque converter nuts.
5. Put matching marks on the drive plate and torque converter alignment stud. CAUTION:
For matching marks, use paint. Never dama ge the drive plate or torque converter.
6. Remove the transaxle to engine and engine to transaxle bolts.
7. Separate the transaxle from the engine.
8. If necessary, remove the following from the transaxle: • CVT fluid charging pipe
• Engine mounting bracket (LH)
• Fluid cooler tubes
• Air breather hose
• Any necessary brackets
INSTALLATION Installation is in the reverse order of removal.
CAUTION:
• When replacing an engine or transmission you mu st make sure any dowels are installed correctly
during re-assembly.
• Improper alignment caused by missing dowels m ay cause vibration, oil leaks or breakage of drive
train components.
• Do not reuse O-rings and copper washers.
• When turning crankshaft, turn it clockwise as viewed from the front of the engine.
• When tightening the nuts for the torque converter while securing the crankshaft pulley bolt, be sure
to confirm the tightening torque of the crankshaft pulley bolt. Refer to EM-160 .
• After converter is installed to drive plate, ro tate crankshaft several turns to check that transaxle
rotates freely without binding.
• When installing the torque converter to the transaxle measure dis- tance A. WCIA0616E
Distance A: 14.4 mm (0.57 in) or more
WCIA0617E
Page 1128 of 4331
![NISSAN LATIO 2009 Service Repair Manual CVT-184< SERVICE INFORMATION >
[RE0F08A]
TRANSAXLE ASSEMBLY
• When installing the cooler outlet tube (1) to the transaxle assembly (2), align the cooler tube bracket (A) against the transax NISSAN LATIO 2009 Service Repair Manual CVT-184< SERVICE INFORMATION >
[RE0F08A]
TRANSAXLE ASSEMBLY
• When installing the cooler outlet tube (1) to the transaxle assembly (2), align the cooler tube bracket (A) against the transax](/img/5/57359/w960_57359-1127.png)
CVT-184< SERVICE INFORMATION >
[RE0F08A]
TRANSAXLE ASSEMBLY
• When installing the cooler outlet tube (1) to the transaxle assembly (2), align the cooler tube bracket (A) against the transaxle as
shown.
• When installing the transaxle to the engine, align t he matching mark on the drive plate with the matching
mark on the torque converter alignment stud.
• When securing the transaxle to the engine, attach the bolts in
accordance with the following standard.
• When installing the drive plate to torque converter nuts, tighten them temporarily. Then tighten the nuts to the specified torque.
• After completing installation check for fluid level, fluid leakage, and the positions of CVT. Refer to CVT-17," Checking CVT Fluid " ,
CVT-175, " Adjustment of CVT Position " and
CVT-175, " Checking of CVT Position " .
• When replacing the CVT assembly, erase EEP ROM in TCM. Refer to CVT-12, " Service After Replacing
TCM and Transaxle Assembly " . WCIA0618E
Bolt No. 1 (Transaxle to engine) 2 (Engine to transaxle)
Number of bolts 2 7
Bolt length
“A” mm (in) 55 (2.17) 50 (1.97)
Tightening torque
N·m (kg-m, ft-lb) 62 (6.3, 46) WCIA0619E
Converter nuts: : 51 N·m (5.2 kg-m, 38 ft-lb)
WCIA0616E
Page 1129 of 4331

CVT
N
O P
SERVICE DATA AND SPECIFICATIONS (SDS)
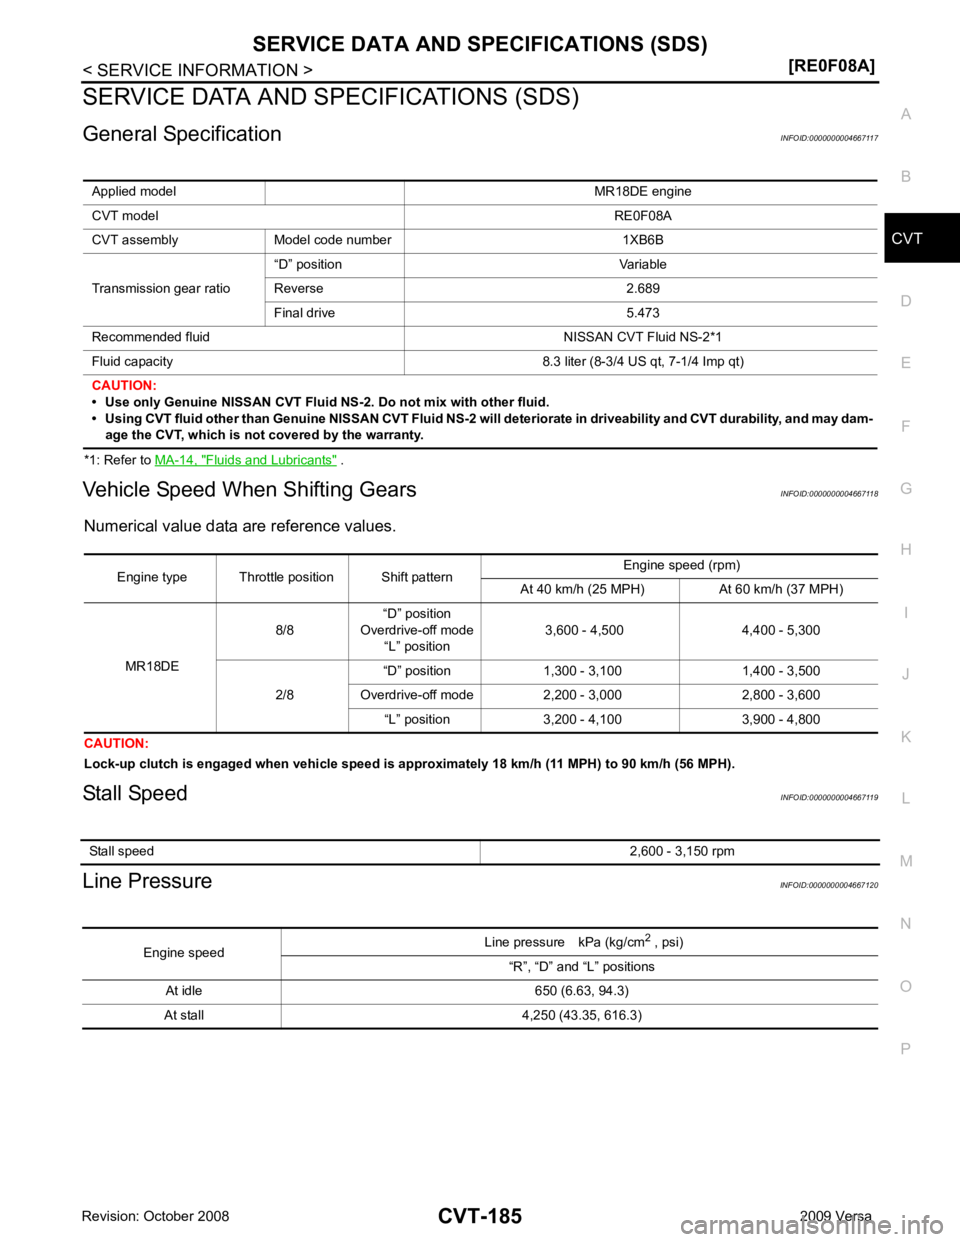
General Specification INFOID:0000000004667117
*1: Refer to MA-14, " Fluids and Lubricants " .
Vehicle Speed When Shifting Gears INFOID:0000000004667118
Numerical value data are reference values.
CAUTION:
Lock-up clutch is engaged when vehi cle speed is approximately 18 km/h (11 MPH) to 90 km/h (56 MPH).
Stall Speed INFOID:0000000004667119
Line Pressure INFOID:0000000004667120
Applied model
MR18DE engine
CVT model RE0F08A
CVT assembly Model code number 1XB6B
Transmission gear ratio “D” position Variable
Reverse 2.689
Final drive 5.473
Recommended fluid NISSAN CVT Fluid NS-2*1
Fluid capacity 8.3 liter (8-3/4 US qt, 7-1/4 Imp qt)
CAUTION:
• Use only Genuine NISSAN CVT Fluid NS-2. Do not mix with other fluid.
• Using CVT fluid other than Genuine NISSAN CVT Fluid NS-2 will deteriorate in driveability and CVT durability, and may dam- age the CVT, which is not covered by the warranty. Stall speed
2,600 - 3,150 rpmEngine speed
Line pressure kPa (kg/cm
2
, psi)
“R”, “D” and “L” positions
At idle 650 (6.63, 94.3)
At stall 4,250 (43.35, 616.3)
Page 1130 of 4331

Name Condition CONSULT-III “DATA MONI
TOR” (Approx.) Resistance (Approx.)
ATF TEMP SEN 20
°C (68 °F) 2.0 V 6.5 k Ω
80 °C (176 °F) 1.0 V 0.9 k ΩName Condition Data (Approx.)
Secondary speed sensor When driving [