NISSAN LATIO 2009 Service Repair Manual
LATIO 2009
NISSAN
NISSAN
https://www.carmanualsonline.info/img/5/57359/w960_57359-0.png
NISSAN LATIO 2009 Service Repair Manual
Trending: jack points, gas type, refrigerant type, turn signal bulb, change key battery, engine oil capacity, clock
Page 611 of 4331
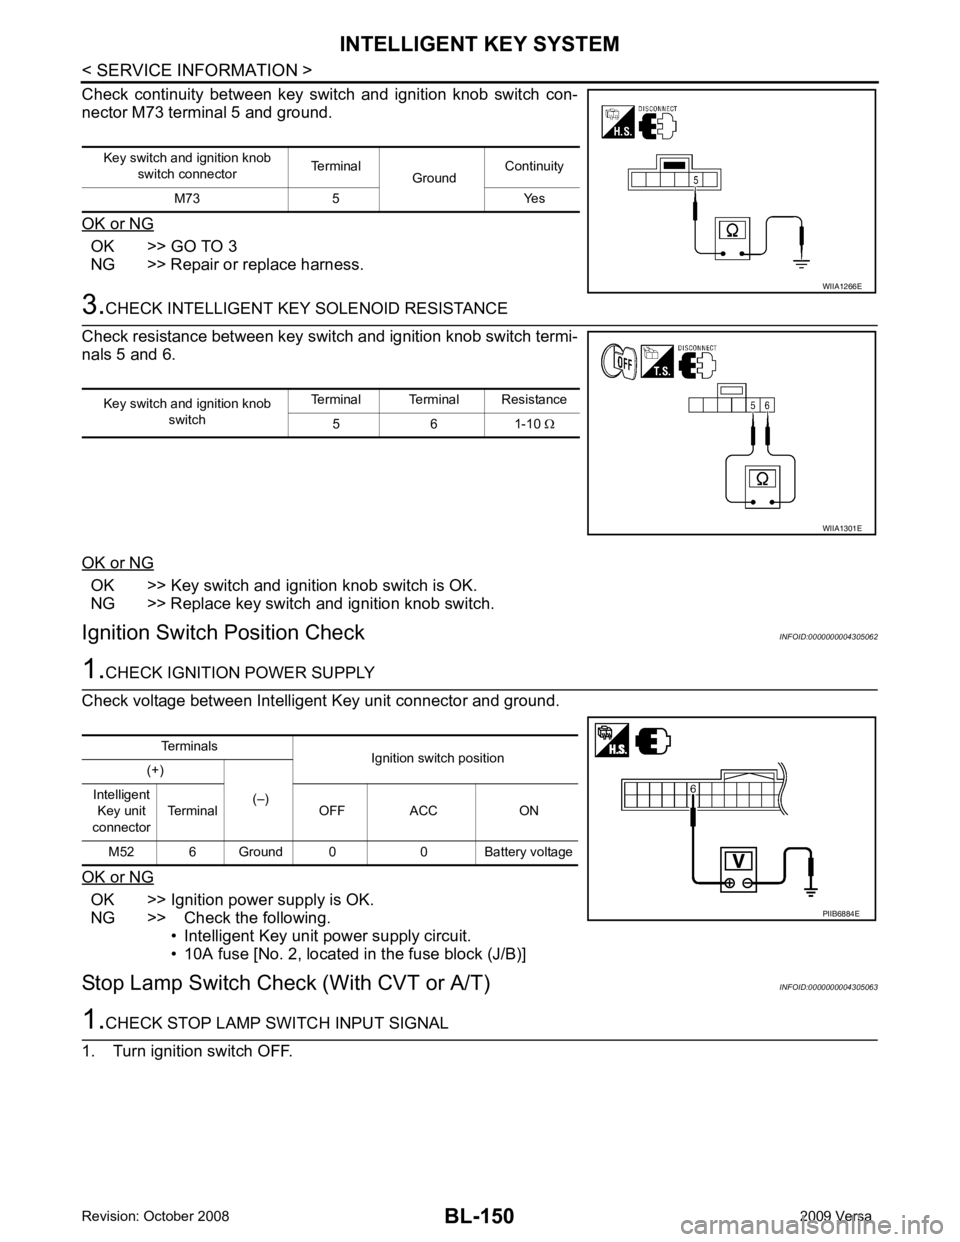
OK >> GO TO 3
NG >> Repair or replace harness. OK >> Key switch and ignition knob switch is OK.
NG >> Replace key switch and ignition knob switch.
Ignition Switch Position Check INFOID:0000000004305062OK >> Ignition power supply is OK.
NG >> Check the following.
• Intelligent Key unit power supply circuit.
• 10A fuse [No. 2, located in the fuse block (J/B)]
Stop Lamp Switch Check (With CVT or A/T) INFOID:0000000004305063
Page 612 of 4331
BL
N
O P
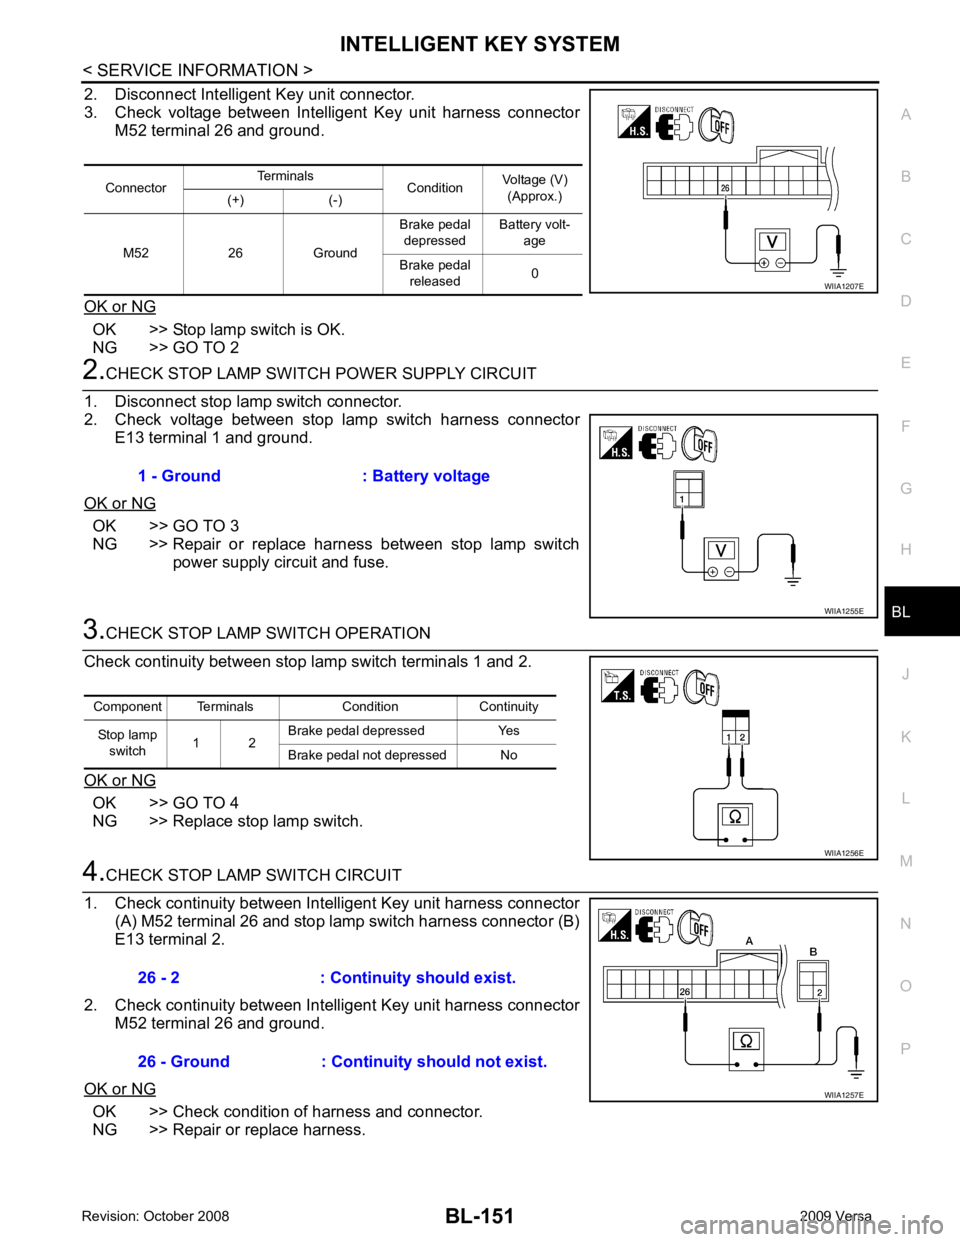
2. Disconnect Intelligent Key unit connector.
3. Check voltage between Intelligent Key unit harness connector M52 terminal 26 and ground.
OK or NG OK >> Stop lamp switch is OK.
NG >> GO TO 2 OK >> GO TO 3
NG >> Repair or replace harness between stop lamp switch power supply circuit and fuse. OK >> GO TO 4
NG >> Replace stop lamp switch. OK >> Check condition of harness and connector.
NG >> Repair or replace harness. Connector
Terminals
ConditionVoltage (V)
(Approx.)
(+) (-)
M52 26 Ground Brake pedal
depressed Battery volt-
age
Brake pedal released 0
Page 613 of 4331
BL-152< SERVICE INFORMATION >
INTELLIGENT KEY SYSTEM
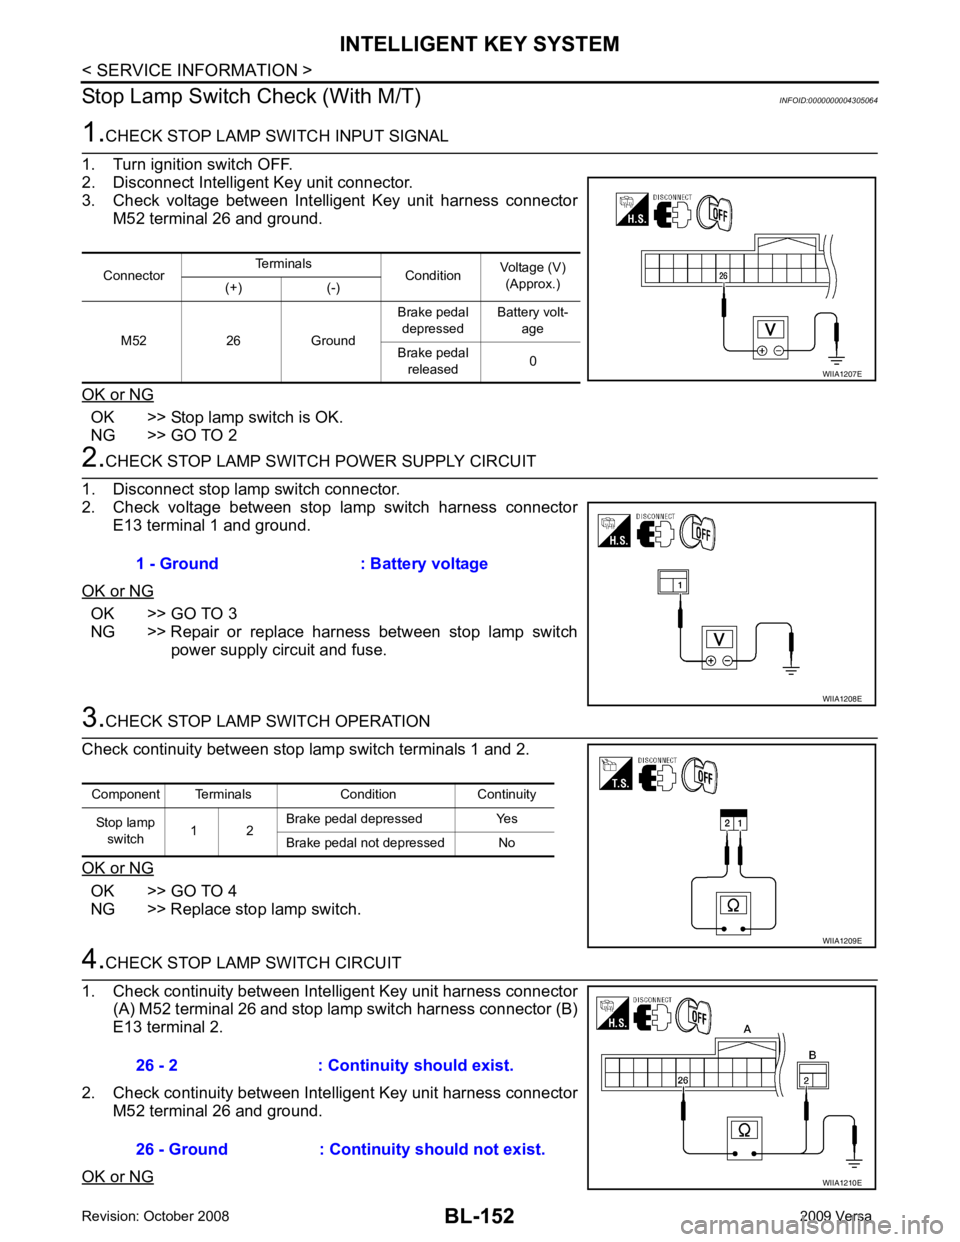
Stop Lamp Switch Check (With M/T) INFOID:00000000043050641.
CHECK STOP LAMP SWITCH INPUT SIGNAL
1. Turn ignition switch OFF.
2. Disconnect Intelligent Key unit connector.
3. Check voltage between Intelligent Key unit harness connector M52 terminal 26 and ground.
OK or NG OK >> Stop lamp switch is OK.
NG >> GO TO 2 2.
CHECK STOP LAMP SWIT CH POWER SUPPLY CIRCUIT
1. Disconnect stop lamp switch connector.
2. Check voltage between stop lamp switch harness connector
E13 terminal 1 and ground.
OK or NG OK >> GO TO 3
NG >> Repair or replace harness between stop lamp switch power supply circuit and fuse. 3.
CHECK STOP LAMP SWITCH OPERATION
Check continuity between stop lamp switch terminals 1 and 2.
OK or NG OK >> GO TO 4
NG >> Replace stop lamp switch. 4.
CHECK STOP LAMP SWITCH CIRCUIT
1. Check continuity between Inte lligent Key unit harness connector
(A) M52 terminal 26 and stop lamp switch harness connector (B)
E13 terminal 2.
2. Check continuity between Inte lligent Key unit harness connector
M52 terminal 26 and ground.
OK or NG Connector
Terminals
ConditionVoltage (V)
(Approx.)
(+) (-)
M52 26 Ground Brake pedal
depressed Battery volt-
age
Brake pedal released 0 WIIA1207E
1 - Ground : Battery voltage
WIIA1208E
Component Terminals Condition Continuity
Stop lamp switch 1 2 Brake pedal depressed Yes
Brake pedal not depressed No WIIA1209E
26 - 2 : Continuity should exist.
26 - Ground : Continuity should not exist. WIIA1210E
Page 614 of 4331
BL
N
O P
OK >> Check condition of harness and connector.
NG >> Repair or replace harness.
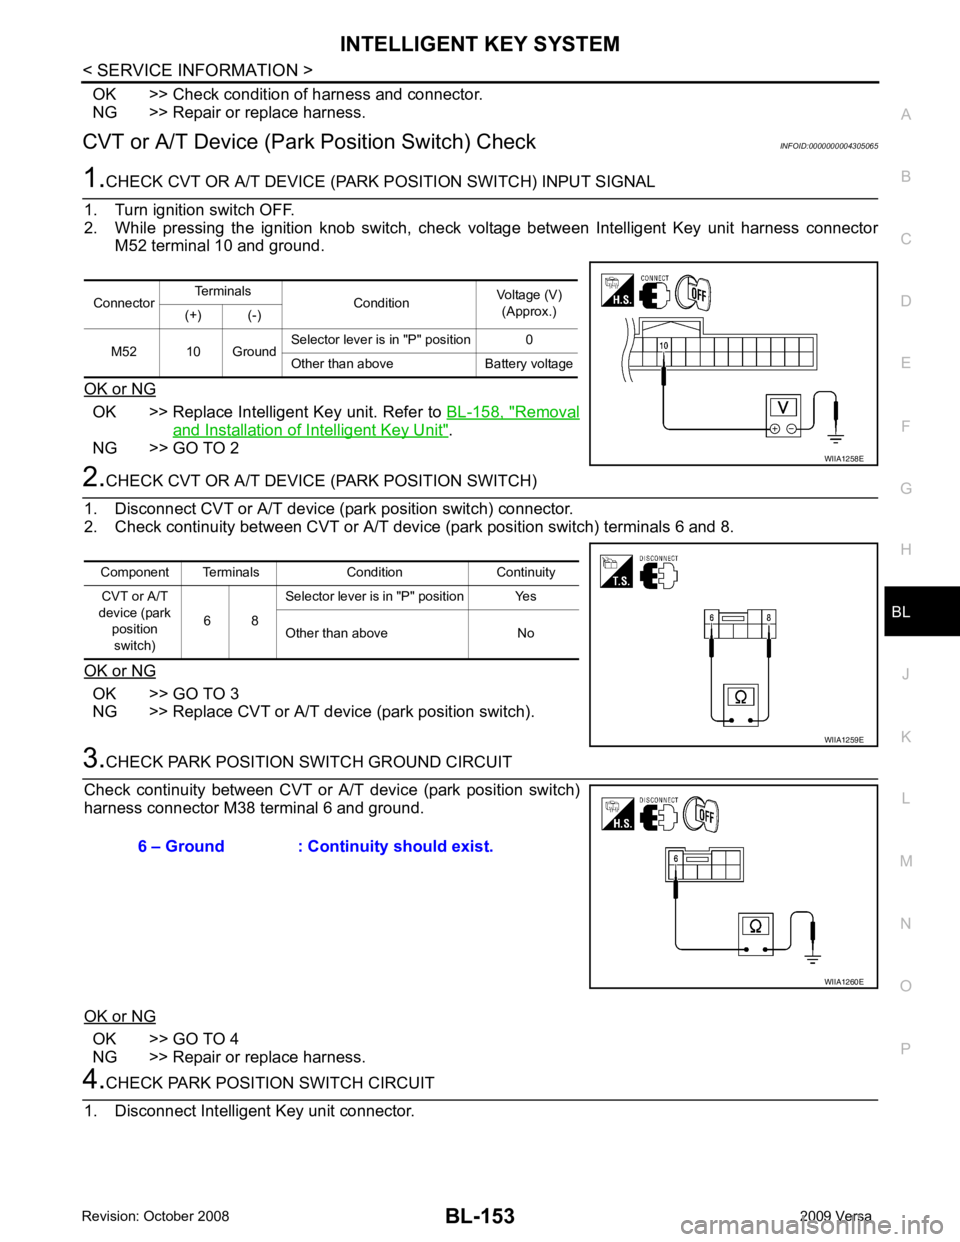
CVT or A/T Device (Park Position Switch) Check INFOID:0000000004305065OK >> Replace Intelligent Key unit. Refer to
BL-158, " Removal
and Installation of Intelligent Key Unit " .
NG >> GO TO 2 OK >> GO TO 3
NG >> Replace CVT or A/T device (park position switch). OK >> GO TO 4
NG >> Repair or replace harness.
Page 615 of 4331
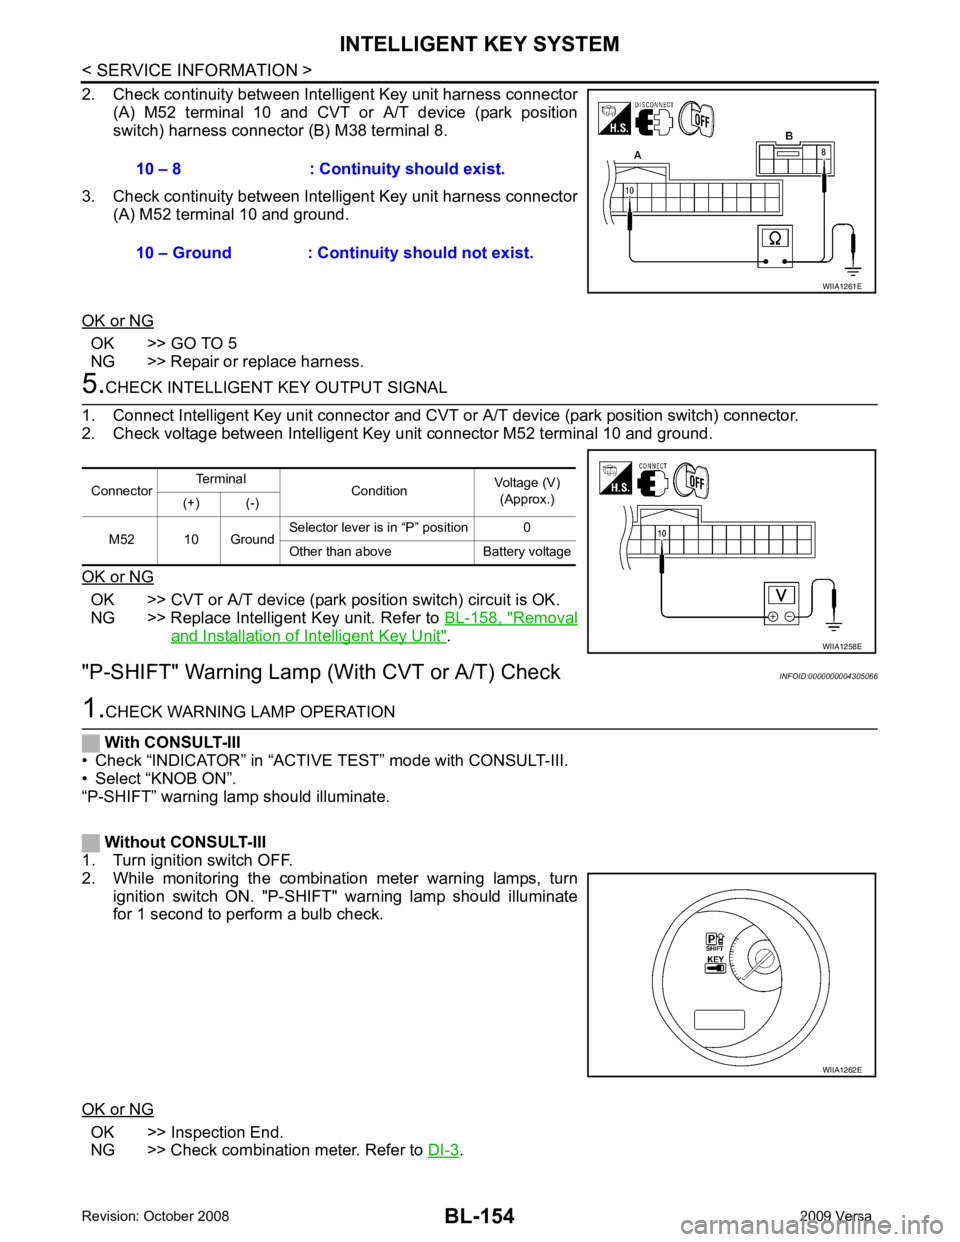
OK >> GO TO 5
NG >> Repair or replace harness. OK >> CVT or A/T device (park position switch) circuit is OK.
NG >> Replace Intelligent Key unit. Refer to BL-158, " Removal
and Installation of Intelligent Key Unit " .
"P-SHIFT" Warning Lamp (With CVT or A/T) Check INFOID:0000000004305066OK >> Inspection End.
NG >> Check combination meter. Refer to DI-3 .
10 – 8 : Continuity should exist.
10 – Ground : Continuity should not exist. WIIA1262E
Page 616 of 4331
BL
N
O P
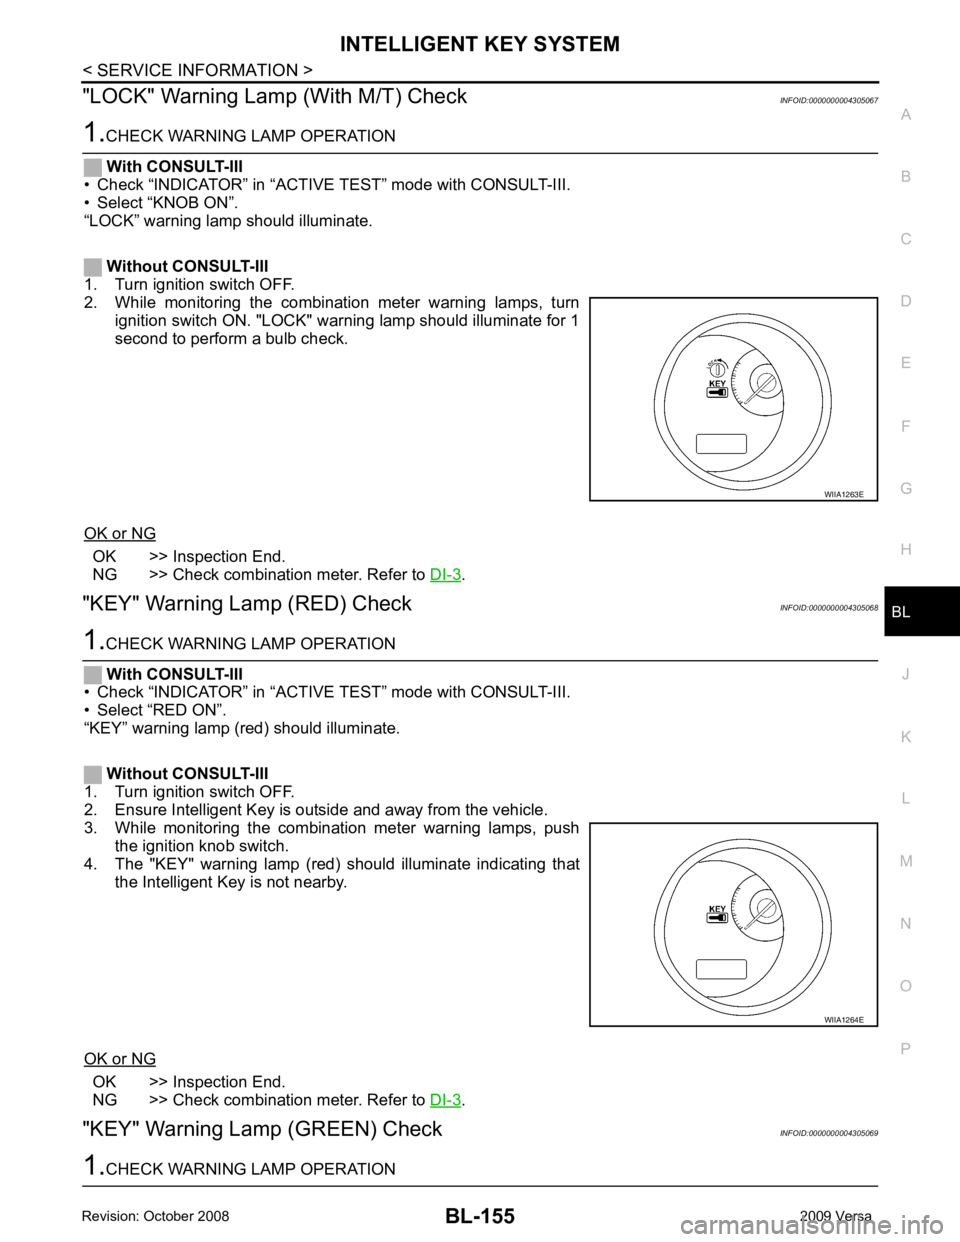
"LOCK" Warning Lamp (With M/T) Check
INFOID:0000000004305067OK >> Inspection End.
NG >> Check combination meter. Refer to DI-3 .
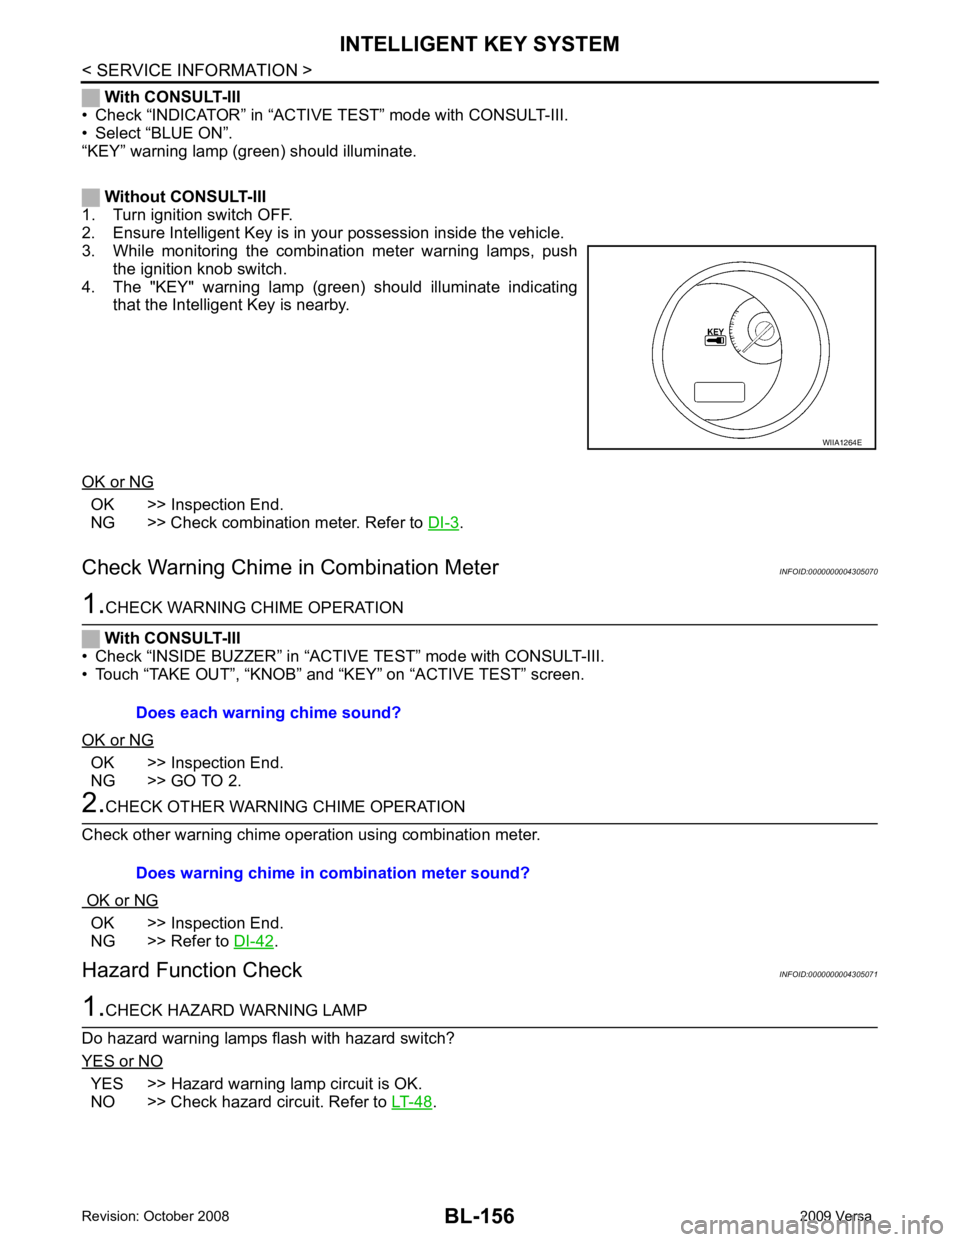
"KEY" Warning Lamp (RED) Check INFOID:0000000004305068OK >> Inspection End.
NG >> Check combination meter. Refer to DI-3 .
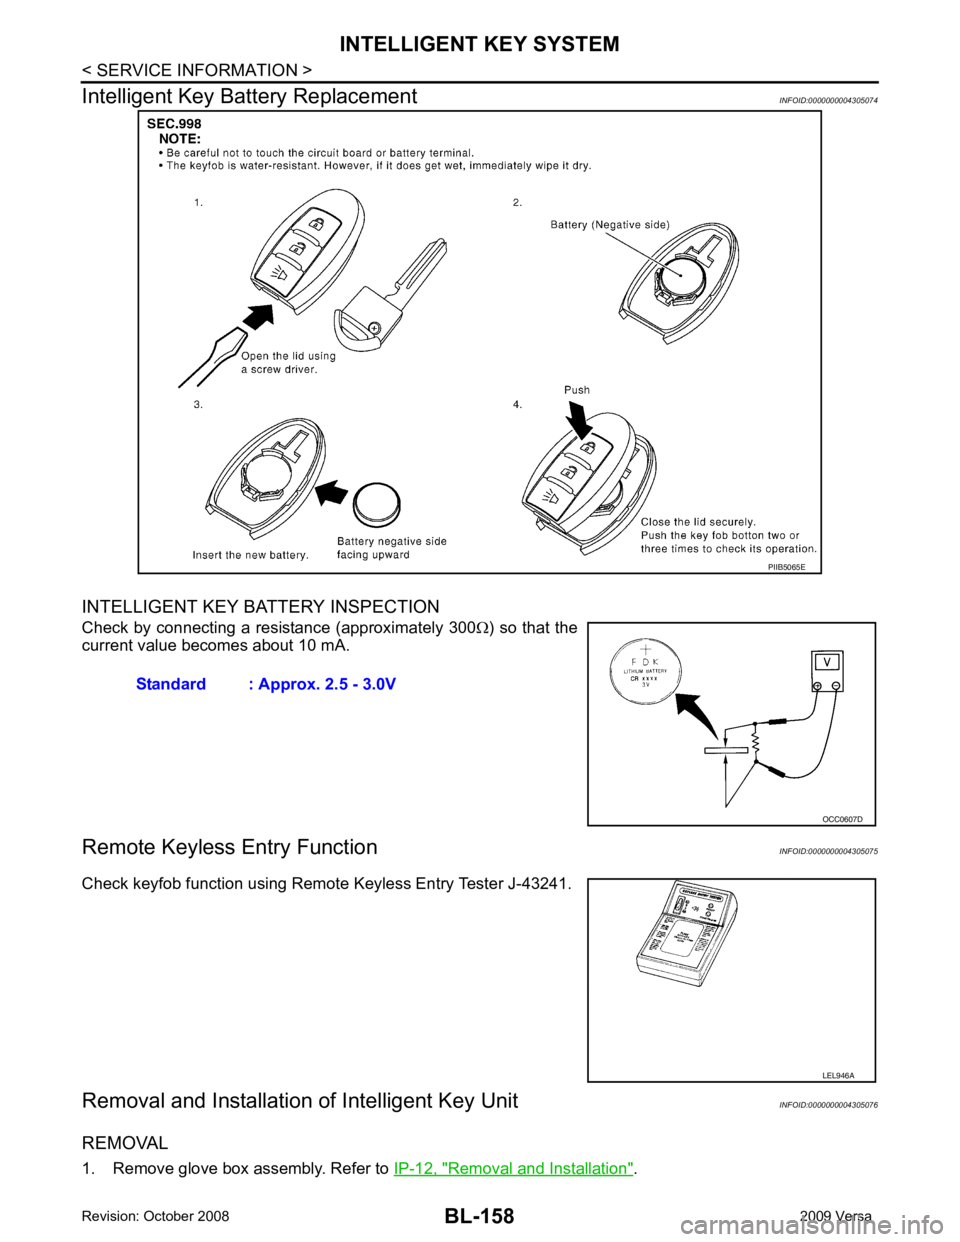
"KEY" Warning Lamp (GREEN) Check INFOID:0000000004305069 WIIA1264E
Page 617 of 4331
OK >> Inspection End.
NG >> Check combination meter. Refer to DI-3 .
Check Warning Chime in Combination Meter INFOID:0000000004305070OK >> Inspection End.
NG >> GO TO 2. OK >> Inspection End.
NG >> Refer to DI-42 .
Hazard Function Check INFOID:0000000004305071YES >> Hazard warning lamp circuit is OK.
NO >> Check hazard circuit. Refer to LT-48 .Does warning chime in combination meter sound?
Page 618 of 4331
INTELLIGENT KEY SYSTEM
BL-157
< SERVICE INFORMATION >
C
D E
F
G H
J
K L
M A
B BL
N
O P
Horn Function Check
INFOID:0000000004305072
First perform the “SELF-DIAG RESULTS” of “BCM” with CONSULT-III, then perform the trouble diag-
nosis of malfunction system indicated in “ SELF-DIAG RESULTS” of “BCM”. Refer to BCS-17, " CAN
Communication Inspection Using CONSULT-III (Self-Diagnosis) " .
1.
CHECK HORN OPERATION
Check if horn sounds with horn switch.
Does horn operate? Yes >> GO TO 2
No >> Check horn circuit. Refer to WW-38 .
2.
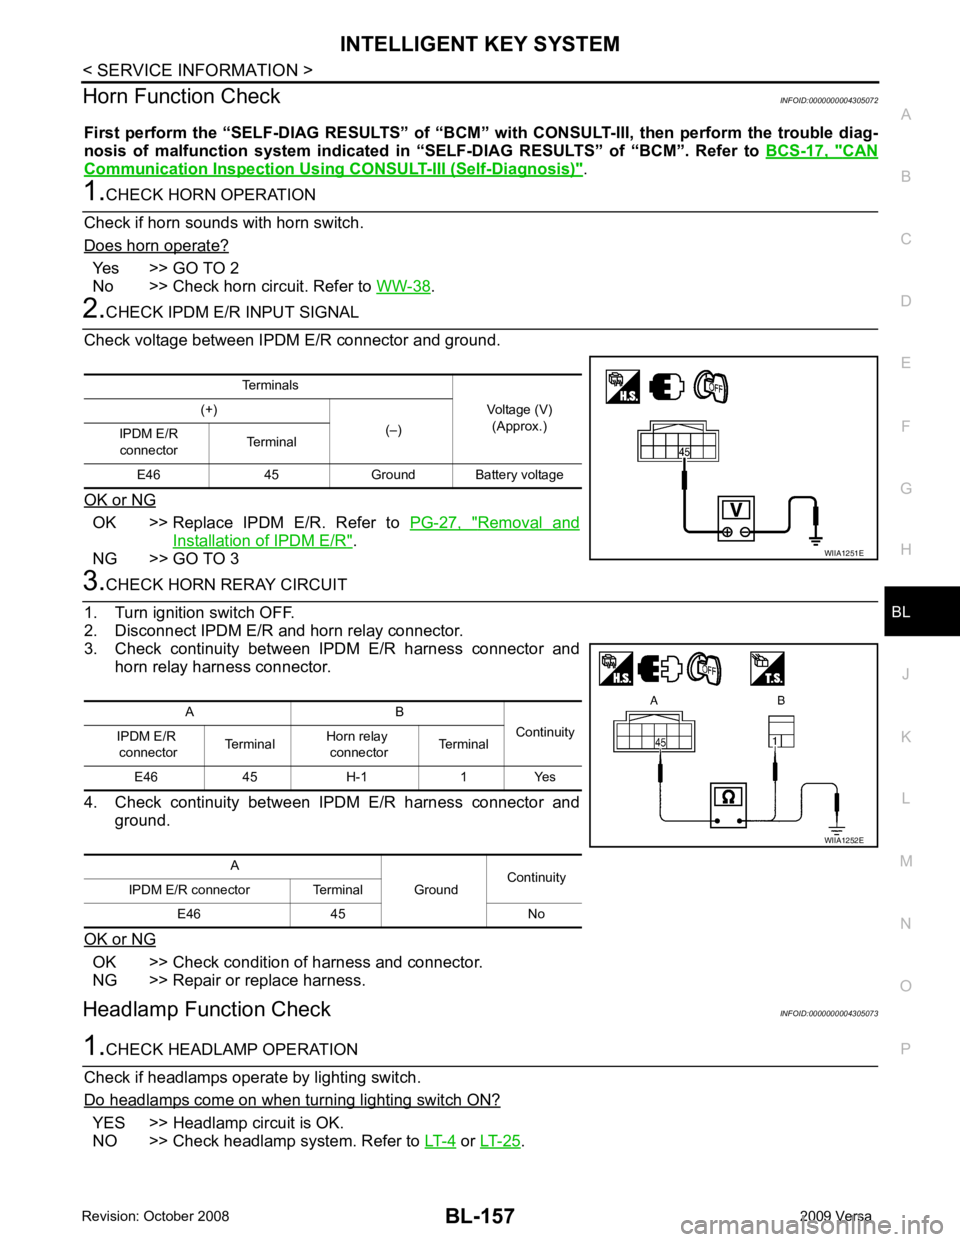
CHECK IPDM E/R INPUT SIGNAL
Check voltage between IPDM E/R connector and ground.
OK or NG OK >> Replace IPDM E/R. Refer to
PG-27, " Removal and
Installation of IPDM E/R " .
NG >> GO TO 3 3.
CHECK HORN RERAY CIRCUIT
1. Turn ignition switch OFF.
2. Disconnect IPDM E/R and horn relay connector.
3. Check continuity between IPDM E/R harness connector and horn relay harness connector.
4. Check continuity between IPDM E/R harness connector and ground.
OK or NG OK >> Check condition of harness and connector.
NG >> Repair or replace harness.
Headlamp Function Check INFOID:00000000043050731.
CHECK HEADLAMP OPERATION
Check if headlamps operate by lighting switch.
Do headlamps come on when turning lighting switch ON? YES >> Headlamp circuit is OK.
NO >> Check headlamp system. Refer to LT-4 or
LT-25 .
Terminals
Voltage (V)(Approx.)
(+)
(–)
IPDM E/R
connector Terminal
E46 45 Ground Ba ttery voltage WIIA1251E
A B
Continuity
IPDM E/R
connector Terminal
Horn relay
connector Terminal
E46 45 H-1 1 Yes
A GroundContinuity
IPDM E/R connector Terminal
E46 45 No WIIA1252E
Page 619 of 4331
Removal and Installation " .
Page 620 of 4331
BL
N
O P
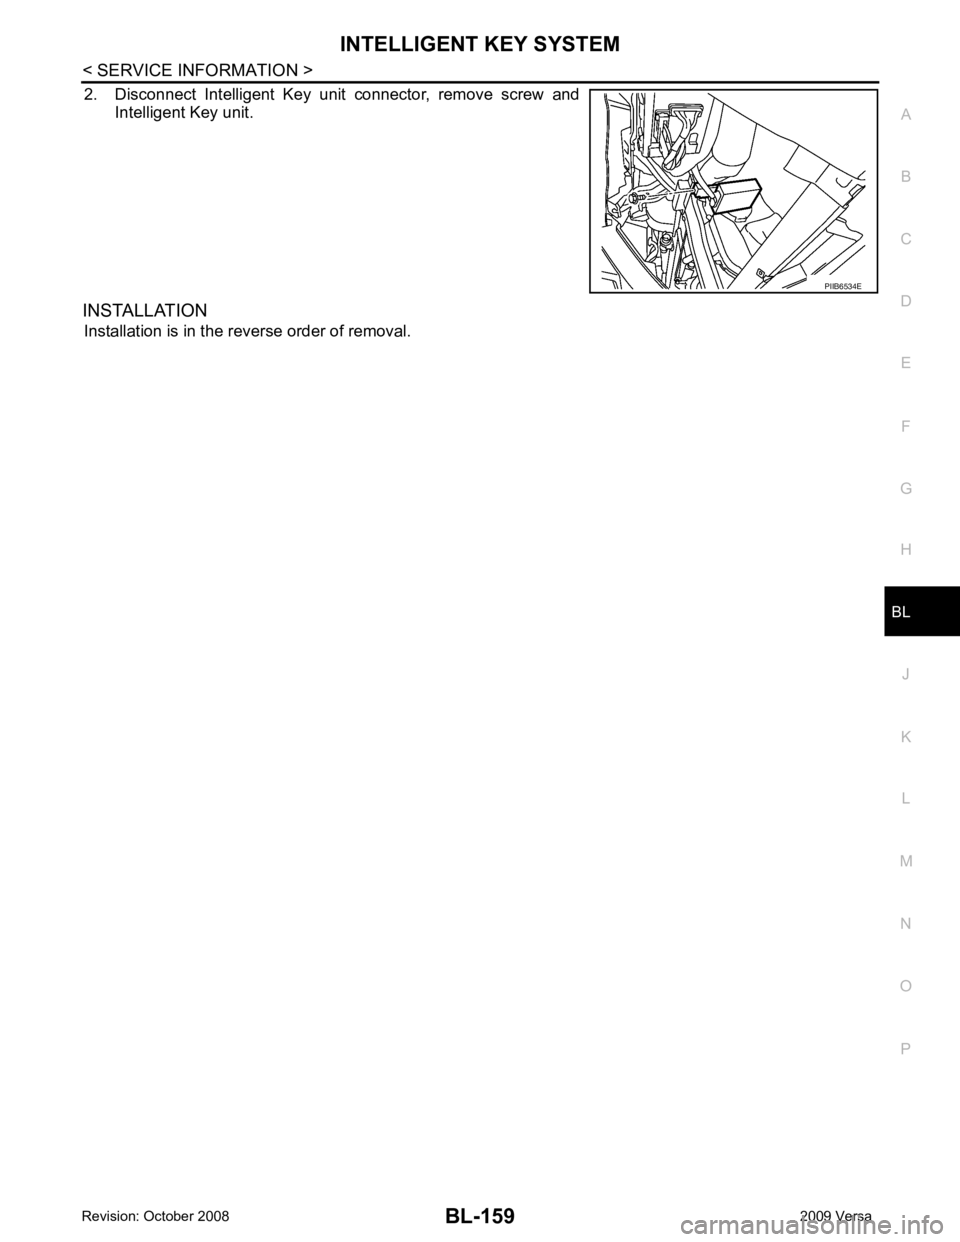
2. Disconnect Intelligent Key unit connector, remove screw and
Intelligent Key unit.
INSTALLATION Installation is in the reverse order of removal.
Trending: transmission oil, immobilizer, OBD port, brake pads, buttons, lug pattern, service indicator
