sensor NISSAN LATIO 2011 Service Repair Manual
[x] Cancel search | Manufacturer: NISSAN, Model Year: 2011, Model line: LATIO, Model: NISSAN LATIO 2011Pages: 3787, PDF Size: 78.35 MB
Page 3636 of 3787

SRS-2
< PRECAUTION >
PRECAUTIONS
PRECAUTION
PRECAUTIONS
Precaution for Supplemental Restraint System (SRS) "AIR BAG" and "SEAT BELT
PRE-TENSIONER"
INFOID:0000000006211104
The Supplemental Restraint System such as “A IR BAG” and “SEAT BELT PRE-TENSIONER”, used along
with a front seat belt, helps to reduce the risk or severity of injury to the driver and front passenger for certain
types of collision. This system includes seat belt switch inputs and dual stage front air bag modules. The SRS
system uses the seat belt switches to determine the front air bag deployment, and may only deploy one front
air bag, depending on the severity of a collision and w hether the front occupants are belted or unbelted.
Information necessary to service the system safely is included in the SRS and SB section of this Service Man-
ual.
WARNING:
• To avoid rendering the SRS inopera tive, which could increase the risk of personal injury or death in
the event of a collision which would result in air bag inflation, all maintenance must be performed by
an authorized NISSAN/INFINITI dealer.
• Improper maintenance, including in correct removal and installation of the SRS, can lead to personal
injury caused by unintent ional activation of the system. For re moval of Spiral Cable and Air Bag
Module, see the SRS section.
• Do not use electrical test equipmen t on any circuit related to the SRS unless instructed to in this
Service Manual. SRS wiring harn esses can be identified by yellow and/or orange harnesses or har-
ness connectors.
PRECAUTIONS WHEN USING POWER TOOLS (AIR OR ELECTRIC) AND HAMMERS
WARNING:
• When working near the Airbag Diagnosis Sensor Unit or other Airbag System sensors with the Igni-
tion ON or engine running, DO NOT use air or electri c power tools or strike near the sensor(s) with a
hammer. Heavy vibration could activate the sensor( s) and deploy the air bag(s), possibly causing
serious injury.
• When using air or electric power tools or hammers , always switch the Ignition OFF, disconnect the
battery, and wait at least 3 minu tes before performing any service.
Precaution for SRS "AIR BAG" and "S EAT BELT PRE-TENSIONER" Service
INFOID:0000000006211105
• Do not use electrical test equipment to check SRS ci rcuits unless instructed to in this Service Manual.
• Before servicing the SRS, turn ignition switch OFF, disconnect both battery cables and wait at least 3 min- utes.
For approximately 3 minutes after the cables are removed, it is still possible for the air bag and seat belt pre-
tensioner to deploy. Therefore, do not work on any SR S connectors or wires until at least 3 minutes have
passed.
• The air bag diagnosis sensor unit must always be installed with the arrow mark “ ⇐” pointing toward the front
of the vehicle for proper operation. Also check air bag diagnosis sensor unit for cracks, deformities or rust
before installation and replace as required.
• The spiral cable must be aligned with the neutral position since its rotations are limited. Do not attempt to
turn steering wheel or column after removal of steering gear.
• Handle air bag module carefully. Always place driver and front passenger air bag modules with the pad side facing upward and seat mounted front side air bag module standing with the stud bolt side facing down.
• Conduct self-diagnosis to check entire SRS for proper function after replacing any components.
• After air bag inflates, the front instrument panel assembly should be replaced if damaged.
• Do not reuse center pillar upper garnish if removed.
Precaution Necessary for Steering W heel Rotation After Battery Disconnect
INFOID:0000000006211106
NOTE:
• This Procedure is applied only to models with Intelligent Key system and NATS (NISSAN ANTI-THEFT SYS-
TEM).
• Remove and install all control units after disconnecting both battery cables with the ignition knob in the
″LOCK ″ position.
Revision: May 2010 2011 Versa
Page 3638 of 3787
SRS-4
< SYMPTOM DIAGNOSIS >
SUPPLEMENTAL RESTRAINT SYSTEM (SRS)
SYMPTOM DIAGNOSIS
SUPPLEMENTAL RESTRAINT SYSTEM (SRS)
SRS ConfigurationINFOID:0000000006211108
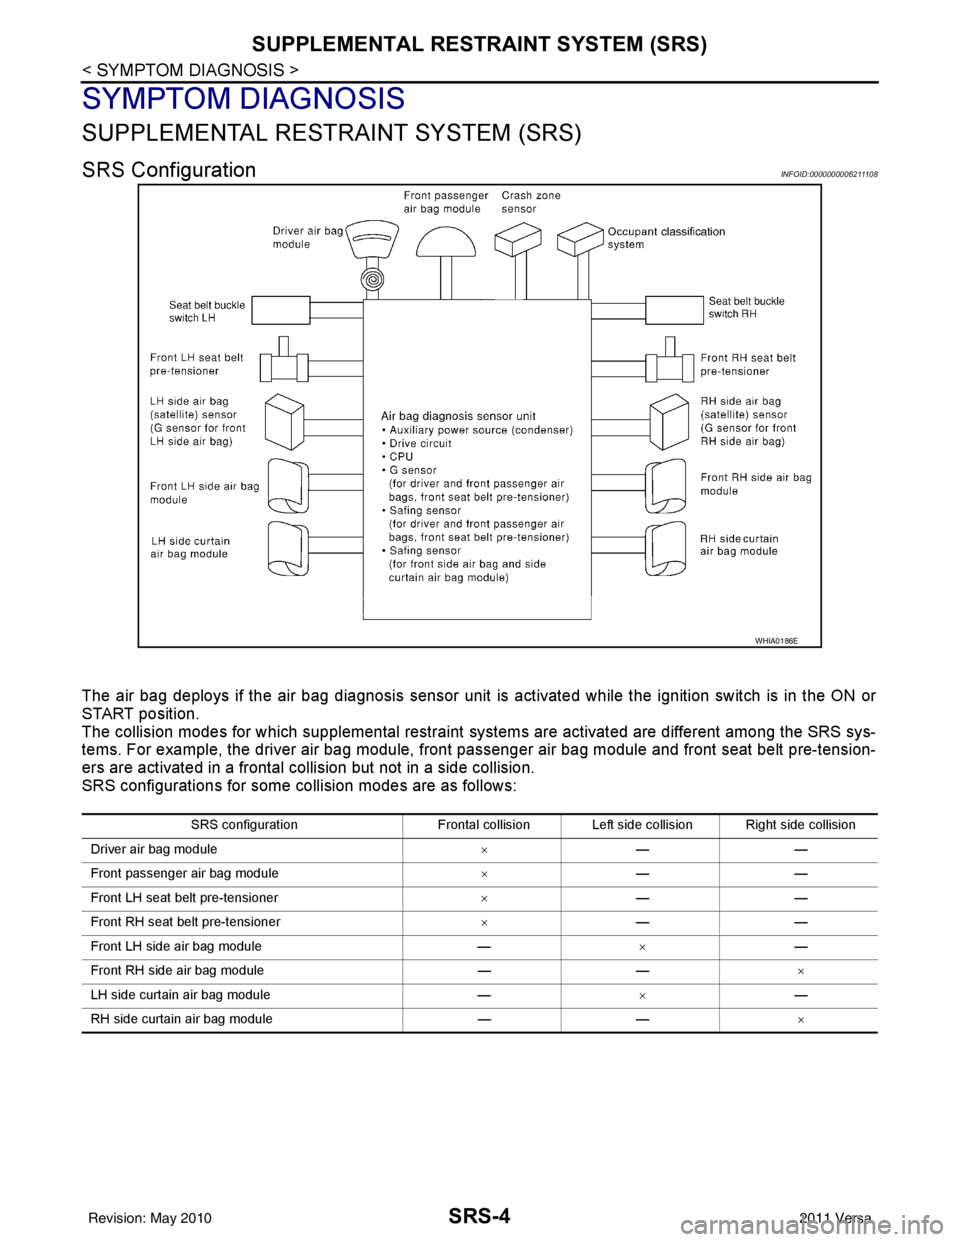
The air bag deploys if the air bag diagnosis sensor unit is activated while the ignition switch is in the ON or
START position.
The collision modes for which supplemental restraint systems are activated are different among the SRS sys-
tems. For example, the driver air bag module, front passenger air bag module and front seat belt pre-tension-
ers are activated in a frontal collision but not in a side collision.
SRS configurations for some collision modes are as follows:
WHIA0186E
SRS configuration Frontal collision Left side collision Right side collision
Driver air bag module ×——
Front passenger air bag module ×——
Front LH seat belt pre-tensioner ×——
Front RH seat belt pre-tensioner ×——
Front LH side air bag module —×—
Front RH side air bag module —— ×
LH side curtain air bag module —×—
RH side curtain air bag module —— ×
Revision: May 2010 2011 Versa
Page 3640 of 3787
SRS-6
< SYMPTOM DIAGNOSIS >
SUPPLEMENTAL RESTRAINT SYSTEM (SRS)
Front Seat Belt Pre-te nsioner with Load Limiter
INFOID:0000000006211113
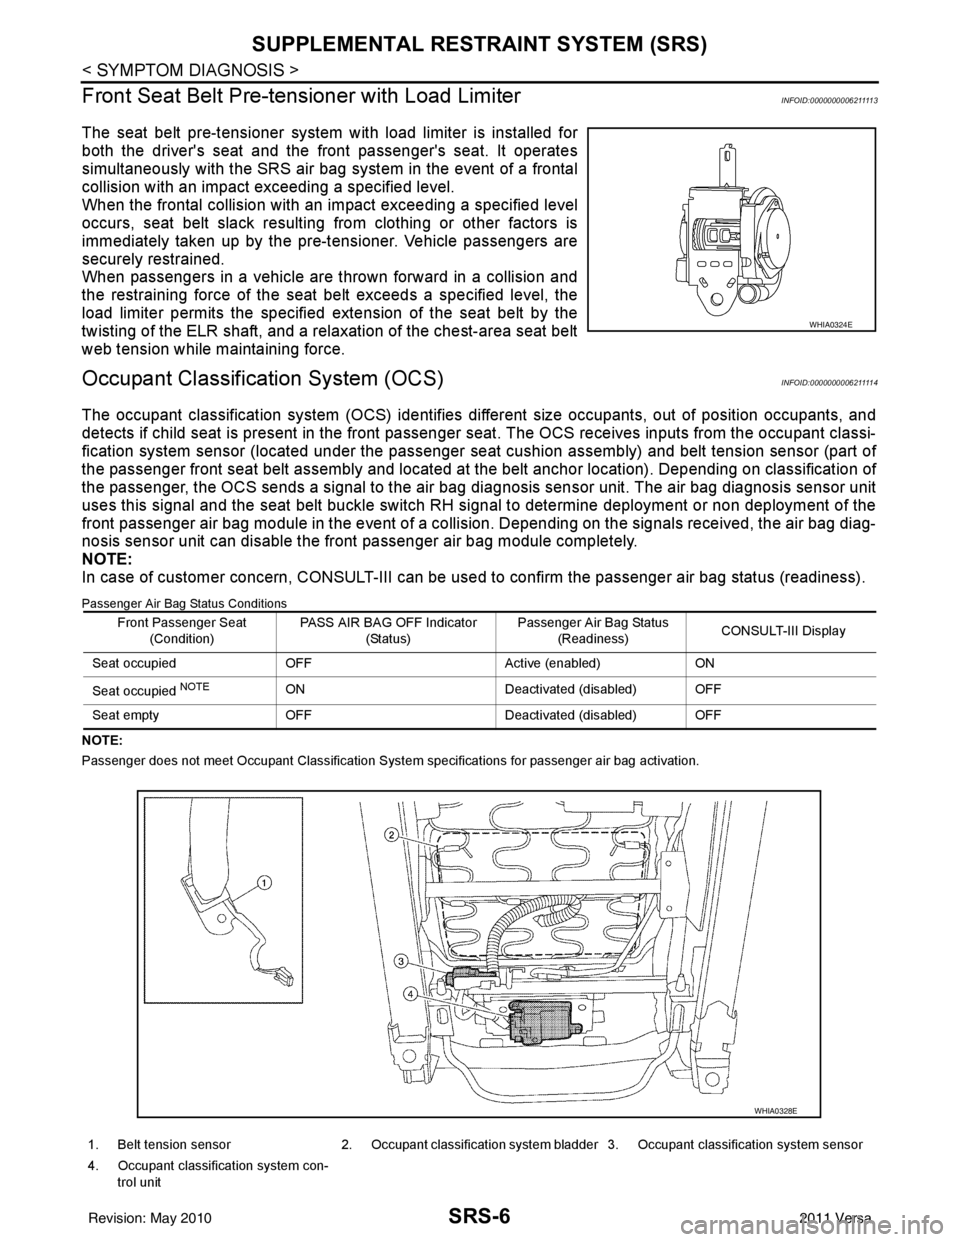
The seat belt pre-tensioner system wi th load limiter is installed for
both the driver's seat and the front passenger's seat. It operates
simultaneously with the SRS air bag system in the event of a frontal
collision with an impact exceeding a specified level.
When the frontal collision with an im pact exceeding a specified level
occurs, seat belt slack resulting from clothing or other factors is
immediately taken up by the pre-tensioner. Vehicle passengers are
securely restrained.
When passengers in a vehicle are thrown forward in a collision and
the restraining force of the seat belt exceeds a specified level, the
load limiter permits the specified extension of the seat belt by the
twisting of the ELR shaft, and a relaxation of the chest-area seat belt
web tension while maintaining force.
Occupant Classification System (OCS)INFOID:0000000006211114
The occupant classification system (OCS) identifies diff erent size occupants, out of position occupants, and
detects if child seat is present in the front passenger seat. The OCS receives inputs from the occupant classi-
fication system sensor (located under the passenger seat cushion assembly) and belt tension sensor (part of
the passenger front seat belt assembly and located at the belt anchor location). Depending on classification of
the passenger, the OCS sends a signal to the air bag di agnosis sensor unit. The air bag diagnosis sensor unit
uses this signal and the seat belt buckle switch RH signal to determine deployment or non deployment of the
front passenger air bag module in the event of a collision. Depending on the signals received, the air bag diag-
nosis sensor unit can disable the front passenger air bag module completely.
NOTE:
In case of customer concern, CONSULT-III can be used to confirm the passenger air bag status (readiness).
Passenger Air Bag Status Conditions
NOTE:
Passenger does not meet Occupant Classification System specifications for passenger air bag activation.
WHIA0324E
Front Passenger Seat
(Condition) PASS AIR BAG OFF Indicator
(Status) Passenger Air Bag Status
(Readiness) CONSULT-III Display
Seat occupied OFF Active (enabled)ON
Seat occupied
NOTEON Deactivated (disabled) OFF
Seat empty OFF Deactivated (disabled) OFF
1. Belt tension sensor 2. Occupant classification system bladder 3. Occupant classification system sensor
4. Occupant classification system con- trol unit
WHIA0328E
Revision: May 2010 2011 Versa
Page 3644 of 3787
SRS-10
< SYMPTOM DIAGNOSIS >
TROUBLE DIAGNOSIS
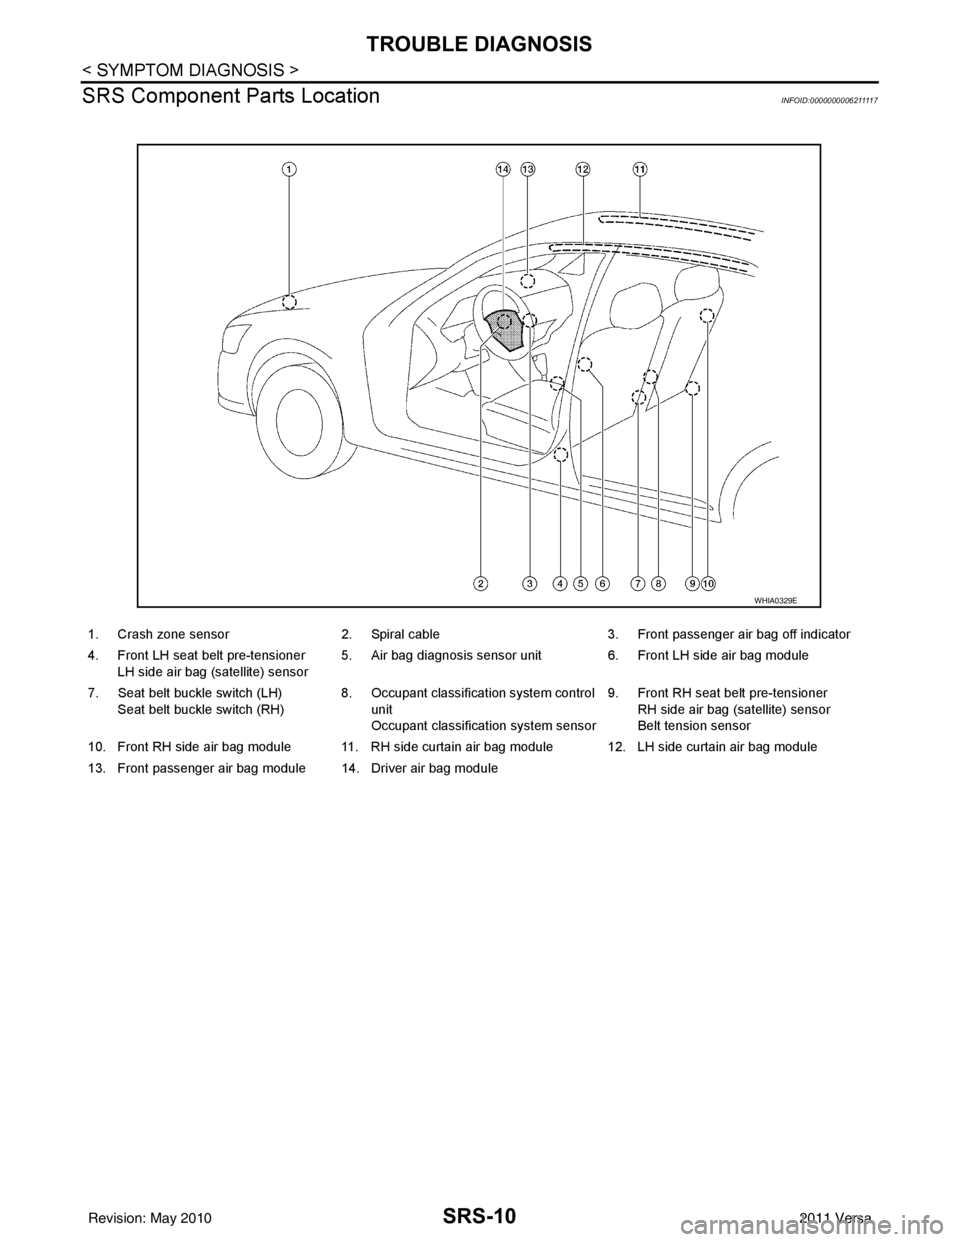
SRS Component Parts Location
INFOID:0000000006211117
1. Crash zone sensor 2. Spiral cable 3. Front passenger air bag off indicator
4. Front LH seat belt pre-tensioner LH side air bag (satellite) sensor 5. Air bag diagnosis sensor unit 6. Front LH side air bag module
7. Seat belt buckle switch (LH) Seat belt buckle switch (RH) 8. Occupant classification system control
unit
Occupant classification system sensor 9. Front RH seat belt pre-tensioner
RH side air bag (satellite) sensor
Belt tension sensor
10. Front RH side air bag module 11. RH side curtain air bag module 12. LH side curtain air bag module
13. Front passenger air bag module 14. Driver air bag module
WHIA0329E
Revision: May 2010 2011 Versa
Page 3652 of 3787

SRS-18
< SYMPTOM DIAGNOSIS >
TROUBLE DIAGNOSIS
HOW TO CHANGE BETWEEN SELF-DIAGNOSIS MODE AND USER MODE WITH CONSULT-III
From User Mode to Diagnosis Mode
After selecting “AIR BAG” on the “SELECT SYSTEM” screen, User mode automatically changes to Diagnosis
mode.
From Diagnosis Mode to User Mode
To return to User mode from Diagnosis mode, touch “BACK” key of CONSULT-III until “SELECT SYSTEM”
appears, Diagnosis mode automatically changes to User mode.
HOW TO ERASE SELF-DIAGNOSIS RESULTS
NOTE:
If the memory in “SELF-DIAG [PAST]” is not erased, User mode will continue to show the system mal-
function by the operation of th e warning lamp even if the malfun ction is repaired completely.
• “SELF-DIAG [CURRENT]” A current self-diagnosis result is displayed on the CO NSULT-III screen in real time. After the malfunction is
repaired completely, no malfunction is detected on “SELF-DIAG [CURRENT]”.
• “SELF-DIAG [PAST]” Return to the “SELF-DIAG [CURRENT]” CONSULT-III screen by touching “BACK” key of CONSULT-III and
select “SELF-DIAG [CURRENT]” in SELECT DIAG MODE. Touch “ERASE” in “SELF-DIAG [CURRENT]”
mode.
• “TROUBLE DIAG RECORD”
The memory of “TROUBLE DI AG RECORD” cannot be erased.
Self-Diagnosis Function (Without CONSULT-III)INFOID:0000000006211121
The reading of these results is accomplished using one of two modes — “User mode” and “Diagnosis mode”.
HOW TO CHANGE BETWEEN USER MODE AND SELF-DIAGNOSIS MODE WITHOUT CONSULT-
AIR BAG diagnostic mode Description
SELF-DIAG [CURRENT] A current Self-diagnosis result is displayed on the CO
NSULT-III screen in real time. This refers to a mal-
functioning part requiring replacement.
SELF-DIAG [PAST] Diagnosis results previously stored in the memory are displayed on the CONSULT-III screen. The
stored results will remain until the memory is erased.
TROUBLE DIAG RECORD With TROUBLE DIAG RECORD, diagnosis results previously erased by a reset operation can be dis-
played on the CONSULT-III screen.
ECU DISCRIMINATED NO. Air bag diagnosis sensor unit ECU discriminated number (identification number) is displayed. Air bag
diagnosis sensor unit has individual ECU discriminated number (identification number) based on model
and equipment.
PASSENGER AIR BAG The STATUS (readiness) of the front passenger air bag module is displayed. The STATUS displayed
(ON/OFF) depends on the signals supplied to the occupant classification system control module and
air bag diagnosis sensor unit. Refer to
SRS-6, "
Occupant Classification System (OCS)" for more in-
formation.
Revision: May 2010 2011 Versa
Page 3654 of 3787
SRS-20
< SYMPTOM DIAGNOSIS >
TROUBLE DIAGNOSIS
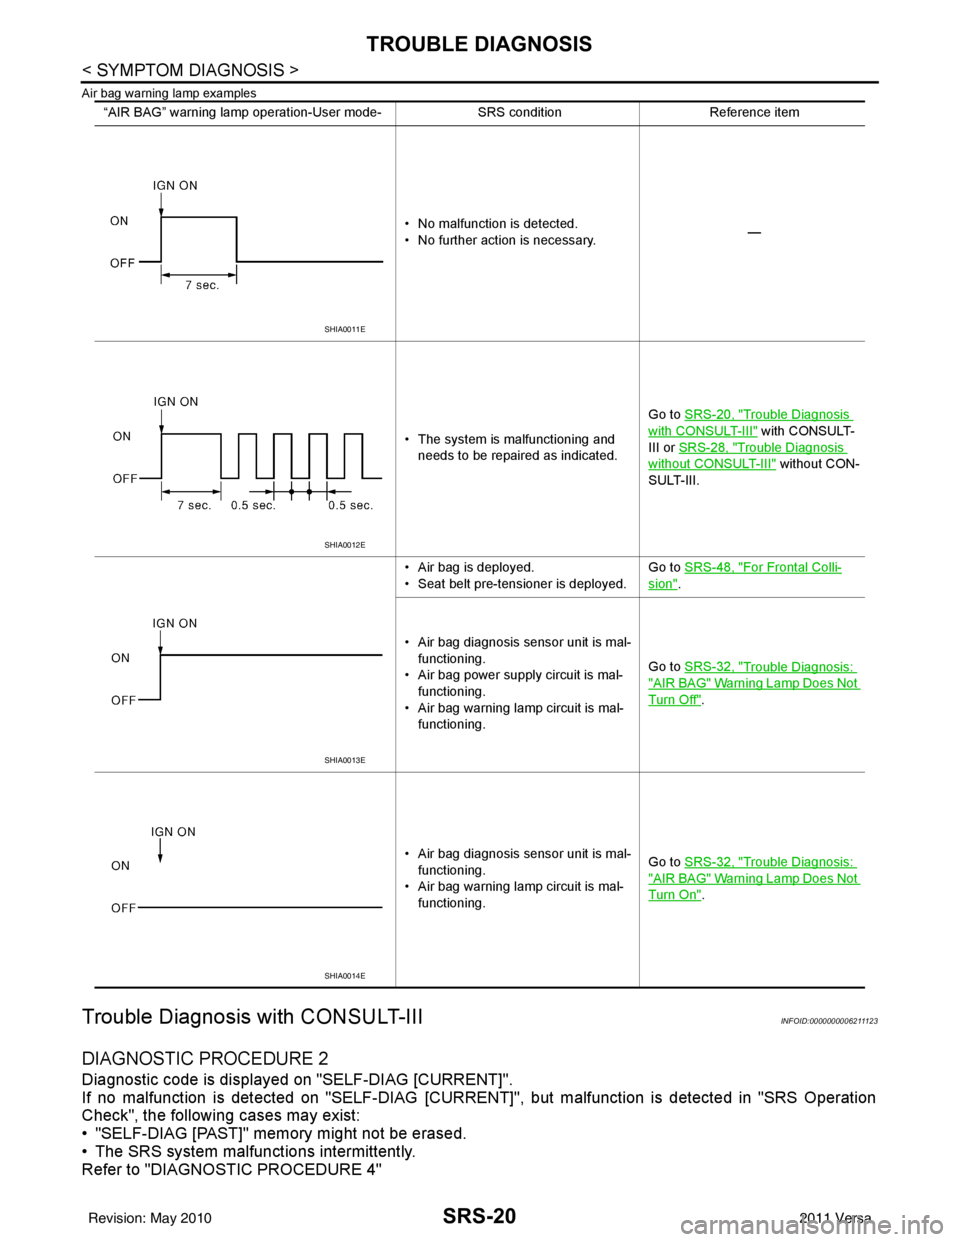
Air bag warning lamp examples
Trouble Diagnosis with CONSULT-IIIINFOID:0000000006211123
DIAGNOSTIC PROCEDURE 2
Diagnostic code is displayed on "SELF-DIAG [CURRENT]".
If no malfunction is detected on "SEL F-DIAG [CURRENT]", but malfunction is detected in "SRS Operation
Check", the following cases may exist:
• "SELF-DIAG [PAST]" memory might not be erased.
• The SRS system malfunctions intermittently.
Refer to "DIAGNOSTIC PROCEDURE 4"
“AIR BAG” warning lamp operation-User mode- SRS conditionReference item
• No malfunction is detected.
• No further action is necessary. —
• The system is malfunctioning and needs to be repaired as indicated. Go to
SRS-20, "
Trouble Diagnosis
with CONSULT-III" with CONSULT-
III or SRS-28, "
Trouble Diagnosis
without CONSULT-III" without CON-
SULT-III.
• Air bag is deployed.
• Seat belt pre-tensioner is deployed. Go to
SRS-48, "
For Frontal Colli-
sion".
• Air bag diagnosis sensor unit is mal- functioning.
• Air bag power supply circuit is mal- functioning.
• Air bag warning lamp circuit is mal- functioning. Go to
SRS-32, "
Trouble Diagnosis:
"AIR BAG" Warning Lamp Does Not
Turn Off".
• Air bag diagnosis sensor unit is mal- functioning.
• Air bag warning lamp circuit is mal- functioning. Go to
SRS-32, "
Trouble Diagnosis:
"AIR BAG" Warning Lamp Does Not
Turn On".
SHIA0011E
SHIA0012E
SHIA0013E
SHIA0014E
Revision: May 2010 2011 Versa
Page 3655 of 3787
![NISSAN LATIO 2011 Service Repair Manual TROUBLE DIAGNOSISSRS-21
< SYMPTOM DIAGNOSIS >
C
DE
F
G
I
J
K L
M A
B
SRS
N
O P
CONSULT-III Diagnostic Code
Chart ("SELF-DIAG [CURRENT]")
Diagnostic item Explanation Repair order
Recheck SRS at each r NISSAN LATIO 2011 Service Repair Manual TROUBLE DIAGNOSISSRS-21
< SYMPTOM DIAGNOSIS >
C
DE
F
G
I
J
K L
M A
B
SRS
N
O P
CONSULT-III Diagnostic Code
Chart ("SELF-DIAG [CURRENT]")
Diagnostic item Explanation Repair order
Recheck SRS at each r](/img/5/57357/w960_57357-3654.png)
TROUBLE DIAGNOSISSRS-21
< SYMPTOM DIAGNOSIS >
C
DE
F
G
I
J
K L
M A
B
SRS
N
O P
CONSULT-III Diagnostic Code
Chart ("SELF-DIAG [CURRENT]")
Diagnostic item Explanation Repair order
Recheck SRS at each replacement
NO DTC IS DETECTED Malfunction is indicat-
ed by the “AIR BAG”
warning lamp in User
mode.Low battery voltage (Less than 9V) 1. Go to
SC-5, "
How to Handle Bat-
tery".
2. Go to "DIAGNOSTIC PROCE-
DURE 3" .
“SELF-DIAG [PAST]” memory might
not be erased. Go to "DIAGNOSTIC PROCEDURE 4"
.
Intermittent malfunction has been
detected in the past. Go to "DIAGNOSTIC PROCEDURE 5"
.
No malfunction is detected in User mode. —
DRIVER AIRBAG MODULE [OPEN]
[B1049] or [B1054] Driver air bag module circuit is open (including the spiral ca-
ble).
1. Visually check the wiring harness
connection.
2. Replace the harness if it has visi- ble damage.
3. Replace driver air bag module.
4. Replace the spiral cable.
5. Replace the air bag diagnosis sensor unit.
6. Replace the related harness.
DRIVER AIRBAG MODULE
[VB-SHORT]
[B1050] or [B1055] Driver air bag module circuit is shorted to some power supply
circuit (including the spiral cable).
DRIVER AIRBAG MODULE [GND-SHORT]
[B1051] or [B1056] Driver air bag module circuit is shorted to ground (including
the spiral cable).
DRIVER AIRBAG MODULE [SHORT]
[B1052] or [B1057] Driver air bag module circuits are shorted to each other.
ASSIST A/B MODULE [OPEN]
[B1065] or [B1070] Front passenger air bag module circuit is open.
1. Visually check the wiring harness
connection.
2. Replace the harness if it has visi- ble damage.
3. Replace front passenger air bag
module.
4. Replace the air bag diagnosis sensor unit.
5. Replace the related harness.
ASSIST A/B MODULE
[VB-SHORT]
[B1066] or [B1071] Front passenger air bag module circuit is shorted to some
power supply circuit.
ASSIST A/B MODULE [GND-SHORT]
[B1067] or [B1072] Front passenger air bag module circuit is shorted to ground.
ASSIST A/B MODULE [SHORT]
[B1068] or [B1073] Front passenger air bag module circuits are shorted to each
other.
CRASH ZONE SEN [UNIT FAIL]
[B1033] or [B1034]
CRASH ZONE SEN [COMM FAIL][B1035] Crash zone sensor
1. Visually check the wiring harness
connection.
2. Replace the harness if it has visi- ble damage.
3. Replace the crash zone sensor.
4. Replace the air bag diagnosis sensor unit.
5. Replace the related harness.
SIDE MODULE LH [OPEN][B1134] Front LH side air bag module circuit is open.
1. Visually check the wiring harness
connection.
2. Replace the harness if it has visi-
ble damage.
3. Replace front LH seat back as- sembly (front LH side air bag
module).
4. Replace the air bag diagnosis sensor unit.
5. Replace the related harness.
SIDE MODULE LH
[VB-SHORT][B1135] Front LH side air bag module circuit is shorted to some power
supply circuit.
SIDE MODULE LH [GND-SHORT]
[B1136] Front LH side air bag module circuit is shorted to ground.
SIDE MODULE LH [SHORT][B 11
37] Front LH side air bag module circuits are shorted to each oth-
er.
Revision: May 2010
2011 Versa
Page 3656 of 3787
![NISSAN LATIO 2011 Service Repair Manual SRS-22
< SYMPTOM DIAGNOSIS >
TROUBLE DIAGNOSIS
SIDE MODULE RH[OPEN][B1129] Front RH side air bag module circuit is open.
1. Visually check the wiring harness
connection.
2. Replace the harness if it NISSAN LATIO 2011 Service Repair Manual SRS-22
< SYMPTOM DIAGNOSIS >
TROUBLE DIAGNOSIS
SIDE MODULE RH[OPEN][B1129] Front RH side air bag module circuit is open.
1. Visually check the wiring harness
connection.
2. Replace the harness if it](/img/5/57357/w960_57357-3655.png)
SRS-22
< SYMPTOM DIAGNOSIS >
TROUBLE DIAGNOSIS
SIDE MODULE RH[OPEN][B1129] Front RH side air bag module circuit is open.
1. Visually check the wiring harness
connection.
2. Replace the harness if it has visi- ble damage.
3. Replace front RH seat back as- sembly (front RH side air bag
module).
4. Replace the air bag diagnosis sensor unit.
5. Replace the related harness.
SIDE MODULE RH
[VB-SHORT]
[B1130] Front RH side air bag module circuit is shorted to some power
supply circuit.
SIDE MODULE RH [GND-SHORT] [B1131] Front RH side air bag module circuit is shorted to ground.
SIDE MODULE RH [SHORT][B1132] Front RH side air bag module circuits are shorted to each oth-
er.
SATELLITE SENS LH [UNIT FAIL]
[B1118] or [B1119]
SATELLITE SENS LH [COMM FAIL]
[B1120] LH side air bag (satellite) sensor
1. Visually check the wiring harness
connection.
2. Replace the harness if it has visi- ble damage.
3. Replace the LH side air bag (sat-
ellite) sensor.
4. Replace the air bag diagnosis sensor unit.
5. Replace the related harness.
SATELLITE SENS RH [UNIT FAIL]
[B1113] or [B1114]
SATELLITE SENS RH [COMM FAIL][ B 111 5 ] RH side air bag (satellite) sensor
1. Visually check the wiring harness
connection.
2. Replace the harness if it has visi-
ble damage.
3. Replace the RH side air bag (sat- ellite) sensor.
4. Replace the air bag diagnosis sensor unit.
5. Replace the related harness.
PRE-TEN FRONT LH [OPEN]
[B1086] The circuit for front LH seat belt pre-tensioner is open. 1. Visually check the wiring harness
connections.
2. Replace the harness if it has visi- ble damage.
3. Replace front LH seat belt pre- tensioner.
4. Replace the air bag diagnosis
sensor unit.
5. Replace the related harness.
PRE-TEN FRONT LH
[VB-SHORT]
[B1087] The circuit for front LH seat belt pre-tensioner is shorted to
some power supply circuit.
PRE-TEN FRONT LH [GND-SHORT] [B1088] The circuit for front LH seat belt pre-tensioner is shorted to
ground.
PRE-TEN FRONT LH [SHORT]
[B1089] The circuits for the front LH seat belt pre-tensioner are shorted
to each other.
PRE-TEN FRONT RH [OPEN]
[B1081] The circuit for front RH seat belt pre-tensioner is open. 1. Visually check the wiring harness
connections.
2. Replace the harness if it has visi-
ble damage.
3. Replace front RH seat belt pre- tensioner.
4. Replace the air bag diagnosis sensor unit.
5. Replace the related harness.
PRE-TEN FRONT RH
[VB-SHORT][B1082] The circuit for front RH seat belt pre-tensioner is shorted to
some power supply circuit.
PRE-TEN FRONT RH [GND-SHOR T]
[
B1083] The circuit for front RH seat belt pre-tensioner is shorted to
ground.
PRE-TEN FRONT RH [SHORT][B1084] The circuits for the front RH seat belt pre-tensioner are short-
ed to each other.
Diagnostic item
Explanation Repair order
Recheck SRS at each replacement
Revision: May 2010 2011 Versa
Page 3657 of 3787
![NISSAN LATIO 2011 Service Repair Manual TROUBLE DIAGNOSISSRS-23
< SYMPTOM DIAGNOSIS >
C
DE
F
G
I
J
K L
M A
B
SRS
N
O P
CURTAIN MODULE LH [OPEN][B1150] The LH side curtain air bag module circuit is open.
1. Visually check the wiring harness NISSAN LATIO 2011 Service Repair Manual TROUBLE DIAGNOSISSRS-23
< SYMPTOM DIAGNOSIS >
C
DE
F
G
I
J
K L
M A
B
SRS
N
O P
CURTAIN MODULE LH [OPEN][B1150] The LH side curtain air bag module circuit is open.
1. Visually check the wiring harness](/img/5/57357/w960_57357-3656.png)
TROUBLE DIAGNOSISSRS-23
< SYMPTOM DIAGNOSIS >
C
DE
F
G
I
J
K L
M A
B
SRS
N
O P
CURTAIN MODULE LH [OPEN][B1150] The LH side curtain air bag module circuit is open.
1. Visually check the wiring harness
connection.
2. Replace the harness if it has visi- ble damage.
3. Replace LH side curtain air bag module.
4. Replace the air bag diagnosis
sensor unit.
5. Replace the related harness.
CURTAIN MODULE LH
[VB-SHORT]
[B1151] The LH side curtain air bag module circuit is shorted to some
power supply circuits.
CURTAIN MODULE LH [GND-SHORT][B1152] The LH side curtain air bag module circuit is shorted to
ground.
CURTAIN MODULE LH [SHORT][B1153] The circuits for the LH side curtain air bag module are shorted
to each other.
CURTAIN MODULE RH [OPEN]
[B1145] The RH side curtain air bag module circuit is open.
1. Visually check the wiring harness
connection.
2. Replace the harness if it has visi- ble damage.
3. Replace RH side curtain air bag
module.
4. Replace the air bag diagnosis sensor unit.
5. Replace the related harness.
CURTAIN MODULE RH
[VB-SHORT][B1146] The RH side curtain air bag module circuit is shorted to some
power supply circuits.
CURTAIN MODULE RH [GND-SHORT][B1147] The RH side curtain air bag module circuit is shorted to
ground.
CURTAIN MODULE RH [SHORT]
[B1148] The circuits for the RH side curtain air bag module are shorted
to each other.
CONTROL UNIT [B1XXX] Air bag diagnosis sensor unit is malfunctioning.
1. Visually check the wiring harness
connection.
2. Replace the air bag diagnosis
sensor unit.
OCCUPANT SENS C/U [UNIT FAIL]
[B1017] or [B1021] The OCS control unit is malfunctioning.
1. Replace RH front seat cushion/
occupant classification system
control unit assembly.
OCCUPANT SENS C/U [UNIT FAIL]
[B1020] The OCS control unit is malfunctioning.
1. Replace the harness if it has visi-
ble damage.
2. Replace the RH front seat cush- ion assembly. Do not disassem-
ble the seat cushion assembly.
3. Replace the RH front seat belt as- sembly.
OCCUPANT SENS C/U [COMM FAIL][B1022] Communication between the OCS control unit and air bag di-
agnosis sensor unit is interrupted.
1. Visually check the wiring harness
connection.
2. Replace the harness if it has visi- ble damage.
3. Replace the RH front seat cush-
ion assembly. Do not disassem-
ble the seat cushion assembly.
4. Replace the air bag diagnosis
sensor unit.
5. Replace the related harness.
OCCUPANT SENS [UNIT FAIL][B1018] OCS sensor is malfunctioning.
1. Visually check the wiring harness
connection to the OCS sensor.
2. Replace the RH front seat cush- ion assembly. Do not disassem-
ble the seat cushion assembly.
Diagnostic item
Explanation Repair order
Recheck SRS at each replacement
Revision: May 2010 2011 Versa
Page 3658 of 3787
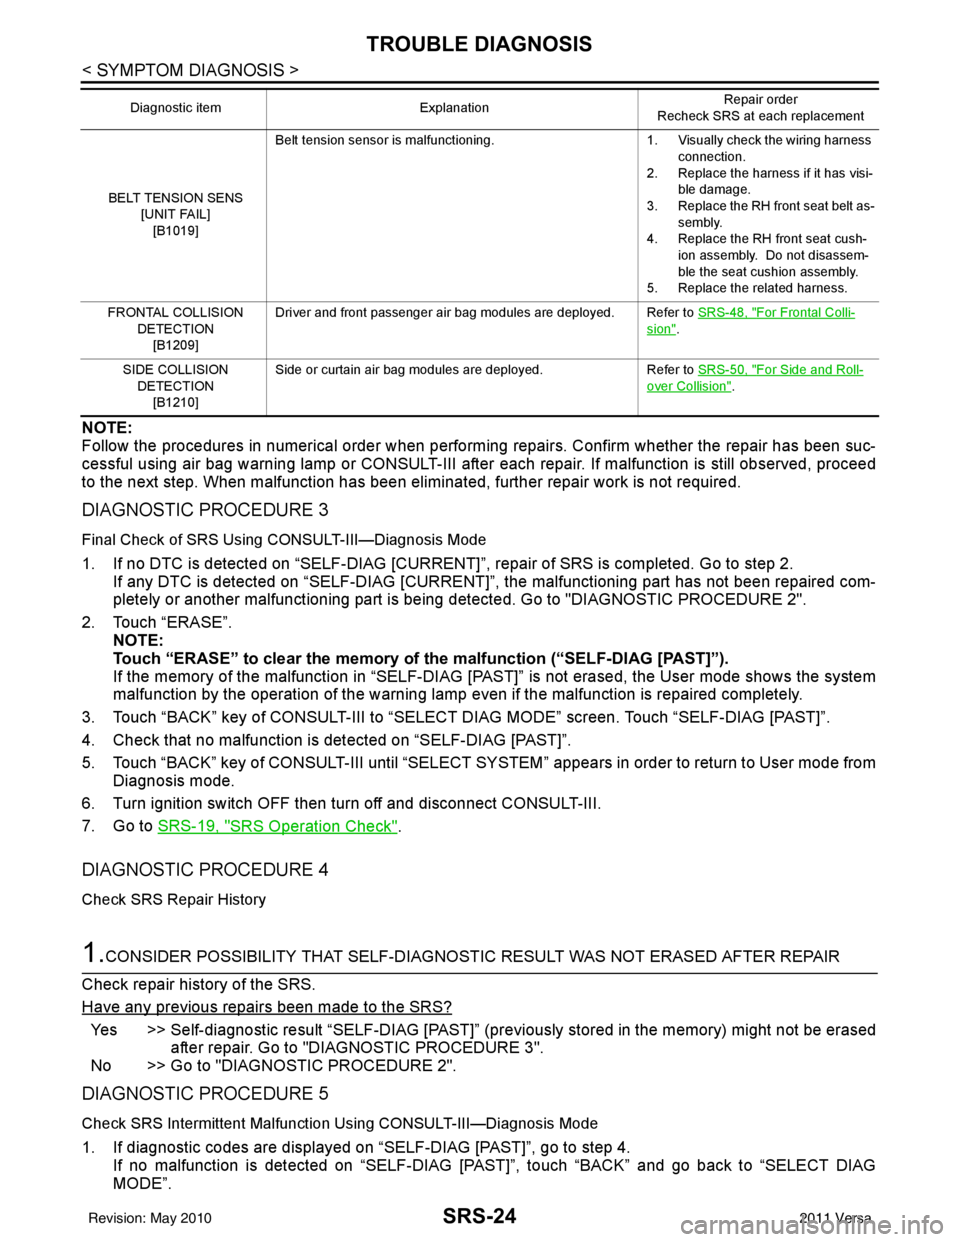
SRS-24
< SYMPTOM DIAGNOSIS >
TROUBLE DIAGNOSIS
NOTE:
Follow the procedures in numerical order when performing repairs. Confirm whether the repair has been suc-
cessful using air bag warning lamp or CONSULT-III after each repair. If malfunction is still observed, proceed
to the next step. When malfunction has been elimi nated, further repair work is not required.
DIAGNOSTIC PROCEDURE 3
Final Check of SRS Using CONSULT-III—Diagnosis Mode
1. If no DTC is detected on “SELF-DIAG [CURRENT]”, repair of SRS is completed. Go to step 2.
If any DTC is detected on “SELF-DIAG [CURRENT]” , the malfunctioning part has not been repaired com-
pletely or another malfunctioning part is being detected. Go to "DIAGNOSTIC PROCEDURE 2".
2. Touch “ERASE”. NOTE:
Touch “ERASE” to clear the memory of the malfunction (“SELF-DIAG [PAST]”).
If the memory of the malfunction in “SELF-DIAG [P AST]” is not erased, the User mode shows the system
malfunction by the operation of the warning lamp even if the malfunction is repaired completely.
3. Touch “BACK” key of CONSULT-III to “SELECT DIAG MODE” screen. Touch “SELF-DIAG [PAST]”.
4. Check that no malfunction is detected on “SELF-DIAG [PAST]”.
5. Touch “BACK” key of CONSULT-III until “SELECT SY STEM” appears in order to return to User mode from
Diagnosis mode.
6. Turn ignition switch OFF then turn off and disconnect CONSULT-III.
7. Go to SRS-19, "
SRS Operation Check".
DIAGNOSTIC PROCEDURE 4
Check SRS Repair History
1.CONSIDER POSSIBILITY THAT SELF-DIAGNOSTIC RESULT WAS NOT ERASED AFTER REPAIR
Check repair history of the SRS.
Have any previous repairs been made to the SRS?
Yes >> Self-diagnostic result “SELF-DIAG [PAST]” (pre viously stored in the memory) might not be erased
after repair. Go to "DIAGNOSTIC PROCEDURE 3".
No >> Go to "DIAGNOSTIC PROCEDURE 2".
DIAGNOSTIC PROCEDURE 5
Check SRS Intermittent Malfuncti on Using CONSULT-III—Diagnosis Mode
1. If diagnostic codes are displayed on “SELF-DIAG [PAST]”, go to step 4.
If no malfunction is detected on “SELF-DIAG [PAS T]”, touch “BACK” and go back to “SELECT DIAG
MODE”.
BELT TENSION SENS
[UNIT FAIL]
[B1019] Belt tension sensor is malfunctioning.
1. Visually check the wiring harness
connection.
2. Replace the harness if it has visi- ble damage.
3. Replace the RH front seat belt as- sembly.
4. Replace the RH front seat cush-
ion assembly. Do not disassem-
ble the seat cushion assembly.
5. Replace the related harness.
FRONTAL COLLISION DETECTION[B1209] Driver and front passenger air bag modules are deployed. Refer to
SRS-48, "
For Frontal Colli-
sion".
SIDE COLLISION DETECTION
[B1210] Side or curtain air bag modules are deployed.
Refer to SRS-50, "
For Side and Roll-
over Collision".
Diagnostic item
Explanation Repair order
Recheck SRS at each replacement
Revision: May 2010 2011 Versa