sensor NISSAN LATIO 2011 Service Manual Online
[x] Cancel search | Manufacturer: NISSAN, Model Year: 2011, Model line: LATIO, Model: NISSAN LATIO 2011Pages: 3787, PDF Size: 78.35 MB
Page 245 of 3787
AT-228
< SERVICE INFORMATION >
ON-VEHICLE SERVICE
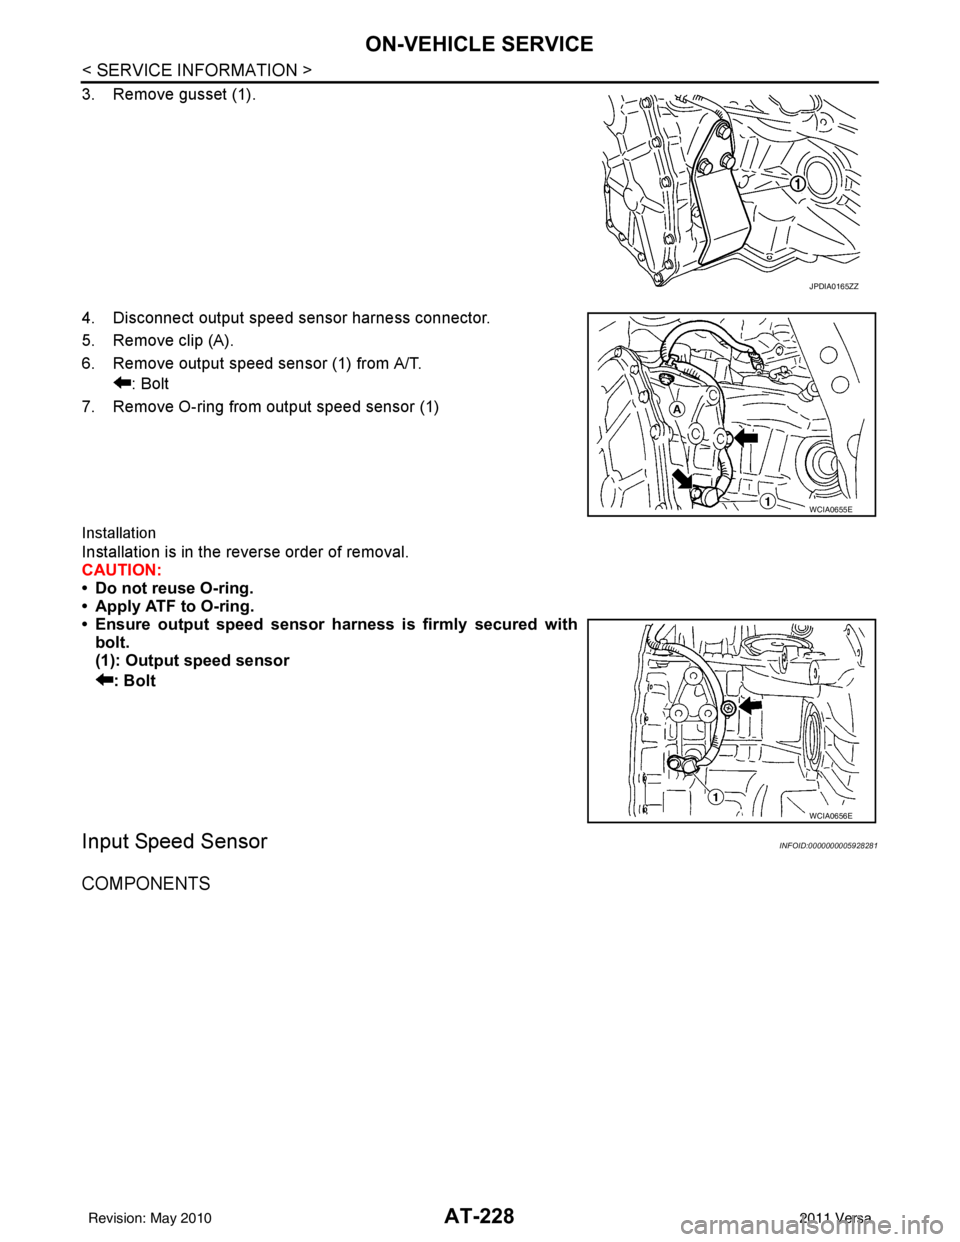
3. Remove gusset (1).
4. Disconnect output speed sensor harness connector.
5. Remove clip (A).
6. Remove output speed sensor (1) from A/T.: Bolt
7. Remove O-ring from output speed sensor (1)
Installation
Installation is in the reverse order of removal.
CAUTION:
• Do not reuse O-ring.
• Apply ATF to O-ring.
• Ensure output speed sensor harness is firmly secured with bolt.
(1): Output speed sensor
: Bolt
Input Speed SensorINFOID:0000000005928281
COMPONENTS
JPDIA0165ZZ
WCIA0655E
WCIA0656E
Revision: May 2010 2011 Versa
Page 246 of 3787
ON-VEHICLE SERVICEAT-229
< SERVICE INFORMATION >
DE
F
G H
I
J
K L
M A
B
AT
N
O P
REMOVAL AND INSTALLATION
Removal
1. Disconnect the battery negative terminal.
2. Remove air duct (inlet). Refer to EM-135
.
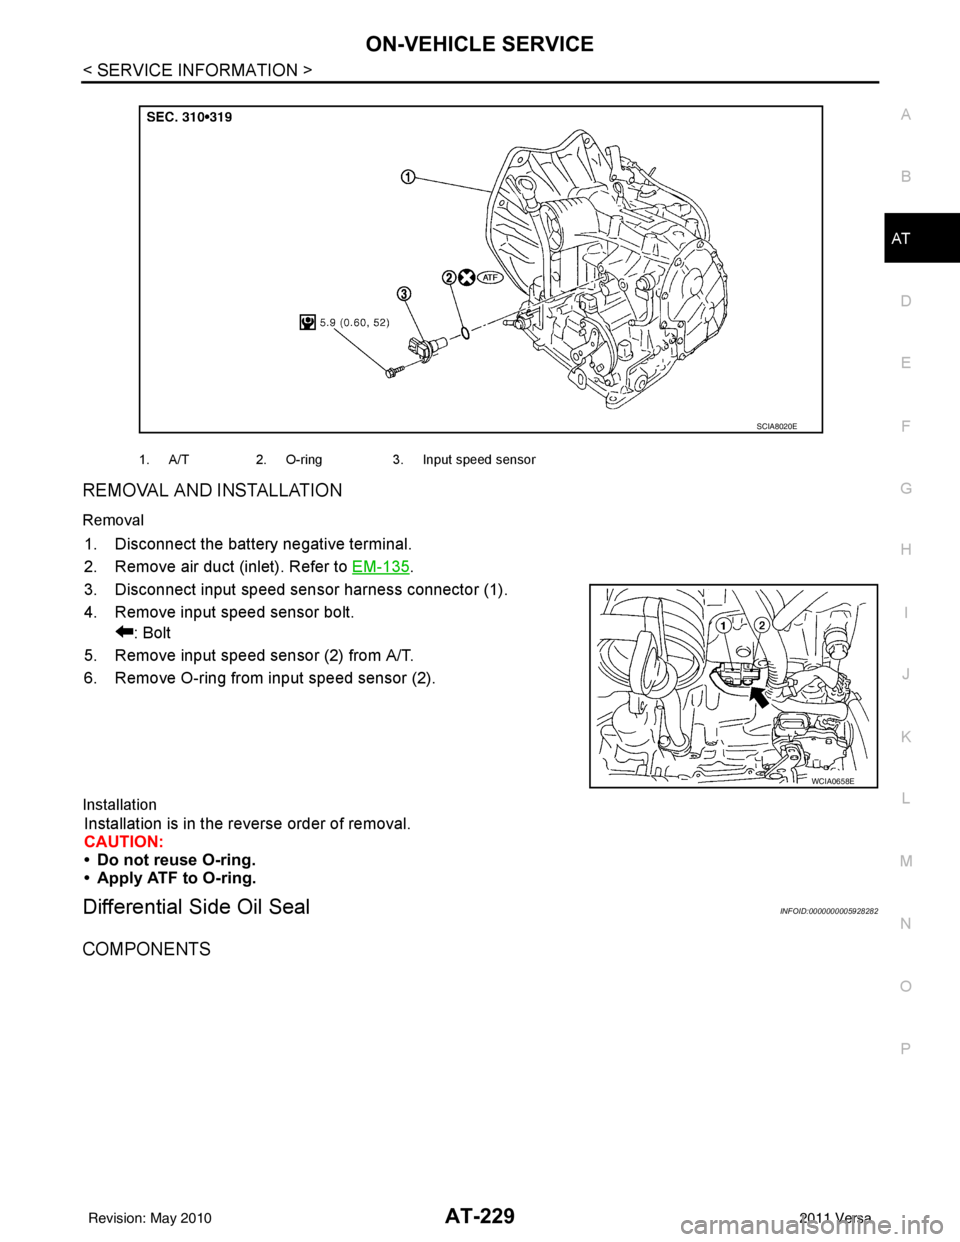
3. Disconnect input speed sens or harness connector (1).
4. Remove input speed sensor bolt. : Bolt
5. Remove input speed sensor (2) from A/T.
6. Remove O-ring from input speed sensor (2).
Installation
Installation is in the reverse order of removal.
CAUTION:
• Do not reuse O-ring.
• Apply ATF to O-ring.
Differential Side Oil SealINFOID:0000000005928282
COMPONENTS
1. A/T 2. O-ring 3. Input speed sensor
SCIA8020E
WCIA0658E
Revision: May 2010 2011 Versa
Page 251 of 3787
AT-234
< SERVICE INFORMATION >
TRANSAXLE ASSEMBLY
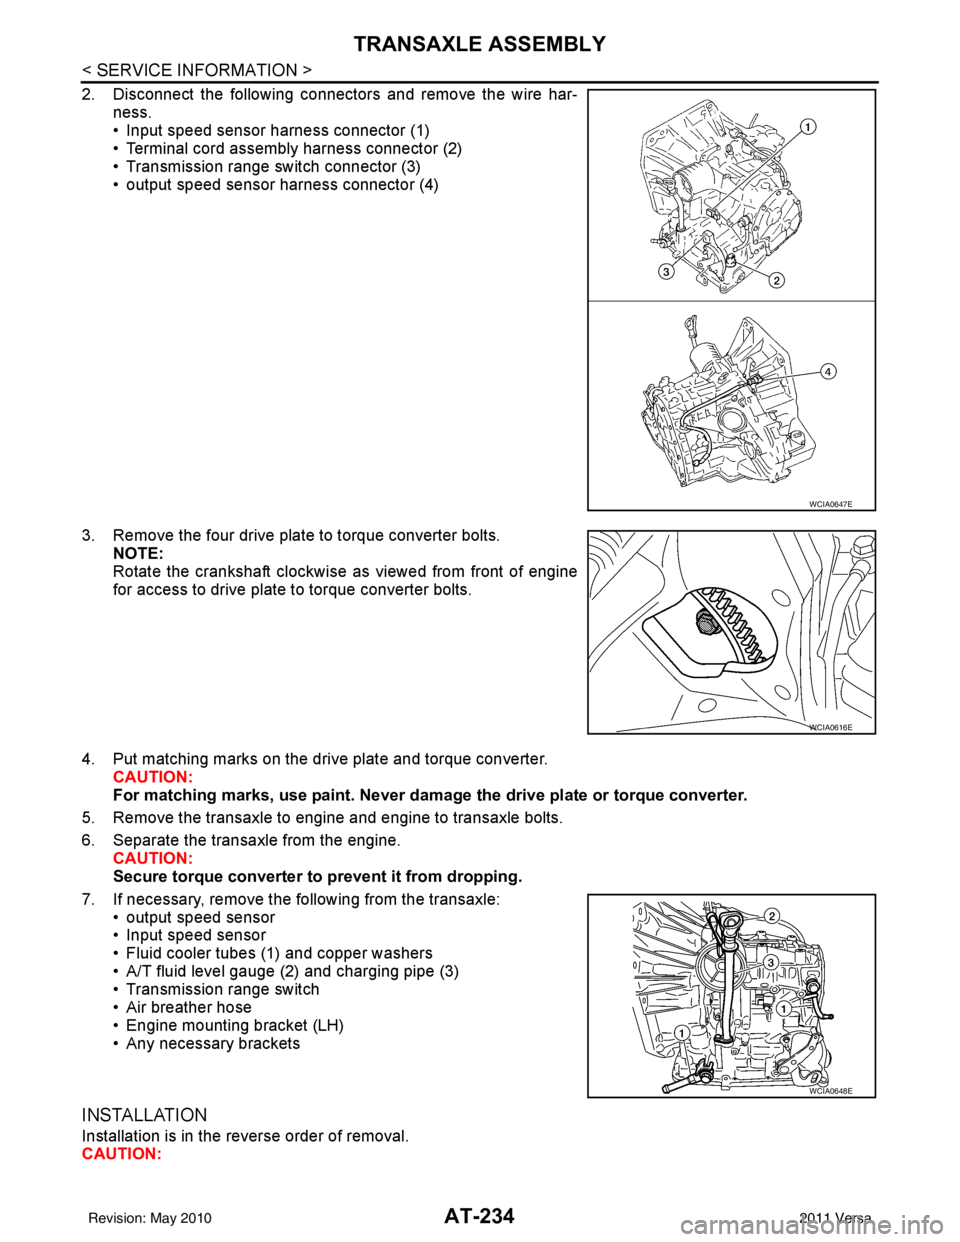
2. Disconnect the following connectors and remove the wire har-ness.
• Input speed sensor harness connector (1)
• Terminal cord assembly harness connector (2)
• Transmission range switch connector (3)
• output speed sensor harness connector (4)
3. Remove the four drive plate to torque converter bolts. NOTE:
Rotate the crankshaft clockwise as viewed from front of engine
for access to drive plate to torque converter bolts.
4. Put matching marks on the drive plate and torque converter. CAUTION:
For matching marks, use paint. Never dama ge the drive plate or torque converter.
5. Remove the transaxle to engine and engine to transaxle bolts.
6. Separate the transaxle from the engine. CAUTION:
Secure torque converter to prevent it from dropping.
7. If necessary, remove the following from the transaxle: • output speed sensor
• Input speed sensor
• Fluid cooler tubes (1) and copper washers
• A/T fluid level gauge (2) and charging pipe (3)
• Transmission range switch
• Air breather hose
• Engine mounting bracket (LH)
• Any necessary brackets
INSTALLATION
Installation is in the reverse order of removal.
CAUTION:
WCIA0647E
WCIA0616E
WCIA0648E
Revision: May 2010 2011 Versa
Page 260 of 3787

OVERHAULAT-243
< SERVICE INFORMATION >
DE
F
G H
I
J
K L
M A
B
AT
N
O P
MR18DE ENGINE MODELS
16. Servo release accumulator piston 17. Return spring
18. Control valve assembly
19. Oil pan gasket 20. Oil pan 21. Drain plug gasket
22. Drain plug 23. Magnet 24. Oil pan bolt
25. Snap ring 26. O-ring 27. O-ring
28. N-D accumulator piston 29. Return spring 30. O-ring
31. Lip seal 32. Input speed sensor 33. O-ring
34. Retaining pin 35. Detent spring 36. Retaining pin
37. Manual shaft 38. Manual shaft oil seal 39. Manual plate
40. Parking rod plate 41. Parking rod 42. OD servo piston retainer
43. Snap ring 44. O-ring 45. OD servo piston
46. D-ring 47. Servo release accumulator piston 48. O-ring
49. E-ring 50. Spring retainer 51. OD servo return spring
52. D-ring 53. Band servo piston 54. Band servo thrust washer
55. Band servo piston stem 56. 2nd servo return spring 57. Transmission range switch
58. Parking shaft 59. Return spring 60. Output gear adjusting spac-
er
61. Output gear bearing 62. Output gear 63. Side cover gasket
64. Side cover 65. Side cover bolt 66. Lock nut
67. Idler gear 68. Idler gear bearing 69. Reduction pinion gear ad-
justing shim
70. Parking actuator support 71. Parking pawl 72. LH differential side oil seal
73. Output speed sensor
: Apply Genuine Anaerobic Liquid Gasket or equivalent.
Revision: May 2010 2011 Versa
Page 267 of 3787

AT-250
< SERVICE INFORMATION >
OVERHAUL
Oil Channel
INFOID:0000000005928286
HR16DE ENGINE MODELS
19. Oil pan 20. Drain plug gasket21. Drain plug
22. Magnet 23. Oil pan bolt24. Snap ring
25. O-ring 26. O-ring27. N-D accumulator piston
28. Return spring 29. O-ring 30. Lip seal
31. Input speed sensor 32. O-ring 33. Retaining pin
34. Detent spring 35. Retaining pin 36. Manual shaft
37. Manual shaft oil seal 38. Manual plate 39. Parking rod plate
40. Parking rod 41. OD servo piston retainer42. Snap ring
43. O-ring 44. OD servo piston45. D-ring
46. Servo piston retainer 47. O-ring48. E-ring
49. Spring retainer 50. OD servo return spring 51. D-ring
52. Band servo piston 53. Band servo thrust washer 54. Band servo piston stem
55. 2nd servo return spring 56. Transmission range switch57. Parking shaft
58. Return spring 59. Thrust needle bearing60. Seal ring
61. Output shaft 62. Output shaft bearing63. Output shaft adjusting shim
64. Side cover 65. Side cover bolt 66. Lock nut
67. Idler gear 68. Idler gear bearing69. Reduction pinion gear adjusting
shim
70. Parking actuator support 71. Parking pawl 72. LH differential side oil seal
73. Output speed sensor
: Apply Genuine Anaerobic Liquid Gasket or equivalent.
Revision: May 2010 2011 Versa
Page 275 of 3787
AT-258
< SERVICE INFORMATION >
DISASSEMBLY
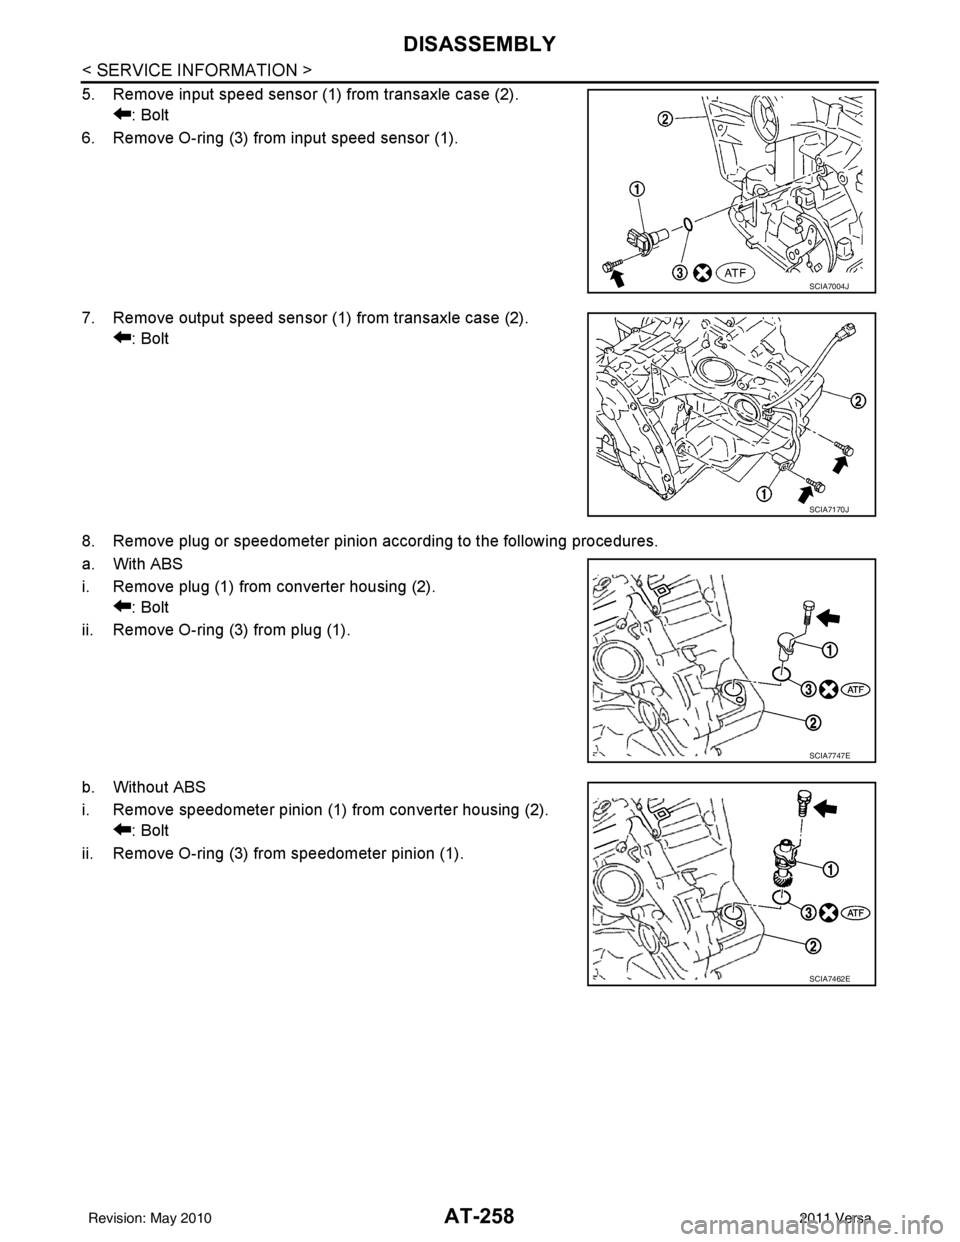
5. Remove input speed sensor (1) from transaxle case (2).: Bolt
6. Remove O-ring (3) from input speed sensor (1).
7. Remove output speed sensor (1) from transaxle case (2). : Bolt
8. Remove plug or speedometer pinion according to the following procedures.
a. With ABS
i. Remove plug (1) from converter housing (2). : Bolt
ii. Remove O-ring (3) from plug (1).
b. Without ABS
i. Remove speedometer pinion (1) from converter housing (2). : Bolt
ii. Remove O-ring (3) from speedometer pinion (1).
SCIA7004J
SCIA7170J
SCIA7747E
SCIA7462E
Revision: May 2010 2011 Versa
Page 303 of 3787
AT-286
< SERVICE INFORMATION >
REPAIR FOR COMPONENT PARTS
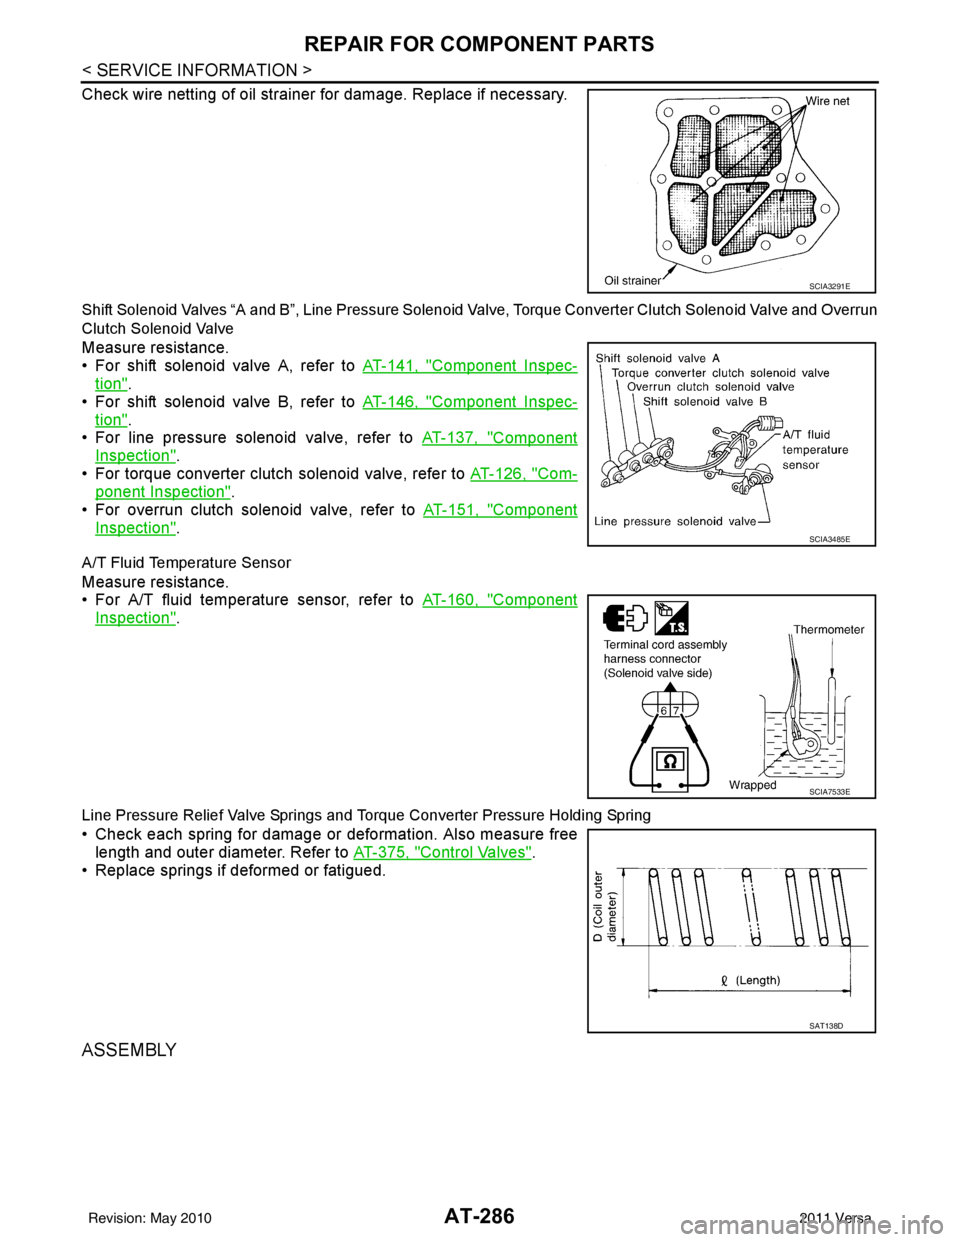
Check wire netting of oil strainer for damage. Replace if necessary.
Shift Solenoid Valves “A and B”, Line Pressure Solenoid Valve, Torque Converter Clutch Solenoid Valve and Overrun
Clutch Solenoid Valve
Measure resistance.
• For shift solenoid valve A, refer to AT-141, "
Component Inspec-
tion".
• For shift solenoid valve B, refer to AT-146, "
Component Inspec-
tion".
• For line pressure solenoid valve, refer to AT-137, "
Component
Inspection".
• For torque converter clutch solenoid valve, refer to AT-126, "
Com-
ponent Inspection".
• For overrun clutch solenoid valve, refer to AT-151, "
Component
Inspection".
A/T Fluid Temperature Sensor
Measure resistance.
• For A/T fluid temperature sensor, refer to AT-160, "
Component
Inspection".
Line Pressure Relief Valve Springs and Torque Converter Pressure Holding Spring
• Check each spring for damage or deformation. Also measure free
length and outer diameter. Refer to AT-375, "
Control Valves".
• Replace springs if deformed or fatigued.
ASSEMBLY
SCIA3291E
SCIA3485E
SCIA7533E
SAT138D
Revision: May 2010 2011 Versa
Page 388 of 3787
ASSEMBLYAT-371
< SERVICE INFORMATION >
DE
F
G H
I
J
K L
M A
B
AT
N
O P
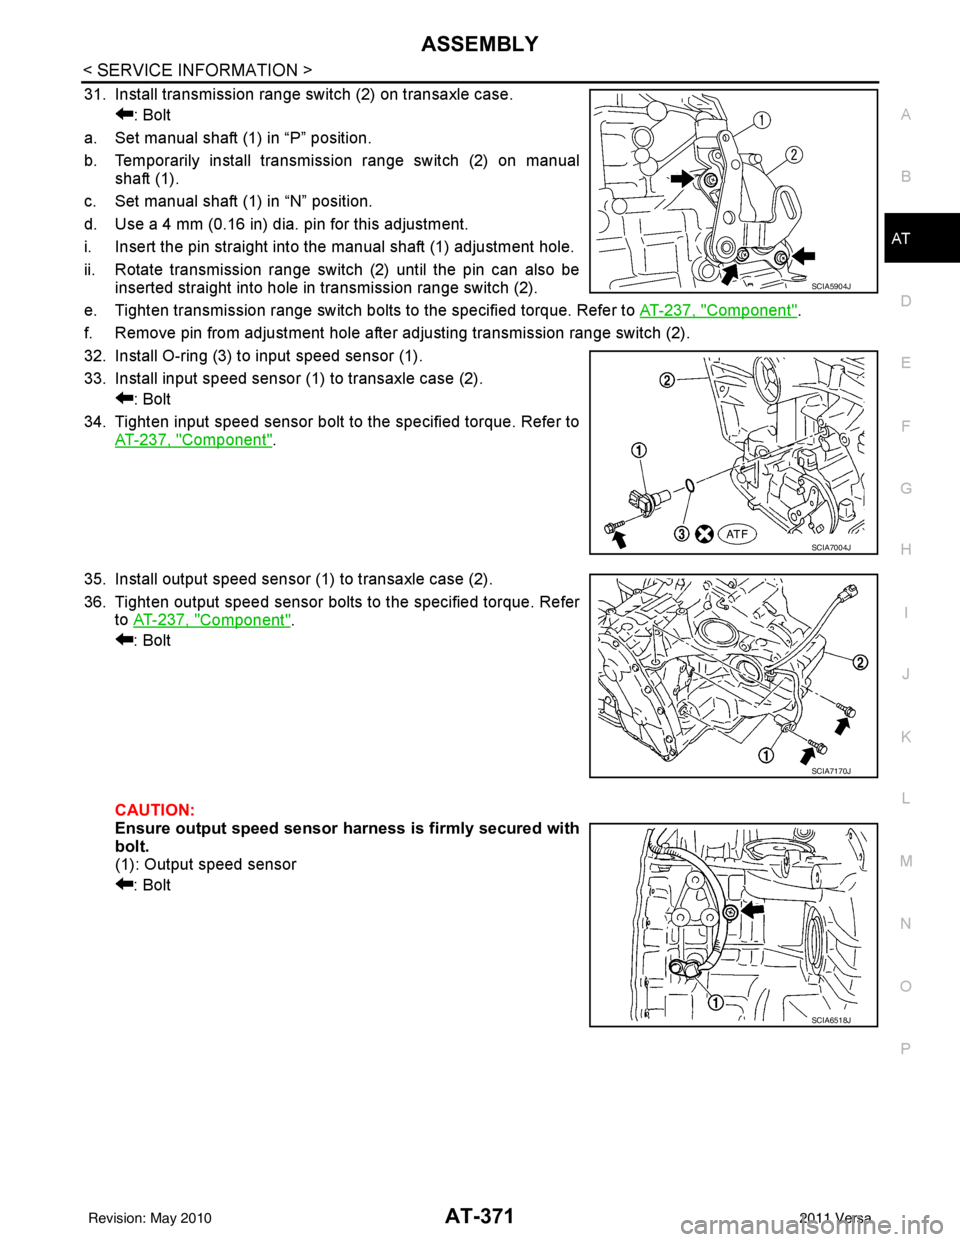
31. Install transmission range switch (2) on transaxle case. : Bolt
a. Set manual shaft (1) in “P” position.
b. Temporarily install transmission range switch (2) on manual shaft (1).
c. Set manual shaft (1) in “N” position.
d. Use a 4 mm (0.16 in) dia. pin for this adjustment.
i. Insert the pin straight into the manual shaft (1) adjustment hole.
ii. Rotate transmission range switch (2) until the pin can also be inserted straight into hole in transmission range switch (2).
e. Tighten transmission range switch bolts to the specified torque. Refer to AT-237, "
Component".
f. Remove pin from adjustment hole after adjusting transmission range switch (2).
32. Install O-ring (3) to input speed sensor (1).
33. Install input speed sensor (1) to transaxle case (2). : Bolt
34. Tighten input speed sensor bolt to the specified torque. Refer to AT-237, "
Component".
35. Install output speed sensor (1) to transaxle case (2).
36. Tighten output speed sensor bolts to the specified torque. Refer to AT-237, "
Component".
: Bolt
CAUTION:
Ensure output speed sensor harness is firmly secured with
bolt.
(1): Output speed sensor
: Bolt
SCIA5904J
SCIA7004J
SCIA7170J
SCIA6518J
Revision: May 2010 2011 Versa
Page 397 of 3787

AT-380
< SERVICE INFORMATION >
SERVICE DATA AND SPECIFICATIONS (SDS)
Solenoid Valves
INFOID:0000000005928330
A/T Fluid Temperature SensorINFOID:0000000005928331
Remarks: Specification data are reference values.
Output Speed SensorINFOID:0000000005928332
Dropping ResistorINFOID:0000000005928333
Input Speed SensorINFOID:0000000005928334
Solenoid valve designation Resistance (Approx.)Terminal
Shift solenoid valve A 20 - 30 Ω 2
Shift solenoid valve B 5 - 20 Ω1
Overrun clutch solenoid valve 20 - 30 Ω 3
Line pressure solenoid valve 2.5 - 5.0 Ω 4
Torque converter clutch solenoid valve 5 - 20 Ω 5
Condition Specification (Approx.)
Cold [20 °C (68 °F)]
↓
Hot [80 °C (176 °F)] 1.5V
↓
0.5V 2.5 k
Ω
↓
0.3 k Ω
Condition Judgment standard
When driving at 20 km/h (12 MPH) 150 Hz (Approx.)
Resistance 12Ω (Approx.)
Condition Judgment standard
When driving at 20 km/h (12 MPH) 360 Hz (Approx.)
Revision: May 2010 2011 Versa
Page 400 of 3787
![NISSAN LATIO 2011 Service Manual Online PRECAUTIONSAV-3
< SERVICE INFORMATION > [AUDIO WITHOUT NAVIGATION]
C
D
E
F
G H
I
J
L
M A
B
AV
N
O P
SERVICE INFORMATION
PRECAUTIONS
Precaution for Supplemental Restraint System (SRS) "AIR BAG" and "S NISSAN LATIO 2011 Service Manual Online PRECAUTIONSAV-3
< SERVICE INFORMATION > [AUDIO WITHOUT NAVIGATION]
C
D
E
F
G H
I
J
L
M A
B
AV
N
O P
SERVICE INFORMATION
PRECAUTIONS
Precaution for Supplemental Restraint System (SRS) "AIR BAG" and "S](/img/5/57357/w960_57357-399.png)
PRECAUTIONSAV-3
< SERVICE INFORMATION > [AUDIO WITHOUT NAVIGATION]
C
D
E
F
G H
I
J
L
M A
B
AV
N
O P
SERVICE INFORMATION
PRECAUTIONS
Precaution for Supplemental Restraint System (SRS) "AIR BAG" and "SEAT BELT
PRE-TENSIONER"
INFOID:0000000006412032
The Supplemental Restraint System such as “AIR BAG” and “SEAT BELT PRE-TENSIONER”, used along
with a front seat belt, helps to reduce the risk or severi ty of injury to the driver and front passenger for certain
types of collision. This system includes seat belt switch inputs and dual stage front air bag modules. The SRS
system uses the seat belt switches to determine the front air bag deployment, and may only deploy one front
air bag, depending on the severity of a collision and w hether the front occupants are belted or unbelted.
Information necessary to service the system safely is included in the SRS and SB section of this Service Man-
ual.
WARNING:
• To avoid rendering the SRS inoper ative, which could increase the risk of personal injury or death in
the event of a collision which would result in air bag inflation, all maintenance must be performed by
an authorized NISSAN/INFINITI dealer.
• Improper maintenance, including in correct removal and installation of the SRS can lead to personal
injury caused by unintentional act ivation of the system. For removal of Spiral Cable and Air Bag
Module, see the SRS section.
• Do not use electrical test equipm ent on any circuit related to the SRS unless instructed to in this
Service Manual. SRS wiring harnesses can be identi fied by yellow and/or orange harnesses or har-
ness connectors.
PRECAUTIONS WHEN USING POWER TOOLS (AIR OR ELECTRIC) AND HAMMERS
WARNING:
• When working near the Airbag Diagnosis Sensor Un it or other Airbag System sensors with the Igni-
tion ON or engine running, DO NOT use air or el ectric power tools or strike near the sensor(s) with a
hammer. Heavy vibration could activate the sensor( s) and deploy the air bag(s), possibly causing
serious injury.
• When using air or electric power tools or hammers, always switch the Ignition OFF, disconnect the battery, and wait at least 3 minutes before performing any service.
Precaution Necessary for Steering Wheel Rotation After Battery Disconnect
INFOID:0000000006412033
NOTE:
• This Procedure is applied only to models with Intelligent Key system and NATS (NISSAN ANTI-THEFT SYS-
TEM).
• Remove and install all control units after disconnecti ng both battery cables with the ignition knob in the
″ LOCK ″ position.
• Always use CONSULT-III to perform self-diagnosis as a part of each function inspection after finishing work.
If DTC is detected, perform trouble diagnosis according to self-diagnostic results.
For models equipped with the Intelligent Key system and NATS , an electrically controlled steering lock mech-
anism is adopted on the key cylinder.
For this reason, if the battery is disconnected or if the battery is discharged, the steering wheel will lock and
steering wheel rotation will become impossible.
If steering wheel rotation is required when battery power is interrupted, follow the procedure below before
starting the repair operation.
OPERATION PROCEDURE
1. Connect both battery cables. NOTE:
Supply power using jumper cables if battery is discharged.
2. Use the Intelligent Key or mechanical key to turn the ignition switch to the ″ACC ″ position. At this time, the
steering lock will be released.
3. Disconnect both battery cables. The steering lock will remain released and the steering wheel can be
rotated.
4. Perform the necessary repair operation.
Revision: May 2010 2011 Versa