light NISSAN LEAF 2015 1.G Quick Reference Guide
[x] Cancel search | Manufacturer: NISSAN, Model Year: 2015, Model line: LEAF, Model: NISSAN LEAF 2015 1.GPages: 28, PDF Size: 1.66 MB
Page 2 of 28
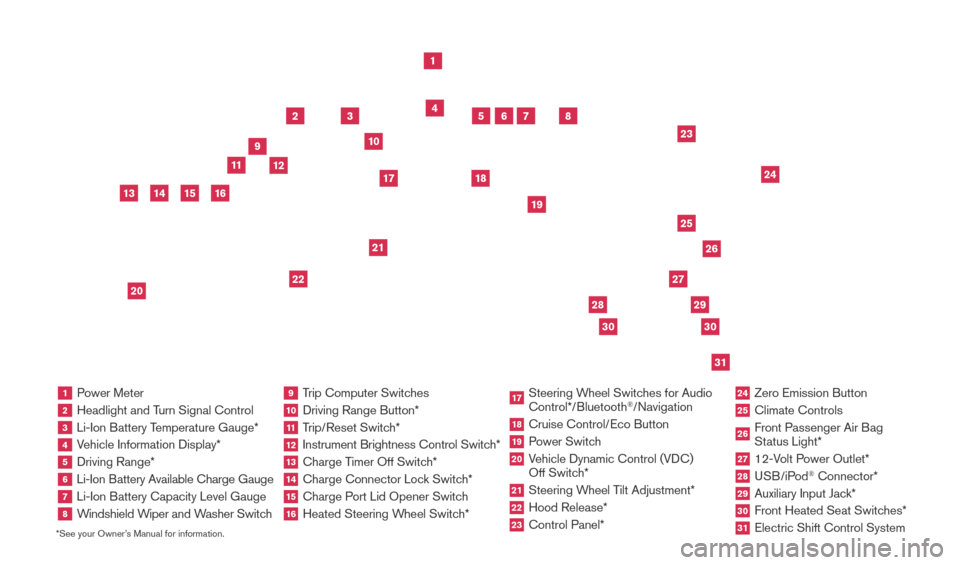
*See your Owner’s Manual for information.1 Power Meter2 Headlight and Turn Signal Control3 Li-Ion Battery Temperature Gauge*4 Vehicle Information Display*5 Driving Range*6
Li-Ion Battery Available Charge Gauge7 Li-Ion Battery Capacity Level Gauge8
Windshield Wiper and Washer Switch
9 Trip Computer Switches10 Driving Range Button*
11 Trip/Reset Switch*12 Instrument Brightness Control Switc h*13 Charge Timer Off Switch*14 Charge Connector Lock Switch*15 Charge Port Lid Opener Switch16 Heated Steering Wheel Switch*
17 Steering Wheel Switches for Audio
Control*/Bluetooth
®/Navigation
18 Cruise Control/ Eco Button19 Power Switch20 Vehicle Dynamic Control (VDC)
Off Switch*21 Steering W heel Tilt Adjustment*22 Hood Release*
23 Control Panel*
24 Zero Emission Button
25 Climate Controls
26 Front Passenger Air B ag
Status Light*27 12-Volt Power Outlet*28 USB/iPod
® Connector*
29 Auxiliary Input Jac k*30 Front Heated Seat Switc hes*31 Electric Shift Control System
1
3
4
2
5
10
11
6
7
23
2629
27
3031
24
25
22
9
12
8
21
19
17
18
2830
13
15
20
14
16
1789594_15b_Leaf_QRG_063014.indd 36/30/14 1:28 PM
Page 3 of 28
25
HOMELINK® UNIVERSAL TRANSCEIVER (if so equipped)
The HomeLink® Universal Transceiver can learn and consolidate the functions of up to
three different hand-held transmitters, operating items such as garage doors, property
gates, outdoor and indoor lights or alarm systems.
To program the HomeLink® Universal Transceiver:
•
P
osition the handheld transceiver 1-3 in. (26-76 mm) away from the HomeLink
surface, keeping the HomeLink indicator light in view.
•
Press and hold the desired HomeLink button and the handheld transmitter \
button
simultaneously until the HomeLink indicator light flashes slowly and then ra\
pidly.
•
B
oth buttons may be released when the indicator light flashes rapidly.
To verify the programing is complete, press and hold the HomeLink button \
and
observe the indicator light:
•
A solid, continuous light indicates the programing is complete and the H\
omeLink
button will activate your device.
•
A blinking light that turns to a solid, continuous light after 2 seconds\
indicates
additional steps are required to complete the programing.
An additional person may make the remaining steps easier
. To complete the
programing process:
•
At the receiver of the device that you are programing to the HomeLink bu\
tton, press
and release the “learn” or “smart” button (the name may var\
y by manufacturer but it
is usually located near where the hanging antenna wire is att
ached to the unit). You
have approximately 30 seconds to initiate the following step.
•
Press and hold the programed HomeLink button for 2 seconds and release.
You may have to repeat the previous 2 steps up to 3 times to complete the\
programing process. HomeLink should now activate your device.
For more information, refer to the “Instruments and controls (section 2)” of your Owner’s Manual, the HomeLink website at www.homelink.com or call 1-800-355-3515.
HOMELINK
1789594_15b_Leaf_QRG_063014.indd 256/30/14 1:28 PM
To view detailed instructional videos regarding these and other features, please go to www.nissanownersinfo.mobi.
Page 4 of 28
NEW SYSTEM FEATURESCARWINGS™/Remote Functions (if so equipped) ........................................................................\
.......2
Approaching Vehicle Sound for Pedestrians (VSP) System.................................................................2
Around View
® Monitor (if so equipped) ........................................................................\
.............................2
Shift Control System ........................................................................\
..............................................................4
Heated Seats
........................................................................\
...........................................................................4
ESSENTIAL INFORMATIONCold Weather Range ........................................................................\
.............................................................5
Parking in Extremely Cold W eather ........................................................................\
.................................... 5
Quick Charge in Cold Weather (if so equipped)........................................................................\
.............5
Li-ion Battery Temperature Gauge........................................................................\
......................................6
Li-ion Battery Gauges
........................................................................\
............................................................6
Power Limitation Indicator Light
........................................................................\
.......................................... 6
Charge Port Lid/Charge Connector Lock Switch
........................................................................\
...........7
Li-ion Battery Charging
........................................................................\
.......................................................
..8
Tire Pressure Monitoring System (TPMS) with Easy Fill Tire Alert
..................................................10
Clock Set/Adjustment
........................................................................\
......................................................... 10
FIRST DRIVE FEATURESNISSAN Intelligent Key® System ........................................................................\
.....................................11
Rear Hatch Release
........................................................................\
............................................................ 11
Seat Adjustments
........................................................................\
................................................................. 12
Outside Mirror Control Switch
........................................................................\
.......................................... 12
Power Meter
........................................................................\
.......................................................................... 13
Electric Vehicle (EV) System Warning Light
........................................................................\
.................. 13
Starting/Stopping the Electric Vehicle (EV) System
........................................................................\
... 14
Headlight Control Switch
........................................................................\
................................................... 14
Windshield Wiper and Washer Switch
........................................................................\
........................... 15
Automatic Climate Controls
........................................................................\
.............................................. 16
FM/AM/SiriusXM
® Satellite Radio with CD Player (if so equipped) ............................................... 17
Cruise Control
........................................................................\
...................................................................... 18
USB (Universal Serial Bus) Connection Port/iPod
® Interface .......................................................... 18
SYSTEM GUIDETrip Computer ........................................................................\
....................................................................... 19
Bluetooth® Hands-free Phone System ........................................................................\
........................... 20
•
System Operating T ips ........................................................................\
.................................................. 20
Bluetooth® System without Navigation (if so equipped) .................................................................... 20
Bluetooth® System with Navigation (if so equipped) ........................................................................\
.. 22
T
ext Messaging (if so equipped) ........................................................................\
...................................... 23
Navigation System (if so equipped)
........................................................................\
................................. 24
HomeLink
® Universal Transceiver (if so equipped) ........................................................................\
...... 25
Please see your Owner’s Manual for important safety information and system operation limitations.
•
A cellular telephone should not be used for any purpose while driving so\
full attention may be given to
vehicle operation.
•
Always wear your seat belt.
•
Supplement
al air bags do not replace proper seat belt usage.
•
Children 12 and under should always ride in the rear seat properly secur\
ed in c
hild restraints or seat belts
according to their age and weight.
•
Do not drink and drive.
F
or more information, refer to the “Safety — Seats, seat belts and supplemental restraint system (se\
ction 1)”,
“Heater, air conditioner, audio and phone systems (section 4)” and the “Starting and driving (section 5)” of your
Owner’s Manual and the “Bluetooth
® hands-free phone system (section 7)” and the “Audio systems (section 4)” of
your Navigation System Owner’s Manual.
Additional information about your vehicle is also available in your Owne\
r’s Manual, Navigation System
Owner’s Manual and at www.nissanusa.com.
TAB LE OF CONTE NTS
1789594_15b_Leaf_QRG_063014.indd 16/30/14 1:28 PM
Page 7 of 28
4
NEW SYSTEM FEATURES
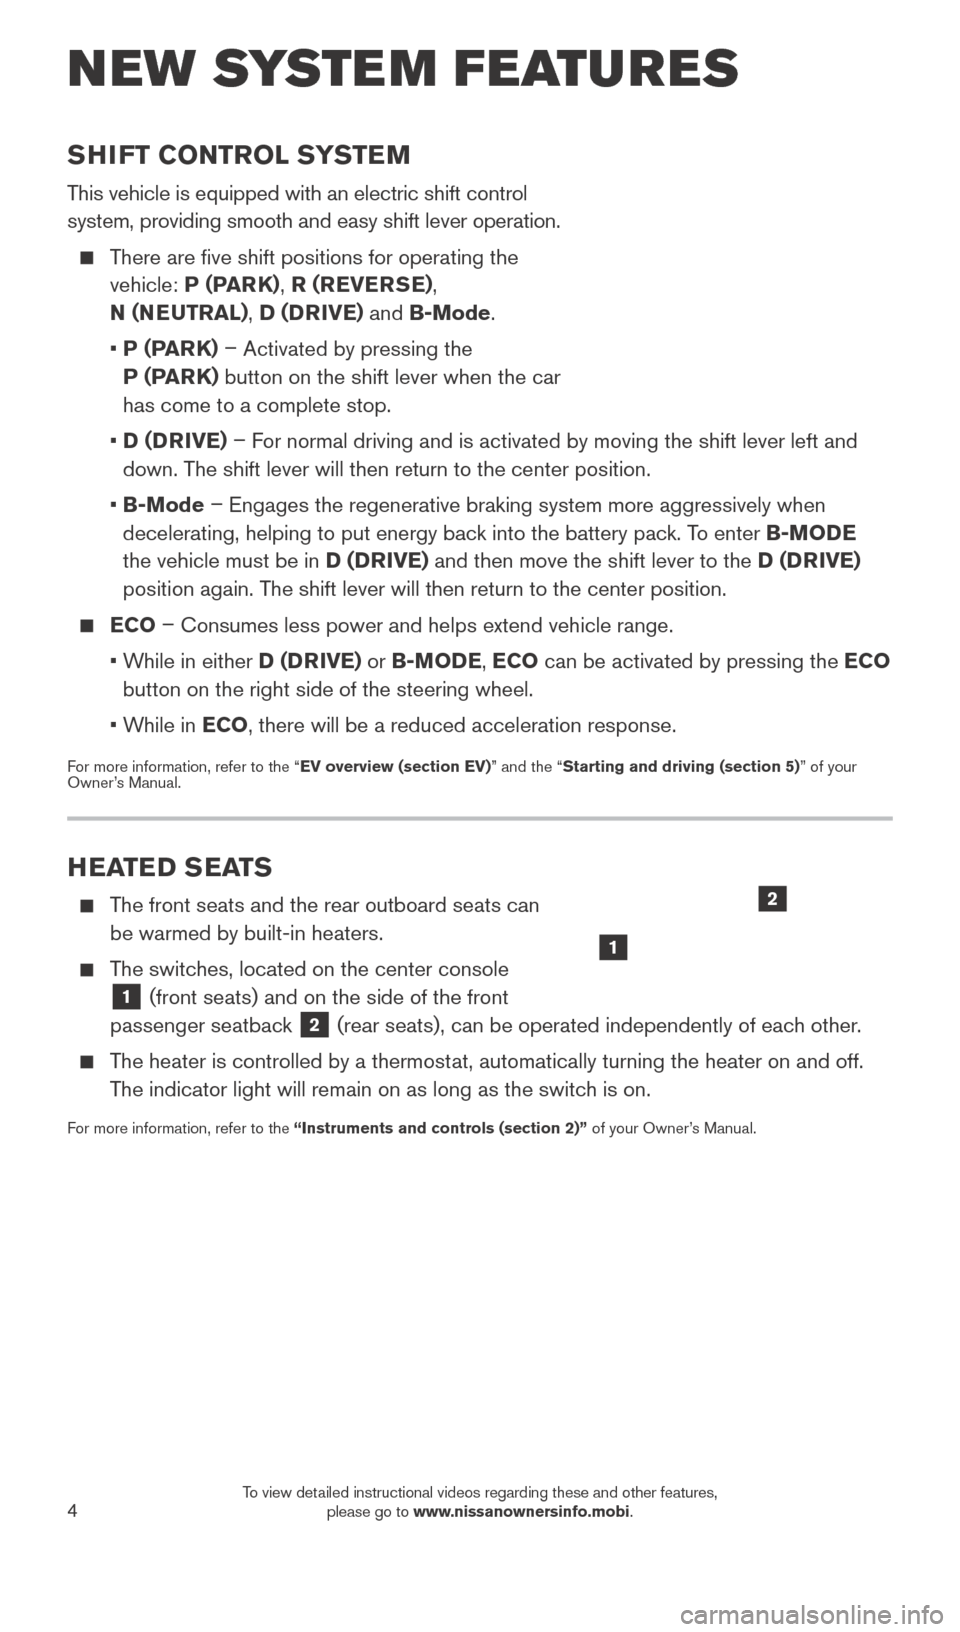
SHIFT CONTROL SYSTEM
This vehicle is equipped with an electric shift control
system, providing smooth and easy shift lever operation.
There are five shift positions for operating the vehicle: P (PARK) , R (REVERSE) ,
N (NEUTRAL) , D (DRIVE) and B-Mode.
•
P (P
ARK) – Activated by pressing the
P (PARK) button on the shift lever when the car
has come to a complete stop.
•
D (D
RIVE) – For normal driving and is activated by moving the shift lever left and
down. The shift lever will then return to the center position.
•
B-Mode
– Engages the regenerative braking system more aggressively when
decelerating, helping to put energy back into the battery pack. To enter B-MODE
the vehicle must be in D (DRIVE) and then move the shift lever to the D (DRIVE)
position again. The shift lever will then return to the center position.
ECO – Consumes less power and helps extend vehicle range.
•
W
hile in either D (DRIVE) or B-MODE, ECO can be activated by pressing the ECO
button on the right side of the steering wheel.
•
W
hile in ECO, there will be a reduced acceleration response.
For more information, refer to the “EV overview (section EV)” and the “Starting and driving (section 5)” of your
Owner’s Manual.
HEATED SEATS
The front seats and the rear outboard seats can be warmed by built-in heaters.
The switches, located on the center console
1 (front seats) and on the side of the front
passenger seatback 2 (rear seats), can be operated independently of each other.
The heater is controlled by a thermostat, automatically turning the heater on and off.
The indicator light will remain on as long as the switch is on.
For more information, refer to the “Instruments and controls (section 2)” of your Owner’s Manual.
1
2
1789594_15b_Leaf_QRG_063014.indd 46/30/14 1:28 PM
To view detailed instructional videos regarding these and other features, please go to www.nissanownersinfo.mobi.
Page 9 of 28
6
POWER LIMITATION INDICATOR LIGHT
When the power limitation indicator light illuminates, power provided to the traction motor is reduced.
This light illuminates in the following conditions:
•
T
he Li-ion battery available charge is
extremely low.
• T
he Li-ion battery temperature is very low.
•
T
he temperature of the Electric Vehicle (EV)
system is high (motor, inverter, coolant system, Li-ion battery, etc.).
• T
he EV system has a malfunction.
If the power limit ation indicator light is illuminated, follow the instructions provided o\
n
the Navigation display.
For more information, refer to the “Instruments and controls (section 2)” of your Owner’s Manual.
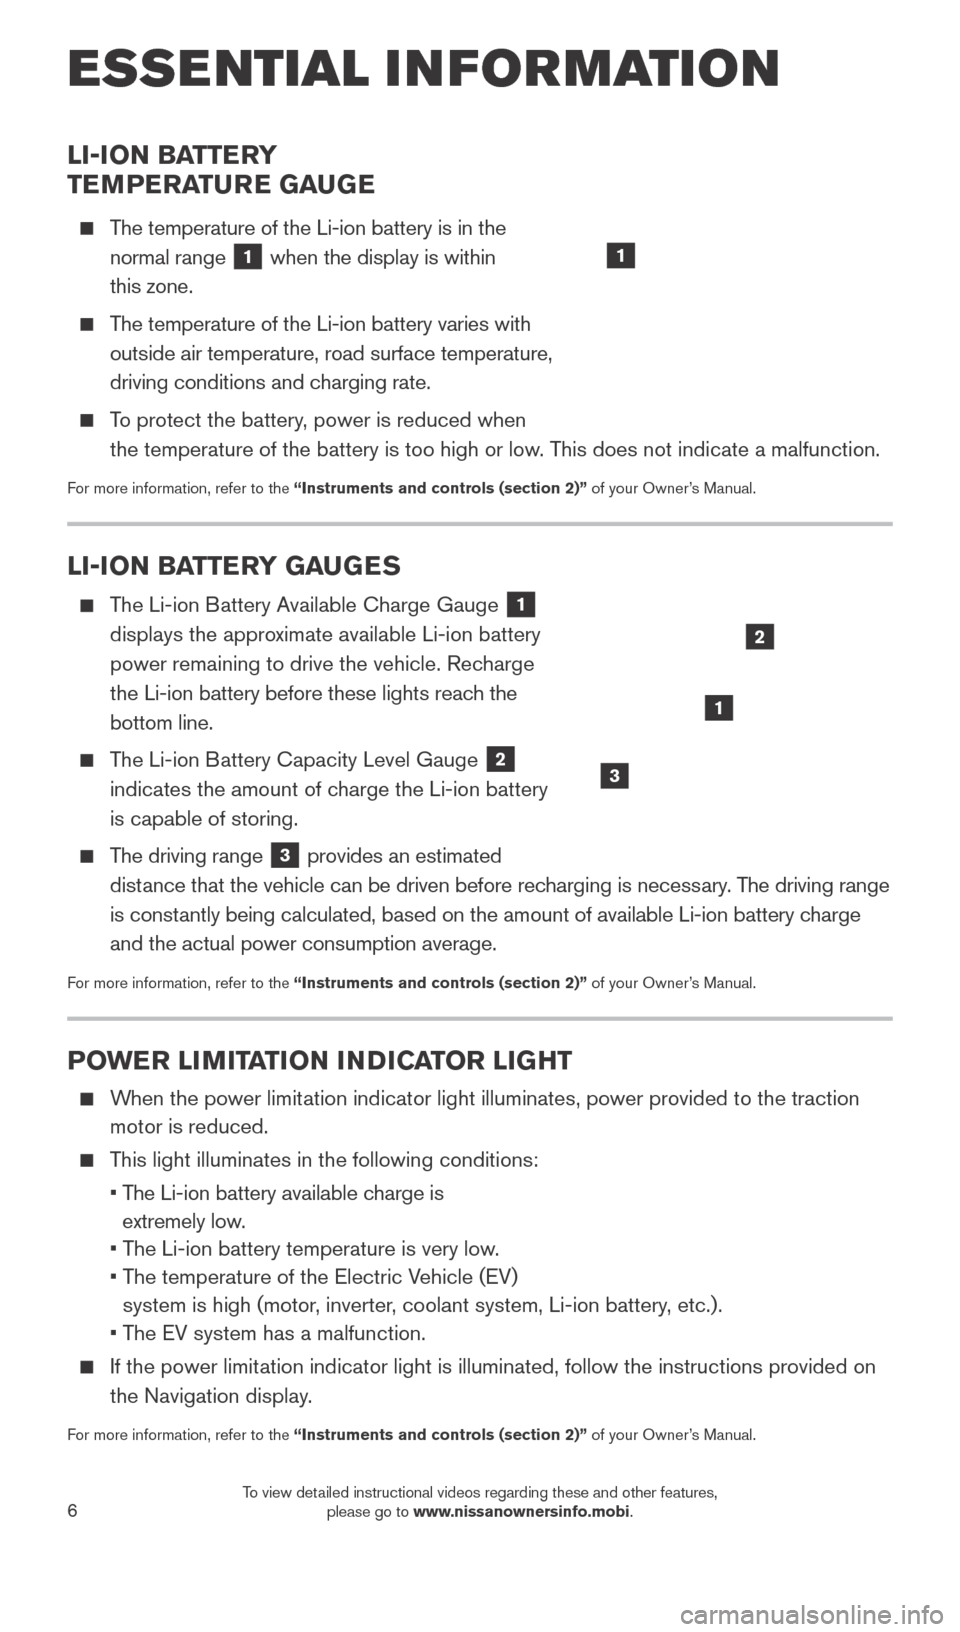
LI-ION BATTERY
TEMPERATURE GAUGE
The temperature of the Li-ion battery is in the normal range
1 when the display is within
this zone.
The temperature of the Li-ion battery varies with outside air temperature, road surface temperature,
driving conditions and charging rate.
To protect the battery, power is reduced when the temperature of the battery is too high or low. This does not indicate a malfunction.
For more information, refer to the “Instruments and controls (section 2)” of your Owner’s Manual.
1
LI-ION BATTERY GAUGES
The Li-ion Battery Available Charge Gauge 1
displays the approximate available Li-ion battery
power remaining to drive the vehicle. Recharge
the Li-ion battery before these lights reach the
bottom line.
The Li-ion Battery Capacity Level Gauge 2
indicates the amount of charge the Li-ion battery
is capable of storing.
The driving range 3 provides an estimated
distance that the vehicle can be driven before recharging is necessary. The driving range
is constantly being calculated, based on the amount of available Li-ion battery \
charge
and the actual power consumption average.
For more information, refer to the “Instruments and controls (section 2)” of your Owner’s Manual.
1
2
3
ESSE NTIAL I N FOR MATION
1789594_15b_Leaf_QRG_063014.indd 66/30/14 1:28 PM
To view detailed instructional videos regarding these and other features, please go to www.nissanownersinfo.mobi.
Page 10 of 28
7
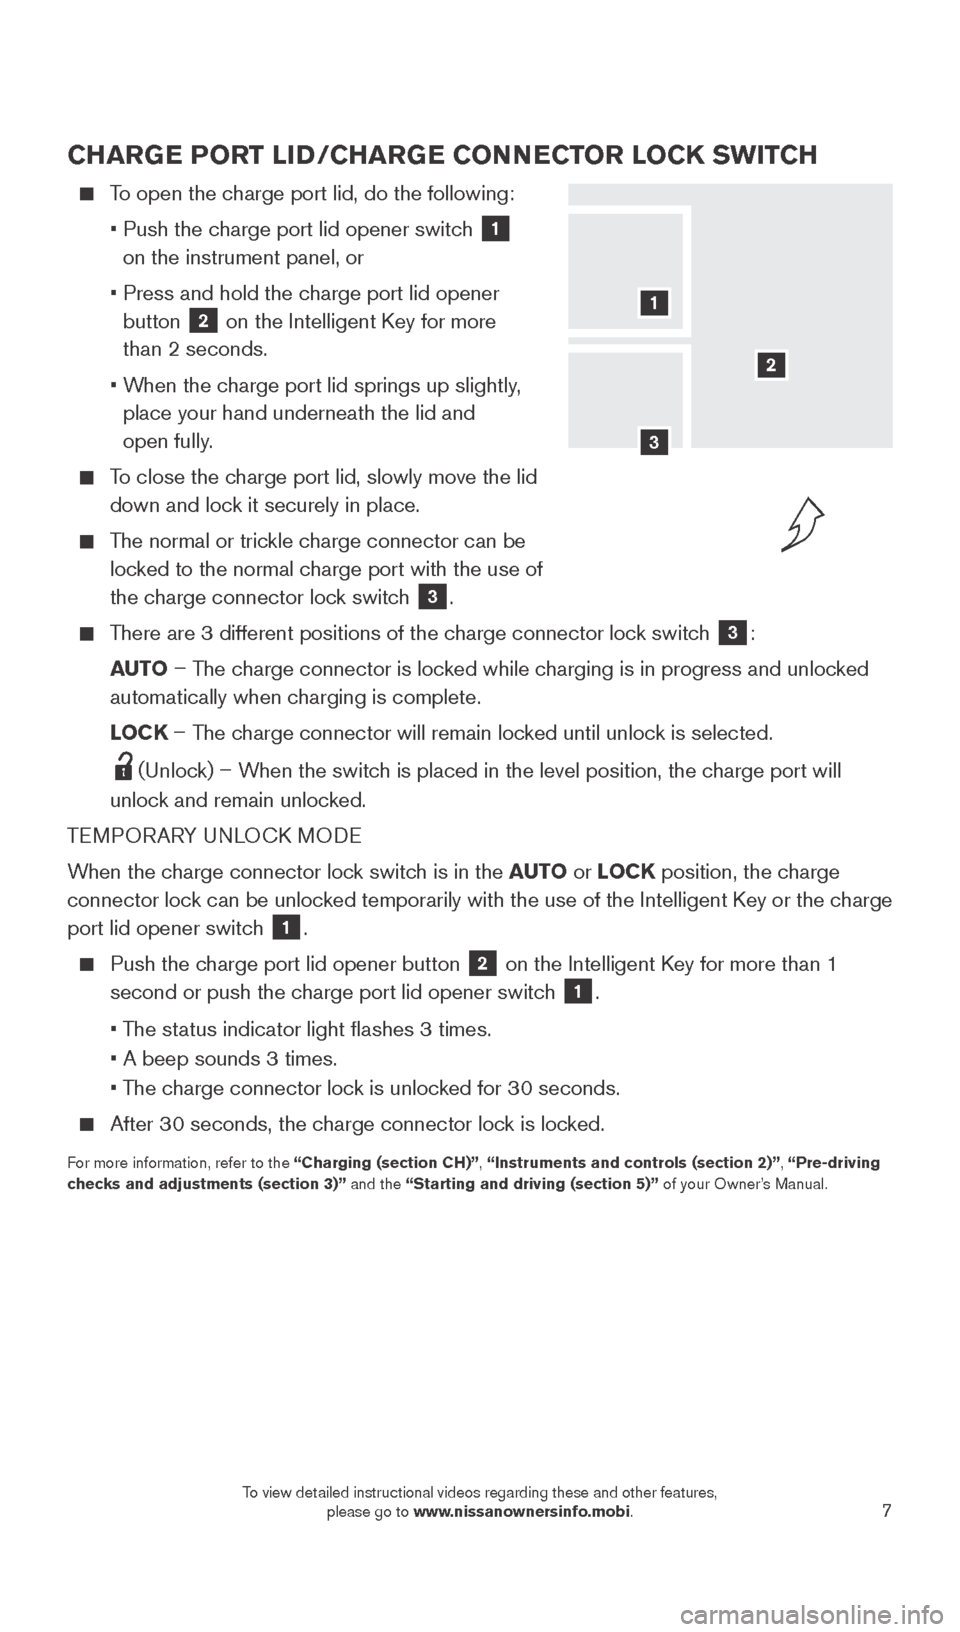
CHARGE PORT LID/CHARGE CONNECTOR LOCK SWITCH
To open the charge port lid, do the following:
•
Push the c
harge port lid opener switch
1
on the instrument panel, or
•
Press and hold the c
harge port lid opener
button
2 on the Intelligent Key for more
than 2 seconds.
•
W
hen the charge port lid springs up slightly,
place your hand underneath the lid and
open fully.
To close the charge port lid, slowly move the lid down and lock it securely in place.
The normal or trickle charge connector can be locked to the normal charge port with the use of
the charge connector lock switch
3.
There are 3 different positions of the charge connector lock switch 3:
AUTO – The charge connector is locked while charging is in progress and unlocked
automatically when charging is complete.
L
OCK – The charge connector will remain locked until unlock is selected.
(Unlock) – When the switch is placed in the level position, the charge port will
unlock and remain unlocked.
TEMPORARY UNLOCK MODE
When the charge connector lock switch is in the AUTO or LOCK position, the charge
connector lock can be unlocked temporarily with the use of the Intelligent Key or the charge
port lid opener switch
1.
Push the charge port lid opener button
2 on the Intelligent Key for more than 1
second or push the charge port lid opener switch
1.
• T
he status indicator light flashes 3 times.
• A beep sounds 3 times.
• T
he charge connector lock is unlocked for 30 seconds.
After 30 seconds, the charge connector lock is locked.
For more information, refer to the “Charging (section CH)”, “Instruments and controls (section 2)”, “Pre-driving
checks and adjustments (section 3)” and the “Starting and driving (section 5)” of your Owner’s Manual.
2
1
3
1789594_15b_Leaf_QRG_063014.indd 76/30/14 1:28 PM
To view detailed instructional videos regarding these and other features, please go to www.nissanownersinfo.mobi.
Page 11 of 28
8
LI-ION BATTERY CHARGING
Before charging the Li-ion battery, see your Owner’s Manual for detailed warnings and
cautions when charging your battery.
There are three methods available to perform the charge operation: normal charge, trickle charge and quick charge (if so equipped).
NORMAL CHARGE
Perform a normal charge using the charger installed in your home.
It takes approximately 3-4 hours to charge the Li-ion battery from empty to full with a 6.6 kW charger (if so equipped).
To charge your vehicle:
•
Place the power switc
h in the OFF position.
•
Push the c
harge port lid opener switch located on the instrument panel to the left of
the steering wheel.
•
Press the c
harge port tab and open the cap.
•
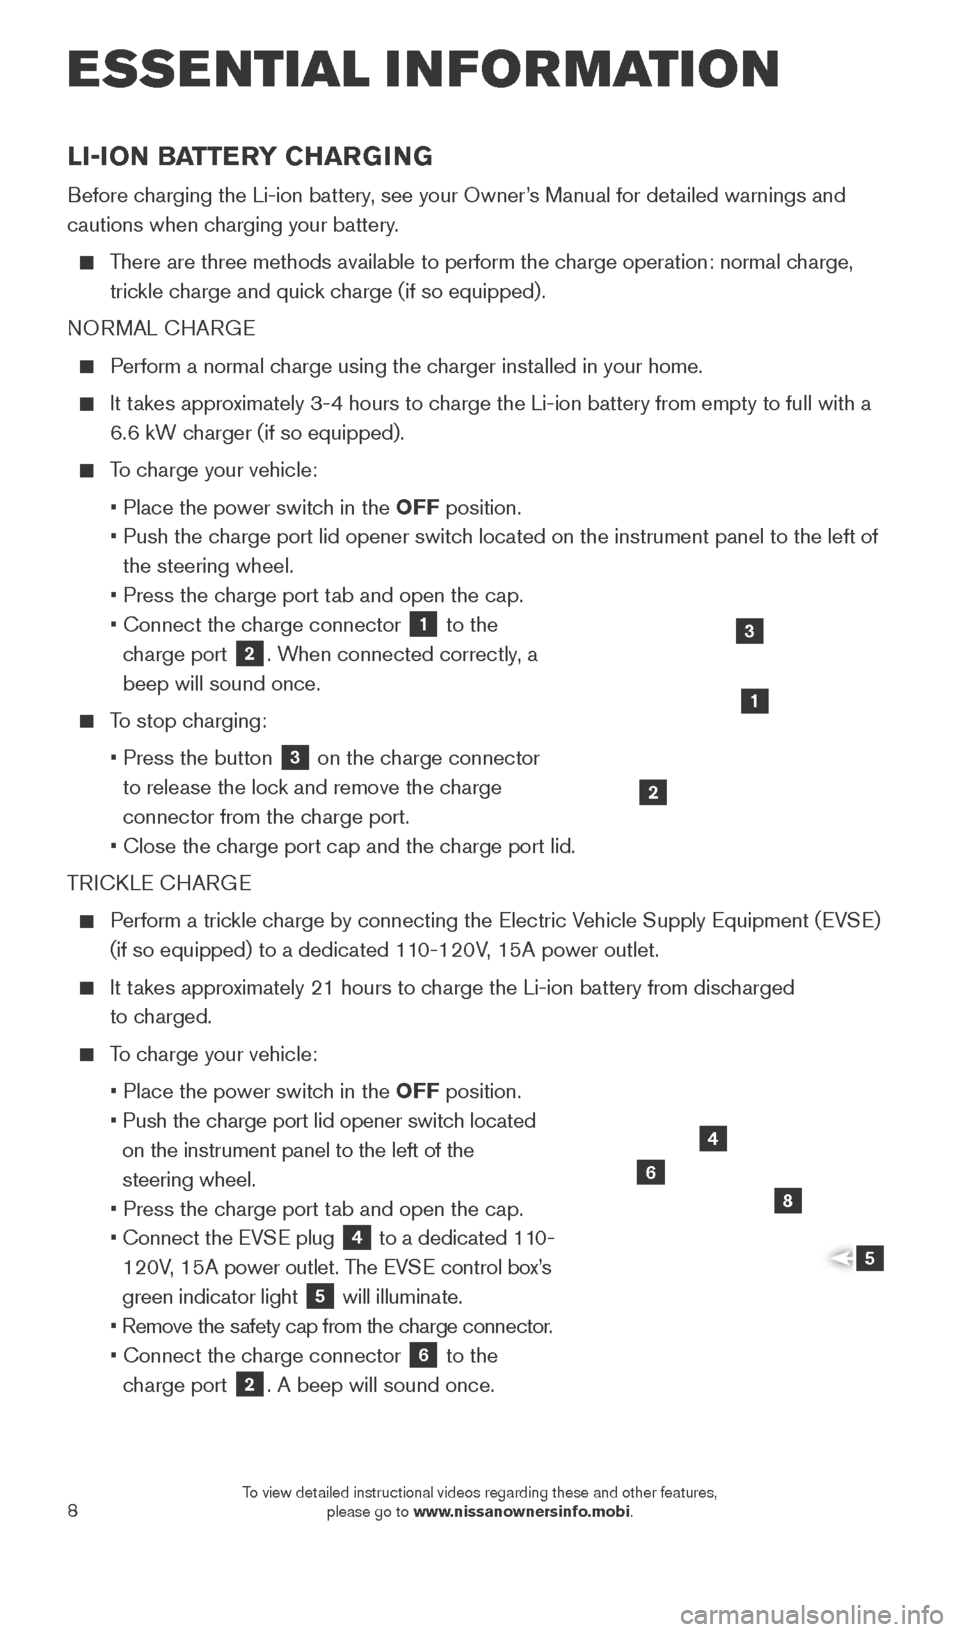
Connect the c
harge connector
1 to the
charge port 2. When connected correctly, a
beep will sound once.
To stop charging:
•
Press the button 3 on the charge connector
to release the lock and remove the charge
connector from the charge port.
•
Close the c
harge port cap and the charge port lid.
TRICKLE CHARGE
Perform a trickle charge by connecting the Electric Vehicle Supply Equipment (EVSE) (if so equipped) to a dedicated 110-120V, 15A power outlet.
It takes approximately 21 hours to charge the Li-ion battery from discharged to charged.
To charge your vehicle:
•
Place the power switc
h in the OFF position.
•
Push the c
harge port lid opener switch located
on the instrument panel to the left of the
steering wheel.
•
Press the c
harge port tab and open the cap.
•
Connect the EV
SE plug
4 to a dedicated 110-
120V, 15A power outlet. The EVSE control box’s
green indicator light
5 will illuminate.
•
Remove the s
afety cap from the charge connector.
•
Connect the c
harge connector
6 to the
charge port 2. A beep will sound once.
4
6
8
5
1
2
3
ESSE NTIAL I N FOR MATION
1789594_15b_Leaf_QRG_063014.indd 86/30/14 1:28 PM
To view detailed instructional videos regarding these and other features, please go to www.nissanownersinfo.mobi.
Page 12 of 28
9
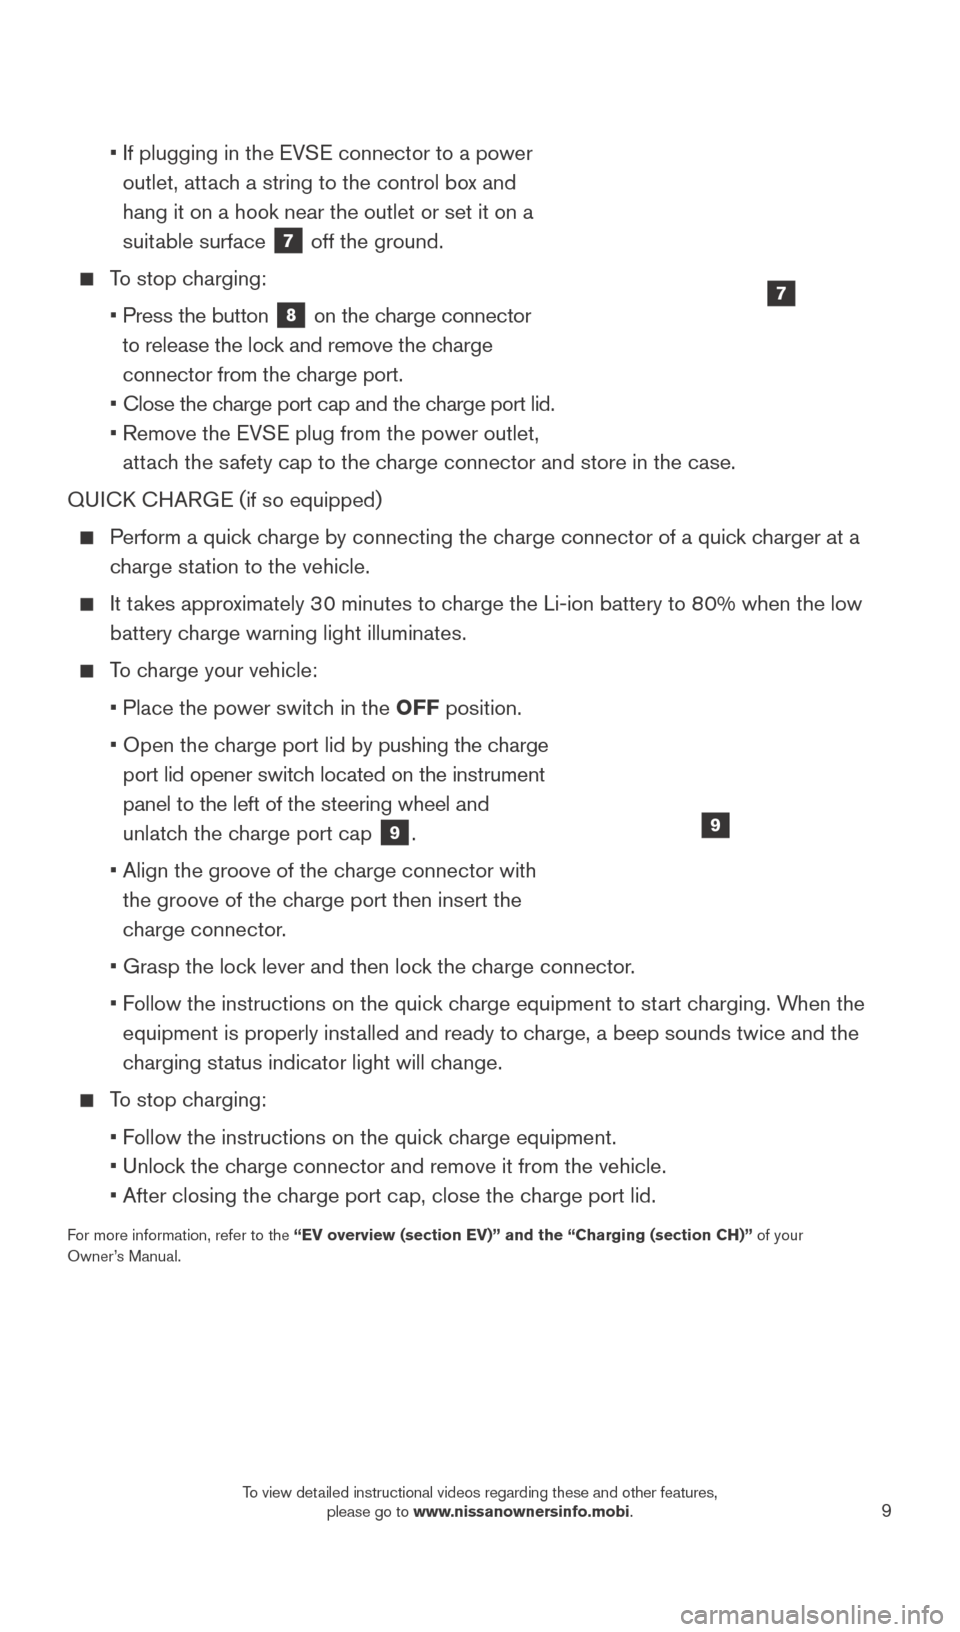
• If plugging in the EV SE connector to a power
outlet, attach a string to the control box and
hang it on a hook near the outlet or set it on a
suitable surface
7 off the ground.
To stop charging:
•
Press the button 8 on the charge connector
to release the lock and remove the charge
connector from the charge port.
•
Close the c
harge port cap and the charge port lid.
•
Remove the EV
SE plug from the power outlet,
attach the safety cap to the charge connector and store in the case.
QUICK CHARGE (if so equipped)
Perform a quick charge by connecting the charge connector of a quick charger at a charge station to the vehicle.
It takes approximately 30 minutes to charge the Li-ion battery to 80% when the low battery charge warning light illuminates.
To charge your vehicle:
•
Place the power switc
h in the OFF position.
•
Open the c
harge port lid by pushing the charge
port lid opener switch located on the instrument
panel to the left of the steering wheel and
unlatch the charge port cap
9.
•
Align the groove of the c
harge connector with
the groove of the charge port then insert the
charge connector.
•
Grasp the loc
k lever and then lock the charge connector.
•
F
ollow the instructions on the quick charge equipment to start charging. When the
equipment is properly installed and ready to charge, a beep sounds twice and the
charging status indicator light will change.
To stop charging:
•
F
ollow the instructions on the quick charge equipment.
•
Unloc
k the charge connector and remove it from the vehicle.
•
After closing the c
harge port cap, close the charge port lid.
For more information, refer to the “EV overview (section EV)” and the “Charging (section CH)”\
of your
Owner’s Manual.
9
7
1789594_15b_Leaf_QRG_063014.indd 96/30/14 1:28 PM
To view detailed instructional videos regarding these and other features, please go to www.nissanownersinfo.mobi.
Page 13 of 28
10
TIRE PRESSURE MONITORING SYSTEM (TPMS)
WITH EASY FILL TIRE ALERT
A CHECK TIRE PRESSURE warning message will appear in the vehicle information display
1 and the low tire pressure warning light
2
will illuminate when one or more tires are low in
pressure and air is needed.
When adding air to an under-inflated tire, the
TPMS with Easy Fill Tire Alert system provides visual and audible signals
to help you inflate the tires to the recommended COLD tire pressure.
To use the Easy Fill Tire Alert system: 1. Apply the parking brake and press the P (PARK) button on the shift lever.
2.
Place the power switc
h in the ON position. Do not place in the READY to drive mode.
3.
Add air to the underinflated tire, and within a few seconds the hazard\
warning lights
will flash.
4.
W
hen the designated tire pressure is reached, the horn will beep once and the
hazard warning message lights will stop flashing.
5.
Repeat this procedure for any additional underinflated tires.
After tire pressures are adjusted, drive the vehicle at speeds above 1 6 mph (25 km/h)
and the warning and indicator light will extinguish.
When the low tire pressure warning light flashes for approximately 1 minute and then remains on, the TPMS is not functioning properly. Have the system checked by a
NISSAN-certified LEAF dealer.
Tire pressure rises and falls depending on the heat caused by the vehicle\
’s operation and the outside temperature. Low outside temperature can lower the temperatu\
re of the
air inside the tire, which can cause a lower tire inflation pressure. This may cause the
low tire pressure warning light to illuminate. If the warning light illuminates, check the tire
pressure in your tires.
For more information, refer to the “Instruments and controls (section 2)” and the “Starting and driving (section
5)” of your Owner’s Manual.
CLOCK SET/ADJUSTMENT
To adjust the instrument panel clock 1, use the
Settings menu in the vehicle information display.
The Settings menu 2 is accessed by pressing
the
button
3 on the left side of the
instrument panel.
Press the button
4 to cycle through the
various Settings modes.
This clock is linked to the GPS (if so equipped) through the center display clock.
•
W
ithout any adjustments, the correct time will be
displayed based on the vehicle’s current location.
•
T
here are also controls in the center display to
compensate for daylight savings time.
For more information, refer to the “Instruments and controls
(section 2)” of your Owner’s Manual.
43
2
1
ESSE NTIAL I N FOR MATION
1
2
1789594_15b_Leaf_QRG_063014.indd 106/30/14 1:29 PM
To view detailed instructional videos regarding these and other features, please go to www.nissanownersinfo.mobi.
Page 14 of 28
11
REAR HATCH RELEASE
To open the rear hatch, unlock it and push the rear hatch opener
switch 1. Pull the rear hatch up to open. The rear hatch can be
unlocked by:
Pressing the button
2 on the NISSAN Intelligent Key® twice.
Pushing the rear hatc
h request switch
3 while carrying the
Intelligent Key with you.
Pushing the door handle request switc h twice.
Pushing the power door lock switch to
the
position.
The rear hatch does not lock when closed. To lock
the rear hatch, use the request switch, power
door lock or key fob.
For more information, refer to the “Pre-driving checks and
adjustments (section 3)” of your Owner’s Manual.
NISSAN INTELLIGENT KEY® SYSTE M
The NISSAN Intelligent Key® System allows you to
lock or unlock the vehicle, open the rear hatch and start
your vehicle. It is important to make sure the Intelligent
Key is with you (that is, in your pocket or purse).
To lock the vehicle, push either door handle request switch
1 or the rear hatch request
switch 2 once or press the
button
3 on
the key fob.
To unlock the vehicle, perform one of the following procedures:
•
Push any request switc
h once; the
corresponding door will unlock. Push the request switch
again within 60 seconds; all other doors will unlock, or
•
Press the button
4 on the key fob to unlock the driver’s
side door. Press the button again; all other doors will unlock.
To open the charge port lid, press and hold the charge port lid opener button
5 for more than 2 seconds.
The Intelligent Key can also be used to activate the panic alarm
by pressing and holding the
button
6 for more than
1 second. Once activated, the panic alarm and headlights will
stay on for a period of time.
For more information, refer to the “Pre-driving checks and adjustments (section 3)” of your Owner’s Manual.
1
2
3
4
6
2
FI RST DR IVE FEATU R ES
5
13
1789594_15b_Leaf_QRG_063014.indd 116/30/14 1:29 PM
To view detailed instructional videos regarding these and other features, please go to www.nissanownersinfo.mobi.