door lock NISSAN LEAF 2020 Owner´s Manual
[x] Cancel search | Manufacturer: NISSAN, Model Year: 2020, Model line: LEAF, Model: NISSAN LEAF 2020Pages: 596, PDF Size: 4.33 MB
Page 12 of 596
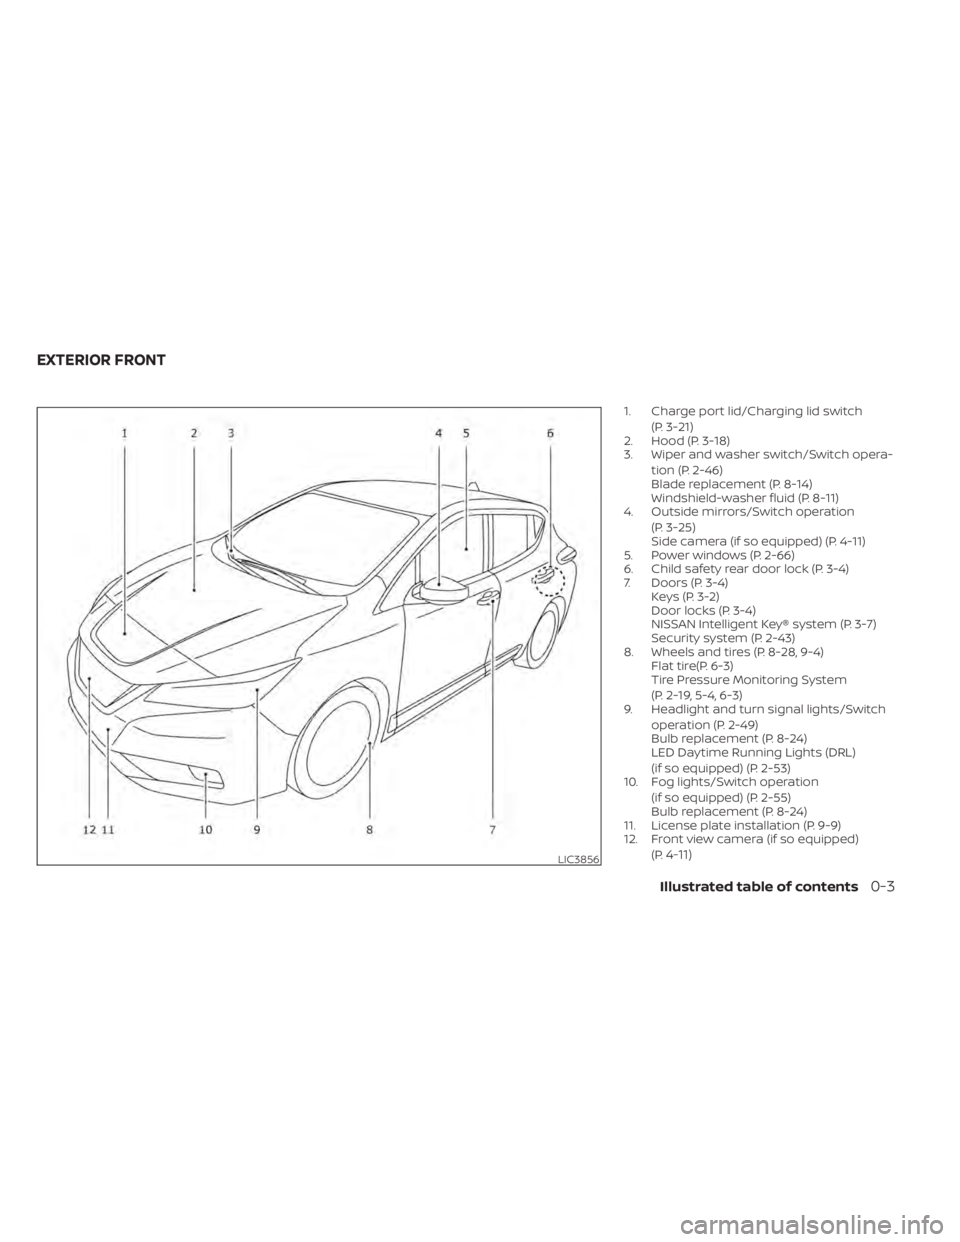
1. Charge port lid/Charging lid switch(P. 3-21)
2. Hood (P. 3-18)
3. Wiper and washer switch/Switch opera-
tion (P. 2-46)
Blade replacement (P. 8-14)
Windshield-washer fluid (P. 8-11)
4. Outside mirrors/Switch operation
(P. 3-25)
Side camera (if so equipped) (P. 4-11)
5. Power windows (P. 2-66)
6. Child safety rear door lock (P. 3-4)
7. Doors (P. 3-4) Keys (P. 3-2)
Door locks (P. 3-4)
NISSAN Intelligent Key® system (P. 3-7)
Security system (P. 2-43)
8. Wheels and tires (P. 8-28, 9-4) Flat tire(P. 6-3)
Tire Pressure Monitoring System
(P. 2-19, 5-4, 6-3)
9. Headlight and turn signal lights/Switch
operation (P. 2-49)
Bulb replacement (P. 8-24)
LED Daytime Running Lights (DRL)
(if so equipped) (P. 2-53)
10. Fog lights/Switch operation
(if so equipped) (P. 2-55)
Bulb replacement (P. 8-24)
11. License plate installation (P. 9-9)
12. Front view camera (if so equipped)
(P.
4-11)LIC3856
EXTERIOR FRONT
Illustrated table of contents0-3
Page 91 of 596
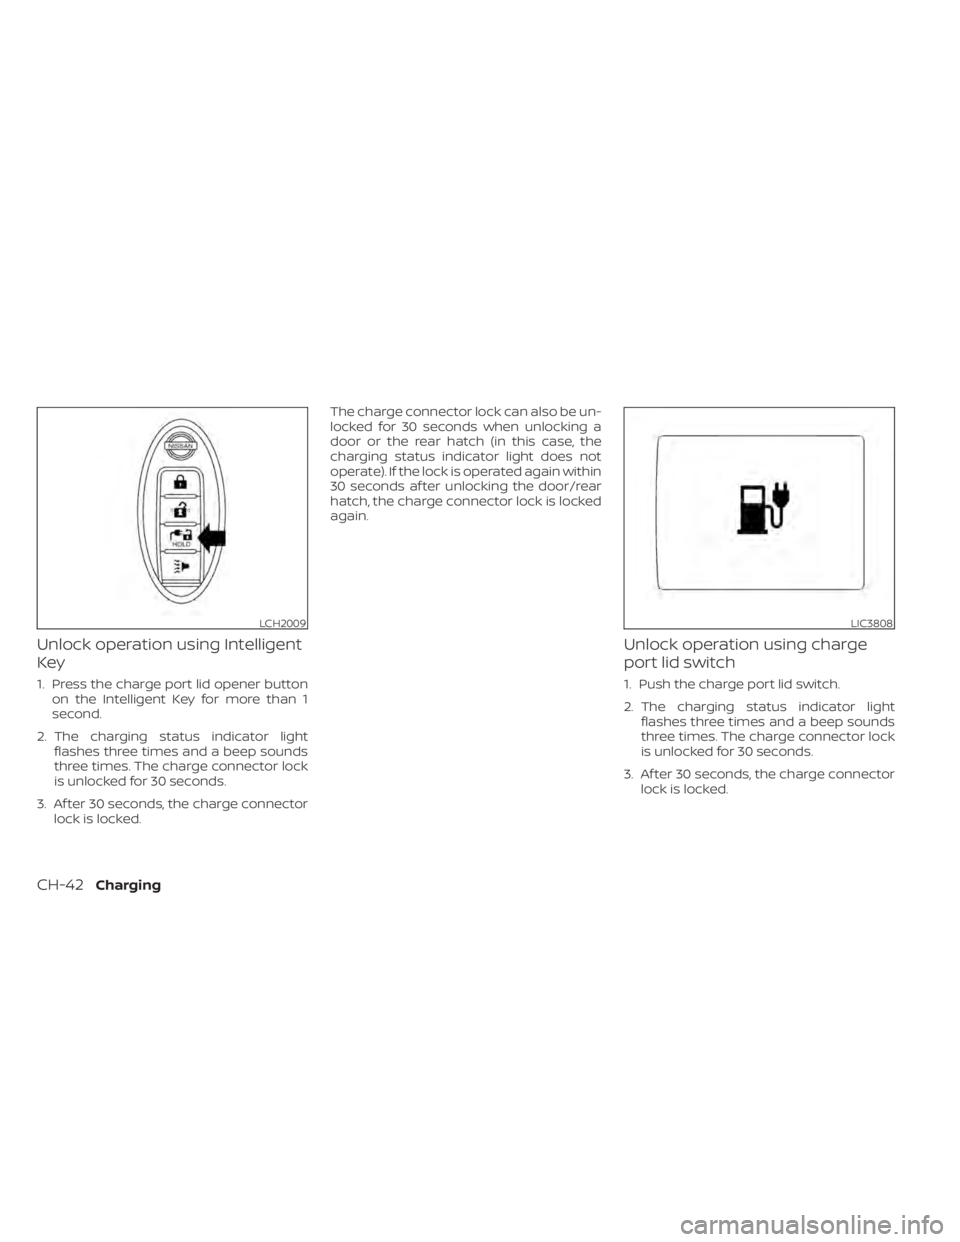
Unlock operation using Intelligent
Key
1. Press the charge port lid opener buttonon the Intelligent Key for more than 1
second.
2. The charging status indicator light flashes three times and a beep sounds
three times. The charge connector lock
is unlocked for 30 seconds.
3. Af ter 30 seconds, the charge connector lock is locked. The charge connector lock can also be un-
locked for 30 seconds when unlocking a
door or the rear hatch (in this case, the
charging status indicator light does not
operate). If the lock is operated again within
30 seconds af ter unlocking the door/rear
hatch, the charge connector lock is locked
again.
Unlock operation using charge
port lid switch
1. Push the charge port lid switch.
2. The charging status indicator light
flashes three times and a beep sounds
three times. The charge connector lock
is unlocked for 30 seconds.
3. Af ter 30 seconds, the charge connector lock is locked.
LCH2009LIC3808
CH-42Charging
Page 96 of 596
• The estimated time may be recalculateddepending on the actual electrical power
af ter the charge cable is connected. Al-
though the estimated time may be differ-
ent from the time that was displayed
when the power switch was placed in the
OFF position, this is not a malfunction.
• When the charging timer is set to OFF, the estimated end time to charge the Li-ion
battery to a full level in the case of per-
forming the immediate charge. The end
time is calculated based on the electrical
power selected in the “Charge Time
Screen”.
• When the Li-ion battery was fully charged, the charging time will be displayed as “--
:--”.
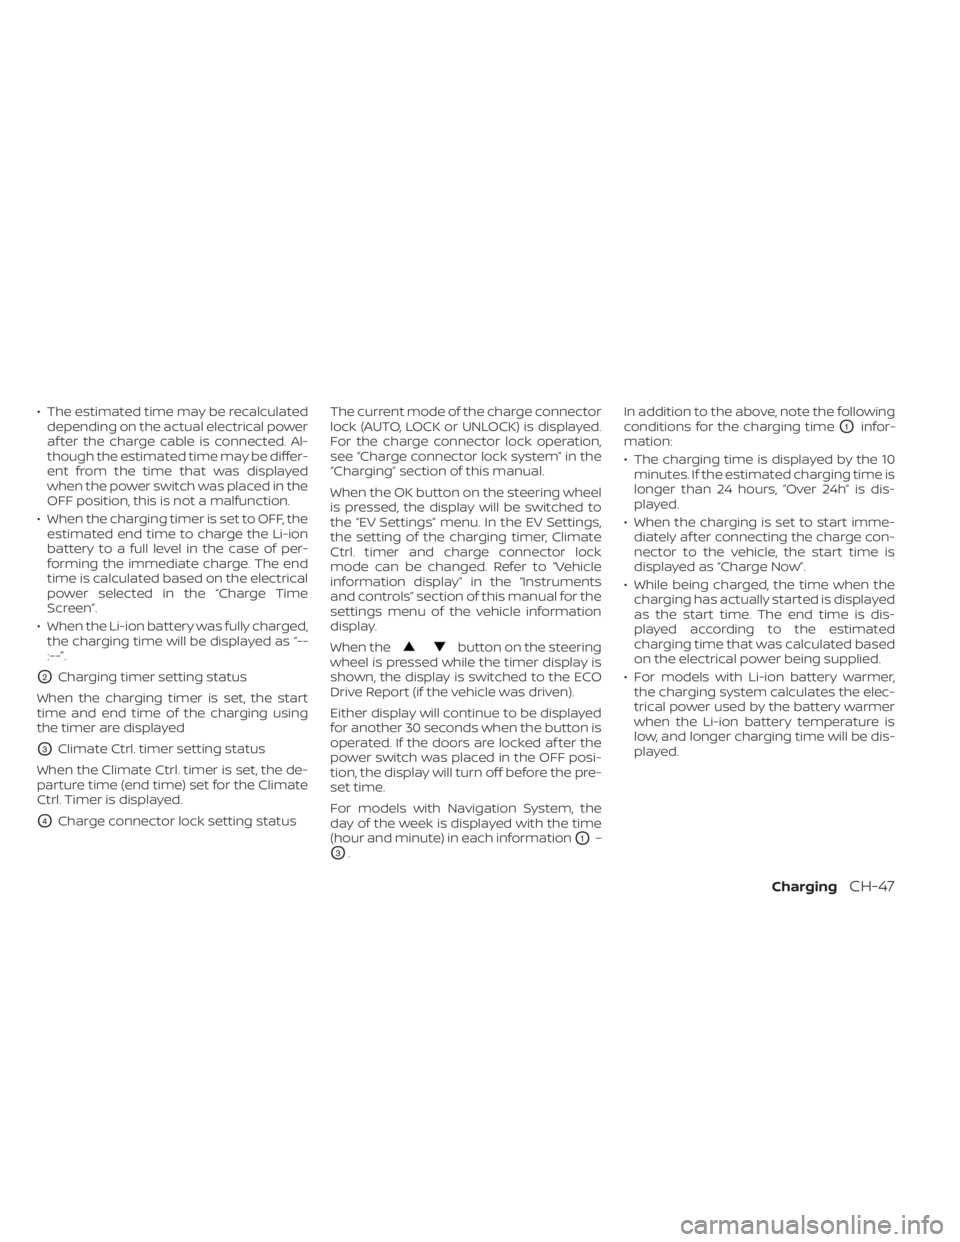
O2Charging timer setting status
When the charging timer is set, the start
time and end time of the charging using
the timer are displayed
O3Climate Ctrl. timer setting status
When the Climate Ctrl. timer is set, the de-
parture time (end time) set for the Climate
Ctrl. Timer is displayed.
O4Charge connector lock setting status The current mode of the charge connector
lock (AUTO, LOCK or UNLOCK) is displayed.
For the charge connector lock operation,
see “Charge connector lock system” in the
“Charging” section of this manual.
When the OK button on the steering wheel
is pressed, the display will be switched to
the “EV Settings” menu. In the EV Settings,
the setting of the charging timer, Climate
Ctrl. timer and charge connector lock
mode can be changed. Refer to “Vehicle
information display” in the “Instruments
and controls” section of this manual for the
settings menu of the vehicle information
display.
When the
button on the steering
wheel is pressed while the timer display is
shown, the display is switched to the ECO
Drive Report (if the vehicle was driven).
Either display will continue to be displayed
for another 30 seconds when the button is
operated. If the doors are locked af ter the
power switch was placed in the OFF posi-
tion, the display will turn off before the pre-
set time.
For models with Navigation System, the
day of the week is displayed with the time
(hour and minute) in each information
O1–
O3. In addition to the above, note the following
conditions for the charging time
O1infor-
mation:
• The charging time is displayed by the 10 minutes. If the estimated charging time is
longer than 24 hours, “Over 24h” is dis-
played.
• When the charging is set to start imme- diately af ter connecting the charge con-
nector to the vehicle, the start time is
displayed as “Charge Now”.
• While being charged, the time when the charging has actually started is displayed
as the start time. The end time is dis-
played according to the estimated
charging time that was calculated based
on the electrical power being supplied.
• For models with Li-ion battery warmer, the charging system calculates the elec-
trical power used by the battery warmer
when the Li-ion battery temperature is
low, and longer charging time will be dis-
played.
ChargingCH-47
Page 162 of 596
4. Remain in this position for 30 secondsallowing the system to classif y the front
passenger before the vehicle is put into
motion.
5. Ensure proper classification by checking the front passenger air bag status light.
NOTE:
This vehicle’s occupant classification
sensor system generally keeps the clas-
sification locked during driving, so it is
important that you confirm that the
front passenger is properly classified
prior to driving. However, the occupant
classification sensor may recalculate the
weight of the occupant under some con-
ditions (both while driving and when
stopped), so front passenger seat occu-
pants should continue to remain seated
as outlined above.
Troubleshooting
If you think the front passenger air bag
status light is incorrect:
1. If the light is ON with an adult occupyingthe front passenger seat:
• Occupant is a small adult — the air bag light is functioning as intended. The
front passenger air bag and passen-
ger knee air bag are suppressed. However, if the occupant is not a small
adult, then this may be due to the following
conditions that may be interfering with the
weight sensors:
• Occupant is not sitting upright, lean-ing against the seatback, and cen-
tered on the seat cushion with his/her
feet comfortably extended to the floor.
• A child restraint or other object press- ing against the rear of the seatback.
• A rear passenger pushing or pulling on the back of the front passenger seat.
• Forcing the front seat or seatback against an object on the seat or floor
behind it.
• An object placed under the front pas- senger seat.
• An object placed between the seat cushion and center console or be-
tween the seat cushion and the door.
If the vehicle is moving, please come to a
stop when it is safe to do so. Check and
correct any of the above conditions. Re-
start the vehicle and wait 1 minute.
NOTE:
A system check will be performed during
which the front passenger air bag status
light will remain lit for about 7 seconds
initially.
If the light is still ON af ter this, the person
should be advised not to ride in the front
passenger seat and the vehicle should be
checked as soon as possible. It is recom-
mended that you visit a NISSAN certified
LEAF dealer for this service.
2. If the light is OFF with a small adult, child or child restraint occupying the front
passenger seat.
This may be due to the following condi-
tions that may be interfering with the
weight sensors:
• Small adult or child is not sitting up- right, leaning against the seatback,
and centered on the seat cushion with
his/her feet comfortably extended to
the floor.
• The child restraint is not properly in- stalled, as outlined in the “Child re-
straints” section of this manual.
• An object weighting over 9.1 lbs. (4 kg) hanging on the seat or placed in the
seatback pocket (if so equipped).
Safety–Seats, seat belts and supplemental restraint system1-55
Page 198 of 596
Key reminder chime
A chime will sound if the driver's side door is
opened while the power switch is pushed
to the ON or ACC position.
Make sure that the power switch is pushed
to the OFF position, and take the Intelligent
Key with you when leaving the vehicle.
Light reminder chime
The light reminder chime will sound when
the driver side door is opened with the light
switch in the
orposition, and
the power switch is in the ACC, OFF or LOCK
position.
Turn the light switch off when you leave the
vehicle.
Parking brake reminder chime
A chime sounds if the parking brake is set
and the vehicle is driven. The chime will
stop if the parking brake is released or the
vehicle speed returns to zero.
Power switch reminder chime
The power switch reminder chime will
sound when the driver's door is opened
while the power switch is in the ON or READY to drive position. Push the power
switch to the OFF position.
Seat belt warning chime
The seat belt warning chime will sound for
about 6 seconds unless the driver’s seat
belt is securely fastened.
12-volt battery charge
warning chime
If the 12-volt battery charge warning light
illuminates, the chime will sound when a
warning message is displayed in the ve-
hicle information display.
When the chime sounds, immediately stop
the vehicle in a safe location and push the P
(Park) position switch on the shif t lever and
apply the parking brake. The 12-volt battery
charge warning light turns off and the
chime will stop when the parking brake is
applied or the vehicle is placed in the P
(Park) position. Have the system checked. It
is recommended that you visit a NISSAN
certified LEAF dealer for this service. For
additional information, refer to “12-volt bat-
tery charge warning light” in this section.
The vehicle information display is located
to the lef t of the speedometer. It displays
items such as:
• Battery information
• Energy economy
• Average vehicle speed
• Driving distance
• Driving time
• Cruise control information
• Intelligent Key information
• Indicators and warnings
LIC3872
VEHICLE INFORMATION DISPLAY
Instruments and controls2-25
Page 203 of 596
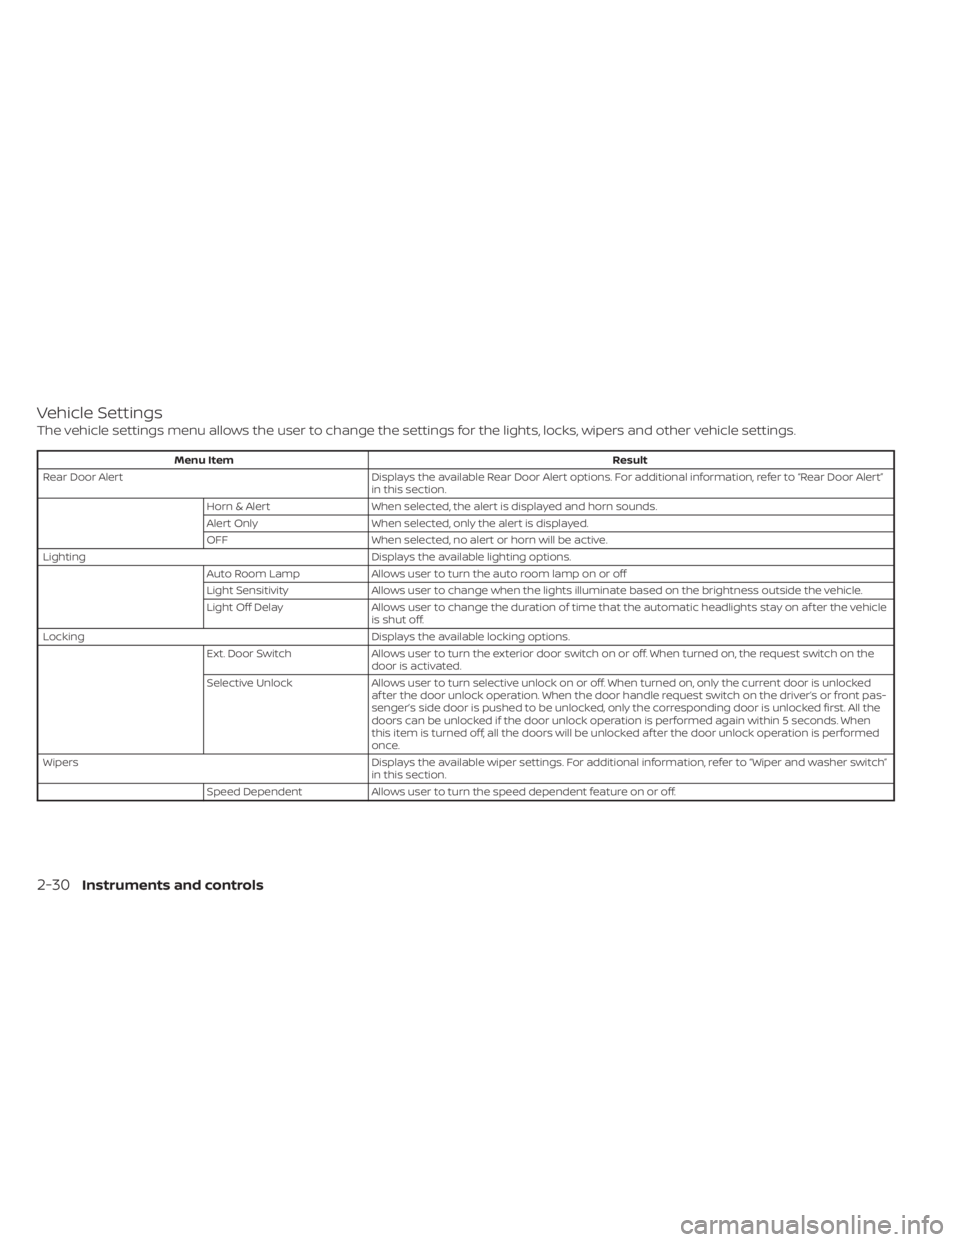
Vehicle Settings
The vehicle settings menu allows the user to change the settings for the lights, locks, wipers and other vehicle settings.
Menu ItemResult
Rear Door Alert Displays the available Rear Door Alert options. For additional information, refer to “Rear Door Alert”
in this section.
Horn & Alert When selected, the alert is displayed and horn sounds.
Alert Only When selected, only the alert is displayed.
OFF When selected, no alert or horn will be active.
Lighting Displays the available lighting options.
Auto Room Lamp Allows user to turn the auto room lamp on or off
Light Sensitivity Allows user to change when the lights illuminate based on the brightness outside the vehicle.
Light Off Delay Allows user to change the duration of time t hat the automatic headlights stay on af ter the vehicle
is shut off.
Locking Displays the available locking options.
Ext. Door Switch Allows user to turn the exterior door switch on or off. When turned on, the request switch on the
door is activated.
Selective Unlock Allows user to turn selective unlock on or off. When turned on, only the current door is unlocked
af ter the door unlock operation. When the door handle request switch on the driver’s or front pas-
senger’s side door is pushed to be unlocked, only the corresponding door is unlocked first. All the
doors can be unlocked if the door unlock operation is performed again within 5 seconds. When
this item is turned off, all the doors will be unlocked af ter the door unlock operation is performed
once.
Wipers Displays the available wiper settings. For additional information, refer to “Wiper and washer switch”
in this section.
Speed Dependent Allows user to turn the speed dependent feature on or off.
2-30Instruments and controls
Page 207 of 596

1. Push brake and power switch to drive
2. No Key Detected
3. Key Battery Low
4. EV system operation for discharged In-telligent Key system indicator
5. Door open
6. Low battery charge indicator
7. Driver alert
8. Low outside air temperature
9. Low Washer Fluid (if so equipped)
10. Reminder Turn OFF Headlights
11. Tire Pressure Low — Add Air
12. Cruise control indicator (if so equipped)
13. Intelligent Cruise Control (ICC) indica- tors (if so equipped)
14. Shif t to Park
15. Key System Error: See Owner’s Manual
16. Release Parking Brake
17. ProPILOT Assist (if so equipped)/ Intelligent Lane Intervention (I-LI)/
Intelligent Blind Spot Intervention (I-BSI)
indicator 18. Not Available Seat Belt Not Fastened (if
so equipped)
19. Malfunction: See Owner’s Manual
20. Indicators for maintenance
21. Steering Assist indicator (if so equipped)
22. Steering Assist warning (if so equipped)
23. Not Available Front Radar Blocked
24. Unavailable Side Radar Obstruction
25. Not Available Visibility is Impaired (if so equipped)
26. Not Available Bad Weather (if so equipped)
27. Driver Attention Alert Take a Break? (if so equipped)
28. Driver Attention Alert System Fault (if so equipped)
29. Unavailable High Cabin Temperature
30. Not Available Parking Brake On (if so equipped)
31. Not Available Poor Road Conditions (if so equipped)
32. Currently not available (if so equipped) 33. Not Available System Malfunction
34. Press Brake Pedal (if so equipped)
35. Lane Departure Warning (LDW)
indicator
36. Vehicle ahead detection indicator
37. Shipping Mode On Push Storage Fuse
38. Blind Spot Warning (BSW) indicator
39. Rear Automatic Braking (RAB) system warning indicator
40. Headlight System Error: See Owner’s Manual (if so equipped)
41. When Parked Apply Parking Brake
42. T/M system malfunction Visit dealer
43. Check position of shif t lever
44. Chassis Control System Error: See Owner’s Manual
45. Press brake pedal to operate e-Pedal switch
46. Rear Door Alert is activated
47. Check Rear Seat For All Articles
48. e-Pedal system failure! Press brake pedal to slow or stop (if so equipped)
49. Parking Sensor
2-34Instruments and controls
Page 216 of 596
![NISSAN LEAF 2020 Owner´s Manual that warns the driver that the Li-ion battery
power level is low.
1. The notification is displayed on the up-per lef t side of the STATUS screen. Touch
[Show] to display the screen showing
detailed in NISSAN LEAF 2020 Owner´s Manual that warns the driver that the Li-ion battery
power level is low.
1. The notification is displayed on the up-per lef t side of the STATUS screen. Touch
[Show] to display the screen showing
detailed in](/img/5/40305/w960_40305-215.png)
that warns the driver that the Li-ion battery
power level is low.
1. The notification is displayed on the up-per lef t side of the STATUS screen. Touch
[Show] to display the screen showing
detailed information.
2. The system displays a message screen and announces the contents of the
message to warn that the Li-ion battery
power level is low. Check the message
displayed on the screen.
Touch [YES] to search for charging sta-
tions within the estimated driving range.
3. Touch
or push the MAPbutton to
return to the vehicle location screen.
NOTE:
• The low battery warning can be set to off. For additional information, refer to
the NissanConnect® Manual for Leaf.
• When the battery power level is low, the system automatically obtains
charging station information. Your vehicle has two types of security sys-
tems, as follows:
• Vehicle security system
• NISSAN Vehicle Immobilizer System
The security status is shown by the secu-
rity indicator light.
VEHICLE SECURITY SYSTEM
The vehicle security system provides visual
and audio alarm signals if someone opens
the doors or rear hatch when the system is
armed. It is not, however, a motion detec-
tion type system that activates when a ve-
hicle is moved or when a vibration occurs. The system helps deter vehicle thef t but
cannot prevent it, nor can it prevent the
thef t of interior or exterior vehicle compo-
nents in all situations. Always secure your
vehicle even if parking for a brief period.
Never leave your keys in the vehicle, and
always lock it when it is lef t unattended. Be
aware of your surroundings, and park in
secure, well-lit areas whenever possible.
Many devices offering additional protec-
tion, such as component locks, identifica-
tion markers, and tracking systems, are
available at auto supply stores and spe-
cialty shops. A NISSAN certified LEAF dealer
may also offer such equipment. Check with
your insurance company to see if you may
be eligible for discounts for various thef t
protection features.
How to arm the vehicle security
system
1. Close all windows.
The system can be armed even if the
windows are open.
2. Place the power switch in the LOCK or OFF position and remove the Intelligent
Key from the vehicle.
JVC0067X
SECURITY SYSTEMS
Instruments and controls2-43
Page 217 of 596
3. Close all doors. Lock all doors. The doorscan be locked with:
• the LOCK
button on the Intelli-
gent Key
• any request switch
• the power door lock switch
4. Confirm that the security indicator light illuminates. The security indicator light
stays on for about 30 seconds. The ve-
hicle security system is now pre-armed.
Af ter about 30 seconds the vehicle se-
curity system automatically shif ts into
the armed phase. The security light be-
gins to flash once every approximately 3
seconds. If, during this 30-second pre-
arm time period, the door is unlocked, or
the power switch is placed in the ACC or
ON position, the system will not arm.
Even when the driver and/or passengers
are in the vehicle, the system will acti-
vate with all doors locked and the power
switch in the OFF position. When placing
the power switch to the ACC or ON posi-
tion, the system will be released.
Vehicle security system activation
The vehicle security system will give the
following alarm:
• The headlights blink and the horn sounds intermittently.
• The alarm automatically turns off af ter approximately 50 seconds. However, the
alarm reactivates if the vehicle is tam-
pered with again.
The alarm is activated by:
• Unlocking the door without using the In- telligent Key, the request switch or the
key. (Even if the door is opened by releas-
ing the door inside lock knob, the alarm
will activate.)
• Opening the hood.
How to stop an activated alarm
The alarm will stop when a door is un-
locked by pushing the UNLOCKbut-
ton on the Intelligent Key, door handle re-
quest switch, or when the power switch is
pushed in the ACC or ON position.
If the system does not operate as de-
scribed above, have it checked. It is rec-
ommended that you visit a NISSAN certi-
fied LEAF dealer for this service.
NISSAN VEHICLE IMMOBILIZER
SYSTEM
The NISSAN Vehicle Immobilizer System
will not allow the power switch to be placed
in the READY to drive position without the
use of the registered key.
If the power switch fails to place the vehicle
into the READY to drive position using the
registered key, it may be due to interfer-
ence caused by another registered key, an
automated toll road device or automated
payment device on the key ring. Restart the
EV system using the following procedure:
1. Leave the power switch in the ON posi- tion for approximately 5 seconds.
2. Place the power switch in the OFF posi- tion and wait approximately 10 seconds.
3. Repeat step 1 and 2 again.
4. Place the power switch in the READY to drive position while holding the device
(which may have caused the interfer-
ence) separate from the registered key.
If this procedure allows the power
switch to be placed in the READY to drive
mode, NISSAN recommends placing the
registered key on a separate key ring to
avoid interference from other devices.
2-44Instruments and controls
Page 233 of 596
The Rear Door Alert system functions un-
der certain conditions to indicate there
may be an object or passenger in the rear
seat(s). Check the seat(s) before exiting the
vehicle.
The Rear Door Alert system is initially dis-
abled. The driver can enable the system
using the vehicle information display. For
additional information, refer to “Vehicle in-
formation display warnings and indicators”
in this section.
When the system is enabled:
• The system is activated when a rear dooris opened and closed within 10 minutes of
the vehicle being driven. When the driver
door is closed and the system is acti-
vated, a visual message appears in the
vehicle information display. For additional
information, refer to “Rear Door Alert is
activated” in this section.
• If a rear door is opened and closed but the vehicle is not driven within approxi-
mately 10 minutes, the system will not be
activated. A rear door must be opened
and closed and the car driven within 10
minutes for the system to activate.When the Rear Door Alert system is activated:
• When the driver puts the vehicle in the P(Park) position, a notification message
appears in the vehicle information dis-
play with the options to “Dismiss Mes-
sage” or “Disable Alert” if desired.– Select “Disable Alert” to temporarily disable for that stop.
– No selection or ‘Dismiss Message” will keep the alert enabled for that stop.
• If the alert is enabled when a driver exits the vehicle, a message will appear in the
vehicle information display that states
“Check Rear Seat for All Articles.”
If “Horn & Alert” setting is selected:
– – An audible horn sound will occur af ter
a short time unless a rear door is
opened and closed within a short time
to deactivate the alert.
–– If the doors are locked before the alert is deactivated by opening a rear door,
the horn will sound.
–– If the rear hatch is opened before a rear door is opened, the horn will be delayed
until af ter the hatch is closed.
NOTE:
If “Alert Only ” setting is selected, the
message alert will still be shown in the
vehicle information display but the horn
will not sound.
WARNING
• If the driver selects “Disable Alert”, no
audible alert will be provided regard-
less of rear door open/close status.
• There may be times when there is an
object or passenger in the rear
seat(s) but the audible alert does not
sound. For example, this may occur if
rear seat passengers enter or exit the
vehicle during a trip.
• The system does not directly detect
objects or passengers in the rear
seat(s). Instead, it can detect when a
rear door is opened and closed, indi-
cating that there may be something
in the rear seat(s).
NOTE:
There may be times when the horn
sounds but there are no objects or pas-
sengers in the rear seat(s).
For additional information, refer to “Rear
Door Alert is activated” in this section.
REAR DOOR ALERT
2-60Instruments and controls