NISSAN MAXIMA 1997 A32 / 4.G Repair Manual
Manufacturer: NISSAN, Model Year: 1997, Model line: MAXIMA, Model: NISSAN MAXIMA 1997 A32 / 4.GPages: 215, PDF Size: 1.75 MB
Page 61 of 215
3-point seat belts have a cinching mechanism
for child seat installation. It is referred to as the
automatic locking mode.
When the cinching mechanism is activated the
seat belt cannot be withdrawn again until the
seat belt tongue is detached from the buckle
and fully retracted. Refer to ªChild restraints for
infants and small childrenº later in this section
for more information.
The automatic locking mode should be
used only for child seat installation. During
normal seat belt use by a passenger, the
locking mode should not be activated. If it
is activated it may cause uncomfortable
seat belt tension.
Unfastening the belts
To unfasten the belt, press the button on the
buckle. The seat belt will automatically retract.
Checking seat belt operation
(3-point type with retractor)
Your seat belt retractors are designed to lock
belt movement using two separate methods:
1) When the belt is pulled quickly from the
retractor.
2) When the vehicle slows down rapidly.
You can check their operation as follows:
IGrasp the shoulder belt and pull quickly
forward. The retractor should lock and re-
strict further belt movement.
If the retractor does not lock during this check
or if you have any questions about belt opera-
tion, see your NISSAN dealer.
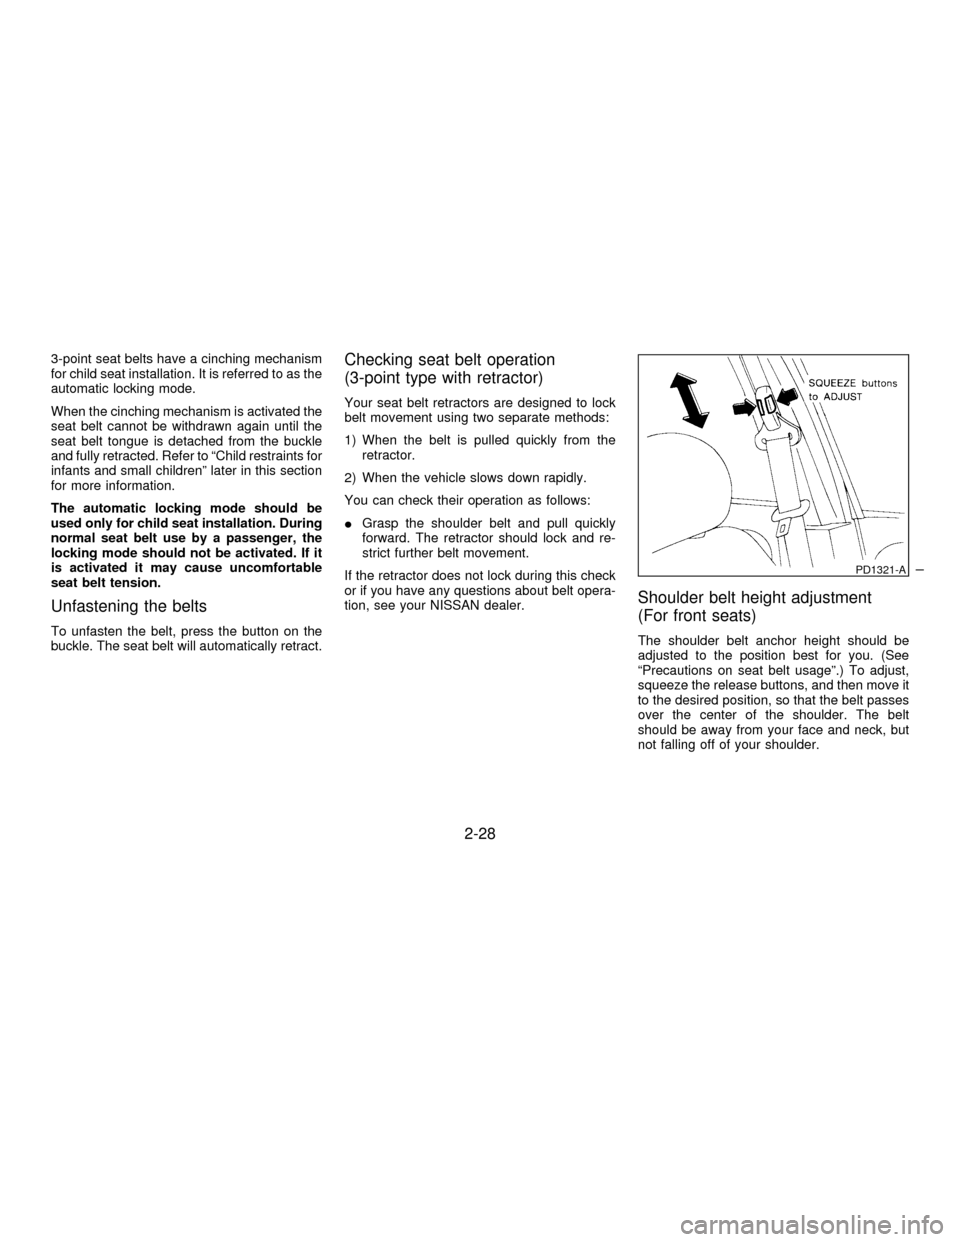
Shoulder belt height adjustment
(For front seats)
The shoulder belt anchor height should be
adjusted to the position best for you. (See
ªPrecautions on seat belt usageº.) To adjust,
squeeze the release buttons, and then move it
to the desired position, so that the belt passes
over the center of the shoulder. The belt
should be away from your face and neck, but
not falling off of your shoulder.
PD1321-A
2-28
Z01.2.1/A32-DX
Page 62 of 215
After adjustment, release the button and
check that it does not move up and
down to make sure the shoulder belt
anchor is securely fixed in position.
2-POINT TYPE WITHOUT
RETRACTOR (center position of
rear seat)
Selecting correct set of belts
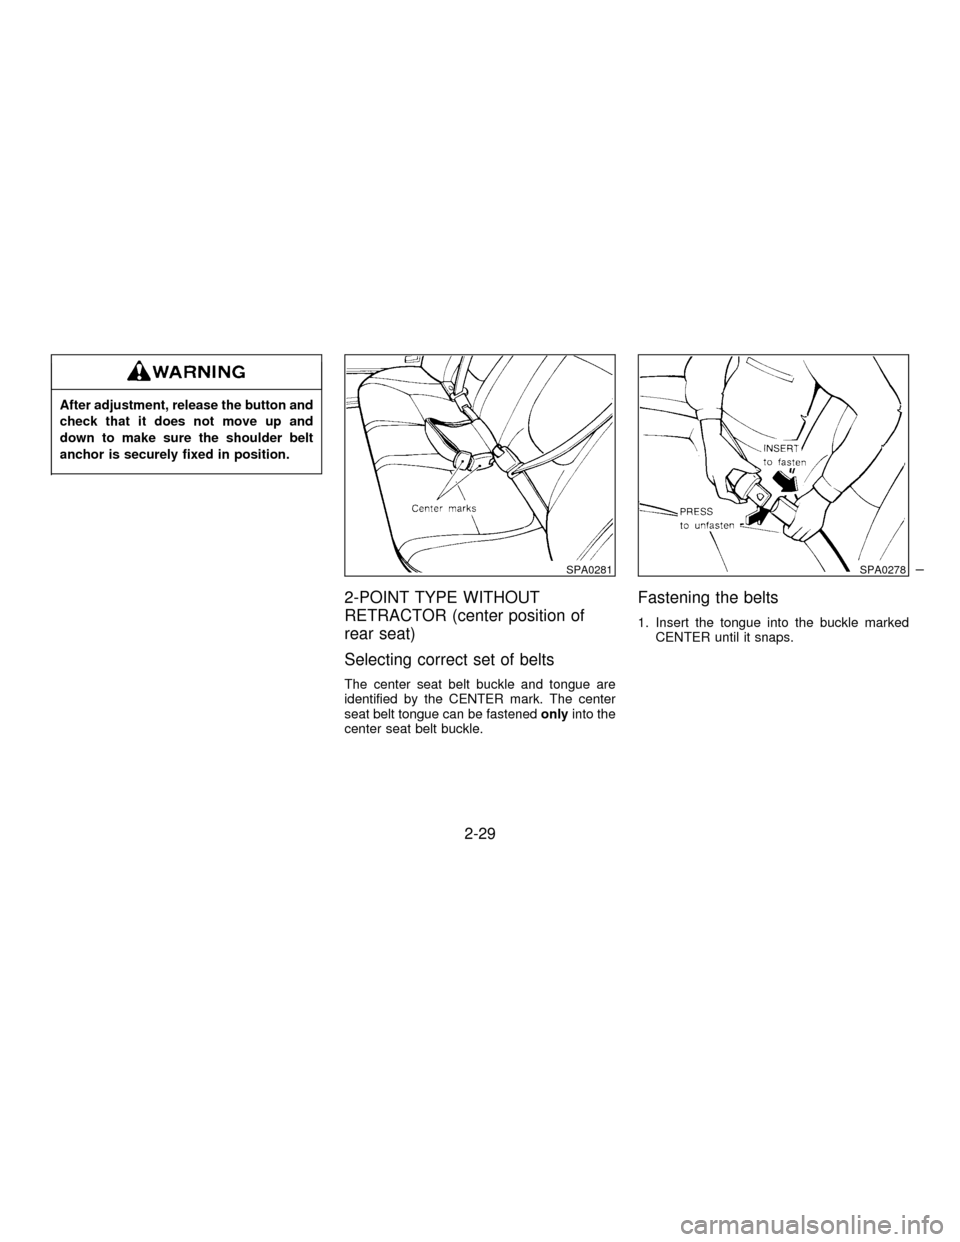
The center seat belt buckle and tongue are
identified by the CENTER mark. The center
seat belt tongue can be fastenedonlyinto the
center seat belt buckle.
Fastening the belts
1. Insert the tongue into the buckle marked
CENTER until it snaps.
SPA0281SPA0278
2-29
Z01.2.1/A32-DX
Page 63 of 215
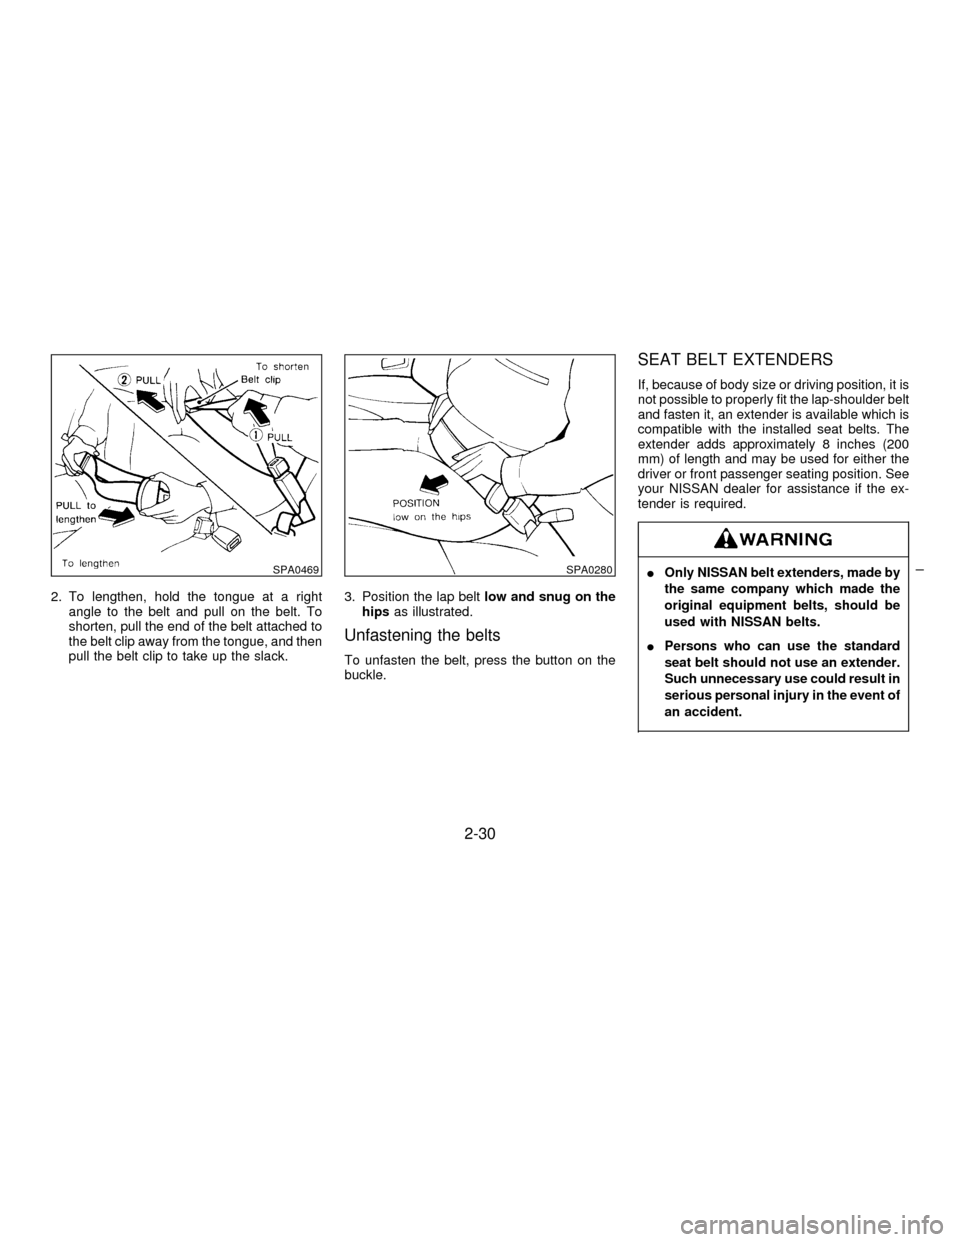
2. To lengthen, hold the tongue at a right
angle to the belt and pull on the belt. To
shorten, pull the end of the belt attached to
the belt clip away from the tongue, and then
pull the belt clip to take up the slack.3. Position the lap beltlow and snug on the
hipsas illustrated.
Unfastening the belts
To unfasten the belt, press the button on the
buckle.
SEAT BELT EXTENDERS
If, because of body size or driving position, it is
not possible to properly fit the lap-shoulder belt
and fasten it, an extender is available which is
compatible with the installed seat belts. The
extender adds approximately 8 inches (200
mm) of length and may be used for either the
driver or front passenger seating position. See
your NISSAN dealer for assistance if the ex-
tender is required.
IOnly NISSAN belt extenders, made by
the same company which made the
original equipment belts, should be
used with NISSAN belts.
IPersons who can use the standard
seat belt should not use an extender.
Such unnecessary use could result in
serious personal injury in the event of
an accident.SPA0469SPA0280
2-30
Z01.2.1/A32-DX
Page 64 of 215

SEAT BELT MAINTENANCE
ITo clean the seat belt webbings,apply a
mild soap solution or any solution recom-
mended for cleaning upholstery or carpets.
Then brush the webbing, wipe it with a cloth
and allow it to dry in the shade. Do not allow
the seat belts to retract until they are com-
pletely dry.
IIf dirt builds up in the shoulder belt guide of
the seat belt anchors, the seat belts may
retract slowly. Wipe the shoulder belt guide
with a clean, dry cloth.
IPeriodically check to see that the seat
belt and the metal componentssuch as
buckles, tongues, retractors, flexible wires
and anchors work properly. If loose parts,
deterioration, cuts or other damage on the
webbing is found, the entire belt assembly
should be replaced.
IInfants and small children should al-
ways be placed in an appropriate
child restraint while riding in the ve-
hicle. Failure to use a child restraint
can result in serious injury or death.
IChildren and infants should never be
carried on your lap. It is not possible
for even the strongest adult to resist
the forces of a severe accident. The
child could be crushed between the
adult and parts of the vehicle. Also,
do not put the same seat belt around
both your child and yourself.
INissan recommends that the child
restraint be installed in the rear seat.
According to accident statistics, chil-
dren are safer when properly re-
strained in the rear seat than in the
front seat.
IAn improperly installed child re-
straint could lead to serious injury or
death in an accident.
In general, child restraints are designed to beinstalled with a lap belt or the lap portion of a
three-point type seat belt.
Child restraints specially designed for infants
and small children are offered by several
manufacturers. When selecting any child re-
straint, keep the following points in mind:
1) Choose only a restraint with a label certify-
ing that it complies with Federal Motor
Vehicle Safety Standard 213 or Canadian
Motor Vehicle Safety Standard 213.
2) Check that child restraint in your vehicle to
be sure it is compatible with the vehicle's
seat and seat belt system. Choose a child
restraint that meets the guidelines of the
Society of Automotive Engineers recom-
mended practice J1819 for child restraint
installation.
3) If the child restraint is compatible with your
vehicle, place your child in the child re-
straint and check the various adjustments
to be sure the child restraint is compatible
with your child. Always follow all recom-
mended procedures.
All U.S. states and provinces of Canada
require that infants and small children be
restrained in approved child restraints at
all times while the vehicle is being oper-
ated.
CHILD RESTRAINTS FOR
INFANTS AND SMALL CHILDREN
2-31
Z01.2.1/A32-DX
Page 65 of 215
INever install a rear-facing child re-
straint in the front seat. An inflating
supplemental air bag could seriously
injure or kill your child. A rear-facing
child restraint must only be used in
the rear seat. See ªInstallation on
front passenger seatº for details.
IImproper use of a child restraint can
result in increased injuries for both
the infant or child and other occu-
pants in the vehicle.
IFollow all of the child restraint manu-
facturer's instructions for installation
and use. When purchasing a child
restraint, be sure to select one which
will fit your child and vehicle. It may
not be possible to properly install
some types of child restraints in your
vehicle.
IIf the child restraint is not anchored
properly, the risk of a child being
injured in a collision or a sudden stop
greatly increases.
IAdjustable seatbacks should be posi-tioned to fit the child restraint, but as
upright as possible.
IAfter attaching the child restraint,
test it before you place the child in it.
Tilt it from side to side. Try to tug it
forward and check to see if the belt
holds the restraint in place. If the
restraint is not secure, tighten the
belt as necessary, or put the restraint
in another seat and test it again.
IFor a front facing child restraint, if the
seat position where it is installed has
a 3-point type lap/shoulder belt,
check to make sure the shoulder belt
does not go in front of the child's face
or neck. If it does, put the shoulder
belt behind the child restraint.
IWhen your child restraint is not in
use, keep it secured with a seat belt
to prevent it from being thrown
around in case of a sudden stop or
accident.Remember that a child restraint left in a
closed vehicle can become very hot.
Check the seating surface and buckles
before placing your child in the child
restraint.
2-32
Z01.2.1/A32-DX
Page 66 of 215
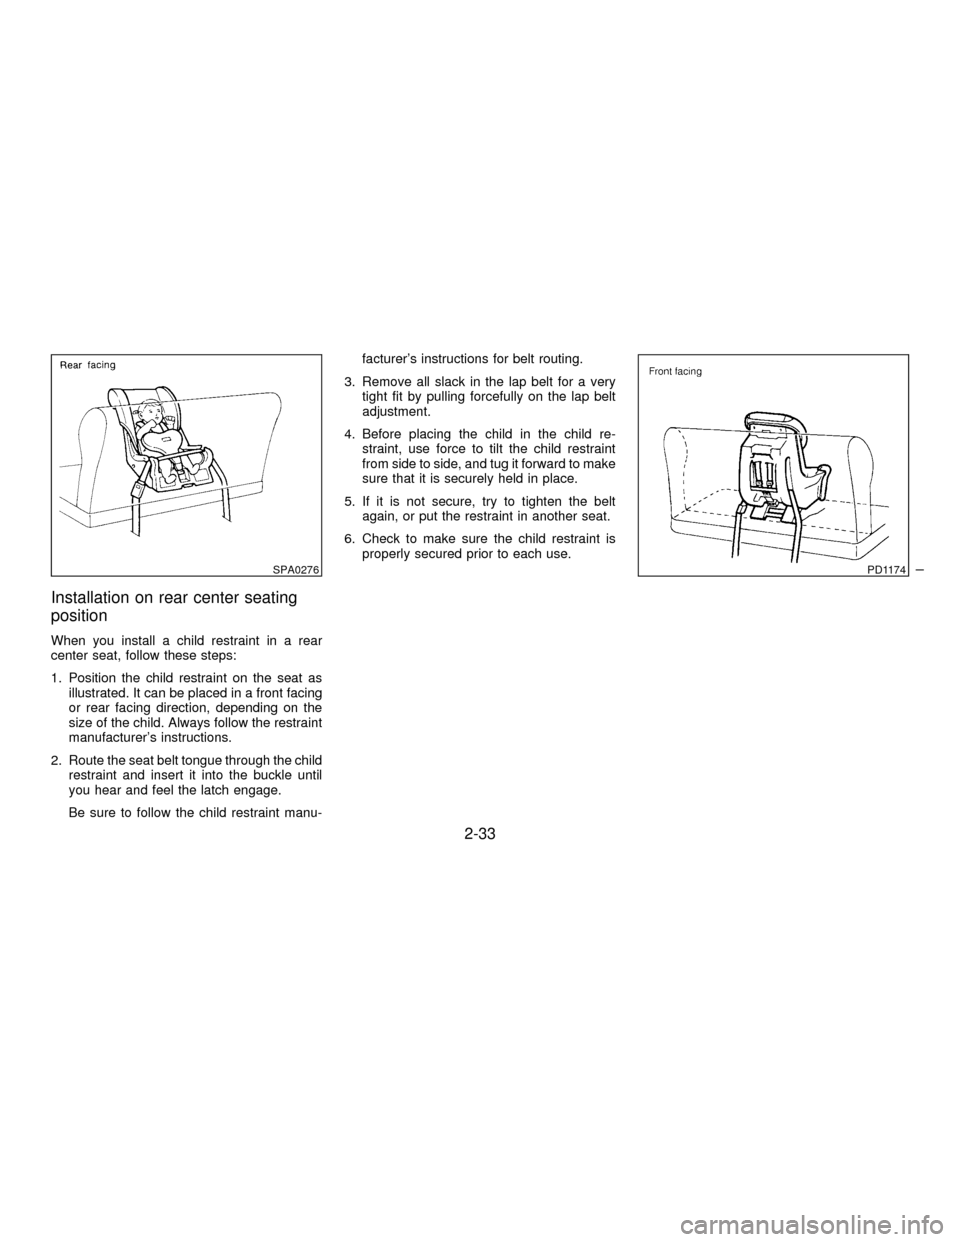
Installation on rear center seating
position
When you install a child restraint in a rear
center seat, follow these steps:
1. Position the child restraint on the seat as
illustrated. It can be placed in a front facing
or rear facing direction, depending on the
size of the child. Always follow the restraint
manufacturer's instructions.
2. Route the seat belt tongue through the child
restraint and insert it into the buckle until
you hear and feel the latch engage.
Be sure to follow the child restraint manu-facturer's instructions for belt routing.
3. Remove all slack in the lap belt for a very
tight fit by pulling forcefully on the lap belt
adjustment.
4. Before placing the child in the child re-
straint, use force to tilt the child restraint
from side to side, and tug it forward to make
sure that it is securely held in place.
5. If it is not secure, try to tighten the belt
again, or put the restraint in another seat.
6. Check to make sure the child restraint is
properly secured prior to each use.
SPA0276PD1174
2-33
Z01.2.1/A32-DX
Page 67 of 215
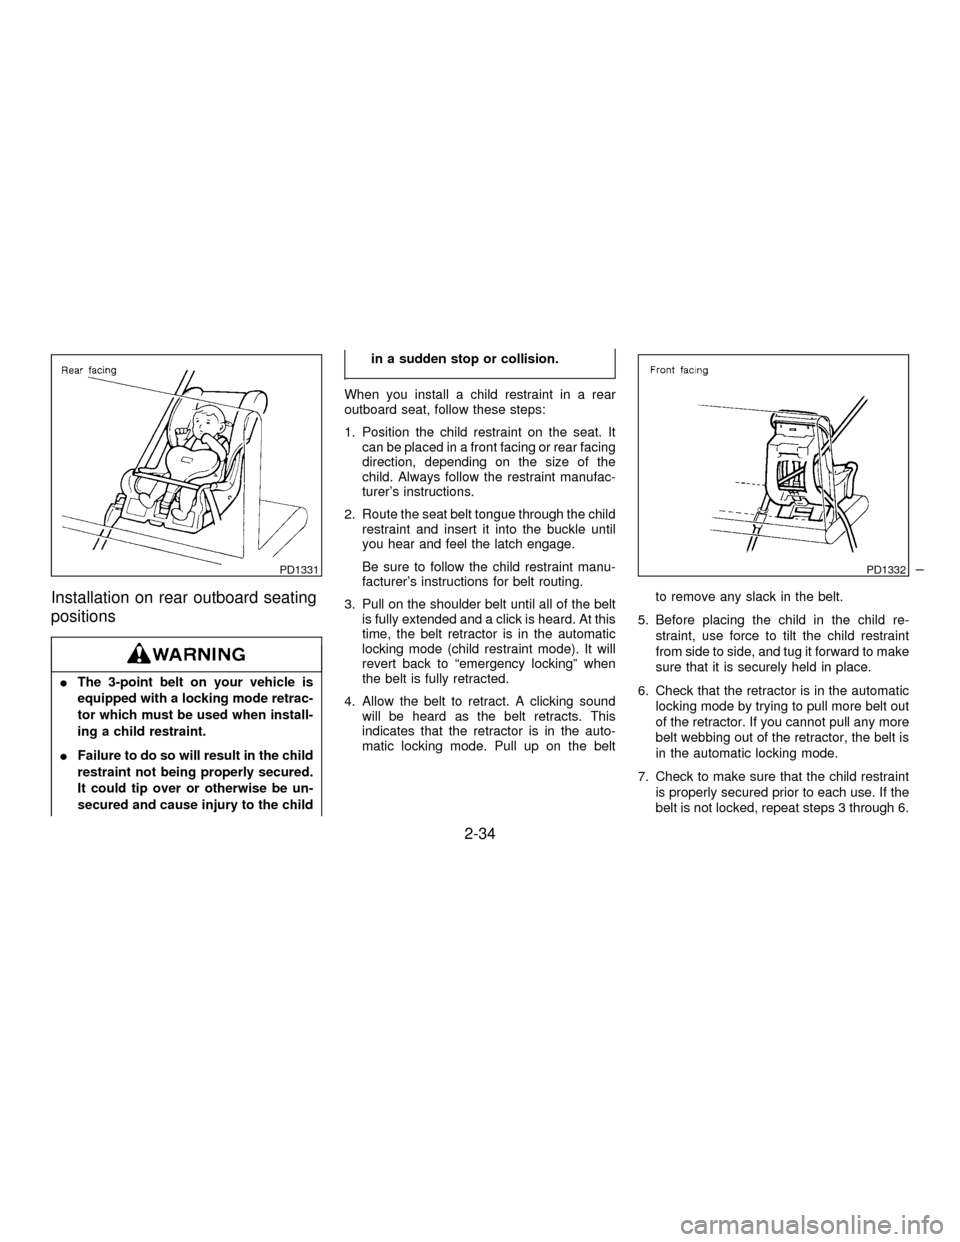
Installation on rear outboard seating
positions
IThe 3-point belt on your vehicle is
equipped with a locking mode retrac-
tor which must be used when install-
ing a child restraint.
IFailure to do so will result in the child
restraint not being properly secured.
It could tip over or otherwise be un-
secured and cause injury to the childin a sudden stop or collision.
When you install a child restraint in a rear
outboard seat, follow these steps:
1. Position the child restraint on the seat. It
can be placed in a front facing or rear facing
direction, depending on the size of the
child. Always follow the restraint manufac-
turer's instructions.
2. Route the seat belt tongue through the child
restraint and insert it into the buckle until
you hear and feel the latch engage.
Be sure to follow the child restraint manu-
facturer's instructions for belt routing.
3. Pull on the shoulder belt until all of the belt
is fully extended and a click is heard. At this
time, the belt retractor is in the automatic
locking mode (child restraint mode). It will
revert back to ªemergency lockingº when
the belt is fully retracted.
4. Allow the belt to retract. A clicking sound
will be heard as the belt retracts. This
indicates that the retractor is in the auto-
matic locking mode. Pull up on the beltto remove any slack in the belt.
5. Before placing the child in the child re-
straint, use force to tilt the child restraint
from side to side, and tug it forward to make
sure that it is securely held in place.
6. Check that the retractor is in the automatic
locking mode by trying to pull more belt out
of the retractor. If you cannot pull any more
belt webbing out of the retractor, the belt is
in the automatic locking mode.
7. Check to make sure that the child restraint
is properly secured prior to each use. If the
belt is not locked, repeat steps 3 through 6.
PD1331PD1332
2-34
Z01.2.1/A32-DX
Page 68 of 215
After the child restraint is removed and the
seat belt is allowed to wind back into the
retractor, the automatic locking mode (child
restraint mode) is canceled; the seat belt may
be used as normal and will only lock during a
sudden stop or impact.
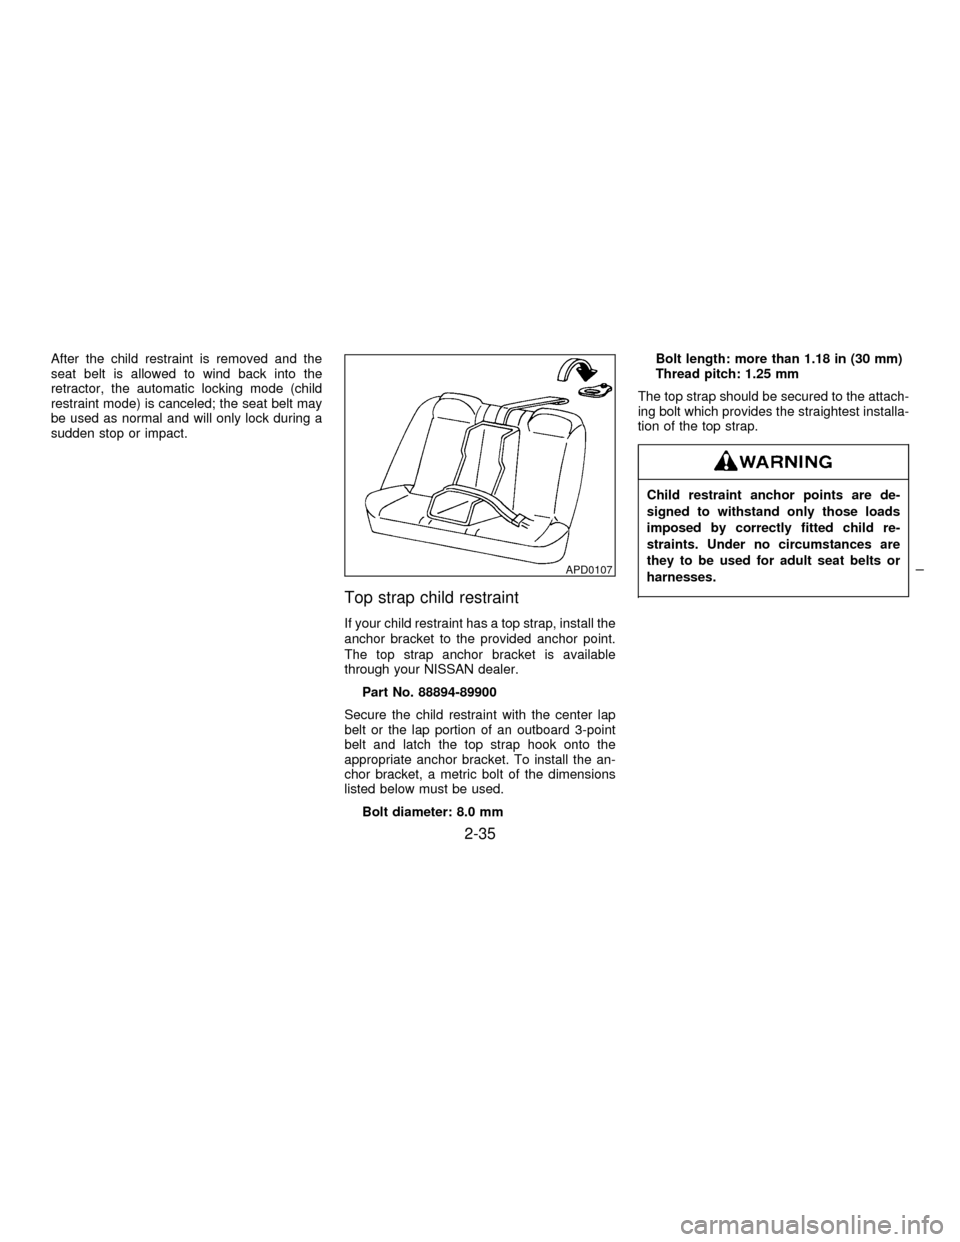
Top strap child restraint
If your child restraint has a top strap, install the
anchor bracket to the provided anchor point.
The top strap anchor bracket is available
through your NISSAN dealer.
Part No. 88894-89900
Secure the child restraint with the center lap
belt or the lap portion of an outboard 3-point
belt and latch the top strap hook onto the
appropriate anchor bracket. To install the an-
chor bracket, a metric bolt of the dimensions
listed below must be used.
Bolt diameter: 8.0 mmBolt length: more than 1.18 in (30 mm)
Thread pitch: 1.25 mm
The top strap should be secured to the attach-
ing bolt which provides the straightest installa-
tion of the top strap.
Child restraint anchor points are de-
signed to withstand only those loads
imposed by correctly fitted child re-
straints. Under no circumstances are
they to be used for adult seat belts or
harnesses.
APD0107
2-35
Z01.2.1/A32-DX
Page 69 of 215
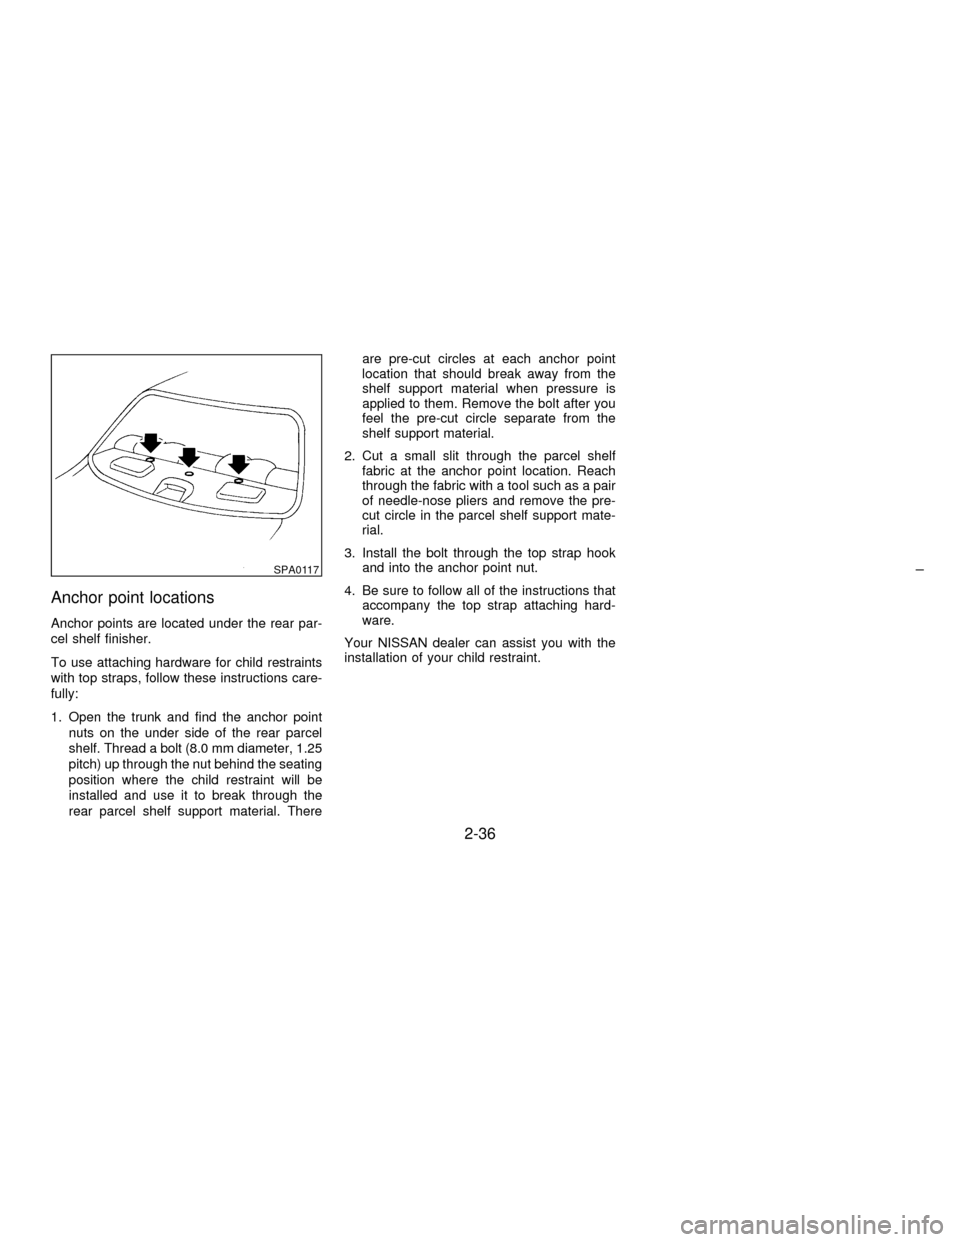
Anchor point locations
Anchor points are located under the rear par-
cel shelf finisher.
To use attaching hardware for child restraints
with top straps, follow these instructions care-
fully:
1. Open the trunk and find the anchor point
nuts on the under side of the rear parcel
shelf. Thread a bolt (8.0 mm diameter, 1.25
pitch) up through the nut behind the seating
position where the child restraint will be
installed and use it to break through the
rear parcel shelf support material. Thereare pre-cut circles at each anchor point
location that should break away from the
shelf support material when pressure is
applied to them. Remove the bolt after you
feel the pre-cut circle separate from the
shelf support material.
2. Cut a small slit through the parcel shelf
fabric at the anchor point location. Reach
through the fabric with a tool such as a pair
of needle-nose pliers and remove the pre-
cut circle in the parcel shelf support mate-
rial.
3. Install the bolt through the top strap hook
and into the anchor point nut.
4. Be sure to follow all of the instructions that
accompany the top strap attaching hard-
ware.
Your NISSAN dealer can assist you with the
installation of your child restraint.
SPA0117
2-36
Z01.2.1/A32-DX
Page 70 of 215
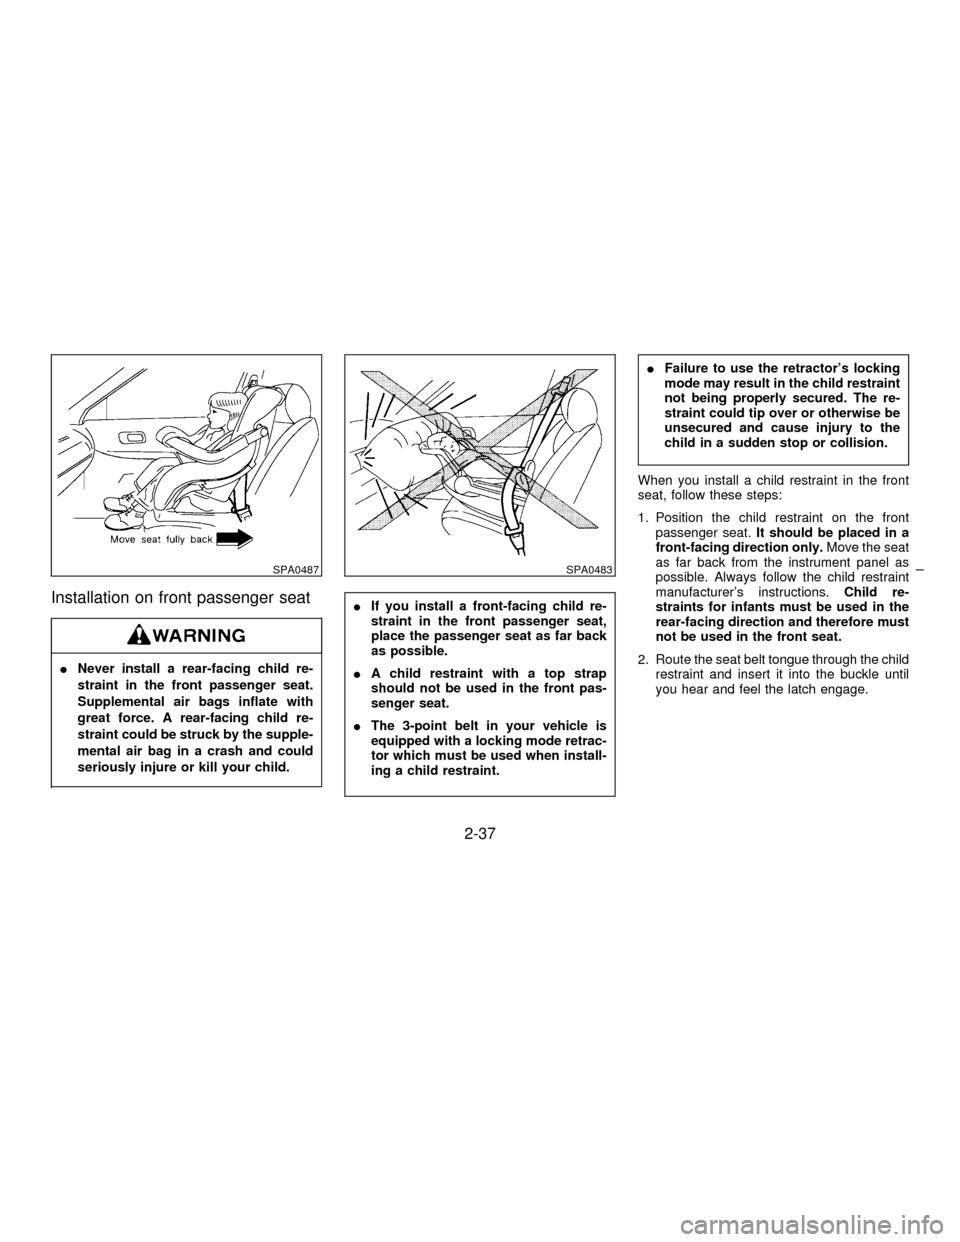
Installation on front passenger seat
INever install a rear-facing child re-
straint in the front passenger seat.
Supplemental air bags inflate with
great force. A rear-facing child re-
straint could be struck by the supple-
mental air bag in a crash and could
seriously injure or kill your child.
IIf you install a front-facing child re-
straint in the front passenger seat,
place the passenger seat as far back
as possible.
IA child restraint with a top strap
should not be used in the front pas-
senger seat.
IThe 3-point belt in your vehicle is
equipped with a locking mode retrac-
tor which must be used when install-
ing a child restraint.
IFailure to use the retractor's locking
mode may result in the child restraint
not being properly secured. The re-
straint could tip over or otherwise be
unsecured and cause injury to the
child in a sudden stop or collision.
When you install a child restraint in the front
seat, follow these steps:
1. Position the child restraint on the front
passenger seat.It should be placed in a
front-facing direction only.Move the seat
as far back from the instrument panel as
possible. Always follow the child restraint
manufacturer's instructions.Child re-
straints for infants must be used in the
rear-facing direction and therefore must
not be used in the front seat.
2. Route the seat belt tongue through the child
restraint and insert it into the buckle until
you hear and feel the latch engage.
SPA0487SPA0483
2-37
Z01.2.1/A32-DX