ECO mode NISSAN MAXIMA 2003 A33 / 5.G User Guide
[x] Cancel search | Manufacturer: NISSAN, Model Year: 2003, Model line: MAXIMA, Model: NISSAN MAXIMA 2003 A33 / 5.GPages: 247, PDF Size: 2.74 MB
Page 103 of 247

During this step, do not turn the ignition to
any positions other than ON.
4. Push the SET switch and, within 5 seconds,
push the memory switch 1 or 2 fully for at
least 1 second.
The indicator light for the pushed memory
switch will come on and stay on for approxi-
mately 5 seconds after pushing the switch.
After the indicator light goes off, the se-
lected positions are stored in the selected
memory (1 or 2).
If memory is stored in the same memory
switch, the previous memory will be de-
leted.
Confirming memory storageITurn the ignition ON and push the SET
switch. If the main memory has not been
stored, the indicator light will come on for
approximately 0.5 seconds. When the
memory has stored the position, the indica-
tor light will stay on for approximately 5
seconds.
IIf the battery cable is disconnected, or if the
fuse blows, the memory will be canceled. In
such a case, reset the desired positions
using the following procedures.
1. Open and close the driver's door more thantwo times with the ignition key in the LOCK
position.
2. Reset the desired position using the previ-
ous procedure.
Selecting the memorized position1. A/T models:
Set the automatic transmission selector le-
ver to the P (Park) position.
M/T models:
Apply the parking brake securely when the
vehicle is stopped.
2. Turn the ignition ON.
3. Push the memory switch 1 or 2 fully for at
least 1 second.
The driver's seat will move to the memo-
rized position with the indicator light flash-
ing. Then the light will stay on for approxi-
mately 5 seconds.
When memory switch 1 or 2 is pushed with the
driver's door open and then the key inserted
into the ignition switch within approximately 1
minute, the driver's seat will move to the
memorized position. Ð A/T models only
System operationThe automatic drive positioner system will not
work or will stop operating under the following
conditions:
Iwhen the vehicle speed is above 4 MPH (7
km/h).
Iwhen any two or more of the memory
switches are simultaneously pressed while
the automatic drive positioner is operating.
Iwhen the adjusting switch for the driver's
seat is turned on while the automatic drive
positioner is operating.
Iwhen the cancel switch located on the
instrument panel is pushed to cancel.
Iwhen the memory switch 1 or 2 is not
pushed for at least 1 second.
Iwhen the seat has already been moved to
the memorized position.
Iwhen no seat position is stored in the
memory switch.
Iwhen the parking brake is not applied. Ð
M/T models
Iwhen the vehicle speed is above 4 MPH (7
km/h) while the parking brake is applied. Ð
M/T models
To restart the drive positioner system,
3-18
Pre-driving checks and adjustments
Z
02.7.12/A33-D/V5.0
X
Page 108 of 247
WARNING
IThe air conditioner cooling function
operates only when the engine is run-
ning.
IDo not leave children, impaired
adults, or pets alone in your vehicle.
On hot, sunny days, temperatures in
a closed vehicle could quickly be-
come high enough to cause severe or
possibly fatal injuries to people oranimals.
IDo not use the recirculation mode for
long periods as it may cause the
interior air to become stale and the
windows to fog up.
IPositioning of the heating or air con-
ditioning controls should not be done
while driving, so full attention may be
given to vehicle operation.
CONTROLS
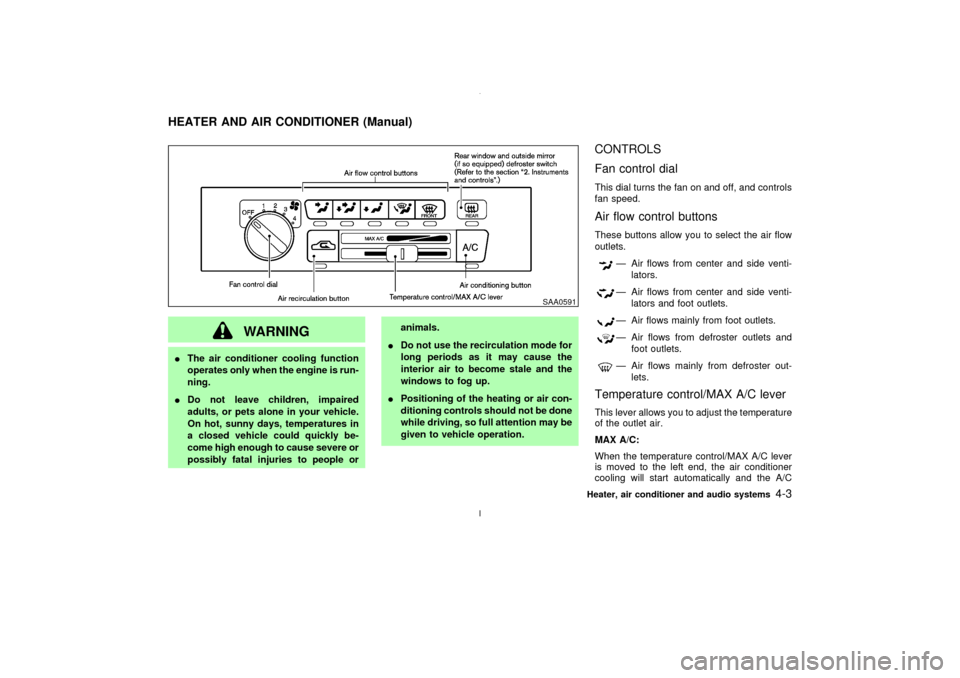
Fan control dialThis dial turns the fan on and off, and controls
fan speed.Air flow control buttonsThese buttons allow you to select the air flow
outlets.
Ð Air flows from center and side venti-
lators.Ð Air flows from center and side venti-
lators and foot outlets.Ð Air flows mainly from foot outlets.Ð Air flows from defroster outlets and
foot outlets.Ð Air flows mainly from defroster out-
lets.
Temperature control/MAX A/C leverThis lever allows you to adjust the temperature
of the outlet air.
MAX A/C:
When the temperature control/MAX A/C lever
is moved to the left end, the air conditioner
cooling will start automatically and the A/C
SAA0591
HEATER AND AIR CONDITIONER (Manual)
Heater, air conditioner and audio systems
4-3
Z
02.7.12/A33-D/V5.0
X
Page 114 of 247
WARNING
IThe air conditioner cooling function
operates only when the engine is run-ning.
IDo not leave children, impaired
adults, or pets alone in your vehicle.On hot, sunny days, temperatures in
a closed vehicle could quickly be-
come high enough to cause severe or
possibly fatal injuries to people or
animals.
IDo not use the recirculation mode for
long periods as it may cause the
interior air to become stale and the
windows to fog up.
IPositioning of the heating or air con-
ditioning controls should not be done
while driving, so full attention may be
given to vehicle operation.
Start the engine and operate the controls to
activate the air conditioner.
AUTOMATIC OPERATION
Cooling and/or dehumidified heating
(AUTO)This mode may be normally used all year
round as the system automatically works to
keep a constant temperature. Air flow distribu-
tion and fan speed are also controlled auto-
matically.
SAA0544A
HEATER AND AIR CONDITIONER
(Automatic) (if so equipped)
Heater, air conditioner and audio systems
4-9
Z
02.7.12/A33-D/V5.0
X
Page 115 of 247

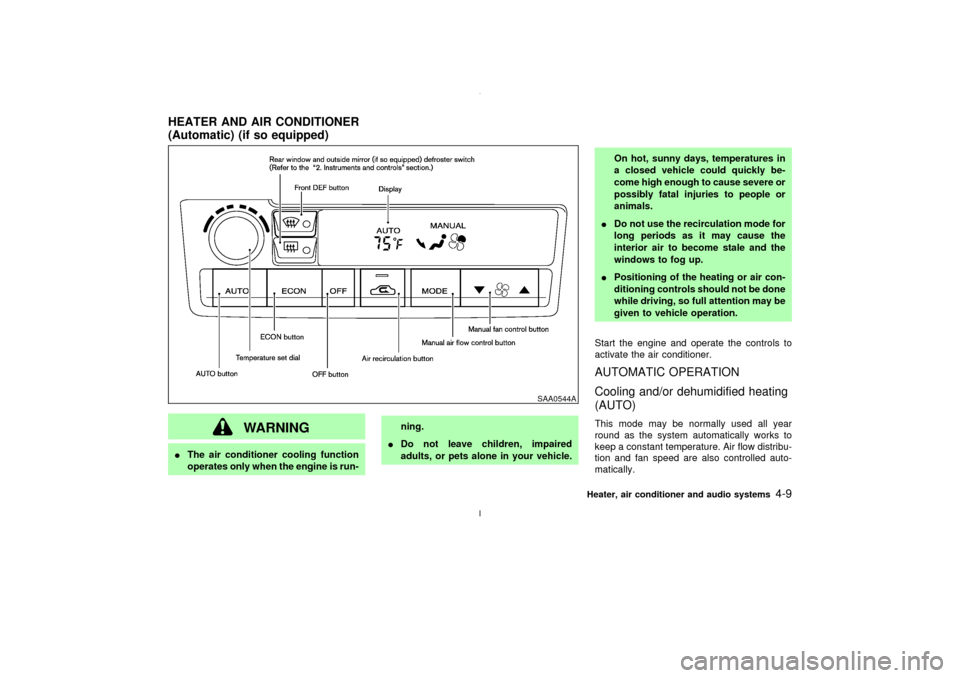
1. Push the AUTO button on. (AUTO will be
displayed.)
2. Turn the temperature set dial to the left or
right to set the desired temperature.
IAdjust the temperature set dial to about
75ÉF (24ÉC) for normal operation.
IThe temperature of the passenger compart-
ment will be maintained automatically. Air
flow distribution and fan speed are also
controlled automatically.Heating (ECON)The air conditioner does not activate. When
you need to heat only, use this mode.
1. Push the ECON (Economy) button on.
(ECON will be displayed.)
2. Turn the temperature set dial to the left or
right to set the desired temperature.
IThe temperature of the passenger compart-
ment will be maintained automatically. Air
flow distribution and fan speed are also
controlled automatically.
IDo not set the temperature lower than the
outside air temperature. Otherwise the sys-
tem may not work properly.
INot recommended if windows fog up.
Dehumidified defrosting or defogging1. Push the DEF button
on. (The indica-
tor light on the button will come on.)
2. Turn the temperature set dial to the left or
right to set the desired temperature.
ITo quickly remove ice from the outside of
the windows, push the manual fan control
button
and set to the maximum posi-
tion.
IAs soon as possible after the windshield is
clean, push the AUTO button to return to
the auto mode.
IWhen the DEF button
is pushed, the
air conditioner will automatically be turned
on at outside temperatures above 23ÉF
(þ5ÉC) to defog the windshield, and the air
recirculate mode will automatically be
turned off.
Outside air is drawn into the passenger
compartment to improve the defogging per-
formance.
MANUAL OPERATION
Fan speed controlPush the fan control button
to manually
control the fan speed.Push the AUTO button to return to automatic
control of the fan speed.
Air recirculationPush the air recirculation button
to recir-
culate interior air inside the vehicle. The indi-
cator light on the switch will come on.
Push it again to make the air inlet controlled
automatically (FRESH, REC/FRE and
RECIRCULATION). The indicator will go out.
The air recirculation button will not be acti-
vated when the air conditioner is in DEF mode.
Air flow controlPushing the manual air flow control button
selects the air outlet to:
: Air flows from center and side ventila-
tors.: Air flows from center and side ventila-
tors and foot outlets.: Air flows mainly from foot outlets.: Air flows from defroster and foot out-
lets.
To turn the system offPush the OFF button.
4-10
Heater, air conditioner and audio systems
Z
02.7.12/A33-D/V5.0
X
Page 121 of 247

FM-AM RADIO WITH CASSETTE
PLAYER AND COMPACT DISC
(CD) PLAYER/CD CHANGER
Audio main operationHead unit:
The radio has an FM diversity reception sys-
tem, which employs two antennas printed on
the rear window. This system automatically
switches to the antenna which is receiving less
interference.
The tape deck employs a permalloy head
which allows for improved reproduction of high
frequency ranges. Noise is also greatly re-
duced by the combined use of the Dolby NR
(Noise Reduction) system. The auto loudness
circuit enhances the low frequency range au-
tomatically in both radio reception and tape
and CD playback.
ON×OFF/Volume control:
Turn the ignition key to ACC or ON, and then
push the ON×OFF/VOL control knob while the
system is off to call up the mode (radio, tape or
CD) which was playing immediately before the
system was turned off. When no CD or tape is
loaded, the radio will come on. While the
system is on, pushing the ON×OFF/VOL con-
trol knob turns the system off.To turn the radio off, press the ON×OFF/VOL
control knob.
Turn the ON×OFF/VOL control knob to adjust
the volume.
This vehicle hasSpeed sensitive Control
Volume (SCV) for audio (type B only). The
audio volume changes as the driving speed
changes.
AUDIO button (BASS, TREBLE, FADER,
BALANCE, (SCV and NR (Dolby) Ð type B
only)):
Press the AUDIO button to change the select-
ing mode as follows.
BASS,TREBLE,FADER,BALANCE,
SCV (type B only),NR (when cassette
playing Ð type B only),BASS
To adjust BASS, Treble, Fader and Balance,
press the AUDIO button until the desired mode
BASS, TREBLE, FADER or BALANCE ap-
pears in the display. Press the TUNE (
)
or (
) button to adjust Bass and Treble to
the desired level. Use the
or
button
also to adjust Fader or Balance modes. Fader
adjusts the sound level between the front and
rear speakers and Balance adjusts the sound
between the right and left speakers.
To change the SCV mode to OFF, LOW, MIDor HIGH, press the
or
(TUNE) but-
ton (type B only).
To change the NR (Dolby) mode to OFF or
ON, press the
or
(TUNE) button
while cassette tape is playing. When Dolby is
ON, the display indicates the
mark.
After 10 seconds, the radio, cassette tape or
CD display reappears. Once the sound quality
is set to the desired level, press the AUDIO
button repeatedly until the radio, cassette tape
or CD display appears.
FM-AM radio operation
FM/AM band select:
Pushing the FM/AM band select button will
change the band as follows:
AM,FM1,FM2,AM
When FM/AM band select button is pushed
while the ignition switch is in the ACC or ON,
the radio will come on at the station last
played.
The last station played will also come on when
the power knob is turned to ON.
If a compact disc or tape is playing when the
FM/AM band select button is turned to ON, the
compact disc or tape will automatically be
4-16
Heater, air conditioner and audio systems
Z
02.7.12/A33-D/V5.0
X
Page 122 of 247
turned off and the last radio station played will
come on.
The FM stereo indicator ST will glow during
FM stereo reception. When the stereo broad-
cast signal is weak, the radio will automatically
change from stereo to monaural reception.
TUNE (Tuning):WARNING
The radio should not be tuned while
driving so full attention may be given to
vehicle operation.
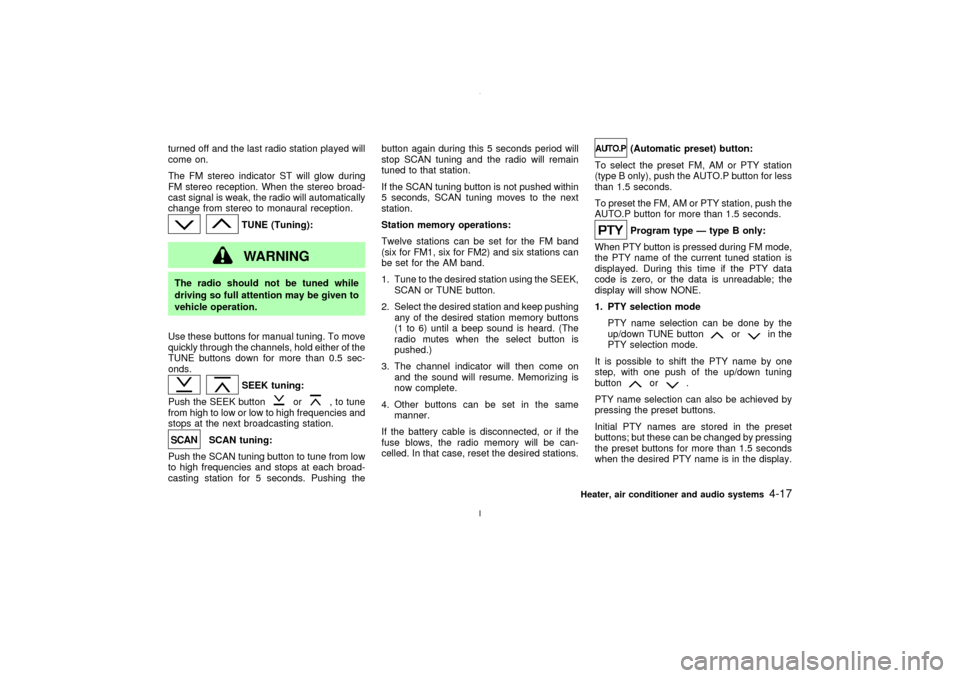
Use these buttons for manual tuning. To move
quickly through the channels, hold either of the
TUNE buttons down for more than 0.5 sec-
onds.
SEEK tuning:
Push the SEEK button
or
, to tune
from high to low or low to high frequencies and
stops at the next broadcasting station.
SCAN tuning:
Push the SCAN tuning button to tune from low
to high frequencies and stops at each broad-
casting station for 5 seconds. Pushing thebutton again during this 5 seconds period will
stop SCAN tuning and the radio will remain
tuned to that station.
If the SCAN tuning button is not pushed within
5 seconds, SCAN tuning moves to the next
station.
Station memory operations:
Twelve stations can be set for the FM band
(six for FM1, six for FM2) and six stations can
be set for the AM band.
1. Tune to the desired station using the SEEK,
SCAN or TUNE button.
2. Select the desired station and keep pushing
any of the desired station memory buttons
(1 to 6) until a beep sound is heard. (The
radio mutes when the select button is
pushed.)
3. The channel indicator will then come on
and the sound will resume. Memorizing is
now complete.
4. Other buttons can be set in the same
manner.
If the battery cable is disconnected, or if the
fuse blows, the radio memory will be can-
celled. In that case, reset the desired stations.
(Automatic preset) button:
To select the preset FM, AM or PTY station
(type B only), push the AUTO.P button for less
than 1.5 seconds.
To preset the FM, AM or PTY station, push the
AUTO.P button for more than 1.5 seconds.Program type Ð type B only:
When PTY button is pressed during FM mode,
the PTY name of the current tuned station is
displayed. During this time if the PTY data
code is zero, or the data is unreadable; the
display will show NONE.
1. PTY selection mode
PTY name selection can be done by the
up/down TUNE button
or
in the
PTY selection mode.
It is possible to shift the PTY name by one
step, with one push of the up/down tuning
button
or
.
PTY name selection can also be achieved by
pressing the preset buttons.
Initial PTY names are stored in the preset
buttons; but these can be changed by pressing
the preset buttons for more than 1.5 seconds
when the desired PTY name is in the display.
Heater, air conditioner and audio systems
4-17
Z
02.7.12/A33-D/V5.0
X
Page 123 of 247
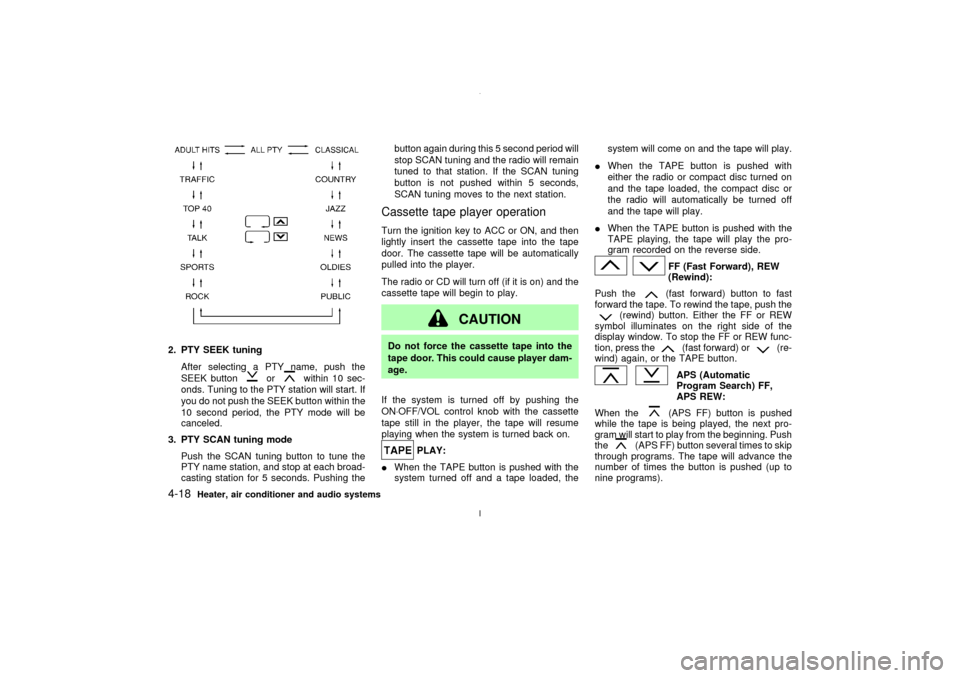
2. PTY SEEK tuning
After selecting a PTY name, push the
SEEK button
or
within 10 sec-
onds. Tuning to the PTY station will start. If
you do not push the SEEK button within the
10 second period, the PTY mode will be
canceled.
3. PTY SCAN tuning mode
Push the SCAN tuning button to tune the
PTY name station, and stop at each broad-
casting station for 5 seconds. Pushing thebutton again during this 5 second period will
stop SCAN tuning and the radio will remain
tuned to that station. If the SCAN tuning
button is not pushed within 5 seconds,
SCAN tuning moves to the next station.
Cassette tape player operationTurn the ignition key to ACC or ON, and then
lightly insert the cassette tape into the tape
door. The cassette tape will be automatically
pulled into the player.
The radio or CD will turn off (if it is on) and the
cassette tape will begin to play.
CAUTION
Do not force the cassette tape into the
tape door. This could cause player dam-
age.
If the system is turned off by pushing the
ON×OFF/VOL control knob with the cassette
tape still in the player, the tape will resume
playing when the system is turned back on.
PLAY:
IWhen the TAPE button is pushed with the
system turned off and a tape loaded, thesystem will come on and the tape will play.
IWhen the TAPE button is pushed with
either the radio or compact disc turned on
and the tape loaded, the compact disc or
the radio will automatically be turned off
and the tape will play.
IWhen the TAPE button is pushed with the
TAPE playing, the tape will play the pro-
gram recorded on the reverse side.
FF (Fast Forward), REW
(Rewind):
Push the(fast forward) button to fast
forward the tape. To rewind the tape, push the
(rewind) button. Either the FF or REW
symbol illuminates on the right side of the
display window. To stop the FF or REW func-
tion, press the
(fast forward) or
(re-
wind) again, or the TAPE button.
APS (Automatic
Program Search) FF,
APS REW:
When the(APS FF) button is pushed
while the tape is being played, the next pro-
gram will start to play from the beginning. Push
the
(APS FF) button several times to skip
through programs. The tape will advance the
number of times the button is pushed (up to
nine programs).
4-18
Heater, air conditioner and audio systems
Z
02.7.12/A33-D/V5.0
X
Page 127 of 247

DISPLAY CD TEXT:
To indicate the CD mode text, push the PTY
button during CD playing.
To change the indicated text, push the PTY
button.
The text will change as follows:If the text is more than 10 letters, push the
AUTOP button to display the remaining text.
(Type B only)
CD EJECT:
When the CD EJECT button is pushed with the
compact disc loaded, the compact disc will be
ejected.
To eject the discs selected by the EJECT
button, push it for less than 1.5 seconds.
To eject all the discs, push the EJECT button
for more than 1.5 seconds.
When this button is pushed while the compact
disc is being played, the compact disc will
come out and the system will turn off.
If the compact disc comes out and is notremoved, it will be pulled back into the slot
to protect it. (except 8 cm diameter com-
pact discs)
CD IN indicator:
CD IN indicator appears on the display when
the CD is loaded with the system on.
4-22
Heater, air conditioner and audio systems
Z
02.7.12/A33-D/V5.0
X
Page 128 of 247
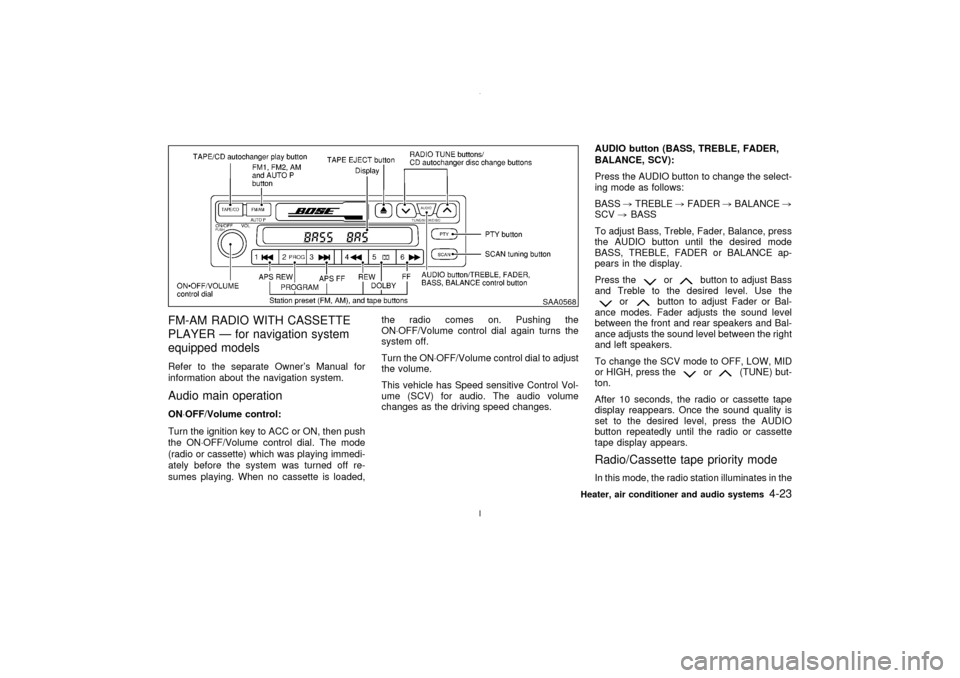
FM-AM RADIO WITH CASSETTE
PLAYER Ð for navigation system
equipped modelsRefer to the separate Owner's Manual for
information about the navigation system.Audio main operationON×OFF/Volume control:
Turn the ignition key to ACC or ON, then push
the ON×OFF/Volume control dial. The mode
(radio or cassette) which was playing immedi-
ately before the system was turned off re-
sumes playing. When no cassette is loaded,the radio comes on. Pushing the
ON×OFF/Volume control dial again turns the
system off.
Turn the ON×OFF/Volume control dial to adjust
the volume.
This vehicle has Speed sensitive Control Vol-
ume (SCV) for audio. The audio volume
changes as the driving speed changes.AUDIO button (BASS, TREBLE, FADER,
BALANCE, SCV):
Press the AUDIO button to change the select-
ing mode as follows:
BASS,TREBLE,FADER,BALANCE,
SCV,BASS
To adjust Bass, Treble, Fader, Balance, press
the AUDIO button until the desired mode
BASS, TREBLE, FADER or BALANCE ap-
pears in the display.
Press the
or
button to adjust Bass
and Treble to the desired level. Use the
or
button to adjust Fader or Bal-
ance modes. Fader adjusts the sound level
between the front and rear speakers and Bal-
ance adjusts the sound level between the right
and left speakers.
To change the SCV mode to OFF, LOW, MID
or HIGH, press the
or
(TUNE) but-
ton.
After 10 seconds, the radio or cassette tape
display reappears. Once the sound quality is
set to the desired level, press the AUDIO
button repeatedly until the radio or cassette
tape display appears.
Radio/Cassette tape priority modeIn this mode, the radio station illuminates in the
SAA0568
Heater, air conditioner and audio systems
4-23
Z
02.7.12/A33-D/V5.0
X
Page 129 of 247
display during radio operation. During cassette
tape operation, TAPE illuminates in the dis-
play.FM-AM radio operation
FM-AM band select and AUTO P:
Pushing the FM-AM band select button will
change the band as follows:
AM,AM (preset station),FM1,FM2,
FM (preset station),AM
When FM/AM band select button is pushed
while the ignition switch is in the ACC or ON,
the radio will come on at the station last
played.
The last station played will also come on when
the power knob is turned to ON.
If a compact disc or tape is playing when the
FM/AM band select button is turned to ON, the
compact disc or tape will automatically be
turned off and the last radio station played will
come on.
To preset (AUTO.P) the AM or FM station,
push the FM/AM button for more than 1.5
seconds.
The FM stereo indicator, ST illuminates during
FM stereo reception. When the stereo broad-
cast signal is weak, the radio automaticallychanges from stereo to monaural reception.
TUNE (Tuning):WARNING
The radio should not be tuned while
driving so full attention may be given to
vehicle operation.
Use these buttons for manual tuning. To move
quickly through the channels, hold either of the
TUNE buttons down for more than 0.5 sec-
onds.
SCAN tuning:
Push the SCAN tuning button and SCAN will
illuminate in the display window. SCAN tuning
begins from high to low or low to high frequen-
cies and stops at each broadcasting station for
5 seconds. Pushing the button again during
this 5 second period stops SCAN tuning and
the radio remains tuned to that station.
If any of the SCAN tuning buttons are not
pushed within 5 seconds, SCAN tuning moves
to the next station.
Station memory (and preset) operations:
Twelve stations can be set for the FM band(six for FM1, six for FM2) and six stations can
be set for the AM band.
1. Tune to the desired station using the SCAN
or TUNE buttons.
2. Select the desired station and keep pushing
any of the desired station memory buttons
(1 to 6) until a beep sound is heard. The
radio mutes when the select button is
pushed.)
3. The channel indicator will come on and the
sound will resume. Memorizing is now com-
plete.
4. Other station select buttons can be set in
the same manner.
If the battery cable is disconnected, or if the
radio fuse opens, the radio memory is can-
celled. In that case, reset the desired stations.
Program type:
When PTY button is pressed during FM mode,
the PTY name of the current tuned station is
displayed. During this time if the PTY data
code is zero, or the data is unreadable; the
display will show NONE.
1. PTY selection mode
PTY name selection can be done by the
4-24
Heater, air conditioner and audio systems
Z
02.7.12/A33-D/V5.0
X