automatic transmission NISSAN MAXIMA 2010 Owner´s Manual
[x] Cancel search | Manufacturer: NISSAN, Model Year: 2010, Model line: MAXIMA, Model: NISSAN MAXIMA 2010Pages: 457, PDF Size: 4.66 MB
Page 157 of 457
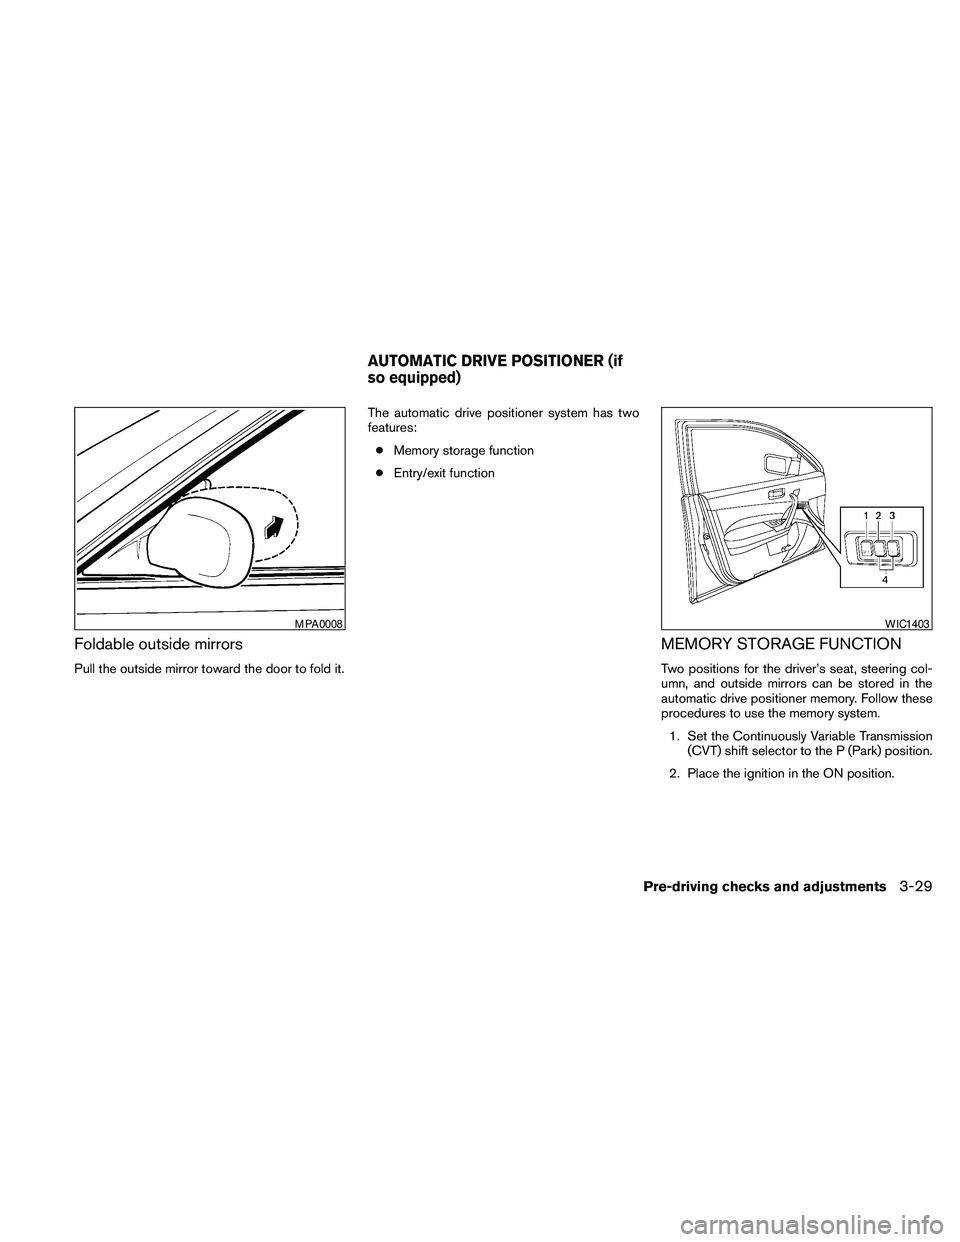
Foldable outside mirrors
Pull the outside mirror toward the door to fold it.The automatic drive positioner system has two
features:
cMemory storage function
cEntry/exit function
MEMORY STORAGE FUNCTION
Two positions for the driver’s seat, steering col-
umn, and outside mirrors can be stored in the
automatic drive positioner memory. Follow these
procedures to use the memory system.
1. Set the Continuously Variable Transmission
(CVT) shift selector to the P (Park) position.
2. Place the ignition in the ON position.
MPA0008WIC1403
AUTOMATIC DRIVE POSITIONER (if
so equipped)
Pre-driving checks and adjustments3-29
Page 340 of 457
WARNING
cDo not depress the accelerator pedal
while shifting from P (Park) or N (Neu-
tral) to R (Reverse) , D (Drive) , Ds (Drive
Sport) or (M) Manual shift mode. Al-
ways depress the brake pedal until
shifting is completed. Failure to do so
could cause you to lose control and
have an accident.
cCold engine idle speed is high, so use
caution when shifting into a forward or
reverse gear before the engine has
warmed up.
cDo not downshift abruptly on slippery
roads. This may cause a loss of control.
cNever shift to P (Park) or R (Reverse)
while the vehicle is moving. This could
cause an accident.
CAUTION
When stopping the vehicle on an uphill
grade, do not hold the vehicle by depress-
ing the accelerator pedal. The foot brake
should be used for this purpose.
The CVT in your vehicle is electronically con-
trolled to produce maximum power and smooth
operation.The CVT can operate in two different automatic
drive modes:
cD (Drive) mode - Move the shift selector to D
(Drive) , the transmission is in the normal
forward automatic driving mode. The posi-
tion indicator in the meter shows a “D”. The
D (Drive) mode does not produce a gear
change sensation like a traditional automatic
transmission.
cDs (Drive Sport) mode - Move the shift se-
lector over from D (Drive) to the left into the
manual shift gate. The position indicator in
the meter shows a “Ds”. In Ds (Drive Sport)
mode, transmission operation changes to
9Sporty” driving shift operation, creating a
more aggressive acceleration feeling than
the D (Drive) mode and a gear change sen-
sation when the driver accelerates quickly.
When the driver selects M (Manual) mode
ratio with shift selector or shift paddles (if so
equipped) during Ds (Drive Sport) mode
operation, the driver must move the shift
selector from Ds mode to D mode and back
again to re-select Ds (Drive Sport) mode.
cTo cancel the Ds mode, return the shift se-
lector to the D (Drive) position. The trans-
mission returns to the automatic drive mode.The CVT can operate in two manual drive modes:
cM (Manual) mode - With the shift selector in
the manual shift gate Ds (Drive Sport) mode,
M (Manual) mode can be selected by mov-
ing the shift selector up (+) or down (–) or
using the shift paddles (if so equipped) up
(+) or down (–) . In M mode, the transmission
will produce noticeable upshifts and down-
shifts. The position indicator in the meter
shows a “M”.
cTemporary M (Manual) shift mode - With the
shift selector in the D (Drive) mode and if the
shift paddle is moved + (up) or - (down) , the
transmission will temporarily switch to the M
(Manual) mode. If the shift paddles are not
used after5-10seconds, the transmission
will return to the D (Drive) mode.
cTo cancel the M (Manual) mode and return to
the D (Drive) mode, press and hold either
shift paddle for3-5seconds.
Follow these procedures for maximum vehicle
performance and driving enjoyment.
5-12Starting and driving
Page 341 of 457
NOTE:
Engine power may be automatically re-
duced to protect the CVT if the engine
speed increases quickly when driving on
slippery roads or while being tested on
some dynamometers.
Starting the vehicle
1. After starting the engine, fully depress the
foot brake pedal before moving the shift
selector out of the P (Park) position.
2. Keep the foot brake pedal depressed and
move the shift selector into a driving gear.
3. Release the foot brake, then gradually start
the vehicle in motion.
4. Stop the vehicle completely before shifting
the shift selector to the P (Park) position.
The CVT is designed so the foot brake
pedal MUST be depressed before shifting
from P (Park) to any drive position while
the ignition switch is in the ON position.
The shift selector cannot be moved out of P
(Park) and into any of the other gear posi-
tions if the ignition switch is pushed to the
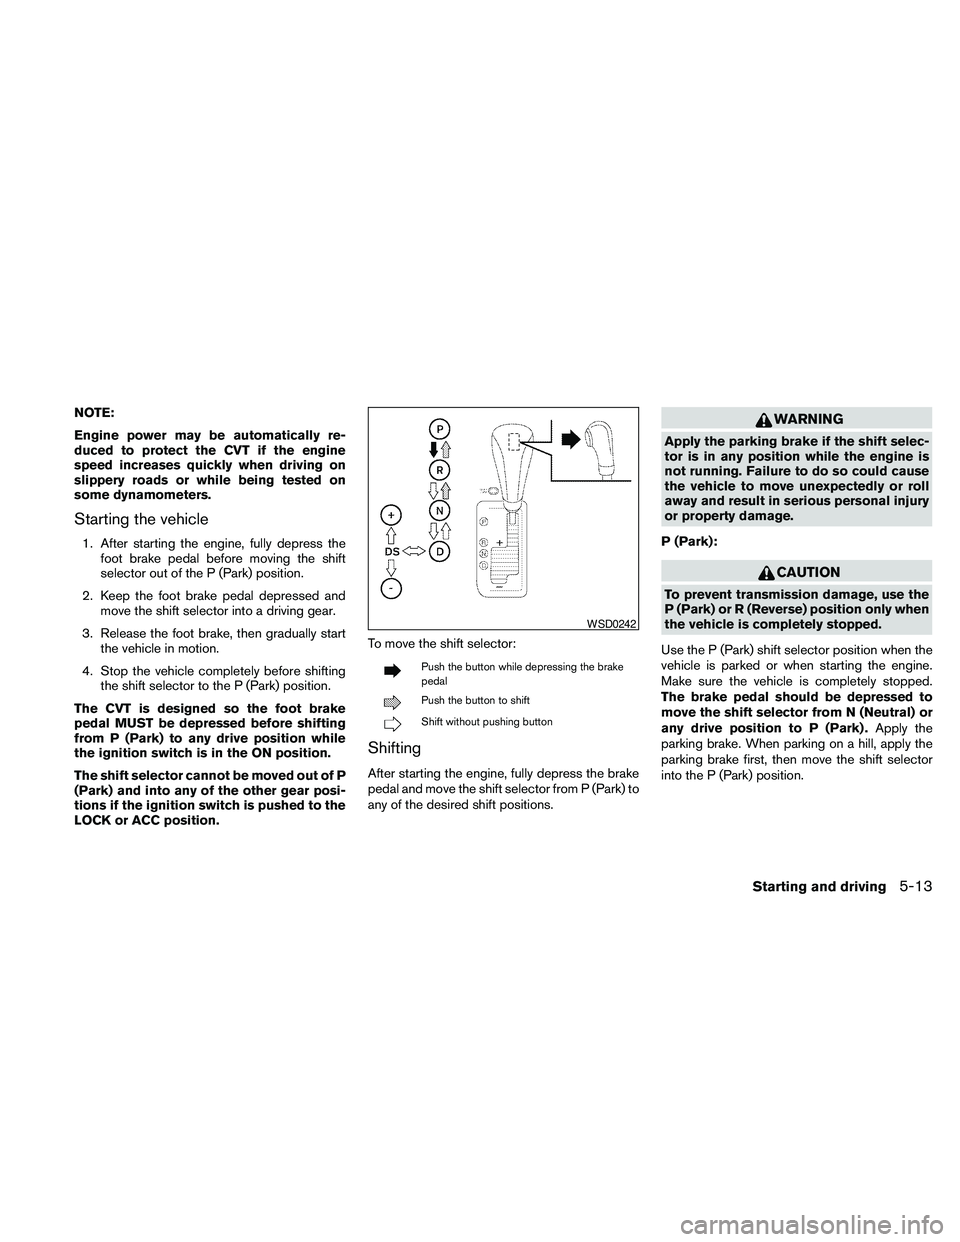
LOCK or ACC position.To move the shift selector:
Push the button while depressing the brake
pedal
Push the button to shift
Shift without pushing button
Shifting
After starting the engine, fully depress the brake
pedal and move the shift selector from P (Park) to
any of the desired shift positions.
WARNING
Apply the parking brake if the shift selec-
tor is in any position while the engine is
not running. Failure to do so could cause
the vehicle to move unexpectedly or roll
away and result in serious personal injury
or property damage.
P (Park):
CAUTION
To prevent transmission damage, use the
P (Park) or R (Reverse) position only when
the vehicle is completely stopped.
Use the P (Park) shift selector position when the
vehicle is parked or when starting the engine.
Make sure the vehicle is completely stopped.
The brake pedal should be depressed to
move the shift selector from N (Neutral) or
any drive position to P (Park) .Apply the
parking brake. When parking on a hill, apply the
parking brake first, then move the shift selector
into the P (Park) position.
WSD0242
Starting and driving5-13
Page 342 of 457
R (Reverse):
CAUTION
To prevent transmission damage, use the
P (Park) or R (Reverse) position only when
the vehicle is completely stopped.
Use the R (Reverse) position to back up. Make
sure the vehicle is completely stopped before
selecting the R (Reverse) position.The brake
pedal must be depressed to move the shift
selector from P (Park) , N (Neutral) or any
drive position to R (Reverse) .
N (Neutral):
Neither forward nor reverse gear is engaged. The
engine can be started in this position. You may
shift to N (Neutral) and restart a stalled engine
while the vehicle is moving.
D (Drive):
Use this position for all normal forward driving.Ds (Drive sport):
When the selector lever is shifted from the D
(Drive) position to the manual shift gate, the
transmission enters the Ds (Drive Sport) mode.
Moving the shift selector to the DS (Drive Sport)
position allows smooth acceleration or decelera-
tion on a hilly road by moving in a lower gear
automatically. When canceling the Ds mode, re-
turn the shift selector to the D (Drive) position.
The transmission returns to the normal driving
mode.
Manual shift mode
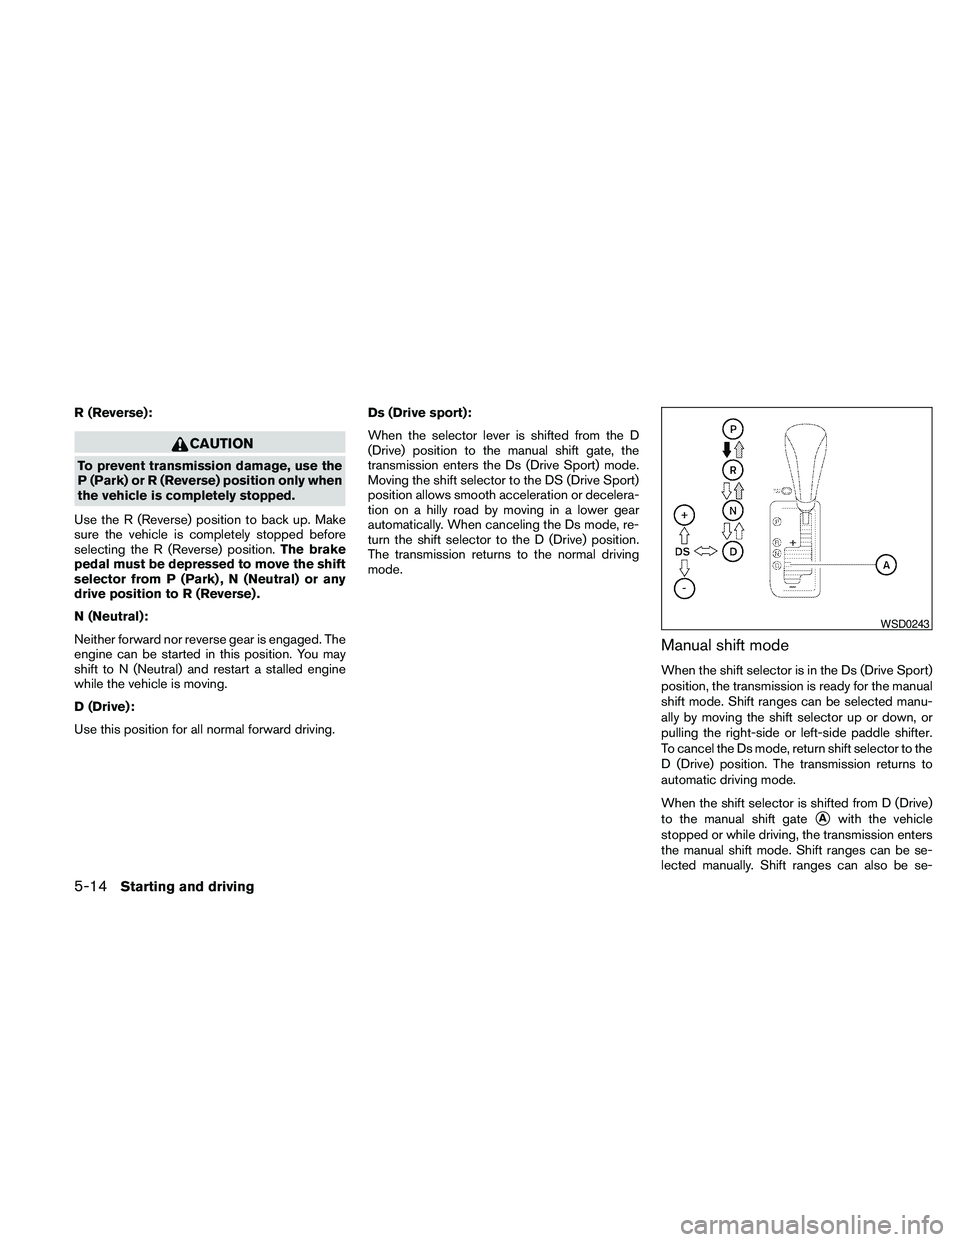
When the shift selector is in the Ds (Drive Sport)
position, the transmission is ready for the manual
shift mode. Shift ranges can be selected manu-
ally by moving the shift selector up or down, or
pulling the right-side or left-side paddle shifter.
To cancel the Ds mode, return shift selector to the
D (Drive) position. The transmission returns to
automatic driving mode.
When the shift selector is shifted from D (Drive)
to the manual shift gate
sAwith the vehicle
stopped or while driving, the transmission enters
the manual shift mode. Shift ranges can be se-
lected manually. Shift ranges can also be se-
WSD0243
5-14Starting and driving
Page 343 of 457
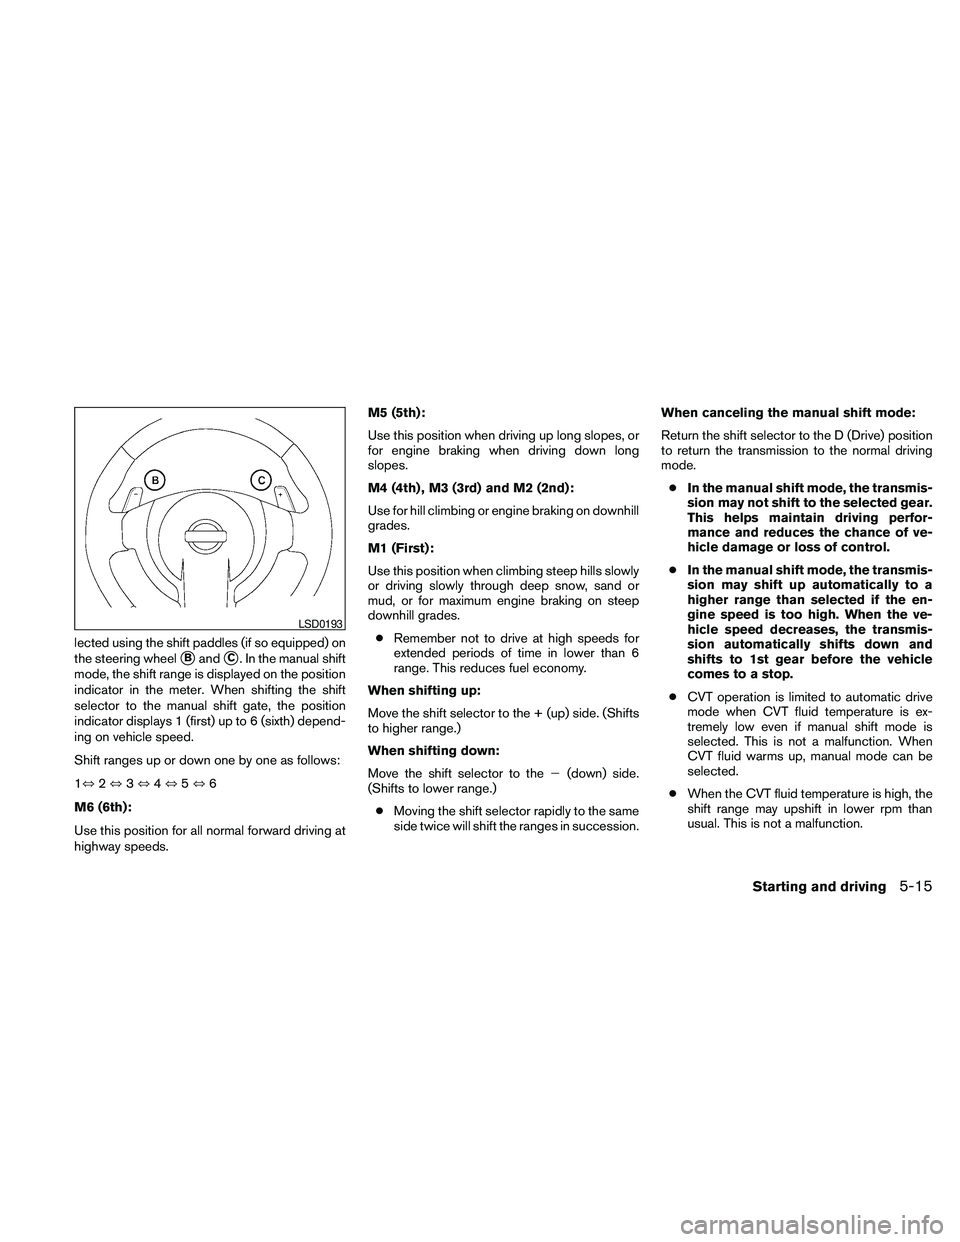
lected using the shift paddles (if so equipped) on
the steering wheel
sBandsC. In the manual shift
mode, the shift range is displayed on the position
indicator in the meter. When shifting the shift
selector to the manual shift gate, the position
indicator displays 1 (first) up to 6 (sixth) depend-
ing on vehicle speed.
Shift ranges up or down one by one as follows:
1,2,3,4,5,6
M6 (6th):
Use this position for all normal forward driving at
highway speeds.M5 (5th):
Use this position when driving up long slopes, or
for engine braking when driving down long
slopes.
M4 (4th) , M3 (3rd) and M2 (2nd):
Use for hill climbing or engine braking on downhill
grades.
M1 (First):
Use this position when climbing steep hills slowly
or driving slowly through deep snow, sand or
mud, or for maximum engine braking on steep
downhill grades.
cRemember not to drive at high speeds for
extended periods of time in lower than 6
range. This reduces fuel economy.
When shifting up:
Move the shift selector to the + (up) side. (Shifts
to higher range.)
When shifting down:
Move the shift selector to the2(down) side.
(Shifts to lower range.)
cMoving the shift selector rapidly to the same
side twice will shift the ranges in succession.When canceling the manual shift mode:
Return the shift selector to the D (Drive) position
to return the transmission to the normal driving
mode.
cIn the manual shift mode, the transmis-
sion may not shift to the selected gear.
This helps maintain driving perfor-
mance and reduces the chance of ve-
hicle damage or loss of control.
cIn the manual shift mode, the transmis-
sion may shift up automatically to a
higher range than selected if the en-
gine speed is too high. When the ve-
hicle speed decreases, the transmis-
sion automatically shifts down and
shifts to 1st gear before the vehicle
comes to a stop.
cCVT operation is limited to automatic drive
mode when CVT fluid temperature is ex-
tremely low even if manual shift mode is
selected. This is not a malfunction. When
CVT fluid warms up, manual mode can be
selected.
cWhen the CVT fluid temperature is high, the
shift range may upshift in lower rpm than
usual. This is not a malfunction.
LSD0193
Starting and driving5-15
Page 344 of 457
Shift lock release
If the battery charge is low or discharged, the
shift selector may not be moved from the P (Park)
position even with the brake pedal depressed
and the shift selector button pushed.
For models with a steering lock mechanism: If the
battery is discharged completely, the steering
wheel cannot be locked or unlocked. Do not
move the vehicle with the steering wheel locked.
It will be necessary to jump start or have your
battery charged, see “Jump starting” in the “In
case of emergency” section. Contact your
NISSAN dealer or a professional towing service.It will be necessary to jump start or have your
battery charged, see “Jump starting” in the “In
case of emergency” section. Contact your
NISSAN dealer or a professional towing service.
To move the shift selector, complete the following
procedure:
1. Push the ignition switch to the LOCK posi-
tion.
2. Apply the parking brake.
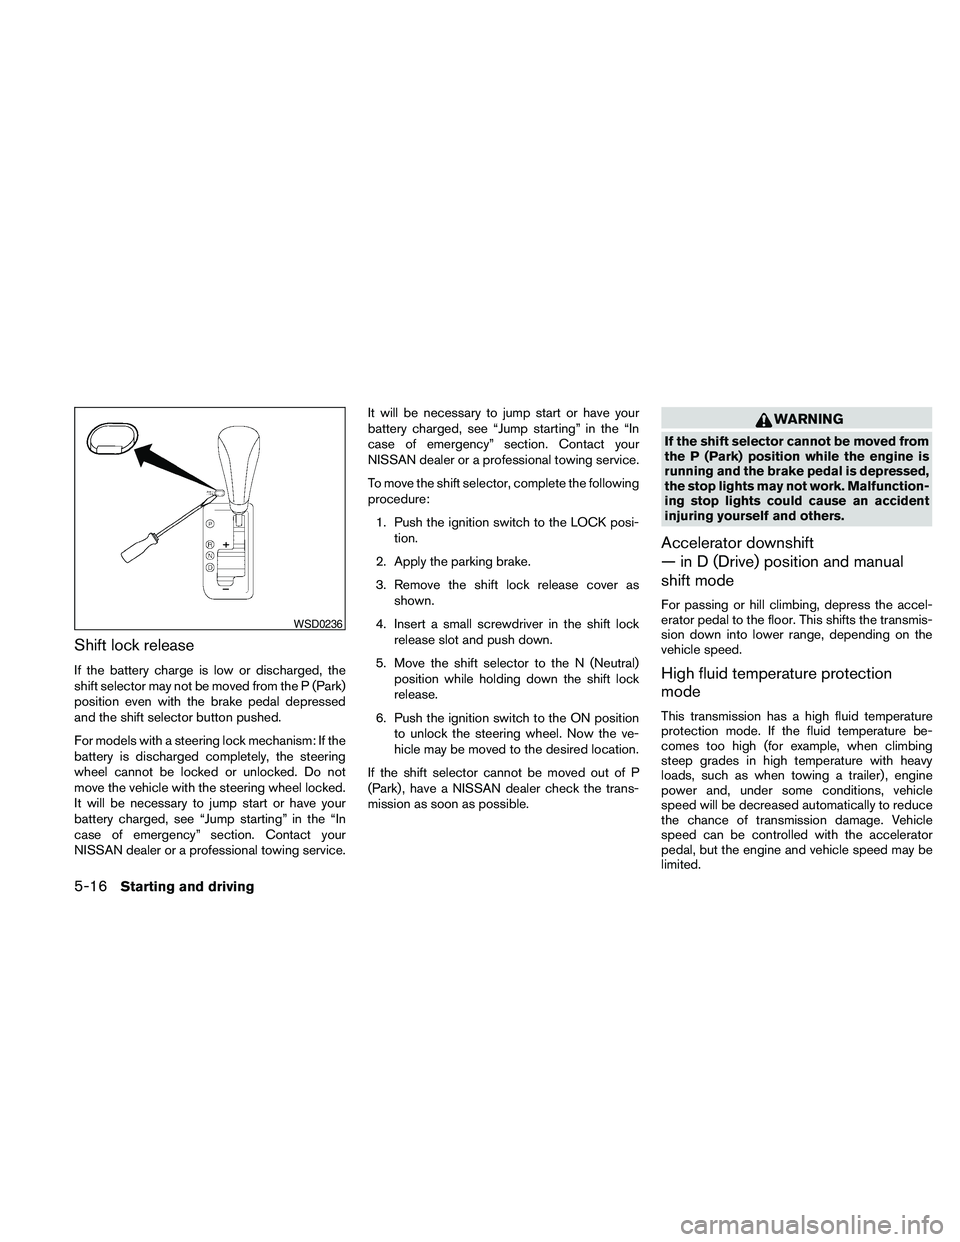
3. Remove the shift lock release cover as
shown.
4. Insert a small screwdriver in the shift lock
release slot and push down.
5. Move the shift selector to the N (Neutral)
position while holding down the shift lock
release.
6. Push the ignition switch to the ON position
to unlock the steering wheel. Now the ve-
hicle may be moved to the desired location.
If the shift selector cannot be moved out of P
(Park) , have a NISSAN dealer check the trans-
mission as soon as possible.
WARNING
If the shift selector cannot be moved from
the P (Park) position while the engine is
running and the brake pedal is depressed,
the stop lights may not work. Malfunction-
ing stop lights could cause an accident
injuring yourself and others.
Accelerator downshift
— in D (Drive) position and manual
shift mode
For passing or hill climbing, depress the accel-
erator pedal to the floor. This shifts the transmis-
sion down into lower range, depending on the
vehicle speed.
High fluid temperature protection
mode
This transmission has a high fluid temperature
protection mode. If the fluid temperature be-
comes too high (for example, when climbing
steep grades in high temperature with heavy
loads, such as when towing a trailer) , engine
power and, under some conditions, vehicle
speed will be decreased automatically to reduce
the chance of transmission damage. Vehicle
speed can be controlled with the accelerator
pedal, but the engine and vehicle speed may be
limited.
WSD0236
5-16Starting and driving
Page 383 of 457
When performing any inspection or maintenance
work on your vehicle, always take care to prevent
serious accidental injury to yourself or damage to
the vehicle. The following are general precau-
tions which should be closely observed.
WARNING
cPark the vehicle on a level surface, ap-
ply the parking brake securely and
block the wheels to prevent the vehicle
from moving. Move the shift selector to
P (Park) .
cBe sure the ignition switch is in the OFF
or LOCK position when performing any
parts replacement or repairs.
cIf you must work with the engine run-
ning, keep your hands, clothing, hair
and tools away from moving fans, belts
and any other moving parts.
cIt is advisable to secure or remove any
loose clothing and remove any jewelry,
such as rings, watches, etc. before
working on your vehicle.
cAlways wear eye protection whenever
you work on your vehicle.cYour vehicle is equipped with an auto-
matic engine cooling fan. It may come
on at any time without warning, even if
the ignition switch is in the OFF posi-
tion and the engine is not running. To
avoid injury, always disconnect the
negative battery cable before working
near the fan.
cIf you must run the engine in an en-
closed space such as a garage, be sure
there is proper ventilation for exhaust
gases to escape.
cNever get under the vehicle while it is
supported only by a jack. If it is neces-
sary to work under the vehicle, support
it with safety stands.
cKeep smoking materials, flame and
sparks away from the fuel tank and
battery.
cOn gasoline engine models, the fuel
filter or fuel lines should be serviced by
a NISSAN dealer because the fuel lines
are under high pressure even when the
engine is off.
CAUTION
cDo not work under the hood while the
engine is hot. Turn the engine off and
wait until it cools down.
cAvoid contact with used engine oil and
coolant. Improperly disposed engine
oil, engine coolant and/or other vehicle
fluids can damage the environment. Al-
ways conform to local regulations for
disposal of vehicle fluid.
cNever leave the engine or automatic
transmission related component har-
nesses disconnected while the ignition
switch is in the ON position.
cNever connect or disconnect the battery
or any transistorized component while
the ignition switch is in the ON position.
This “Maintenance and do-it-yourself” section
gives instructions regarding only those items
which are relatively easy for an owner to perform.
You should be aware that incomplete or improper
servicing may result in operating difficulties or
excessive emissions, and could affect warranty
coverage.If in doubt about any servicing,
have it done by a NISSAN dealer.
MAINTENANCE PRECAUTIONS
Maintenance and do-it-yourself8-5
Page 437 of 457
Temperature conditions also can affect towing.
For example, towing a heavy trailer in high outside
temperatures on graded roads can affect engine
performance and cause overheating. The trans-
mission high fluid temperature protection mode,
which helps reduce the chance of transmission
damage, could activate and automatically de-
crease engine power. Under some conditions,
engine and vehicle speed could be reduced. Plan
your trip carefully to account for trailer and vehicle
load, weather, and road conditions.
WARNING
Overheating can result in reduced engine
power and lower vehicle speed. Also,
when the high temperature mode oper-
ates, engine and vehicle speed may be
gradually reduced. On highways, the re-
duced speed may be lower than other traf-
fic which could increase the chance of a
collision. Be especially careful when driv-
ing. If the vehicle cannot maintain a safe
driving speed, pull to the side of the road
in a safe area and allow the engine to cool
or the transmission to return to normal
operation. See “If your vehicle overheats”
in the “In case of emergency” section of
this manual.
CAUTION
Vehicle damage resulting from improper
towing procedures is not covered by
NISSAN warranties.
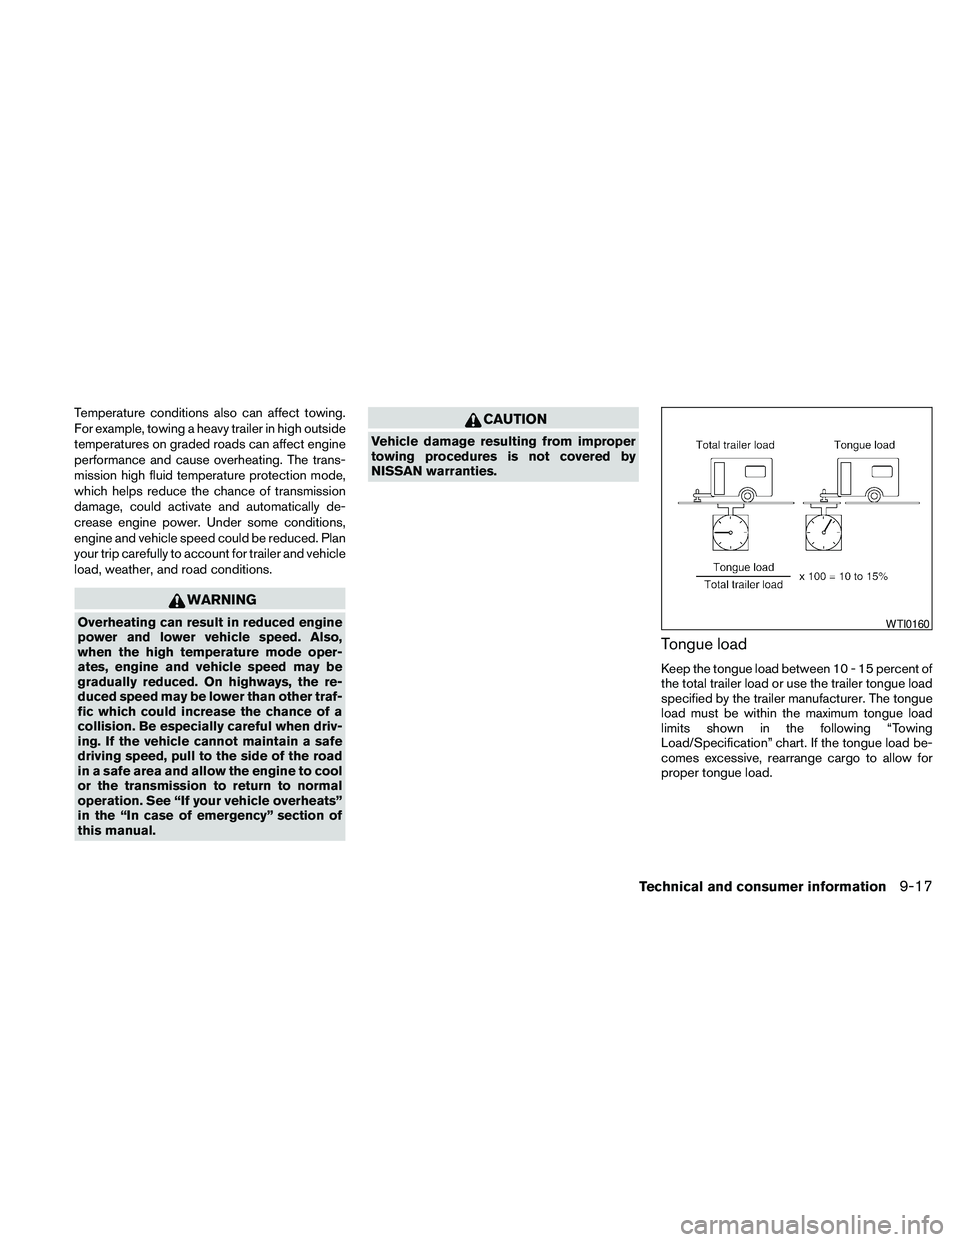
Tongue load
Keep the tongue load between 10 - 15 percent of
the total trailer load or use the trailer tongue load
specified by the trailer manufacturer. The tongue
load must be within the maximum tongue load
limits shown in the following “Towing
Load/Specification” chart. If the tongue load be-
comes excessive, rearrange cargo to allow for
proper tongue load.
WTI0160
Technical and consumer information9-17
Page 444 of 457
CAUTION
cFailure to follow these guidelines can
result in severe transmission damage.
cWhenever flat towing your vehicle, al-
ways tow forward, never backward.
cDO NOT tow any automatic transmis-
sion vehicle with all four wheels on the
ground (flat towing) . Doing so WILL
DAMAGE internal transmission parts
due to lack of transmission lubrication.
cFor emergency towing procedures refer
to “Towing recommended by NISSAN”
in the “In case of emergency” section of
this manual.
Continuously Variable Transmission
To tow a vehicle equipped with a continuously
variable transmission, an appropriate vehicle
dollyMUSTbe placed under the towed vehicle’s
drive wheels.Alwaysfollow the dolly manufac-
turer’s recommendations when using their prod-
uct.DOT (Department of Transportation) Quality
Grades: All passenger car tires must conform to
federal safety requirements in addition to these
grades.
Quality grades can be found where applicable on
the tire sidewall between tread shoulder and
maximum section width. For example:
Treadwear 200 Traction AA Temperature A
Treadwear
The treadwear grade is a comparative rating
based on the wear rate of the tire when tested
under controlled conditions on a specified gov-
ernment test course. For example, a tire graded
150 would wear one and one-half (1 1/2) times
as well on the government course as a tire graded
100. The relative performance of tires depends
upon the actual conditions of their use, however,
and may depart significantly from the norm due to
variations in driving habits, service practices and
differences in road characteristics and climate.
Traction AA, A, B and C
The traction grades, from highest to lowest, are
AA, A, B, and C. Those grades represent the
tire’s ability to stop on wet pavement as mea-
sured under controlled conditions on specified
government test surfaces of asphalt and con-
crete. A tire marked C may have poor traction
performance.
WARNING
The traction grade assigned to this tire is
based on straight-ahead braking traction
tests, and does not include acceleration,
cornering, hydroplaning, or peak traction
characteristics.
Temperature A, B and C
The temperature grades are A (the highest) , B,
and C, representing the tire’s resistance to the
generation of heat, and its ability to dissipate heat
when tested under controlled conditions on a
specified indoor laboratory test wheel. Sustained
high temperature can cause the material of the
tire to degenerate and reduce tire life, and exces-
sive temperature can lead to sudden tire failure.
The grade C corresponds to a level of perfor-
mance which all passenger car tires must meet
under the Federal Motor Safety Standard No.
109. Grades B and A represent higher levels of
performance on the laboratory test wheel than
the minimum required by law.
UNIFORM TIRE QUALITY GRADING
9-24Technical and consumer information
Page 449 of 457
10 Index
A
Air bag
(See supplemental restraint system).....1-39
Air bag system
Front (See supplemental front impact
air bag system)...............1-46
Air bag warning light...........1-53, 2-14
Air cleaner housing filter............8-17
Air conditioner
Air conditioner service...........4-48
Air conditioner specification label.....9-11
Air conditioner system refrigerant and
oil recommendations.............9-6
Heater and air conditioner
controls................4-41, 4-44
Rear seat air conditioner..........4-47
Servicing air conditioner..........4-48
Alarm system
(See vehicle security system).........2-24
Anchor point locations.............1-25
Antenna....................4-116
Anti-lock brake warning light......2-10, 2-11
Anti-lock Braking System (ABS)........5-23
Armrests.....................1-7
Audible reminders...............2-16
Audio system..................4-48
BluetoothTaudio.............4-109
Compact Disc (CD) changer.......4-66
Compact disc (CD) player.....4-72, 4-79
FM-AM radio with compact disc (CD)
changer...................4-64FM/AM/SAT radio with CD/DVD player . .4-75
FM/AM/SAT radio with compact disc
(CD) player.................4-69
Audio System
iPodTPlayer.............4-92, 4-93
Music Box hard-disk drive audio
system...............4-96, 4-102
Audio system
Radio....................4-48
Rear audio controls............4-115
Audio System
Settings...............4-70, 4-76
Audio system
Steering wheel audio control switch . . .4-113
USB interface............4-87, 4-88
Autolight switch.................2-30
Automatic
Automatic drive positioner.........3-29
Automatic power window switch.....2-43
Automatic transmission position indicator
light.....................2-14
Transmission selector lever lock
release....................5-16
Automatic anti-glare inside mirror.......3-25
Automatic door locks..............3-6
AUX jack....................4-68
B
Battery......................8-13
Charge warning light............2-11
Before starting the engine...........5-10Belt (See drive belt)..............8-15
Block heater
Engine....................5-27
BluetoothTaudio...............4-109
BluetoothThands-free phone
system.................4-117, 4-132
Booster seats..................1-36
Brake
Anti-lock Braking System (ABS)......5-23
Brake fluid..................8-12
Brake light (See stop light).........8-26
Brake system................5-22
Brake warning light.............2-11
Brake wear indicators........2-16, 8-19
Parking brake operation..........5-17
Self-adjusting brakes............8-19
Brakes......................8-19
Break-in schedule...............5-19
Brightness control
Instrument panel..............2-32
Brightness/contrast button.......4-15, 4-31
Bulb check/instrument panel..........2-10
Bulb replacement................8-26
C
Capacities and recommended
fuel/lubricants...................9-2
Car phone or CB radio............4-117
Cargo net....................2-41
Cargo (See vehicle loading information) . . .9-12
CD care and cleaning.............4-112