remote control NISSAN MURANO 2008 Owners Manual
[x] Cancel search | Manufacturer: NISSAN, Model Year: 2008, Model line: MURANO, Model: NISSAN MURANO 2008Pages: 444, PDF Size: 6.09 MB
Page 10 of 444
Black plate (7,1)
Model "Z51-D" EDITED: 2008/ 6/ 26
SSI0375
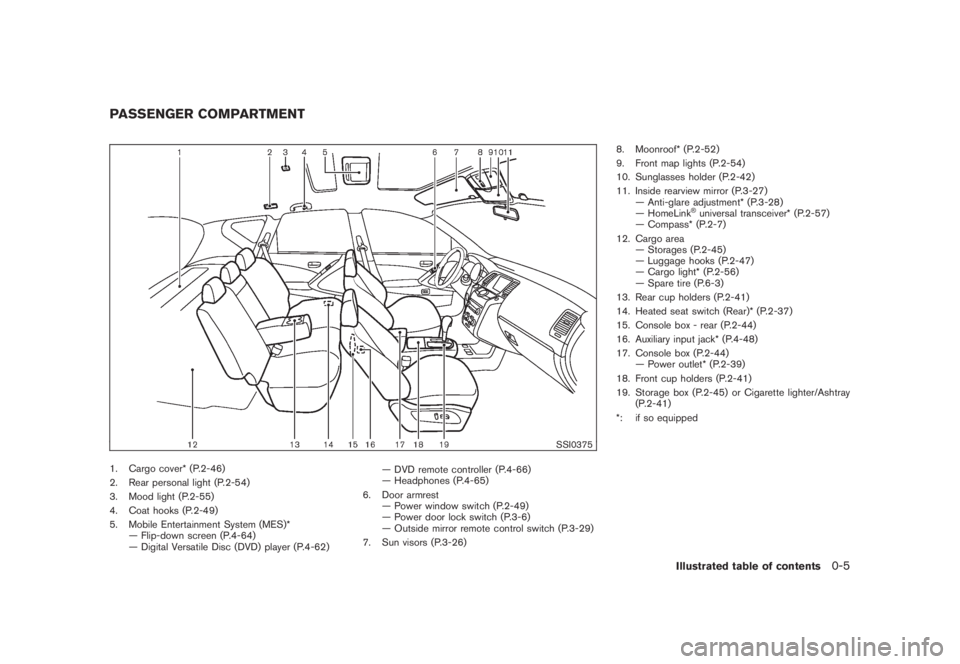
1. Cargo cover* (P.2-46)
2. Rear personal light (P.2-54)
3. Mood light (P.2-55)
4. Coat hooks (P.2-49)
5. Mobile Entertainment System (MES)*
— Flip-down screen (P.4-64)
— Digital Versatile Disc (DVD) player (P.4-62)— DVD remote controller (P.4-66)
— Headphones (P.4-65)
6. Door armrest
— Power window switch (P.2-49)
— Power door lock switch (P.3-6)
— Outside mirror remote control switch (P.3-29)
7. Sun visors (P.3-26)8. Moonroof* (P.2-52)
9. Front map lights (P.2-54)
10. Sunglasses holder (P.2-42)
11. Inside rearview mirror (P.3-27)
— Anti-glare adjustment* (P.3-28)
— HomeLink
®universal transceiver* (P.2-57)
— Compass* (P.2-7)
12. Cargo area
— Storages (P.2-45)
— Luggage hooks (P.2-47)
— Cargo light* (P.2-56)
— Spare tire (P.6-3)
13. Rear cup holders (P.2-41)
14. Heated seat switch (Rear)* (P.2-37)
15. Console box - rear (P.2-44)
16. Auxiliary input jack* (P.4-48)
17. Console box (P.2-44)
— Power outlet* (P.2-39)
18. Front cup holders (P.2-41)
19. Storage box (P.2-45) or Cigarette lighter/Ashtray
(P.2-41)
*: if so equipped
PASSENGER COMPARTMENT
Illustrated table of contents
0-5
Page 139 of 444
Black plate (137,1)
Model "Z51-D" EDITED: 2008/ 6/ 26
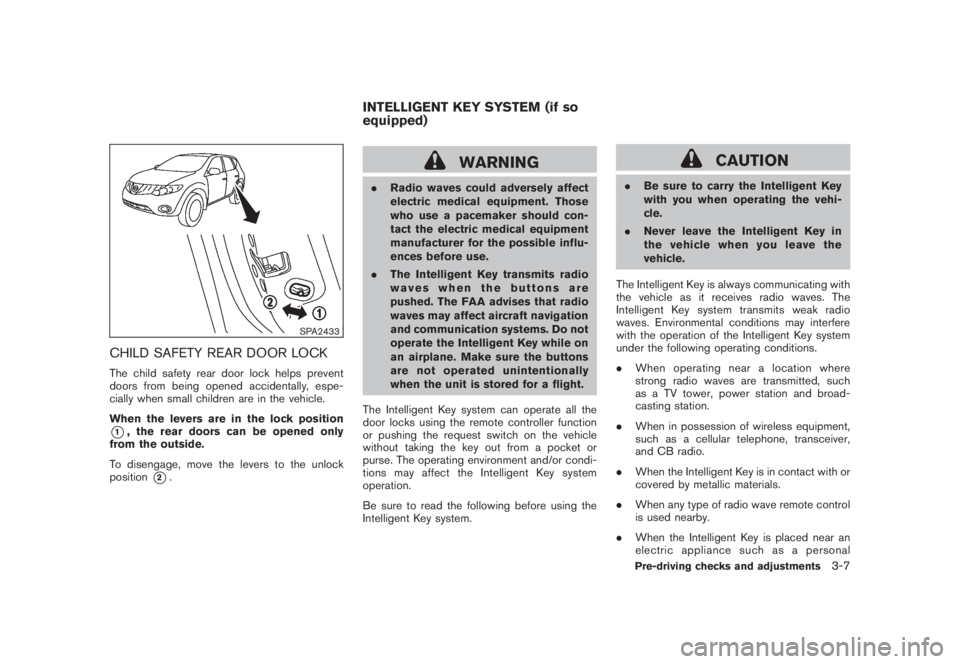
SPA2433
CHILD SAFETY REAR DOOR LOCKThe child safety rear door lock helps prevent
doors from being opened accidentally, espe-
cially when small children are in the vehicle.
When the levers are in the lock position*1, the rear doors can be opened only
from the outside.
To disengage, move the levers to the unlock
position
*2.
WARNING
.Radio waves could adversely affect
electric medical equipment. Those
who use a pacemaker should con-
tact the electric medical equipment
manufacturer for the possible influ-
ences before use.
.The Intelligent Key transmits radio
waves when the buttons are
pushed. The FAA advises that radio
waves may affect aircraft navigation
and communication systems. Do not
operate the Intelligent Key while on
an airplane. Make sure the buttons
are not operated unintentionally
when the unit is stored for a flight.
The Intelligent Key system can operate all the
door locks using the remote controller function
or pushing the request switch on the vehicle
without taking the key out from a pocket or
purse. The operating environment and/or condi-
tions may affect the Intelligent Key system
operation.
Be sure to read the following before using the
Intelligent Key system.
CAUTION
.Be sure to carry the Intelligent Key
with you when operating the vehi-
cle.
.Never leave the Intelligent Key in
the vehicle when you leave the
vehicle.
The Intelligent Key is always communicating with
the vehicle as it receives radio waves. The
Intelligent Key system transmits weak radio
waves. Environmental conditions may interfere
with the operation of the Intelligent Key system
under the following operating conditions.
.When operating near a location where
strong radio waves are transmitted, such
as a TV tower, power station and broad-
casting station.
.When in possession of wireless equipment,
such as a cellular telephone, transceiver,
and CB radio.
.When the Intelligent Key is in contact with or
covered by metallic materials.
.When any type of radio wave remote control
is used nearby.
.When the Intelligent Key is placed near an
electric appliance such as a personal
INTELLIGENT KEY SYSTEM (if so
equipped)
Pre-driving checks and adjustments
3-7
Page 165 of 444
Black plate (13,1)
4 Monitor, heater, air conditioner, audio,
phone and voice recognition systems
Model "Z51-D" EDITED: 2008/ 6/ 23
Safety note....................................................... 4-2
Center multi-function control panel
(models with color display screen)......................... 4-2
How to use multi-function controller................... 4-4
How to use touch screen
(models with navigation system)........................ 4-4
Start-up screen (models with navigation system) . . . 4-6
Start menu................................................... 4-6
How to select menus on the screen................... 4-7
Vehicle information and settings............................. 4-8
How to use STATUS button.............................. 4-8
How to use brightness control and display ON/
OFF button................................................... 4-8
How to use INFO button.................................. 4-8
How to use SETTING button.......................... 4-12
Rearview monitor (if so equipped)........................ 4-19
How to read the displayed lines....................... 4-20
How to park with predicted course lines............ 4-20
Difference between predicted and actual
distances................................................... 4-22
How to adjust the screen............................... 4-24
Operating tips............................................. 4-24
Ventilators...................................................... 4-25
Heater and air conditioner.................................. 4-26
Automatic operation...................................... 4-28
Manual operation......................................... 4-29
To turn the system off................................... 4-30Operating tips............................................. 4-30
In-cabin microfilter........................................ 4-30
Servicing air conditioner................................ 4-30
Audio system.................................................. 4-31
Audio operation precautions........................... 4-31
FM-AM radio with Compact Disc (CD)
changer..................................................... 4-39
FM-AM-SAT radio with Compact Disc (CD)
changer..................................................... 4-44
CompactFlash (CF) player operation
(models with navigation system)...................... 4-49
iPod
®player operation (if so equipped).............. 4-51
Music box hard drive
(models with navigation system)...................... 4-52
CD/CF (CompactFlash) care and cleaning......... 4-59
Steering-wheel-mounted controls for audio
(if so equipped)........................................... 4-60
Antenna..................................................... 4-61
NISSAN Mobile Entertainment System (MES)
(if so equipped)............................................... 4-62
DVD player operation precautions.................... 4-63
Digital Versatile Disc (DVD) system
components............................................... 4-64
Remote controller and headphones battery
replacement................................................ 4-67
Before operating the DVD entertainment
system....................................................... 4-68
Page 180 of 444
Black plate (176,1)
Model "Z51-D" EDITED: 2008/ 6/ 26
To turn on the screen, set this item to the ON
position, or push the “
OFF” button.
Brightness/Contrast/Background Color:
To adjust the brightness and contrast of the
screen, select the “Brightness”or“Contrast”
key and push theENTERbutton.
Then, you can adjust the brightness to “Darker”
or “Brighter”, and the contrast to “Lower” or
“Higher” using the multi-function controller.
For information on the “Background Color”
key, refer to the separate Navigation System
Owner’s Manual.
Navigation settings (if so equipped)For the details of “Navigation” settings, refer to
the separate Navigation System Owner’s Man-
ual.
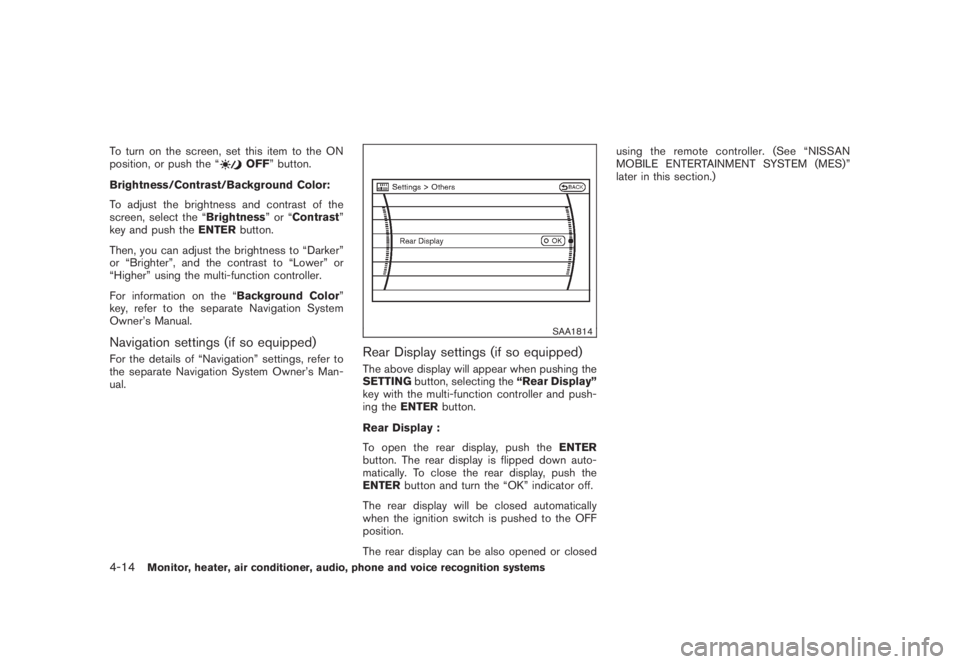
SAA1814
Rear Display settings (if so equipped)The above display will appear when pushing the
SETTINGbutton, selecting the“Rear Display”
key with the multi-function controller and push-
ing theENTERbutton.
Rear Display :
To open the rear display, push theENTER
button. The rear display is flipped down auto-
matically. To close the rear display, push the
ENTERbutton and turn the “OK” indicator off.
The rear display will be closed automatically
when the ignition switch is pushed to the OFF
position.
The rear display can be also opened or closedusing the remote controller. (See “NISSAN
MOBILE ENTERTAINMENT SYSTEM (MES)”
later in this section.)
4-14
Monitor, heater, air conditioner, audio, phone and voice recognition systems
Page 231 of 444
Black plate (227,1)
Model "Z51-D" EDITED: 2008/ 6/ 26
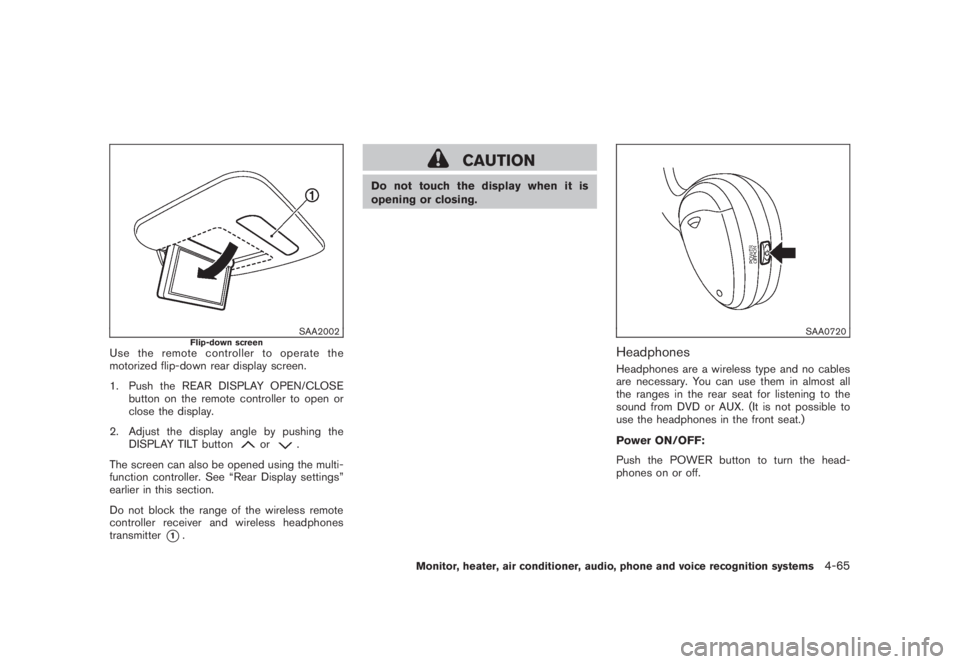
SAA2002
Flip-down screen
Use the remote controller to operate the
motorized flip-down rear display screen.
1. Push the REAR DISPLAY OPEN/CLOSE
button on the remote controller to open or
close the display.
2. Adjust the display angle by pushing the
DISPLAY TILT button
or
.
The screen can also be opened using the multi-
function controller. See “Rear Display settings”
earlier in this section.
Do not block the range of the wireless remote
controller receiver and wireless headphones
transmitter
*1.
CAUTION
Do not touch the display when it is
opening or closing.
SAA0720
HeadphonesHeadphones are a wireless type and no cables
are necessary. You can use them in almost all
the ranges in the rear seat for listening to the
sound from DVD or AUX. (It is not possible to
use the headphones in the front seat.)
Power ON/OFF:
Push the POWER button to turn the head-
phones on or off.
Monitor, heater, air conditioner, audio, phone and voice recognition systems
4-65
Page 232 of 444
Black plate (228,1)
Model "Z51-D" EDITED: 2008/ 6/ 26
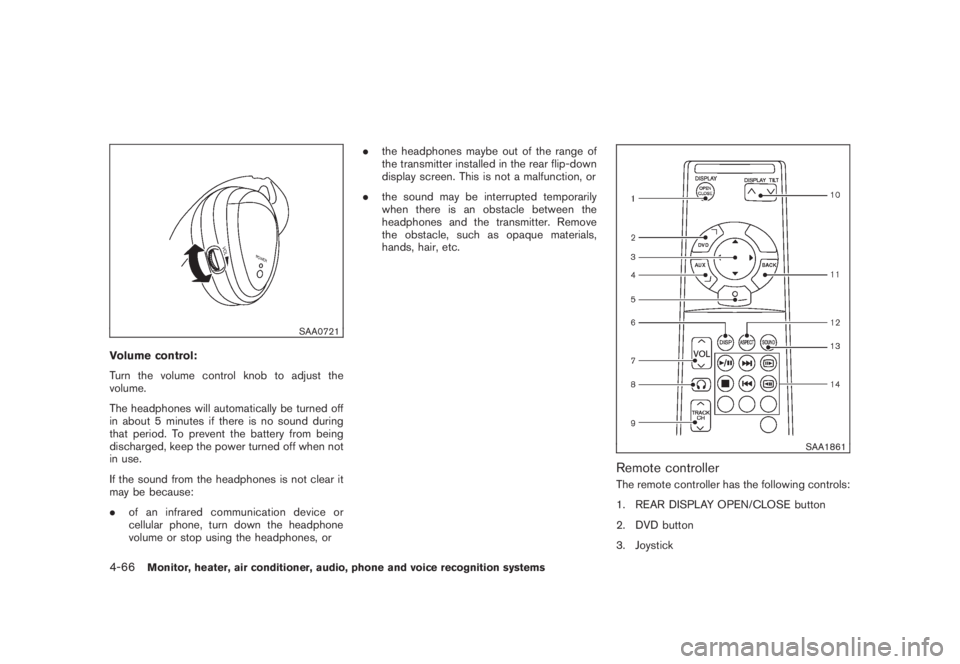
SAA0721
Volume control:
Turn the volume control knob to adjust the
volume.
The headphones will automatically be turned off
in about 5 minutes if there is no sound during
that period. To prevent the battery from being
discharged, keep the power turned off when not
in use.
If the sound from the headphones is not clear it
may be because:
.of an infrared communication device or
cellular phone, turn down the headphone
volume or stop using the headphones, or.the headphones maybe out of the range of
the transmitter installed in the rear flip-down
display screen. This is not a malfunction, or
.the sound may be interrupted temporarily
when there is an obstacle between the
headphones and the transmitter. Remove
the obstacle, such as opaque materials,
hands, hair, etc.
SAA1861
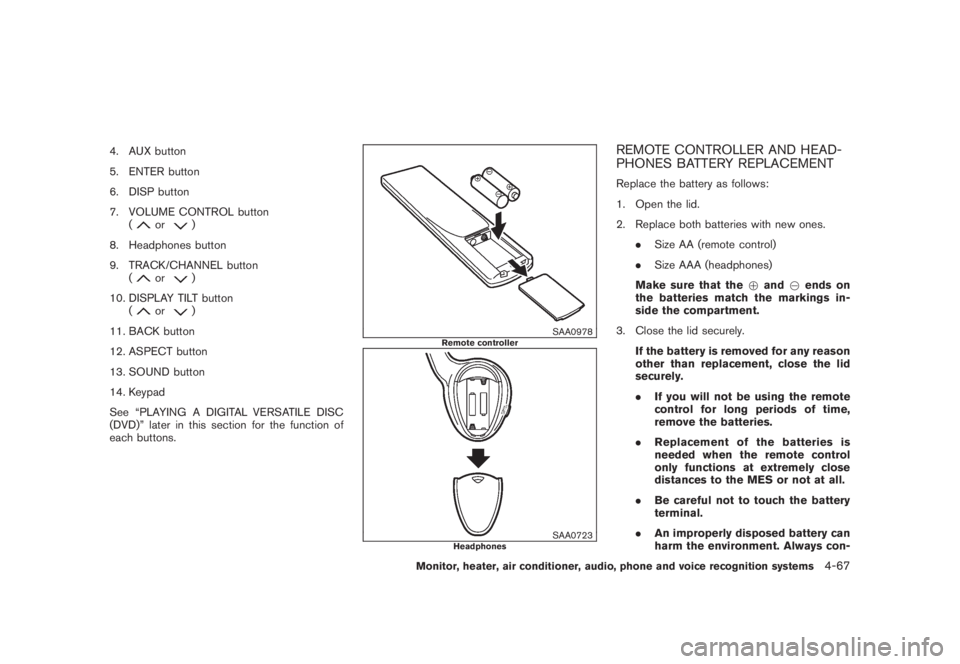
Remote controllerThe remote controller has the following controls:
1. REAR DISPLAY OPEN/CLOSE button
2. DVD button
3. Joystick
4-66
Monitor, heater, air conditioner, audio, phone and voice recognition systems
Page 233 of 444
Black plate (229,1)
Model "Z51-D" EDITED: 2008/ 6/ 26
4. AUX button
5. ENTER button
6. DISP button
7. VOLUME CONTROL button
(
or
)
8. Headphones button
9. TRACK/CHANNEL button
(
or
)
10. DISPLAY TILT button
(
or
)
11. BACK button
12. ASPECT button
13. SOUND button
14. Keypad
See “PLAYING A DIGITAL VERSATILE DISC
(DVD)” later in this section for the function of
each buttons.
SAA0978
Remote controller
SAA0723
Headphones
REMOTE CONTROLLER AND HEAD-
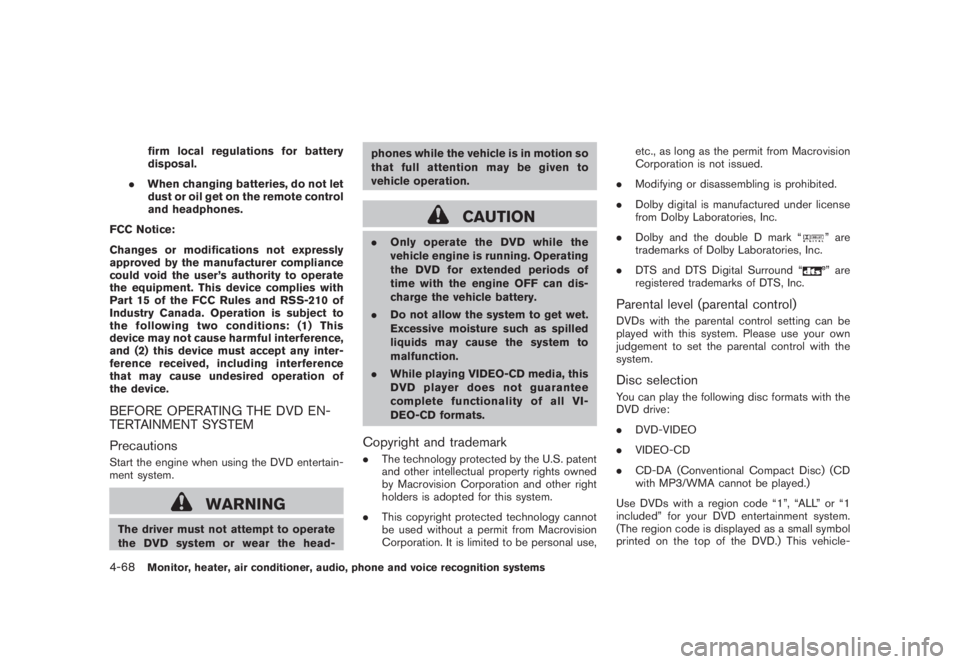
PHONES BATTERY REPLACEMENTReplace the battery as follows:
1. Open the lid.
2. Replace both batteries with new ones.
.Size AA (remote control)
.Size AAA (headphones)
Make sure that the+and7ends on
the batteries match the markings in-
side the compartment.
3. Close the lid securely.
If the battery is removed for any reason
other than replacement, close the lid
securely.
.If you will not be using the remote
control for long periods of time,
remove the batteries.
.Replacement of the batteries is
needed when the remote control
only functions at extremely close
distances to the MES or not at all.
.Be careful not to touch the battery
terminal.
.An improperly disposed battery can
harm the environment. Always con-
Monitor, heater, air conditioner, audio, phone and voice recognition systems
4-67
Page 234 of 444
Black plate (230,1)
Model "Z51-D" EDITED: 2008/ 6/ 26
firm local regulations for battery
disposal.
.When changing batteries, do not let
dust or oil get on the remote control
and headphones.
FCC Notice:
Changes or modifications not expressly
approved by the manufacturer compliance
could void the user’s authority to operate
the equipment. This device complies with
Part 15 of the FCC Rules and RSS-210 of
Industry Canada. Operation is subject to
the following two conditions: (1) This
device may not cause harmful interference,
and (2) this device must accept any inter-
ference received, including interference
that may cause undesired operation of
the device.
BEFORE OPERATING THE DVD EN-
TERTAINMENT SYSTEM
PrecautionsStart the engine when using the DVD entertain-
ment system.
WARNING
The driver must not attempt to operate
the DVD system or wear the head-phones while the vehicle is in motion so
that full attention may be given to
vehicle operation.
CAUTION
.Only operate the DVD while the
vehicle engine is running. Operating
the DVD for extended periods of
time with the engine OFF can dis-
charge the vehicle battery.
.Do not allow the system to get wet.
Excessive moisture such as spilled
liquids may cause the system to
malfunction.
.While playing VIDEO-CD media, this
DVD player does not guarantee
complete functionality of all VI-
DEO-CD formats.Copyright and trademark.The technology protected by the U.S. patent
and other intellectual property rights owned
by Macrovision Corporation and other right
holders is adopted for this system.
.This copyright protected technology cannot
be used without a permit from Macrovision
Corporation. It is limited to be personal use,etc., as long as the permit from Macrovision
Corporation is not issued.
.Modifying or disassembling is prohibited.
.Dolby digital is manufactured under license
from Dolby Laboratories, Inc.
.Dolby and the double D mark “
” are
trademarks of Dolby Laboratories, Inc.
.DTS and DTS Digital Surround “” are
registered trademarks of DTS, Inc.
Parental level (parental control)DVDs with the parental control setting can be
played with this system. Please use your own
judgement to set the parental control with the
system.Disc selectionYou can play the following disc formats with the
DVD drive:
.DVD-VIDEO
.VIDEO-CD
.CD-DA (Conventional Compact Disc) (CD
with MP3/WMA cannot be played.)
Use DVDs with a region code “1”, “ALL” or “1
included” for your DVD entertainment system.
(The region code is displayed as a small symbol
printed on the top of the DVD.) This vehicle-
4-68
Monitor, heater, air conditioner, audio, phone and voice recognition systems
Page 235 of 444
Black plate (231,1)
Model "Z51-D" EDITED: 2008/ 6/ 26
installed DVD player cannot play DVDs with a
region code other than “1” or “ALL”.Display settingsFront display:
To adjust the front display mode, press the
SETTING button while the DVD is being played,
select the “Others” key with the multi-function
controller, and then press the ENTER button.
To adjust the display ON/OFF, brightness, tint,
color, contrast and black level select each key
using the multi-function controller and press the
ENTER button.
Then you can adjust each item using the multi-
function controller. After changes have been
made press the BACK button to save the
settings.
Rear display:
To adjust the rear display mode, push the “DISP”
(Display) button on the remote controller.
To adjust the display brightness, tint, color and
contrast, select each key using the joystick on
the remote controller and tilt the joystick to right
or left.
Push the BACK button to apply the settings and
return to the previous display.
SAA1829
PLAYING A DIGITAL VERSATILE DISC
(DVD)
DISC buttonPark the vehicle in a safe location for the
front seat occupants to operate the DVD
drive while watching the images.
Push the “DISC” button on the instrument panel
to turn the display to the DVD mode.
When a DVD is loaded, it will be replayed
automatically.
The operation screen will be turned on when the
“DISC” button located on the instrument panel
is pushed while a DVD is being played, and itwill turn off automatically after a period of time.
To turn it on again, push the “DISC” button once
more.
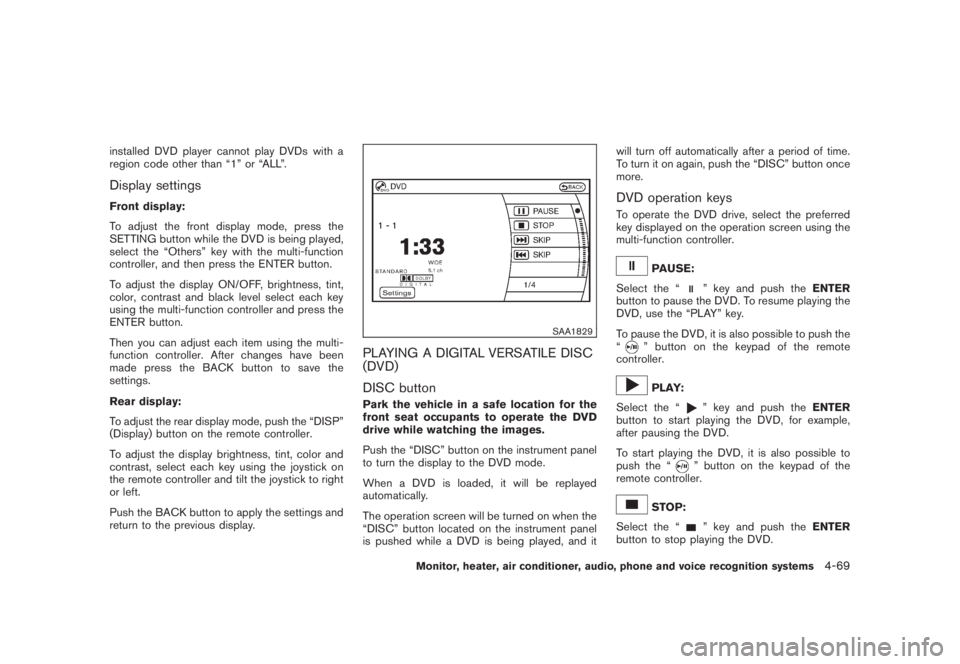
DVD operation keysTo operate the DVD drive, select the preferred
key displayed on the operation screen using the
multi-function controller.
PAUSE:
Select the “
” key and push theENTER
button to pause the DVD. To resume playing the
DVD, use the “PLAY” key.
To pause the DVD, it is also possible to push the
“
” button on the keypad of the remote
controller.PLAY:
Select the “
” key and push theENTER
button to start playing the DVD, for example,
after pausing the DVD.
To start playing the DVD, it is also possible to
push the “” button on the keypad of the
remote controller.
STOP:
Select the “
” key and push theENTER
button to stop playing the DVD.
Monitor, heater, air conditioner, audio, phone and voice recognition systems
4-69
Page 236 of 444
Black plate (232,1)
Model "Z51-D" EDITED: 2008/ 6/ 26
To stop playing the DVD, it is also possible to
push the “
” button on the keypad of the
remote controller.
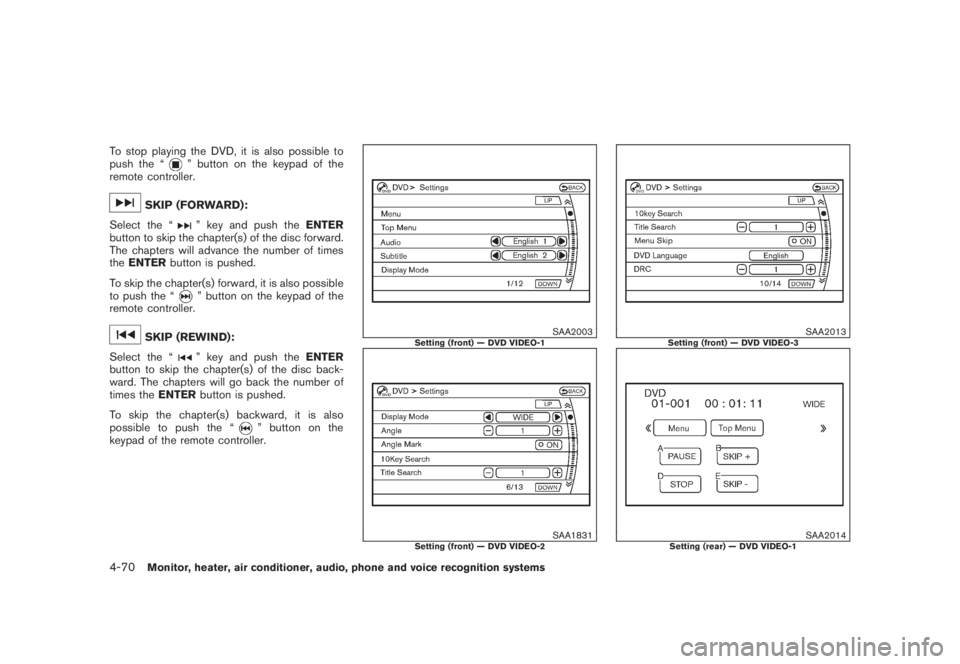
SKIP (FORWARD):
Select the “
” key and push theENTER
button to skip the chapter(s) of the disc forward.
The chapters will advance the number of times
theENTERbutton is pushed.
To skip the chapter(s) forward, it is also possible
to push the “” button on the keypad of the
remote controller.
SKIP (REWIND):
Select the “
” key and push theENTER
button to skip the chapter(s) of the disc back-
ward. The chapters will go back the number of
times theENTERbutton is pushed.
To skip the chapter(s) backward, it is also
possible to push the “
” button on the
keypad of the remote controller.
SAA2003
Setting (front) — DVD VIDEO-1
SAA1831
Setting (front) — DVD VIDEO-2
SAA2013
Setting (front) — DVD VIDEO-3
SAA2014
Setting (rear) — DVD VIDEO-1
4-70
Monitor, heater, air conditioner, audio, phone and voice recognition systems