clock NISSAN MURANO 2011 Owner´s Manual
[x] Cancel search | Manufacturer: NISSAN, Model Year: 2011, Model line: MURANO, Model: NISSAN MURANO 2011Pages: 433, PDF Size: 3.7 MB
Page 13 of 433
Black plate (9,1)
Model "Z51-D" EDITED: 2010/ 7/ 23
25. Audio system (P.4-33)— Clock* (P.2-40)
26. Heated seat switch* (P.2-38)
27. Selector lever (P.5-14)
28. Front passenger air bag status light (P.1-50)
29. Power outlet (P.2-41)
30. All-Wheel Drive (AWD) LOCK switch* (P.5-21)
31. Rear window and outside mirror* defroster switch (P.2-32)
32. Heater/air conditioner control (P.4-28) or Audio system (P.4-33)
33. Glove box (P.2-45)
*: if so equipped
**: Refer to the separate Navigation System Owner’s Manual (if so equipped) .
Illustrated table of contents
0-7
Page 74 of 433
Black plate (7,1)
2 Instruments and controls
Model "Z51-D" EDITED: 2010/ 7/ 23
Instrument panel................................................ 2-2
Meters and gauges ............................................. 2-4
Speedometer and odometer ............................. 2-5
Tachometer ................................................... 2-6
Engine coolant temperature gauge ..................... 2-6
Fuel gauge ................................................... 2-7
Compass (if so equipped) .................................... 2-7
Zone variation change procedure ....................... 2-9
Warning/indicator lights and audible reminders ....... 2-10
Checking bulbs ........................................... 2-10
Warning lights ............................................. 2-10
Indicator lights ............................................. 2-15
Audible reminders ........................................ 2-17
Dot matrix liquid crystal display ............................ 2-17
Indicators for operation .................................. 2-18
Indicators for maintenance .............................. 2-21
Trip computer .............................................. 2-21
Security systems .............................................. 2-26
Vehicle Security System (if so equipped) ........... 2-26
NISSAN Vehicle Immobilizer System ................. 2-27
Windshield wiper and washer switch .................... 2-28
Rain-sensing auto wiper system
(if so equipped) ........................................... 2-30
Rear window wiper and washer switch .................. 2-31
Rear window and outside mirror defroster switch ..... 2-32Headlight and turn signal switch
.......................... 2-33
Xenon headlights (if so equipped) .................... 2-33
Headlight switch .......................................... 2-33
Turn signal switch ........................................ 2-36
Fog light switch (if so equipped) ...................... 2-36
Hazard warning flasher switch ............................. 2-37
Horn ............................................................. 2-37
Heated steering wheel (if so equipped) ................. 2-38
Heated seats (if so equipped) ............................. 2-38
Clock ............................................................ 2-40
Models with color display ............................... 2-40
Models without color display ........................... 2-40
Vehicle Dynamic Control (VDC) OFF switch ........... 2-41
Power outlet ................................................... 2-41
Cigarette lighter and ashtray (if so equipped) .......... 2-42
Storage ......................................................... 2-43
Cup holders ................................................ 2-43
Sunglasses holder ........................................ 2-44
Glove box .................................................. 2-45
Console box ............................................... 2-45
Storage box (if so equipped) .......................... 2-46
Cargo floor box ........................................... 2-47
Luggage side box ......................................... 2-47
Cargo cover (if so equipped) .......................... 2-47
Luggage hooks ............................................ 2-48
Roof rack (if so equipped) .............................. 2-49
Page 76 of 433
Black plate (74,1)
Model "Z51-D" EDITED: 2010/ 7/ 23
SSI0805
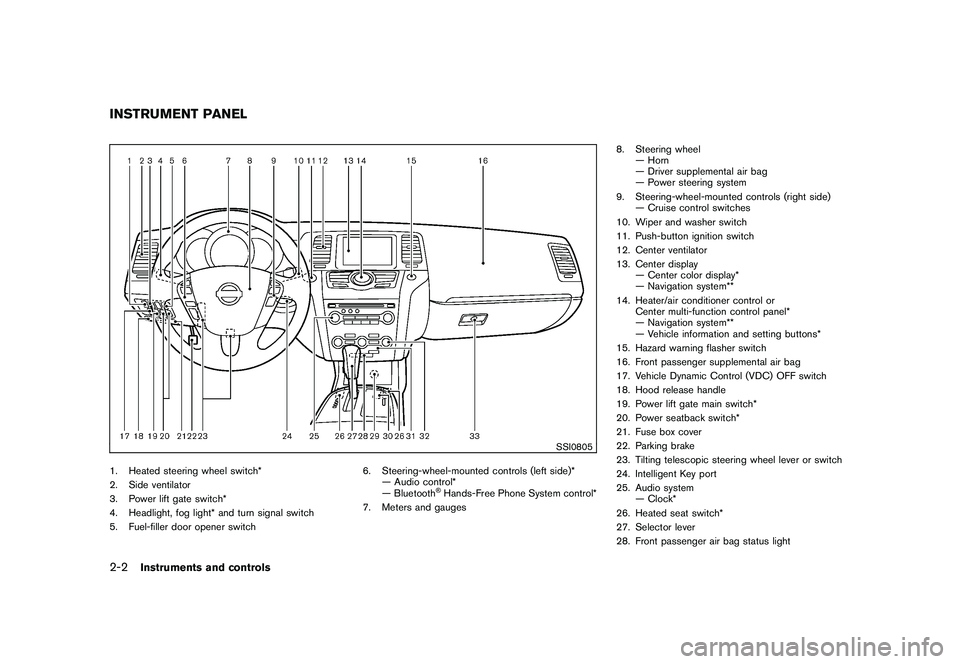
1. Heated steering wheel switch*
2. Side ventilator
3. Power lift gate switch*
4. Headlight, fog light* and turn signal switch
5. Fuel-filler door opener switch6. Steering-wheel-mounted controls (left side)*
— Audio control*
— Bluetooth
®Hands-Free Phone System control*
7. Meters and gauges 8. Steering wheel
— Horn
— Driver supplemental air bag
— Power steering system
9. Steering-wheel-mounted controls (right side) — Cruise control switches
10. Wiper and washer switch
11. Push-button ignition switch
12. Center ventilator
13. Center display — Center color display*
— Navigation system**
14. Heater/air conditioner control or Center multi-function control panel*
— Navigation system**
— Vehicle information and setting buttons*
15. Hazard warning flasher switch
16. Front passenger supplemental air bag
17. Vehicle Dynamic Control (VDC) OFF switch
18. Hood release handle
19. Power lift gate main switch*
20. Power seatback switch*
21. Fuse box cover
22. Parking brake
23. Tilting telescopic steering wheel lever or switch
24. Intelligent Key port
25. Audio system — Clock*
26. Heated seat switch*
27. Selector lever
28. Front passenger air bag status light
INSTRUMENT PANEL2-2
Instruments and controls
Page 106 of 433
Black plate (104,1)
Model "Z51-D" EDITED: 2010/ 7/ 23
The rear window wiper and washer operate
when the ignition switch is in the ON position.
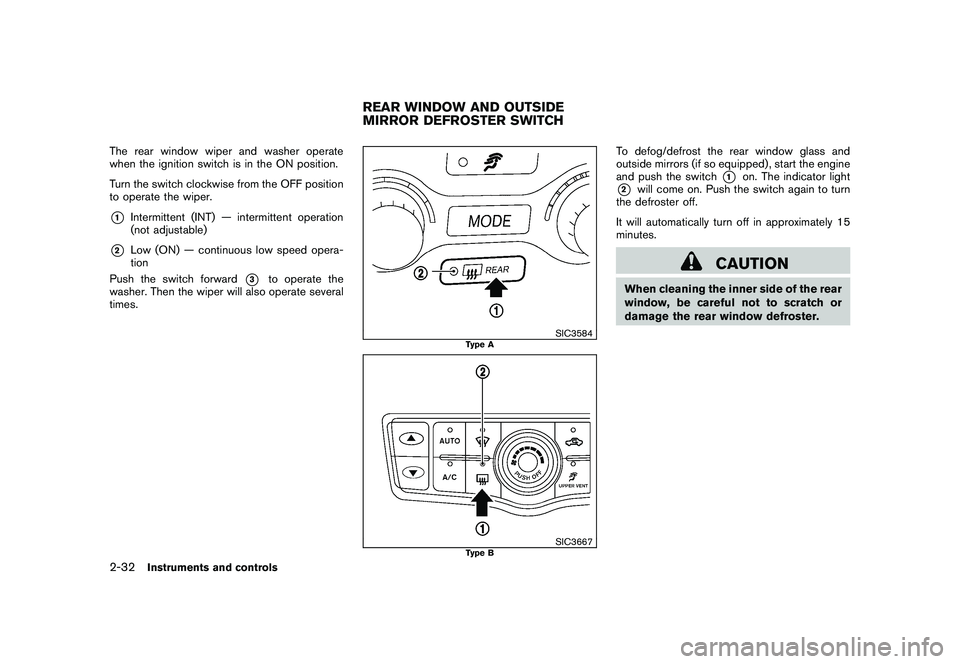
Turn the switch clockwise from the OFF position
to operate the wiper.*1
Intermittent (INT) — intermittent operation
(not adjustable)
*2
Low (ON) — continuous low speed opera-
tion
Push the switch forward
*3
to operate the
washer. Then the wiper will also operate several
times.
SIC3584
Type A
SIC3667
Type B
To defog/defrost the rear window glass and
outside mirrors (if so equipped) , start the engine
and push the switch
*1
on. The indicator light
*2
will come on. Push the switch again to turn
the defroster off.
It will automatically turn off in approximately 15
minutes.
CAUTION
When cleaning the inner side of the rear
window, be careful not to scratch or
damage the rear window defroster.
REAR WINDOW AND OUTSIDE
MIRROR DEFROSTER SWITCH
2-32
Instruments and controls
Page 114 of 433
Black plate (112,1)
Model "Z51-D" EDITED: 2010/ 7/ 23
MODELS WITH COLOR DISPLAYTo adjust the clock on the front color display, use
the SETTING button on the center multi-
function control panel. See “HOW TO USE
SETTING BUTTON” in the “4. Center display,
heater, air conditioner, audio, phone and voice
recognition systems” section.
The clock settings display cannot be operated
while driving. Stop the vehicle in a safe place
and apply the parking brake before setting the
clock.
SIC3802
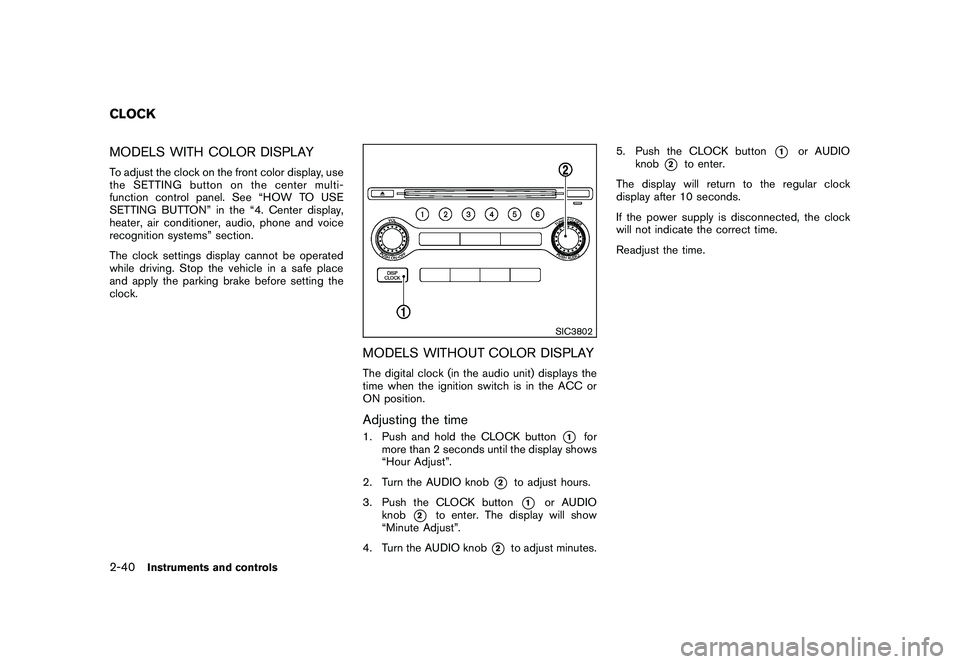
MODELS WITHOUT COLOR DISPLAYThe digital clock (in the audio unit) displays the
time when the ignition switch is in the ACC or
ON position.Adjusting the time1. Push and hold the CLOCK button
*1
for
more than 2 seconds until the display shows
“Hour Adjust”.
2. Turn the AUDIO knob
*2
to adjust hours.
3. Push the CLOCK button*1
or AUDIO
knob
*2
to enter. The display will show
“Minute Adjust”.
4. Turn the AUDIO knob
*2
to adjust minutes. 5. Push the CLOCK button
*1
or AUDIO
knob
*2
to enter.
The display will return to the regular clock
display after 10 seconds.
If the power supply is disconnected, the clock
will not indicate the correct time.
Readjust the time.
CLOCK2-40
Instruments and controls
Page 161 of 433
Black plate (159,1)
Model "Z51-D" EDITED: 2010/ 7/ 23
cle.
. Do not fill a portable fuel container
in the vehicle or trailer. Static elec-
tricity can cause an explosion of
flammable liquid, vapor or gas in
any vehicle or trailer. To reduce the
risk of serious injury or death when
filling portable fuel containers:
— Always place the container on
the ground when filling.
— Do not use electronic devices when filling.
— Keep the pump nozzle in contact with the container while you are
filling it.
— Use only approved portable fuel containers for flammable liquid.
CAUTION
. If fuel is spilled on the vehicle body,
flush it away with water to avoid
paint damage.
. Insert the cap straight into the fuel-
filler tube, then tighten until the
fuel-filler cap clicks. Failure to tight-
en the fuel-filler cap properly may
cause the
malfunction indicator light (MIL) to illuminate. If the
light illuminates because the fuel-
filler cap is loose or missing, tighten
or install the cap and continue to
drive the vehicle. The
light
should turn off after a few driving
trips. If the
light does not turn
off after a few driving trips, have the
vehicle inspected by a NISSAN deal-
er.
For additional information, see
“Malfunction Indicator Light (MIL)”
in the “2. Instruments and controls”
section.
. The LOOSE FUEL CAP warning will
appear if the fuel-filler cap is not
properly tightened. Failure to tight-
en the fuel-filler cap properly after
the LOOSE FUEL CAP warning ap-
pears may cause the
Malfunc-
tion Indicator Light (MIL) to
illuminate.
SPA2442
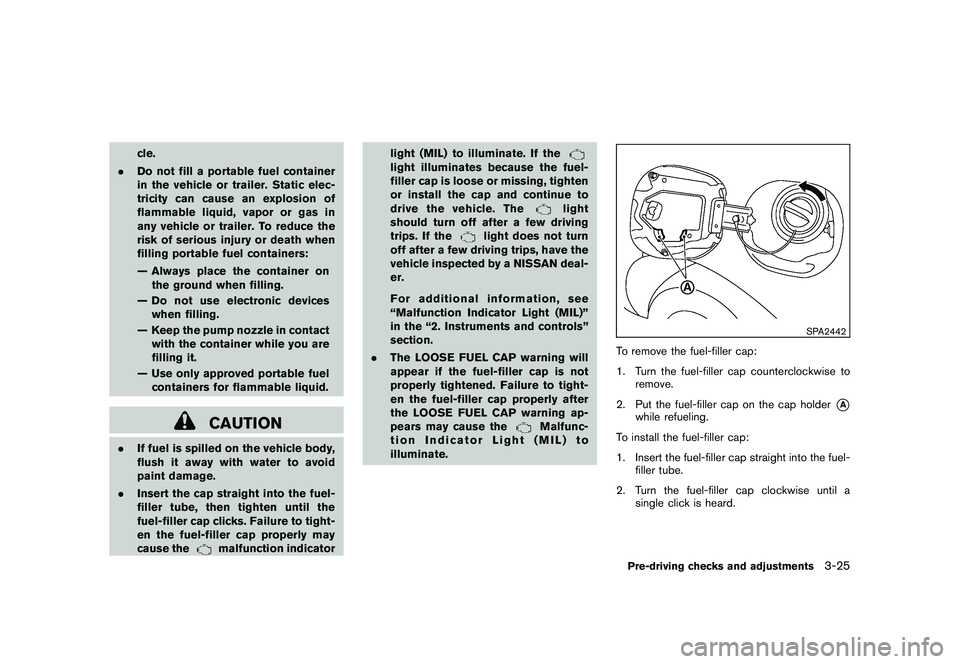
To remove the fuel-filler cap:
1. Turn the fuel-filler cap counterclockwise to remove.
2. Put the fuel-filler cap on the cap holder
*A
while refueling.
To install the fuel-filler cap:
1. Insert the fuel-filler cap straight into the fuel- filler tube.
2. Turn the fuel-filler cap clockwise until a single click is heard.Pre-driving checks and adjustments
3-25
Page 186 of 433
Black plate (184,1)
Model "Z51-D" EDITED: 2010/ 7/ 23
SAA2487
Models with navigation system
SAA3562
Models without navigation system
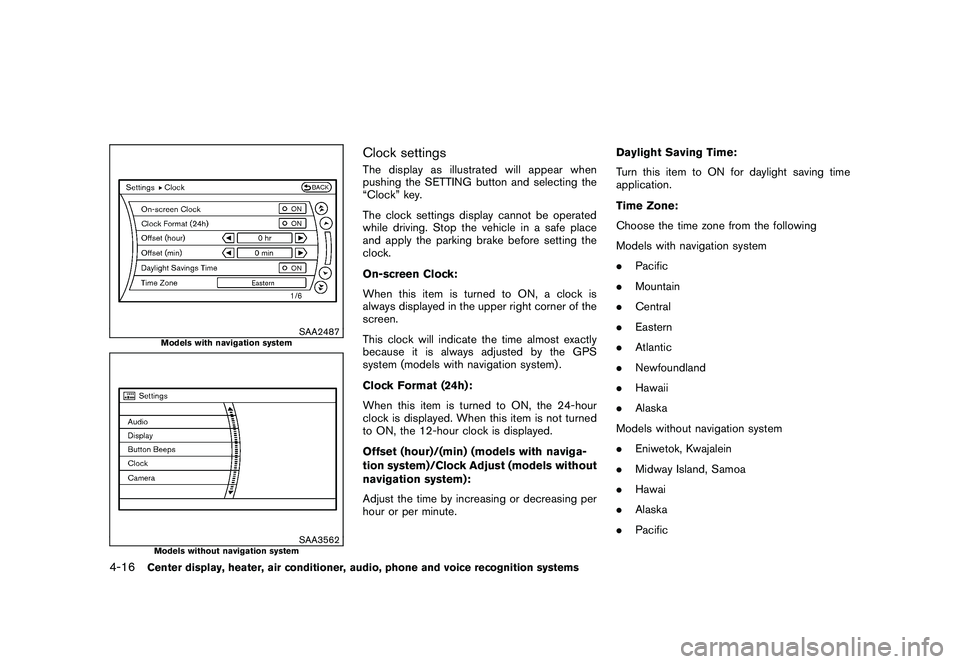
Clock settingsThe display as illustrated will appear when
pushing the SETTING button and selecting the
“Clock” key.
The clock settings display cannot be operated
while driving. Stop the vehicle in a safe place
and apply the parking brake before setting the
clock.
On-screen Clock:
When this item is turned to ON, a clock is
always displayed in the upper right corner of the
screen.
This clock will indicate the time almost exactly
because it is always adjusted by the GPS
system (models with navigation system) .
Clock Format (24h):
When this item is turned to ON, the 24-hour
clock is displayed. When this item is not turned
to ON, the 12-hour clock is displayed.
Offset (hour)/(min) (models with naviga-
tion system)/Clock Adjust (models without
navigation system):
Adjust the time by increasing or decreasing per
hour or per minute.Daylight Saving Time:
Turn this item to ON for daylight saving time
application.
Time Zone:
Choose the time zone from the following
Models with navigation system
.
Pacific
. Mountain
. Central
. Eastern
. Atlantic
. Newfoundland
. Hawaii
. Alaska
Models without navigation system
. Eniwetok, Kwajalein
. Midway Island, Samoa
. Hawai
. Alaska
. Pacific
4-16
Center display, heater, air conditioner, audio, phone and voice recognition systems
Page 216 of 433
Black plate (214,1)
Model "Z51-D" EDITED: 2010/ 7/ 23
SAA3473
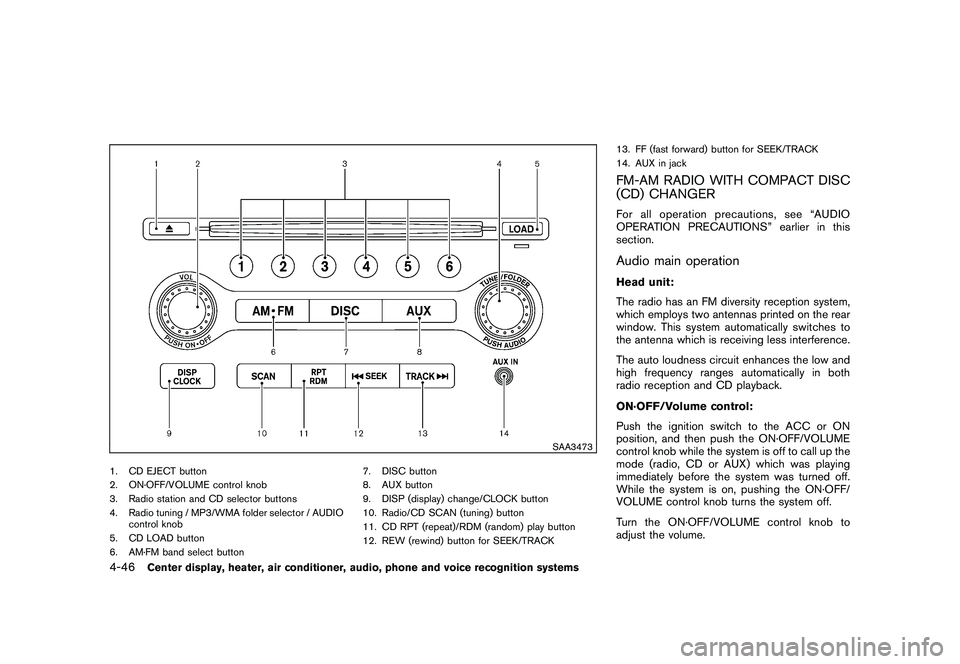
1. CD EJECT button
2. ON·OFF/VOLUME control knob
3. Radio station and CD selector buttons
4. Radio tuning / MP3/WMA folder selector / AUDIOcontrol knob
5. CD LOAD button
6. AM·FM band select button 7. DISC button
8. AUX button
9. DISP (display) change/CLOCK button
10. Radio/CD SCAN (tuning) button
11. CD RPT (repeat)/RDM (random) play button
12. REW (rewind) button for SEEK/TRACK13. FF (fast forward) button for SEEK/TRACK
14. AUX in jack
FM-AM RADIO WITH COMPACT DISC
(CD) CHANGERFor all operation precautions, see “AUDIO
OPERATION PRECAUTIONS” earlier in this
section.Audio main operationHead unit:
The radio has an FM diversity reception system,
which employs two antennas printed on the rear
window. This system automatically switches to
the antenna which is receiving less interference.
The auto loudness circuit enhances the low and
high frequency ranges automatically in both
radio reception and CD playback.
ON·OFF/Volume control:
Push the ignition switch to the ACC or ON
position, and then push the ON·OFF/VOLUME
control knob while the system is off to call up the
mode (radio, CD or AUX) which was playing
immediately before the system was turned off.
While the system is on, pushing the ON·OFF/
VOLUME control knob turns the system off.
Turn the ON·OFF/VOLUME control knob to
adjust the volume.
4-46
Center display, heater, air conditioner, audio, phone and voice recognition systems
Page 217 of 433
Black plate (215,1)
Model "Z51-D" EDITED: 2010/ 7/ 23
Adjusting sound quality:
Push the Audio control knob to change the
selecting mode as follows.
Bass?Treble ?Fade ?Balance ?Speed
Sensitive Volume ?Beep
Rotate the Audio control knob to adjust Bass,
Treble, Fade and Balance to the desired level.
Fade adjusts the sound level between the front
and rear speakers and Balance adjusts the
sound between the right and left speakers.
These items can also be adjusted by pushing
the AUDIO button.
. Speed Sensitive Vol.
Sound volume is increased according to the
vehicle speed. Choose the effect level from
“HIGH”, “MID”, “LOW” or “OFF”.
. Beep tuning
When this item is turned to ON, you will hear
a beep sound when you use a button.
Once you have adjusted the sound quality to the
desired level, push the Audio control knob
repeatedly until the radio or CD display re-
appears. Otherwise, the radio or CD display will
automatically reappear after about 5 seconds.
CLOCK adjust:
Push the CLOCK adjust button for more than
1.5 seconds to turn on the CLOCK display.
See “CLOCK” in the “2. Instruments and
controls” section for the detailed clock adjust-
ment operation.
AM-FM radio operation
radio (FM/AM) band select:
Pushing the radio band select button will
change the band as follows:
AM ?FM1 ?FM2 ?AM
When the radio band select button is pushed
while the ignition switch is in the ACC or ON
position, the radio will come on at the station last
played.
The last station/channel played will also come
on when the ON·OFF/VOL control knob is
pushed to ON.
If another audio source is playing when the radio
band select button is turned to ON, the audio
source will automatically be turned off and the
last radio station played will come on.
When the stereo broadcast signal is weak, the
radio will automatically change from stereo to
monaural reception. TUNE (Tuning):
Turn the TUNE/FOLDER knob for manual tuning.
SEEK tuning:
Push the SEEK·CAT or TRACK button
or
to tune from low to high or high to low
frequencies and to stop at the next broadcasting
station.SCAN tuning:
Push the SCAN tuning button to tune from low
to high frequencies and stops at each broad-
casting station for 5 seconds. Pushing the
button again during this 5 seconds period will
stop SCAN tuning and the radio will remain
tuned to that station.
If the SCAN tuning button is not pushed within 5
seconds, SCAN tuning moves to the next
station.
*1
to
*6
Station memory operations:
12 stations/channels can be set for the FM band
(6 for FM1, 6 for FM2) and 6 stations can be set
for the AM band.
1. Choose the radio band AM, FM1 or FM2 using the radio band select button.
2. Tune to the desired station using the SEEK, SCAN or TUNE button.
Center display, heater, air conditioner, audio, phone and voice recognition systems
4-47
Page 251 of 433
Black plate (249,1)
Model "Z51-D" EDITED: 2010/ 7/ 23
ANTENNA
Window antennaThe antenna pattern is printed inside the rear
window.
CAUTION
.Do not place metalized film near the
rear window glass or attach any
metal parts to it. This may cause
poor reception or noise.
. When cleaning the inside of the rear
window, be careful not to scratch or
damage the rear window antenna.
Lightly wipe along the antenna with
a dampened soft cloth.
SAA2102
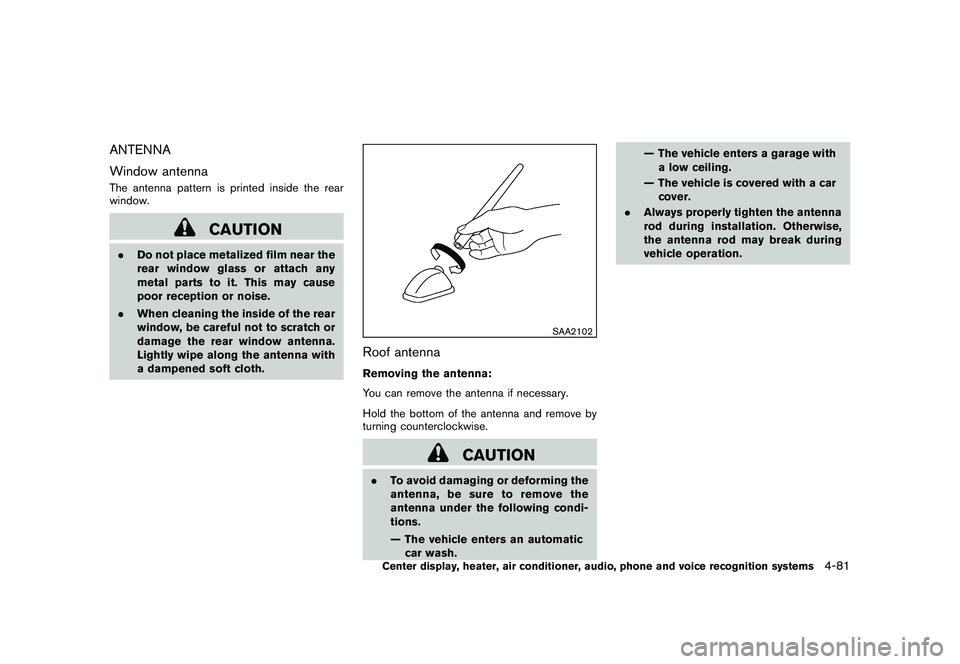
Roof antennaRemoving the antenna:
You can remove the antenna if necessary.
Hold the bottom of the antenna and remove by
turning counterclockwise.
CAUTION
.To avoid damaging or deforming the
antenna,besuretoremovethe
antenna under the following condi-
tions.
— The vehicle enters an automatic
car wash. — The vehicle enters a garage with
a low ceiling.
— The vehicle is covered with a car cover.
. Always properly tighten the antenna
rod during installation. Otherwise,
the antenna rod may break during
vehicle operation.Center display, heater, air conditioner, audio, phone and voice recognition systems
4-81