steering NISSAN MURANO 2015 3.G LC2 Kai Navigation Manual
[x] Cancel search | Manufacturer: NISSAN, Model Year: 2015, Model line: MURANO, Model: NISSAN MURANO 2015 3.GPages: 203, PDF Size: 1.12 MB
Page 13 of 203
2 Getting started
Control buttons and touch screen display .......................... 2-2Control panel ........................................................................\
2-2
Steering wheel switches ................................................... 2-4
USB (Universal Serial Bus) Connection Ports and
AUX (auxiliary) input jack ................................................... 2-5
Starting system ........................................................................\
.. 2-6 Start-up screen .................................................................... 2-6
Basic operation ........................................................................\
.. 2-7 Selecting menu from Launch Bar .................................... 2-7
Touch panel operation ........................................................ 2-8
Main screen operations ..................................................... 2-9 Adjusting settings .......................................................... 2-10
How to input letters and numbers ............................. 2-10
How to view and operate HOME MENU screen ..... 2-11
Functions disabled while driving ................................ 2-13
System settings ..................................................................... 2-14 Settings menu ................................................................. 2-14
Display settings .............................................................. 2-15
Volume and Beeps settings ......................................... 2-15
Language and unit settings ......................................... 2-16
Clock settings ................................................................. 2-16
Connecting Bluetooth
�Šdevice ................................... 2-17
Page 16 of 203
2. Getting started
slow. These conditions are normal. The
display will function normally when the
interior of the vehicle has warmed up.
. Some pixels in the display are darker or
brighter than others. This condition is an
inherent characteristic of liquid crystal dis-
plays, and it is not a malfunction.
. A remnant of the previous display image may
remain on the screen. This screen burn is
inherent in displays, and it is not a malfunc-
tion.
. The screen may become distorted by strong
magnetic fields.
Maintenance of display:
CAUTION
. To clean the display screen, use a dry,
soft cloth. If additional cleaning is
necessary, use a small amount of
neutral detergent with a soft cloth.
. Clean the display with the ignition
switch in the “OFF” position. If the
display is cleaned while the ignition
switch is placed in the “ON” position,
unintentional operation may occur. .
To clean the display, never use a
rough cloth, alcohol, benzine, thinner
or any kind of solvent or paper towel
with a chemical cleaning agent. They
will scratch or deteriorate the panel.
. Do not splash any liquid such as
water or car fragrance on the display.
Contact with liquid will cause the
system to malfunction.
STEERING WHEEL SWITCHES
*1<>(TALK):
Push to use the voice recognition system.
Push and hold to end the voice recognition
session.
“Giving voice commands” (page 7-2)
*2<>/<>,
During voice recognition operation, tilt up/
down to highlight different items, and push
to select the highlighted item.
Audio operations are also possible by tilting
the switch up and down.
“Steering wheel mounted audio con-
trol buttons” (page 3-11)
2-4
Page 17 of 203
*3<>:
Push to display the hands-free phone
operation screen.
When you receive a phone call, push this
button to answer the call.
“4. Hands-Free Phone”
*4<>/<>:
The buttons are used mainly for the vehicle
information display operation. Refer to the
vehicle Owner’s Manual for details.
During voice recognition operation, <
>
can be used to return to the previous
screen.
*5
Push to change the audio source to the
available mode.
*6<+> /<->:
Push to adjust the volume.
INFO:
Steering wheel switches are mainly for the
vehicle information display control and may not
be able to operate the touch screen display
depending on the conditions. Follow the pop-up
guide messages and labels shown on the vehicle
information display.
Some of the information displayed on the vehicle information display are linked with the touch
screen display.
“Control panel and vehicle information
display interaction” (page 5-8)
For other details of the vehicle information
display, refer to the vehicle Owner’s Manual.
USB (Universal Serial Bus) CONNEC-
TION PORTS AND AUX (auxiliary)
INPUT JACK
WARNING
Do not connect, disconnect or operate
the USB device while driving. Doing so
can be a distraction. If distracted you
could lose control of your vehicle and
cause an accident or serious injury.
CAUTION
. Do not force the USB device into the
USB port. Inserting the USB device
tilted or up-side-down into the port
may damage the port. Make sure that
the USB device is connected correctly
into the USB port.
. Do not grab the USB port cover (if so
equipped) when pulling the USB
device out of the port. This could damage the port and the cover.
. Do not leave the USB cable in a place
where it can be pulled unintention-
ally. Pulling the cable may damage
the port.
The vehicle is equipped with USB ports and an
AUX input jack. When connected, the in-vehicle
audio system can play audio contents from the
compatible device.Media pocket
2. Getting started
2-5
Page 19 of 203
BASIC OPERATION
SELECTING MENU FROM LAUNCH
BAR
Various system functions can be accessed by
touching the items on the Launch Bar
*1which
is displayed on most of the main menu screens.
(The Launch Bar does not appear on some
screens such as scrolled map screen, keyboard
screen, etc.)
Touch the keys on the Launch Bar to display the
corresponding menu screens.
The following menus are available on the Launch
Bar.
. [Audio] .
[Phone]
. [Info]
. [MENU]
. [Map]
. [Navi]
. [Settings]
Audio
Touching [Audio] on the Launch Bar will display
the audio screen. When [Audio] is touched while
the audio screen is displayed, the audio source
menu screen will be displayed.
“Selecting audio source” (page 3-11)
INFO:
Pushing
Page 31 of 203
3 Audio system
Audio operation precautions .................................................. 3-2Radio ........................................................................\
.............. 3-2
Compact Disc (CD) player ............................................... 3-4
USB (Universal Serial Bus) connection ports .............. 3-5
Compressed Audio Files (MP3/WMA/AAC) ............... 3-7
Bluetooth
�Šstreaming audio .............................................. 3-9
Names and functions of audio control buttons ............... 3-10
Audio main buttons .......................................................... 3-10
Steering wheel mounted audio control buttons ........ 3-11
Audio operations .................................................................... 3-11 Audio main operation ...................................................... 3-11
Radio ........................................................................\
........... 3-12 Compact Disc (CD) player .......................................... 3-17
USB memory device player ......................................... 3-20
iPod
�Šplayer ..................................................................... 3-23
Bluetooth�Šaudio ............................................................ 3-27
Auxiliary (AUX) devices ................................................. 3-30
Audio settings ........................................................................\
3-31 Audio adjustments when map, audio or HOME
MENU is displayed ........................................................ 3-32
CD/USB memory device care and cleaning ................... 3-32 CD ........................................................................\
............. 3-32
USB memory device ...................................................... 3-32
Page 41 of 203
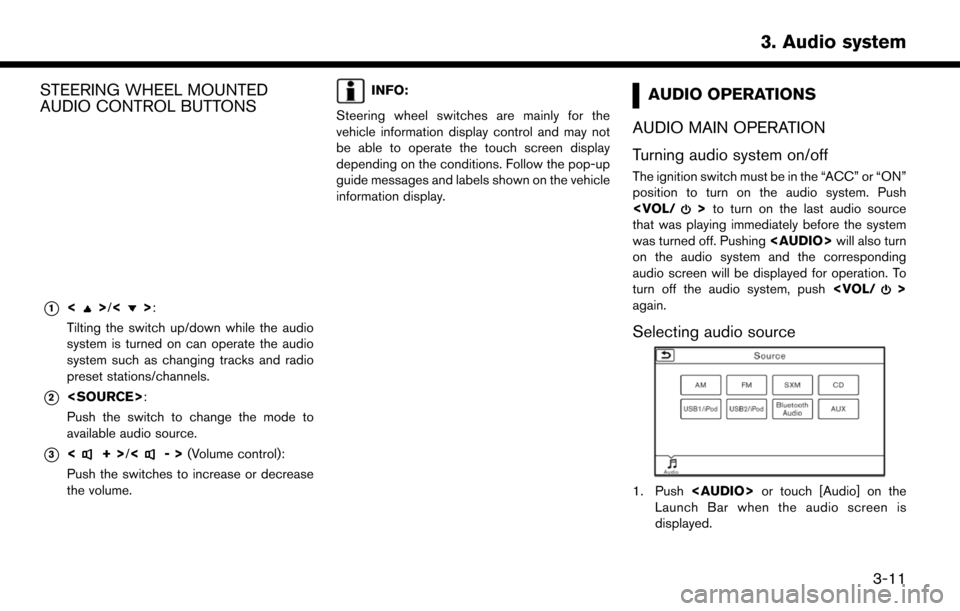
STEERING WHEEL MOUNTED
AUDIO CONTROL BUTTONS
*1<>/<>:
Tilting the switch up/down while the audio
system is turned on can operate the audio
system such as changing tracks and radio
preset stations/channels.
*2
Push the switch to change the mode to
available audio source.
*3<+> /<->(Volume control):
Push the switches to increase or decrease
the volume.
INFO:
Steering wheel switches are mainly for the
vehicle information display control and may not
be able to operate the touch screen display
depending on the conditions. Follow the pop-up
guide messages and labels shown on the vehicle
information display.AUDIO OPERATIONS
AUDIO MAIN OPERATION
Turning audio system on/off
The ignition switch must be in the “ACC” or “ON”
position to turn on the audio system. Push
that was playing immediately before the system
was turned off. Pushing
Page 43 of 203
![NISSAN MURANO 2015 3.G LC2 Kai Navigation Manual The radio screen can be viewed and operated on
the touch screen display.
*1[AM Menu]/[FM Menu]/[SXM Menu]:
Touch to display the radio menu screen.
“Radio Menu” (page 3-14)
*2[Source]:
Touch to dis NISSAN MURANO 2015 3.G LC2 Kai Navigation Manual The radio screen can be viewed and operated on
the touch screen display.
*1[AM Menu]/[FM Menu]/[SXM Menu]:
Touch to display the radio menu screen.
“Radio Menu” (page 3-14)
*2[Source]:
Touch to dis](/img/5/436/w960_436-42.png)
The radio screen can be viewed and operated on
the touch screen display.
*1[AM Menu]/[FM Menu]/[SXM Menu]:
Touch to display the radio menu screen.
“Radio Menu” (page 3-14)
*2[Source]:
Touch to display the audio source screen to
select the other audio source.
“Selecting audio source” (page 3-11)
*3Preset number:
A preset number is displayed if the current
frequency is stored as a preset station/
channel.
*4Audio source indicator:
Indicates the currently selected audio
source.
*5Reception information display:
Reception information available at the time
such as frequency, station/channel name,
etc. are displayed.
*6Turn direction indicator:
When a route to the destination is set,
turning direction and the distance to the
next turn is displayed.
*7TAG indicator (for U.S.):
TAG indicator is displayed if the iTunes�Š
Tagging information exists in the HD broad-
cast receiving.
“Radio Menu” (page 3-14)
*8Preset list:
To listen to a preset station, touch the
corresponding key in the preset list. Touch [
< ] or [ > ] to scroll the preset list. Touch and
hold one of the keys in the preset list to store
the station/channel currently tuned to.
“Presetting” (page 3-14)
*9Mode indicator (for U.S.):
HD Radio icon will appear when HD mode
setting is turned on.
“Radio Menu” (page 3-14)
“Live” will appear when in ballgame mode
during reception of the HD broadcast.
INFO:
HD Radio (for U.S.) reception needs to be
activated to receive HD Radio broadcasts. This
enables you to receive radio broadcasts digitally
(where available) , providing a better quality
sound with clear reception. When this feature
is not activated or HD Radio broadcasts are not
available, you will receive analog radio (AM/FM) broadcasts.
“Radio Menu” (page 3-14)
Radio operation
Radio activation and band selection:
To listen to the radio, turn on the audio system
and select a preferred radio band on the audio
source menu screen.
“Selecting audio source” (page 3-11)
INFO:
When the stereo broadcast signal is weak, the
radio will automatically change from stereo to
monaural reception.
Seeking stations/channels:
Tilt and hold <
>/<>on the steering
wheel to seek up/down to the next receivable
broadcast station/channel.
To tune to stations/channels manually, turn
station is selected.
Scan tuning:
To scan tune the stations/channels, touch [FM
Menu], [AM Menu] or [SXM Menu] on the radio
screen and then touch [Scan]. The stations/
channels will be tuned from low to high
3. Audio system
3-13
Page 44 of 203
![NISSAN MURANO 2015 3.G LC2 Kai Navigation Manual 3. Audio system
frequencies and stop at each broadcasting
station/channel for several seconds. Touching
[Scan] again during this period of several
seconds will stop scan tuning and the radio will
rema NISSAN MURANO 2015 3.G LC2 Kai Navigation Manual 3. Audio system
frequencies and stop at each broadcasting
station/channel for several seconds. Touching
[Scan] again during this period of several
seconds will stop scan tuning and the radio will
rema](/img/5/436/w960_436-43.png)
3. Audio system
frequencies and stop at each broadcasting
station/channel for several seconds. Touching
[Scan] again during this period of several
seconds will stop scan tuning and the radio will
remain tuned to that station/channel.
Pushing<
>/<>will also scan tune the
stations/channels.
Presetting:
Up to 6 for AM, 12 for FM, and 18 for SXM
stations/channels can be registered in the preset
list.
1. Select a radio band (AM, FM or SXM) .
2. Tune to the station/channel you wish to store in the preset list.
3. Touch and hold one of the preset numbers in the preset list.
4. The information such as frequency (AM/FM) , channel number (SXM) , etc. will be dis-
played on the preset list.
INFO:
Tilting <
>/<> on the steering wheel
briefly will scroll up/down the preset stations/
channels.
Radio Menu
Touch [FM Menu], [AM Menu], and [SXM Menu]
on the FM, AM or SXM screen to display the
corresponding screen.
The following items are available.
3-14
Page 48 of 203
![NISSAN MURANO 2015 3.G LC2 Kai Navigation Manual 3. Audio system
[] Each time [] is touched, the
repeat mode changes.
“Changing play mode”
(page 3-18)
[
] Touch once to return to the begin- ning of the current track. Touch again
to select the pr NISSAN MURANO 2015 3.G LC2 Kai Navigation Manual 3. Audio system
[] Each time [] is touched, the
repeat mode changes.
“Changing play mode”
(page 3-18)
[
] Touch once to return to the begin- ning of the current track. Touch again
to select the pr](/img/5/436/w960_436-47.png)
3. Audio system
[] Each time [] is touched, the
repeat mode changes.
“Changing play mode”
(page 3-18)
[
] Touch once to return to the begin- ning of the current track. Touch again
to select the previous track. Touch
and hold to rewind the current track.
[
] Touch to play the track.
[
] Touch to pause the track.
[
] Touch to select the next tack. Touch and hold to fast-forward the track.
[
] Each time [] is touched, the
random mode changes.
“Changing play mode”
(page 3-18)
*8Track and folder number:
Indicates the track number and the folder
number.
*9Data type indicator:
Indicates the type of data currently playing.
CD player operation
Loading:
Insert a CD into the slot with the label side facing
up. The CD will be guided automatically into the
slot and start playing.
After loading the CD, the CD screen will appear
on the display.
Activation and playing:
The CD mode can be also selected from the
source list with a CD loaded.
“Selecting audio source” (page 3-11)
To play the CD, touch [
].
Touch [
] to pause.
Skipping tracks:
To skip to the previous or the next track, push
<
>/<>, touch []/[] on the CD
screen, or tilt up/down <>/<>on the
steering wheel briefly.
Skipping folders:
Turn
different folders. If no folders are found, tracks
will be skipped. Fast-forwarding/rewinding:
The following operation methods are available for
rewinding and fast-forwarding the track.
Control panel operation:
. Push and hold <
>/<>.
. Touch and hold [
]/[].
Steering wheel switch operation: . Tilt and hold <
>/<>.
Changing play mode:
Repeat mode
Touch [
] on the CD screen to change the
repeat mode as follows.
. CD:
[Disc] �œ[1 Track]
. CD with compressed audio files:
[All] ?[1 Track] ?[1 Folder] ?[All]
Random mode
Touch [
] on the CD screen to change the
random mode as follows.
. CD:
(off) �œ[Disc]
. CD with compressed audio files:
(off) ?[1 Folder] ?[All] ?(off)
3-18
Page 52 of 203
![NISSAN MURANO 2015 3.G LC2 Kai Navigation Manual 3. Audio system
[] Each time [] is touched, the
repeat mode changes.
“Changing play mode”
(page 3-22)
[
] Touch to return to the beginning of the current track. Touch again to
select the previous NISSAN MURANO 2015 3.G LC2 Kai Navigation Manual 3. Audio system
[] Each time [] is touched, the
repeat mode changes.
“Changing play mode”
(page 3-22)
[
] Touch to return to the beginning of the current track. Touch again to
select the previous](/img/5/436/w960_436-51.png)
3. Audio system
[] Each time [] is touched, the
repeat mode changes.
“Changing play mode”
(page 3-22)
[
] Touch to return to the beginning of the current track. Touch again to
select the previous track. Touch and
hold to rewind the current track.
[
] Touch to play the track.
[
] Touch to pause the track.
[
] Touch to select the next tack. Touch and hold to fast-forward the track.
[
] Each time [] is touched, the
random mode changes.
“Changing play mode”
(page 3-22)
*8Track and folder number:
Indicates the track number and the folder
number.
*9Data type indicator:
Indicates the type of data currently playing.
USB memory device player operation
Activation and playing:
Connecting the USB memory device into the
port will activate the USB mode.
USB memory device can also be played by
selecting the source on the audio source menu
screen.
“Selecting audio source” (page 3-11)
To pause playing the USB memory device, touch
[
]. To resume playing, touch [].
Skipping tracks:
To skip to the previous or the next track, push
<
>/<>, touch []/[] on the CD
screen, or tilt up/down <>/<>on the
steering wheel briefly.
Skipping folders:
Turn
different folders. If no folders are found, tracks
will be skipped.
Fast-forwarding/rewinding:
To rewind or fast-forward the track, push and
hold <
>/<>, touch and hold []/[],
or tilt and hold <
>/<>on the steering
wheel. Changing play mode:
Repeat mode
Touch [
] on the screen to change the repeat
mode as follows.
. Data without compressed audio files:
[Disc] �œ[1 Track]
. Data with compressed audio files:
[All] ?[1 Track] ?[1 Folder] ?[All]
Random mode
Touch [
] on the screen to change the random
mode as follows.
. Data without compressed audio files:
(off) �œ[Disc]
. Data with compressed audio files:
(off) ?[1 Folder] ?[All] ?(off)
USB Menu
Touch [USB Menu] on the USB screen to display
the USB Menu screen.
The following items are available.
3-22