technical NISSAN MURANO 2020 Owner´s Manual
[x] Cancel search | Manufacturer: NISSAN, Model Year: 2020, Model line: MURANO, Model: NISSAN MURANO 2020Pages: 518, PDF Size: 3.52 MB
Page 25 of 518
Table of
contentsIllustrated table of contents
Safety-Seats, seat belts and supplemental restraint system
Instruments and controls
Pre-driving checks and adjustments
Monitor, climate, audio, phone and voice recognition systems
Starting and driving
In case of emergency
Appearance and care
Do-it-yourself
Maintenance and schedules
Technical and consumer information
Index
0
1
2
3
4
5
6
7
8
9
10
11
Page 123 of 518
(I/M) test” in the “Technical and consumer
information” section of this manual.
Operation
The MIL will come on in one of two ways:
• MIL on steady — An emission control sys-tem malfunction has been detected.
Check the fuel-filler cap if the Loose Fuel
Cap warning appears in the vehicle infor-
mation display. If the fuel-filler cap is loose
or missing, tighten or install the cap and
continue to drive the vehicle. The
light should turn off af ter a few driving
trips. If thelight does not turn off
af ter a few driving trips, have the vehicle
inspected. It is recommended that you
visit a NISSAN dealer for this service. You
do not need to have your vehicle towed
to the dealer.
• MIL blinking — An engine misfire has been detected which may damage the emis-
sion control system. To reduce or avoid
emission control system damage:– do not drive at speeds above 45 mph (72 km/h).
– avoid hard acceleration or decelera- tion.
– avoid steep uphill grades.
– if possible, reduce the amount of cargo being hauled or towed. The MIL may stop blinking and come on
steady. Have the vehicle inspected. It is rec-
ommended that you visit a NISSAN dealer
for this service. You do not need to have
your vehicle towed to the dealer.
CAUTION
Continued vehicle operation without
having the emission control system
checked and repaired as necessary
could lead to poor driveability, reduced
fuel economy, and possible damage to
the emission control system.
Security indicator light
This light blinks when the ignition switch is
placed in the OFF, LOCK or ACC (if so
equipped) position.
The blinking security indicator light indi-
cates that the security systems equipped
on the vehicle are operational.
For additional information, refer to “Security
systems” in this section.
Side light and headlight
indicator light (green)
The side light and headlight indicator light
illuminates when the side light or headlight
position is selected. For additional informa-
tion, refer to “Headlight and turn signal
switch” in this section.
Slip indicator light
This indicator light will blink when the Ve-
hicle Dynamic Control (VDC) system is op-
erating, thus alerting the driver to the fact
that the road surface is slippery and the
vehicle is nearing its traction limits.
You may feel or hear the system working;
this is normal.
The light will blink for a few seconds af ter
the VDC system stops limiting wheel spin.
The
indicator light also comes on
when you place the ignition switch in the
ON position. The light will turn off af ter ap-
proximately 2 seconds if the system is op-
erational. If the light does not come on
have the system checked. It is recom-
mended that you visit a NISSAN dealer for
this service.
Instruments and controls2-15
Page 212 of 518
FUEL-FILLER CAP
WARNING
• Gasoline is extremely flammable and
highly explosive under certain condi-
tions. You could be burned or seri-
ously injured if it is misused or mis-
handled. Always stop the engine and
do not smoke or allow open flames or
sparks near the vehicle when
refueling.
• Do not attempt to top off the fuel
tank af ter the fuel pump nozzle
shuts off automatically. Continued
refueling may cause fuel overflow,
resulting in fuel spray and possibly a
fire.
• Use only an original equipment type
fuel-filler cap as a replacement. It has
a built-in safety valve needed for
proper operation of the fuel system
and emission control system. An in-
correct cap can result in a serious
malfunction and possible injury. It
could also cause the
Malfunc-
tion Indicator Light (MIL) to come on.
• Never pour fuel into the throttle body
to attempt to start your vehicle. •
Do not fill a portable fuel container in
the vehicle or trailer. Static electricity
can cause an explosion of flammable
liquid, vapor or gas in any vehicle or
trailer. To reduce the risk of serious
injury or death when filling portable
fuel containers:
– Always place the container on the
ground when filling.
– Do not use electronic devices
when filling.
– Keep the pump nozzle in contact
with the container while you are
filling it.
– Use only approved portable fuel
containers for flammable liquid.
CAUTION
• Do not use a fuel containing more
than 15% ethanol in your vehicle. For
additional information, refer to “Fuel
recommendation” in the “Technical
and consumer information” section
of this manual. •
The Loose Fuel Cap warning mes-
sage will be displayed/warning will
appear if the fuel-filler cap is not
properly tightened. It may take a few
driving trips for the message to be
displayed. Failure to tighten the fuel-
filler cap properly af ter the Loose
Fuel Cap warning message is
displayed/warning appears may
cause the
Malfunction Indicator
Light (MIL) to illuminate.
• Failure to tighten the fuel-filler cap
properly may cause the
Mal-
function Indicator Light (MIL) to illu-
minate. If the
light illuminates
because the fuel-filler cap is loose or
missing, tighten or install the cap and
continue to drive the vehicle. The
light should turn off af ter a few
driving trips. If thelight does not
turn off af ter a few driving trips, have
the vehicle inspected. It is recom-
mended that you visit a NISSAN
dealer for this service.
• For additional information, refer to
“Malfunction Indicator Light (MIL)” in
the “Instruments and controls” sec-
tion of this manual.
3-30Pre-driving checks and adjustments
Page 253 of 518
OPERATING TIPS
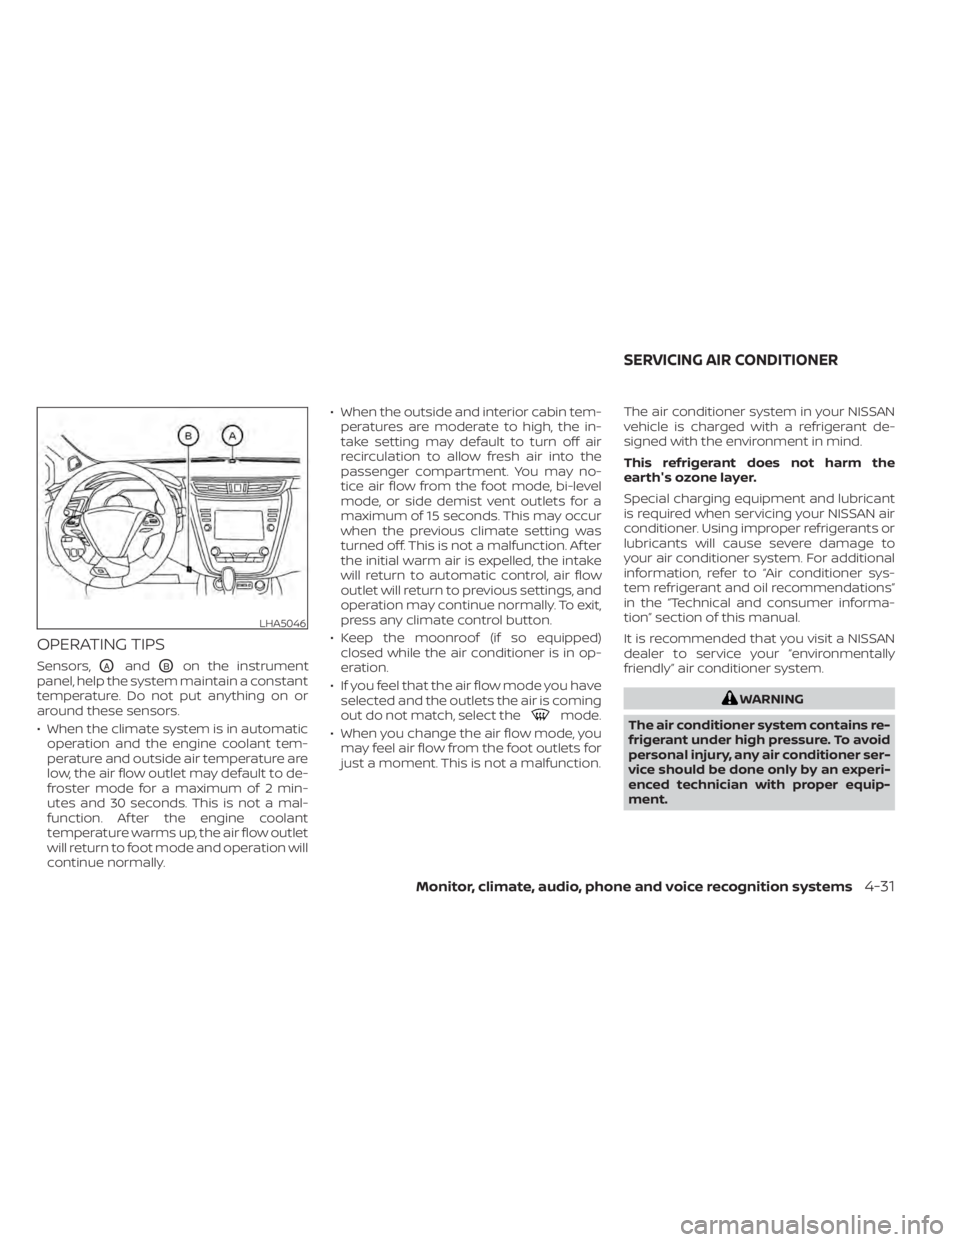
Sensors,OAandOBon the instrument
panel, help the system maintain a constant
temperature. Do not put anything on or
around these sensors.
• When the climate system is in automatic operation and the engine coolant tem-
perature and outside air temperature are
low, the air flow outlet may default to de-
froster mode for a maximum of 2 min-
utes and 30 seconds. This is not a mal-
function. Af ter the engine coolant
temperature warms up, the air flow outlet
will return to foot mode and operation will
continue normally. • When the outside and interior cabin tem-
peratures are moderate to high, the in-
take setting may default to turn off air
recirculation to allow fresh air into the
passenger compartment. You may no-
tice air flow from the foot mode, bi-level
mode, or side demist vent outlets for a
maximum of 15 seconds. This may occur
when the previous climate setting was
turned off. This is not a malfunction. Af ter
the initial warm air is expelled, the intake
will return to automatic control, air flow
outlet will return to previous settings, and
operation may continue normally. To exit,
press any climate control button.
• Keep the moonroof (if so equipped) closed while the air conditioner is in op-
eration.
• If you feel that the air flow mode you have selected and the outlets the air is coming
out do not match, select the
mode.
• When you change the air flow mode, you may feel air flow from the foot outlets for
just a moment. This is not a malfunction. The air conditioner system in your NISSAN
vehicle is charged with a refrigerant de-
signed with the environment in mind.
This refrigerant does not harm the
earth's ozone layer.
Special charging equipment and lubricant
is required when servicing your NISSAN air
conditioner. Using improper refrigerants or
lubricants will cause severe damage to
your air conditioner system. For additional
information, refer to “Air conditioner sys-
tem refrigerant and oil recommendations”
in the “Technical and consumer informa-
tion” section of this manual.
It is recommended that you visit a NISSAN
dealer to service your “environmentally
friendly ” air conditioner system.
WARNING
The air conditioner system contains re-
frigerant under high pressure. To avoid
personal injury, any air conditioner ser-
vice should be done only by an experi-
enced technician with proper equip-
ment.
LHA5046
SERVICING AIR CONDITIONER
Monitor, climate, audio, phone and voice recognition systems4-31
Page 380 of 518
7.Avoid Idling
• Shutting off your engine when safe for stops exceeding 30–60 seconds saves
fuel and reduces emissions.
8. Buy an Automated Pass for Toll Roads
• Automated passes permit drivers to use special lanes to maintain cruising
speed through the toll and avoid stop-
ping and starting.
9. Winter Warm Up
• Limit idling time to minimize impact to fuel economy.
• Vehicles typically need no more than 30 seconds of idling at start-up to ef-
fectively circulate the engine oil before
driving.
• Your vehicle will reach its ideal operat- ing temperature more quickly while
driving versus idling.
10. Keeping your Vehicle Cool
• Park your vehicle in a covered parking area or in the shade whenever pos-
sible.
• When entering a hot vehicle, opening the windows will help to reduce the
inside temperature faster, resulting in
reduced demand on your A/C system. • Keep your engine tuned up.
• Follow the recommended scheduled
maintenance.
• Keep the tires inflated to the correct pres- sure. Low tire pressure increases tire
wear and lowers fuel economy.
• Keep all the wheels in correct alignment. Improper alignment increases tire wear
and lowers fuel economy.
• Use the recommended viscosity engine oil. For additional information, refer to “En-
gine oil and oil filter recommendations” in
the “Technical and consumer informa-
tion” section of this manual. If any malfunction occurs in the AWD sys-
tem while the engine is running, messages
are displayed in the meter.
INCREASING FUEL ECONOMY
ALL-WHEEL DRIVE (AWD) (if so
equipped)
5-124Starting and driving
Page 386 of 518
•Tire type and condition may also af-
fect braking effectiveness.
– When replacing tires, install the
specified size of tires on all four
wheels.
– When installing a spare tire, make
sure that it is the proper size and
type as specified on the Tire and
Loading Information label. For ad-
ditional information, refer to “Tire
and Loading Information label” in
the “Technical and consumer in-
formation” section of this manual.
– For additional information, refer
to “Wheels and tires” in the “Do-it-
yourself ” section of this manual.
The ABS controls the brakes so the wheels
do not lock during hard braking or when
braking on slippery surfaces. The system
detects the rotation speed at each wheel
and varies the brake fluid pressure to pre-
vent each wheel from locking and sliding.
By preventing each wheel from locking, the
system helps the driver maintain steering
control and helps to minimize swerving
and spinning on slippery surfaces.Using the system
Depress the brake pedal and hold it down.
Depress the brake pedal with firm steady
pressure, but do not pump the brakes. The
Anti-lock Braking System will operate to
prevent the wheels from locking up. Steer
the vehicle to avoid obstacles.
WARNING
Do not pump the brake pedal. Doing so
may result in increased stopping dis-
tances.
Self-test feature
The Anti-lock Braking System (ABS) in-
cludes electronic sensors, electric pumps,
hydraulic solenoids and a computer. The
computer has a built-in diagnostic feature
that tests the system each time you start
the engine and move the vehicle at a low
speed in forward or reverse. When the self-
test occurs, you may hear a “clunk” noise
and/or feel a pulsation in the brake pedal.
This is normal and does not indicate a mal-
function. If the computer senses a mal-
function, it switches the ABS off and illumi-
nates the ABS warning light on the instrument panel. The brake system then
operates normally, but without anti-lock
assistance.
If the ABS warning light illuminates during
the self-test or while driving, have the ve-
hicle checked. It is recommended that you
visit a NISSAN dealer for this service.
Normal operation
The Anti-lock Braking System (ABS) oper-
ates at speeds abov
e3-6mph(5-10
km/h). The speed varies according to road
conditions.
When the ABS senses that one or more
wheels are close to locking up, the actuator
rapidly applies and releases hydraulic pres-
sure. This action is similar to pumping the
brakes very quickly. You may feel a pulsa-
tion in the brake pedal and hear a noise
from under the hood or feel a vibration
from the actuator when it is operating. This
is normal and indicates that the ABS is op-
erating properly. However, the pulsation
may indicate that road conditions are haz-
ardous and extra care is required while
driving.
5-130Starting and driving
Page 407 of 518
For additional information, refer to “Flat
towing for all-wheel drive vehicle” in the
“Technical and consumer information” sec-
tion of this manual.
TOWING RECOMMENDED BY
NISSAN
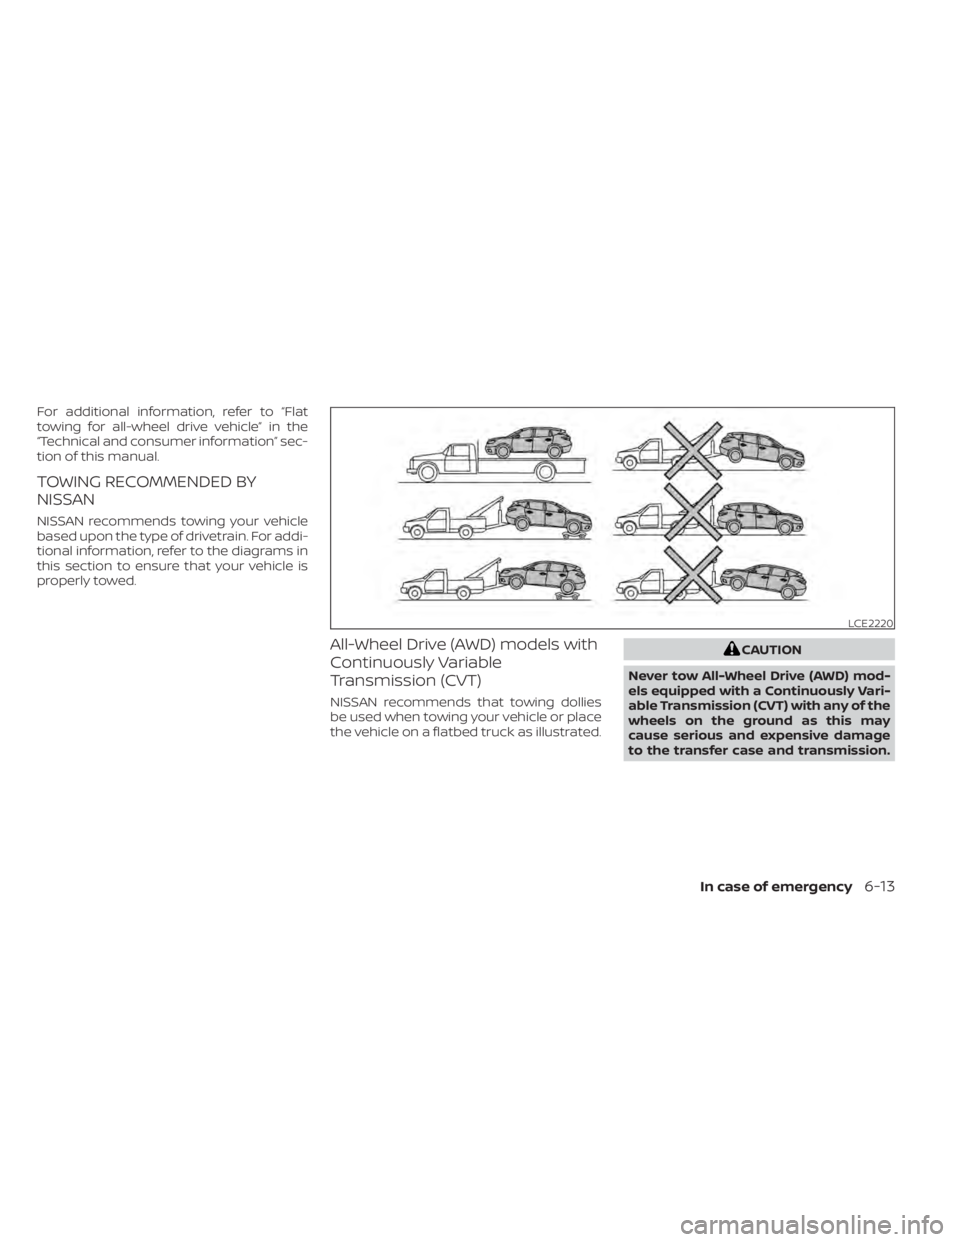
NISSAN recommends towing your vehicle
based upon the type of drivetrain. For addi-
tional information, refer to the diagrams in
this section to ensure that your vehicle is
properly towed.
All-Wheel Drive (AWD) models with
Continuously Variable
Transmission (CVT)
NISSAN recommends that towing dollies
be used when towing your vehicle or place
the vehicle on a flatbed truck as illustrated.
CAUTION
Never tow All-Wheel Drive (AWD) mod-
els equipped with a Continuously Vari-
able Transmission (CVT) with any of the
wheels on the ground as this may
cause serious and expensive damage
to the transfer case and transmission.
LCE2220
In case of emergency6-13
Page 420 of 518
When performing any inspection or main-
tenance work on your vehicle, always take
care to prevent serious accidental injury to
yourself or damage to the vehicle. The fol-
lowing are general precautions which
should be closely observed.
WARNING
• Park the vehicle on a level surface,
apply the parking brake securely and
block the wheels to prevent the ve-
hicle from moving. Move the shif t le-
ver to P (Park).
• Be sure the ignition switch is in the
OFF or LOCK position when perform-
ing any parts replacement or repairs.
• If you must work with the engine run-
ning, keep your hands, clothing, hair
and tools away from moving fans,
belts and any other moving parts.
• It is advisable to secure or remove
any loose clothing and remove any
jewelry, such as rings, watches, etc.
before working on your vehicle.
• Always wear eye protection when-
ever you work on your vehicle.
•
Your vehicle is equipped with an auto-
matic engine cooling fan. It may come
on at any time without warning, even if the ignition switch is in the OFF posi-
tion and the engine is not running. To
avoid injury, always disconnect the
negative battery cable before working
near the fan.
•
If you must run the engine in an en-
closed space such as a garage, be
sure there is proper ventilation for
exhaust gases to escape.
• Never get under the vehicle while it is
supported only by a jack. If it is nec-
essary to work under the vehicle,
support it with safety stands.
• Keep smoking materials, flame and
sparks away from the fuel tank and
battery.
• Because the fuel lines on gasoline
engine models are under high pres-
sure even when the engine is off, it is
recommended that you visit a
NISSAN dealer for service of the fuel
filter or fuel lines.
CAUTION
• Do not work under the hood while
the engine is hot. Turn the engine off
and wait until it cools down. •
Avoid contact with used engine oil and
coolant. Improperly disposed engine
oil, engine coolant and/or other ve-
hicle fluids can damage the environ-
ment. Always conform to local regula-
tions for disposal of vehicle fluid.
• Never leave the engine or Continu-
ously Variable Transmission (CVT) re-
lated component harnesses discon-
nected while the ignition switch is in
the ON position.
• Never connect or disconnect the bat-
tery or any transistorized compo-
nent while the ignition switch is in
the ON position.
This “Do-it-yourself ” section gives instruc-
tions regarding only those items which are
relatively easy for an owner to perform.
A Genuine NISSAN service manual is also
available. For additional information, refer
to “Owner's Manual/Service Manual order
information” in the “Technical and con-
sumer information” section of this manual.
You should be aware that incomplete or
improper servicing may result in operating
difficulties or excessive emissions, and
could affect warranty coverage. If in doubt
about any servicing, it is recommended
that you have it done by a NISSAN dealer.
MAINTENANCE PRECAUTIONS
8-2Do-it-yourself
Page 428 of 518
6. Coat the gasket on the new filter withclean engine oil.
7. Screw in the oil filter clockwise until a slight resistance is felt, then tighten addi-
tionally more than 2/3 turn.
Oil filter tightening torque: 11 to 15 f t-lb (14.7 to 20.6 N·m)
8. Clean and re-install the drain plug with a new washer. Securely tighten the drain
plug with a wrench. Do not use exces-
sive force.
Drain plug tightening torque: 22 to 29 f t-lb (29.4 to 39.2 N·m)
9. Refill the engine with the recommended oil through the oil filler opening, and in-
stall the oil filler cap securely.
For additional information about drain and
refill capacity, refer to “Recommended
fluids/lubricants and capacities” in the
“Technical and consumer information” sec-
tion of this manual. The drain and refill ca-
pacity depends on the oil temperature and
drain time. Use these specifications for ref-
erence only. Always use the dipstick to de-
termine the proper amount of oil in the
engine. 10. Start the engine and check for leakage
around the drain plug and the oil filter.
Correct as required. Turn the engine off
and wait more than 15 minutes. Check
the oil level with the dipstick. Add en-
gine oil if necessary.
Af ter the operation
1. Reinstall engine protectors in reverse or-der of removal.
2. Lower the vehicle carefully to the ground.
3. Reset oil and oil filter maintenance re- minder. For additional information, refer
to “Vehicle information display” in the “In-
struments and controls” section of this
manual.
• Dispose of waste oil and filter properly.
• Check your local regulations.
CAUTION
• NISSAN recommends using Genuine
NISSAN CVT Fluid NS-3 (or equiva-
lent) ONLY in NISSAN CVTs. Do not mix
with other fluids.
• Do not use Automatic Transmission
Fluid (ATF) or manual transmission
fluid in a NISSAN CVT, as it may dam-
age the CVT. Damage caused by the
use of fluids other than as recom-
mended is not covered under
NISSAN's New Vehicle Limited
Warranty.
• Using fluids that are not equivalent
to Genuine NISSAN CVT Fluid NS-3
may also damage the CVT. Damage
caused by the use of fluids other than
as recommended is not covered un-
der NISSAN's New Vehicle Limited
Warranty.
When checking or replacement of CVT fluid
is required, we recommend a NISSAN
dealer for servicing.
CONTINUOUSLY VARIABLE
TRANSMISSION (CVT) FLUID
8-10Do-it-yourself
Page 430 of 518
CAUTION
Do not spill the fluid on any painted sur-
faces. This will damage the paint. If fluid
is spilled, immediately wash the sur-
face with water.
Check the fluid level in the reservoir. If the
brake fluid is below the MIN line
OB, the
brake warning light will illuminate. Add
brake fluid up to the MAX line
OA. For addi-
tional information on brake fluid type, refer
to “Recommended fluids/lubricants and
capacities” in the “Technical and consumer
information” section of this manual.
If the brake fluid must be added frequently,
the brake system should be thoroughly
checked. It is recommended that you visit a
NISSAN dealer for this service.
WINDSHIELD-WASHER FLUID
RESERVOIR
Fill the windshield-washer fluid reservoir pe-
riodically. Add windshield-washer fluid when
the “Low Washer Fluid” warning message
shows on the vehicle information display.
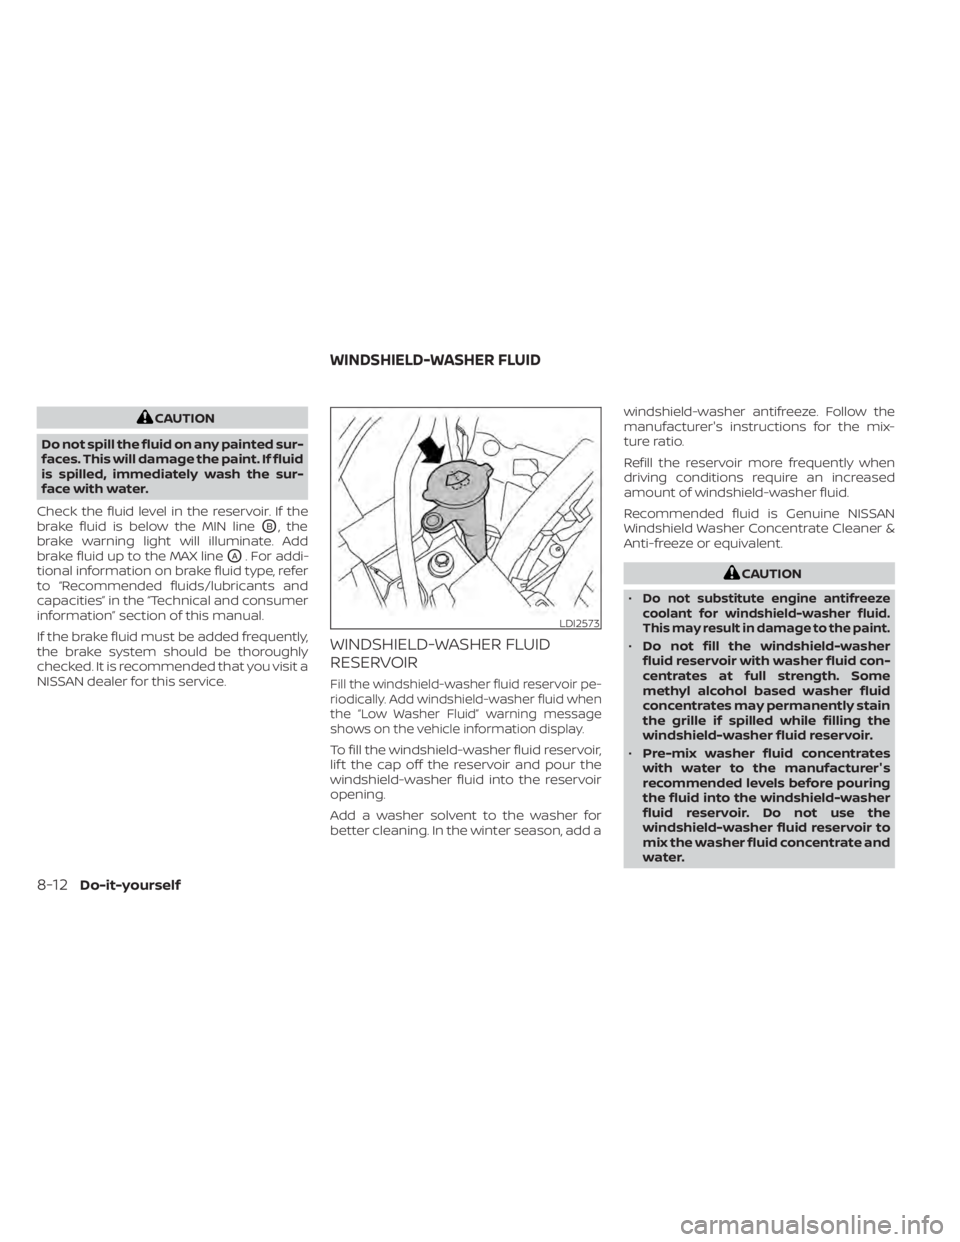
To fill the windshield-washer fluid reservoir,
lif t the cap off the reservoir and pour the
windshield-washer fluid into the reservoir
opening.
Add a washer solvent to the washer for
better cleaning. In the winter season, add a windshield-washer antifreeze. Follow the
manufacturer's instructions for the mix-
ture ratio.
Refill the reservoir more frequently when
driving conditions require an increased
amount of windshield-washer fluid.
Recommended fluid is Genuine NISSAN
Windshield Washer Concentrate Cleaner &
Anti-freeze or equivalent.
CAUTION
•
Do not substitute engine antifreeze
coolant for windshield-washer fluid.
This may result in damage to the paint.
• Do not fill the windshield-washer
fluid reservoir with washer fluid con-
centrates at full strength. Some
methyl alcohol based washer fluid
concentrates may permanently stain
the grille if spilled while filling the
windshield-washer fluid reservoir.
• Pre-mix washer fluid concentrates
with water to the manufacturer's
recommended levels before pouring
the fluid into the windshield-washer
fluid reservoir. Do not use the
windshield-washer fluid reservoir to
mix the washer fluid concentrate and
water.
LDI2573
WINDSHIELD-WASHER FLUID
8-12Do-it-yourself