light NISSAN NAVARA 2005 Repair Workshop Manual
[x] Cancel search | Manufacturer: NISSAN, Model Year: 2005, Model line: NAVARA, Model: NISSAN NAVARA 2005Pages: 3171, PDF Size: 49.59 MB
Page 1387 of 3171
PRECAUTIONS
EM-5
C
D
E
F
G
H
I
J
K
L
MA
EM
Precautions For Liquid GasketEBS01E5N
REMOVAL OF LIQUID GASKET
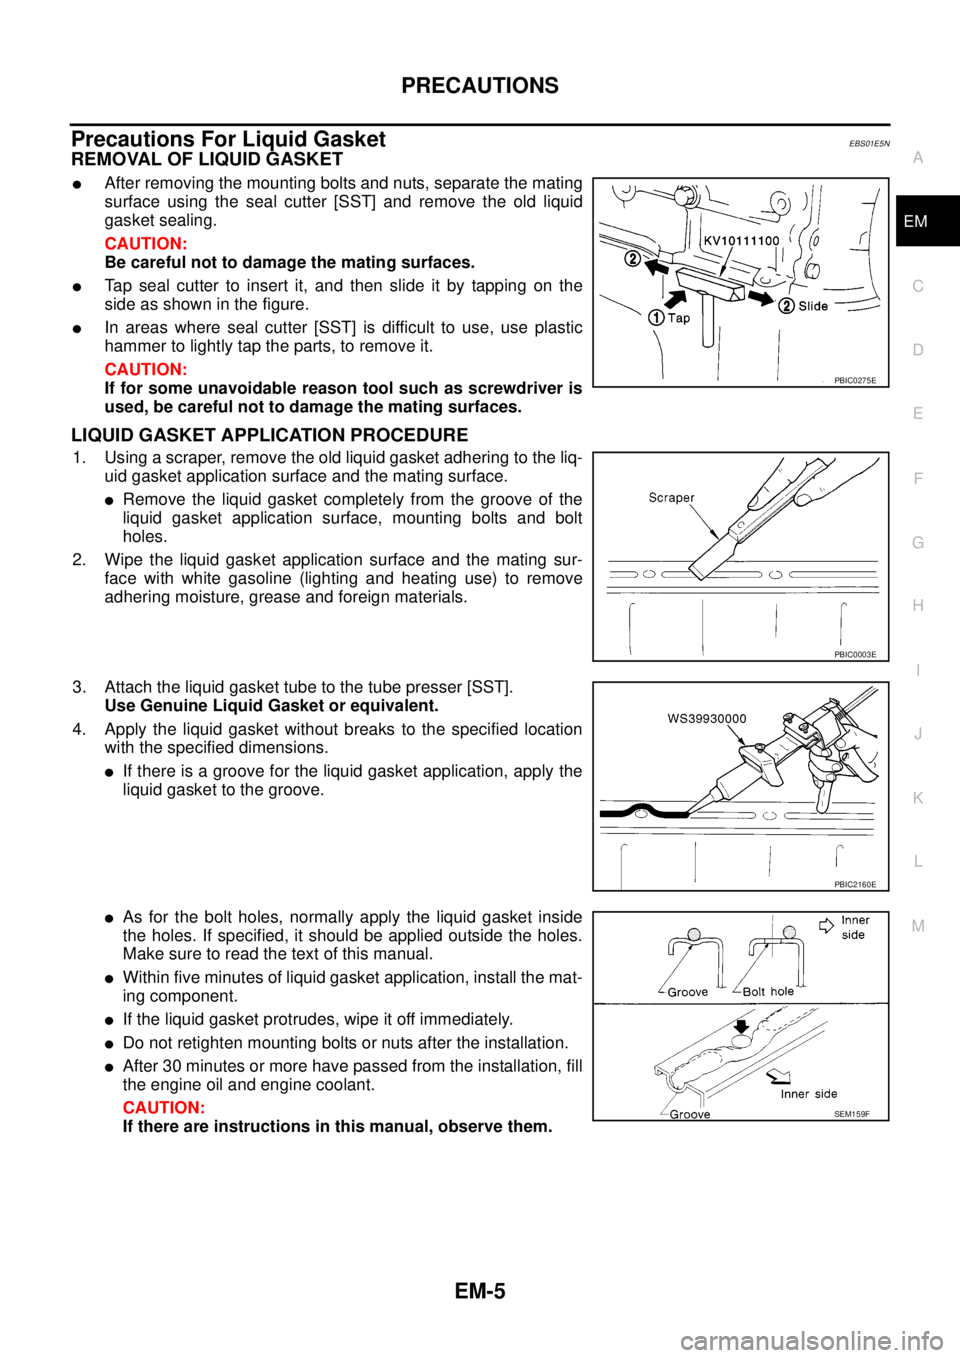
lAfter removing the mounting bolts and nuts, separate the mating
surface using the seal cutter [SST] and remove the old liquid
gasket sealing.
CAUTION:
Be careful not to damage the mating surfaces.
lTap seal cutter to insert it, and then slide it by tapping on the
side as shown in the figure.
lIn areas where seal cutter [SST] is difficult to use, use plastic
hammer to lightly tap the parts, to remove it.
CAUTION:
If for some unavoidable reason tool such as screwdriver is
used, be careful not to damage the mating surfaces.
LIQUID GASKET APPLICATION PROCEDURE
1. Using a scraper, remove the old liquid gasket adhering to the liq-
uid gasket application surface and the mating surface.
lRemove the liquid gasket completely from the groove of the
liquid gasket application surface, mounting bolts and bolt
holes.
2. Wipe the liquid gasket application surface and the mating sur-
face with white gasoline (lighting and heating use) to remove
adhering moisture, grease and foreign materials.
3. Attach the liquid gasket tube to the tube presser [SST].
Use Genuine Liquid Gasket or equivalent.
4. Apply the liquid gasket without breaks to the specified location
with the specified dimensions.
lIf there is a groove for the liquid gasket application, apply the
liquid gasket to the groove.
lAs for the bolt holes, normally apply the liquid gasket inside
the holes. If specified, it should be applied outside the holes.
Make sure to read the text of this manual.
lWithin five minutes of liquid gasket application, install the mat-
ing component.
lIf the liquid gasket protrudes, wipe it off immediately.
lDo not retighten mounting bolts or nuts after the installation.
lAfter 30 minutes or more have passed from the installation, fill
the engine oil and engine coolant.
CAUTION:
If there are instructions in this manual, observe them.
PBIC0275E
PBIC0003E
PBIC2160E
SEM159F
Page 1468 of 3171
EM-86
PRIMARY TIMING CHAIN
c. Turn all bolts 65 degrees clockwise (angle tightening).
d. Completely loosen.
CAUTION:
In this step, loosen bolts in the reverse order as shown in
the figure.
e. Tighten all bolts.
f. Turn them another 65 degrees clockwise (angle tightening).
CAUTION:
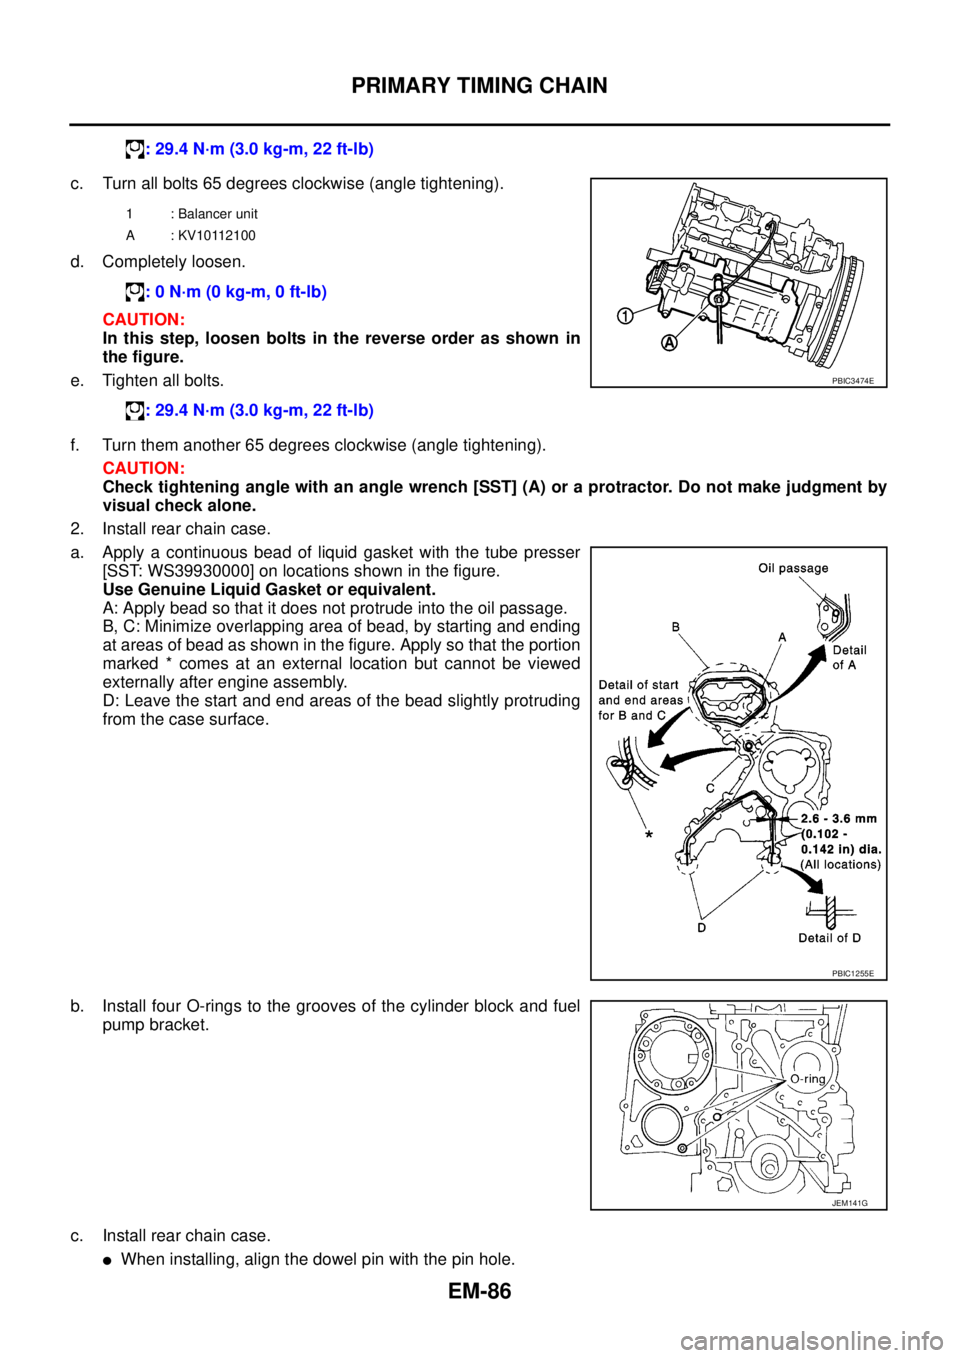
Check tightening angle with an angle wrench [SST] (A) or a protractor. Do not make judgment by
visual check alone.
2. Install rear chain case.
a. Apply a continuous bead of liquid gasket with the tube presser
[SST: WS39930000] on locations shown in the figure.
Use Genuine Liquid Gasket or equivalent.
A: Apply bead so that it does not protrude into the oil passage.
B, C: Minimize overlapping area of bead, by starting and ending
at areas of bead as shown in the figure. Apply so that the portion
marked * comes at an external location but cannot be viewed
externally after engine assembly.
D: Leave the start and end areas of the bead slightly protruding
from the case surface.
b. Install four O-rings to the grooves of the cylinder block and fuel
pump bracket.
c. Install rear chain case.
lWhen installing, align the dowel pin with the pin hole.: 29.4 N·m (3.0 kg-m, 22 ft-lb)
1 : Balancer unit
A : KV10112100
: 0 N·m (0 kg-m, 0 ft-lb)
: 29.4 N·m (3.0 kg-m, 22 ft-lb)
PBIC3474E
PBIC1255E
JEM141G
Page 1471 of 3171
PRIMARY TIMING CHAIN
EM-89
C
D
E
F
G
H
I
J
K
L
MA
EM
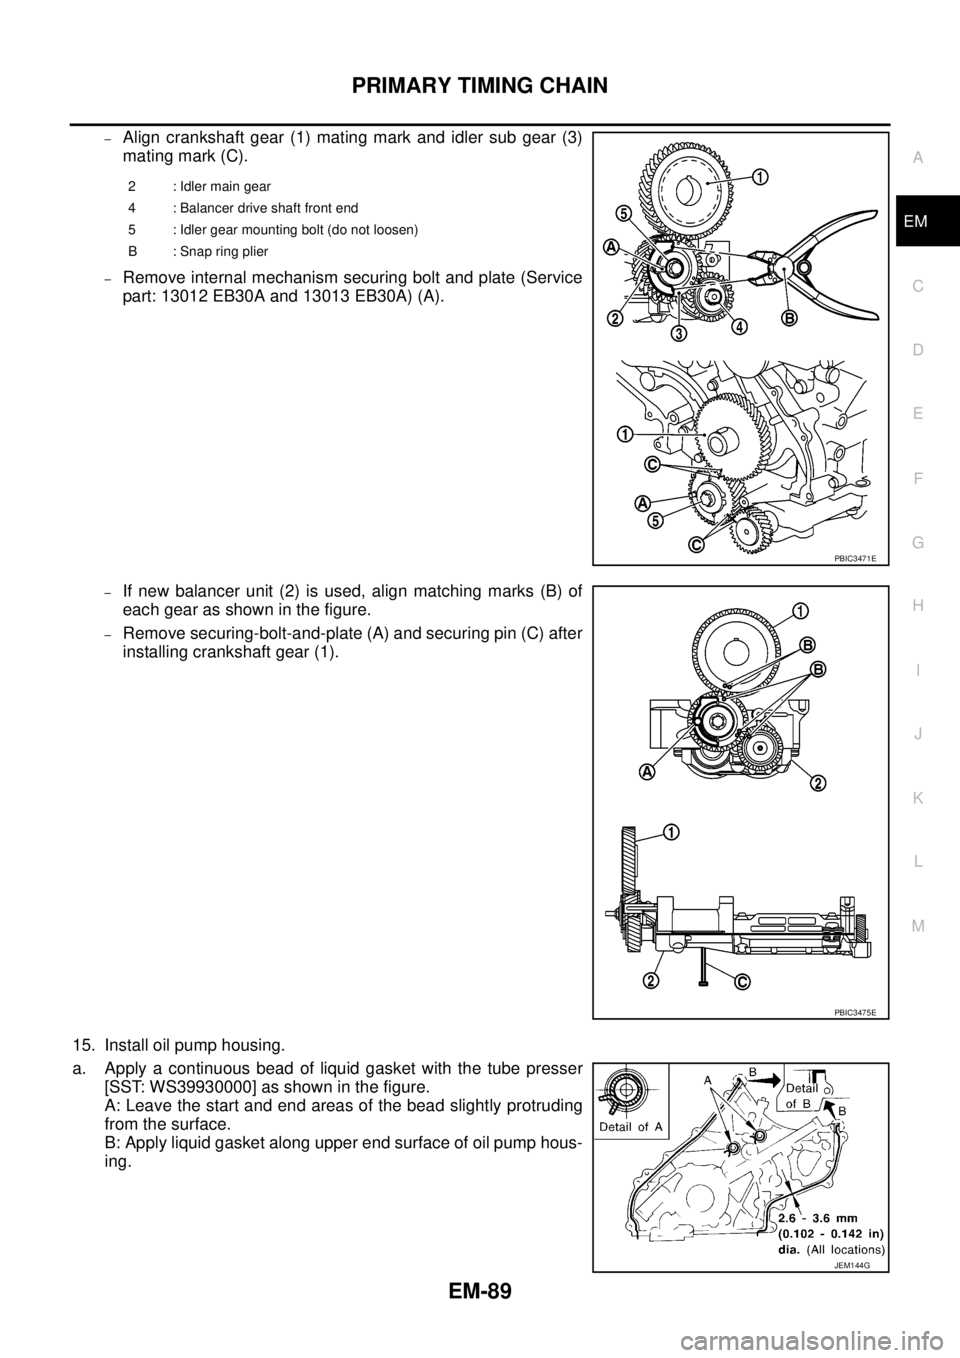
–Align crankshaft gear (1) mating mark and idler sub gear (3)
mating mark (C).
–Remove internal mechanism securing bolt and plate (Service
part: 13012 EB30A and 13013 EB30A) (A).
–If new balancer unit (2) is used, align matching marks (B) of
each gear as shown in the figure.
–Remove securing-bolt-and-plate (A) and securing pin (C) after
installing crankshaft gear (1).
15. Install oil pump housing.
a. Apply a continuous bead of liquid gasket with the tube presser
[SST: WS39930000] as shown in the figure.
A: Leave the start and end areas of the bead slightly protruding
from the surface.
B: Apply liquid gasket along upper end surface of oil pump hous-
ing.
2 : Idler main gear
4 : Balancer drive shaft front end
5 : Idler gear mounting bolt (do not loosen)
B : Snap ring plier
PBIC3471E
PBIC3475E
JEM144G
Page 1513 of 3171
CYLINDER BLOCK
EM-131
C
D
E
F
G
H
I
J
K
L
MA
EM
lIf corrected, measure the bearing oil clearance of the corrected journal and/or pin. Then select the main
bearing or connecting rod bearing. Refer toEM-132, "
MAIN BEARING OIL CLEARANCE"and/orEM-
131, "CONNECTING ROD BEARING OIL CLEARANCE".
CRANKSHAFT RUNOUT
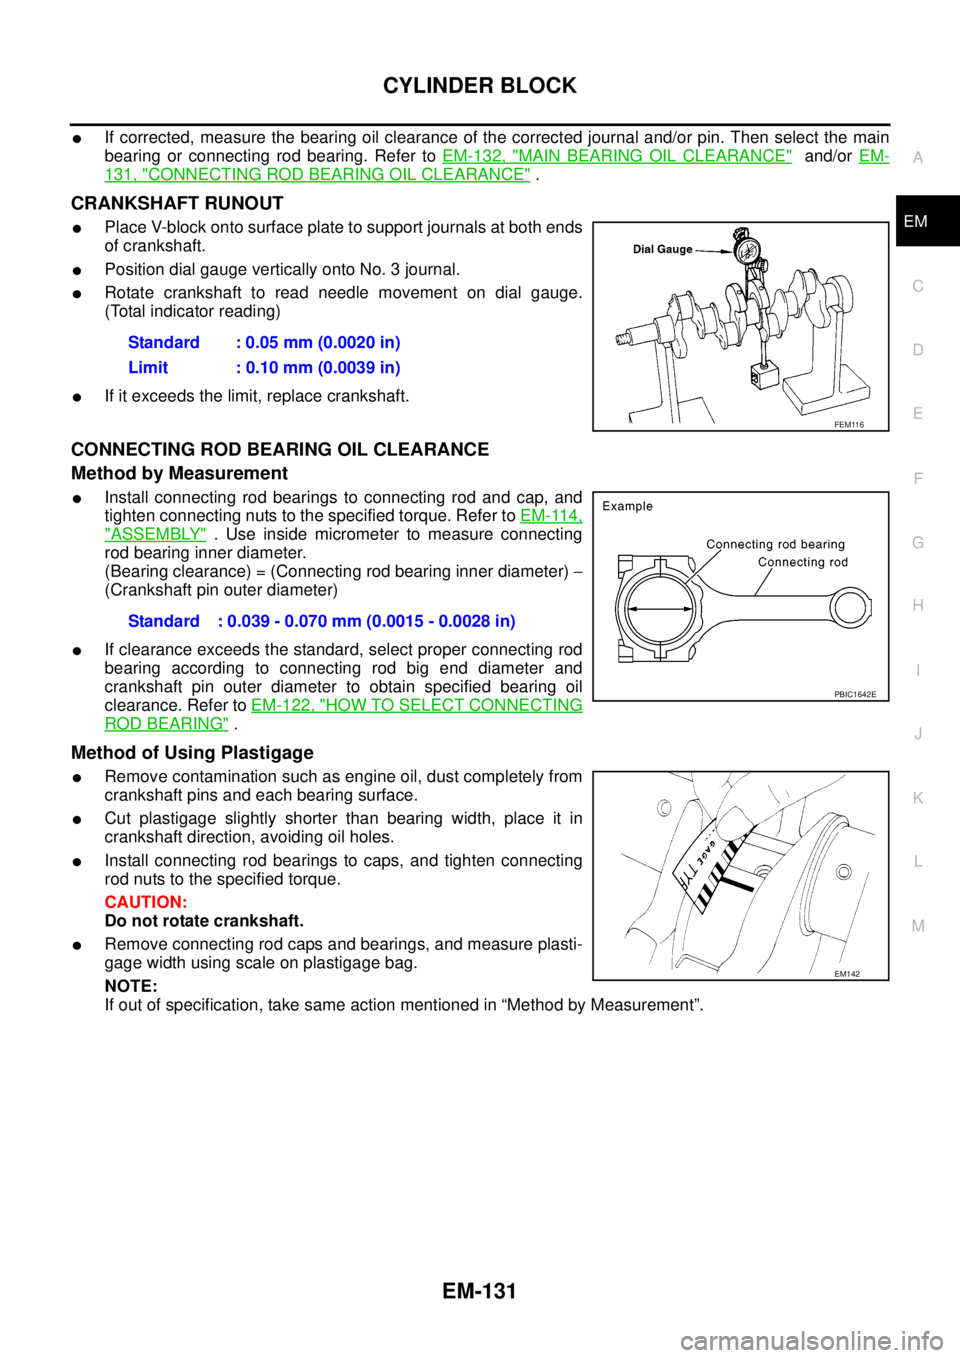
lPlace V-block onto surface plate to support journals at both ends
of crankshaft.
lPosition dial gauge vertically onto No. 3 journal.
lRotate crankshaft to read needle movement on dial gauge.
(Total indicator reading)
lIf it exceeds the limit, replace crankshaft.
CONNECTING ROD BEARING OIL CLEARANCE
Method by Measurement
lInstall connecting rod bearings to connecting rod and cap, and
tighten connecting nuts to the specified torque. Refer toEM-114,
"ASSEMBLY". Use inside micrometer to measure connecting
rod bearing inner diameter.
(Bearing clearance) = (Connecting rod bearing inner diameter)-
(Crankshaft pin outer diameter)
lIf clearance exceeds the standard, select proper connecting rod
bearing according to connecting rod big end diameter and
crankshaft pin outer diameter to obtain specified bearing oil
clearance. Refer toEM-122, "
HOW TO SELECT CONNECTING
ROD BEARING".
Method of Using Plastigage
lRemove contamination such as engine oil, dust completely from
crankshaft pins and each bearing surface.
lCut plastigage slightly shorter than bearing width, place it in
crankshaft direction, avoiding oil holes.
lInstall connecting rod bearings to caps, and tighten connecting
rod nuts to the specified torque.
CAUTION:
Do not rotate crankshaft.
lRemove connecting rod caps and bearings, and measure plasti-
gage width using scale on plastigage bag.
NOTE:
If out of specification, take same action mentioned in “Method by Measurement”.Standard : 0.05 mm (0.0020 in)
Limit : 0.10 mm (0.0039 in)
FEM116
Standard : 0.039 - 0.070 mm (0.0015 - 0.0028 in)
PBIC1642E
EM142
Page 1514 of 3171
EM-132
CYLINDER BLOCK
MAIN BEARING OIL CLEARANCE
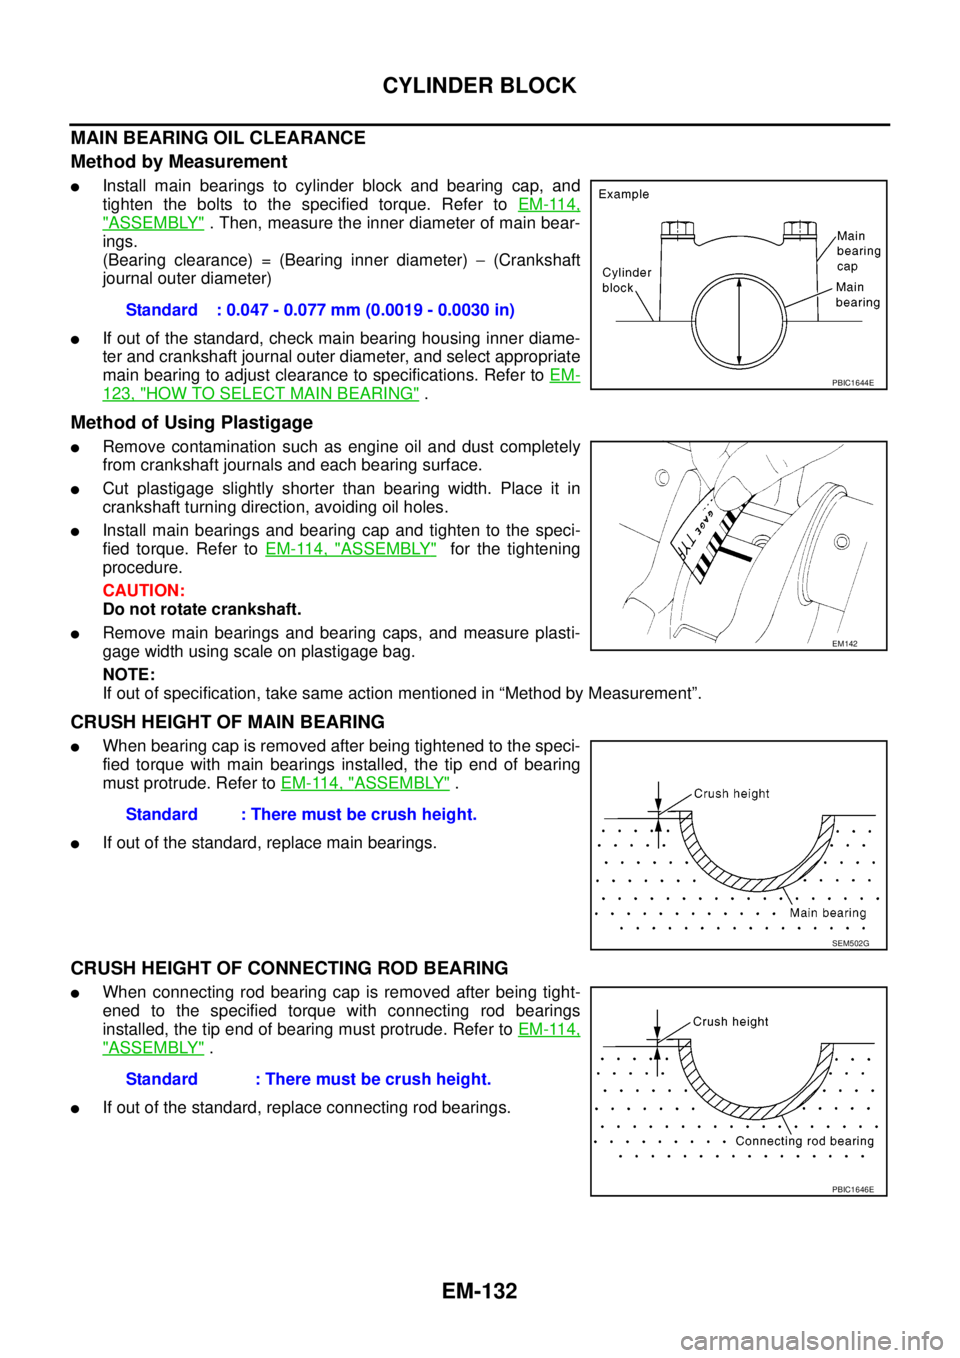
Method by Measurement
lInstall main bearings to cylinder block and bearing cap, and
tighten the bolts to the specified torque. Refer toEM-114,
"ASSEMBLY". Then, measure the inner diameter of main bear-
ings.
(Bearing clearance) = (Bearing inner diameter)-(Crankshaft
journal outer diameter)
lIf out of the standard, check main bearing housing inner diame-
ter and crankshaft journal outer diameter, and select appropriate
main bearing to adjust clearance to specifications. Refer toEM-
123, "HOW TO SELECT MAIN BEARING".
Method of Using Plastigage
lRemove contamination such as engine oil and dust completely
from crankshaft journals and each bearing surface.
lCut plastigage slightly shorter than bearing width. Place it in
crankshaft turning direction, avoiding oil holes.
lInstall main bearings and bearing cap and tighten to the speci-
fied torque. Refer toEM-114, "
ASSEMBLY"for the tightening
procedure.
CAUTION:
Do not rotate crankshaft.
lRemove main bearings and bearing caps, and measure plasti-
gage width using scale on plastigage bag.
NOTE:
If out of specification, take same action mentioned in “Method by Measurement”.
CRUSH HEIGHT OF MAIN BEARING
lWhen bearing cap is removed after being tightened to the speci-
fied torque with main bearings installed, the tip end of bearing
must protrude. Refer toEM-114, "
ASSEMBLY".
lIf out of the standard, replace main bearings.
CRUSH HEIGHT OF CONNECTING ROD BEARING
lWhen connecting rod bearing cap is removed after being tight-
ened to the specified torque with connecting rod bearings
installed, the tip end of bearing must protrude. Refer toEM-114,
"ASSEMBLY".
lIf out of the standard, replace connecting rod bearings.Standard : 0.047 - 0.077 mm (0.0019 - 0.0030 in)
PBIC1644E
EM142
Standard : There must be crush height.
SEM502G
Standard : There must be crush height.
PBIC1646E
Page 1610 of 3171
FSU-10
COIL SPRING AND SHOCK ABSORBER
COIL SPRING AND SHOCK ABSORBER
PFP:56210
Removal and InstallationEES002KO
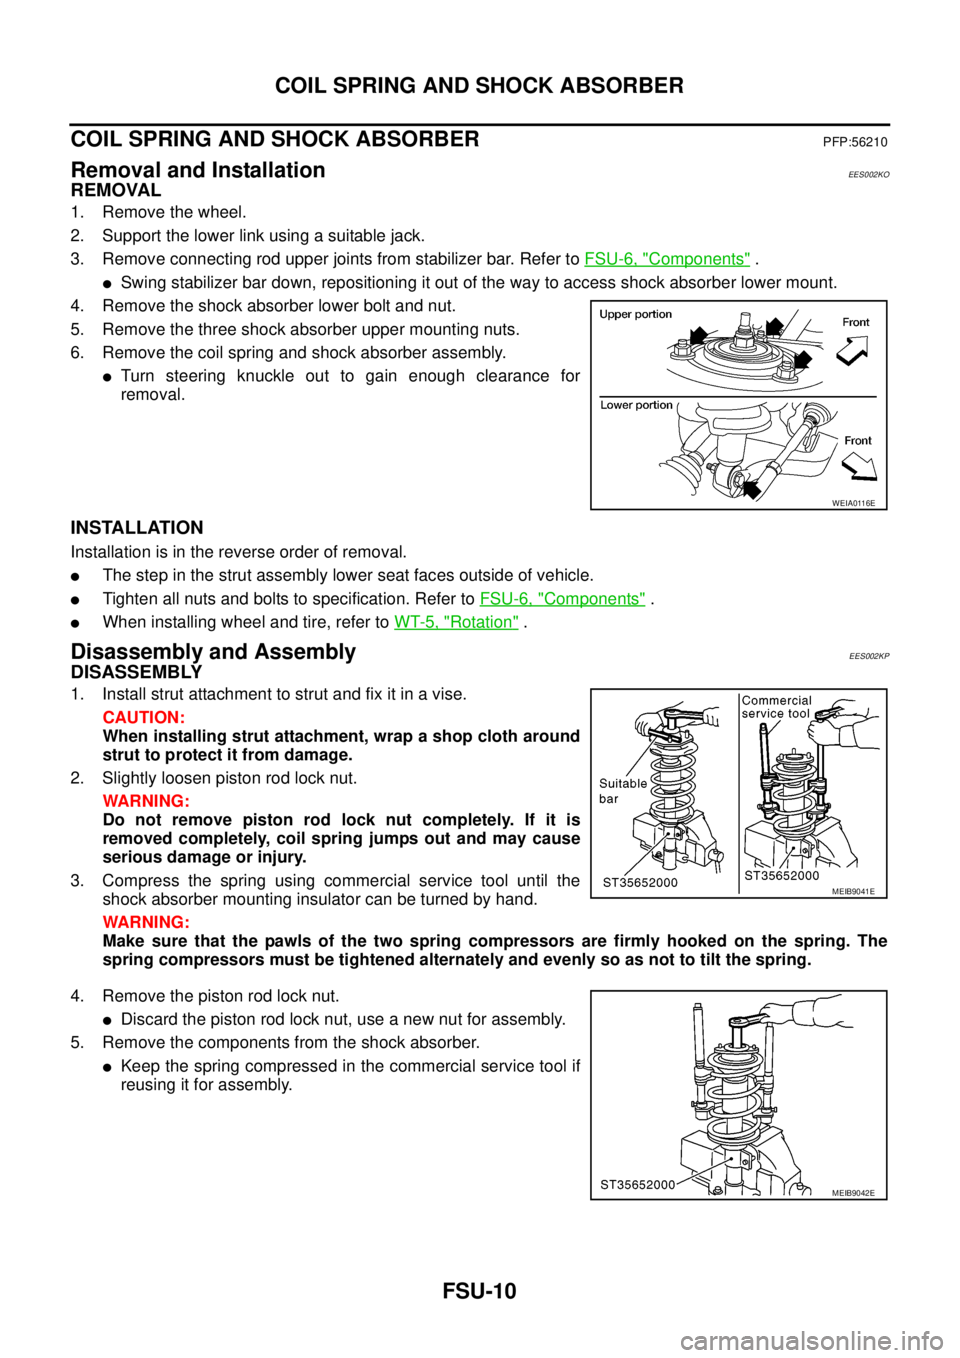
REMOVAL
1. Remove the wheel.
2. Support the lower link using a suitable jack.
3. Remove connecting rod upper joints from stabilizer bar. Refer toFSU-6, "
Components".
lSwing stabilizer bar down, repositioning it out of the way to access shock absorber lower mount.
4. Remove the shock absorber lower bolt and nut.
5. Remove the three shock absorber upper mounting nuts.
6. Remove the coil spring and shock absorber assembly.
lTurn steering knuckle out to gain enough clearance for
removal.
INSTALLATION
Installation is in the reverse order of removal.
lThe step in the strut assembly lower seat faces outside of vehicle.
lTighten all nuts and bolts to specification. Refer toFSU-6, "Components".
lWhen installing wheel and tire, refer toWT-5, "Rotation".
Disassembly and AssemblyEES002KP
DISASSEMBLY
1. Install strut attachment to strut and fix it in a vise.
CAUTION:
When installing strut attachment, wrap a shop cloth around
strut to protect it from damage.
2. Slightly loosen piston rod lock nut.
WARNING:
Do not remove piston rod lock nut completely. If it is
removed completely, coil spring jumps out and may cause
serious damage or injury.
3. Compress the spring using commercial service tool until the
shock absorber mounting insulator can be turned by hand.
WARNING:
Make sure that the pawls of the two spring compressors are firmly hooked on the spring. The
spring compressors must be tightened alternately and evenly so as not to tilt the spring.
4. Remove the piston rod lock nut.
lDiscard the piston rod lock nut, use a new nut for assembly.
5. Remove the components from the shock absorber.
lKeep the spring compressed in the commercial service tool if
reusing it for assembly.
WEIA0116E
MEIB9041E
MEIB9042E
Page 1625 of 3171
PRECAUTIONS
GI-3
C
D
E
F
G
H
I
J
K
L
MB
GI
PRECAUTIONSPFP:00001
DescriptionEAS001GG
Observe the following precautions to ensure safe and proper servicing. These precautions are not
described in each individual section.
Precautions for Supplemental Restraint System (SRS) “AIR BAG” and “SEAT
BELT PRE-TENSIONER”
EAS001GH
The Supplemental Restraint System such as “AIR BAG” and “SEAT BELT PRE-TENSIONER”, used along
with a front seat belt, helps to reduce the risk or severity of injury to the driver and front passenger for certain
types of collision. Information necessary to service the system safely is included in the SRS and SB section of
this Service Manual.
WARNING:
lTo avoid rendering the SRS inoperative, which could increase the risk of personal injury or death
in the event of a collision which would result in air bag inflation, all maintenance must be per-
formed by an authorized NISSAN/INFINITI dealer.
lImproper maintenance, including incorrect removal and installation of the SRS, can lead to per-
sonal injury caused by unintentional activation of the system. For removal of Spiral Cable and Air
Bag Module, see the SRS section.
lDo not use electrical test equipment on any circuit related to the SRS unless instructed to in this
Service Manual. SRS wiring harnesses can be identified by yellow and/or orange harnesses or
harness connectors.
Precautions for NATS (NISSAN ANTI-THEFT SYSTEM)EAS001GI
NATS will immobilize the engine if someone tries to start it without the registered key of NATS.
Both of the originally supplied ignition key IDs have been NATS registered.
The security indicator is located on the instrument panel. The indicator blinks when the immobilizer system is
functioning.
Therefore, NATS warns outsiders that the vehicle is equipped with the anti-theft system.
lWhen NATS detects trouble, the security indicator lamp lights up while ignition switch is in "ON" position.
This lighting up indicates that the anti-theft is not functioning, so prompt service is required.
lWhen servicing NATS (trouble diagnoses, system initialization and additional registration of other NATS
ignition key IDs), CONSULT-II hardware and CONSULT-II NATS software is necessary.
Regarding the procedures of NATS initialization and NATS ignition key ID registration, refer to CONSULT-
II operation manual, NATS.
Therefore, CONSULT-II NATS software (program card and operation manual) must be kept strictly con-
fidential to maintain the integrity of the anti-theft function.
lWhen servicing NATS (trouble diagnoses, system initialization and additional registration of other NATS
ignition key IDs), it may be necessary to re-register original key identification. Therefore, be sure to
receive all keys from vehicle owner. A maximum of four or five key IDs can be registered into NATS.
lWhen failing to start the engine first time using the key of NATS, start as follows.
1. Leave the ignition key in "ON" position for approximately 5 seconds.
2. Turn ignition key to "OFF" or "LOCK" position and wait approximately 5 seconds.
3. Repeat step 1 and 2 again.
4. Restart the engine while keeping the key separate from any others on key-chain.
Precautions Necessary for Steering Wheel Rotation After Battery DisconnectEAS001HY
NOTE:
lThis Procedure is applied only to models with Intelligent Key system and NATS (NISSAN ANTI-THEFT
SYSTEM).
lRemove and install all control units after disconnecting both battery cables with the ignition knob in the
²LOCK²position.
lAlways use CONSULT-II to perform self-diagnosis as a part of each function inspection after finishing
work. If DTC is detected, perform trouble diagnosis according to self-diagnostic results.
For models equipped with the Intelligent Key system and NATS, an electrically controlled steering lock mech-
anism is adopted on the key cylinder.
Page 1640 of 3171

GI-18
HOW TO USE THIS MANUAL
14 Wire color
lThis shows a code for the color of the wire.
B=Black
W=White
R=Red
G = Green
L=Blue
Y = Yellow
LG = Light GreenBR = Brown
OR or O = Orange
P=Pink
PU or V (Violet) = Purple
GY or GR = Gray
SB = Sky Blue
CH = Dark Brown
DG = Dark Green
When the wire color is striped, the base color is given first, followed by the stripe color as shown
below:
Example: L/W = Blue with White Stripe
15 Option description
lThis shows a description of the option abbreviation used on the page.
16 Switch
lThis shows that continuity exists between terminals 1 and 2 when the switch is in the A posi-
tion. Continuity exists between terminals 1 and 3 when the switch is in the B position.
17 Assembly parts
lConnector terminal in component shows that it is a harness incorporated assembly.
18 Cell code
lThis identifies each page of the wiring diagram by section, system and wiring diagram page
number.
19 Current flow arrow
lArrow indicates electric current flow, especially where the direction of standard flow (vertically
downward or horizontally from left to right) is difficult to follow.
lA double arrow “ ” shows that current can flow in either direction depending on cir-
cuit operation.
20 System branch
lThis shows that the system branches to another system identified by cell code (section and
system).
21 Page crossing
lThis arrow shows that the circuit continues to another page identified by cell code.
lThe C will match with the C on another page within the system other than the next or preced-
ing pages.
22 Shielded line
lThe line enclosed by broken line circle shows shield wire.
23Component box in
wave line
lThis shows that another part of the component is also shown on another page (indicated by
wave line) within the system.
24 Component name
lThis shows the name of a component.
25 Connector number
lThis shows the connector number.
lThe letter shows which harness the connector is located in.
lExample:M: main harness. For detail and to locate the connector, refer to PG section "Main
Harness", “Harness Layout”. A coordinate grid is included for complex harnesses to aid in
locating connectors.
26 Ground (GND)
lThe line spliced and grounded under wire color shows that ground line is spliced at the
grounded connector.
27 Ground (GND)
lThis shows the ground connection. For detailed ground distribution information, refer to
"Ground Distribution" in PG section.
28 Connector views
lThis area shows the connector faces of the components in the wiring diagram on the page.
29 Common component
lConnectors enclosed in broken line show that these connectors belong to the same compo-
nent.
30 Connector color
lThis shows a code for the color of the connector. For code meaning, refer to wire color codes,
Number 14 of this chart.
31Fusible link and fuse
box
lThis shows the arrangement of fusible link(s) and fuse(s), used for connector views of
"POWER SUPPLY ROUTING" in PG section.
The open square shows current flow in, and the shaded square shows current flow out.
32 Reference area
lThis shows that more information on the Super Multiple Junction (SMJ) and Joint Connectors
(J/C) exists on the PG section. Refer to "Reference Area" for details. Num-
berItem Description
Page 1647 of 3171
SERVICE INFORMATION FOR ELECTRICAL INCIDENT
GI-25
C
D
E
F
G
H
I
J
K
L
MB
GI
lHeat sensitive
lFreezing
lWater intrusion
lElectrical load
lCold or hot start up
Get a thorough description of the incident from the customer. It is important for simulating the conditions of the
problem.
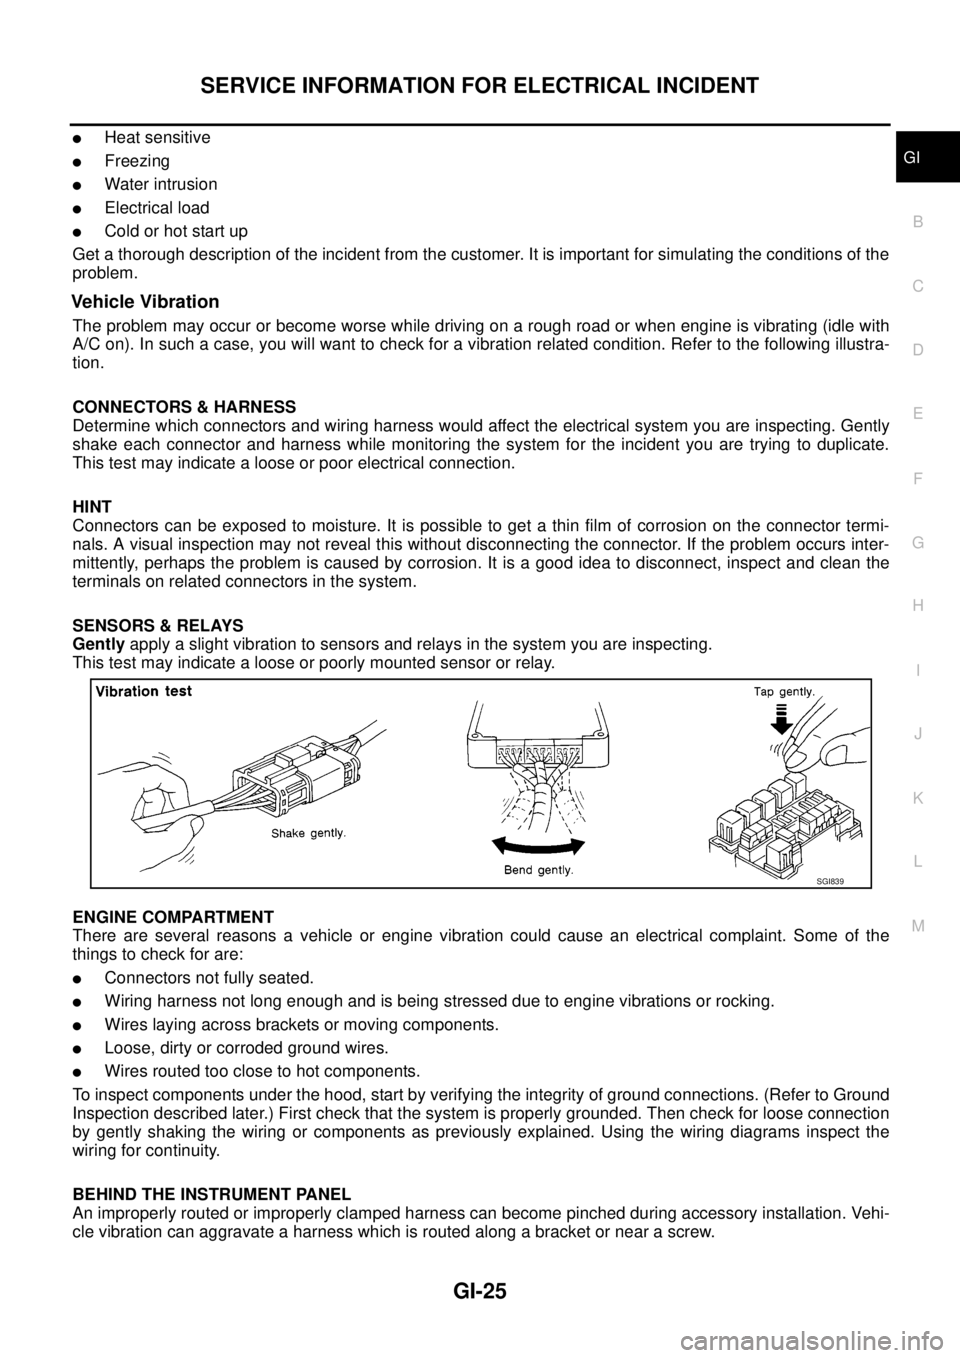
Vehicle Vibration
The problem may occur or become worse while driving on a rough road or when engine is vibrating (idle with
A/C on). In such a case, you will want to check for a vibration related condition. Refer to the following illustra-
tion.
CONNECTORS & HARNESS
Determine which connectors and wiring harness would affect the electrical system you are inspecting. Gently
shake each connector and harness while monitoring the system for the incident you are trying to duplicate.
This test may indicate a loose or poor electrical connection.
HINT
Connectors can be exposed to moisture. It is possible to get a thin film of corrosion on the connector termi-
nals. A visual inspection may not reveal this without disconnecting the connector. If the problem occurs inter-
mittently, perhaps the problem is caused by corrosion. It is a good idea to disconnect, inspect and clean the
terminals on related connectors in the system.
SENSORS & RELAYS
Gentlyapply a slight vibration to sensors and relays in the system you are inspecting.
This test may indicate a loose or poorly mounted sensor or relay.
ENGINE COMPARTMENT
There are several reasons a vehicle or engine vibration could cause an electrical complaint. Some of the
things to check for are:
lConnectors not fully seated.
lWiring harness not long enough and is being stressed due to engine vibrations or rocking.
lWires laying across brackets or moving components.
lLoose, dirty or corroded ground wires.
lWires routed too close to hot components.
To inspect components under the hood, start by verifying the integrity of ground connections. (Refer to Ground
Inspection described later.) First check that the system is properly grounded. Then check for loose connection
by gently shaking the wiring or components as previously explained. Using the wiring diagrams inspect the
wiring for continuity.
BEHIND THE INSTRUMENT PANEL
An improperly routed or improperly clamped harness can become pinched during accessory installation. Vehi-
cle vibration can aggravate a harness which is routed along a bracket or near a screw.
SGI839
Page 1651 of 3171
SERVICE INFORMATION FOR ELECTRICAL INCIDENT
GI-29
C
D
E
F
G
H
I
J
K
L
MB
GI
no voltage; short is further down the circuit than SW1.
lWith SW1 closed, relay and solenoid disconnected and the DMM leads across both fuse terminals, check
for voltage.
voltage; short is between SW1 and the relay (point B).
no voltage; short is further down the circuit than the relay.
lWith SW1 closed, relay contacts jumped with fused jumper wire check for voltage.
voltage; short is down the circuit of the relay or between the relay and the disconnected solenoid (point C).
no voltage; retrace steps and check power to fuse block.
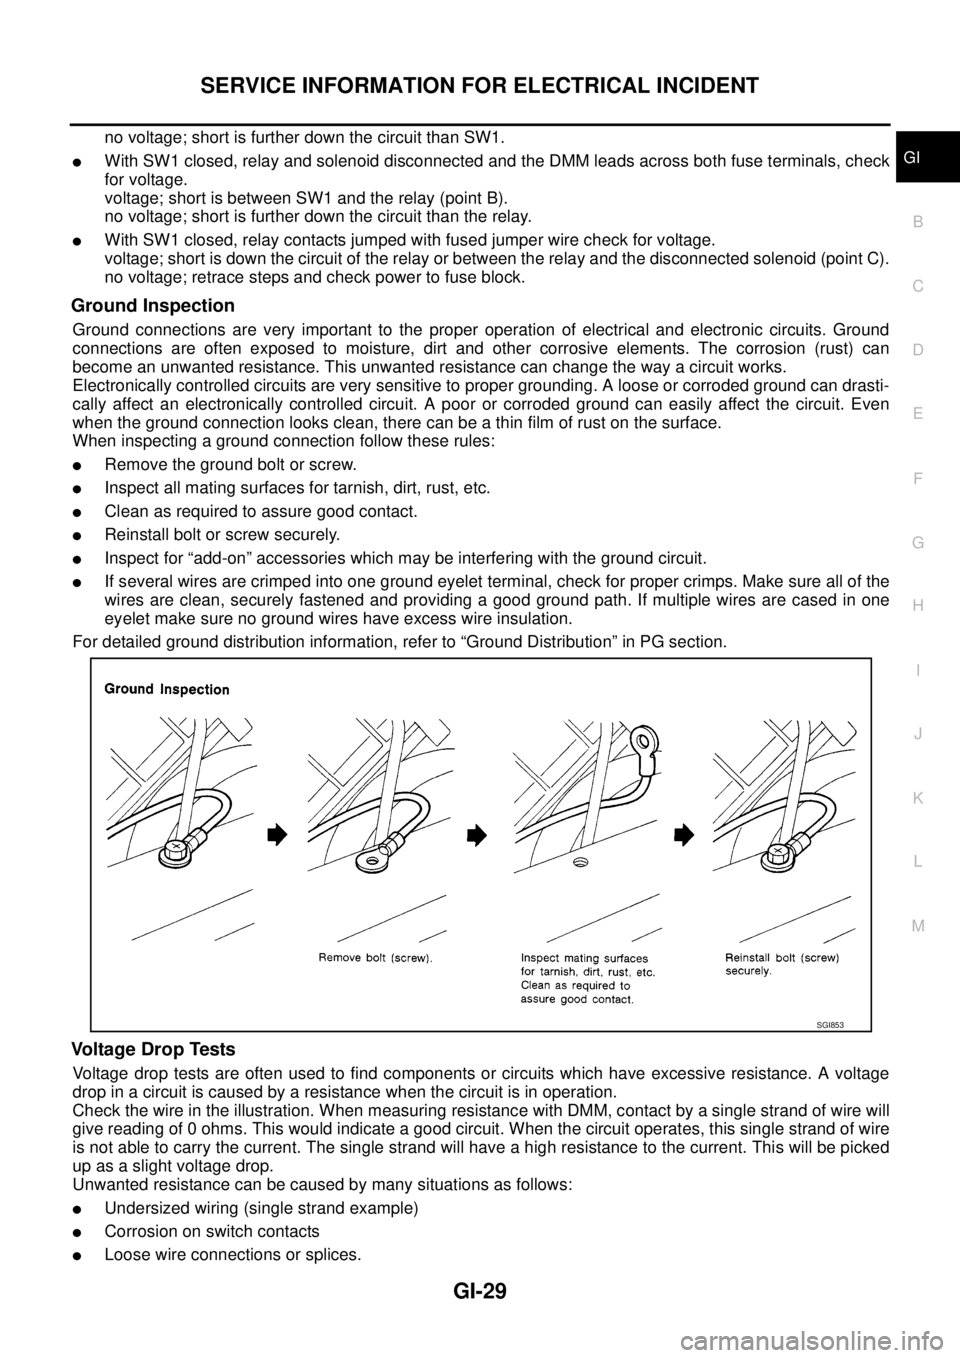
Ground Inspection
Ground connections are very important to the proper operation of electrical and electronic circuits. Ground
connections are often exposed to moisture, dirt and other corrosive elements. The corrosion (rust) can
become an unwanted resistance. This unwanted resistance can change the way a circuit works.
Electronically controlled circuits are very sensitive to proper grounding. A loose or corroded ground can drasti-
cally affect an electronically controlled circuit. A poor or corroded ground can easily affect the circuit. Even
when the ground connection looks clean, there can be a thin film of rust on the surface.
When inspecting a ground connection follow these rules:
lRemove the ground bolt or screw.
lInspect all mating surfaces for tarnish, dirt, rust, etc.
lClean as required to assure good contact.
lReinstall bolt or screw securely.
lInspect for “add-on” accessories which may be interfering with the ground circuit.
lIf several wires are crimped into one ground eyelet terminal, check for proper crimps. Make sure all of the
wires are clean, securely fastened and providing a good ground path. If multiple wires are cased in one
eyelet make sure no ground wires have excess wire insulation.
For detailed ground distribution information, refer to “Ground Distribution” in PG section.
Voltage Drop Tests
Voltage drop tests are often used to find components or circuits which have excessive resistance. A voltage
drop in a circuit is caused by a resistance when the circuit is in operation.
Check the wire in the illustration. When measuring resistance with DMM, contact by a single strand of wire will
give reading of 0 ohms. This would indicate a good circuit. When the circuit operates, this single strand of wire
is not able to carry the current. The single strand will have a high resistance to the current. This will be picked
up as a slight voltage drop.
Unwanted resistance can be caused by many situations as follows:
lUndersized wiring (single strand example)
lCorrosion on switch contacts
lLoose wire connections or splices.
SGI853