headlamp NISSAN NAVARA 2005 Repair Workshop Manual
[x] Cancel search | Manufacturer: NISSAN, Model Year: 2005, Model line: NAVARA, Model: NISSAN NAVARA 2005Pages: 3171, PDF Size: 49.59 MB
Page 570 of 3171
BCS-4
BCM (BODY CONTROL MODULE)
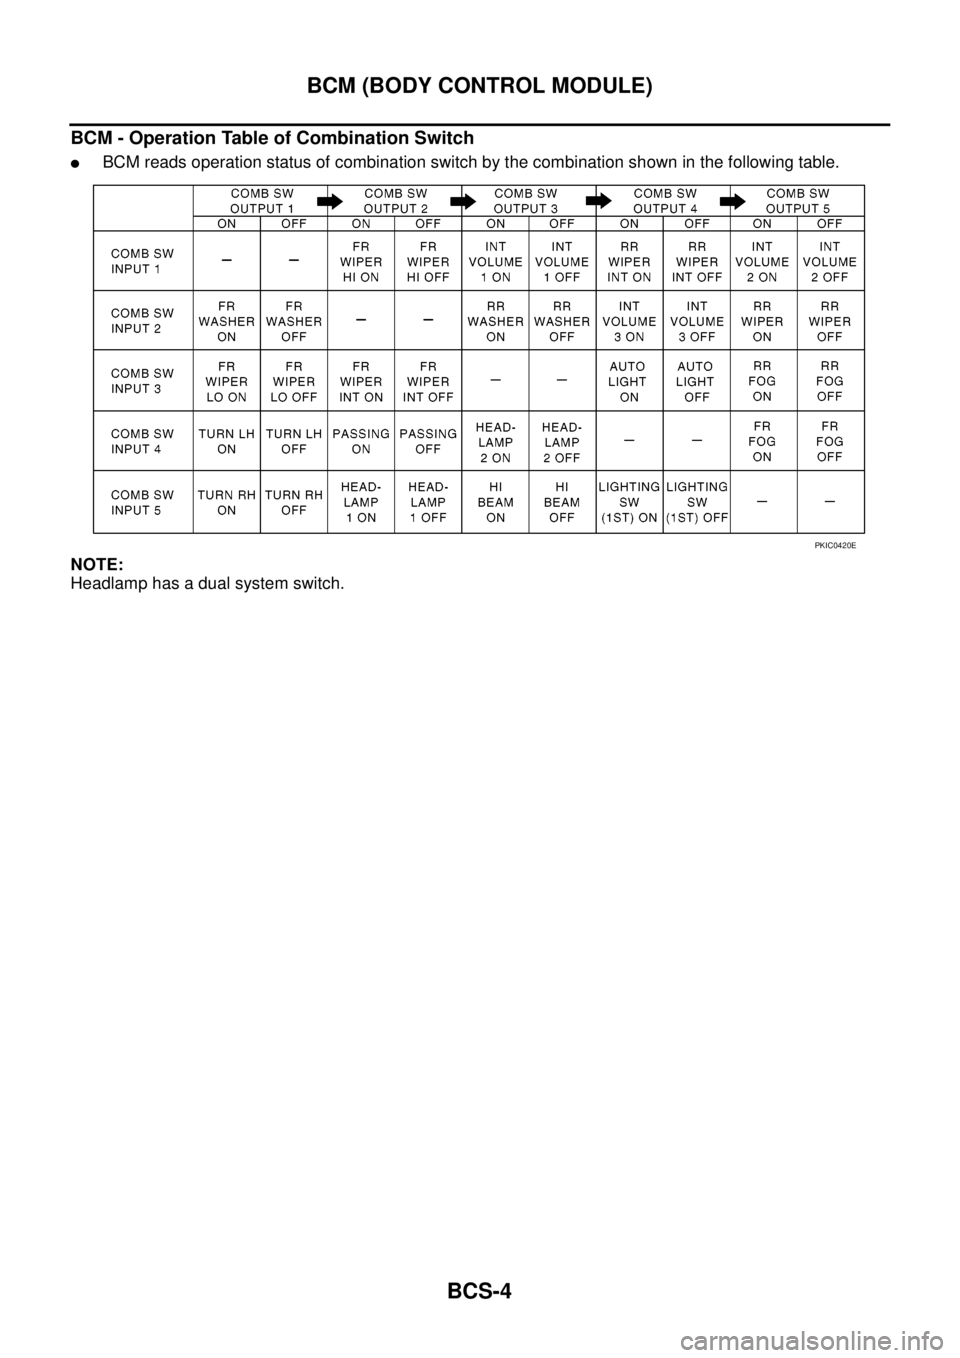
BCM - Operation Table of Combination Switch
lBCM reads operation status of combination switch by the combination shown in the following table.
NOTE:
Headlamp has a dual system switch.
PKIC0420E
Page 574 of 3171
BCS-8
BCM (BODY CONTROL MODULE)
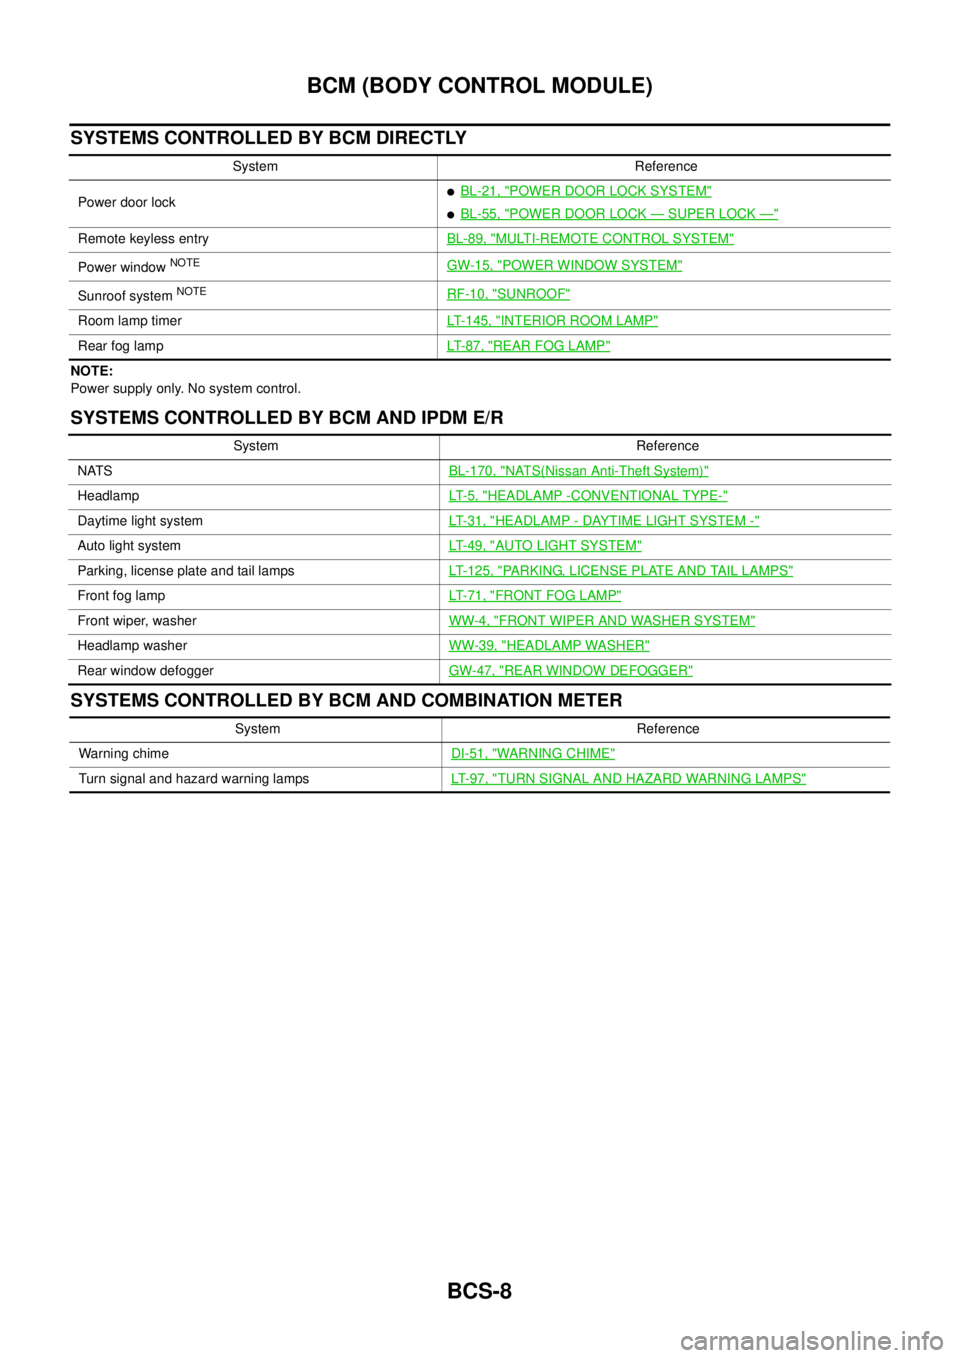
SYSTEMS CONTROLLED BY BCM DIRECTLY
NOTE:
Power supply only. No system control.
SYSTEMS CONTROLLED BY BCM AND IPDM E/R
SYSTEMS CONTROLLED BY BCM AND COMBINATION METER
System Reference
Power door lock
lBL-21, "POWER DOOR LOCK SYSTEM"
lBL-55, "POWER DOOR LOCK—SUPER LOCK—"
Remote keyless entryBL-89, "MULTI-REMOTE CONTROL SYSTEM"
Power windowNOTEGW-15, "POWER WINDOW SYSTEM"
Sunroof systemNOTERF-10, "SUNROOF"
Room lamp timerLT-145, "INTERIOR ROOM LAMP"
Rear fog lampLT- 8 7 , "REAR FOG LAMP"
System Reference
NATSBL-170, "
NATS(Nissan Anti-Theft System)"
HeadlampLT- 5 , "HEADLAMP -CONVENTIONAL TYPE-"
Daytime light systemLT-31, "HEADLAMP - DAYTIME LIGHT SYSTEM -"
Auto light systemLT-49, "AUTO LIGHT SYSTEM"
Parking, license plate and tail lampsLT-125, "PARKING, LICENSE PLATE AND TAIL LAMPS"
Front fog lampLT-71, "FRONT FOG LAMP"
Front wiper, washerWW-4, "FRONT WIPER AND WASHER SYSTEM"
Headlamp washerWW-39, "HEADLAMP WASHER"
Rear window defoggerGW-47, "REAR WINDOW DEFOGGER"
System Reference
Warning chimeDI-51, "
WARNING CHIME"
Turn signal and hazard warning lampsLT-97, "TURN SIGNAL AND HAZARD WARNING LAMPS"
Page 575 of 3171
BCM (BODY CONTROL MODULE)
BCS-9
C
D
E
F
G
H
I
J
L
MA
B
BCS
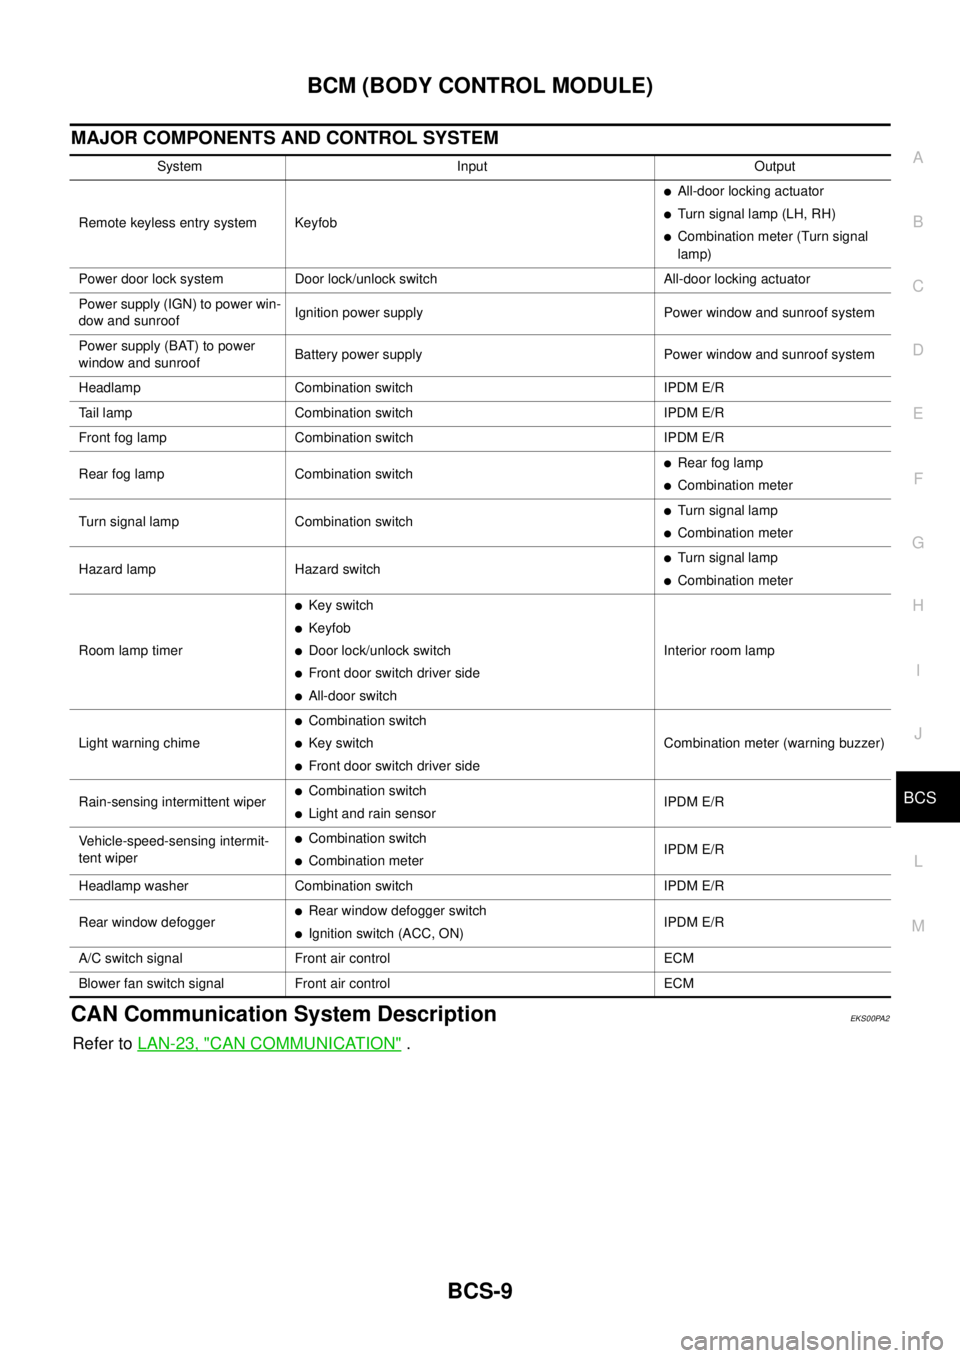
MAJOR COMPONENTS AND CONTROL SYSTEM
CAN Communication System DescriptionEKS00PA2
Refer toLAN-23, "CAN COMMUNICATION".
System Input Output
Remote keyless entry system Keyfob
lAll-door locking actuator
lTurn signal lamp (LH, RH)
lCombination meter (Turn signal
lamp)
Power door lock system Door lock/unlock switch All-door locking actuator
Power supply (IGN) to power win-
dow and sunroofIgnition power supply Power window and sunroof system
Power supply (BAT) to power
window and sunroofBattery power supply Power window and sunroof system
Headlamp Combination switch IPDM E/R
Tail lamp Combination switch IPDM E/R
Front fog lamp Combination switch IPDM E/R
Rear fog lamp Combination switch
lRear fog lamp
lCombination meter
Turn signal lamp Combination switch
lTurn signal lamp
lCombination meter
Hazard lamp Hazard switch
lTurn signal lamp
lCombination meter
Room lamp timer
lKey switch
lKeyfob
lDoor lock/unlock switch
lFront door switch driver side
lAll-door switchInterior room lamp
Light warning chime
lCombination switch
lKey switch
lFront door switch driver sideCombination meter (warning buzzer)
Rain-sensing intermittent wiper
lCombination switch
lLight and rain sensorIPDM E/R
Vehicle-speed-sensing intermit-
tent wiper
lCombination switch
lCombination meterIPDM E/R
Headlamp washer Combination switch IPDM E/R
Rear window defogger
lRear window defogger switch
lIgnition switch (ACC, ON)IPDM E/R
A/C switch signal Front air control ECM
Blower fan switch signal Front air control ECM
Page 581 of 3171
BCM (BODY CONTROL MODULE)
BCS-15
C
D
E
F
G
H
I
J
L
MA
B
BCS
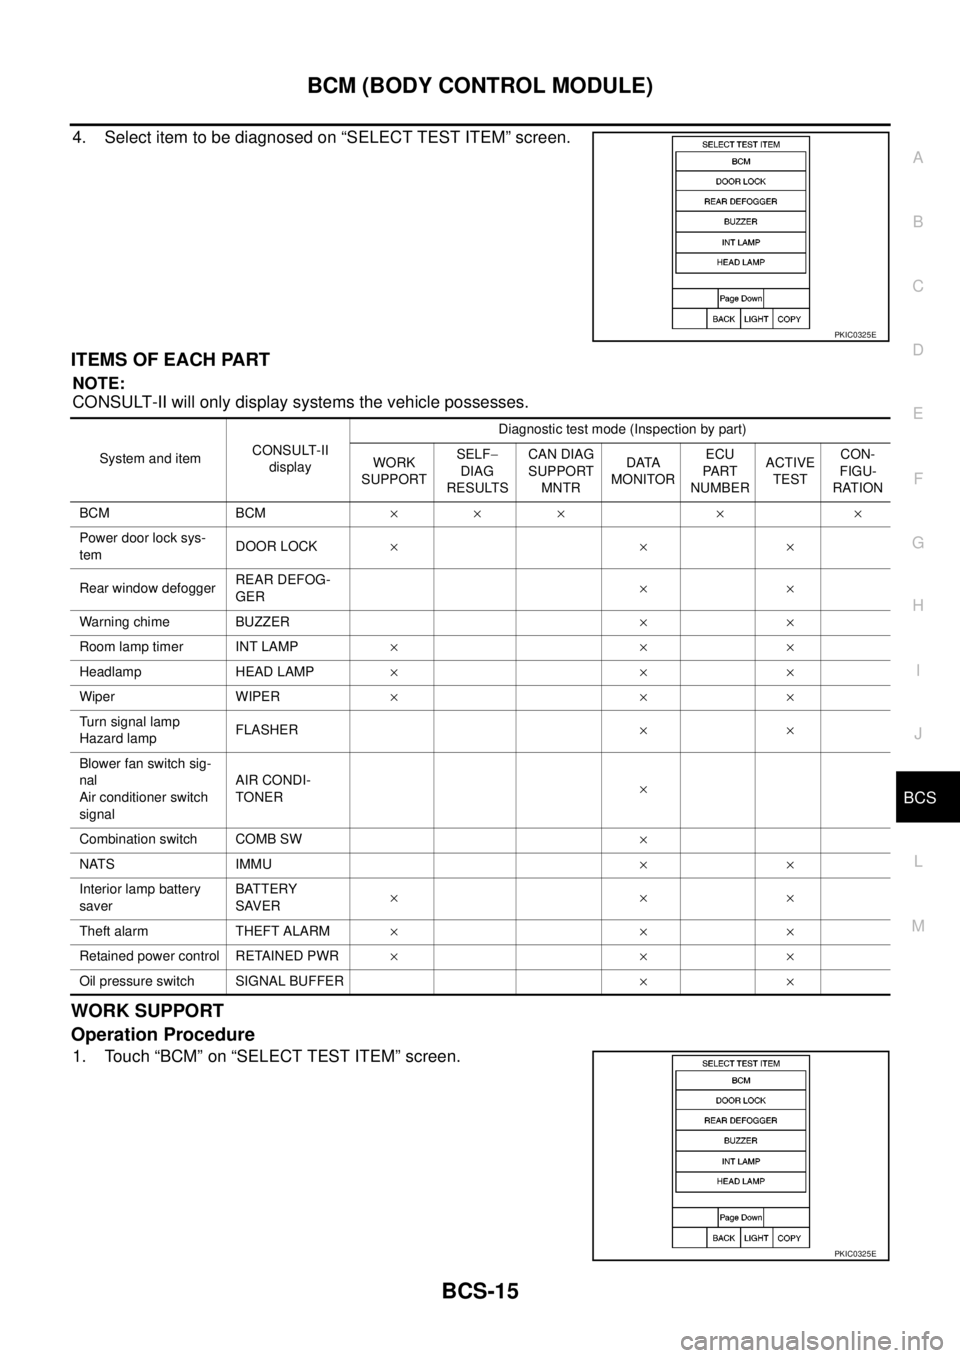
4. Select item to be diagnosed on “SELECT TEST ITEM” screen.
ITEMS OF EACH PART
NOTE:
CONSULT-II will only display systems the vehicle possesses.
WORK SUPPORT
Operation Procedure
1. Touch “BCM” on “SELECT TEST ITEM” screen.
PKIC0325E
System and itemCONSULT-II
displayDiagnostic test mode (Inspection by part)
WORK
SUPPORTSELF-
DIAG
RESULTSCAN DIAG
SUPPORT
MNTRDATA
MONITORECU
PA RT
NUMBERACTIVE
TESTCON-
FIGU-
RATION
BCM BCM´´ ´ ´ ´
Power door lock sys-
temDOOR LOCK´´´
Rear window defoggerREAR DEFOG-
GER´´
Warning chime BUZZER´´
Room lamp timer INT LAMP´´´
Headlamp HEAD LAMP´´´
Wiper WIPER´´´
Turn signal lamp
Hazard lampFLASHER´´
Blower fan switch sig-
nal
Air conditioner switch
signalAIR CONDI-
TONER´
Combination switch COMB SW´
NATS IMMU´´
Interior lamp battery
saverBATTERY
SAVER´´´
Theft alarm THEFT ALARM´´´
Retained power control RETAINED PWR´´´
Oil pressure switch SIGNAL BUFFER´´
PKIC0325E
Page 596 of 3171
BL-12
HOOD
HOOD
PFP:F5100
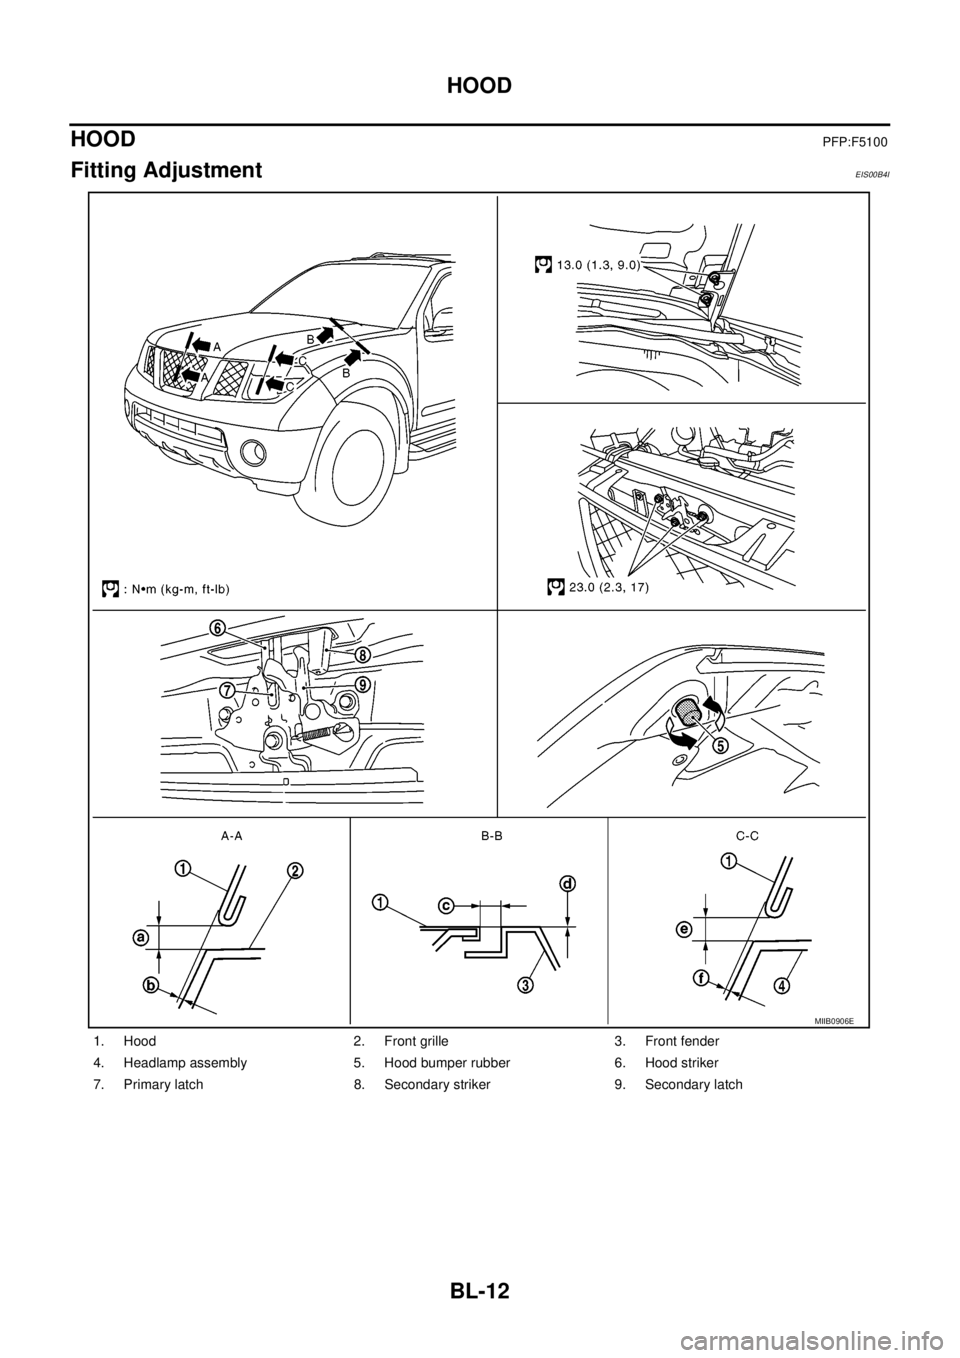
Fitting AdjustmentEIS00B4I
1. Hood 2. Front grille 3. Front fender
4. Headlamp assembly 5. Hood bumper rubber 6. Hood striker
7. Primary latch 8. Secondary striker 9. Secondary latch
MIIB0906E
Page 597 of 3171
HOOD
BL-13
C
D
E
F
G
H
J
K
L
MA
B
BL
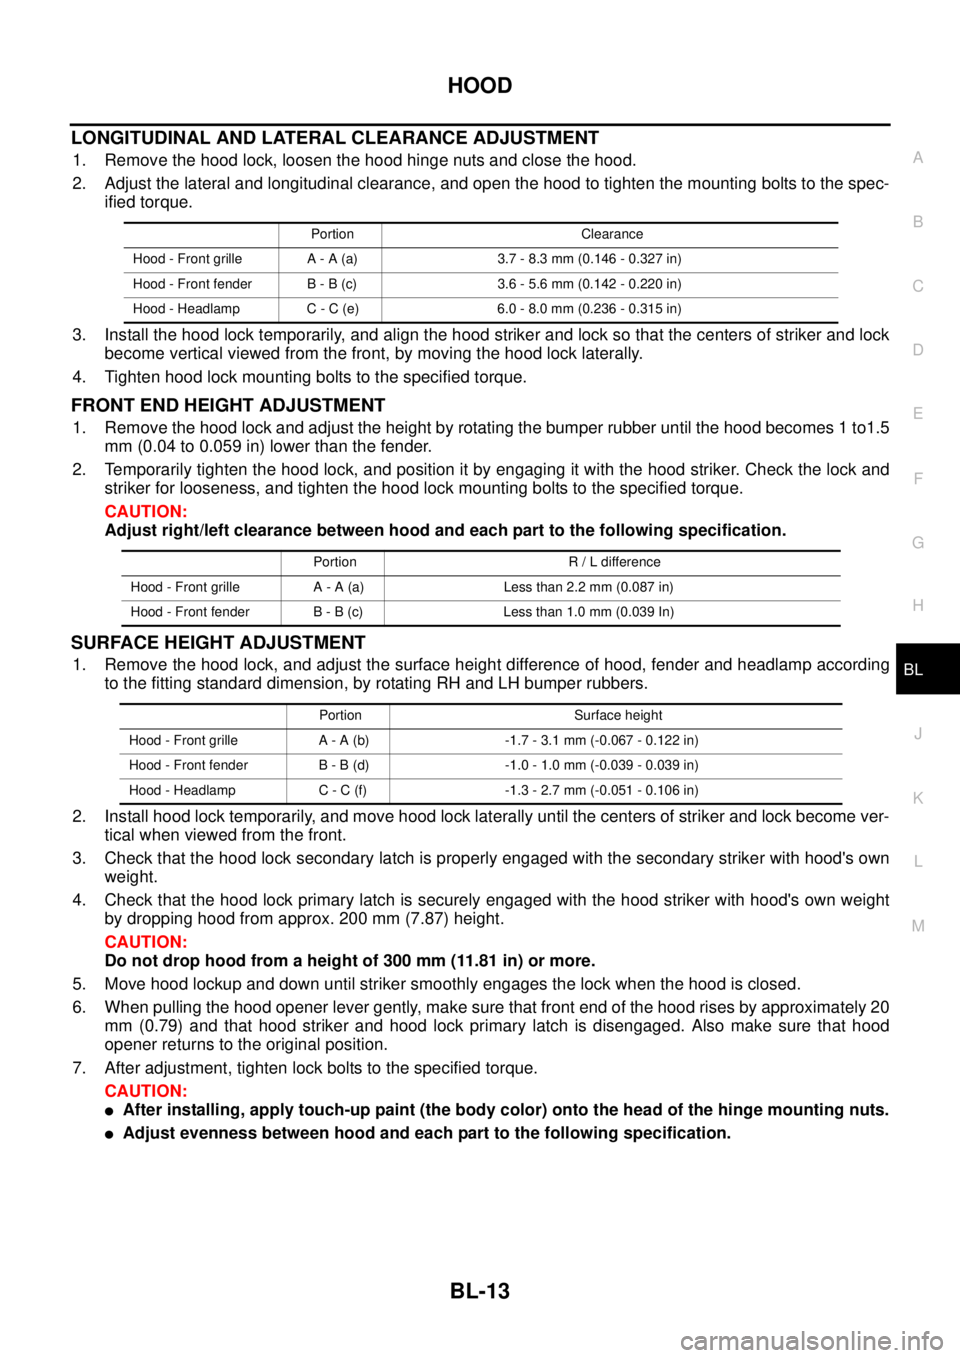
LONGITUDINAL AND LATERAL CLEARANCE ADJUSTMENT
1. Remove the hood lock, loosen the hood hinge nuts and close the hood.
2. Adjust the lateral and longitudinal clearance, and open the hood to tighten the mounting bolts to the spec-
ified torque.
3. Install the hood lock temporarily, and align the hood striker and lock so that the centers of striker and lock
become vertical viewed from the front, by moving the hood lock laterally.
4. Tighten hood lock mounting bolts to the specified torque.
FRONT END HEIGHT ADJUSTMENT
1. Remove the hood lock and adjust the height by rotating the bumper rubber until the hood becomes 1 to1.5
mm (0.04 to 0.059 in) lower than the fender.
2. Temporarily tighten the hood lock, and position it by engaging it with the hood striker. Check the lock and
striker for looseness, and tighten the hood lock mounting bolts to the specified torque.
CAUTION:
Adjust right/left clearance between hood and each part to the following specification.
SURFACE HEIGHT ADJUSTMENT
1. Remove the hood lock, and adjust the surface height difference of hood, fender and headlamp according
to the fitting standard dimension, by rotating RH and LH bumper rubbers.
2. Install hood lock temporarily, and move hood lock laterally until the centers of striker and lock become ver-
tical when viewed from the front.
3. Check that the hood lock secondary latch is properly engaged with the secondary striker with hood's own
weight.
4. Check that the hood lock primary latch is securely engaged with the hood striker with hood's own weight
by dropping hood from approx. 200 mm (7.87) height.
CAUTION:
Do not drop hood from a height of 300 mm (11.81 in) or more.
5. Move hood lockup and down until striker smoothly engages the lock when the hood is closed.
6. When pulling the hood opener lever gently, make sure that front end of the hood rises by approximately 20
mm (0.79) and that hood striker and hood lock primary latch is disengaged. Also make sure that hood
opener returns to the original position.
7. After adjustment, tighten lock bolts to the specified torque.
CAUTION:
lAfter installing, apply touch-up paint (the body color) onto the head of the hinge mounting nuts.
lAdjust evenness between hood and each part to the following specification.
Portion Clearance
Hood - Front grille A - A (a) 3.7 - 8.3 mm (0.146 - 0.327 in)
Hood - Front fender B - B (c) 3.6 - 5.6 mm (0.142 - 0.220 in)
Hood - Headlamp C - C (e) 6.0 - 8.0 mm (0.236 - 0.315 in)
Portion R / L difference
Hood - Front grille A - A (a) Less than 2.2 mm (0.087 in)
Hood - Front fender B - B (c) Less than 1.0 mm (0.039 In)
Portion Surface height
Hood - Front grille A - A (b) -1.7 - 3.1 mm (-0.067 - 0.122 in)
Hood - Front fender B - B (d) -1.0 - 1.0 mm (-0.039 - 0.039 in)
Hood - Headlamp C - C (f) -1.3 - 2.7 mm (-0.051 - 0.106 in)
Page 602 of 3171
BL-18
RADIATOR CORE SUPPORT
RADIATOR CORE SUPPORT
PFP:62500
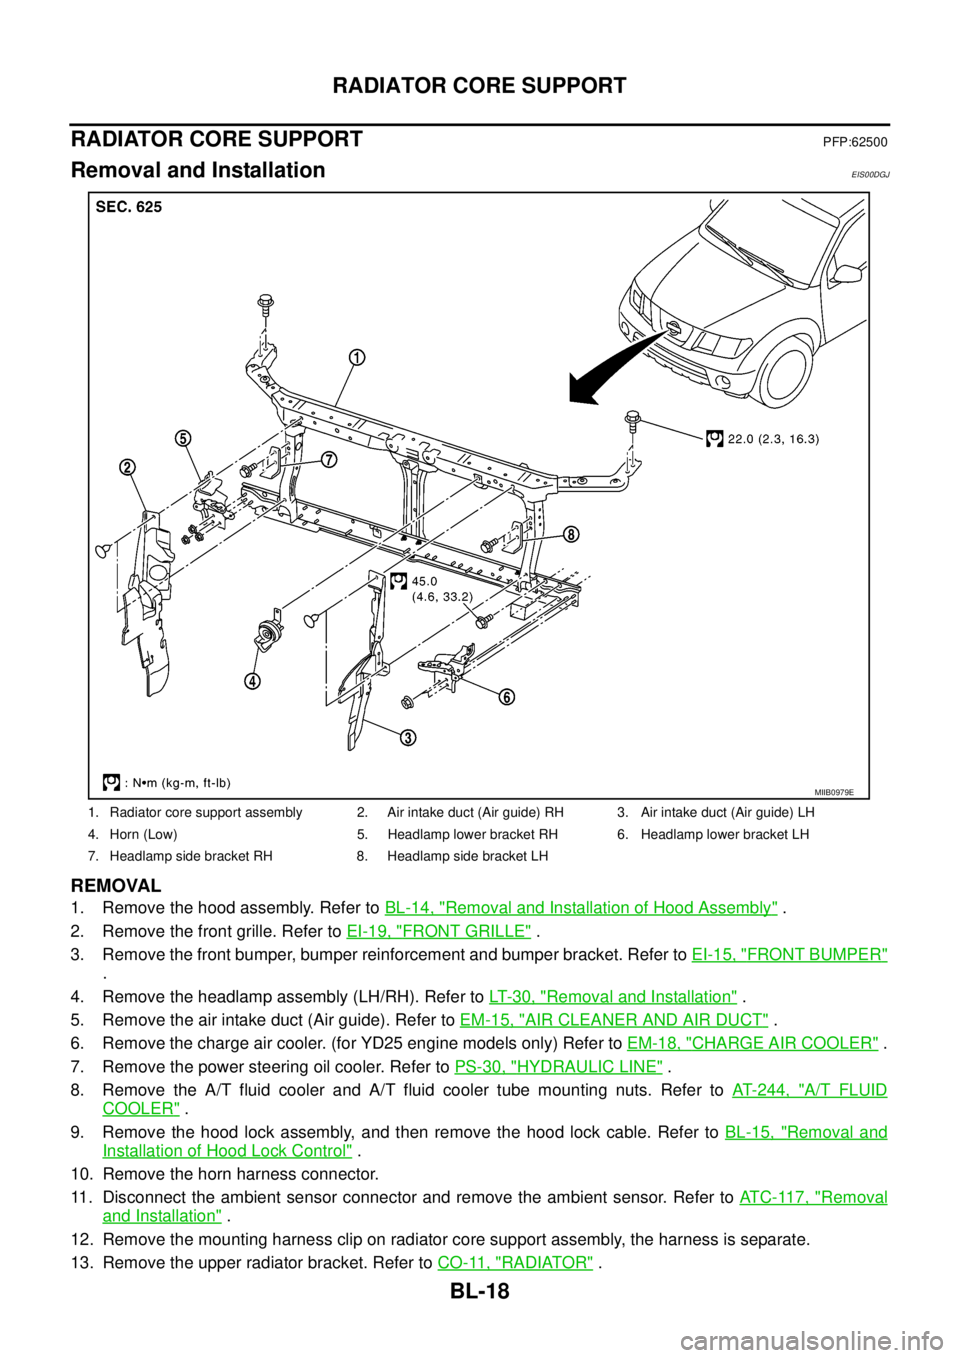
Removal and InstallationEIS00DGJ
REMOVAL
1. Remove the hood assembly. Refer toBL-14, "Removal and Installation of Hood Assembly".
2. Remove the front grille. Refer toEI-19, "
FRONT GRILLE".
3. Remove the front bumper, bumper reinforcement and bumper bracket. Refer toEI-15, "
FRONT BUMPER"
.
4. Remove the headlamp assembly (LH/RH). Refer toLT-30, "
Removal and Installation".
5. Remove the air intake duct (Air guide). Refer toEM-15, "
AIR CLEANER AND AIR DUCT".
6. Remove the charge air cooler. (for YD25 engine models only) Refer toEM-18, "
CHARGE AIR COOLER".
7. Remove the power steering oil cooler. Refer toPS-30, "
HYDRAULIC LINE".
8. Remove the A/T fluid cooler and A/T fluid cooler tube mounting nuts. Refer toAT- 2 4 4 , "
A/T FLUID
COOLER".
9. Remove the hood lock assembly, and then remove the hood lock cable. Refer toBL-15, "
Removal and
Installation of Hood Lock Control".
10. Remove the horn harness connector.
11. Disconnect the ambient sensor connector and remove the ambient sensor. Refer toAT C - 11 7 , "
Removal
and Installation".
12. Remove the mounting harness clip on radiator core support assembly, the harness is separate.
13. Remove the upper radiator bracket. Refer toCO-11, "
RADIATOR".
1. Radiator core support assembly 2. Air intake duct (Air guide) RH 3. Air intake duct (Air guide) LH
4. Horn (Low) 5. Headlamp lower bracket RH 6. Headlamp lower bracket LH
7. Headlamp side bracket RH 8. Headlamp side bracket LH
MIIB0979E
Page 603 of 3171
RADIATOR CORE SUPPORT
BL-19
C
D
E
F
G
H
J
K
L
MA
B
BL
14. Remove the radiator core support mounting bolts and remove the radiator core support assembly.
15. After removing the radiator core support assembly, the following parts are separate.
lHorn (Low).
lHeadlamp side bracket (LH/RH).
lHeadlamp lower bracket (LH/RH).
INSTALLATION
Install in the reverse order of removal.
CAUTION:
After installing, check the hood adjustment and hood opener operation. Refer toBL-12, "
Fitting
Adjustment"andBL-17, "Hood Lock Control Inspection".
Page 604 of 3171
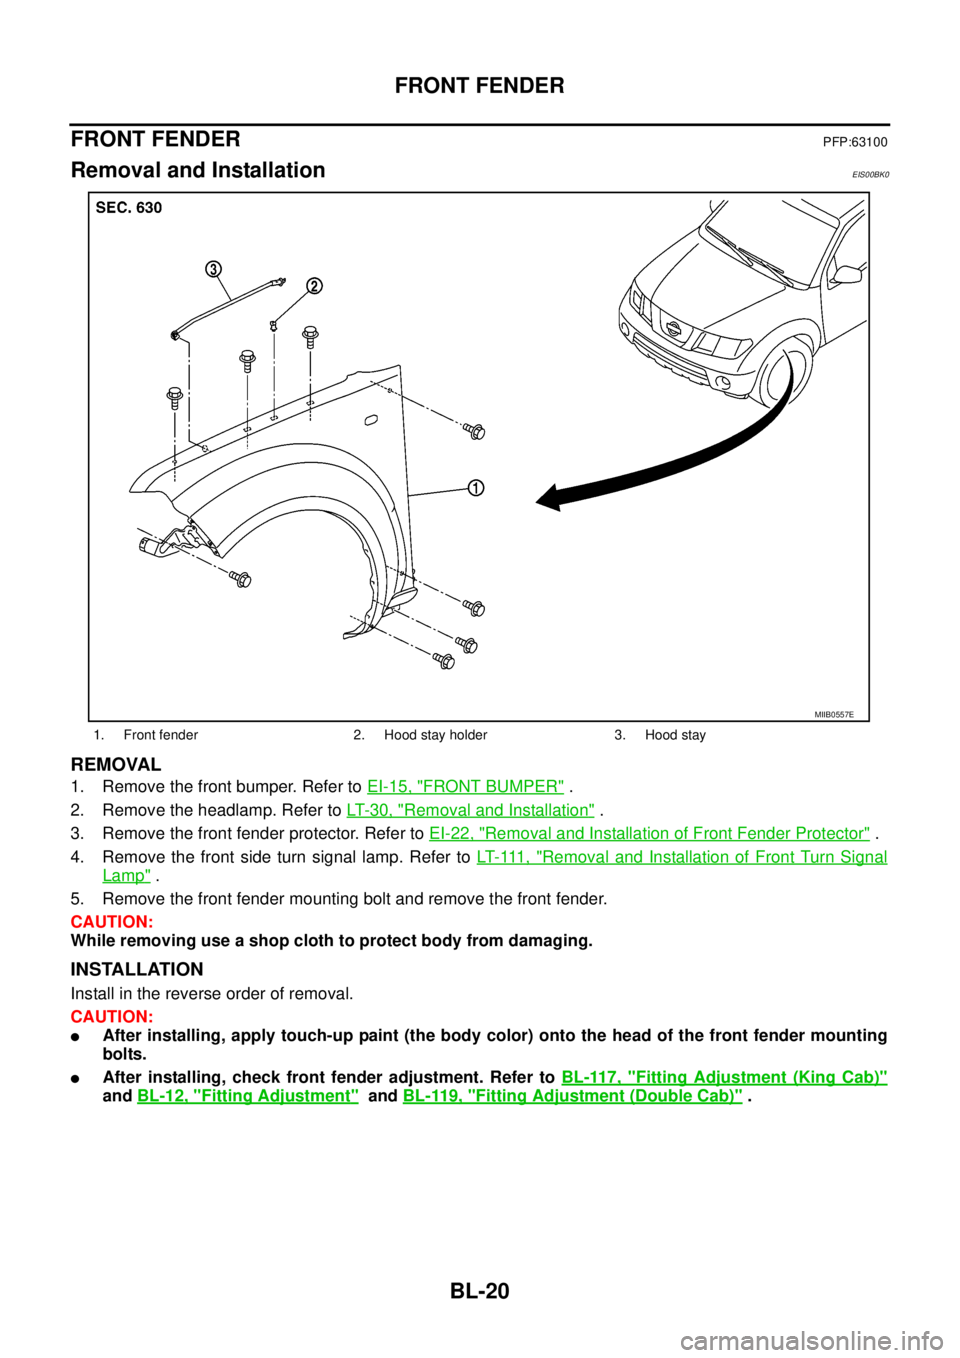
BL-20
FRONT FENDER
FRONT FENDER
PFP:63100
Removal and InstallationEIS00BK0
REMOVAL
1. Remove the front bumper. Refer toEI-15, "FRONT BUMPER".
2. Remove the headlamp. Refer toLT-30, "
Removal and Installation".
3. Remove the front fender protector. Refer toEI-22, "
Removal and Installation of Front Fender Protector".
4. Remove the front side turn signal lamp. Refer toLT- 111 , "
Removal and Installation of Front Turn Signal
Lamp".
5. Remove the front fender mounting bolt and remove the front fender.
CAUTION:
While removing use a shop cloth to protect body from damaging.
INSTALLATION
Install in the reverse order of removal.
CAUTION:
lAfter installing, apply touch-up paint (the body color) onto the head of the front fender mounting
bolts.
lAfter installing, check front fender adjustment. Refer toBL-117, "Fitting Adjustment (King Cab)"
andBL-12, "Fitting Adjustment"andBL-119, "Fitting Adjustment (Double Cab)".
1. Front fender 2. Hood stay holder 3. Hood stay
MIIB0557E
Page 857 of 3171
![NISSAN NAVARA 2005 Repair Workshop Manual TROUBLE DIAGNOSIS
BRC-35
[ABS]
C
D
E
G
H
I
J
K
L
MA
B
BRC
Symptom 4: ABS Function Does Not OperateEFS005UB
CAUTION:
ABS does not operate when speed is 10 km/h (6 MPH) or lower.
1.CHECK ABS WARNING LAM NISSAN NAVARA 2005 Repair Workshop Manual TROUBLE DIAGNOSIS
BRC-35
[ABS]
C
D
E
G
H
I
J
K
L
MA
B
BRC
Symptom 4: ABS Function Does Not OperateEFS005UB
CAUTION:
ABS does not operate when speed is 10 km/h (6 MPH) or lower.
1.CHECK ABS WARNING LAM](/img/5/57362/w960_57362-856.png)
TROUBLE DIAGNOSIS
BRC-35
[ABS]
C
D
E
G
H
I
J
K
L
MA
B
BRC
Symptom 4: ABS Function Does Not OperateEFS005UB
CAUTION:
ABS does not operate when speed is 10 km/h (6 MPH) or lower.
1.CHECK ABS WARNING LAMP DISPLAY
Make sure that the ABS warning lamp is turned off after the ignition switch is turned ON or when driving.
OK or NG
OK >> GO TO procedure 3 “CHECK WHEEL SENSOR AND SENSOR ROTOR” of symptom1. Refer to
BRC-33, "
Symptom 1: Excessive ABS Function Operation Frequency".
NG >> Perform self-diagnosis. Refer toBRC-18, "
Self-Diagnosis".
Symptom 5: Pedal Vibration or ABS Operation Sound OccursEFS005UC
CAUTION:
Under the following conditions, ABS is activated and vibration is felt when brake pedal is lightly
depressed (just place a foot on it). However, this is normal.
lWhen shifting gears
lWhen driving on slippery road
lDuring cornering at high speed
lWhen passing over bumps or grooves [at approximately 50 mm (1.97 in) or more]
lWhen pulling away just after starting engine [at approximately 10 km/h (6 MPH) or more]
1.SYMPTOM CHECK 1
Check if there is pedal vibration or operation noise when the engine is started.
Do symptoms occur?
YES >> GO TO 2.
NO >> Perform self-diagnosis. Refer toBRC-18, "
Self-Diagnosis".
2.SYMPTOM CHECK 2
Check symptoms when electrical component (headlamps, etc.) switches are operated.
Do symptoms occur?
YES >> Check if there is a radio, antenna, antenna lead wire, or wiring close to the control unit. If there is,
move it farther away.
NO >> GO TO procedure 3²CHECK WHEEL SENSOR AND SENSOR ROTOR²of symptom 1. Refer to
BRC-33, "
Symptom 1: Excessive ABS Function Operation Frequency".
Symptom 6: ABS Warning Lamp Indication Is Not NormalEFS005UD
NOTE:
Lighting condition of ABS warning lamp refer toBRC-24, "
BASIC INSPECTION 3 ABS WARNING LAMP AND
BRAKE WARNING LAMP INSPECTION".
1.CHECK COMBINATION METER INDICATION
Check the combination meter indication and operation. Refer toDI-13, "
Self-Diagnosis Mode of Combination
Meter".
OK or NG
OK >> GO TO 2.
NG >> Combination meter is malfunctioning. Check combination meter. Refer toDI-4, "
COMBINATION
METERS".