fuse NISSAN NV PASSENGER VAN 2018 Owners Manual
[x] Cancel search | Manufacturer: NISSAN, Model Year: 2018, Model line: NV PASSENGER VAN, Model: NISSAN NV PASSENGER VAN 2018Pages: 426, PDF Size: 4.52 MB
Page 16 of 426
17. Rear Sonar System (RSS)OFF switch (if so equipped) (P. 2-37)
Front and rear sonar system
OFF switch (if so equipped) (P. 2-37)
Power inverter switch
(if so equipped) (P. 2-36)
Heated seat switch
(if so equipped) (P. 2-34)
Tow mode switch (if so equipped)
(P. 2-38)
USB connection port (P. 4-60)
AUX IN jack (P. 4-60)
18. 12v power outlet (P. 2-39)
19. Ignition switch (P. 5-8)
20. Tilt steering wheel control (P. 3-16)
21. Hood release switch (P. 3-13)
22. Fuse box (P. 8-22)
23. Outside power mirror switch
(P. 3-17)
Vehicle Dynamic Control (VDC)
OFF switch (P. 2-35)
*: Refer to the separate NissanConnect®
Owner’s Manual (if so equipped).
Refer to the page number indicated in
parentheses for operating details.
Illustrated table of contents0-7
Page 17 of 426
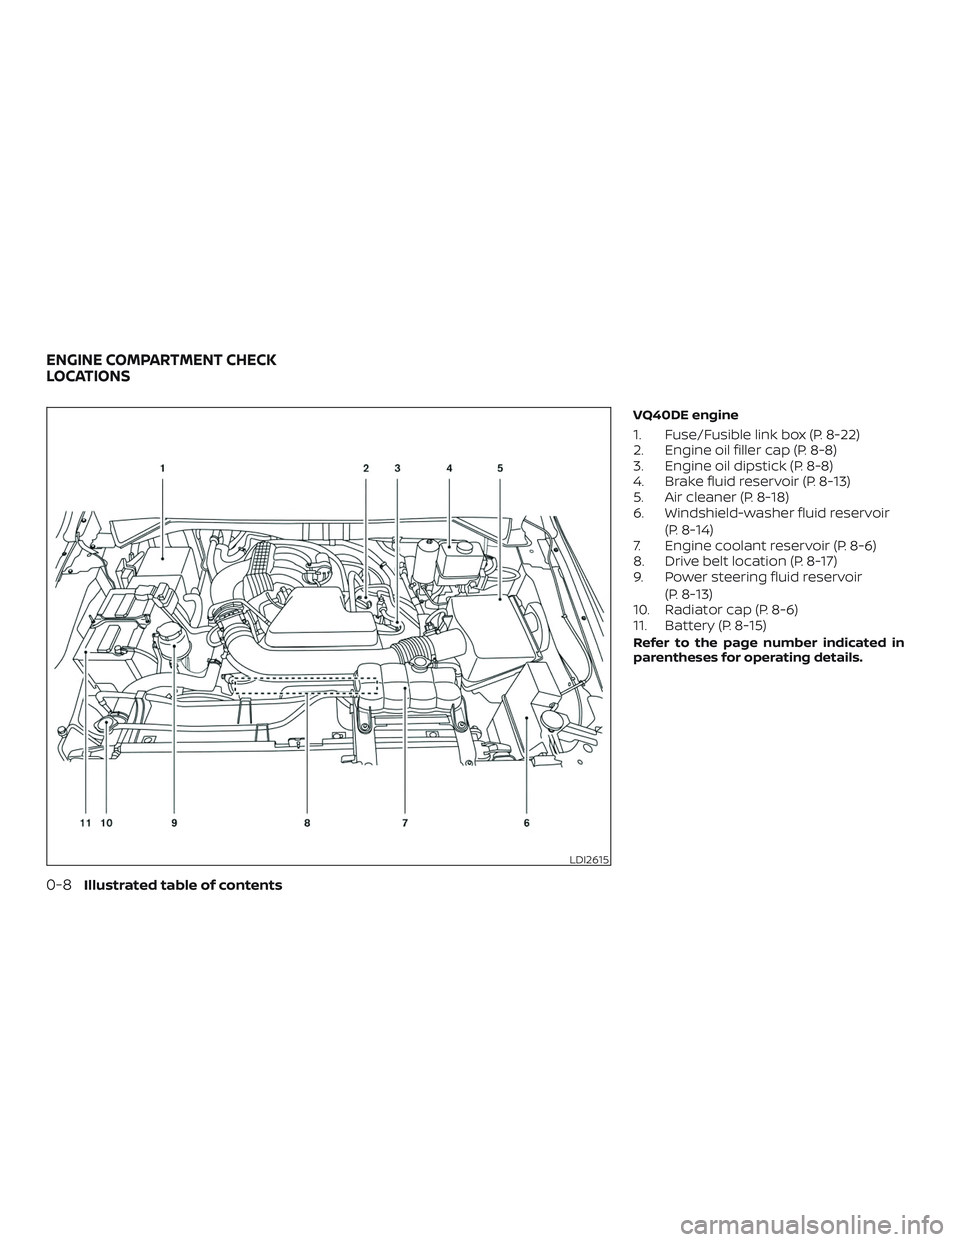
VQ40DE engine
1. Fuse/Fusible link box (P. 8-22)
2. Engine oil filler cap (P. 8-8)
3. Engine oil dipstick (P. 8-8)
4. Brake fluid reservoir (P. 8-13)
5. Air cleaner (P. 8-18)
6. Windshield-washer fluid reservoir(P. 8-14)
7. Engine coolant reservoir (P. 8-6)
8. Drive belt location (P. 8-17)
9. Power steering fluid reservoir
(P. 8-13)
10. Radiator cap (P. 8-6)
11. Battery (P. 8-15)
Refer to the page number indicated in
parentheses for operating details.
LDI2615
ENGINE COMPARTMENT CHECK
LOCATIONS
0-8Illustrated table of contents
Page 18 of 426
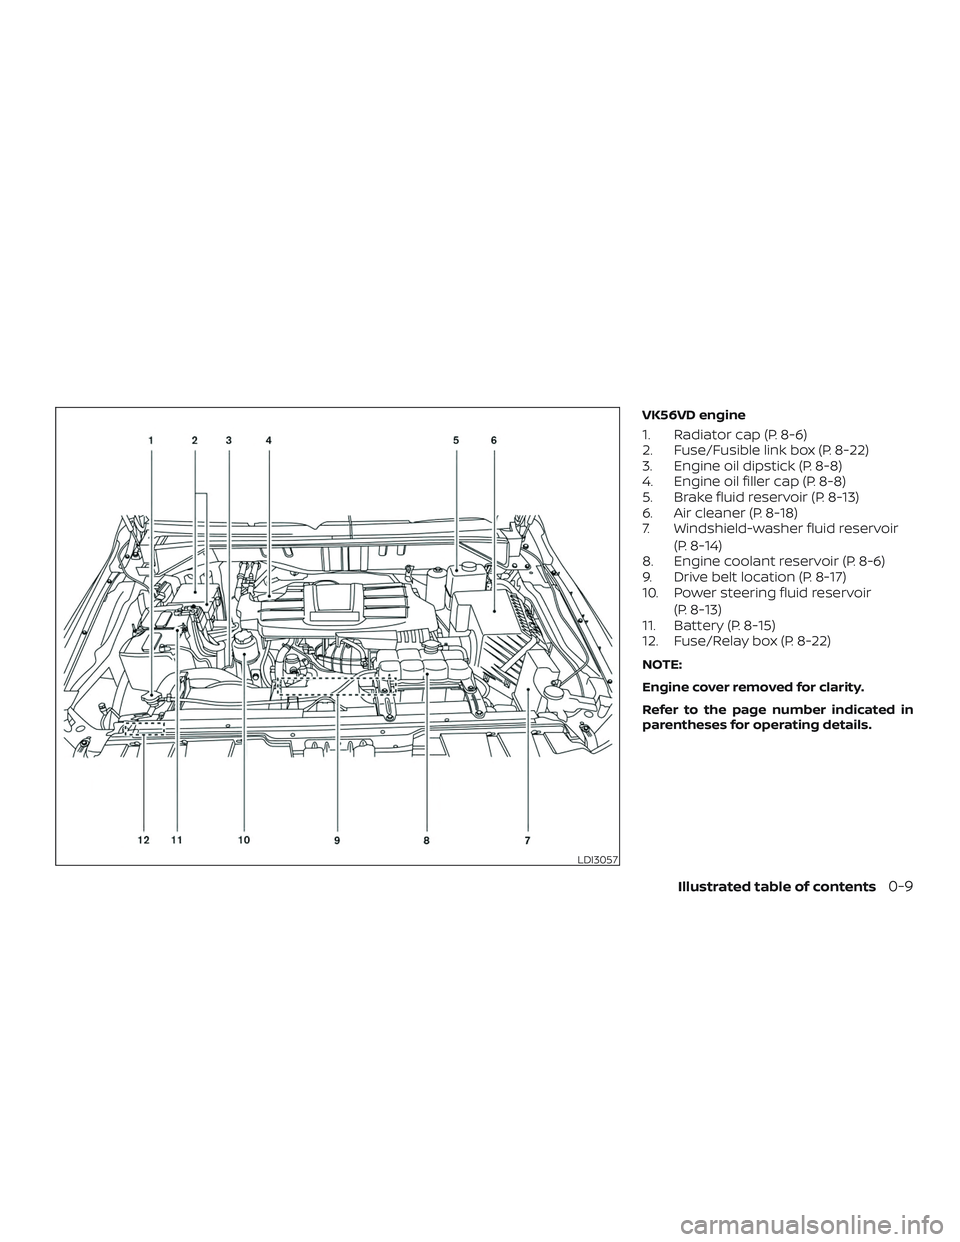
VK56VD engine
1. Radiator cap (P. 8-6)
2. Fuse/Fusible link box (P. 8-22)
3. Engine oil dipstick (P. 8-8)
4. Engine oil filler cap (P. 8-8)
5. Brake fluid reservoir (P. 8-13)
6. Air cleaner (P. 8-18)
7. Windshield-washer fluid reservoir(P. 8-14)
8. Engine coolant reservoir (P. 8-6)
9. Drive belt location (P. 8-17)
10. Power steering fluid reservoir
(P. 8-13)
11. Battery (P. 8-15)
12. Fuse/Relay box (P. 8-22)
NOTE:
Engine cover removed for clarity.
Refer to the page number indicated in
parentheses for operating details.
LDI3057
Illustrated table of contents0-9
Page 92 of 426
17. Rear Sonar System (RSS)OFF switch (if so equipped) (P. 2-37)
Front and rear sonar system
OFF switch (if so equipped) (P. 2-37)
Power inverter switch (if so
equipped) (P. 2-36)
Heated seat switch
(if so equipped) (P. 2-34)
Tow mode switch (if so equipped)
(P. 2-38)
USB connection port (P. 4-60)
AUX IN jack (P. 4-60)
18. 12v power outlet (P. 2-39)
19. Ignition switch (P. 5-8)
20. Tilt steering wheel control (P. 3-16)
21. Hood release switch (P. 3-13)
22. Fuse box (P. 8-22)
23. Outside power mirror switch
(P. 3-17)
Vehicle Dynamic Control (VDC)
OFF switch (P. 2-35)
*: Refer to the separate NissanConnect®
Owner’s Manual (if so equipped).
Refer to the page number indicated in
parentheses for operating details.
Instruments and controls2-3
Page 129 of 426
∙ Do not use with accessories that ex-ceed a 12 volt, 120W (10A) power draw.
∙ Do not use double adapters or more than one electrical accessory.
∙ Use power outlets with the engine running to avoid discharging the ve-
hicle battery.
∙ Avoid using power outlets when the air conditioner, headlights or rear win-
dow defroster is on.
∙ Before inserting or disconnecting a plug, be sure the electrical accessory
being used is turned off.
∙ Push the plug in as far as it will go. If good contact is not made, the plug
may overheat or the internal tem-
perature fuse may open.
∙ When not in use, be sure to close the cap. Do not allow water or any other
liquid to contact the outlet.
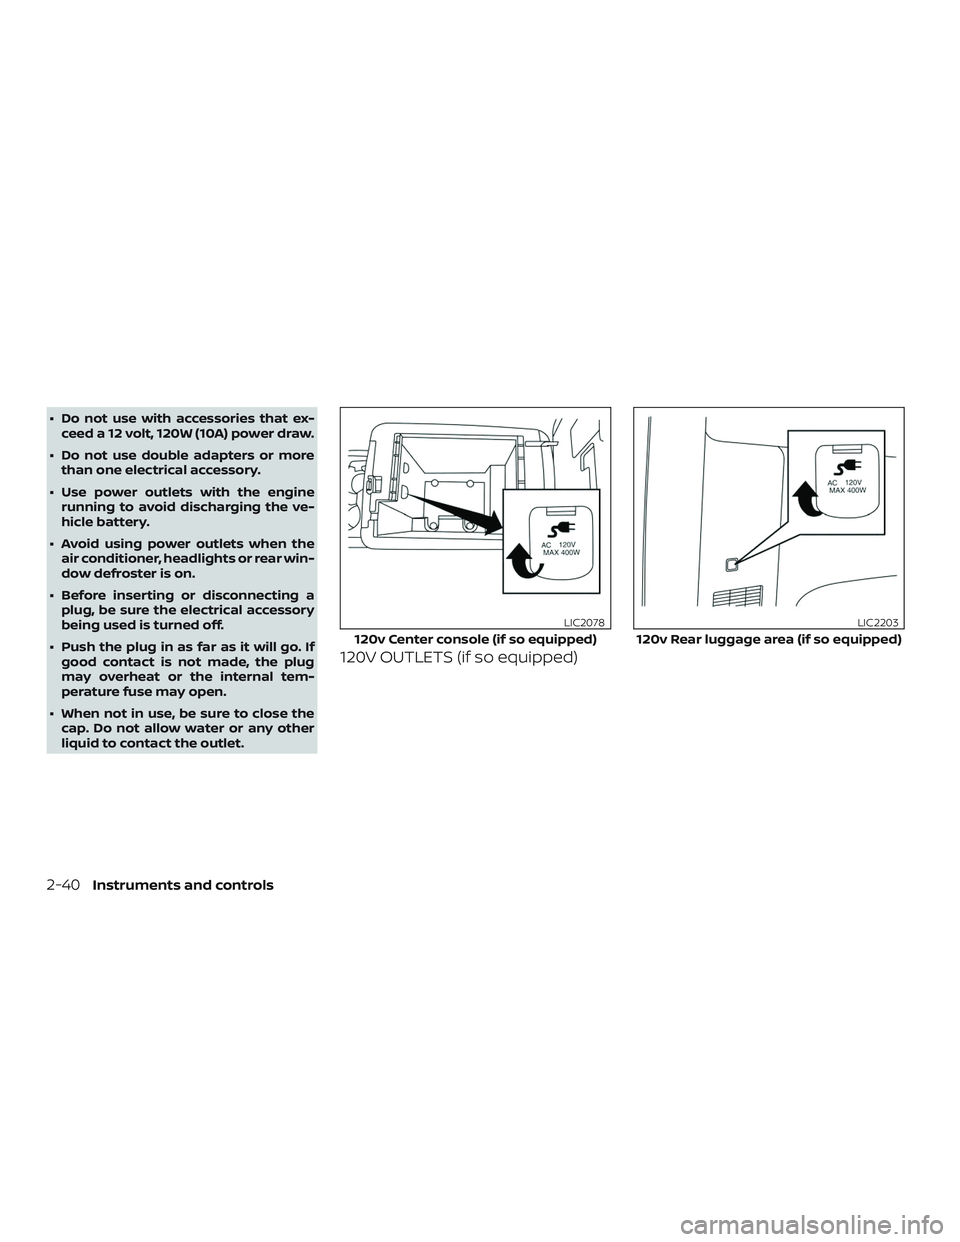
120V OUTLETS (if so equipped)
120v Center console (if so equipped)
LIC2078
120v Rear luggage area (if so equipped)
LIC2203
2-40Instruments and controls
Page 130 of 426
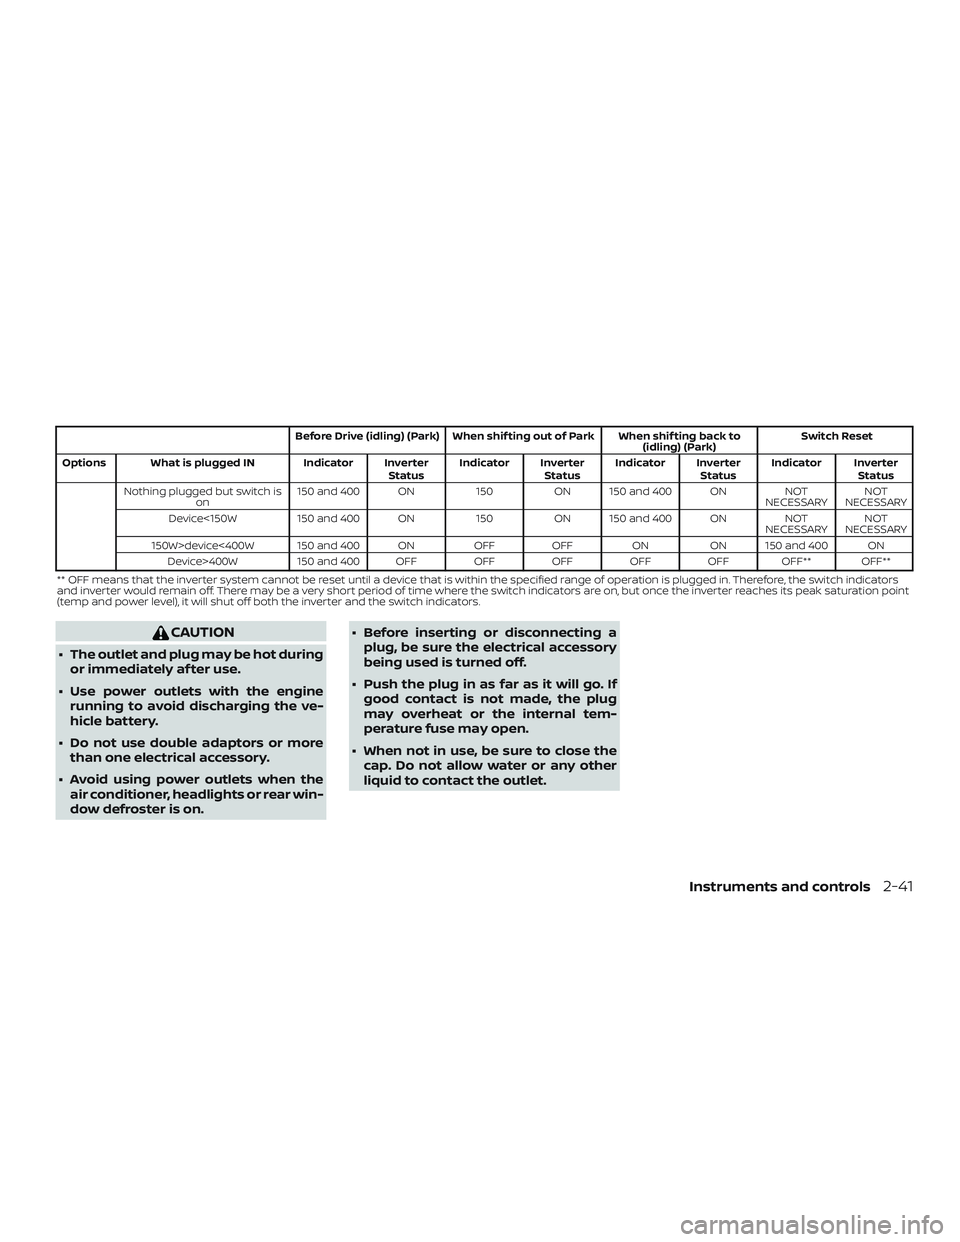
Before Drive (idling) (Park) When shif ting out of Park When shif ting back to(idling) (Park)Switch Reset
Options What is plugged IN Indicator Inverter StatusIndicator Inverter
StatusIndicator Inverter
StatusIndicator Inverter
Status
Nothing plugged but switch is on 150 and 400 ON
150ON 150 and 400 ON NOT
NECESSARY NOT
NECESSARY
Device<150W 150 and 400 ON 150ON 150 and 400 ON NOT
NECESSARY NOT
NECESSARY
150W>device<400W 150 and 400 ON OFFOFF ONON 150 and 400 ON
Device>400W 150 and 400 OFF OFFOFFOFFOFF OFF** OFF**
** OFF means that the inverter system cannot be reset until a device that is within the specified range of operation is plugged in. Therefore, the switch indicators
and inverter would remain off. There may be a very short period of time where the switch indicators are on, but once the inverter reaches its peak saturat ion point
(temp and power level), it will shut off both the inverter and the switch indicators.
CAUTION
∙ The outlet and plug may be hot during
or immediately af ter use.
∙ Use power outlets with the engine running to avoid discharging the ve-
hicle battery.
∙ Do not use double adaptors or more than one electrical accessory.
∙ Avoid using power outlets when the air conditioner, headlights or rear win-
dow defroster is on. ∙ Before inserting or disconnecting a
plug, be sure the electrical accessory
being used is turned off.
∙ Push the plug in as far as it will go. If good contact is not made, the plug
may overheat or the internal tem-
perature fuse may open.
∙ When not in use, be sure to close the cap. Do not allow water or any other
liquid to contact the outlet.
Instruments and controls2-41
Page 208 of 426
4. Other buttons can be set in the samemanner.
If the battery cable is disconnected, or if the
fuse opens, the radio memory will be can-
celed. In that case, reset the desired sta-
tions.
Compact disc (CD) player
operation
If the radio is already operating, it automati-
cally turns off and the compact disc begins
to play.
MEDIA button
With a CD loaded, press the MEDIA button
until the CD mode is displayed on the
screen.
CD/MP3 display mode
While listening to an MP3/WMA CD, certain
text may be displayed on the screen if the
CD has been encoded with text informa-
tion. Depending on how the MP3/WMA CD
is encoded, information such as Artist,
Song and Folder will be displayed.
The track number and the total number of
tracks in the current folder or on the cur-
rent disc are displayed on the screen as
well.
SEEK/TRACK (Reverse or Fast Forward) button
Press and hold the SEEK/TRACK
button
orfor 1.5 seconds while
the compact disc is playing to reverse or
fast forward the track being played. The
compact disc plays at an increased speed
while reversing or fast forwarding. When
the button is released, the compact disc
returns to normal play speed.
SEEK/TRACK button
Press the
SEEK/TRACK button while a
CD or MP3/WMA CD is playing to return to
the beginning of the current track. Press
the
SEEK/TRACK button several times
to skip backward several tracks.
Press the
SEEK/TRACK button while a
CD or MP3/WMA CD is playing to advance
one track. Press the
SEEK/TRACK but-
ton several times to skip forward several
tracks. If the last track on a CD is skipped,
the first track on the disc is played. If the last
track in a folder of an MP3/WMA CD is
skipped, the first track of the next folder is
played. TUNE/FOLDER knob (MP3/WMA CD only)
If a MP3/WMA CD with multiple folders is
playing, turn the TUNE/FOLDER knob to
change folders. Turn the knob to the lef t to
skip back a folder. Turn the knob to the right
to skip ahead a folder.
RPT (repeat) button
When the RPT button is pressed while a
compact disc is playing, the play pattern
can be changed as follows:
CD:
1 Track Repeat
←→OFF
CD with MP3 or WMA:
1 Folder Repeat →1 Track Repeat →OFF
1 Track Repeat: the current track will be
repeated.
1 Folder Repeat: the current folder will be
repeated.
OFF: No repeat play pattern is applied. The
indicator on the display will turn off.
The current play pattern of the CD is dis-
played on the screen unless no pattern is
applied.
Monitor, climate, audio, phone and voice recognition systems4-45
Page 214 of 426
1 to 6 Station memory operations
Six stations can be set for the AM band.
Twelve stations can be set for the FM band
(6 for FM1, 6 for FM2). Eighteen channels can
be set for the satellite radio (6 for XM1, 6 for
XM2, 6 for XM3).1. Choose the radio band AM, FM1 or FM2 using the FM·AM select button, or
choose the satellite band XM1, XM2 or
XM3 using the XM button.
2. Tune to the desired station using manual, SEEK or SCAN tuning. Press
and hold any of the desired station
memory buttons (1 – 6) until the preset
number is updated on the display and
the sound is briefly muted.
3. The channel indicator will then come on and the sound will resume. Pro-
gramming is now complete.
4. Other buttons can be set in the same manner.
If the battery cable is disconnected, or if the
fuse opens, the radio memory will be can-
celed. In that case, reset the desired sta-
tions.Compact disc (CD) player
operation
If the radio is already operating, it automati-
cally turns off and the compact disc begins
to play.
MEDIA button
With a CD loaded, press the MEDIA button
until the CD mode is displayed on the
screen.
CD/MP3 display mode
While listening to an MP3/WMA CD, certain
text may be displayed on the screen if the
CD has been encoded with text informa-
tion. Depending on how the MP3/WMA CD
is encoded, information such as Artist,
Song and Folder will be displayed.
The track number and the total number of
tracks in the current folder or on the cur-
rent disc are displayed on the screen as
well.
SEEK/CAT (Reverse or Fast Forward) button
Press and hold the SEEK/CAT button
orfor 1.5 seconds while the compact
disc is playing to reverse or fast forward the
track being played. The compact disc plays at an increased speed while reversing or
fast forwarding. When the button is re-
leased, the compact disc returns to normal
play speed.
SEEK/CAT button
Press the
SEEK/CAT button while a
CD or MP3/WMA CD is playing to return to
the beginning of the current track. Press
the
SEEK/CAT button several times to
skip backward several tracks.
Press the
SEEK/CAT button while a
CD or MP3/WMA CD is playing to advance
one track. Press the
SEEK/CAT button
several times to skip forward several
tracks. If the last track on a CD is skipped,
the first track on the disc is played. If the last
track in a folder of an MP3/WMA CD is
skipped, the first track of the next folder is
played.
TUNE/SCROLL knob (MP3/WMA CD only)
If a MP3/WMA CD with multiple folders is
playing, turn the TUNE/SCROLL knob to
change folders. Turn the knob to the lef t to
skip back a folder. Turn the knob to the right
to skip ahead a folder.
Monitor, climate, audio, phone and voice recognition systems4-51
Page 219 of 426
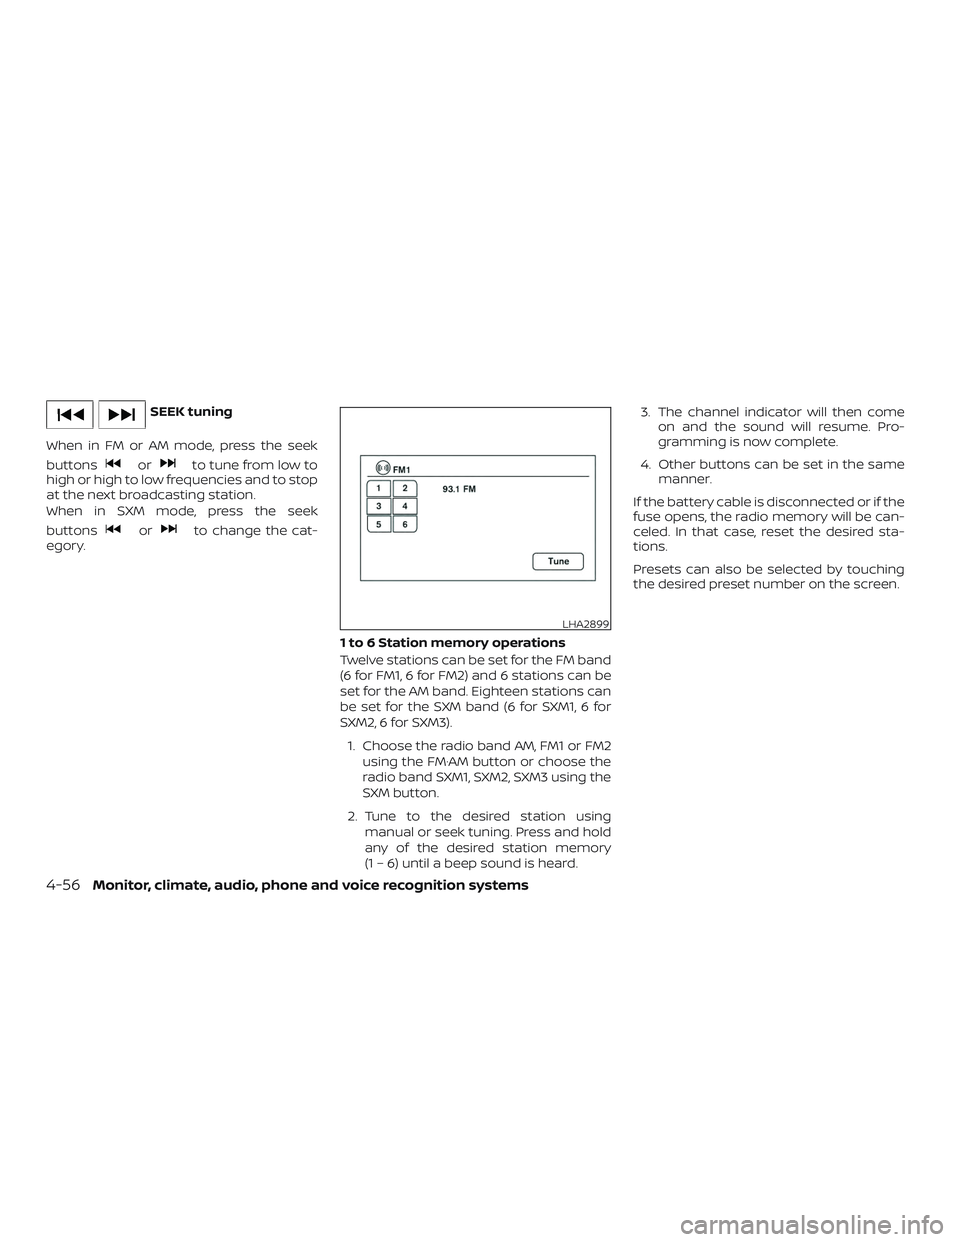
SEEK tuning
When in FM or AM mode, press the seek
buttons
orto tune from low to
high or high to low frequencies and to stop
at the next broadcasting station.
When in SXM mode, press the seek
buttons
orto change the cat-
egory.
1 to 6 Station memory operations
Twelve stations can be set for the FM band
(6 for FM1, 6 for FM2) and 6 stations can be
set for the AM band. Eighteen stations can
be set for the SXM band (6 for SXM1, 6 for
SXM2, 6 for SXM3).1. Choose the radio band AM, FM1 or FM2 using the FM·AM button or choose the
radio band SXM1, SXM2, SXM3 using the
SXM button.
2. Tune to the desired station using manual or seek tuning. Press and hold
any of the desired station memory
(1 – 6) until a beep sound is heard. 3. The channel indicator will then come
on and the sound will resume. Pro-
gramming is now complete.
4. Other buttons can be set in the same manner.
If the battery cable is disconnected or if the
fuse opens, the radio memory will be can-
celed. In that case, reset the desired sta-
tions.
Presets can also be selected by touching
the desired preset number on the screen.
LHA2899
4-56Monitor, climate, audio, phone and voice recognition systems
Page 257 of 426
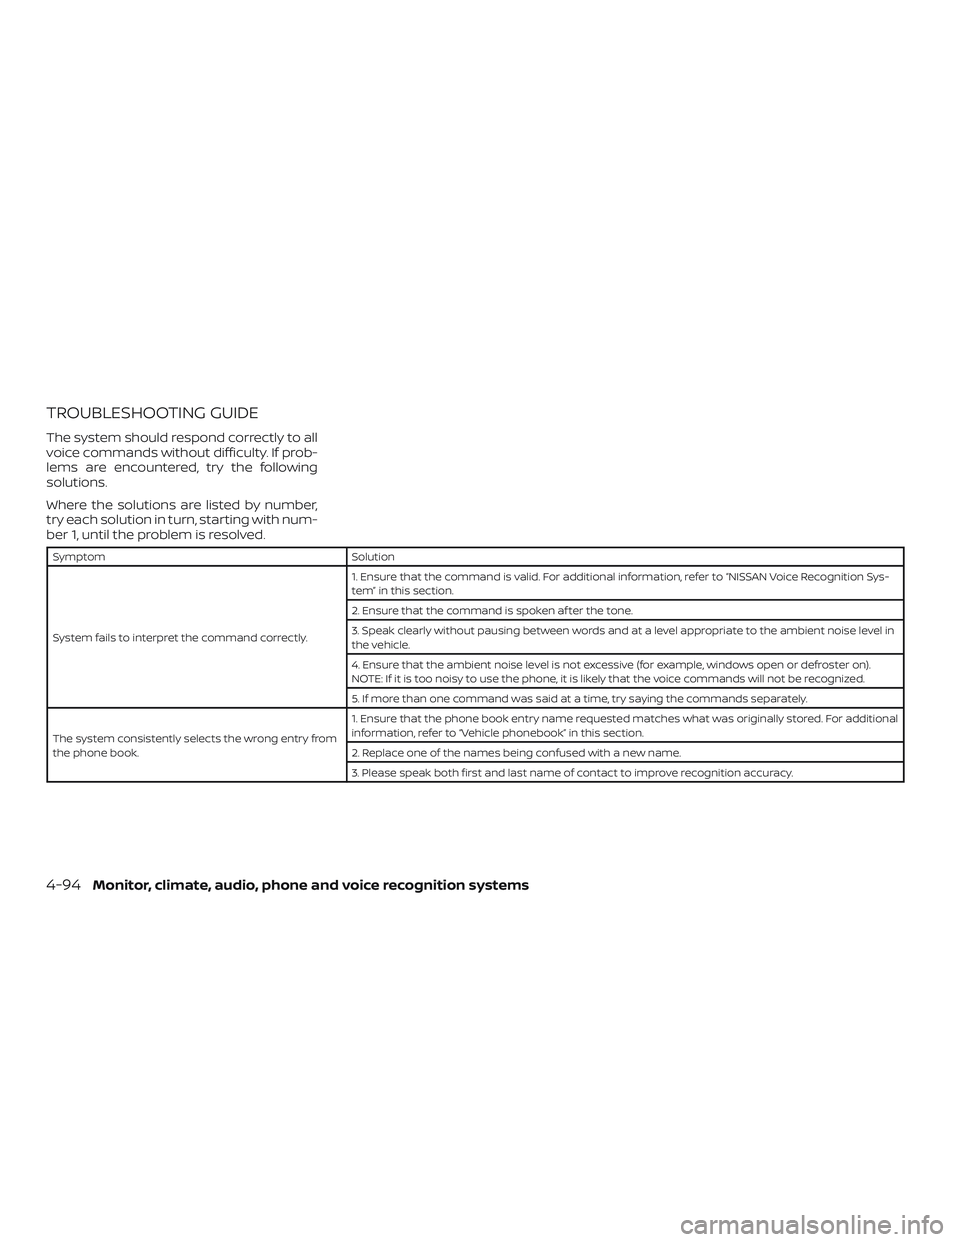
TROUBLESHOOTING GUIDE
The system should respond correctly to all
voice commands without difficulty. If prob-
lems are encountered, try the following
solutions.
Where the solutions are listed by number,
try each solution in turn, starting with num-
ber 1, until the problem is resolved.
SymptomSolution
System fails to interpret the command correctly. 1. Ensure that the command is valid. For additional information, refer to “NISSAN Voice Recognition Sys-
tem” in this section.
2. Ensure that the command is spoken af ter the tone.
3. Speak clearly without pausing between words and at a level appropriate to the ambient noise level in
the vehicle.
4. Ensure that the ambient noise level is not excessive (for example, windows open or defroster on).
NOTE: If it is too noisy to use the phone, it is likely that the voice commands will not be recognized.
5. If more than one command was said at a time, try saying the commands separately.
The system consistently selects the wrong entry from
the phone book. 1. Ensure that the phone book entry name requested matches what was originally stored. For additional
information, refer to “Vehicle phonebook” in this section.
2. Replace one of the names being confused with a new name.
3. Please speak both first and last name of contact to improve recognition accuracy.
4-94Monitor, climate, audio, phone and voice recognition systems