NISSAN PATHFINDER 2002 R50 / 2.G Owners Manual
Manufacturer: NISSAN, Model Year: 2002, Model line: PATHFINDER, Model: NISSAN PATHFINDER 2002 R50 / 2.GPages: 288, PDF Size: 2.49 MB
Page 141 of 288
the FF or REW symbol flashes on the right
side of the display window while searching for
the selection.
This system searches for the blank intervals
between selections. If there is a blank interval
within one program or there is no interval
between programs, the system may not stop in
the desired or expected location.
SCAN tuning:
Push the SCAN tuning button while playing
tape, and it stops at the next tape program for
5 seconds. Pushing the button again during
this 5 second period will stop SCAN tuning and
the tape program is continued. If the SCAN
tuning button is not pushed within 5 seconds,
SCAN tuning moves to the next tape program.TAPE EJECT:
When this button is pushed with the tape
loaded, the tape will be ejected.
When the tape is ejected while it is being
played, the system will be turned off.
Compact disc (CD) changer
operationTurn the ignition key to the ACC or ON position
and insert the compact disc into the slot with
the label side facing up. The compact disc willbe guided automatically into the slot and start
playing.
After loading the disc, the number of tracks on
the disc and the play time will appear on the
display.
If the radio or tape is already operating, it will
automatically turn off and the compact disc will
play.
CAUTION
Do not force the compact disc into the
slot. This could damage the player.
If the system has been turned off while the
compact disc was playing, pushing the
ON×OFF/VOL control knob will start the com-
pact disc.
8 cm diameter compact discs can also be used
without an adapter.
LOAD button:
To insert a CD in the CD changer, push the
LOAD button for less than 1.5 seconds. And
select the loading slot by pushing the CD insert
select button (1 to 6) then insert the CD.
To insert 6 CDs to the CD changer, push the
LOAD button for more than 1.5 seconds.The inserted slot numbers will illuminate on the
display.
PLAY:
When the CD6 button is pushed with the
system off and the compact disc loaded, the
system will turn on and the compact disc will
start to play.
When the CD6 button is pushed with the
compact disc loaded but the tape or the radio
playing, the tape or radio will automatically be
turned off and the compact disc will start to
play.
FF (Fast Forward), REW
(Rewind):
When the(fast forward) or
(rewind)
button is pushed while the compact disc is
being played, the compact disc will play while
fast forwarding or rewinding. When the button
is released, the compact disc will return to
normal play speed.
APS (Automatic
Program Search) FF,
APS REW:
When the(APS FF) button is pushed
while the compact disc is being played, the
program next to the present one will start to
play from its beginning. Push several times to
4-24
Heater, air conditioner and audio systems
Z
01.9.21/R50-D/V5
X
Page 142 of 288

skip through programs. The compact disc will
advance the number of times the button is
pushed. (When the last program on the com-
pact disc is skipped through, the first program
will be played.) When the
(APS REW)
button is pushed, the program being played
returns to its beginning. Push several times to
skip back through programs. The compact disc
will go back the number of times the button is
pushed.
CD PLAY button:
To change CD, push the CD play select button
(1 to 6).
SCAN tuning:
When the SCAN tuning button is pushed for
less than 1.5 seconds while the CD is being
played, the beginning of all the tracks of CDs
will be played for 10 seconds in sequence.
When the SCAN tuning button is pushed for
more than 1.5 seconds while the CD is being
played, the first program in all the CDs will be
played for 10 seconds.
Pushing the button again during this 10 sec-
ond period will stop SCAN tuning.
If the SCAN tuning button is not pushed within
10 seconds, SCAN tuning moves to the next
disc program.
REPEAT (RPT):
When the RPT button is pushed while the
compact disc is played, the play pattern can be
changed as follows:
DISPLAY CD TEXT:
To indicate the CD mode text, push the PTY
button during CD playing.
To change the indicated text, push the PTY
button.
The text will change as follows:If the text is more than 11 letters, push the
AUTO.P button to display the remaining text.
CD EJECT:
When the CD EJECT button is pushed with the
compact disc loaded, the compact disc will be
ejected.
To eject the discs selected by the CD select
button, push the EJECT button for less than
1.5 seconds.To eject all the discs, push the EJECT button
for more than 1.5 seconds.
If the compact disc comes out and is not
removed, it will be pulled back into the slot
to protect it. (without 8 cm diameter com-
pact discs)
CD IN indicator:
CD IN indicator appears on the display when
the CD is loaded with the system on.
Heater, air conditioner and audio systems
4-25
Z
01.9.21/R50-D/V5
X
Page 143 of 288
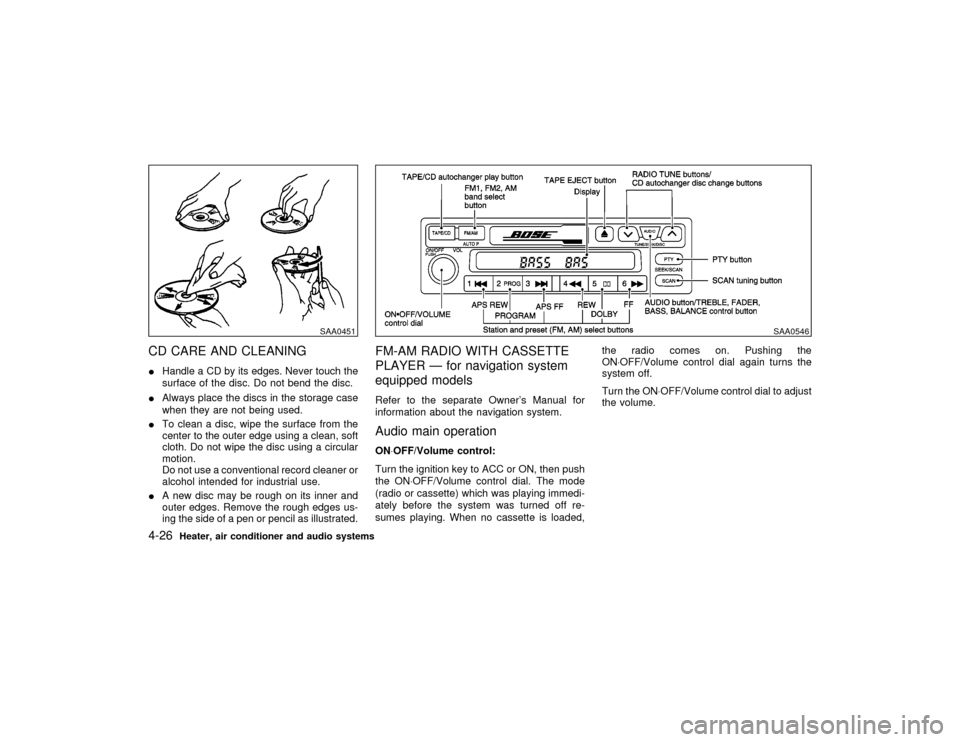
CD CARE AND CLEANINGIHandle a CD by its edges. Never touch the
surface of the disc. Do not bend the disc.
IAlways place the discs in the storage case
when they are not being used.
ITo clean a disc, wipe the surface from the
center to the outer edge using a clean, soft
cloth. Do not wipe the disc using a circular
motion.
Do not use a conventional record cleaner or
alcohol intended for industrial use.
IA new disc may be rough on its inner and
outer edges. Remove the rough edges us-
ing the side of a pen or pencil as illustrated.
FM-AM RADIO WITH CASSETTE
PLAYER Ð for navigation system
equipped modelsRefer to the separate Owner's Manual for
information about the navigation system.Audio main operationON×OFF/Volume control:
Turn the ignition key to ACC or ON, then push
the ON×OFF/Volume control dial. The mode
(radio or cassette) which was playing immedi-
ately before the system was turned off re-
sumes playing. When no cassette is loaded,the radio comes on. Pushing the
ON×OFF/Volume control dial again turns the
system off.
Turn the ON×OFF/Volume control dial to adjust
the volume.
SAA0451
SAA0546
4-26
Heater, air conditioner and audio systems
Z
01.9.21/R50-D/V5
X
Page 144 of 288
AUDIO button (BASS, TREBLE, FADER,
BALANCE):
Press the AUDIO button to change the select-
ing mode as follows:
BASS,TREBLE,FADER,BALANCE,
BASS
To adjust Bass, Treble, Fader, Balance, press
the AUDIO button until the desired mode
BASS, TREBLE, FADER or BALANCE ap-
pears in the display.
Press the
or
button to adjust Bass
and Treble to the desired level. Use the
or
button to adjust Fader or Bal-
ance modes. Fader adjusts the sound level
between the front and rear speakers and Bal-
ance adjusts the sound level between the right
and left speakers.
After 10 seconds, the radio or cassette tape
display reappears. Once the sound quality is
set to the desired level, press the AUDIO
button repeatedly until the radio or cassette
tape display appears.
Radio/Cassette tape priority modeIn this mode, the radio station illuminates in the
display during radio operation. During cassette
tape operation, TAPE illuminates in the dis-
play.
FM-AM radio operation
FM-AM band select:
Pushing the FM-AM band select button will
change the band as follows:
AM,AM (preset station),FM1,FM2,
FM (preset station),AM
When FM/AM band select button is pushed
while the ignition switch is in the ACC or ON,
the radio will come on at the station last
played.
The last station played will also come on when
the power knob is turned to ON.
If a compact disc or tape is playing when the
FM/AM band select button is turned to ON, the
compact disc or tape will automatically be
turned off and the last radio station played will
come on.
The FM stereo indicator, ST illuminates during
FM stereo reception. When the stereo broad-
cast signal is weak, the radio automatically
changes from stereo to monaural reception.
TUNE (Tuning):WARNING
The radio should not be tuned while
driving so full attention may be given to
vehicle operation.
Use these buttons for manual tuning. To move
quickly through the channels, hold either of the
TUNE buttons down for more than 0.5 sec-
onds.
SCAN tuning:
Push the SCAN tuning button then SCAN will
illuminate in the display window. SCAN tuning
begins from high to low or low to high frequen-
cies and stops at each broadcasting station for
5 seconds. Pushing the button again during
this 5 second period stops SCAN tuning and
the radio remains tuned to that station.
If any of the SEEK/SCAN tuning buttons are
not pushed within 5 seconds, SCAN tuning
moves to the next station.
Station memory (and preset) operations:
Twelve stations can be set for the FM band
(six for FM1, six for FM2) and six stations can
Heater, air conditioner and audio systems
4-27
Z
01.9.21/R50-D/V5
X
Page 145 of 288

be set for the AM band.
1. Tune to the desired station using the SCAN
or TUNE buttons.
2. Select the desired station and keep pushing
any of the desired station memory buttons
(1 to 6) until a beep sound is heard. (The
radio mutes when the select button is
pushed.)
3. The indicator ch2 will come on and the
sound will resume. Memorizing is now com-
plete.
4. Other station select buttons can be set in
the same manner.
If the battery cable is disconnected, or if the
radio fuse opens, the radio memory is can-
celled. In that case, reset the desired stations.
Program type:
When PTY button is pressed during FM mode,
the PTY name of the current tuned station is
displayed. During this time if the PTY data
code is zero, or the data is unreadable; the
display will show NONE.
1. PTY selection mode
PTY name selection can be done by the
up/down TUNE button
or
in the
PTY selection mode.It is possible to shift the PTY name by one
step, with one push of the up/down tuning
button
or
.
PTY name selection can also be achieved by
pressing the preset buttons.
Initial PTY names are stored in the preset
buttons; but these can be changed by pressing
the preset buttons for more than 1.5 seconds
when the desired PTY name is in the display.
2. PTY SEEK tuning
After selecting a PTY name, push the
TUNE button
or
within 10 sec-
onds. Tuning to the PTY station will start. If
you do not push the TUNE button within the
10 second period, the PTY mode will be
canceled.
3. PTY SCAN tuning mode
Push the SCAN tuning button to tune the
PTY name station, and stop at each broad-
casting station for 5 seconds. Pushing the
button again during this 5 second period will
stop SCAN tuning and the radio will remain
tuned to that station. If the SCAN tuning
button is not pushed within 5 seconds,
SCAN tuning moves to the next station.
Cassette tape player operationTurn the ignition key to ACC or ON, then
carefully insert a cassette tape into the tape
door.
The cassette tape automatically pulls into the
player. The word TAPE and moving digital
squares illuminate on the right side of the
display window.
4-28
Heater, air conditioner and audio systems
Z
01.9.21/R50-D/V5
X
Page 146 of 288
CAUTION
Do not force the cassette tape into the
tape door. This could cause player dam-
age.
The cassette tape automatically changes di-
rections to play the other side when the first
side is complete. At this time, the moving
digital squares illuminate on the left side of the
display window.
PLAY:
When the TAPE/CD button is pushed with the
radio turned on and the tape loaded, the radio
will automatically be turned off and the tape
will play.
If the TAPE/CD button is pushed during either
the FF, REW, APS FF or APS REW function,
the cassette tape enters the normal play
mode.
When the TAPE/CD button is pushed with the
CD playing, the tape will play.
FF (fast forward), REW
(rewind):
Push either the FF or REW button for the
desired direction.
The FF or REW symbol illuminates in the
display.
To stop the FF or REW function, press the FF
or REW button again, or the TAPE/CD button.APS (automatic program
search) FF, APS REW:
Push either the APS FF or APS REW button
while the cassette tape is playing. The tape
runs quickly, stops, then plays the next selec-
tion. Either the FF or REW symbol flashes in
the display while searching for the selection.
This system searches at the blank intervals
between selections. If there is a blank interval
within one selection or there is no interval
between selections, the system may not stop
in the desired or expected location.
PROG (program):
Push the PROG button. The moving digital
squares illuminate on either the right or left
side of the display window to indicate the side
of program play.
If the PROG button is pushed during either theFF or REW function the tape enters the normal
play mode.
Dolby NR (Noise Reduction):
Push the Dolby NR
button for Dolby NR
encoded tapes to reduce high frequency tape
noise. The
indicator light comes on.
Dolby NR is manufactured under license from
Dolby Laboratories Licensing Corporation.
DOLBY NR and the double-D symbol
are trademarks of Dolby Laboratories
Licensing Corporation.
Metal or chrome tape usage:
The cassette player is automatically set to high
performance play when playing a metal or
chrome cassette tape.TAPE EJECT:
Push the EJECT button. The cassette tape
automatically comes out.
Heater, air conditioner and audio systems
4-29
Z
01.9.21/R50-D/V5
X
Page 147 of 288
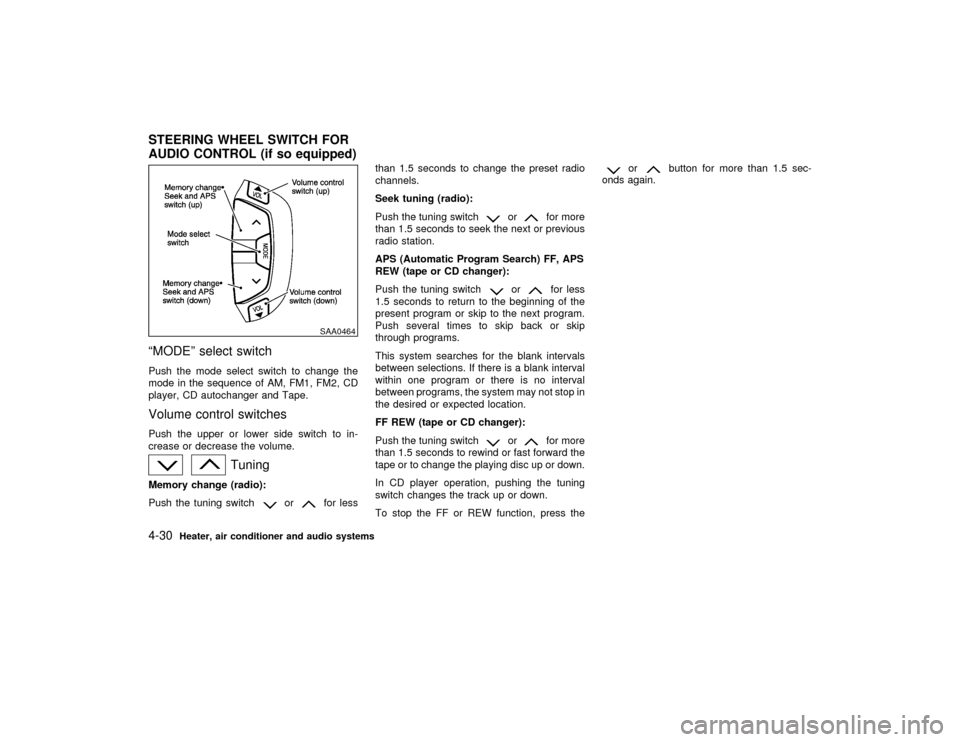
ªMODEº select switchPush the mode select switch to change the
mode in the sequence of AM, FM1, FM2, CD
player, CD autochanger and Tape.Volume control switchesPush the upper or lower side switch to in-
crease or decrease the volume.
Tuning
Memory change (radio):
Push the tuning switch
or
for lessthan 1.5 seconds to change the preset radio
channels.
Seek tuning (radio):
Push the tuning switch
or
for more
than 1.5 seconds to seek the next or previous
radio station.
APS (Automatic Program Search) FF, APS
REW (tape or CD changer):
Push the tuning switch
or
for less
1.5 seconds to return to the beginning of the
present program or skip to the next program.
Push several times to skip back or skip
through programs.
This system searches for the blank intervals
between selections. If there is a blank interval
within one program or there is no interval
between programs, the system may not stop in
the desired or expected location.
FF REW (tape or CD changer):
Push the tuning switch
or
for more
than 1.5 seconds to rewind or fast forward the
tape or to change the playing disc up or down.
In CD player operation, pushing the tuning
switch changes the track up or down.
To stop the FF or REW function, press the
or
button for more than 1.5 sec-
onds again.
SAA0464
STEERING WHEEL SWITCH FOR
AUDIO CONTROL (if so equipped)4-30
Heater, air conditioner and audio systems
Z
01.9.21/R50-D/V5
X
Page 148 of 288
ANTENNA
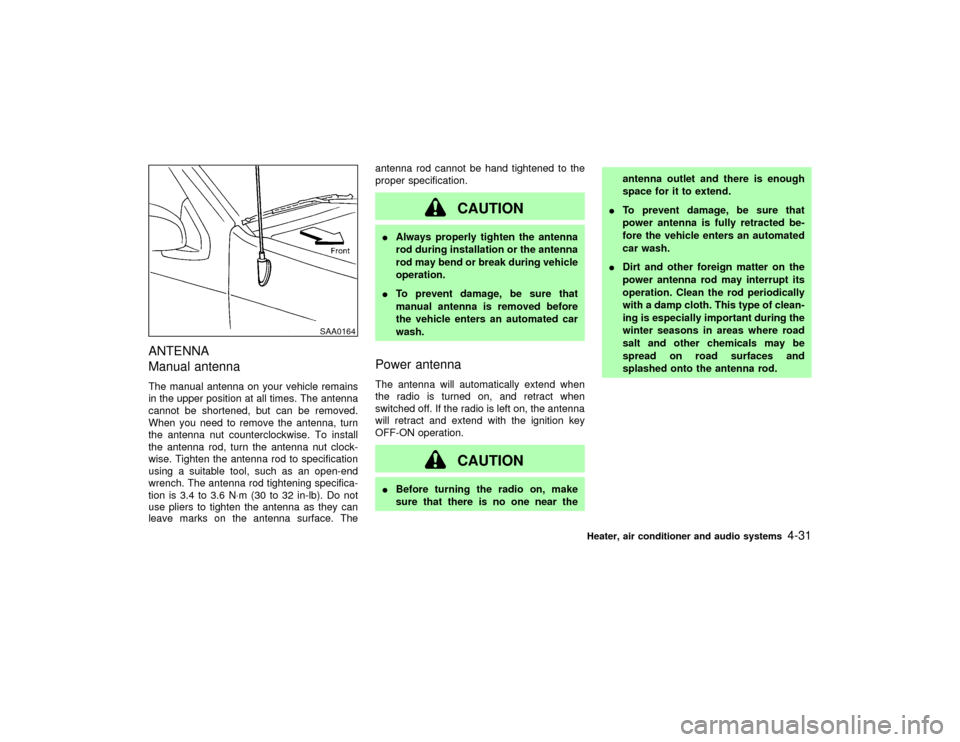
Manual antennaThe manual antenna on your vehicle remains
in the upper position at all times. The antenna
cannot be shortened, but can be removed.
When you need to remove the antenna, turn
the antenna nut counterclockwise. To install
the antenna rod, turn the antenna nut clock-
wise. Tighten the antenna rod to specification
using a suitable tool, such as an open-end
wrench. The antenna rod tightening specifica-
tion is 3.4 to 3.6 N×m (30 to 32 in-lb). Do not
use pliers to tighten the antenna as they can
leave marks on the antenna surface. Theantenna rod cannot be hand tightened to the
proper specification.
CAUTION
IAlways properly tighten the antenna
rod during installation or the antenna
rod may bend or break during vehicle
operation.
ITo prevent damage, be sure that
manual antenna is removed before
the vehicle enters an automated car
wash.Power antennaThe antenna will automatically extend when
the radio is turned on, and retract when
switched off. If the radio is left on, the antenna
will retract and extend with the ignition key
OFF-ON operation.
CAUTION
IBefore turning the radio on, make
sure that there is no one near theantenna outlet and there is enough
space for it to extend.
ITo prevent damage, be sure that
power antenna is fully retracted be-
fore the vehicle enters an automated
car wash.
IDirt and other foreign matter on the
power antenna rod may interrupt its
operation. Clean the rod periodically
with a damp cloth. This type of clean-
ing is especially important during the
winter seasons in areas where road
salt and other chemicals may be
spread on road surfaces and
splashed onto the antenna rod.
SAA0164
Heater, air conditioner and audio systems
4-31
Z
01.9.21/R50-D/V5
X
Page 149 of 288
When installing a car phone or CB, ham radio
in your NISSAN, be sure to observe the follow-
ing cautions, otherwise the new equipment
may adversely affect the Engine control sys-
tem and other electronic parts.
WARNING
IA cellular telephone should not be
used while driving so full attention
may be given to vehicle operation.
Some jurisdictions prohibit the use of
cellular telephones while driving.
IIf you must make a call while your
vehicle is in motion, the hands free
cellular phone operational mode (if
so equipped) is highly recommended.
Exercise extreme caution at all times
so full attention may be given to ve-
hicle operation.
IIf a conversation in a moving vehicle
requires you to take notes, pull off the
road to a safe location and stop your
vehicle before doing so.
CAUTION
IKeep the antenna as far as possible
away from the Engine Control Module
(ECM).
IKeep the antenna wire more than 8 in
(20 cm) away from the Multiport Fuel
Injection harness. Do not route the
antenna wire next to any harness.
IAdjust the antenna standing-wave ra-
tio as recommended by the manufac-
turer.
IConnect the ground wire from the CB
radio chassis to the body.
IFor details, consult an authorized
NISSAN dealer.
CAR PHONE OR CB RADIO4-32
Heater, air conditioner and audio systems
Z
01.9.21/R50-D/V5
X
Page 150 of 288

5 Starting and drivingPrecautions when starting and driving ...................... 5-2
Exhaust gas (Carbon monoxide).......................... 5-2
Three way catalyst ............................................... 5-3
On-pavement and offroad driving precautions ..... 5-3
Avoiding collision and rollover .............................. 5-4
Drinking alcohol/drugs and driving ....................... 5-4
Driving safety precautions .................................... 5-4
Ignition switch............................................................ 5-6
Automatic transmission ........................................ 5-6
Manual transmission ............................................ 5-7
Key positions ........................................................ 5-8
Nissan vehicle immobilizer system ...................... 5-8
Before starting the engine ......................................... 5-9
Starting the engine .................................................... 5-9
Driving the vehicle ................................................... 5-10
Automatic transmission ...................................... 5-10
Manual transmission .......................................... 5-14
Parking brake .......................................................... 5-16
Cruise control (if so equipped) ................................ 5-17
Precautions on cruise control ............................. 5-17
Cruise control operations ................................... 5-17Break-in schedule ................................................... 5-19
Increasing fuel economy ......................................... 5-19
Using part time four wheel drive (4WD) ................. 5-20
Transfer case shifting procedures ...................... 5-21
Using all-mode four wheel drive (4WD) .................. 5-23
Transfer case shifting procedures ...................... 5-23
Parking/parking on hills ........................................... 5-30
Power steering ........................................................ 5-31
Brake system .......................................................... 5-32
Braking precautions............................................ 5-32
Anti-lock brake system (ABS) ............................ 5-32
Cold weather driving ............................................... 5-34
Freeing a frozen door lock ................................. 5-34
Anti-freeze .......................................................... 5-34
Battery ................................................................ 5-34
Draining of coolant water ................................... 5-34
Tire equipment ................................................... 5-34
Special winter equipment ................................... 5-35
Driving on snow or ice ....................................... 5-35
Engine block heater (if so equipped) ................. 5-35
Z
01.9.21/R50-D/V5
X