display NISSAN PATHFINDER 2017 R52 / 4.G Quick Reference Guide
[x] Cancel search | Manufacturer: NISSAN, Model Year: 2017, Model line: PATHFINDER, Model: NISSAN PATHFINDER 2017 R52 / 4.GPages: 40, PDF Size: 2.61 MB
Page 20 of 40
18
FIRST DRIVE FEATURES
3 ON•OFF BUTTON/FAN SPEED CONTROL DIAL
Turn the fan speed control dial lef t to decrease fan speed or right to increase
fan speed.
Press the ON•OFF button to turn the system on or off.
4 MODE BUTTON
Press the MODE button to cycle through the following air flow outlets:
Air flows from the center and side vents.
Air flows from the center, side and foot vents.
Air flows mainly from the foot vents.
Air flows from the front defroster and foot vents.
5 AIR RECIRCULATION BUTTON
Press the air recirculation button to recirculate interior air inside the
vehicle. The indicator light on the button will illuminate. This system is used to
avoid certain outside odors and to help adjust the inside vehicle temperature
more effectively.
The air recirculation mode cannot be activated when the climate control
system is in the front defroster mode .
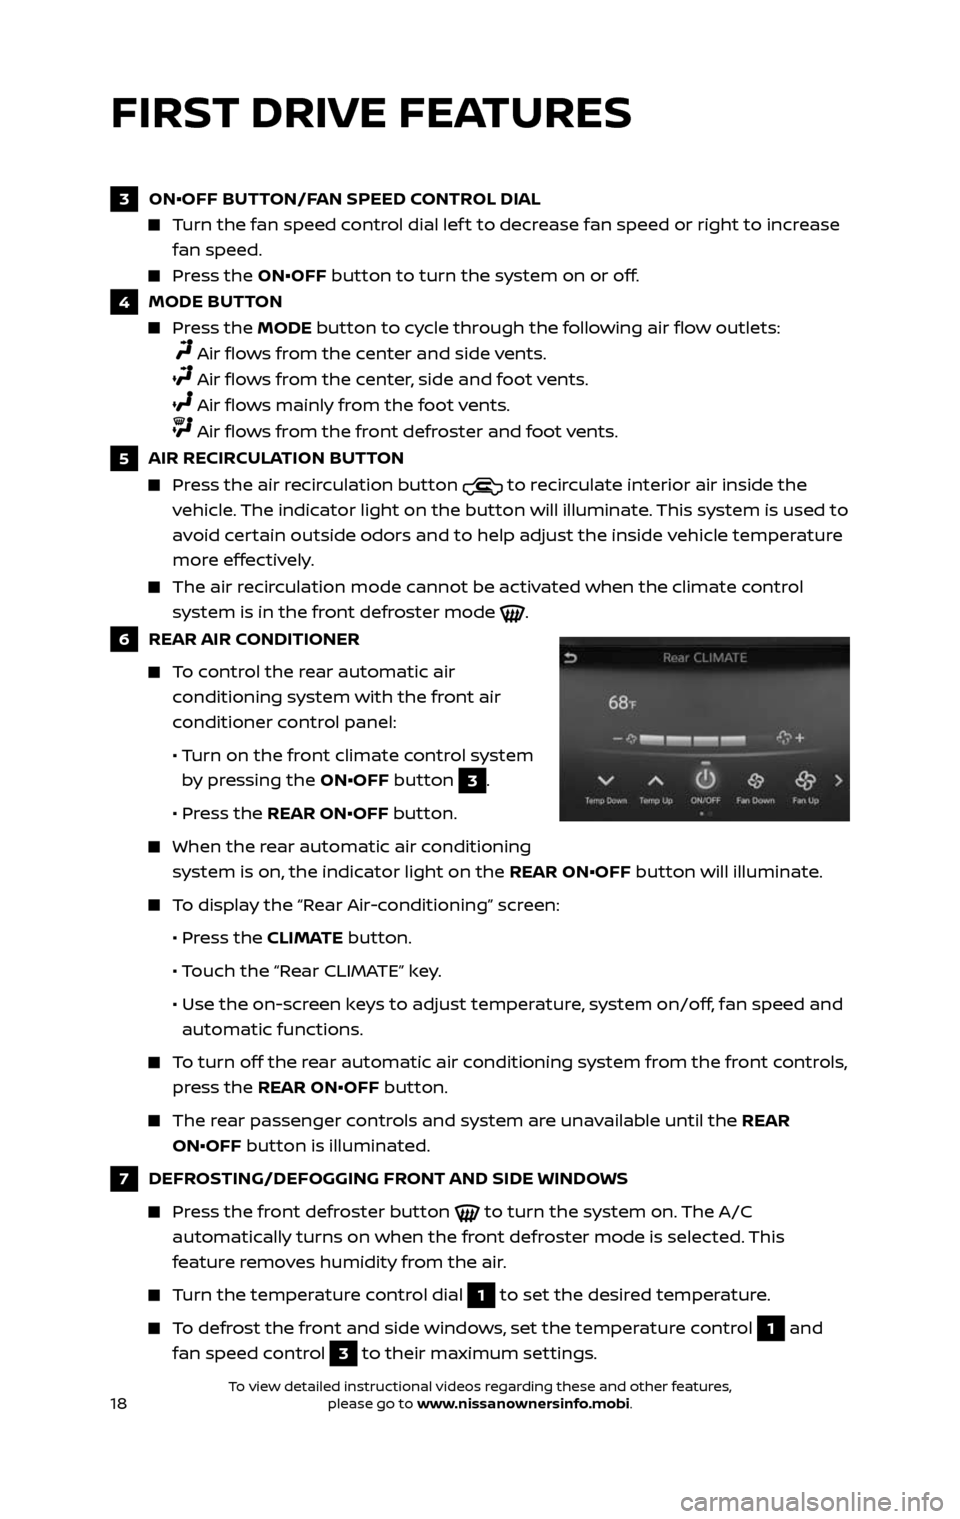
6 REAR AIR CONDITIONER
To control the rear automatic air
conditioning system with the front air
conditioner control panel:
• Turn on the front climate control system
by pressing the ON•OFF button 3.
• Pr ess the REAR ON•OFF button.
When the r ear automatic air conditioning
system is on, the indicator light on the REAR ON•OFF button will illuminate.
To display the “Rear Air-conditioning” screen:
• Press the CLIMATE button.
• Touch the “Rear CLIMATE” key.
• Use the on-scr een keys to adjust temperature, system on/off, fan speed and
automatic functions.
To turn off the rear automatic air conditioning system from the front controls,
press the REAR ON•OFF button.
The rear passenger controls and system are unavailable until the REAR
ON•OFF button is illuminated.
7 DEFROSTING/DEFOGGING FRONT AND SIDE WINDOWS
Press the front defroster button to turn the system on. The A/C
automatically turns on when the front defroster mode is selected. This
feature removes humidity from the air.
Turn the temperature control dial 1 to set the desired temperature.
To defrost the front and side windows, set the temperature control 1 and
fan speed control
3 to their maximum settings.
2485215_17b_Pathfinder_pQRG_111816b.indd 1811/18/16 1:45 PM
To view detailed instructional videos regarding these and other features, please go to www.nissanownersinfo.mobi.To view detailed instructional videos regarding these and other features, please go to www.nissanownersinfo.mobi.
Page 21 of 40
19
REAR CLIMATE CONTROLS
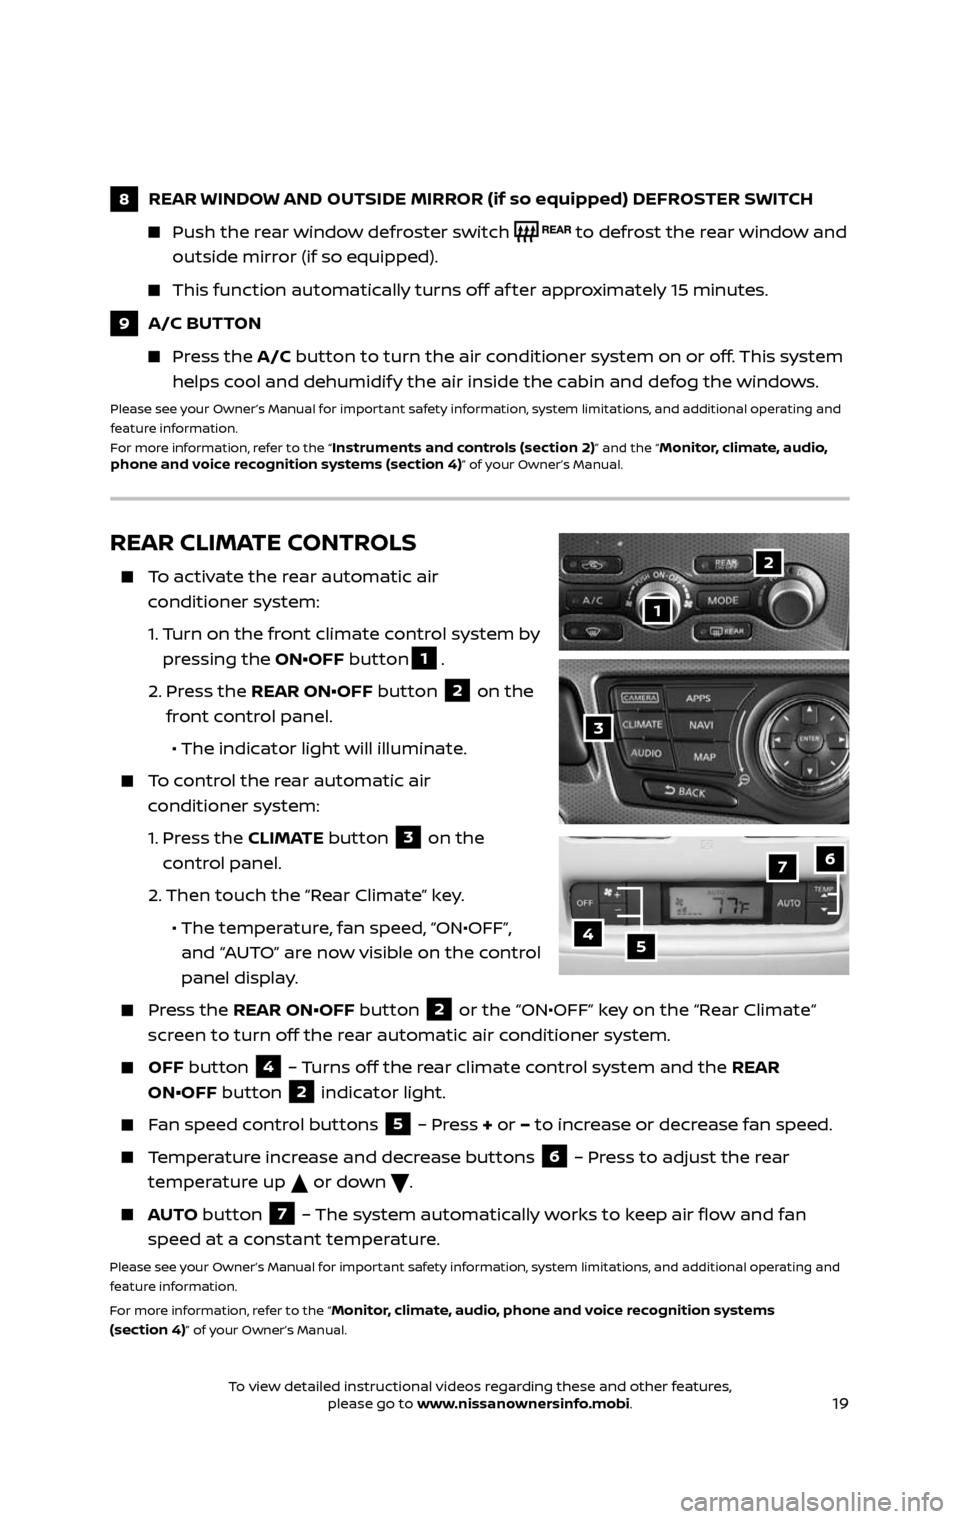
To activate the rear automatic air
conditioner system:
1. Turn on the front climate control system by
pressing the ON•OFF button1.
2. Press the REAR ON•OFF button 2 on the
front control panel.
• The indicator light will illuminate.
To control the rear automatic air
conditioner system:
1. Press the CLIMATE button 3 on the
control panel.
2. Then touch the “Rear Climate” key.
• The temper ature, fan speed, “ON•OFF”,
and “AUTO” are now visible on the control
panel display.
Press the REAR ON•OFF button 2 or the “ON•OFF” key on the “Rear Climate“
screen to turn off the rear automatic air conditioner system.
OFF button 4 – Turns off the rear climate control system and the REAR
ON•OFF button
2 indicator light.
Fan speed control buttons 5 – Press + or – to increase or decrease fan speed.
Temperature increase and decrease buttons 6 – Press to adjust the rear
temperature up
or down .
AUTO button 7 – The system automatically works to keep air flow and fan
speed at a constant temperature.
Please see your Owner’s Manual for important safety information, system limitations, and additional operating and
feature information.
For more information, refer to the “
Monitor, climate, audio, phone and voice recognition systems
(section 4)” of your Owner’s Manual.
2
4
7
5
6
1
3
8 REAR WINDOW AND OUTSIDE MIRROR (if so equipped) DEFROSTER SWITCH
Push the r ear window defroster switch to defrost the rear window and
outside mirror (if so equipped).
This function automatically turns off af ter approximately 15 minutes.
9 A/C BUTTON
Press the A/C button to turn the air conditioner system on or off. This system
helps cool and dehumidify the air inside the cabin and defog the windows.
Please see your Owner’s Manual for important safety information, system limitations, and additional operating and
feature information.
For more information, refer to the “
Instruments and controls (section 2)” and the “Monitor, climate, audio,
phone and voice recognition systems (section 4)” of your Owner’s Manual.
2485215_17b_Pathfinder_pQRG_111816b.indd 1911/18/16 1:45 PM
To view detailed instructional videos regarding these and other features, please go to www.nissanownersinfo.mobi.To view detailed instructional videos regarding these and other features, please go to www.nissanownersinfo.mobi.
Page 22 of 40
20
AM/FM/SiriusXM®* SATELLITE/HD® RADIO WITH
CD/DVD PLAYER (if so equipped)
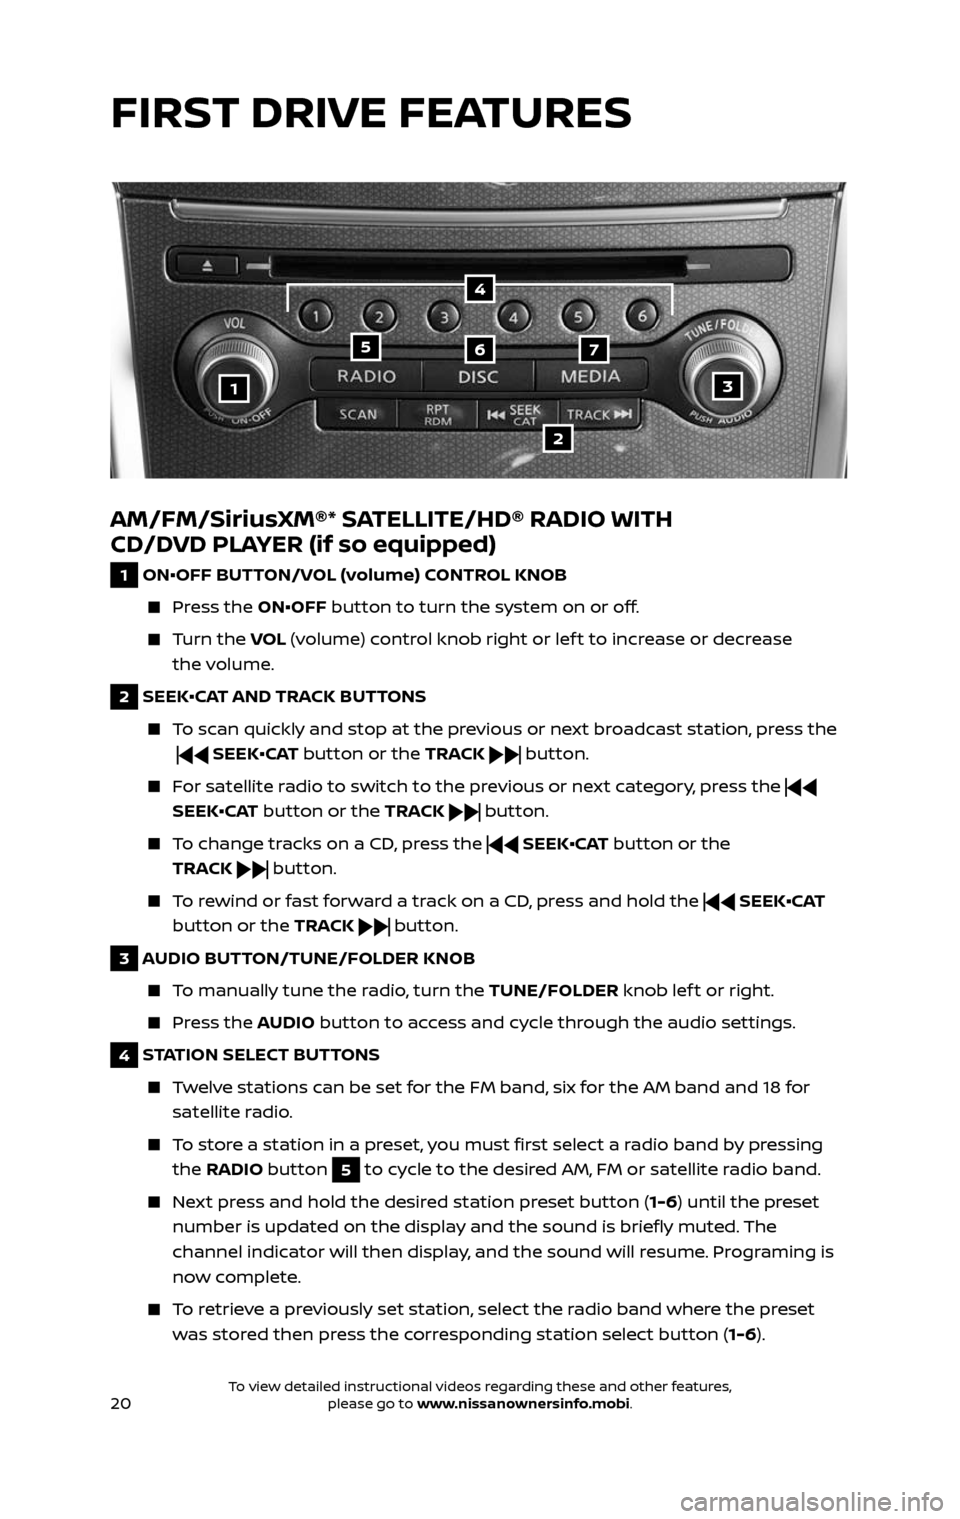
1 ON•OFF BUTTON/VOL (volume) CONTROL KNOB
Press the ON•OFF button to turn the system on or off.
Turn the VOL (volume) control knob right or lef t to increase or decrease
the volume.
2 SEEK•CAT AND TRACK BUTTONS
To scan quickly and stop at the previous or next broadcast station, press the
SEEK•CAT button or the TRACK button.
For satellite radio to switch to the previous or next category, press the
SEEK•CAT button or the TRACK
button.
To change tracks on a CD, press the SEEK•CAT button or the
TRACK
button.
To rewind or fast forward a track on a CD, press and hold the SEEK•CAT
button or the TRACK
button.
3 AUDIO BUTTON/TUNE/FOLDER KNOB
To manually tune the radio, turn the TUNE/FOLDER knob lef t or right.
Press the AUDIO button to access and cycle through the audio settings.
4 STATION SELECT BUTTONS
Twelve stations can be set for the FM band, six for the AM band and 18 for
satellite radio.
To store a station in a preset, you must first select a radio band by pressing
the RADIO button 5 to cycle to the desired AM, FM or satellite radio band.
Next press and hold the desired station preset button (1-6) until the preset
number is updated on the display and the sound is briefly muted. The
channel indicator will then display, and the sound will resume. Programing is
now complete.
To retrieve a previously set station, select the radio band where the preset
was stored then press the corresponding station select button ( 1-6).
13
2
567
4
FIRST DRIVE FEATURES
2485215_17b_Pathfinder_pQRG_111816b.indd 2011/18/16 1:45 PM
To view detailed instructional videos regarding these and other features, please go to www.nissanownersinfo.mobi.To view detailed instructional videos regarding these and other features, please go to www.nissanownersinfo.mobi.
Page 23 of 40
21
CRUISE CONTROL (if so equipped)
The cruise control system enables you to set
a constant cruising speed once the vehicle
has reached 25 mph (40 km/h).
The system wil l automatically maintain the
set speed until you tap the brake pedal,
accelerate, cancel or turn the system off.
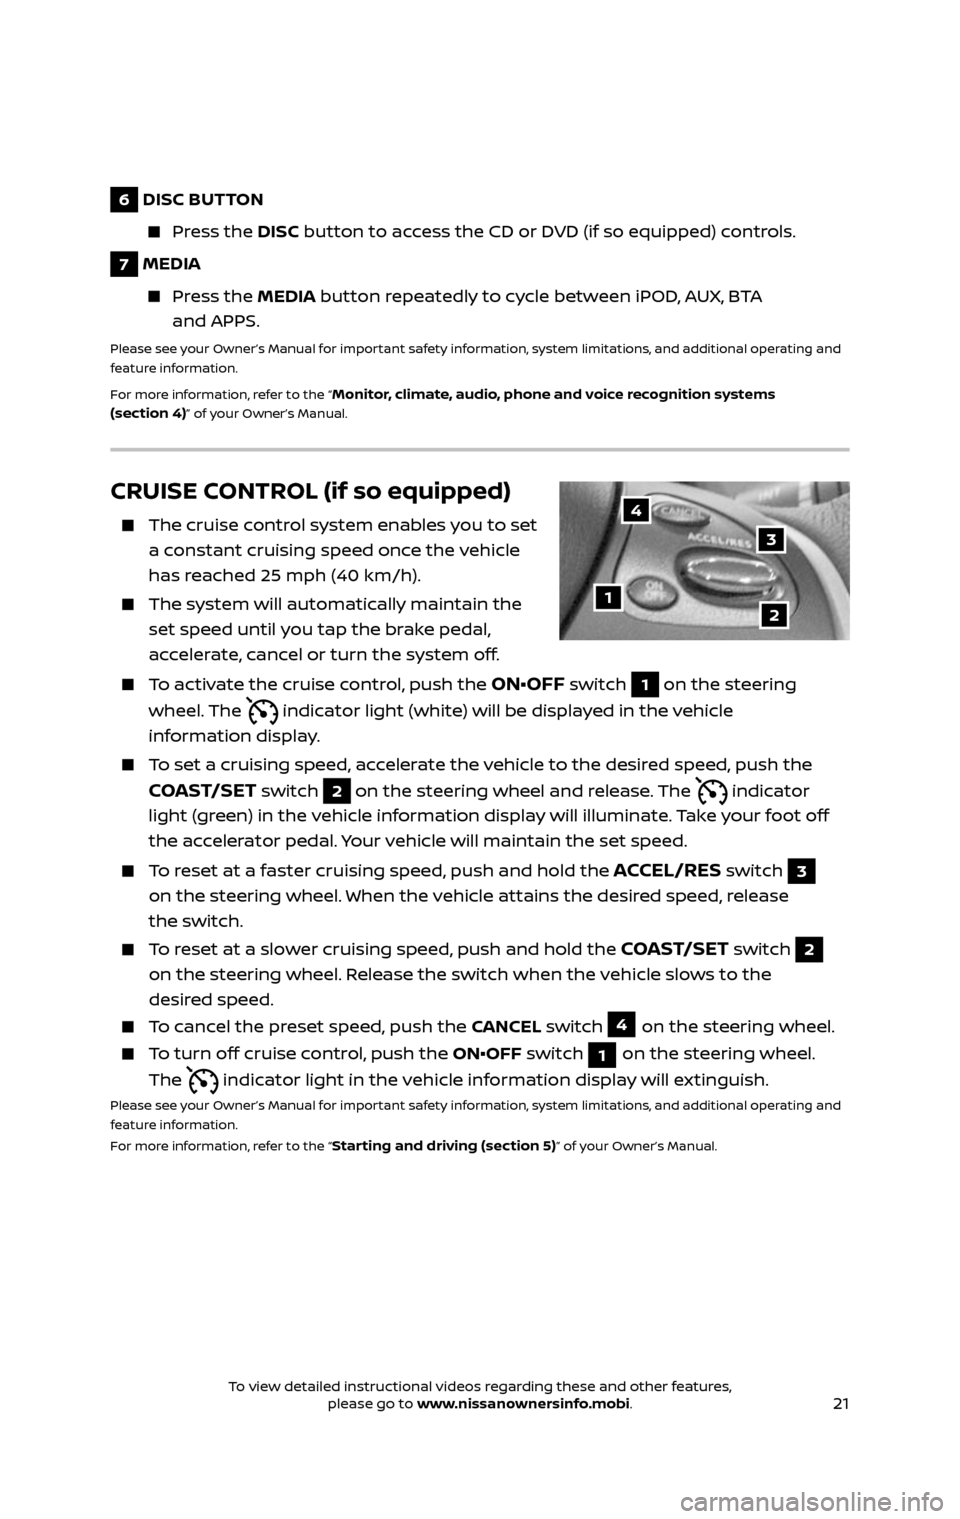
To activate the cruise control, push the ON•OFF switch 1 on the steering
wheel. The
indicator light (white) will be displayed in the vehicle
information display.
To set a cruising speed, accelerate the vehicle to the desired speed, push the
COAST/SET switch 2 on the steering wheel and release. The indicator
light (green) in the vehicle information display will illuminate. Take your foot off
the accelerator pedal. Your vehicle will maintain the set speed.
To reset at a faster cruising speed, push and hold the ACCEL/RES switch 3
on the steering wheel. When the vehicle attains the desired speed, release
the switch.
To reset at a slower cruising speed, push and hold the COAST/SET switch 2
on the steering wheel. Release the switch when the vehicle slows to the
desired speed.
To cancel the preset speed, push the CANCEL switch 4 on the steering wheel.
To turn off cruise control, push the ON•OFF switch 1 on the steering wheel.
The
indicator light in the vehicle information display will extinguish.
Please see your Owner’s Manual for important safety information, system limitations, and additional operating and
feature information.
For more information, refer to the “
Starting and driving (section 5)” of your Owner’s Manual.
12
3
4
6 DISC BUTTON
Press the DISC button to access the CD or DVD (if so equipped) controls.
7 MEDIA
Press the MEDIA button repeatedly to cycle between iPOD, AUX, BTA
and APPS.
Please see your Owner’s Manual for important safety information, system limitations, and additional operating and
feature information.
For more information, refer to the “
Monitor, climate, audio, phone and voice recognition systems
(section 4)” of your Owner’s Manual.
2485215_17b_Pathfinder_pQRG_111816b.indd 2111/18/16 1:45 PM
To view detailed instructional videos regarding these and other features, please go to www.nissanownersinfo.mobi.To view detailed instructional videos regarding these and other features, please go to www.nissanownersinfo.mobi.
Page 26 of 40
24
VEHICLE INFORMATION DISPLAY
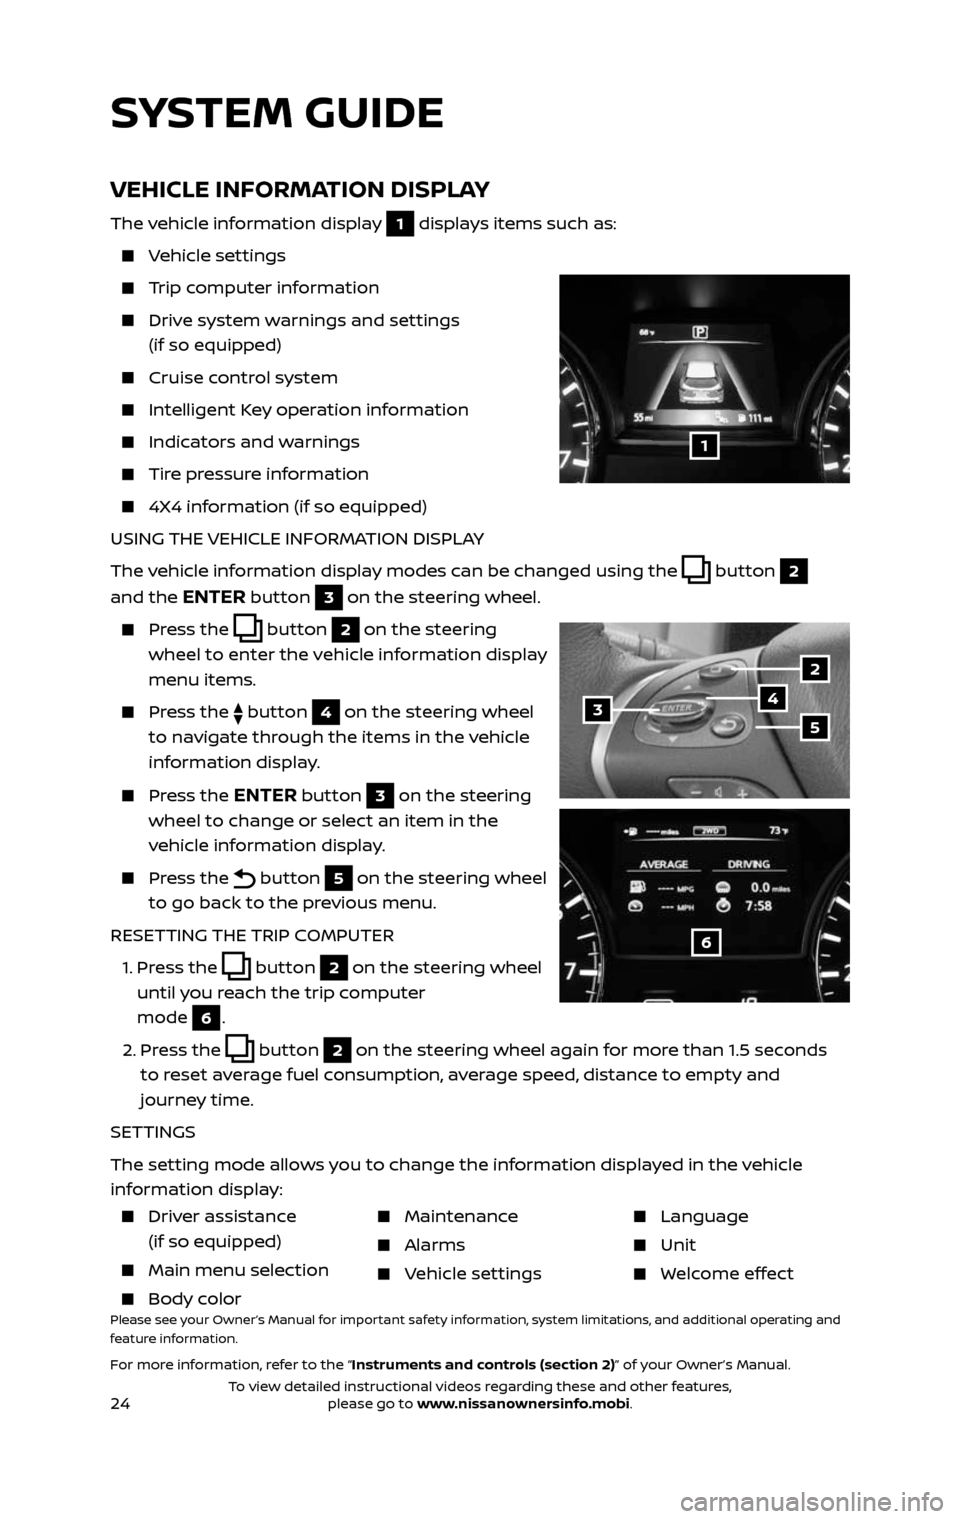
The vehicle information display 1 displays items such as:
Vehicle settings
Trip computer information
Drive system warnings and settings
(if so equipped)
Cruise control system
Intelligent Key operation information
Indicators and warnings
Tire pressure information
4X4 information (if so equipped)
USING THE VEHICLE INFORMATION DISPLAY
The vehicle information display modes can be changed using the
button 2
and the
ENTER button 3 on the steering wheel.
Press the button 2 on the steering
wheel to enter the vehicle information display
menu items.
Press the button 4 on the steering wheel
to navigate through the items in the vehicle
information display.
Press the ENTER button 3 on the steering
wheel to change or select an item in the
vehicle information display.
Press the button 5 on the steering wheel
to go back to the previous menu.
RESETTING THE TRIP COMPUTER
1. Press the button 2 on the steering wheel
until you reach the trip computer
mode
6.
2. Press the button 2 on the steering wheel again for more than 1.5 seconds
to reset average fuel consumption, average speed, distance to empty and
journey time.
SETTINGS
The setting mode allows you to change the information displayed in the vehicle
information display:
1
2
435
6
Driver assistance
(if so equipped)
Main menu selec tion
Body color
Maintenance
Alarms
Vehicle settings
Language
Unit
Welcome effect
Please see your Owner’s Manual for important safety information, system limitations, and additional operating and
feature information.
For more information, refer to the “Instruments and controls (section 2)” of your Owner’s Manual.
SYSTEM GUIDE
2485215_17b_Pathfinder_pQRG_111816b.indd 2411/18/16 1:45 PM
To view detailed instructional videos regarding these and other features, please go to www.nissanownersinfo.mobi.To view detailed instructional videos regarding these and other features, please go to www.nissanownersinfo.mobi.
Page 27 of 40
25
HANDS-FREE TEXT MESSAGING ASSISTANT*
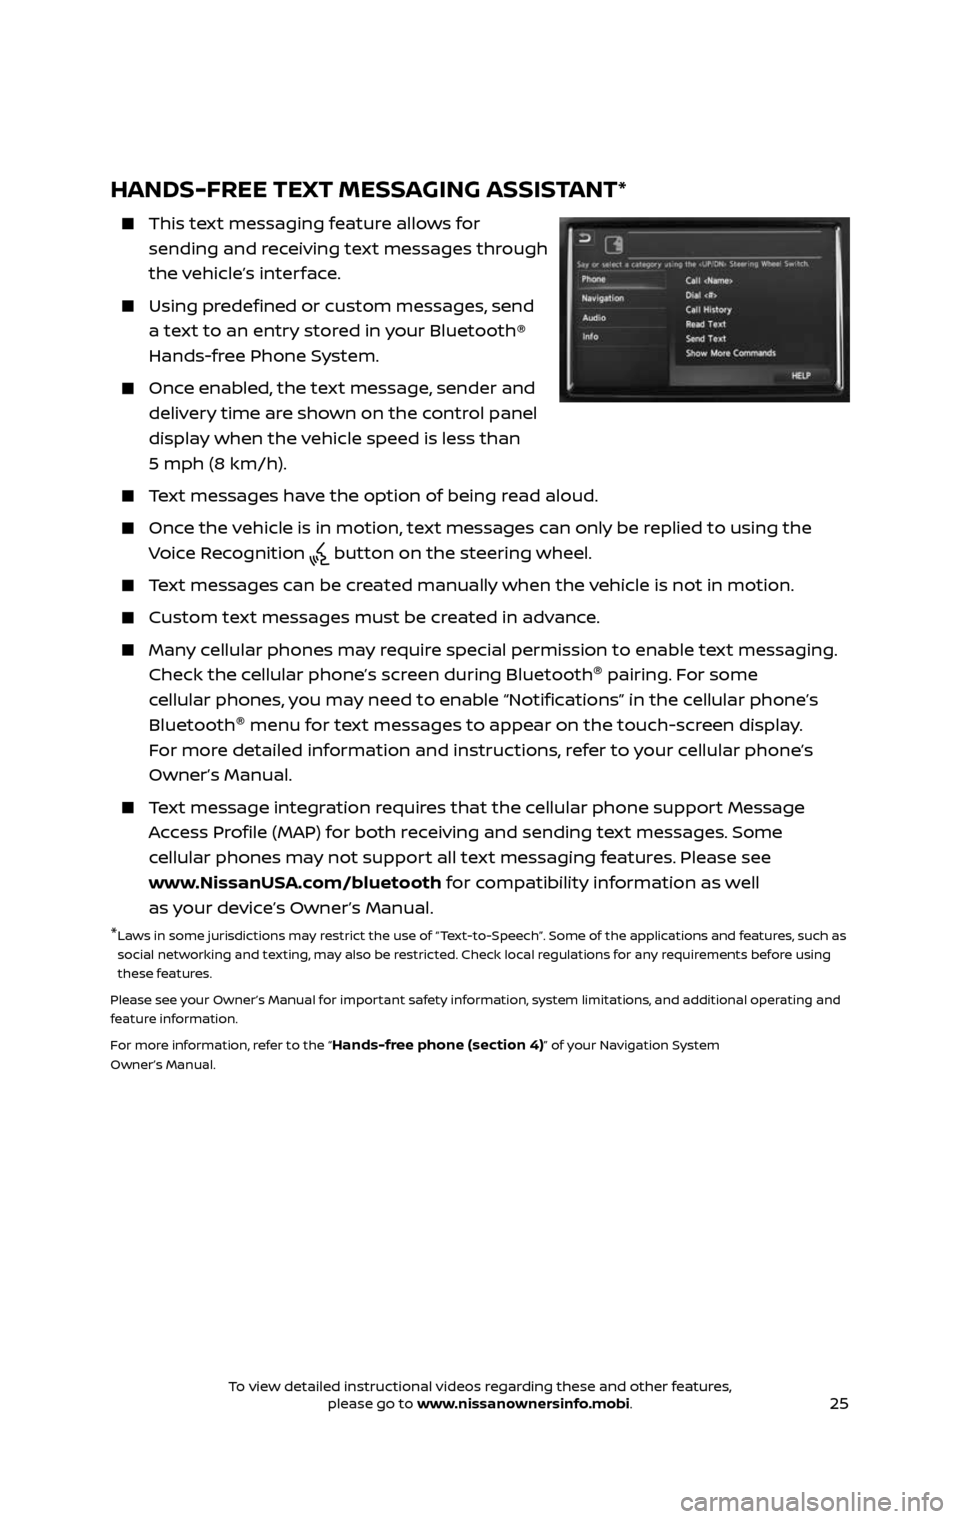
This text messaging feature allows for
sending and receiving text messages through
the vehicle’s interface.
Using predefined or custom messages, send
a text to an entry stored in your Bluetooth®
Hands-free Phone System.
Once enabled, the text message, sender and
delivery time are shown on the control panel
display when the vehicle speed is less than
5 mph (8 km/h).
Text messages have the option of being read aloud.
Once the vehicle is in motion, text messages can only be replied to using the
Voice Recognition button on the steering wheel.
Text messages can be created manually when the vehicle is not in motion.
Custom text messages must be created in advance.
Many cellular phones may require special permission to enable text messaging.
Check the cellular phone’s screen during Bluetooth ®
pairing. For some
cellular phones, you may need to enable “Notifications” in the cellular phone’s
Bluetooth ®
menu for text messages to appear on the touch-screen display.
For more detailed information and instructions, refer to your cellular phone’s
Owner’s Manual.
Text message integration requires that the cellular phone support Message
Access Profile (MAP) for both receiving and sending text messages. Some
cellular phones may not support all text messaging features. Please see
www.NissanUSA.com/bluetooth for compatibility information as well
as your device’s Owner’s Manual.
* Laws in some jurisdictions may restrict the use of “Text-to-Speech”. Some of the applications and features, such as
social networking and texting, may also be restricted. Check local regulations for any requirements before using
these features.
Please see your Owner’s Manual for important safety information, system limitations, and additional operating and
feature information.
For more information, refer to the “
Hands-free phone (section 4)” of your Navigation System
Owner’s Manual.
2485215_17b_Pathfinder_pQRG_111816b.indd 2511/18/16 1:45 PM
To view detailed instructional videos regarding these and other features, please go to www.nissanownersinfo.mobi.To view detailed instructional videos regarding these and other features, please go to www.nissanownersinfo.mobi.
Page 29 of 40
27
BLUETOOTH® SYSTEM WITH NAVIGATION* (if so equipped)
CONNECTING PROCEDURE
The vehicle must be stationary when
connecting the cellular phone.
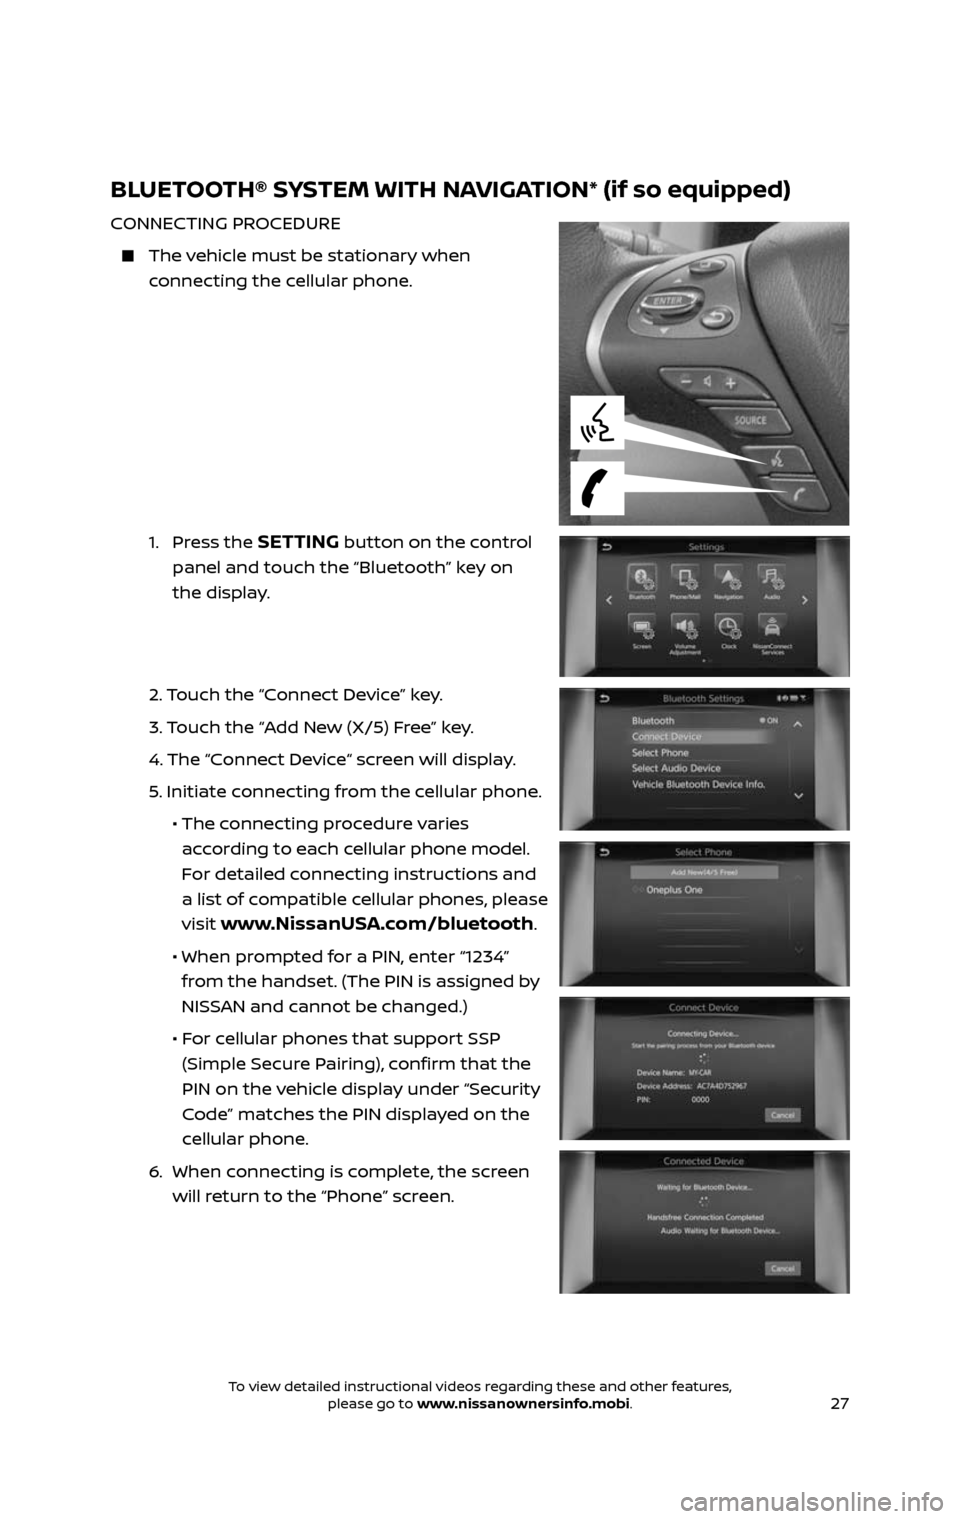
1. Press the SETTING button on the control
panel and touch the “Bluetooth” key on
the display.
2. Touch the “Connect Device” key.
3. Touch the “Add New (X/5) Free” key.
4. The “C onnect Device“ screen will display.
5. Initiate connecting from the cellular phone.
• The c onnecting procedure varies
according to each cellular phone model.
For detailed connecting instructions and
a list of compatible cellular phones, please
visit
www.NissanUSA.com/bluetooth.
• When pr ompted for a PIN, enter “1234”
from the handset. (The PIN is assigned by
NISSAN and cannot be changed.)
• For cellular phones that support SSP
(Simple Secure Pairing), confirm that the
PIN on the vehicle display under “Security
Code” matches the PIN displayed on the
cellular phone.
6. When c onnecting is complete, the screen
will return to the “Phone” screen.
2485215_17b_Pathfinder_pQRG_111816b.indd 2711/18/16 1:45 PM
To view detailed instructional videos regarding these and other features, please go to www.nissanownersinfo.mobi.To view detailed instructional videos regarding these and other features, please go to www.nissanownersinfo.mobi.
Page 30 of 40
28
PHONEBOOK
Depending on your cellular phone, the system may automatically download your cellular
phone’s entire phonebook to the vehicle’s
Bluetooth®
system.
If the phonebook does not do wnload automatically, the vehicle phonebook may be
set for up to 2,000 entries.
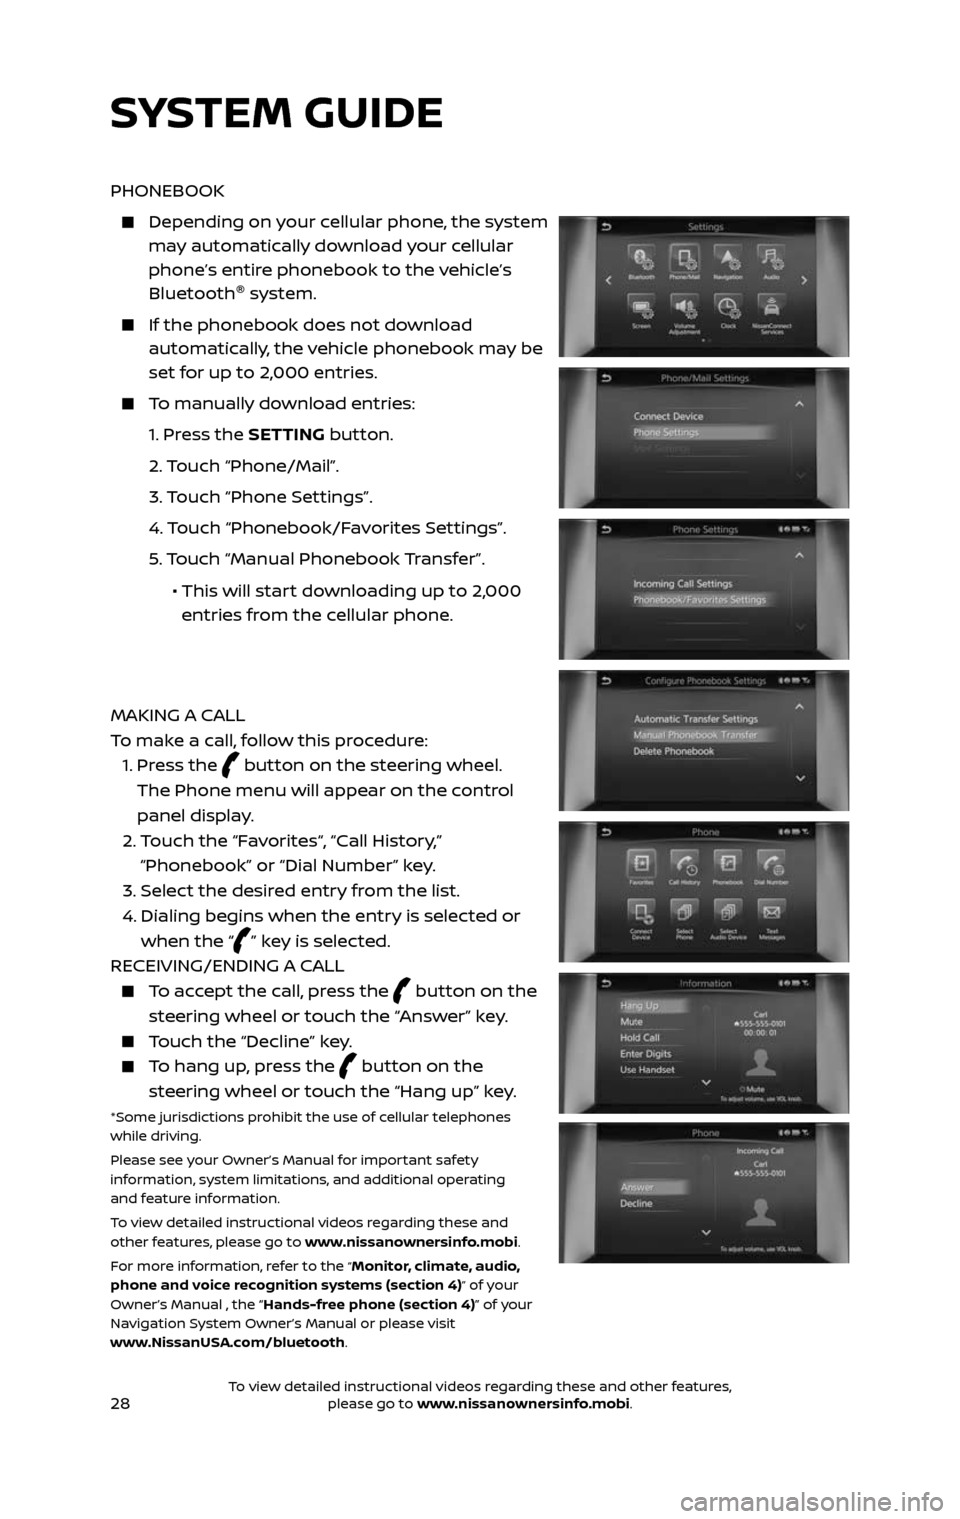
To manually download entries:
1. Press the SETTING button.
2. Touch “Phone/Mail”.
3. Touch “Phone Settings”.
4. Touch “Phonebook/Favorites Settings”.
5. Touch “Manual Phonebook Transfer”.
• This will start downloading up to 2,000
entries from the cellular phone.
MAKING A CALL
To make a call, follow this procedure:
1. Press the button on the steering wheel.
The Phone menu will appear on the control
panel display.
2. Touch the “Favorites“, “Call History,”
“Phonebook” or “Dial Number” key.
3. Select the desired entry from the list.
4. Dialing begins when the entr y is selected or
when the “” key is selected.
RECEIVING/ENDING A CALL
To accept the call, press the button on the
steering wheel or touch the “Answer” key.
Touch the “Decline” key.
To hang up, press the button on the
steering wheel or touch the “Hang up” key.
*Some jurisdictions prohibit the use of cellular telephones
while driving.
Please see your Owner’s Manual for important safety
information, system limitations, and additional operating
and feature information.
To view detailed instructional videos regarding these and
other features, please go to www.nissanownersinfo.mobi.
For more information, refer to the
“Monitor, climate, audio,
phone and voice recognition systems (section 4)” of your
Owner’s Manual , the “Hands-free phone (section 4)” of your
Navigation System Owner’s Manual or please visit
www.NissanUSA.com/bluetooth.
SYSTEM GUIDE
2485215_17b_Pathfinder_pQRG_111816b.indd 2811/18/16 1:45 PM
To view detailed instructional videos regarding these and other features, please go to www.nissanownersinfo.mobi.To view detailed instructional videos regarding these and other features, please go to www.nissanownersinfo.mobi.
Page 33 of 40
31
BLUETOOTH® STREAMING AUDIO*
If you have a compatible Bluetooth® device with streaming audio (A2DP
and AVRCP profiles), you can set up the wireless connection between your
Bluetooth® device and your vehicle’s audio system. This connection allows you
to listen to audio from the Bluetooth® device using your vehicle’s speakers.
A cellular telephone should not be used while driving so full attention may be
given to vehicle operation.*
To use your connected Bluetooth® device to stream audio, it will need to be
connected as an audio device. The following procedure will initially connect a
Bluetooth® device as an audio player and allow you to switch between devices.
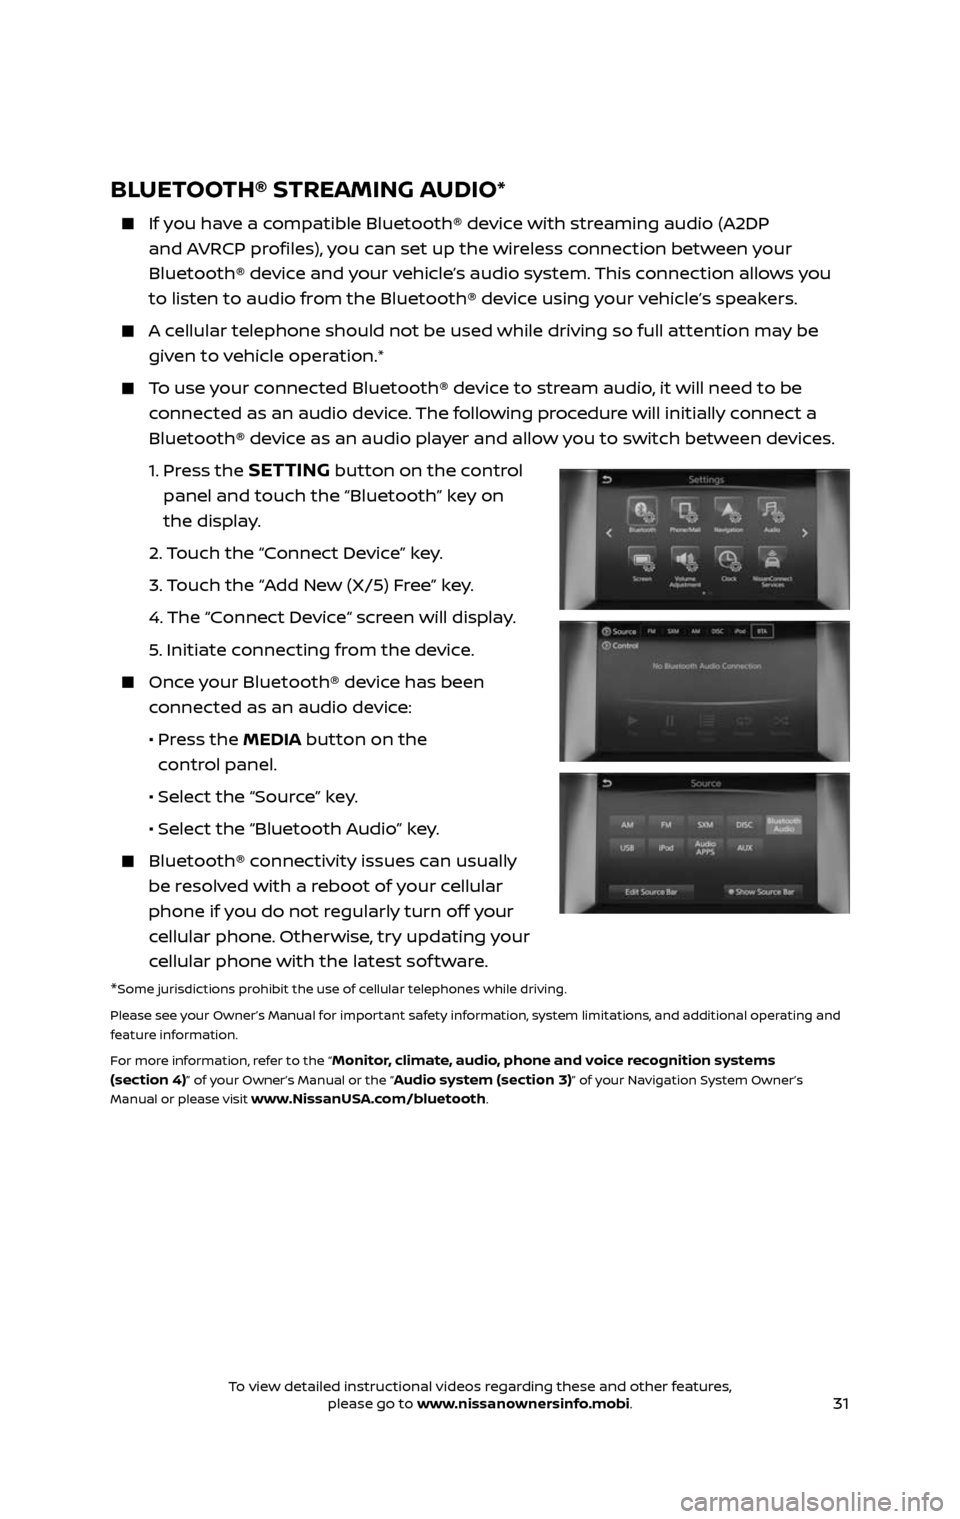
1. Press the SETTING button on the control
panel and touch the “Bluetooth” key on
the display.
2. Touch the “Connect Device” key.
3. Touch the “Add New (X/5) Free” key.
4. The “C onnect Device“ screen will display.
5. Initiate connecting from the device.
Once your Bluetooth® device has been
connected as an audio device:
• Press the MEDIA button on the
control panel.
• Selec t the “Source” key.
• Selec t the “Bluetooth Audio” key.
Bluetooth® c onnectivity issues can usually
be resolved with a reboot of your cellular
phone if you do not regularly turn off your
cellular phone. Otherwise, try updating your
cellular phone with the latest sof tware.
*Some jurisdictions prohibit the use of cellular telephones while driving.
Please see your Owner’s Manual for important safety information, system limitations, and additional operating and
feature information.
For more information, refer to the “
Monitor, climate, audio, phone and voice recognition systems
(section 4)” of your Owner’s Manual or the “Audio system (section 3)” of your Navigation System Owner’s
Manual or please visit www.NissanUSA.com/bluetooth.
2485215_17b_Pathfinder_pQRG_111816b.indd 3111/18/16 1:45 PM
To view detailed instructional videos regarding these and other features, please go to www.nissanownersinfo.mobi.To view detailed instructional videos regarding these and other features, please go to www.nissanownersinfo.mobi.
Page 34 of 40
32
NAVIGATION SYSTEM (if so equipped)
Your Navigation
System can calculate
a route from your
current location to a
preferred destination.
The real-time map
display and turn-by-
turn voice guidance
will lead you along
the route.
The Navigation
System will continually
update your vehicle’s
position. If you have
deviated from the
original route, it
will recalculate the
route from your
current location.
To help promote safe driving, some functions cannot be operated or have
limited operation when the vehicle speed is above
5 mph (8 km/h). The on-screen text and keys for these restricted functions will
be grayed-out or muted and cannot be selected while driving. These functions
will become available again when the vehicle speed is reduced to 5 mph (8
km/h). Voice commands may be available for some of the restricted functions.
For more information, refer to the “Monitor, climate, audio, phone and voice
recognition systems (section 4)” of your Owner’s Manual.
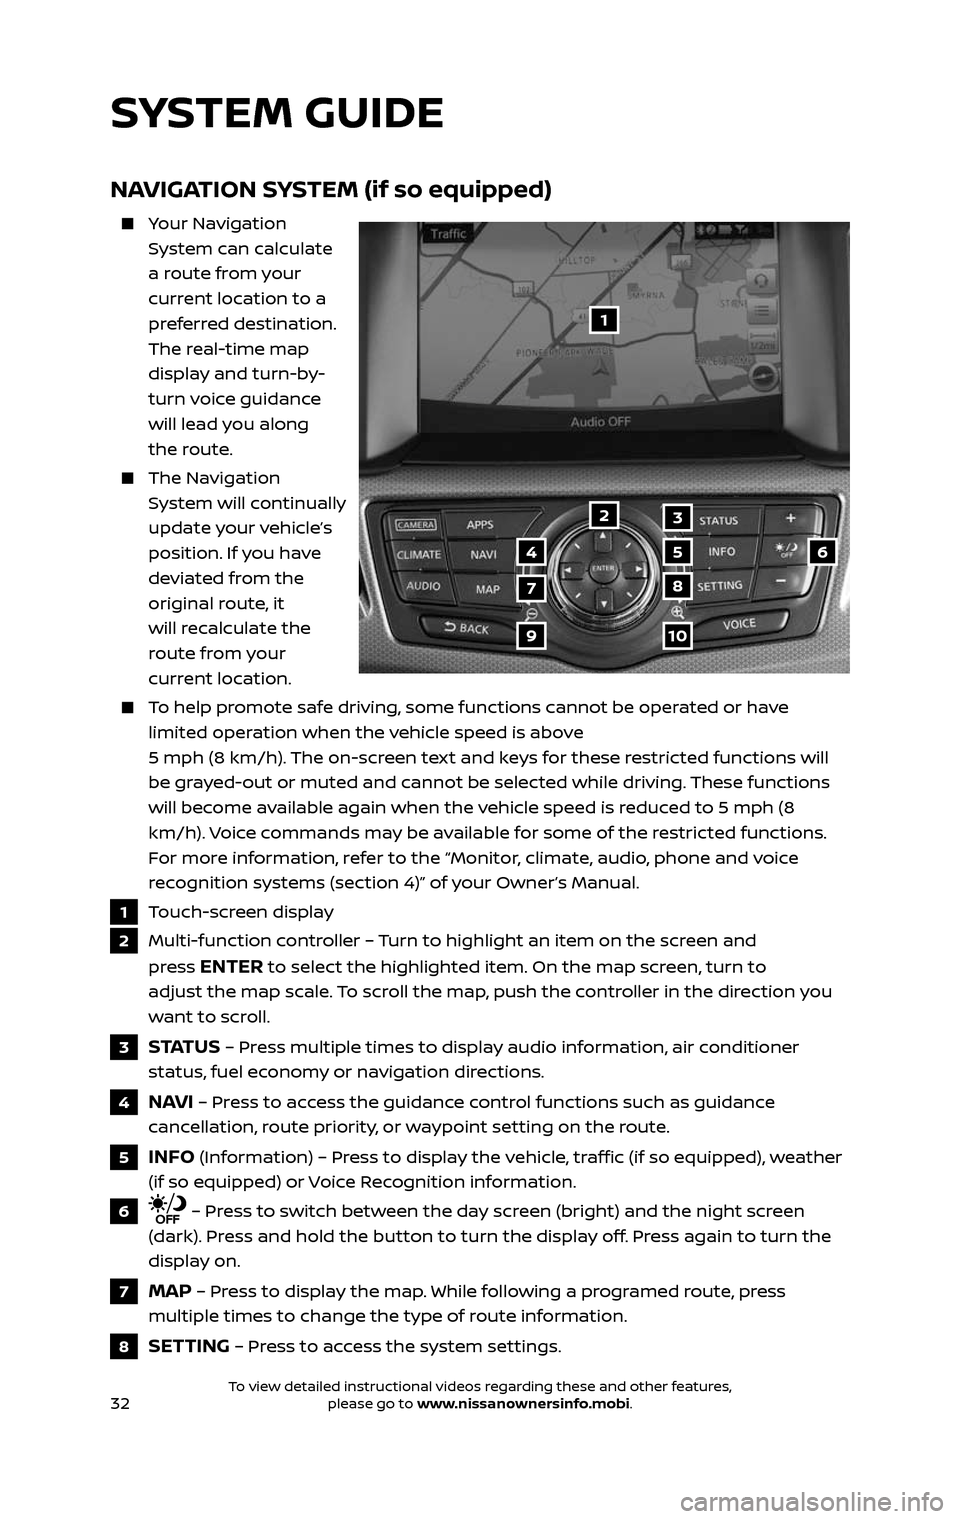
1 Touch-screen display
2 Multi-function controller – Turn to highlight an item on the screen and
press
ENTER to select the highlighted item. On the map screen, turn to
adjust the map scale. To scroll the map, push the controller in the direction you
want to scroll.
3 S TAT U S – Press multiple times to display audio information, air conditioner
status, fuel economy or navigation directions.
4 NAVI – Press to access the guidance control functions such as guidance
cancellation, route priority, or waypoint setting on the route.
5 INFO (Information) – Press to display the vehicle, traffic (if so equipped), weather
(if so equipped) or Voice Recognition information.
6 – Press to switch between the day screen (bright) and the night screen
(dark). Press and hold the button to turn the display off. Press again to turn the
display on.
7 MAP – Press to display the map. While following a programed route, press
multiple times to change the type of route information.
8 SETTING – Press to access the system settings.
1
3
7
9
2
456
10
8
SYSTEM GUIDE
2485215_17b_Pathfinder_pQRG_111816b.indd 3211/18/16 1:45 PM
To view detailed instructional videos regarding these and other features, please go to www.nissanownersinfo.mobi.To view detailed instructional videos regarding these and other features, please go to www.nissanownersinfo.mobi.