NISSAN PATROL 2006 Service Manual
Manufacturer: NISSAN, Model Year: 2006, Model line: PATROL, Model: NISSAN PATROL 2006Pages: 1226, PDF Size: 37.18 MB
Page 711 of 1226
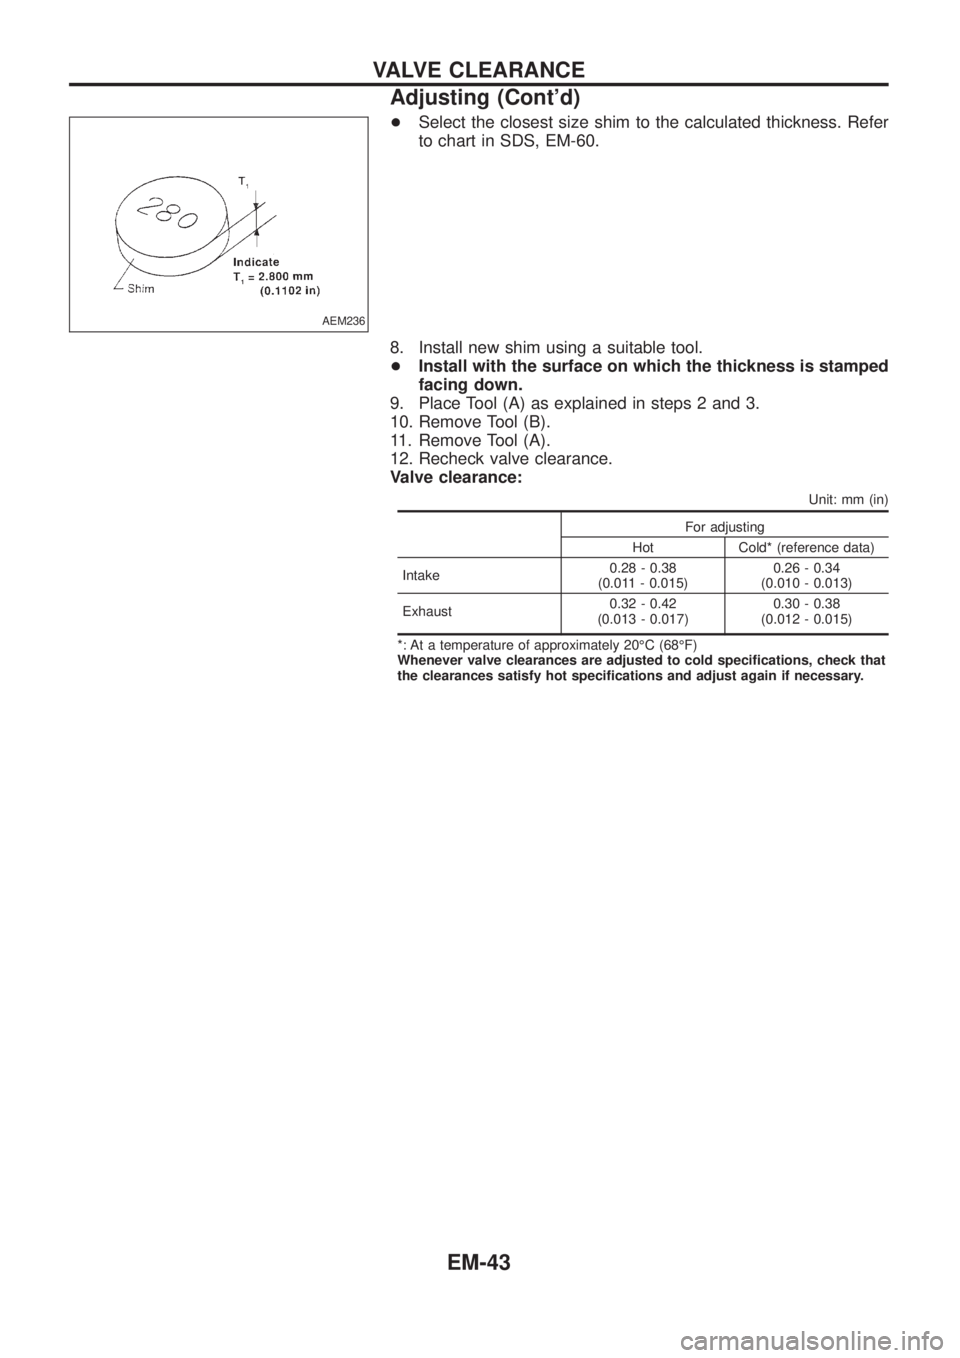
+Select the closest size shim to the calculated thickness. Refer
to chart in SDS, EM-60.
8. Install new shim using a suitable tool.
+Install with the surface on which the thickness is stamped
facing down.
9. Place Tool (A) as explained in steps 2 and 3.
10. Remove Tool (B).
11. Remove Tool (A).
12. Recheck valve clearance.
Valve clearance:
Unit: mm (in)
For adjusting
Hot Cold* (reference data)
Intake0.28 - 0.38
(0.011 - 0.015)0.26 - 0.34
(0.010 - 0.013)
Exhaust0.32 - 0.42
(0.013 - 0.017)0.30 - 0.38
(0.012 - 0.015)
*: At a temperature of approximately 20ÉC (68ÉF)
Whenever valve clearances are adjusted to cold speci®cations, check that
the clearances satisfy hot speci®cations and adjust again if necessary.
AEM236
VALVE CLEARANCE
Adjusting (Cont'd)
EM-43
Page 712 of 1226
SEM433C
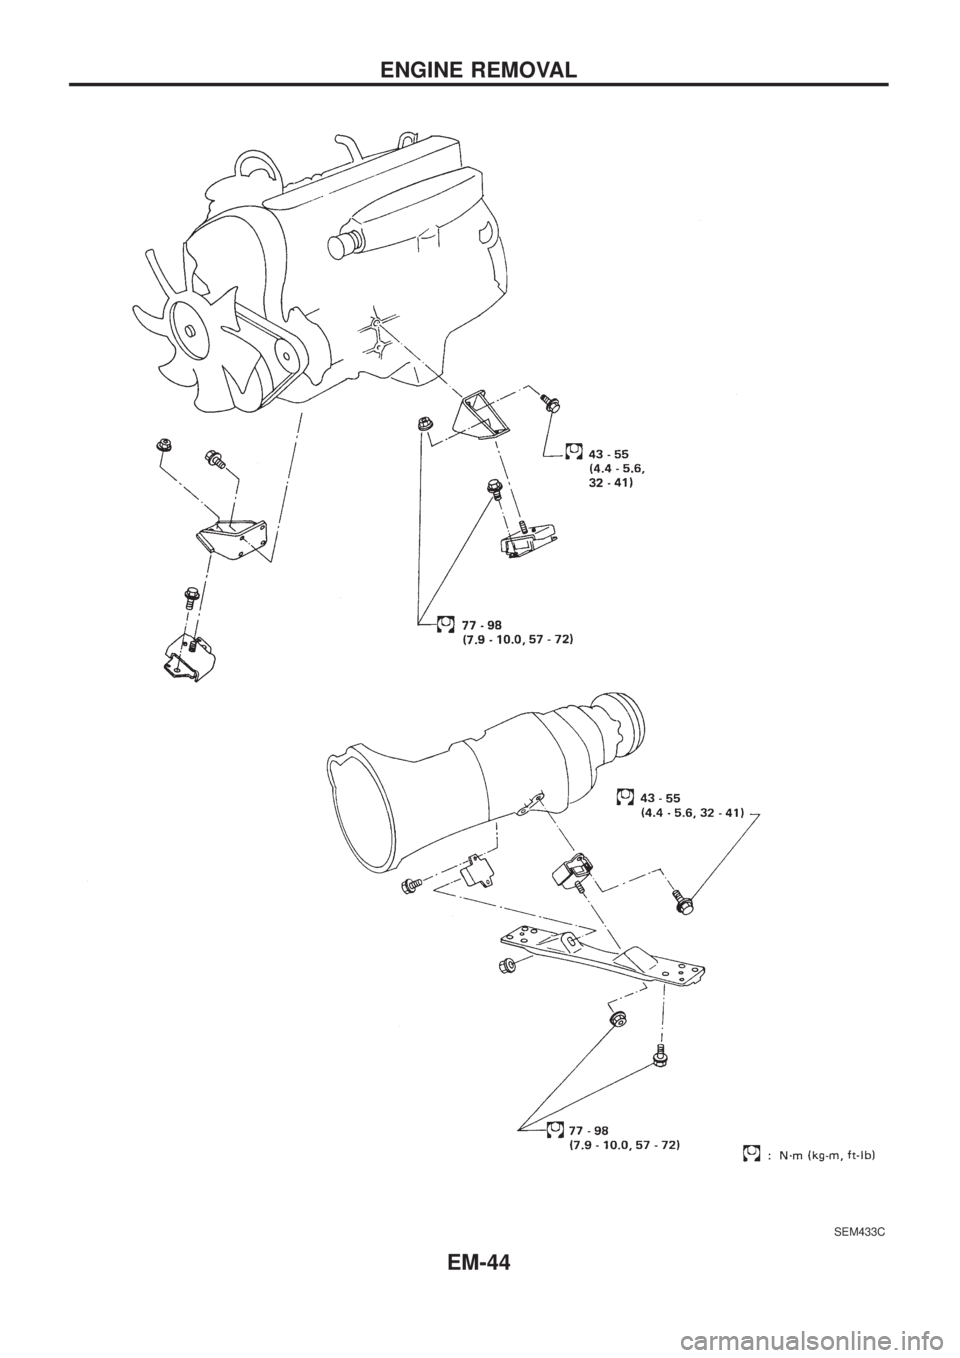
ENGINE REMOVAL
EM-44
Page 713 of 1226
Removal
1. Remove engine, transmission and transfer's undercovers, oil
pan guard and hood.
2. Drain engine coolant.
3. Remove charge air cooler assembly.
4. Remove vacuum hoses, fuel tubes, harnesses, and connectors
and so on.
5. Remove radiator assembly.
6. Remove drive belts.
7. Remove power steering oil pump, alternator and air conditioner
compressor.
8. Remove starter motor assembly.
9. Remove front exhaust tube.
10. Remove transmission from vehicle.
Refer to MT section.
11. Hoist engine with engine slingers and remove engine mounting
bolts from both sides.
12. Remove engine from vehicle.
Installation
+Install in reverse order of removal.
ENGINE REMOVAL
EM-45
Page 714 of 1226
SEM788F
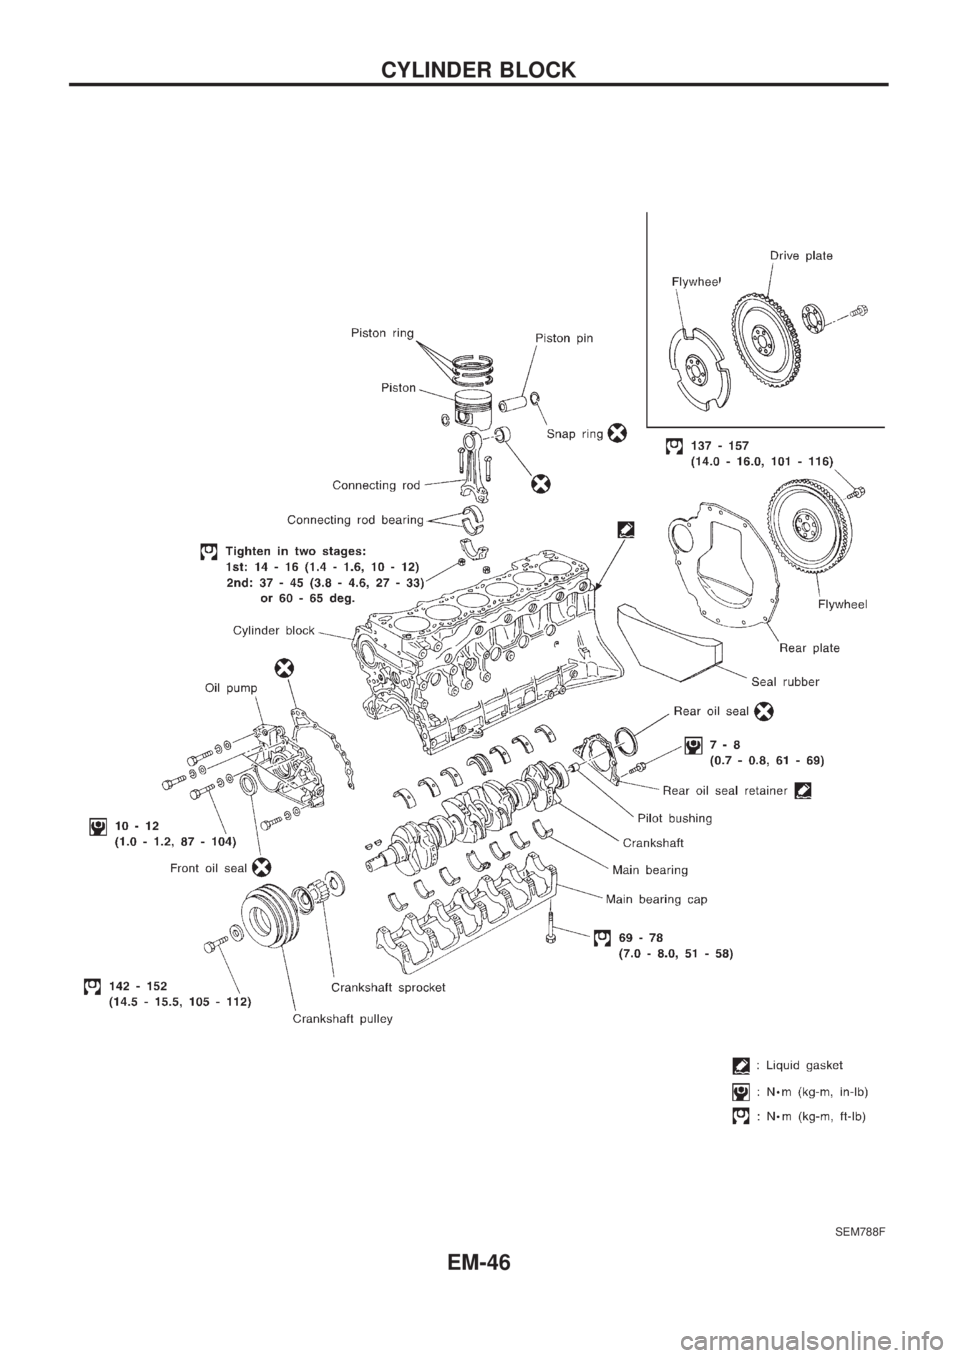
CYLINDER BLOCK
EM-46
Page 715 of 1226
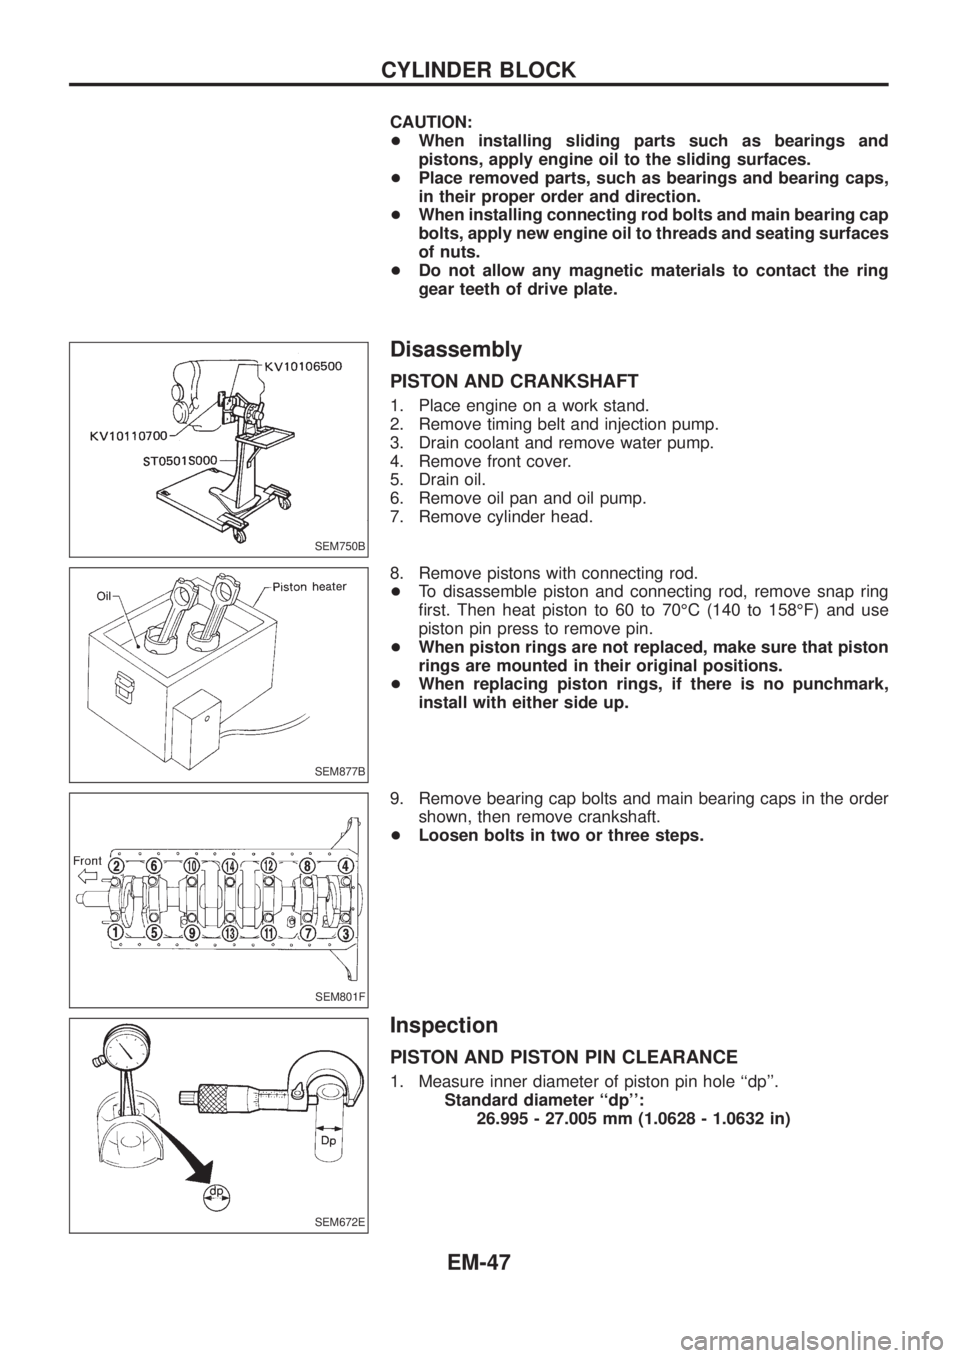
CAUTION:
+When installing sliding parts such as bearings and
pistons, apply engine oil to the sliding surfaces.
+Place removed parts, such as bearings and bearing caps,
in their proper order and direction.
+When installing connecting rod bolts and main bearing cap
bolts, apply new engine oil to threads and seating surfaces
of nuts.
+Do not allow any magnetic materials to contact the ring
gear teeth of drive plate.
Disassembly
PISTON AND CRANKSHAFT
1. Place engine on a work stand.
2. Remove timing belt and injection pump.
3. Drain coolant and remove water pump.
4. Remove front cover.
5. Drain oil.
6. Remove oil pan and oil pump.
7. Remove cylinder head.
8. Remove pistons with connecting rod.
+To disassemble piston and connecting rod, remove snap ring
®rst. Then heat piston to 60 to 70ÉC (140 to 158ÉF) and use
piston pin press to remove pin.
+When piston rings are not replaced, make sure that piston
rings are mounted in their original positions.
+When replacing piston rings, if there is no punchmark,
install with either side up.
9. Remove bearing cap bolts and main bearing caps in the order
shown, then remove crankshaft.
+Loosen bolts in two or three steps.
Inspection
PISTON AND PISTON PIN CLEARANCE
1. Measure inner diameter of piston pin hole ``dp''.
Standard diameter ``dp'':
26.995 - 27.005 mm (1.0628 - 1.0632 in)
SEM750B
SEM877B
SEM801F
SEM672E
CYLINDER BLOCK
EM-47
Page 716 of 1226
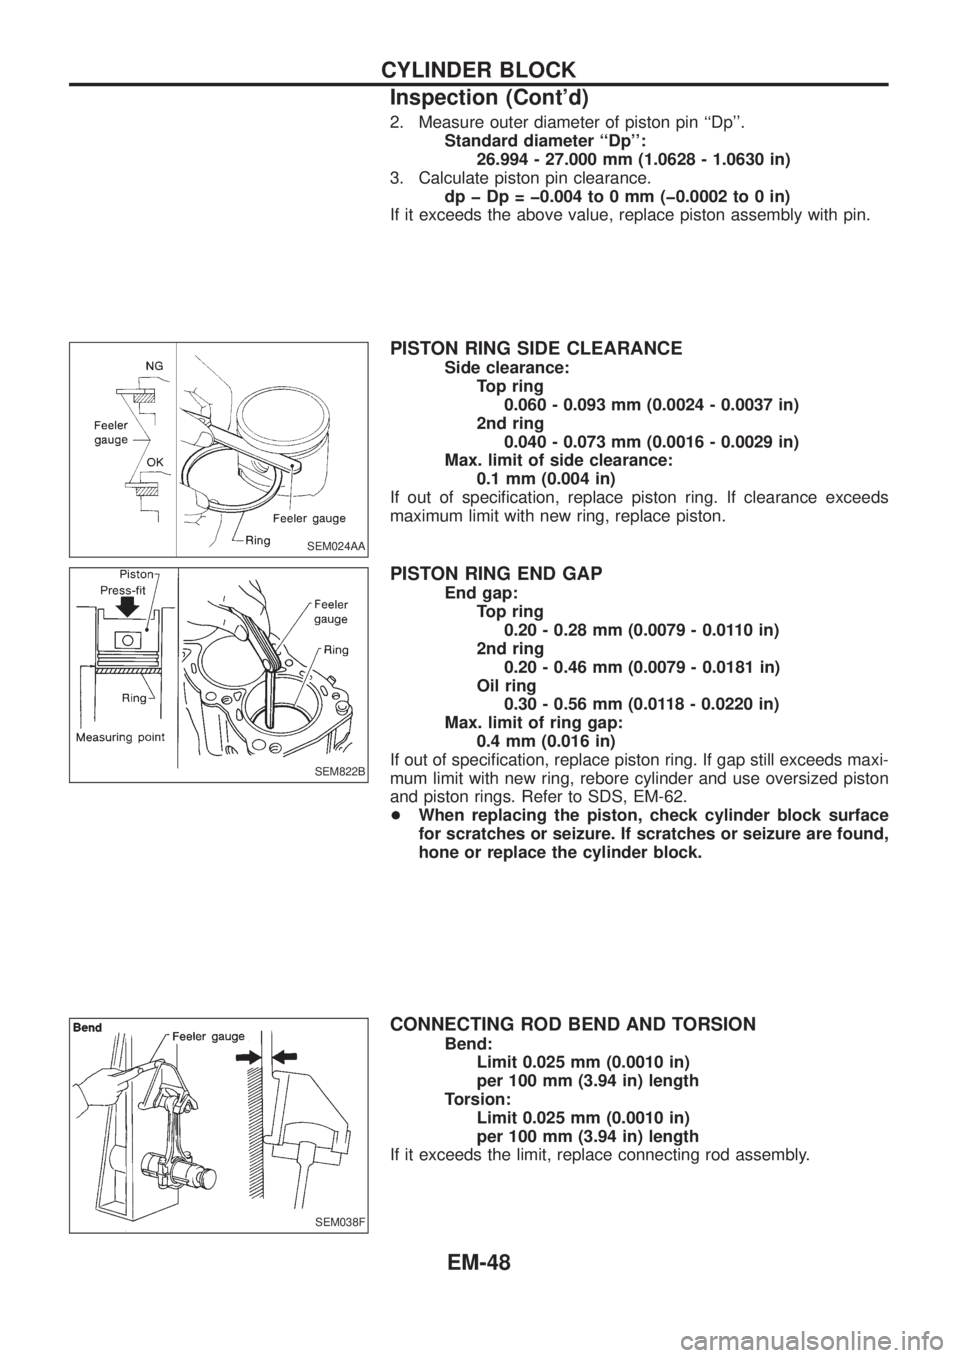
2. Measure outer diameter of piston pin ``Dp''.
Standard diameter ``Dp'':
26.994 - 27.000 mm (1.0628 - 1.0630 in)
3. Calculate piston pin clearance.
dp þ Dp = þ0.004 to 0 mm (þ0.0002 to 0 in)
If it exceeds the above value, replace piston assembly with pin.
PISTON RING SIDE CLEARANCE
Side clearance:
Top ring
0.060 - 0.093 mm (0.0024 - 0.0037 in)
2nd ring
0.040 - 0.073 mm (0.0016 - 0.0029 in)
Max. limit of side clearance:
0.1 mm (0.004 in)
If out of speci®cation, replace piston ring. If clearance exceeds
maximum limit with new ring, replace piston.
PISTON RING END GAP
End gap:
Top ring
0.20 - 0.28 mm (0.0079 - 0.0110 in)
2nd ring
0.20 - 0.46 mm (0.0079 - 0.0181 in)
Oil ring
0.30 - 0.56 mm (0.0118 - 0.0220 in)
Max. limit of ring gap:
0.4 mm (0.016 in)
If out of speci®cation, replace piston ring. If gap still exceeds maxi-
mum limit with new ring, rebore cylinder and use oversized piston
and piston rings. Refer to SDS, EM-62.
+When replacing the piston, check cylinder block surface
for scratches or seizure. If scratches or seizure are found,
hone or replace the cylinder block.
CONNECTING ROD BEND AND TORSION
Bend:
Limit 0.025 mm (0.0010 in)
per 100 mm (3.94 in) length
Torsion:
Limit 0.025 mm (0.0010 in)
per 100 mm (3.94 in) length
If it exceeds the limit, replace connecting rod assembly.
SEM024AA
SEM822B
SEM038F
CYLINDER BLOCK
Inspection (Cont'd)
EM-48
Page 717 of 1226
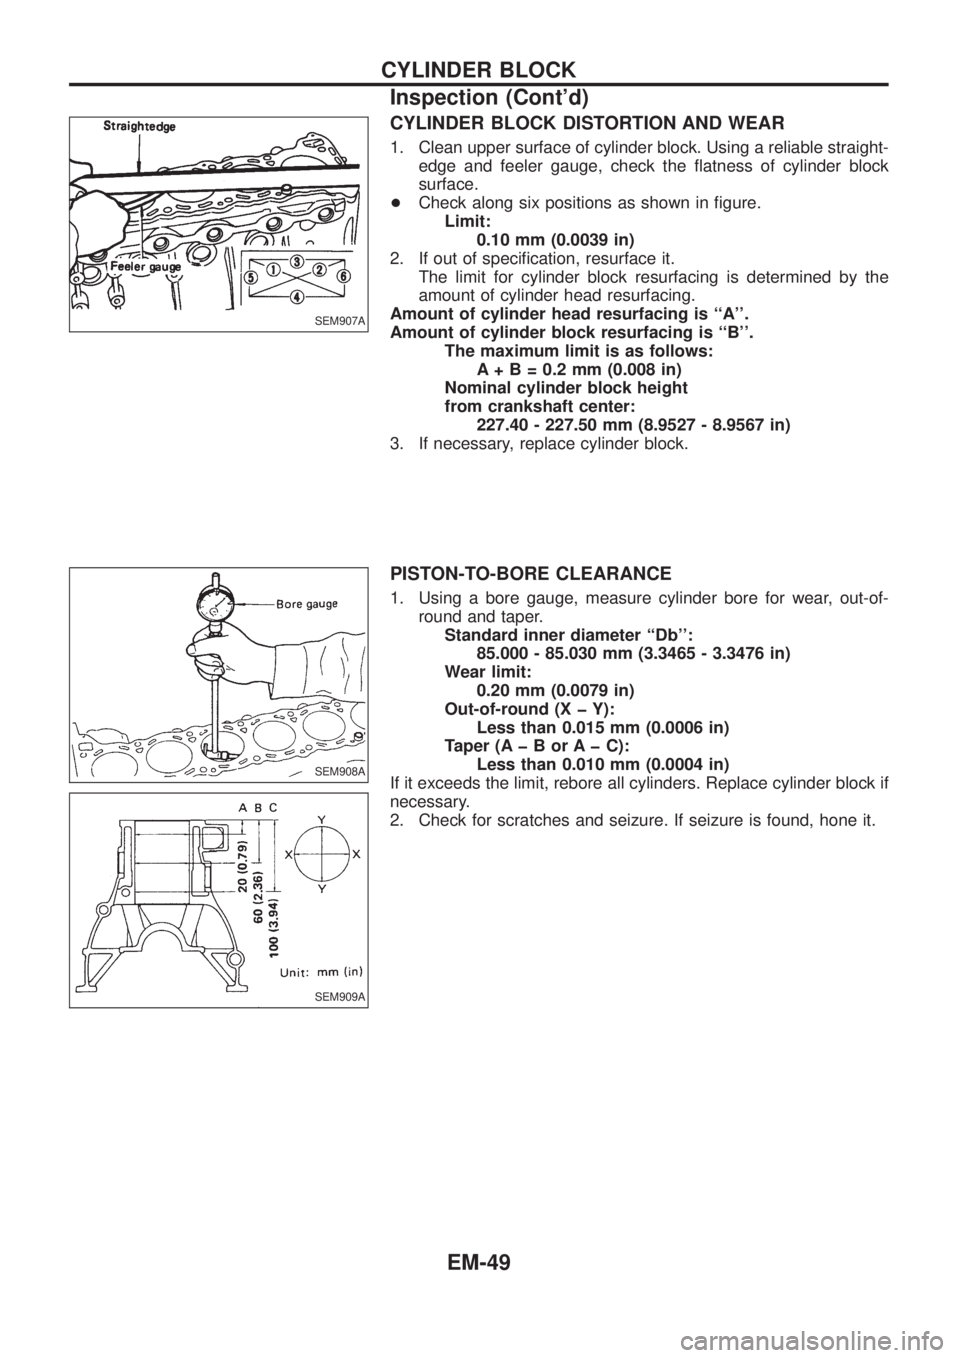
CYLINDER BLOCK DISTORTION AND WEAR
1. Clean upper surface of cylinder block. Using a reliable straight-
edge and feeler gauge, check the ¯atness of cylinder block
surface.
+Check along six positions as shown in ®gure.
Limit:
0.10 mm (0.0039 in)
2. If out of speci®cation, resurface it.
The limit for cylinder block resurfacing is determined by the
amount of cylinder head resurfacing.
Amount of cylinder head resurfacing is ``A''.
Amount of cylinder block resurfacing is ``B''.
The maximum limit is as follows:
A + B = 0.2 mm (0.008 in)
Nominal cylinder block height
from crankshaft center:
227.40 - 227.50 mm (8.9527 - 8.9567 in)
3. If necessary, replace cylinder block.
PISTON-TO-BORE CLEARANCE
1. Using a bore gauge, measure cylinder bore for wear, out-of-
round and taper.
Standard inner diameter ``Db'':
85.000 - 85.030 mm (3.3465 - 3.3476 in)
Wear limit:
0.20 mm (0.0079 in)
Out-of-round (X þ Y):
Less than 0.015 mm (0.0006 in)
Taper (A þ B or A þ C):
Less than 0.010 mm (0.0004 in)
If it exceeds the limit, rebore all cylinders. Replace cylinder block if
necessary.
2. Check for scratches and seizure. If seizure is found, hone it.
SEM907A
SEM908A
SEM909A
CYLINDER BLOCK
Inspection (Cont'd)
EM-49
Page 718 of 1226
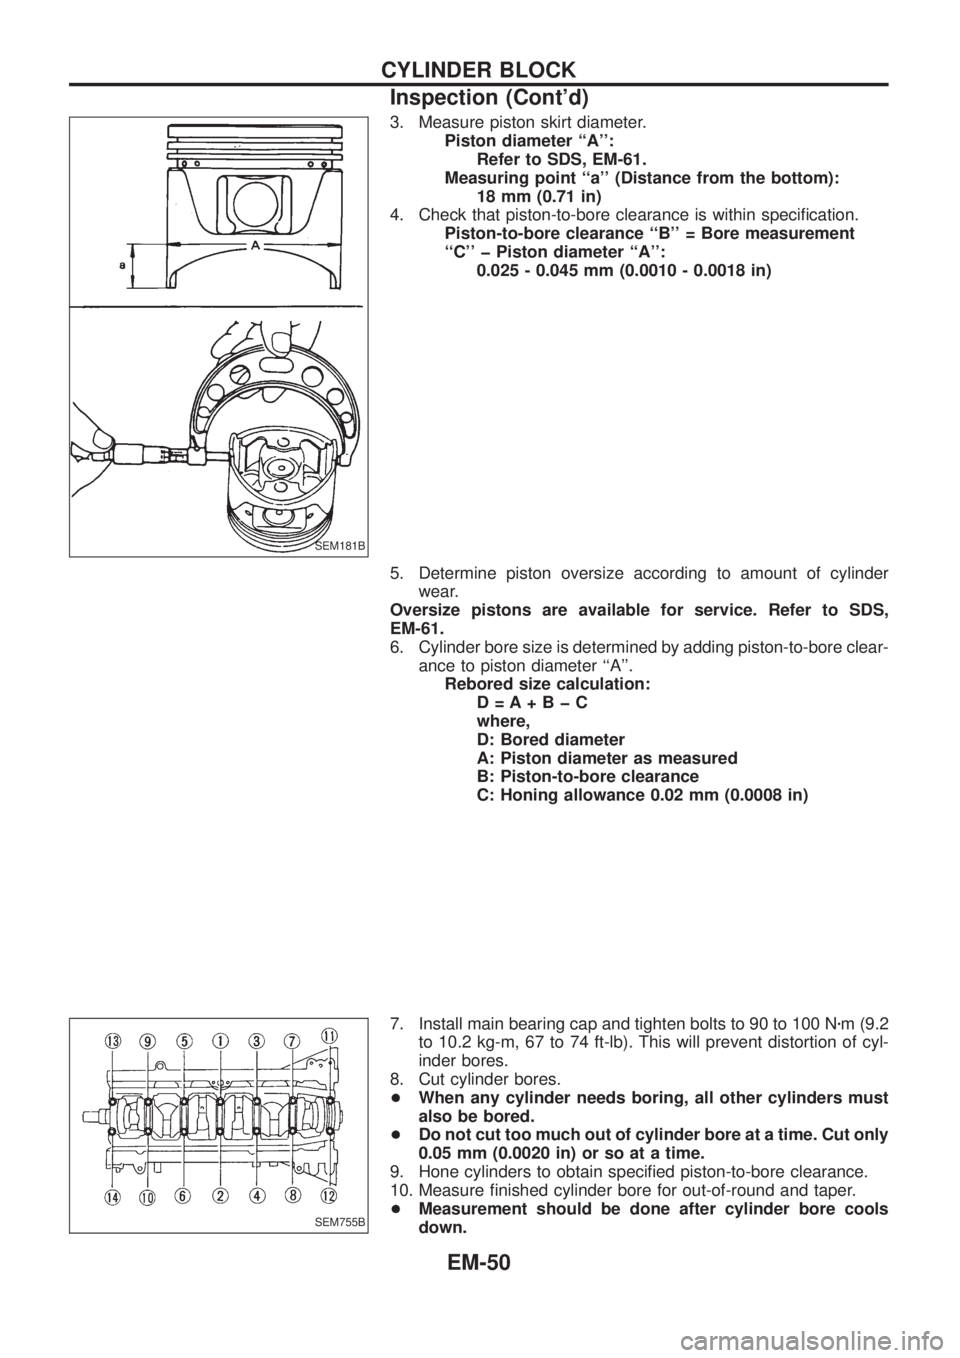
3. Measure piston skirt diameter.
Piston diameter ``A'':
Refer to SDS, EM-61.
Measuring point ``a'' (Distance from the bottom):
18 mm (0.71 in)
4. Check that piston-to-bore clearance is within speci®cation.
Piston-to-bore clearance ``B'' = Bore measurement
``C'' þ Piston diameter ``A'':
0.025 - 0.045 mm (0.0010 - 0.0018 in)
5. Determine piston oversize according to amount of cylinder
wear.
Oversize pistons are available for service. Refer to SDS,
EM-61.
6. Cylinder bore size is determined by adding piston-to-bore clear-
ance to piston diameter ``A''.
Rebored size calculation:
D=A+BþC
where,
D: Bored diameter
A: Piston diameter as measured
B: Piston-to-bore clearance
C: Honing allowance 0.02 mm (0.0008 in)
7. Install main bearing cap and tighten bolts to 90 to 100 Nzm (9.2
to 10.2 kg-m, 67 to 74 ft-lb). This will prevent distortion of cyl-
inder bores.
8. Cut cylinder bores.
+When any cylinder needs boring, all other cylinders must
also be bored.
+Do not cut too much out of cylinder bore at a time. Cut only
0.05 mm (0.0020 in) or so at a time.
9. Hone cylinders to obtain speci®ed piston-to-bore clearance.
10. Measure ®nished cylinder bore for out-of-round and taper.
+Measurement should be done after cylinder bore cools
down.
SEM181B
SEM755B
CYLINDER BLOCK
Inspection (Cont'd)
EM-50
Page 719 of 1226
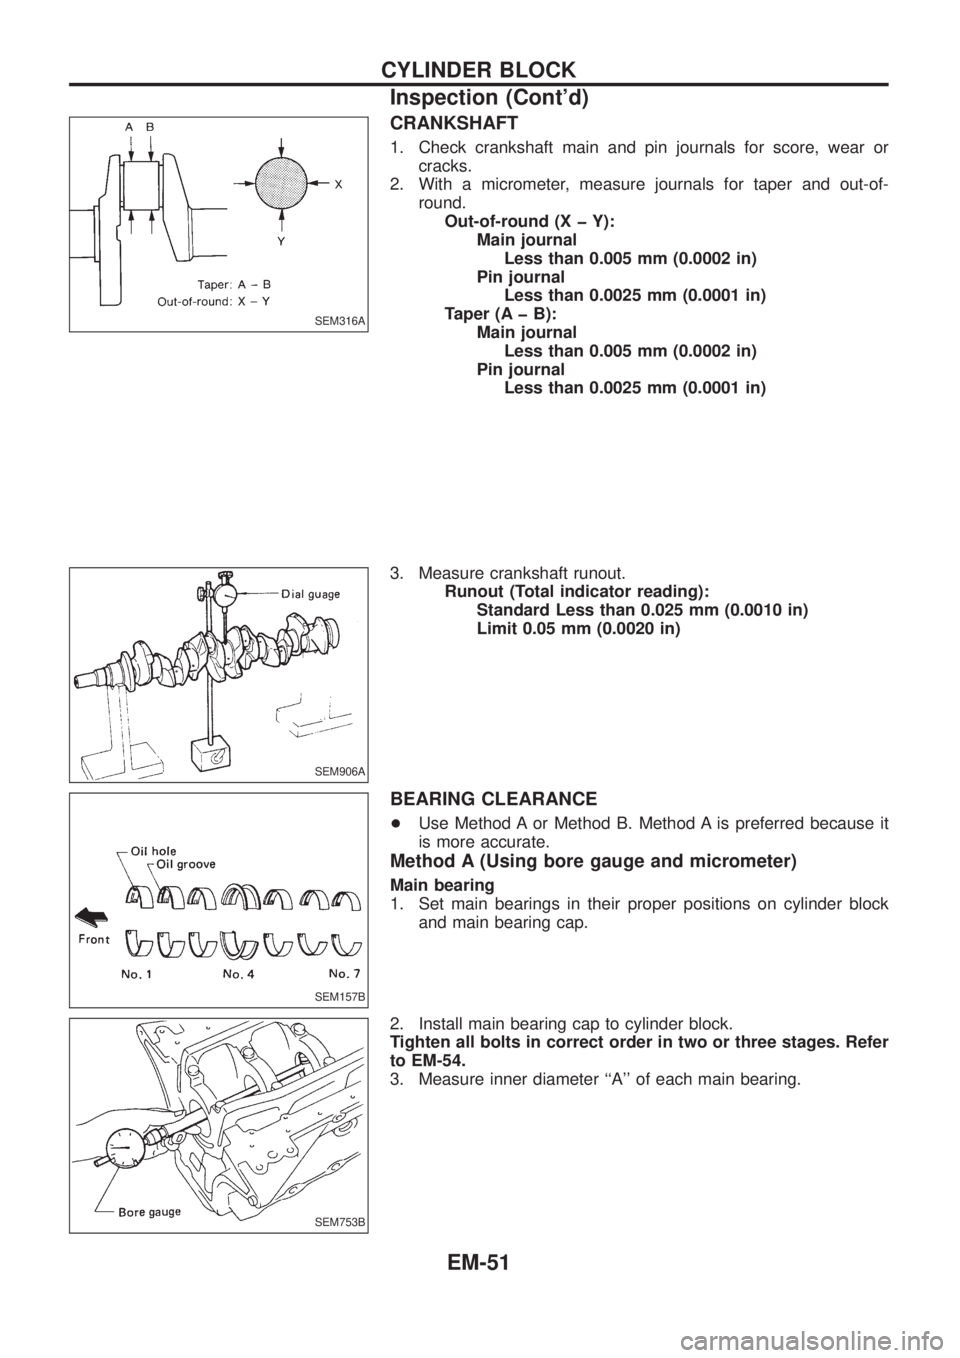
CRANKSHAFT
1. Check crankshaft main and pin journals for score, wear or
cracks.
2. With a micrometer, measure journals for taper and out-of-
round.
Out-of-round (X þ Y):
Main journal
Less than 0.005 mm (0.0002 in)
Pin journal
Less than 0.0025 mm (0.0001 in)
Taper (A þ B):
Main journal
Less than 0.005 mm (0.0002 in)
Pin journal
Less than 0.0025 mm (0.0001 in)
3. Measure crankshaft runout.
Runout (Total indicator reading):
Standard Less than 0.025 mm (0.0010 in)
Limit 0.05 mm (0.0020 in)
BEARING CLEARANCE
+Use Method A or Method B. Method A is preferred because it
is more accurate.
Method A (Using bore gauge and micrometer)
Main bearing
1. Set main bearings in their proper positions on cylinder block
and main bearing cap.
2. Install main bearing cap to cylinder block.
Tighten all bolts in correct order in two or three stages. Refer
to EM-54.
3. Measure inner diameter ``A'' of each main bearing.
SEM316A
SEM906A
SEM157B
SEM753B
CYLINDER BLOCK
Inspection (Cont'd)
EM-51
Page 720 of 1226
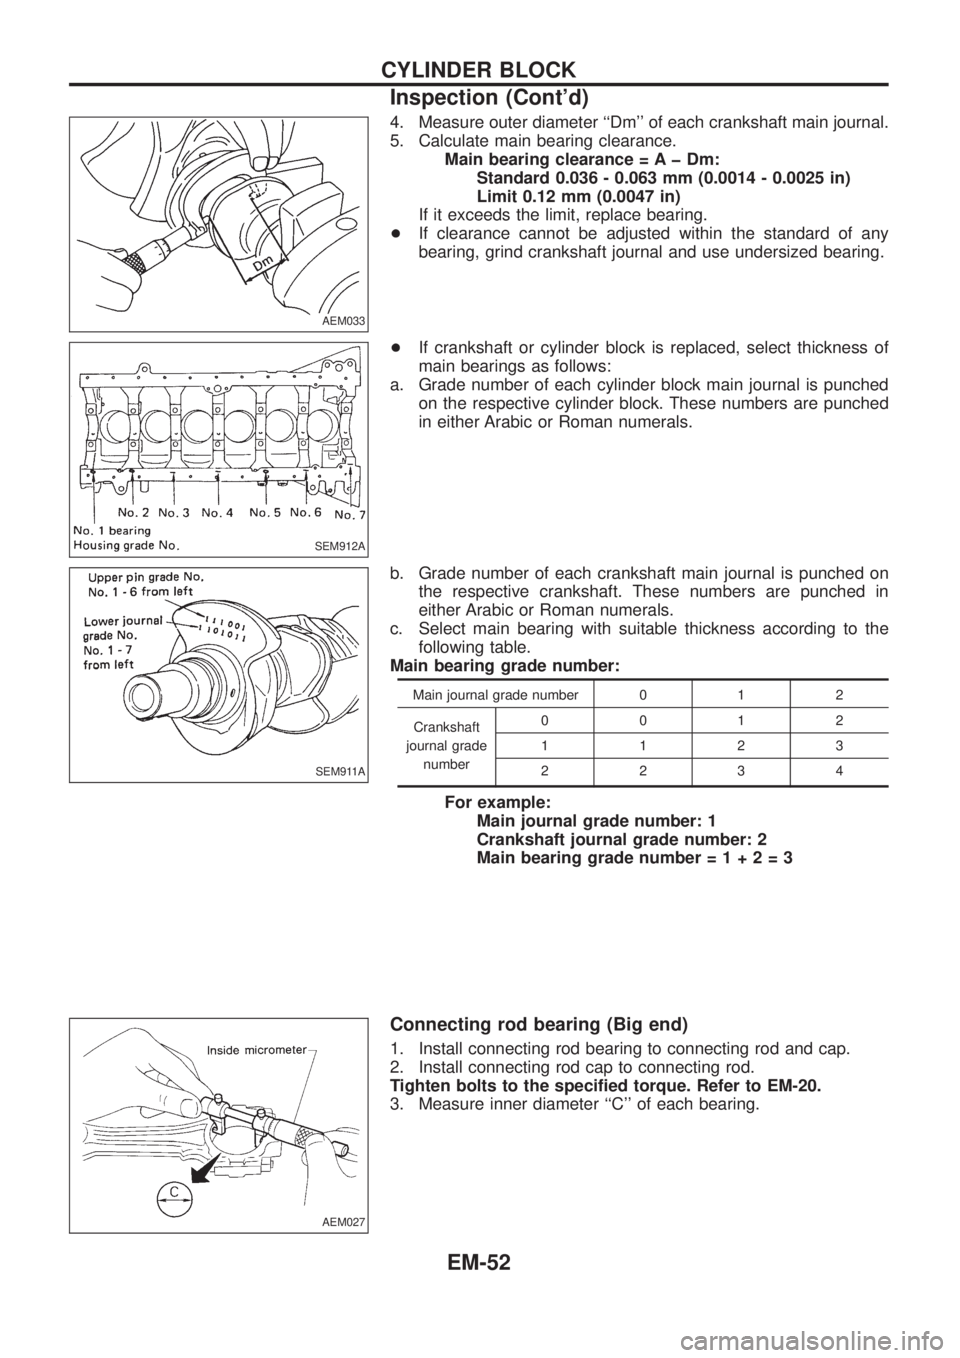
4. Measure outer diameter ``Dm'' of each crankshaft main journal.
5. Calculate main bearing clearance.
Main bearing clearance = A þ Dm:
Standard 0.036 - 0.063 mm (0.0014 - 0.0025 in)
Limit 0.12 mm (0.0047 in)
If it exceeds the limit, replace bearing.
+If clearance cannot be adjusted within the standard of any
bearing, grind crankshaft journal and use undersized bearing.
+If crankshaft or cylinder block is replaced, select thickness of
main bearings as follows:
a. Grade number of each cylinder block main journal is punched
on the respective cylinder block. These numbers are punched
in either Arabic or Roman numerals.
b. Grade number of each crankshaft main journal is punched on
the respective crankshaft. These numbers are punched in
either Arabic or Roman numerals.
c. Select main bearing with suitable thickness according to the
following table.
Main bearing grade number:
Main journal grade number 0 1 2
Crankshaft
journal grade
number0012
1123
2234
For example:
Main journal grade number: 1
Crankshaft journal grade number: 2
Main bearing grade number=1+2=3
Connecting rod bearing (Big end)
1. Install connecting rod bearing to connecting rod and cap.
2. Install connecting rod cap to connecting rod.
Tighten bolts to the speci®ed torque. Refer to EM-20.
3. Measure inner diameter ``C'' of each bearing.
AEM033
SEM912A
SEM911A
AEM027
CYLINDER BLOCK
Inspection (Cont'd)
EM-52