NISSAN PATROL 2006 Service Manual
PATROL 2006
NISSAN
NISSAN
https://www.carmanualsonline.info/img/5/57368/w960_57368-0.png
NISSAN PATROL 2006 Service Manual
Trending: ignition, jacking, front propeller axle, Break, brake pads, rear bumper, display
Page 691 of 1226
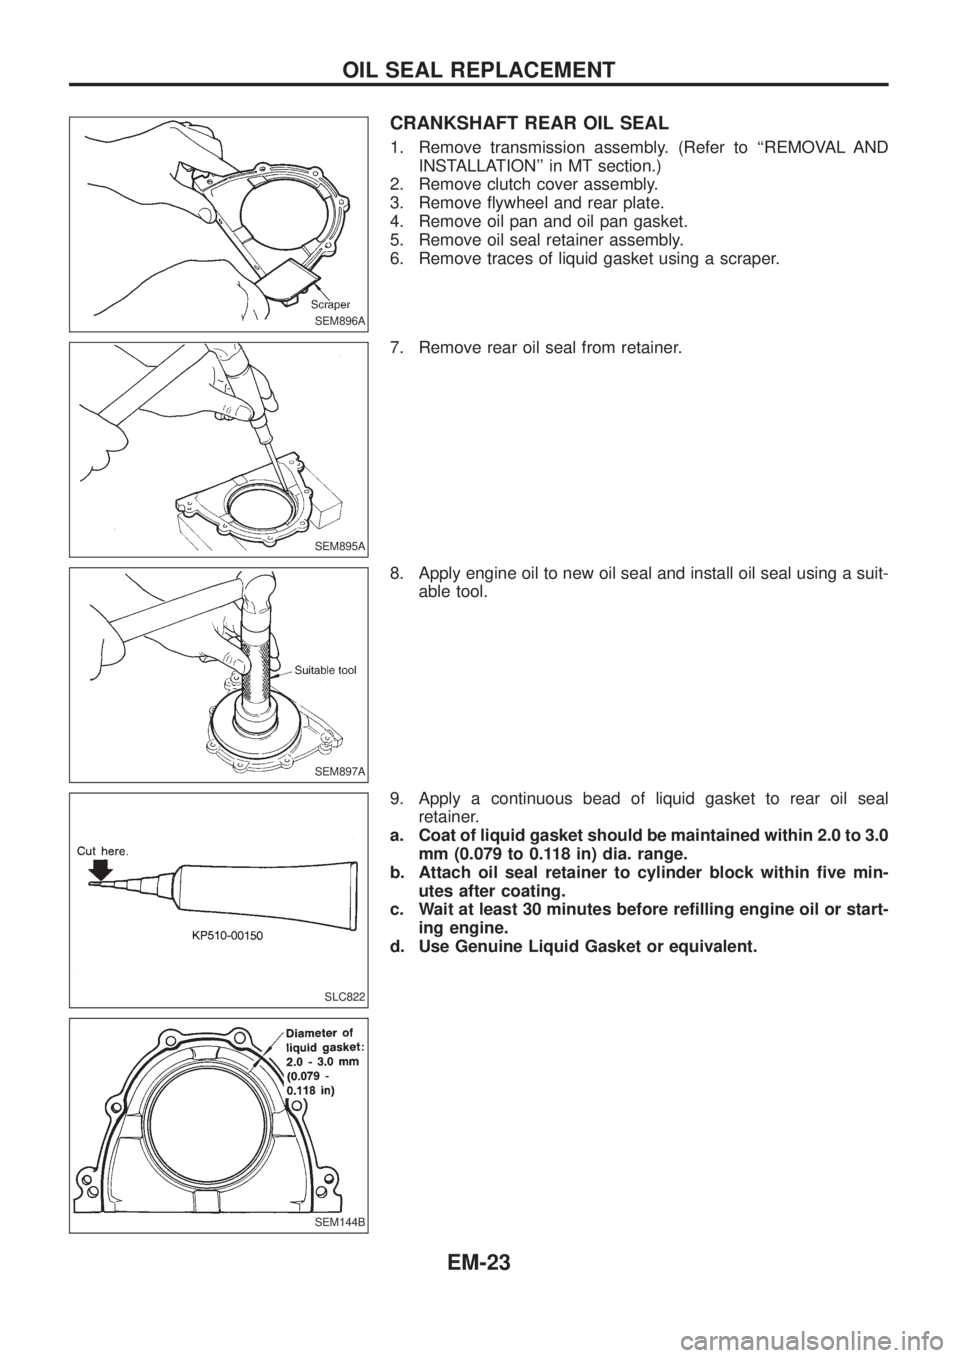
CRANKSHAFT REAR OIL SEAL
1. Remove transmission assembly. (Refer to ``REMOVAL AND
INSTALLATION'' in MT section.)
2. Remove clutch cover assembly.
3. Remove ¯ywheel and rear plate.
4. Remove oil pan and oil pan gasket.
5. Remove oil seal retainer assembly.
6. Remove traces of liquid gasket using a scraper.
7. Remove rear oil seal from retainer.
8. Apply engine oil to new oil seal and install oil seal using a suit-
able tool.
9. Apply a continuous bead of liquid gasket to rear oil seal
retainer.
a. Coat of liquid gasket should be maintained within 2.0 to 3.0
mm (0.079 to 0.118 in) dia. range.
b. Attach oil seal retainer to cylinder block within ®ve min-
utes after coating.
c. Wait at least 30 minutes before re®lling engine oil or start-
ing engine.
d. Use Genuine Liquid Gasket or equivalent.
SEM896A
SEM895A
SEM897A
SLC822
SEM144B
OIL SEAL REPLACEMENT
EM-23
Page 692 of 1226
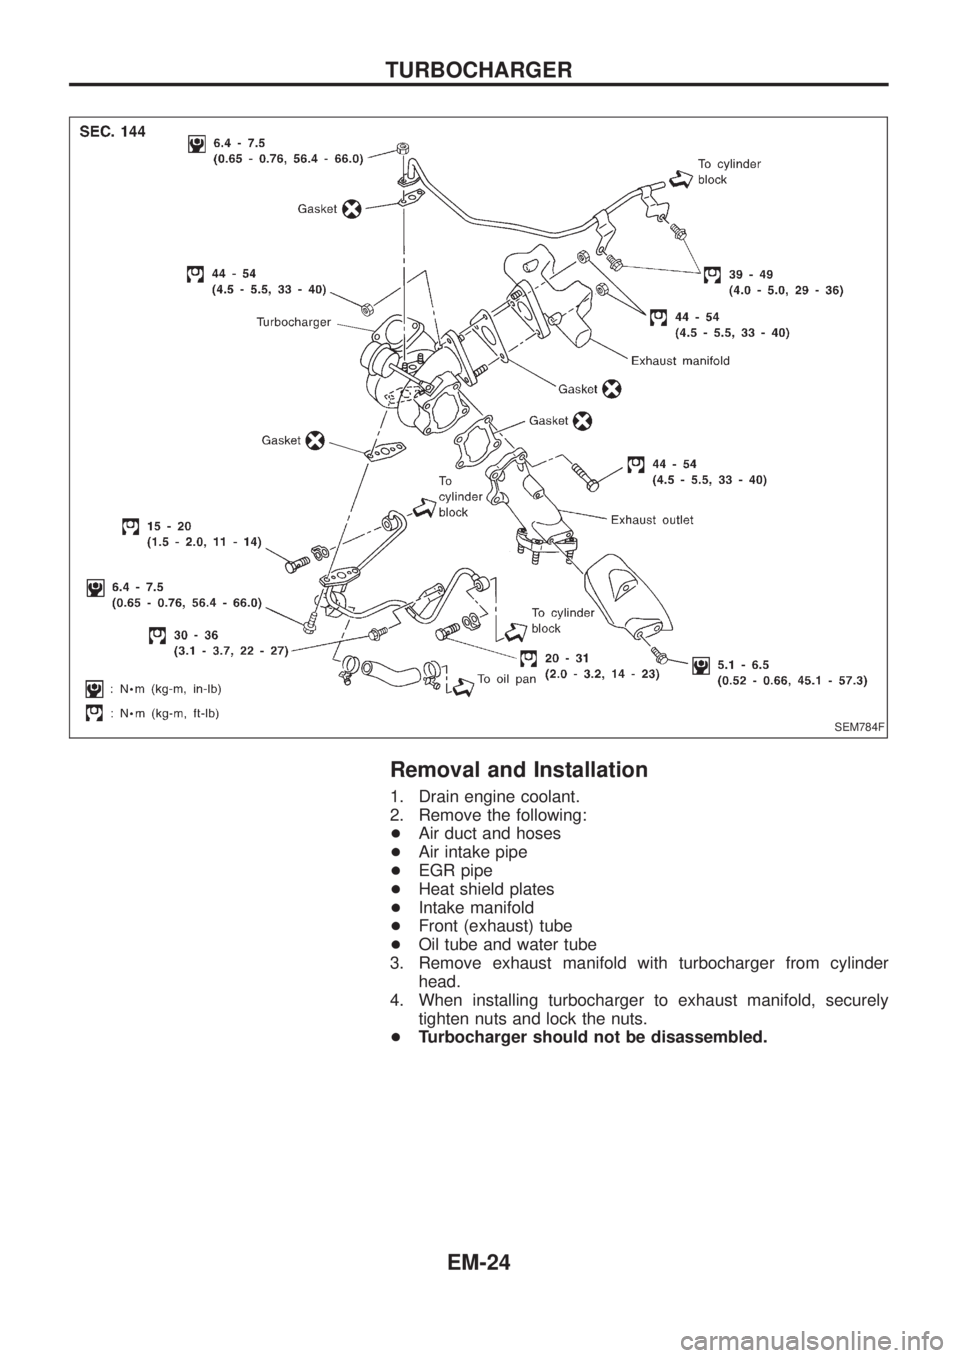
Removal and Installation
1. Drain engine coolant.
2. Remove the following:
+Air duct and hoses
+Air intake pipe
+EGR pipe
+Heat shield plates
+Intake manifold
+Front (exhaust) tube
+Oil tube and water tube
3. Remove exhaust manifold with turbocharger from cylinder
head.
4. When installing turbocharger to exhaust manifold, securely
tighten nuts and lock the nuts.
+Turbocharger should not be disassembled.
SEM784F
TURBOCHARGER
EM-24
Page 693 of 1226
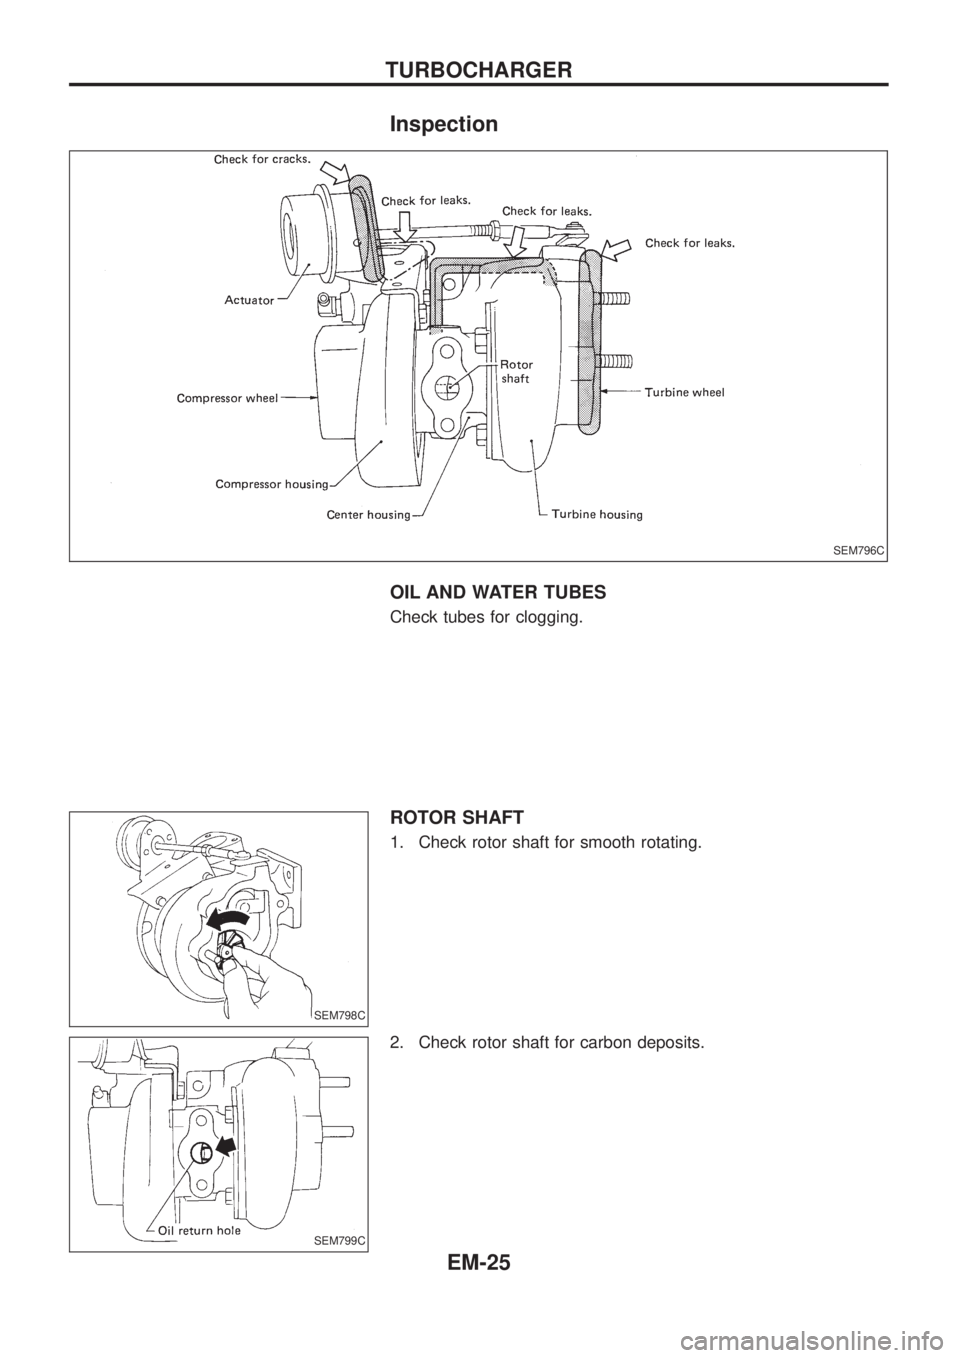
Inspection
OIL AND WATER TUBES
Check tubes for clogging.
ROTOR SHAFT
1. Check rotor shaft for smooth rotating.
2. Check rotor shaft for carbon deposits.
SEM796C
SEM798C
SEM799C
TURBOCHARGER
EM-25
Page 694 of 1226
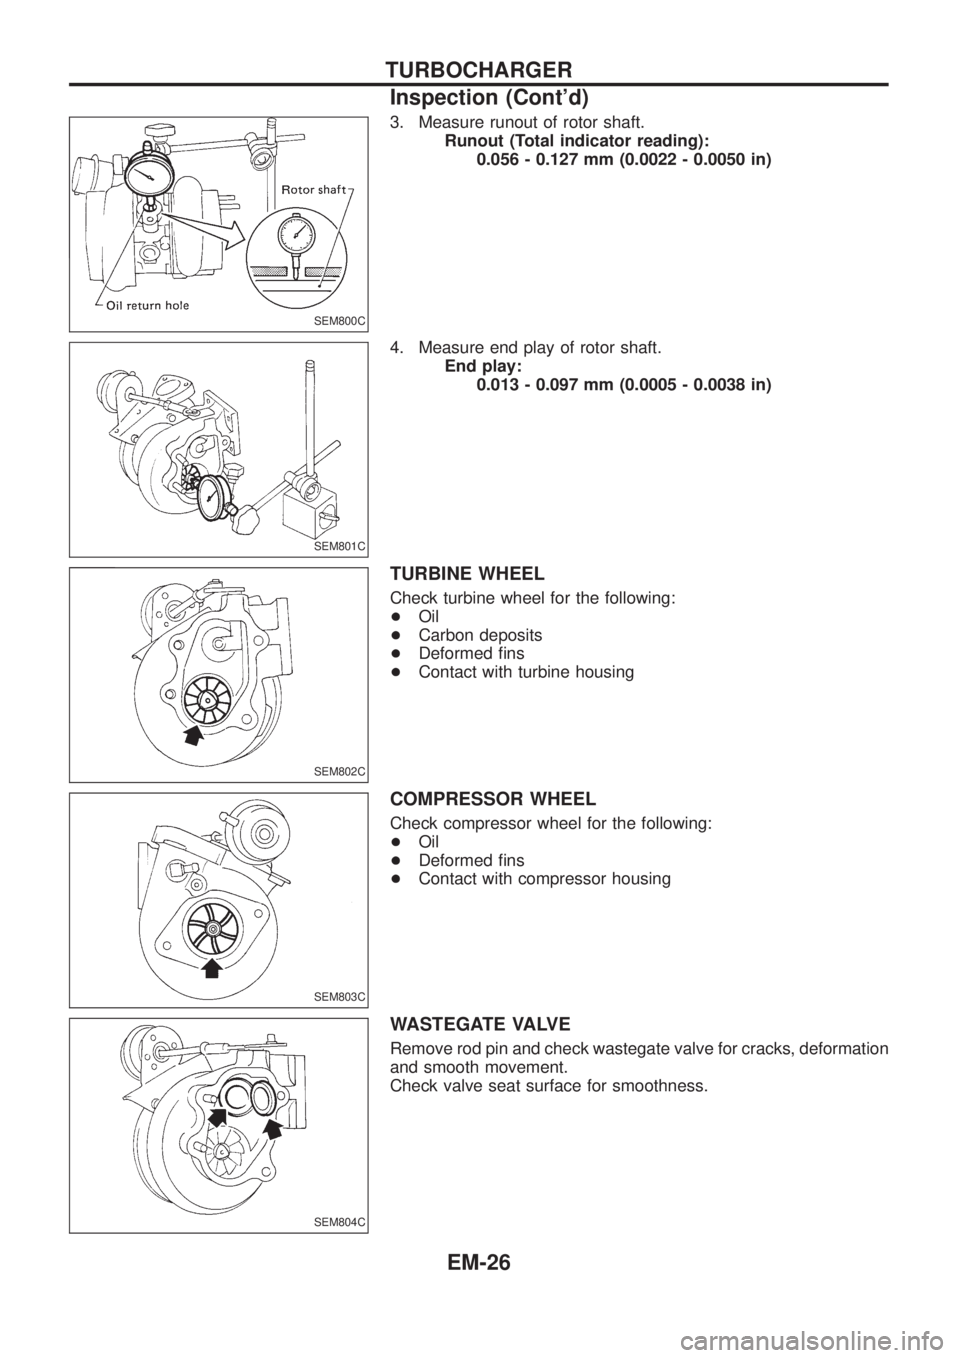
3. Measure runout of rotor shaft.
Runout (Total indicator reading):
0.056 - 0.127 mm (0.0022 - 0.0050 in)
4. Measure end play of rotor shaft.
End play:
0.013 - 0.097 mm (0.0005 - 0.0038 in)
TURBINE WHEEL
Check turbine wheel for the following:
+Oil
+Carbon deposits
+Deformed ®ns
+Contact with turbine housing
COMPRESSOR WHEEL
Check compressor wheel for the following:
+Oil
+Deformed ®ns
+Contact with compressor housing
WASTEGATE VALVE
Remove rod pin and check wastegate valve for cracks, deformation
and smooth movement.
Check valve seat surface for smoothness.
SEM800C
SEM801C
SEM802C
SEM803C
SEM804C
TURBOCHARGER
Inspection (Cont'd)
EM-26
Page 695 of 1226
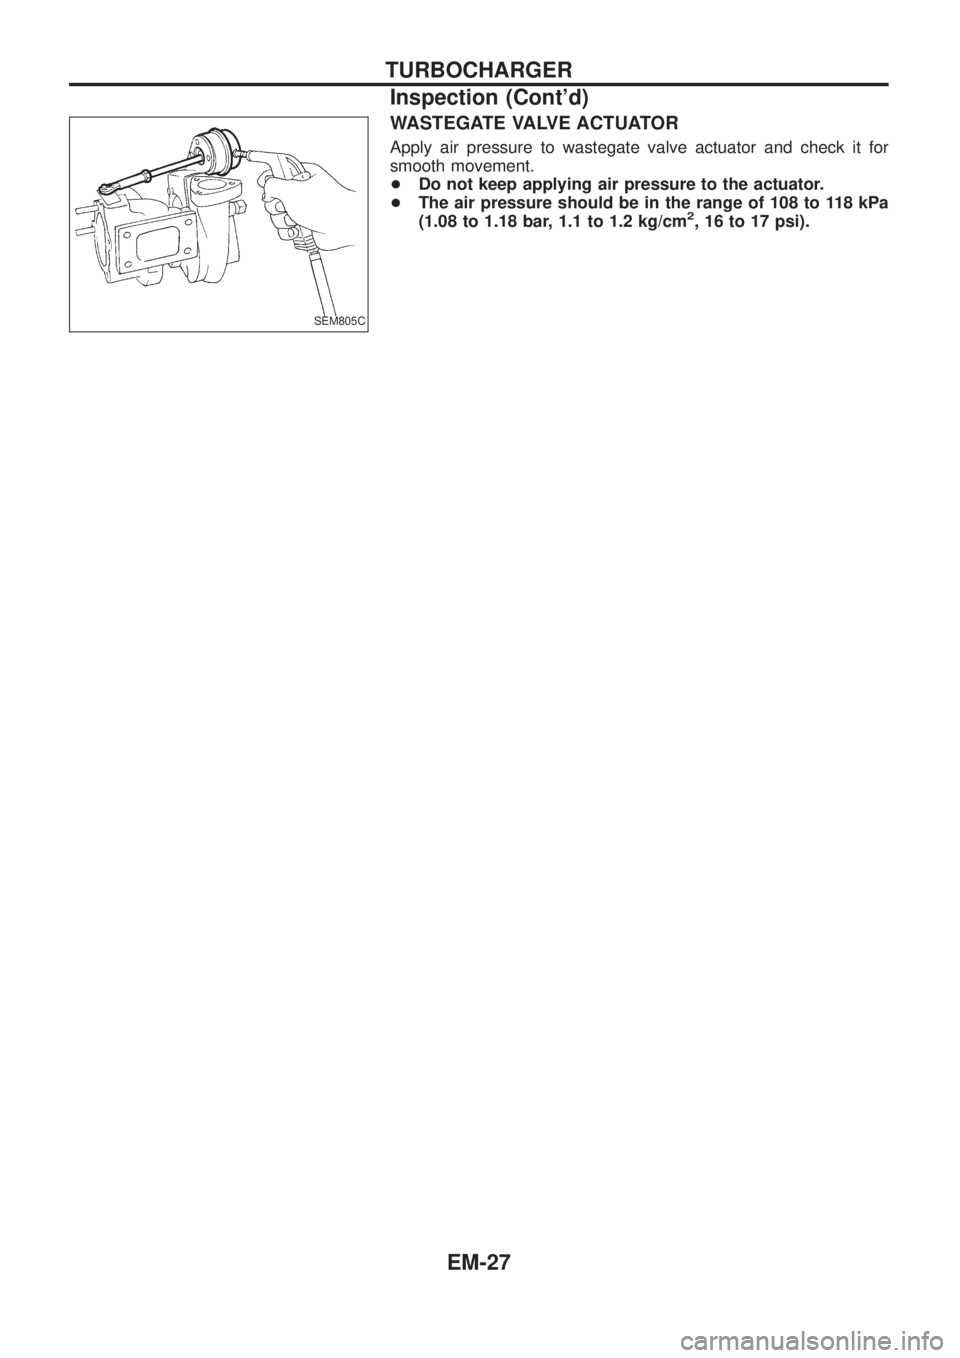
WASTEGATE VALVE ACTUATOR
Apply air pressure to wastegate valve actuator and check it for
smooth movement.
+Do not keep applying air pressure to the actuator.
+The air pressure should be in the range of 108 to 118 kPa
(1.08 to 1.18 bar, 1.1 to 1.2 kg/cm
2, 16 to 17 psi).
SEM805C
TURBOCHARGER
Inspection (Cont'd)
EM-27
Page 696 of 1226
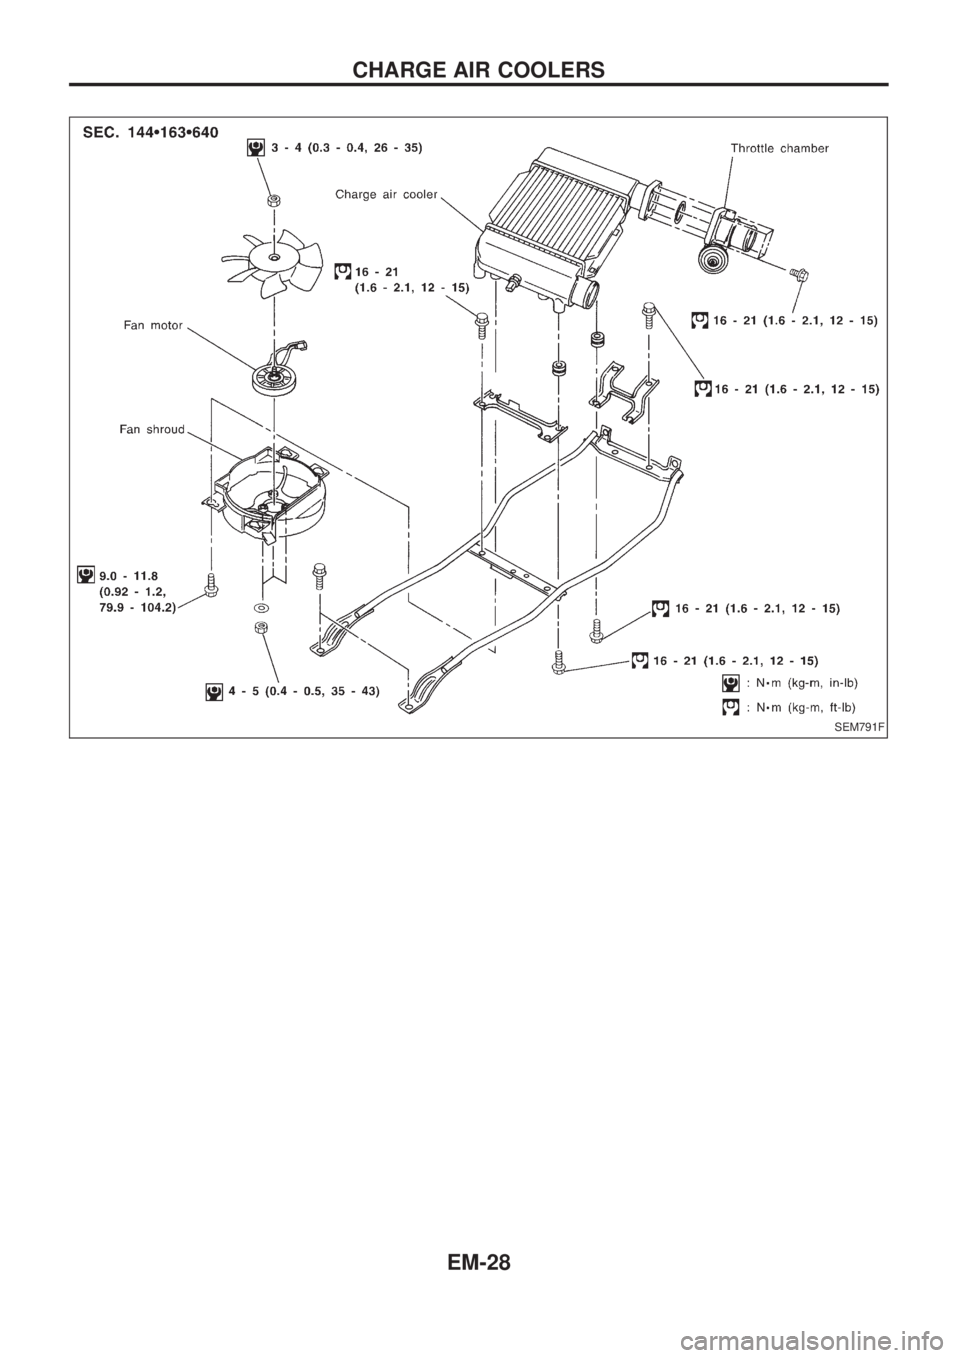
SEM791F
CHARGE AIR COOLERS
EM-28
Page 697 of 1226
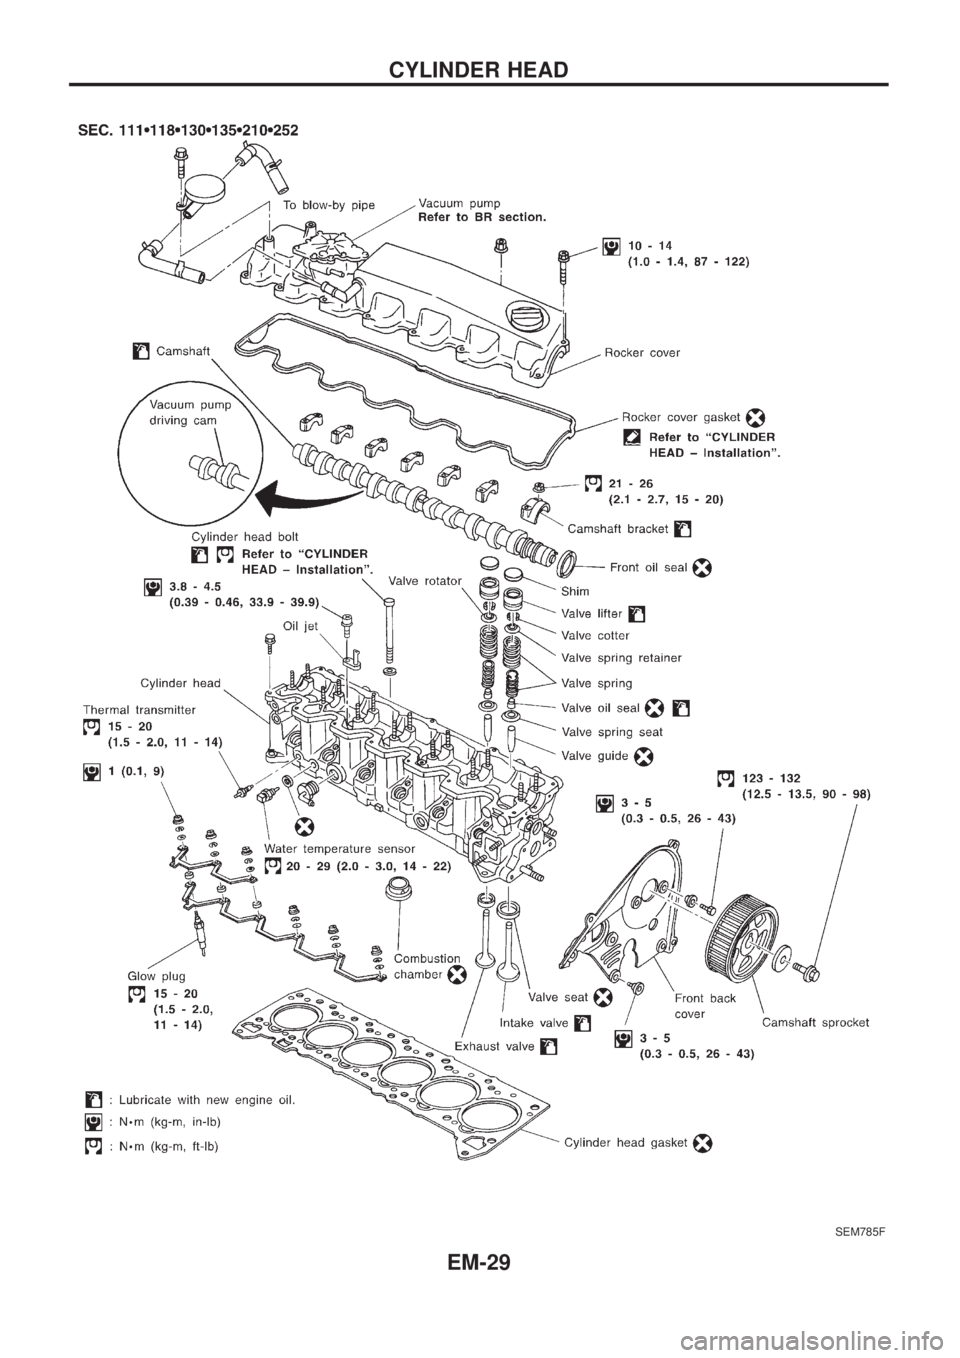
SEM785F
CYLINDER HEAD
EM-29
Page 698 of 1226
CAUTION:
+When installing sliding parts such as camshaft and oil
seal, be sure to apply new engine oil on their sliding sur-
faces.
+When tightening cylinder head bolts, apply new engine oil
to thread portions and seat surfaces of bolts.
Removal
1. Remove charge air cooler assembly.
2. Set No. 1 cylinder at BDC on its expansion stroke.
3. Drain engine coolant from drain plugs on cylinder block and
radiator.
4. Remove air cleaner and/or air duct.
5. Remove timing belt.
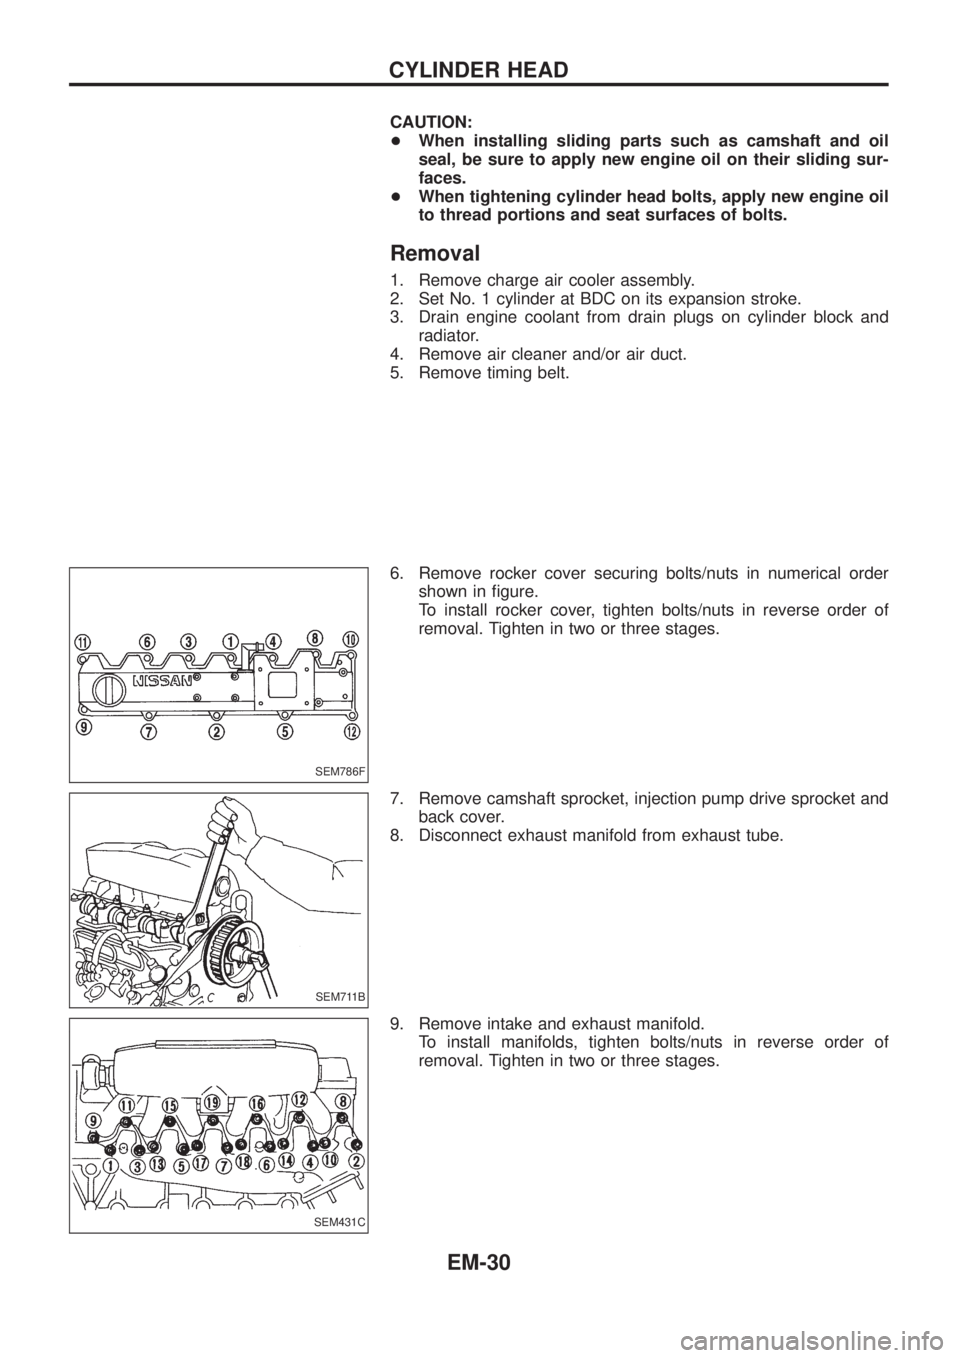
6. Remove rocker cover securing bolts/nuts in numerical order
shown in ®gure.
To install rocker cover, tighten bolts/nuts in reverse order of
removal. Tighten in two or three stages.
7. Remove camshaft sprocket, injection pump drive sprocket and
back cover.
8. Disconnect exhaust manifold from exhaust tube.
9. Remove intake and exhaust manifold.
To install manifolds, tighten bolts/nuts in reverse order of
removal. Tighten in two or three stages.
SEM786F
SEM711B
SEM431C
CYLINDER HEAD
EM-30
Page 699 of 1226
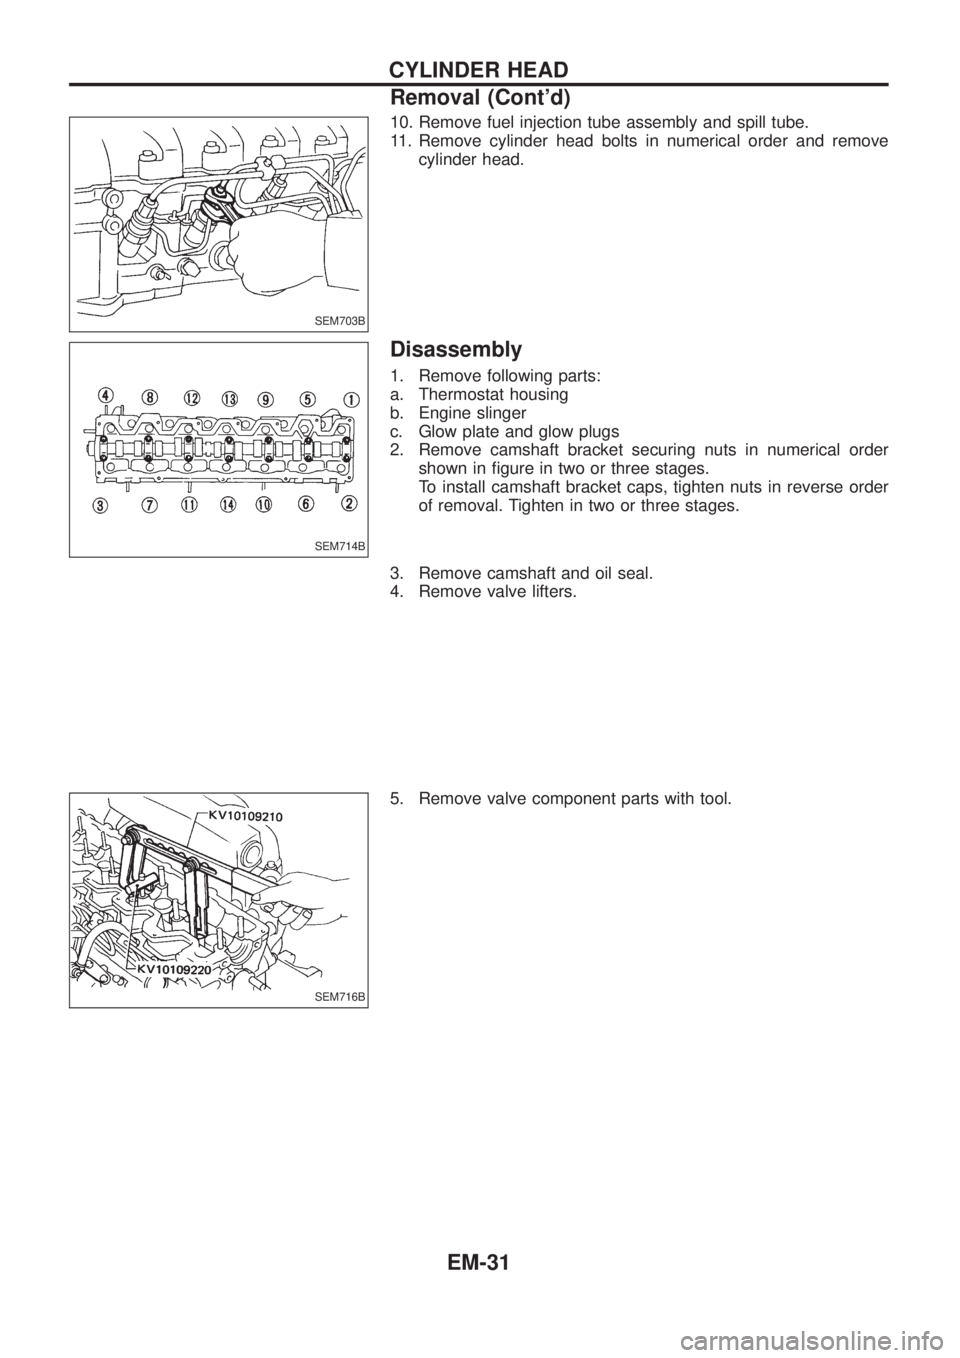
10. Remove fuel injection tube assembly and spill tube.
11. Remove cylinder head bolts in numerical order and remove
cylinder head.
Disassembly
1. Remove following parts:
a. Thermostat housing
b. Engine slinger
c. Glow plate and glow plugs
2. Remove camshaft bracket securing nuts in numerical order
shown in ®gure in two or three stages.
To install camshaft bracket caps, tighten nuts in reverse order
of removal. Tighten in two or three stages.
3. Remove camshaft and oil seal.
4. Remove valve lifters.
5. Remove valve component parts with tool.
SEM703B
SEM714B
SEM716B
CYLINDER HEAD
Removal (Cont'd)
EM-31
Page 700 of 1226
Inspection
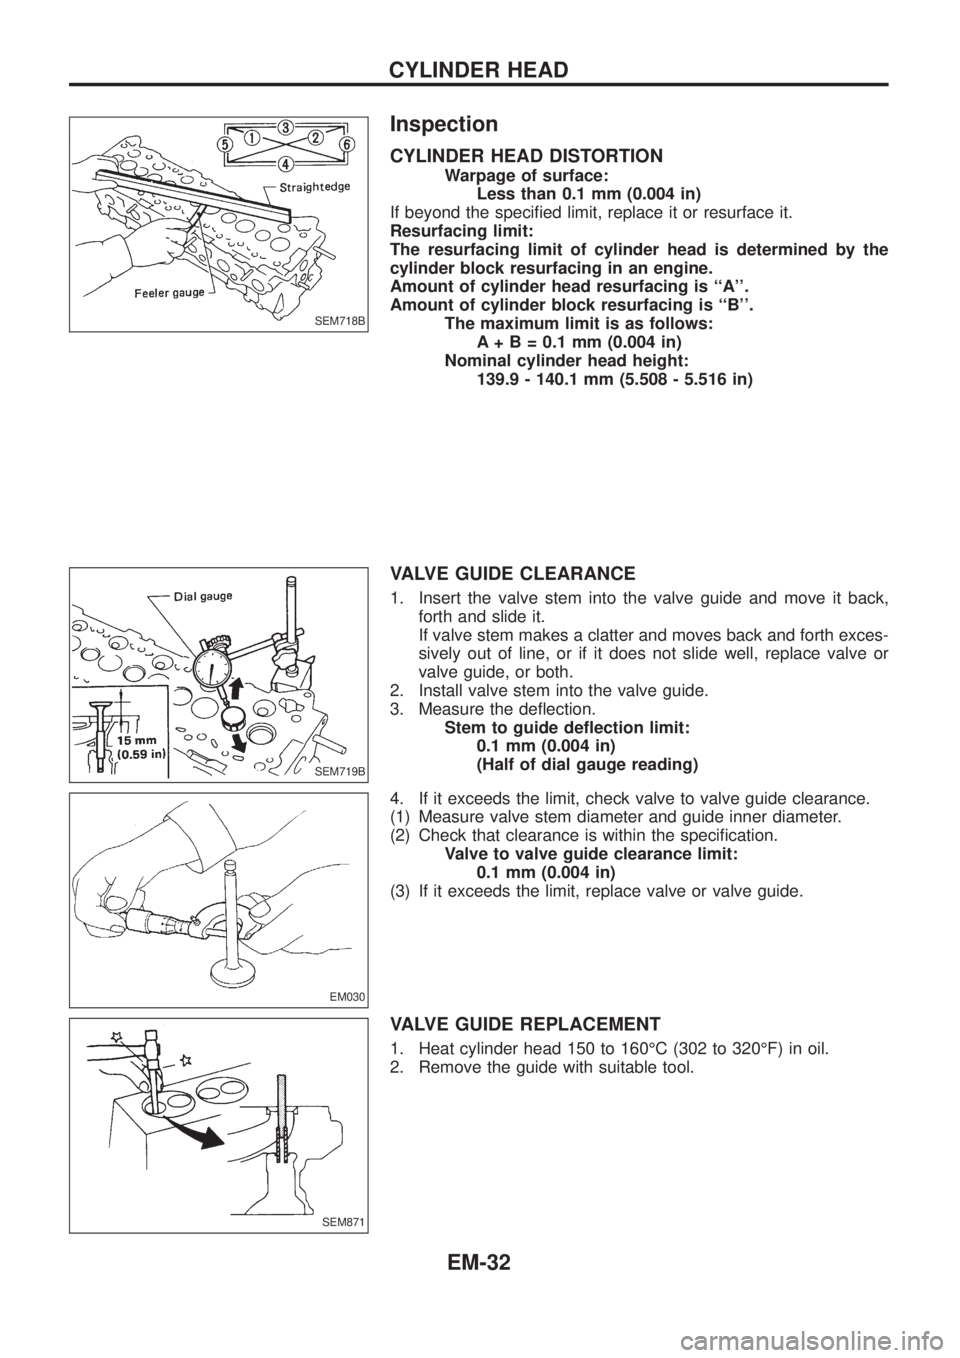
CYLINDER HEAD DISTORTION
Warpage of surface:
Less than 0.1 mm (0.004 in)
If beyond the speci®ed limit, replace it or resurface it.
Resurfacing limit:
The resurfacing limit of cylinder head is determined by the
cylinder block resurfacing in an engine.
Amount of cylinder head resurfacing is ``A''.
Amount of cylinder block resurfacing is ``B''.
The maximum limit is as follows:
A + B = 0.1 mm (0.004 in)
Nominal cylinder head height:
139.9 - 140.1 mm (5.508 - 5.516 in)
VALVE GUIDE CLEARANCE
1. Insert the valve stem into the valve guide and move it back,
forth and slide it.
If valve stem makes a clatter and moves back and forth exces-
sively out of line, or if it does not slide well, replace valve or
valve guide, or both.
2. Install valve stem into the valve guide.
3. Measure the de¯ection.
Stem to guide de¯ection limit:
0.1 mm (0.004 in)
(Half of dial gauge reading)
4. If it exceeds the limit, check valve to valve guide clearance.
(1) Measure valve stem diameter and guide inner diameter.
(2) Check that clearance is within the speci®cation.
Valve to valve guide clearance limit:
0.1 mm (0.004 in)
(3) If it exceeds the limit, replace valve or valve guide.
VALVE GUIDE REPLACEMENT
1. Heat cylinder head 150 to 160ÉC (302 to 320ÉF) in oil.
2. Remove the guide with suitable tool.
SEM718B
SEM719B
EM030
SEM871
CYLINDER HEAD
EM-32
Trending: radiator, airbag, adding oil, sunroof, trailer, hazard indicators, sensor
