belt NISSAN PICK-UP 1998 Owner's Manual
[x] Cancel search | Manufacturer: NISSAN, Model Year: 1998, Model line: PICK-UP, Model: NISSAN PICK-UP 1998Pages: 1659, PDF Size: 53.39 MB
Page 892 of 1659
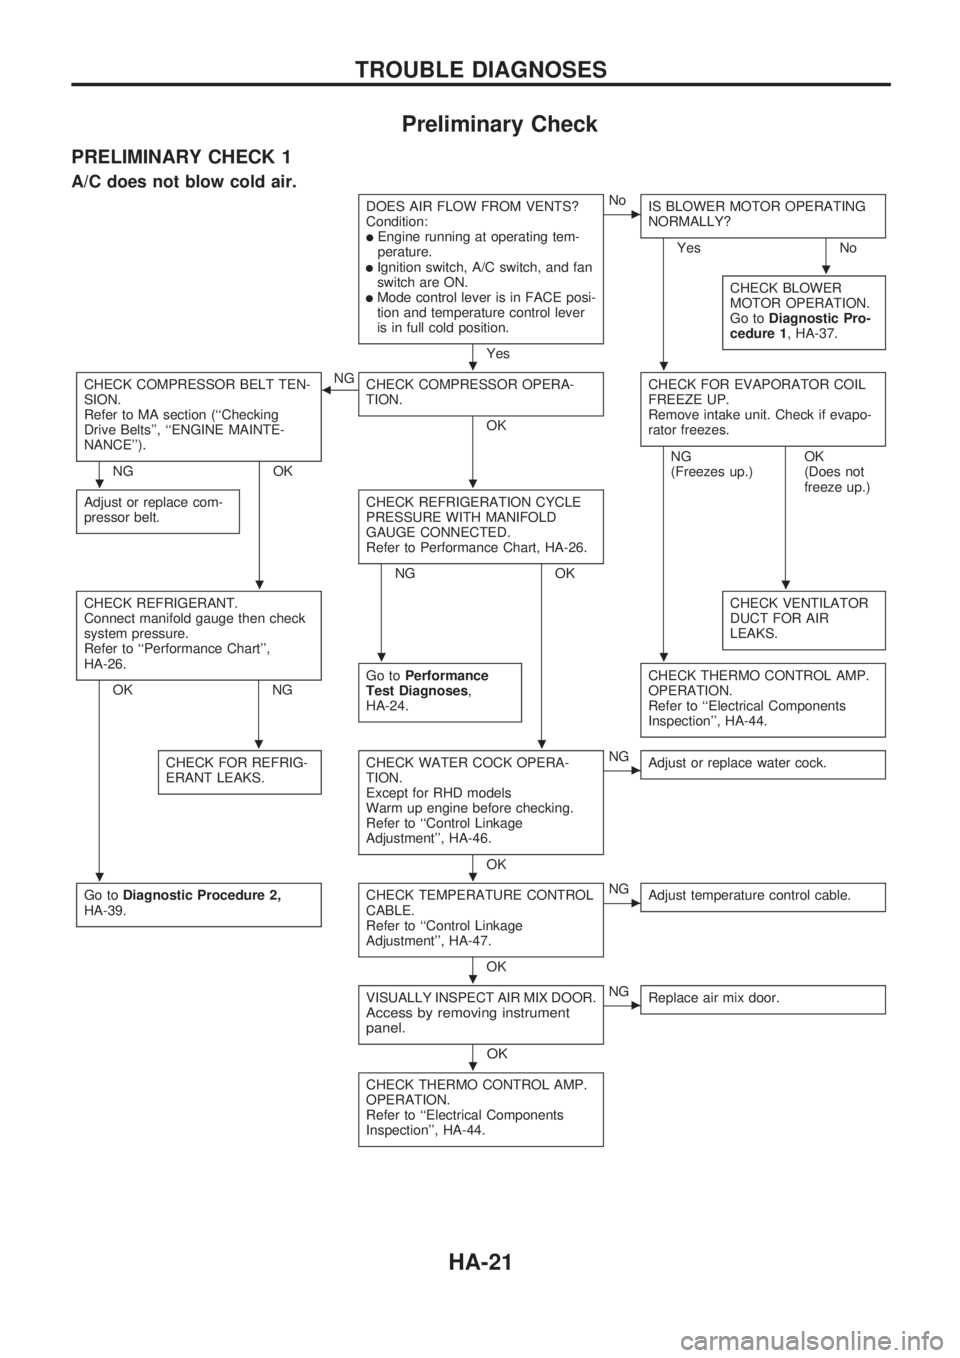
Preliminary Check
PRELIMINARY CHECK 1
A/C does not blow cold air.
DOES AIR FLOW FROM VENTS?
Condition:
lEngine running at operating tem-
perature.
lIgnition switch, A/C switch, and fan
switch are ON.
lMode control lever is in FACE posi-
tion and temperature control lever
is in full cold position.
Yes
cNo
IS BLOWER MOTOR OPERATING
NORMALLY?
Yes No
CHECK BLOWER
MOTOR OPERATION.
Go toDiagnostic Pro-
cedure 1, HA-37.
CHECK COMPRESSOR BELT TEN-
SION.
Refer to MA section (``Checking
Drive Belts'', ``ENGINE MAINTE-
NANCE'').
NG OKNG
bCHECK COMPRESSOR OPERA-
TION.
OKCHECK FOR EVAPORATOR COIL
FREEZE UP.
Remove intake unit. Check if evapo-
rator freezes.
Adjust or replace com-
pressor belt.CHECK REFRIGERATION CYCLE
PRESSURE WITH MANIFOLD
GAUGE CONNECTED.
Refer to Performance Chart, HA-26.
NG OKNG
(Freezes up.)OK
(Does not
freeze up.)
CHECK REFRIGERANT.
Connect manifold gauge then check
system pressure.
Refer to ``Performance Chart'',
HA-26.
OK NGCHECK VENTILATOR
DUCT FOR AIR
LEAKS.Go toPerformance
Test Diagnoses,
HA-24.CHECK THERMO CONTROL AMP.
OPERATION.
Refer to ``Electrical Components
Inspection'', HA-44.
CHECK FOR REFRIG-
ERANT LEAKS.CHECK WATER COCK OPERA-
TION.
Except for RHD models
Warm up engine before checking.
Refer to ``Control Linkage
Adjustment'', HA-46.
OK
cNG
Adjust or replace water cock.
Go toDiagnostic Procedure 2,
HA-39.CHECK TEMPERATURE CONTROL
CABLE.
Refer to ``Control Linkage
Adjustment'', HA-47.
OK
cNG
Adjust temperature control cable.
VISUALLY INSPECT AIR MIX DOOR.Access by removing instrument
panel.
OK
cNG
Replace air mix door.
CHECK THERMO CONTROL AMP.
OPERATION.
Refer to ``Electrical Components
Inspection'', HA-44.
.
..
..
..
..
..
..
.
.
TROUBLE DIAGNOSES
HA-21
Page 893 of 1659
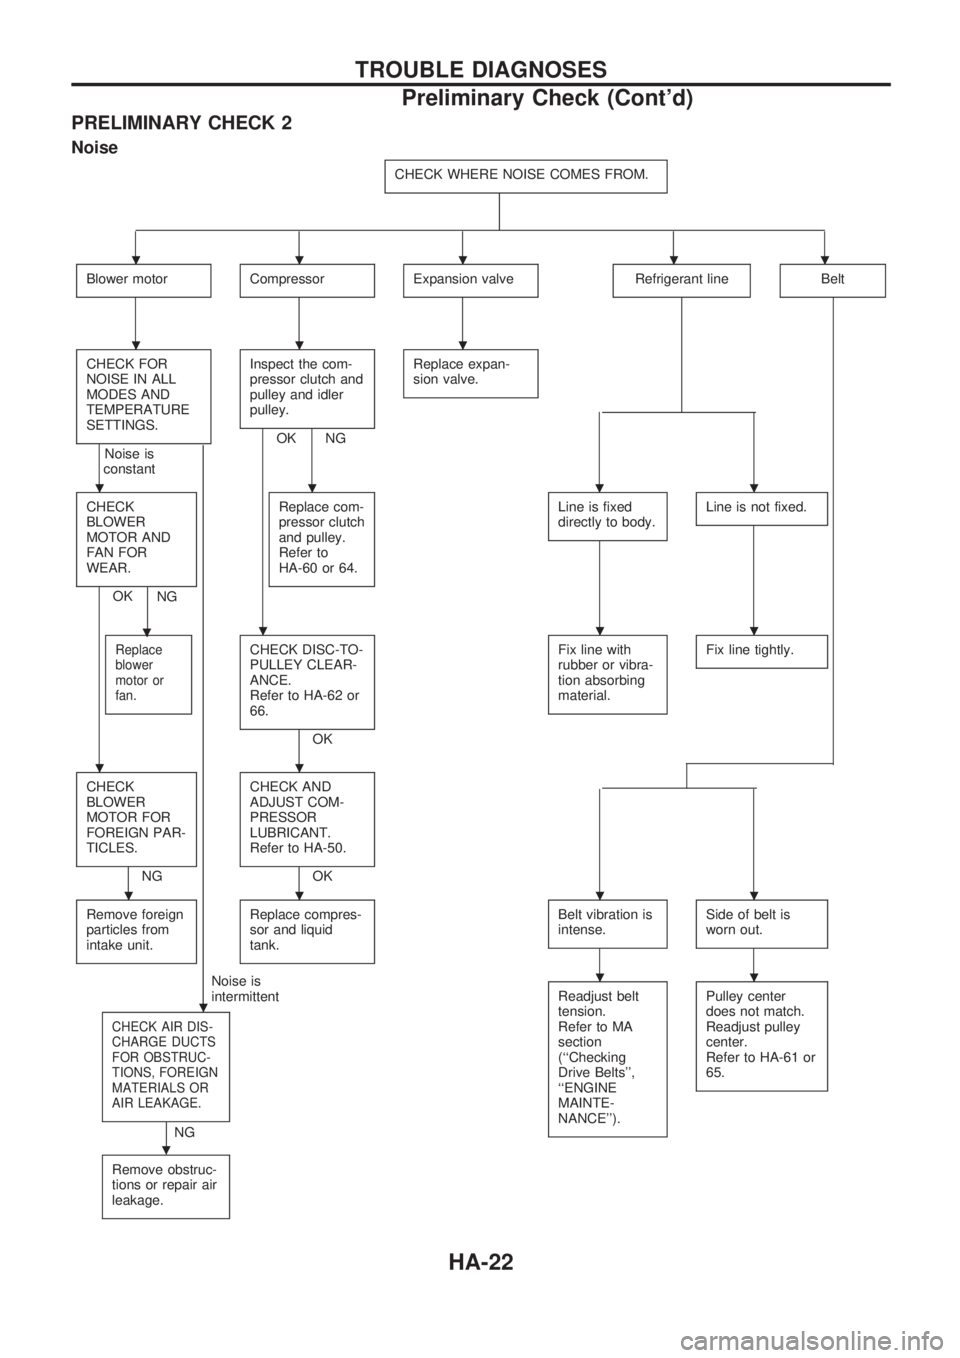
PRELIMINARY CHECK 2
Noise
CHECK WHERE NOISE COMES FROM.
Blower motorCompressorExpansion valveRefrigerant lineBelt
CHECK FOR
NOISE IN ALL
MODES AND
TEMPERATURE
SETTINGS.
Noise is
constant
.
Inspect the com-
pressor clutch and
pulley and idler
pulley.
OK NGReplace expan-
sion valve.
CHECK
BLOWER
MOTOR AND
FAN FOR
WEAR.
OK
.
NGReplace com-
pressor clutch
and pulley.
Refer to
HA-60 or 64.
Line is fixed
directly to body.Line is not fixed.
Replace
blower
motor or
fan.CHECK DISC-TO-
PULLEY CLEAR-
ANCE.
Refer to HA-62 or
66.
OKFix line with
rubber or vibra-
tion absorbing
material.
Fix line tightly.
CHECK
BLOWER
MOTOR FOR
FOREIGN PAR-
TICLES.
NGCHECK AND
ADJUST COM-
PRESSOR
LUBRICANT.
Refer to HA-50.OK
Remove foreign
particles from
intake unit.
Replace compres-
sor and liquid
tank.Belt vibration is
intense.Side of belt is
worn out.
Noise is
intermittent
CHECK AIR DIS-
CHARGE DUCTS
FOR OBSTRUC-
TIONS, FOREIGN
MATERIALS OR
AIR LEAKAGE.
.
NGReadjust belt
tension.
Refer to MA
section
(``Checking
Drive Belts'',
``ENGINE
MAINTE-
NANCE'').
Pulley center
does not match.
Readjust pulley
center.
Refer to HA-61 or
65.
Remove obstruc-
tions or repair air
leakage.
.....
...
....
...
..
....
..
TROUBLE DIAGNOSES
Preliminary Check (Cont'd)
HA-22
Page 896 of 1659
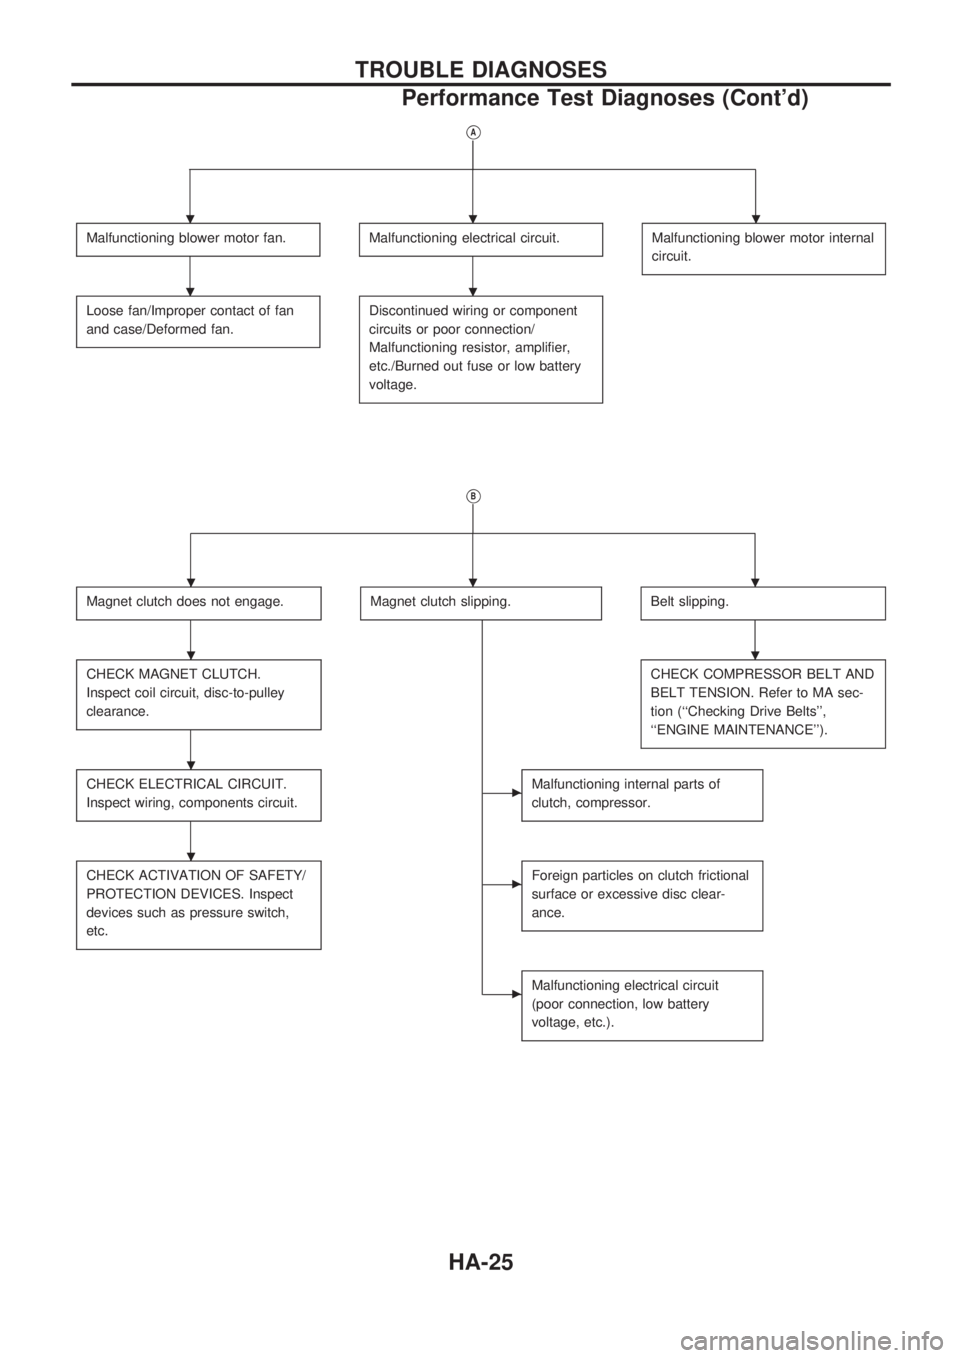
VA
Malfunctioning blower motor fan.Malfunctioning electrical circuit.Malfunctioning blower motor internal
circuit.
Loose fan/Improper contact of fan
and case/Deformed fan.Discontinued wiring or component
circuits or poor connection/
Malfunctioning resistor, amplifier,
etc./Burned out fuse or low battery
voltage.
VB
Magnet clutch does not engage.Magnet clutch slipping.Belt slipping.
CHECK MAGNET CLUTCH.
Inspect coil circuit, disc-to-pulley
clearance.CHECK COMPRESSOR BELT AND
BELT TENSION. Refer to MA sec-
tion (``Checking Drive Belts'',
``ENGINE MAINTENANCE'').
CHECK ELECTRICAL CIRCUIT.
Inspect wiring, components circuit.cMalfunctioning internal parts of
clutch, compressor.
CHECK ACTIVATION OF SAFETY/
PROTECTION DEVICES. Inspect
devices such as pressure switch,
etc.cForeign particles on clutch frictional
surface or excessive disc clear-
ance.
cMalfunctioning electrical circuit
(poor connection, low battery
voltage, etc.).
...
..
...
..
.
.
TROUBLE DIAGNOSES
Performance Test Diagnoses (Cont'd)
HA-25
Page 938 of 1659
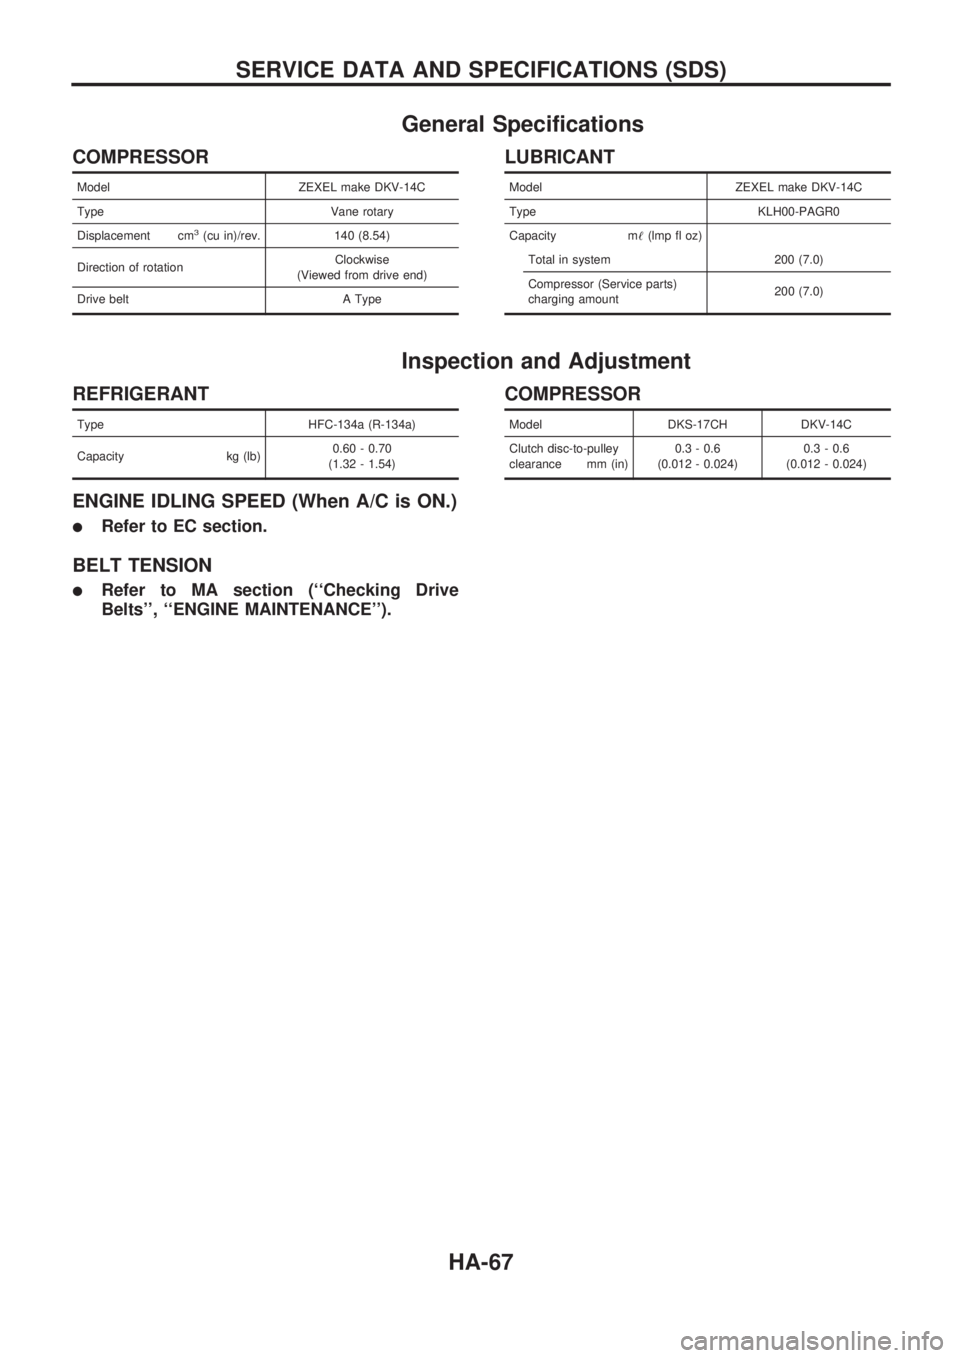
General Specifications
COMPRESSOR
Model ZEXEL make DKV-14C
Type Vane rotary
Displacement cm
3(cu in)/rev. 140 (8.54)
Direction of rotationClockwise
(Viewed from drive end)
Drive belt A Type
LUBRICANT
Model ZEXEL make DKV-14C
Type KLH00-PAGR0
Capacity m!(lmp fl oz)
Total in system 200 (7.0)
Compressor (Service parts)
charging amount200 (7.0)
Inspection and Adjustment
REFRIGERANT
Type HFC-134a (R-134a)
Capacity kg (lb)0.60 - 0.70
(1.32 - 1.54)
ENGINE IDLING SPEED (When A/C is ON.)
lRefer to EC section.
BELT TENSION
lRefer to MA section (``Checking Drive
Belts'', ``ENGINE MAINTENANCE'').
COMPRESSOR
Model DKS-17CH DKV-14C
Clutch disc-to-pulley
clearance mm (in)0.3 - 0.6
(0.012 - 0.024)0.3 - 0.6
(0.012 - 0.024)
SERVICE DATA AND SPECIFICATIONS (SDS)
HA-67
Page 946 of 1659
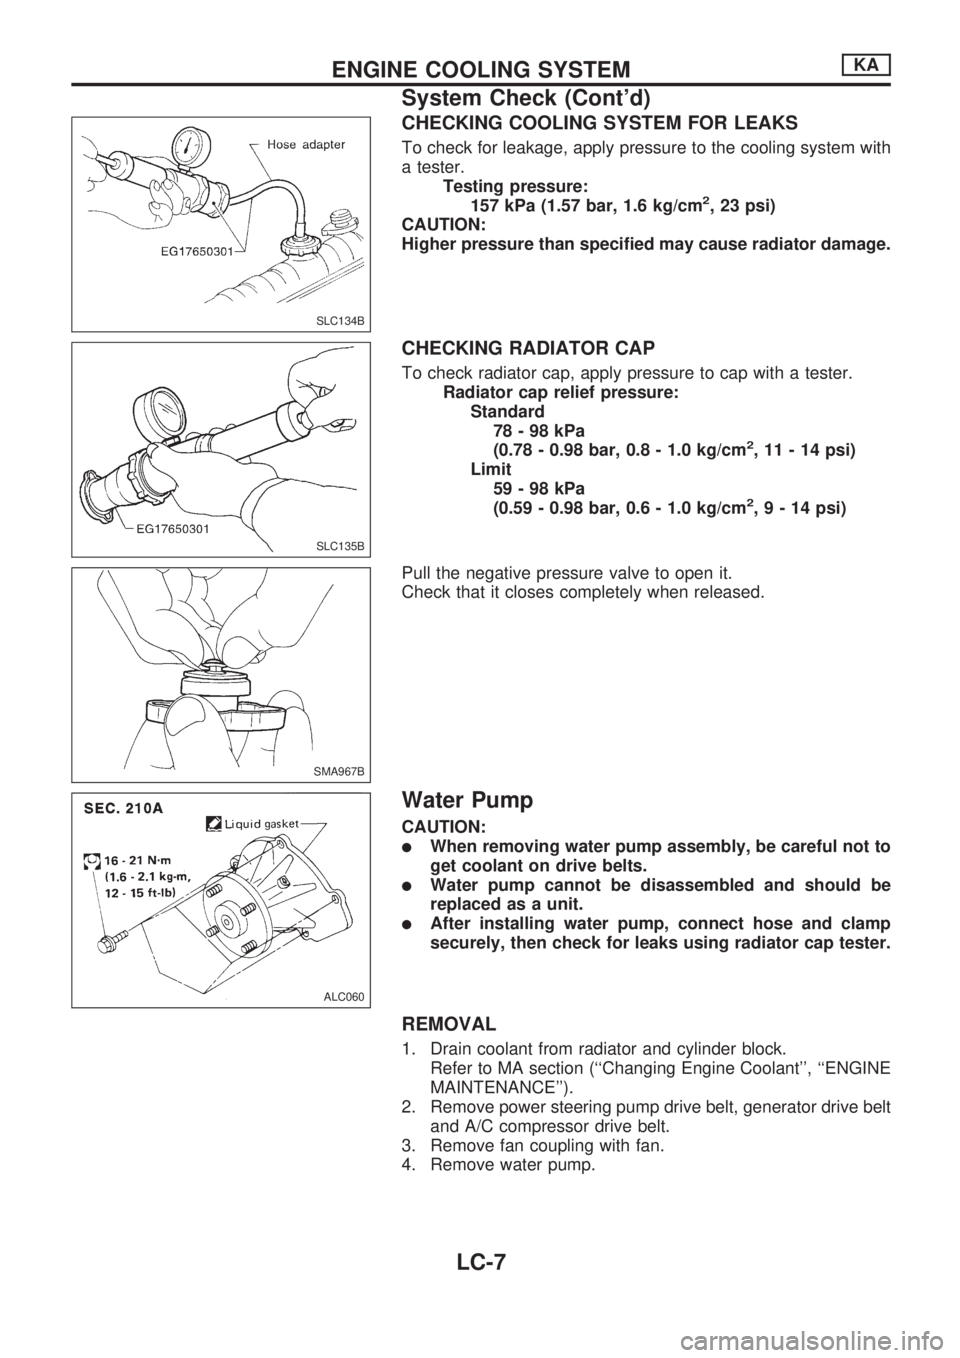
CHECKING COOLING SYSTEM FOR LEAKS
To check for leakage, apply pressure to the cooling system with
a tester.
Testing pressure:
157 kPa (1.57 bar, 1.6 kg/cm
2, 23 psi)
CAUTION:
Higher pressure than specified may cause radiator damage.
CHECKING RADIATOR CAP
To check radiator cap, apply pressure to cap with a tester.
Radiator cap relief pressure:
Standard
78-98kPa
(0.78 - 0.98 bar, 0.8 - 1.0 kg/cm
2, 11 - 14 psi)
Limit
59-98kPa
(0.59 - 0.98 bar, 0.6 - 1.0 kg/cm
2,9-14psi)
Pull the negative pressure valve to open it.
Check that it closes completely when released.
Water Pump
CAUTION:
lWhen removing water pump assembly, be careful not to
get coolant on drive belts.
lWater pump cannot be disassembled and should be
replaced as a unit.
lAfter installing water pump, connect hose and clamp
securely, then check for leaks using radiator cap tester.
REMOVAL
1. Drain coolant from radiator and cylinder block.
Refer to MA section (``Changing Engine Coolant'', ``ENGINE
MAINTENANCE'').
2. Remove power steering pump drive belt, generator drive belt
and A/C compressor drive belt.
3. Remove fan coupling with fan.
4. Remove water pump.
SLC134B
SLC135B
SMA967B
ALC060
ENGINE COOLING SYSTEMKA
System Check (Cont'd)
LC-7
Page 947 of 1659
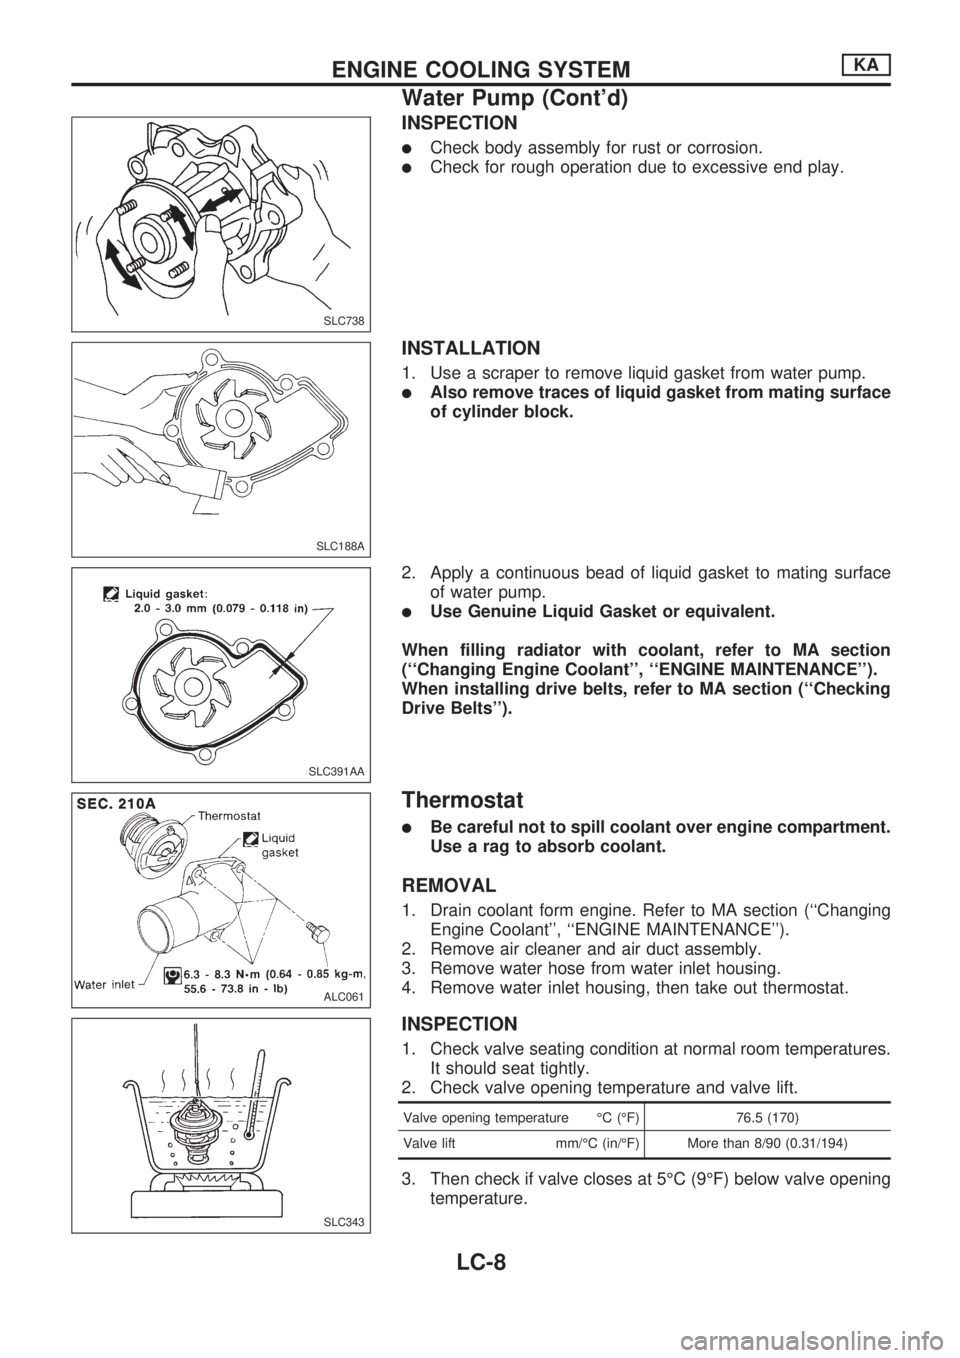
INSPECTION
lCheck body assembly for rust or corrosion.
lCheck for rough operation due to excessive end play.
INSTALLATION
1. Use a scraper to remove liquid gasket from water pump.
lAlso remove traces of liquid gasket from mating surface
of cylinder block.
2. Apply a continuous bead of liquid gasket to mating surface
of water pump.
lUse Genuine Liquid Gasket or equivalent.
When filling radiator with coolant, refer to MA section
(``Changing Engine Coolant'', ``ENGINE MAINTENANCE'').
When installing drive belts, refer to MA section (``Checking
Drive Belts'').
Thermostat
lBe careful not to spill coolant over engine compartment.
Use a rag to absorb coolant.
REMOVAL
1. Drain coolant form engine. Refer to MA section (``Changing
Engine Coolant'', ``ENGINE MAINTENANCE'').
2. Remove air cleaner and air duct assembly.
3. Remove water hose from water inlet housing.
4. Remove water inlet housing, then take out thermostat.
INSPECTION
1. Check valve seating condition at normal room temperatures.
It should seat tightly.
2. Check valve opening temperature and valve lift.
Valve opening temperature ÉC (ÉF) 76.5 (170)
Valve lift mm/ÉC (in/ÉF) More than 8/90 (0.31/194)
3. Then check if valve closes at 5ÉC (9ÉF) below valve opening
temperature.
SLC738
SLC188A
SLC391AA
ALC061
SLC343
ENGINE COOLING SYSTEMKA
Water Pump (Cont'd)
LC-8
Page 949 of 1659

Cooling Fan (Crankshaft driven)
REMOVAL AND INSTALLATION
lDo not release the drive belt tension by removing the fan/
water pump pulley.
lFan coupling cannot be disassembled and should be
replaced as a unit. If front mark
VFis present, install fan so
that side marked
VFfaces the front.
lInstall the drive belt only after the fan and fan coupling to
water pump flange bolts/nuts have been properly torqued.
lProper alignment of these components is essential. Improper
alignment will cause them to wobble and may eventually
cause the fan to separate from the water pump causing
extensive damage.
SLC227B
SLC224B
ENGINE COOLING SYSTEMKA
Radiator (Cont'd)
LC-10
Page 950 of 1659
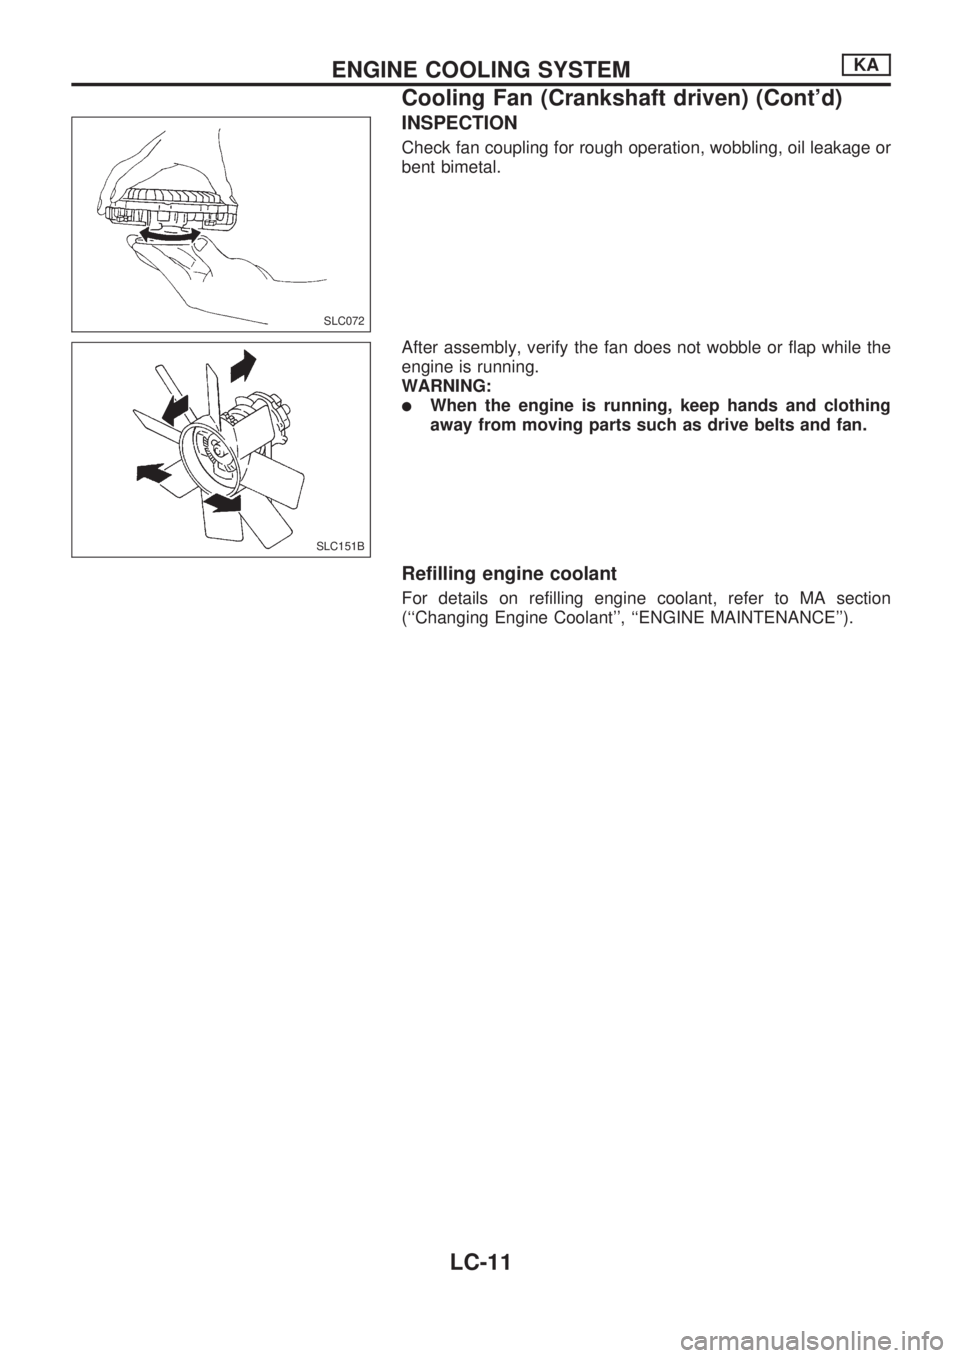
INSPECTION
Check fan coupling for rough operation, wobbling, oil leakage or
bent bimetal.
After assembly, verify the fan does not wobble or flap while the
engine is running.
WARNING:
lWhen the engine is running, keep hands and clothing
away from moving parts such as drive belts and fan.
Refilling engine coolant
For details on refilling engine coolant, refer to MA section
(``Changing Engine Coolant'', ``ENGINE MAINTENANCE'').
SLC072
SLC151B
ENGINE COOLING SYSTEMKA
Cooling Fan (Crankshaft driven) (Cont'd)
LC-11
Page 960 of 1659
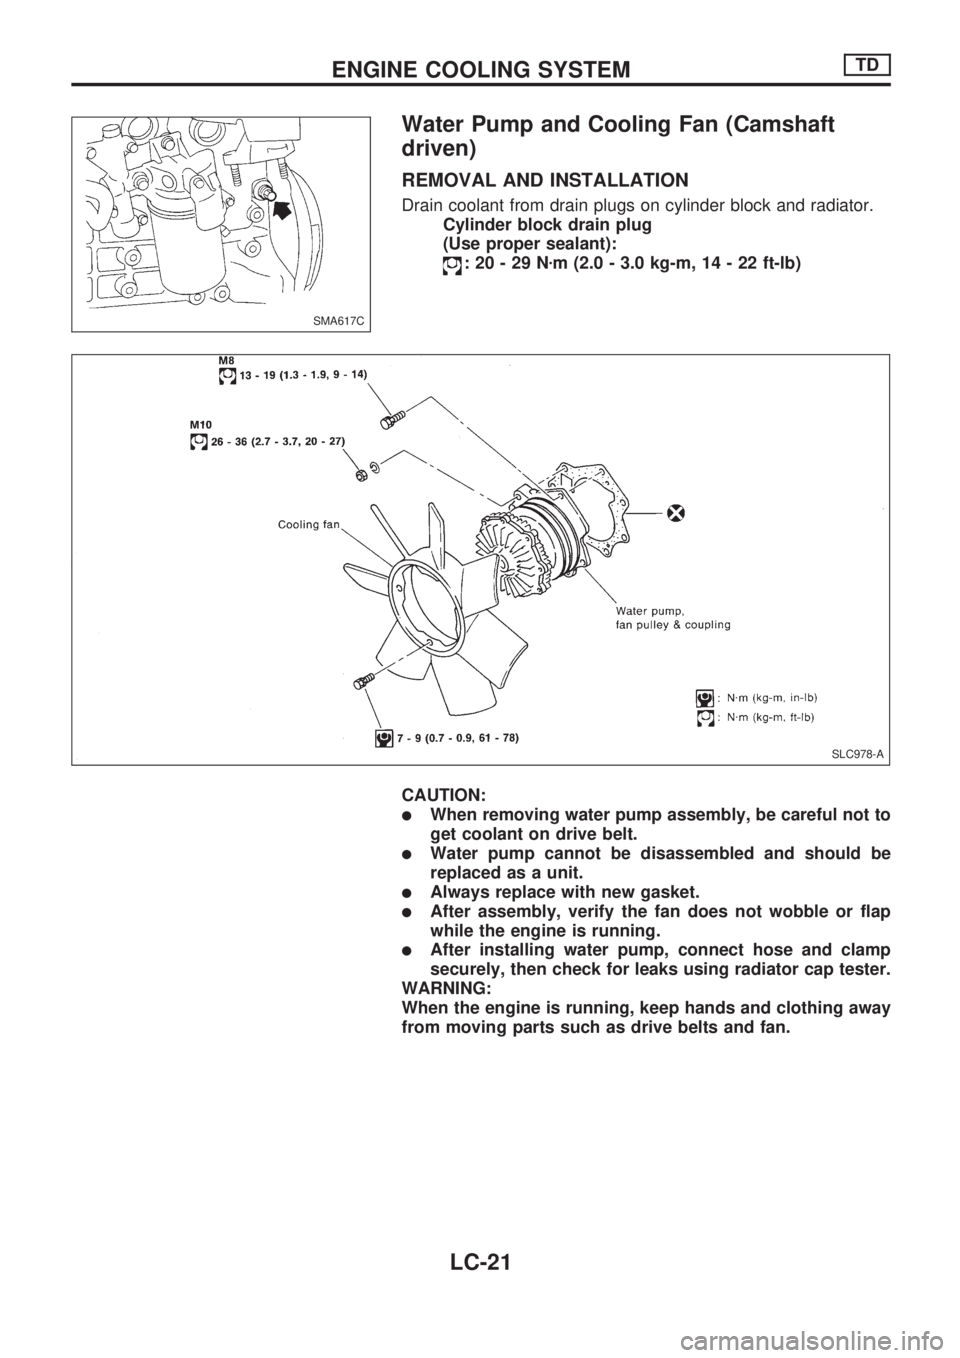
Water Pump and Cooling Fan (Camshaft
driven)
REMOVAL AND INSTALLATION
Drain coolant from drain plugs on cylinder block and radiator.
Cylinder block drain plug
(Use proper sealant):
:20-29Nzm (2.0 - 3.0 kg-m, 14 - 22 ft-lb)
CAUTION:
lWhen removing water pump assembly, be careful not to
get coolant on drive belt.
lWater pump cannot be disassembled and should be
replaced as a unit.
lAlways replace with new gasket.
lAfter assembly, verify the fan does not wobble or flap
while the engine is running.
lAfter installing water pump, connect hose and clamp
securely, then check for leaks using radiator cap tester.
WARNING:
When the engine is running, keep hands and clothing away
from moving parts such as drive belts and fan.
SMA617C
SLC978-A
ENGINE COOLING SYSTEMTD
LC-21
Page 970 of 1659
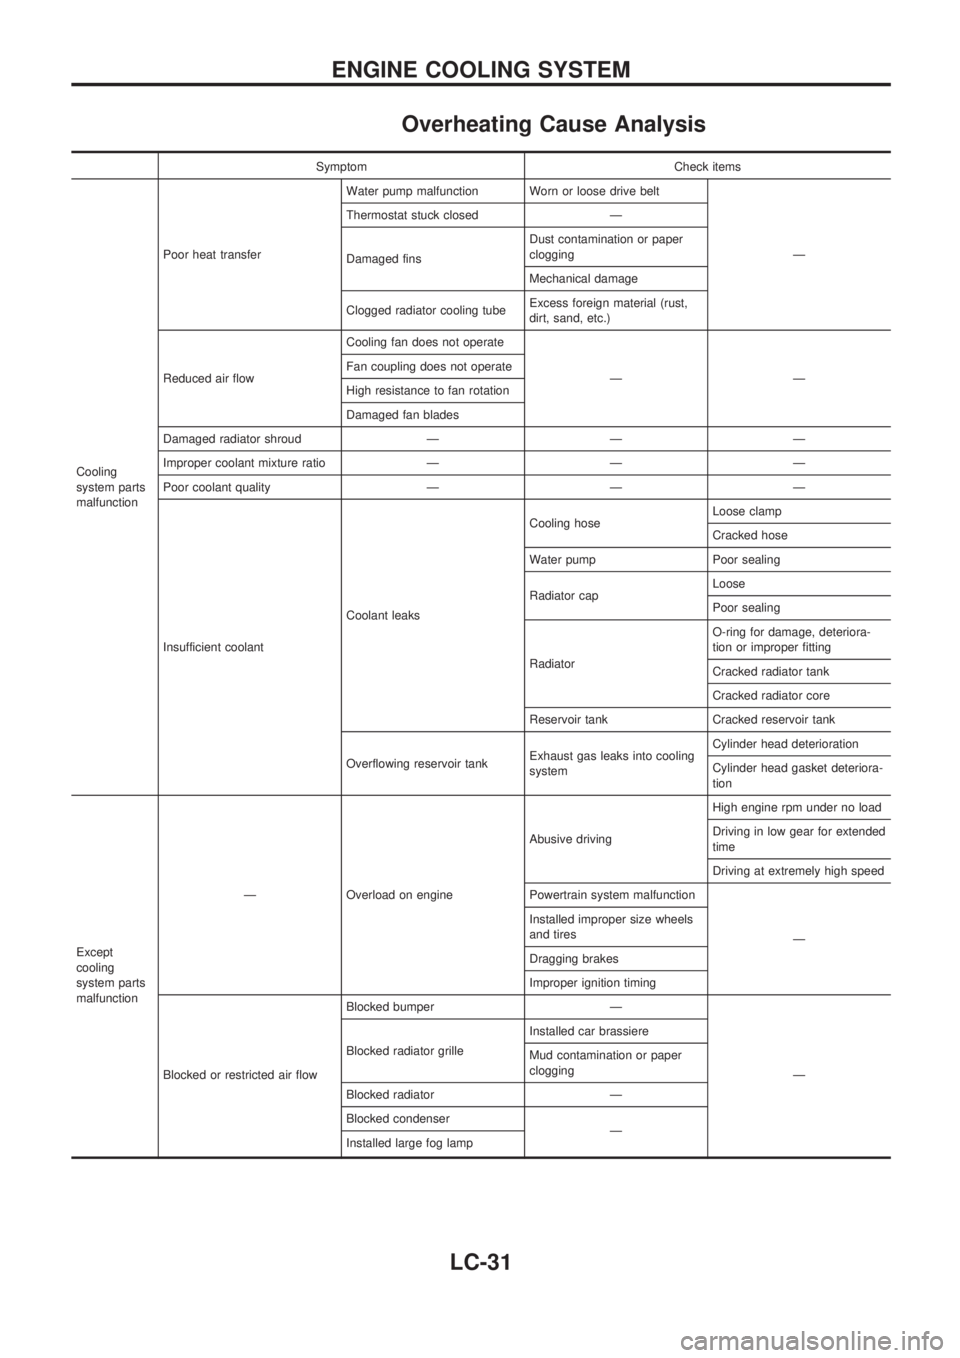
Overheating Cause Analysis
Symptom Check items
Cooling
system parts
malfunctionPoor heat transferWater pump malfunction Worn or loose drive belt
Ð Thermostat stuck closed Ð
Damaged finsDust contamination or paper
clogging
Mechanical damage
Clogged radiator cooling tubeExcess foreign material (rust,
dirt, sand, etc.)
Reduced air flowCooling fan does not operate
ÐÐ Fan coupling does not operate
High resistance to fan rotation
Damaged fan blades
Damaged radiator shroud Ð Ð Ð
Improper coolant mixture ratio Ð Ð Ð
Poor coolant quality Ð Ð Ð
Insufficient coolantCoolant leaksCooling hoseLoose clamp
Cracked hose
Water pump Poor sealing
Radiator capLoose
Poor sealing
RadiatorO-ring for damage, deteriora-
tion or improper fitting
Cracked radiator tank
Cracked radiator core
Reservoir tank Cracked reservoir tank
Overflowing reservoir tankExhaust gas leaks into cooling
systemCylinder head deterioration
Cylinder head gasket deteriora-
tion
Except
cooling
system parts
malfunctionÐ Overload on engineAbusive drivingHigh engine rpm under no load
Driving in low gear for extended
time
Driving at extremely high speed
Powertrain system malfunction
Ð Installed improper size wheels
and tires
Dragging brakes
Improper ignition timing
Blocked or restricted air flowBlocked bumper Ð
Ð Blocked radiator grilleInstalled car brassiere
Mud contamination or paper
clogging
Blocked radiator Ð
Blocked condenser
Ð
Installed large fog lamp
ENGINE COOLING SYSTEM
LC-31