air condition NISSAN PICK-UP 1998 Service Manual
[x] Cancel search | Manufacturer: NISSAN, Model Year: 1998, Model line: PICK-UP, Model: NISSAN PICK-UP 1998Pages: 1659, PDF Size: 53.39 MB
Page 266 of 1659
ON BOARD DIAGNOSIS LOGIC
Diagnostic
Trouble
Code No.Malfunction is detected when ...Check Items
(Possible Cause)
43
lAn excessively low or high voltage from the sensor is
sent to ECM.*lHarness or connectors
(The sensor circuit is open or shorted.)
lThrottle position sensor
*: When this malfunction is detected, the ECM enters fail-safe mode.
Engine operating condition in fail-safe mode Condition Driving condition
Throttle position will be determined based on the
amount of mass air flow and the engine speed.
Therefore, acceleration will be poor.When engine is idling Normal
When accelerating Poor acceleration
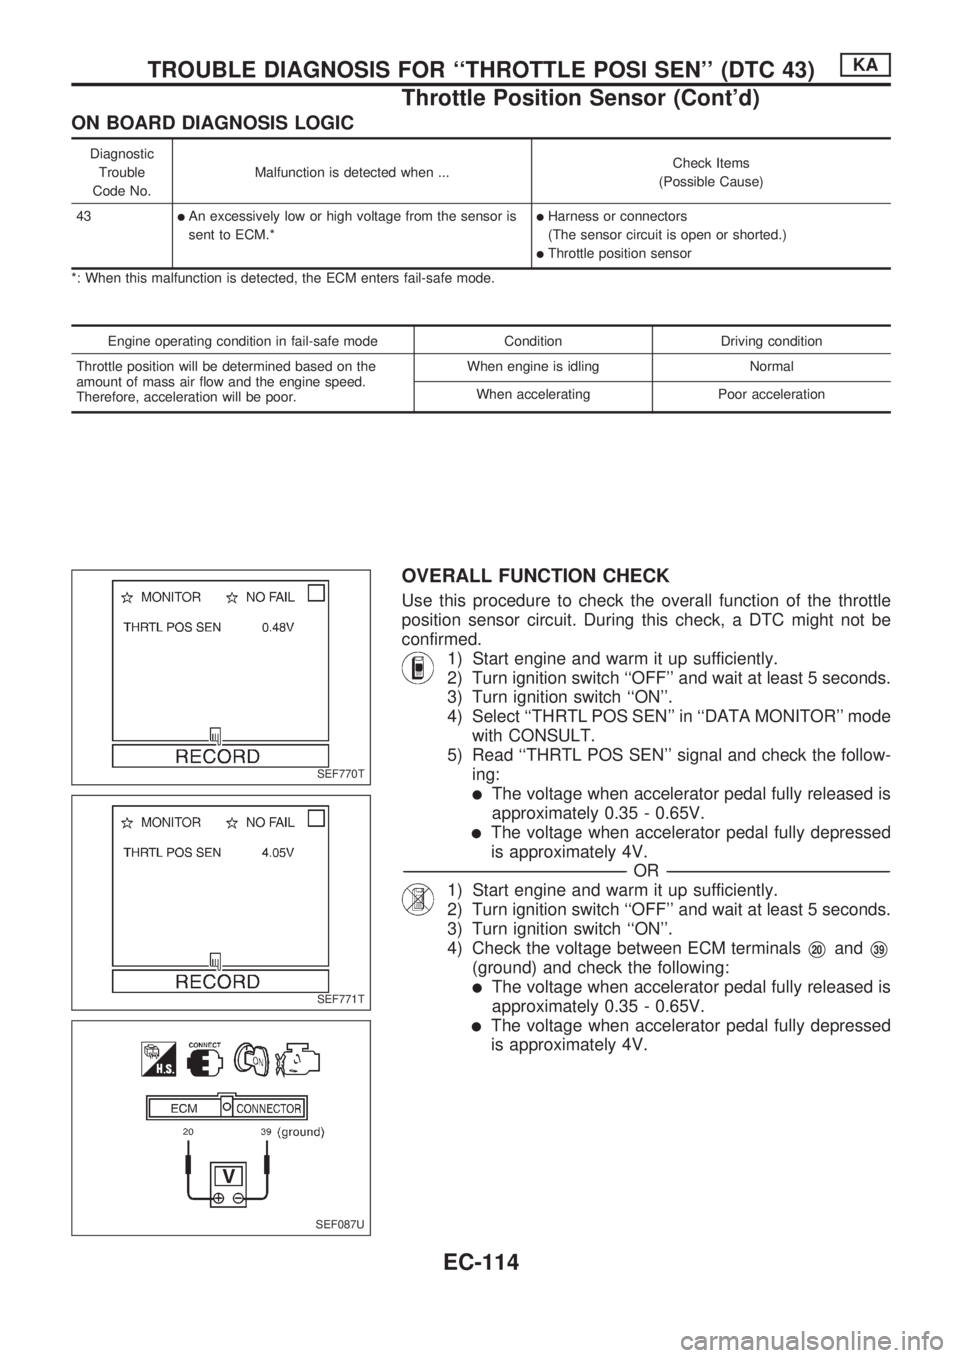
OVERALL FUNCTION CHECK
Use this procedure to check the overall function of the throttle
position sensor circuit. During this check, a DTC might not be
confirmed.
1) Start engine and warm it up sufficiently.
2) Turn ignition switch ``OFF'' and wait at least 5 seconds.
3) Turn ignition switch ``ON''.
4) Select ``THRTL POS SEN'' in ``DATA MONITOR'' mode
with CONSULT.
5) Read ``THRTL POS SEN'' signal and check the follow-
ing:
lThe voltage when accelerator pedal fully released is
approximately 0.35 - 0.65V.
lThe voltage when accelerator pedal fully depressed
is approximately 4V.
-------------------------------------------------------------------------------------------------------------------------------------------------------------------------------------------------------------------------------------------------OR-------------------------------------------------------------------------------------------------------------------------------------------------------------------------------------------------------------------------------------------------
1) Start engine and warm it up sufficiently.
2) Turn ignition switch ``OFF'' and wait at least 5 seconds.
3) Turn ignition switch ``ON''.
4) Check the voltage between ECM terminals
V20andV39
(ground) and check the following:
lThe voltage when accelerator pedal fully released is
approximately 0.35 - 0.65V.
lThe voltage when accelerator pedal fully depressed
is approximately 4V.
SEF770T
SEF771T
SEF087U
TROUBLE DIAGNOSIS FOR ``THROTTLE POSI SEN'' (DTC 43)KA
Throttle Position Sensor (Cont'd)
EC-114
Page 269 of 1659

VA
CHECK INPUT SIGNAL CIRCUIT.
1. Disconnect ECM harness connector.
2. Check harness continuity between
ECM terminal
V20and terminalV2.
Continuity should exist.
If OK, check harness for short to
ground and short to power.
OK
cNG
Check the following.
lHarness connectorsM205,M301(LHD models)
F5,F101(RHD models)
lHarness for open or short
between throttle position
sensor and ECM
If NG, repair open circuit,
short to ground or short to
power in harness or connec-
tors.
CHECK COMPONENT
(Throttle position sensor).
Refer to ``COMPONENT INSPECTION''
below.
OK
cNG
Replace throttle position
sensor. To adjust it, perform
BASIC INSPECTION,
EC-58.
Disconnect and reconnect harness con-
nectors in the circuit. Then retest.
Trouble is not fixed.
Check ECM pin terminals for damage
and check the connection of ECM har-
ness connector.
Reconnect ECM harness connector and
retest.
INSPECTION END
COMPONENT INSPECTION
Throttle position sensor
1. Start engine and warm it up sufficiently.
2. Turn ignition switch ``OFF''.
3. Disconnect throttle position sensor harness connector.
4. Make sure that resistance between terminals
V2andV3
changes when opening throttle valve manually.
Throttle valve conditions Resistance at 25ÉC (77ÉF)
Completely closed Approximately 0.6 kW
Partially open 0.6 - 4.0 kW
Completely open Approximately 4 kW
If NG, replace throttle position sensor.
To adjust throttle position sensor, perform ``BASIC
INSPECTION'', EC-58.
SEF088U
SEF161U
.
.
.
.
.
TROUBLE DIAGNOSIS FOR ``THROTTLE POSI SEN'' (DTC 43)KA
Throttle Position Sensor (Cont'd)
EC-117
Page 275 of 1659

Heated Oxygen Sensor (HO2S)
Ð LHD Models Ð
COMPONENT DESCRIPTION
The heated oxygen sensor is placed into the front exhaust tube.
It detects the amount of oxygen in the exhaust gas compared to
the outside air. The heated oxygen sensor has a closed-end tube
made of ceramic zirconia. The zirconia generates voltage from
approximately 1V in richer conditions to 0V in leaner conditions.
The heated oxygen sensor signal is sent to the ECM. The ECM
adjusts the injection pulse duration to achieve the ideal air-fuel
ratio. The ideal air-fuel ratio occurs near the radical change from
1V to 0V.
CONSULT REFERENCE VALUE IN DATA MONITOR MODE
Remarks: Specification data are reference values.
MONITOR ITEM CONDITION SPECIFICATION
O2 SEN
lEngine: After warming up Maintaining engine speed at 2,000 rpm 0 - 0.3V«0.6 - 1.0V
ECM TERMINALS AND REFERENCE VALUE
Remarks: Specification data are reference values, and are measured between each terminal andV39(ECCS ground) with a voltme-
ter.
TER-
MINAL
NO.WIRE
COLORITEM CONDITIONDATA
(DC voltage)
19 W Heated oxygen sensorEngine is running.
After warming up sufficiently and engine speed
is 2,000 rpm.0 - Approximately 1.0V
(periodically change)
SEF463R
SEF288D
TROUBLE DIAGNOSIS FOR NON-DETECTABLE ITEMSKA
EC-123
Page 281 of 1659
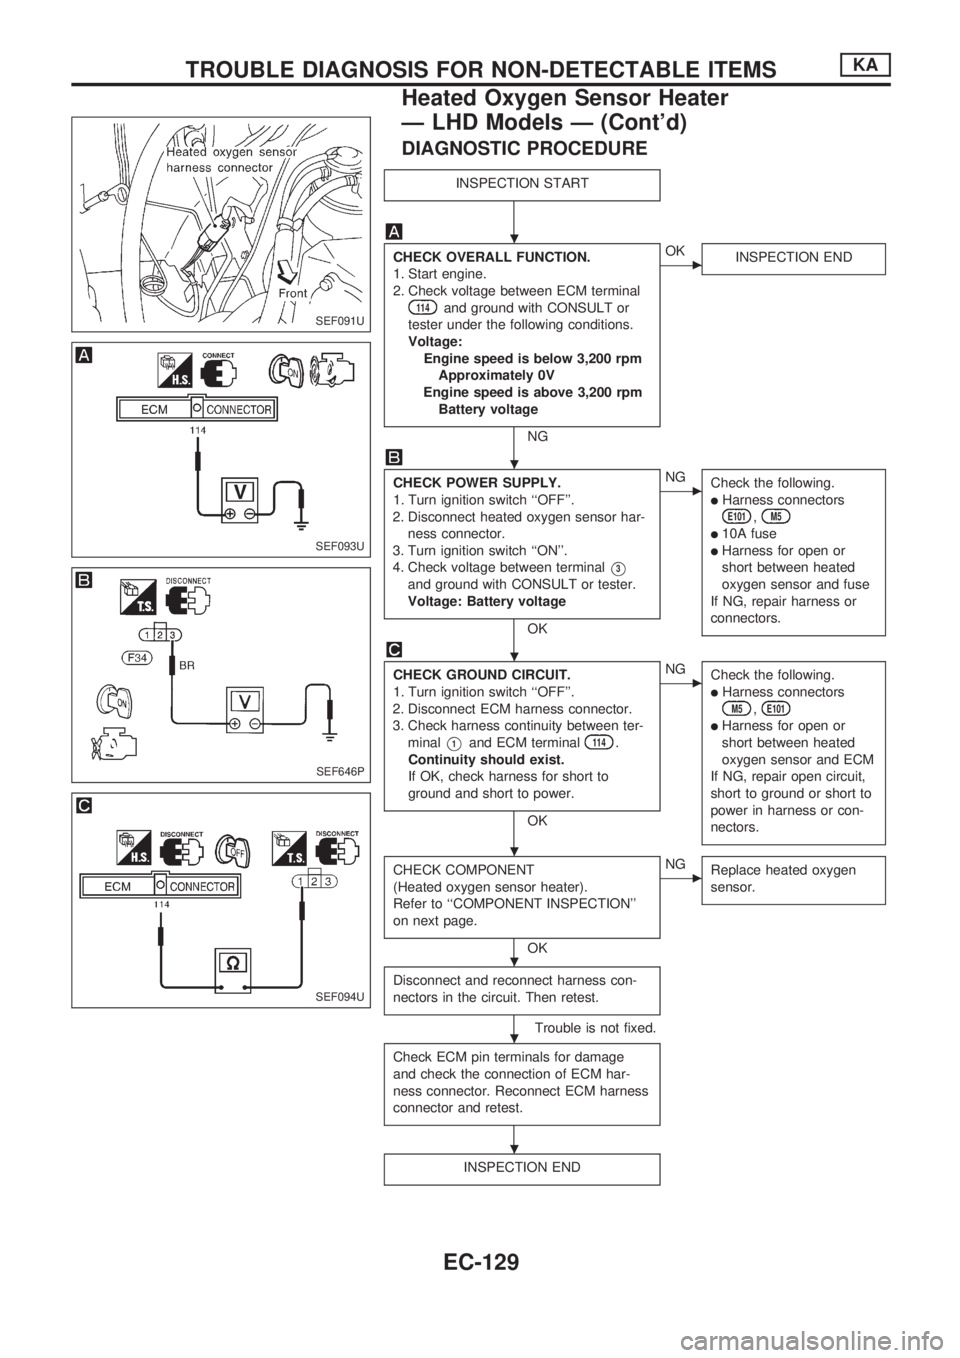
DIAGNOSTIC PROCEDURE
INSPECTION START
CHECK OVERALL FUNCTION.
1. Start engine.
2. Check voltage between ECM terminal
114and ground with CONSULT or
tester under the following conditions.
Voltage:
Engine speed is below 3,200 rpm
Approximately 0V
Engine speed is above 3,200 rpm
Battery voltage
NG
cOK
INSPECTION END
CHECK POWER SUPPLY.
1. Turn ignition switch ``OFF''.
2. Disconnect heated oxygen sensor har-
ness connector.
3. Turn ignition switch ``ON''.
4. Check voltage between terminal
V3
and ground with CONSULT or tester.
Voltage: Battery voltage
OK
cNG
Check the following.
lHarness connectorsE101,M5
l10A fuse
lHarness for open or
short between heated
oxygen sensor and fuse
If NG, repair harness or
connectors.
CHECK GROUND CIRCUIT.
1. Turn ignition switch ``OFF''.
2. Disconnect ECM harness connector.
3. Check harness continuity between ter-
minal
V1and ECM terminal114.
Continuity should exist.
If OK, check harness for short to
ground and short to power.
OK
cNG
Check the following.
lHarness connectorsM5,E101
lHarness for open or
short between heated
oxygen sensor and ECM
If NG, repair open circuit,
short to ground or short to
power in harness or con-
nectors.
CHECK COMPONENT
(Heated oxygen sensor heater).
Refer to ``COMPONENT INSPECTION''
on next page.
OK
cNG
Replace heated oxygen
sensor.
Disconnect and reconnect harness con-
nectors in the circuit. Then retest.
Trouble is not fixed.
Check ECM pin terminals for damage
and check the connection of ECM har-
ness connector. Reconnect ECM harness
connector and retest.
INSPECTION END
SEF091U
SEF093U
SEF646P
SEF094U
.
.
.
.
.
.
.
TROUBLE DIAGNOSIS FOR NON-DETECTABLE ITEMSKA
Heated Oxygen Sensor Heater
Ð LHD Models Ð (Cont'd)
EC-129
Page 283 of 1659
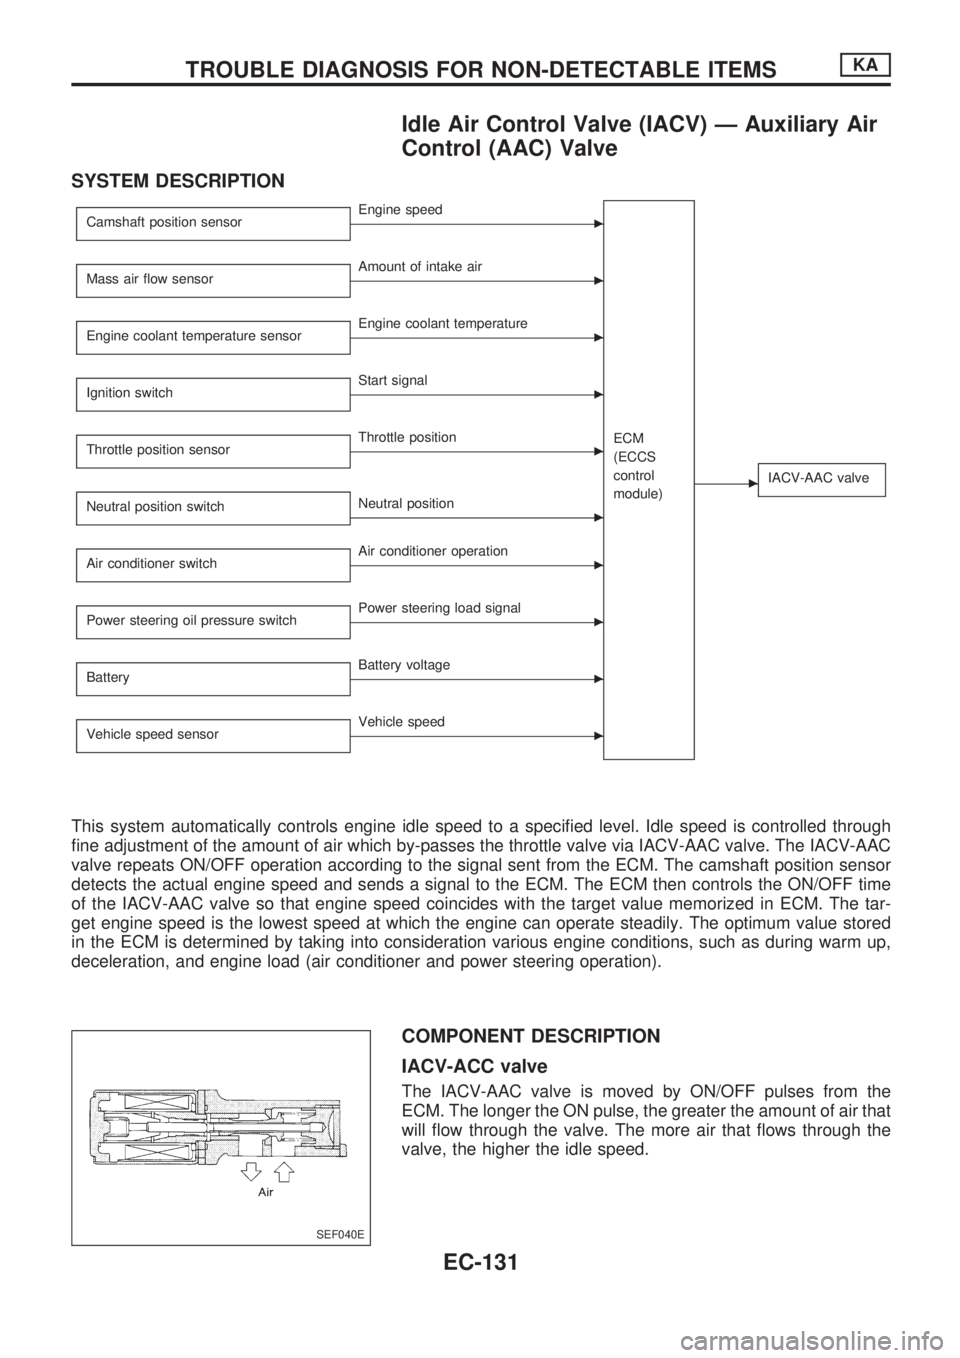
Idle Air Control Valve (IACV) Ð Auxiliary Air
Control (AAC) Valve
SYSTEM DESCRIPTION
Camshaft position sensorcEngine speed
ECM
(ECCS
control
module)
cIACV-AAC valve
Mass air flow sensorcAmount of intake air
Engine coolant temperature sensor
cEngine coolant temperature
Ignition switch
cStart signal
Throttle position sensor
cThrottle position
Neutral position switch
cNeutral position
Air conditioner switch
cAir conditioner operation
Power steering oil pressure switch
cPower steering load signal
Battery
cBattery voltage
Vehicle speed sensor
cVehicle speed
This system automatically controls engine idle speed to a specified level. Idle speed is controlled through
fine adjustment of the amount of air which by-passes the throttle valve via IACV-AAC valve. The IACV-AAC
valve repeats ON/OFF operation according to the signal sent from the ECM. The camshaft position sensor
detects the actual engine speed and sends a signal to the ECM. The ECM then controls the ON/OFF time
of the IACV-AAC valve so that engine speed coincides with the target value memorized in ECM. The tar-
get engine speed is the lowest speed at which the engine can operate steadily. The optimum value stored
in the ECM is determined by taking into consideration various engine conditions, such as during warm up,
deceleration, and engine load (air conditioner and power steering operation).
COMPONENT DESCRIPTION
IACV-ACC valve
The IACV-AAC valve is moved by ON/OFF pulses from the
ECM. The longer the ON pulse, the greater the amount of air that
will flow through the valve. The more air that flows through the
valve, the higher the idle speed.
SEF040E
TROUBLE DIAGNOSIS FOR NON-DETECTABLE ITEMSKA
EC-131
Page 284 of 1659
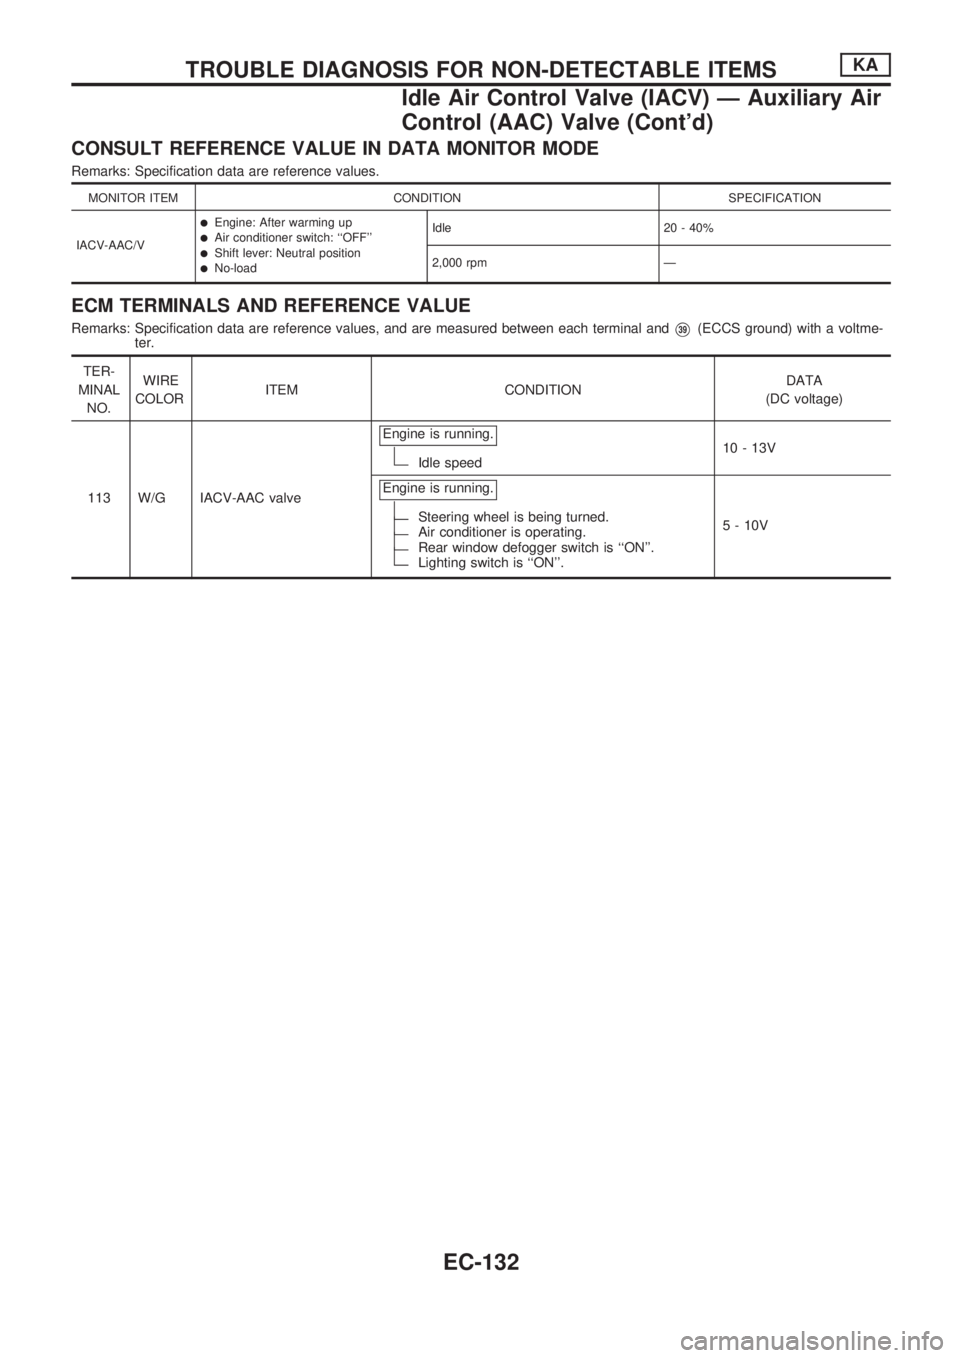
CONSULT REFERENCE VALUE IN DATA MONITOR MODE
Remarks: Specification data are reference values.
MONITOR ITEM CONDITION SPECIFICATION
IACV-AAC/V
lEngine: After warming uplAir conditioner switch: ``OFF''lShift lever: Neutral positionlNo-loadIdle 20 - 40%
2,000 rpm Ð
ECM TERMINALS AND REFERENCE VALUE
Remarks: Specification data are reference values, and are measured between each terminal andV39(ECCS ground) with a voltme-
ter.
TER-
MINAL
NO.WIRE
COLORITEM CONDITIONDATA
(DC voltage)
113 W/G IACV-AAC valveEngine is running.
Idle speed10 - 13V
Engine is running.
Steering wheel is being turned.Air conditioner is operating.Rear window defogger switch is ``ON''.Lighting switch is ``ON''.5 - 10V
TROUBLE DIAGNOSIS FOR NON-DETECTABLE ITEMSKA
Idle Air Control Valve (IACV) Ð Auxiliary Air
Control (AAC) Valve (Cont'd)
EC-132
Page 290 of 1659
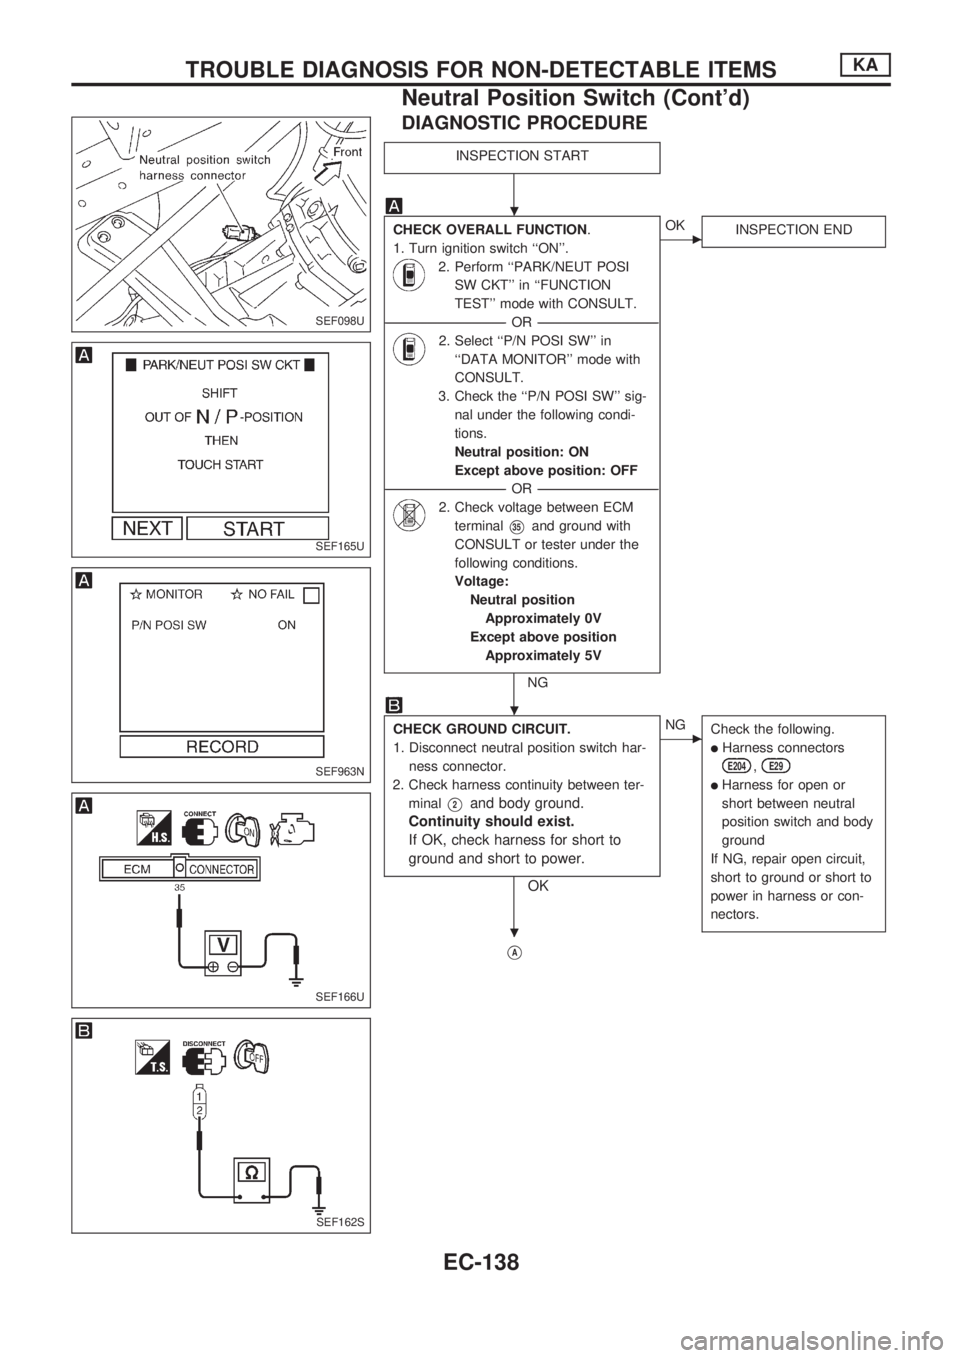
DIAGNOSTIC PROCEDURE
INSPECTION START
CHECK OVERALL FUNCTION.
1. Turn ignition switch ``ON''.
2. Perform ``PARK/NEUT POSI
SW CKT'' in ``FUNCTION
TEST'' mode with CONSULT.
----------------------------------------------------------------------------------------------------------------------------------OR----------------------------------------------------------------------------------------------------------------------------------
2. Select ``P/N POSI SW'' in
``DATA MONITOR'' mode with
CONSULT.
3. Check the ``P/N POSI SW'' sig-
nal under the following condi-
tions.
Neutral position: ON
Except above position: OFF
----------------------------------------------------------------------------------------------------------------------------------OR----------------------------------------------------------------------------------------------------------------------------------
2. Check voltage between ECM
terminal
V35and ground with
CONSULT or tester under the
following conditions.
Voltage:
Neutral position
Approximately 0V
Except above position
Approximately 5V
NG
cOK
INSPECTION END
CHECK GROUND CIRCUIT.
1. Disconnect neutral position switch har-
ness connector.
2. Check harness continuity between ter-
minal
V2and body ground.
Continuity should exist.
If OK, check harness for short to
ground and short to power.
OK
cNG
Check the following.
lHarness connectors
E204,E29
lHarness for open or
short between neutral
position switch and body
ground
If NG, repair open circuit,
short to ground or short to
power in harness or con-
nectors.
VA
SEF098U
SEF165U
SEF963N
SEF166U
SEF162S
.
.
.
TROUBLE DIAGNOSIS FOR NON-DETECTABLE ITEMSKA
Neutral Position Switch (Cont'd)
EC-138
Page 292 of 1659
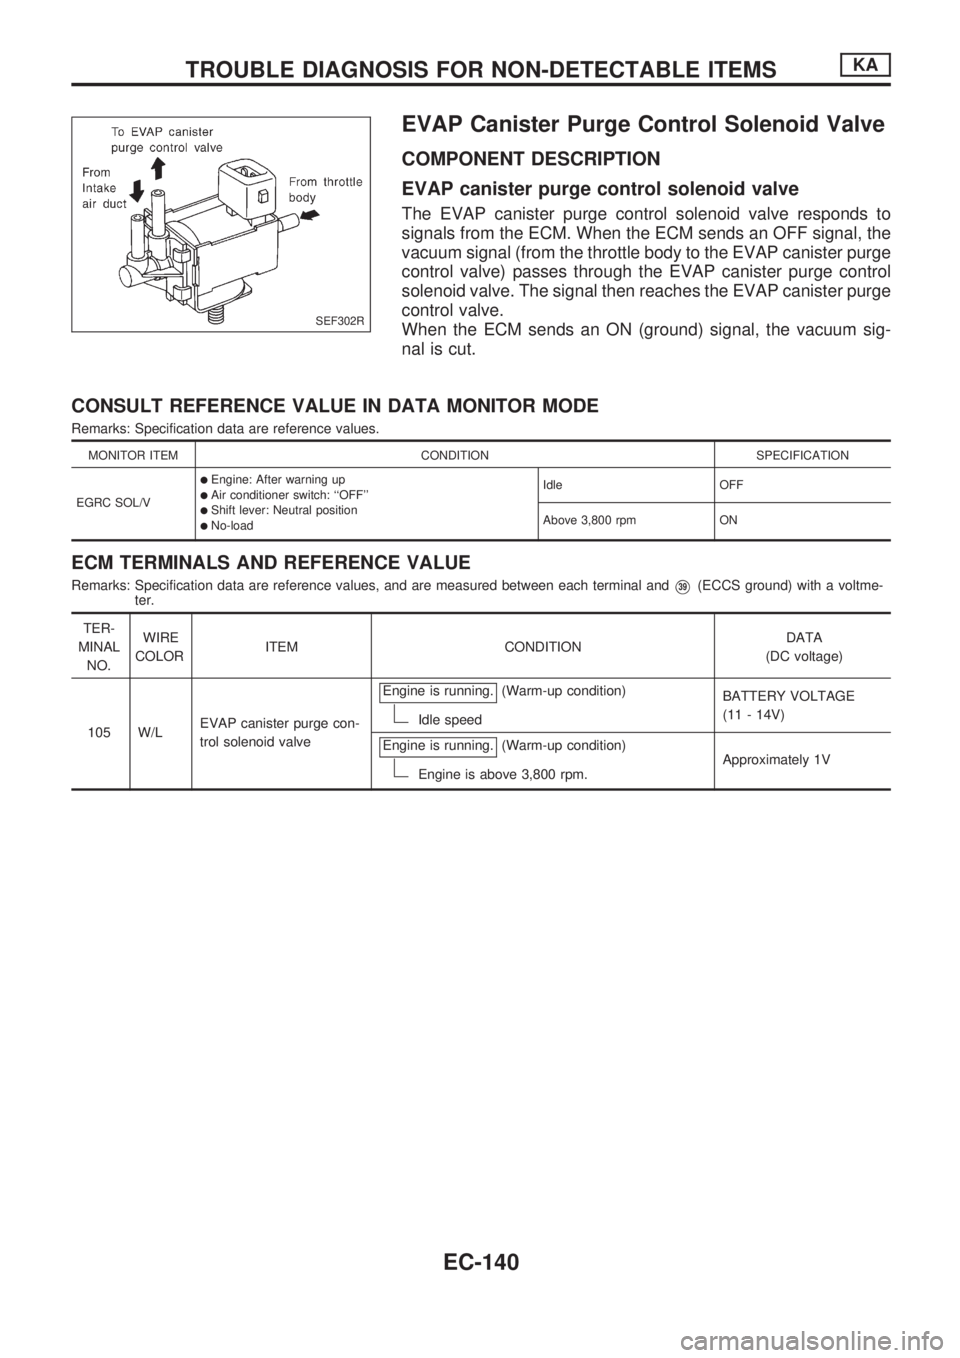
EVAP Canister Purge Control Solenoid Valve
COMPONENT DESCRIPTION
EVAP canister purge control solenoid valve
The EVAP canister purge control solenoid valve responds to
signals from the ECM. When the ECM sends an OFF signal, the
vacuum signal (from the throttle body to the EVAP canister purge
control valve) passes through the EVAP canister purge control
solenoid valve. The signal then reaches the EVAP canister purge
control valve.
When the ECM sends an ON (ground) signal, the vacuum sig-
nal is cut.
CONSULT REFERENCE VALUE IN DATA MONITOR MODE
Remarks: Specification data are reference values.
MONITOR ITEM CONDITION SPECIFICATION
EGRC SOL/V
lEngine: After warning uplAir conditioner switch: ``OFF''lShift lever: Neutral positionlNo-loadIdle OFF
Above 3,800 rpm ON
ECM TERMINALS AND REFERENCE VALUE
Remarks: Specification data are reference values, and are measured between each terminal andV39(ECCS ground) with a voltme-
ter.
TER-
MINAL
NO.WIRE
COLORITEM CONDITIONDATA
(DC voltage)
105 W/LEVAP canister purge con-
trol solenoid valveEngine is running.
(Warm-up condition)
Idle speedBATTERY VOLTAGE
(11 - 14V)
Engine is running.
(Warm-up condition)
Engine is above 3,800 rpm.Approximately 1V
SEF302R
TROUBLE DIAGNOSIS FOR NON-DETECTABLE ITEMSKA
EC-140
Page 294 of 1659
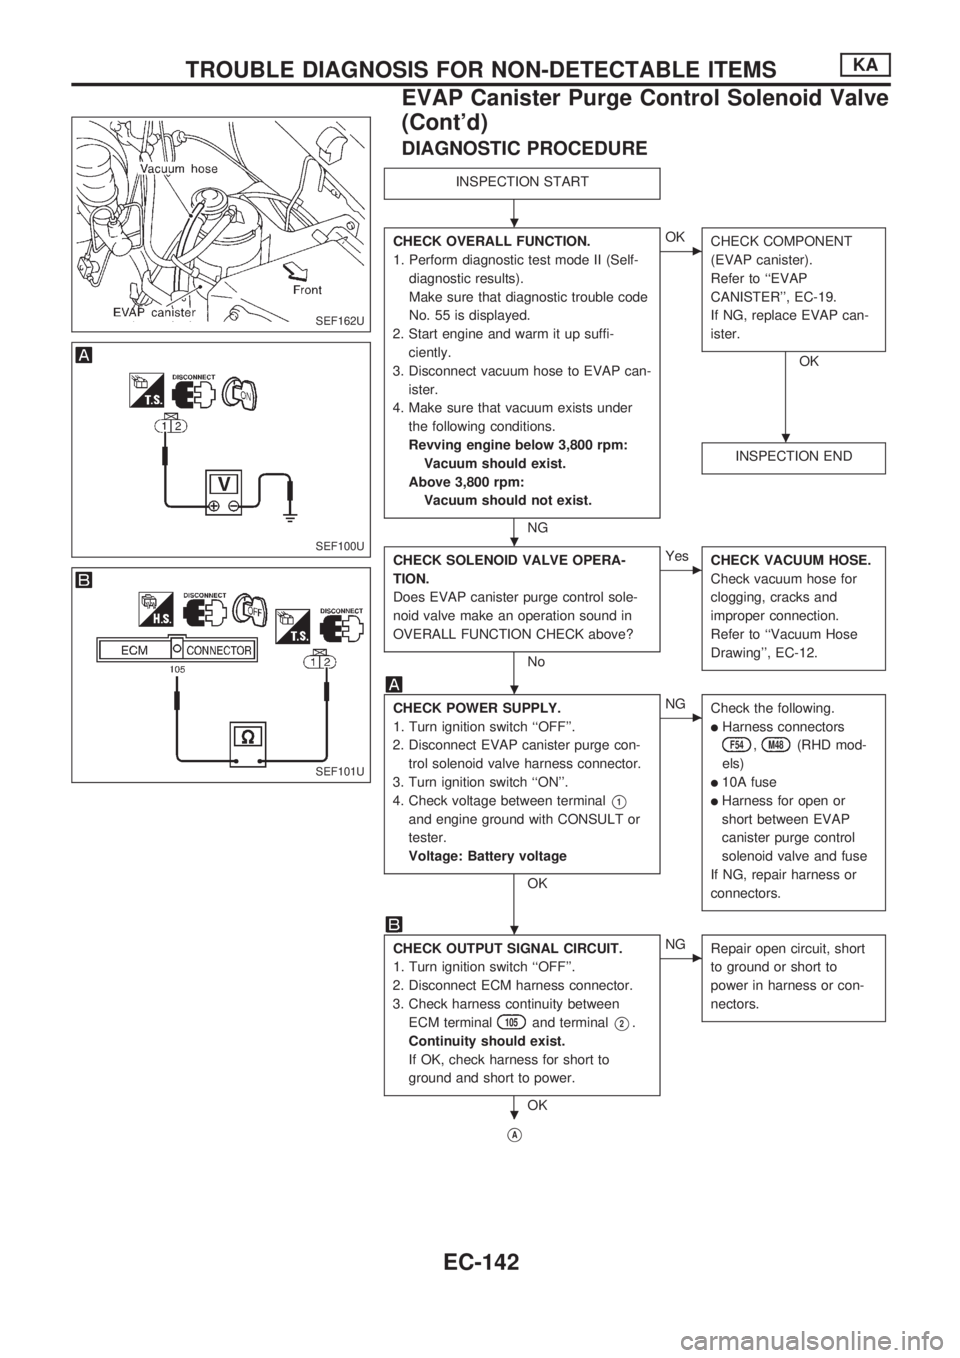
DIAGNOSTIC PROCEDURE
INSPECTION START
CHECK OVERALL FUNCTION.
1. Perform diagnostic test mode II (Self-
diagnostic results).
Make sure that diagnostic trouble code
No. 55 is displayed.
2. Start engine and warm it up suffi-
ciently.
3. Disconnect vacuum hose to EVAP can-
ister.
4. Make sure that vacuum exists under
the following conditions.
Revving engine below 3,800 rpm:
Vacuum should exist.
Above 3,800 rpm:
Vacuum should not exist.
NG
cOK
CHECK COMPONENT
(EVAP canister).
Refer to ``EVAP
CANISTER'', EC-19.
If NG, replace EVAP can-
ister.
OK
INSPECTION END
CHECK SOLENOID VALVE OPERA-
TION.
Does EVAP canister purge control sole-
noid valve make an operation sound in
OVERALL FUNCTION CHECK above?
No
cYes
CHECK VACUUM HOSE.
Check vacuum hose for
clogging, cracks and
improper connection.
Refer to ``Vacuum Hose
Drawing'', EC-12.
CHECK POWER SUPPLY.
1. Turn ignition switch ``OFF''.
2. Disconnect EVAP canister purge con-
trol solenoid valve harness connector.
3. Turn ignition switch ``ON''.
4. Check voltage between terminal
V1
and engine ground with CONSULT or
tester.
Voltage: Battery voltage
OK
cNG
Check the following.
lHarness connectors
F54,M48(RHD mod-
els)
l10A fuse
lHarness for open or
short between EVAP
canister purge control
solenoid valve and fuse
If NG, repair harness or
connectors.
CHECK OUTPUT SIGNAL CIRCUIT.
1. Turn ignition switch ``OFF''.
2. Disconnect ECM harness connector.
3. Check harness continuity between
ECM terminal
105and terminalV2.
Continuity should exist.
If OK, check harness for short to
ground and short to power.
OK
cNG
Repair open circuit, short
to ground or short to
power in harness or con-
nectors.
VA
SEF162U
SEF100U
SEF101U
.
.
.
.
.
.
TROUBLE DIAGNOSIS FOR NON-DETECTABLE ITEMSKA
EVAP Canister Purge Control Solenoid Valve
(Cont'd)
EC-142
Page 295 of 1659
VA
CHECK COMPONENT.
(EVAP canister purge control solenoid
valve).
Refer to ``COMPONENT INSPECTION'',
below.
OK
cNG
Replace EVAP canister
purge control solenoid
valve.
Disconnect and reconnect harness con-
nectors in the circuit. Then retest.
Trouble is not fixed.
Check ECM pin terminals for damage
and check the connection of ECM har-
ness connector. Reconnect ECM harness
connector and retest.
INSPECTION END
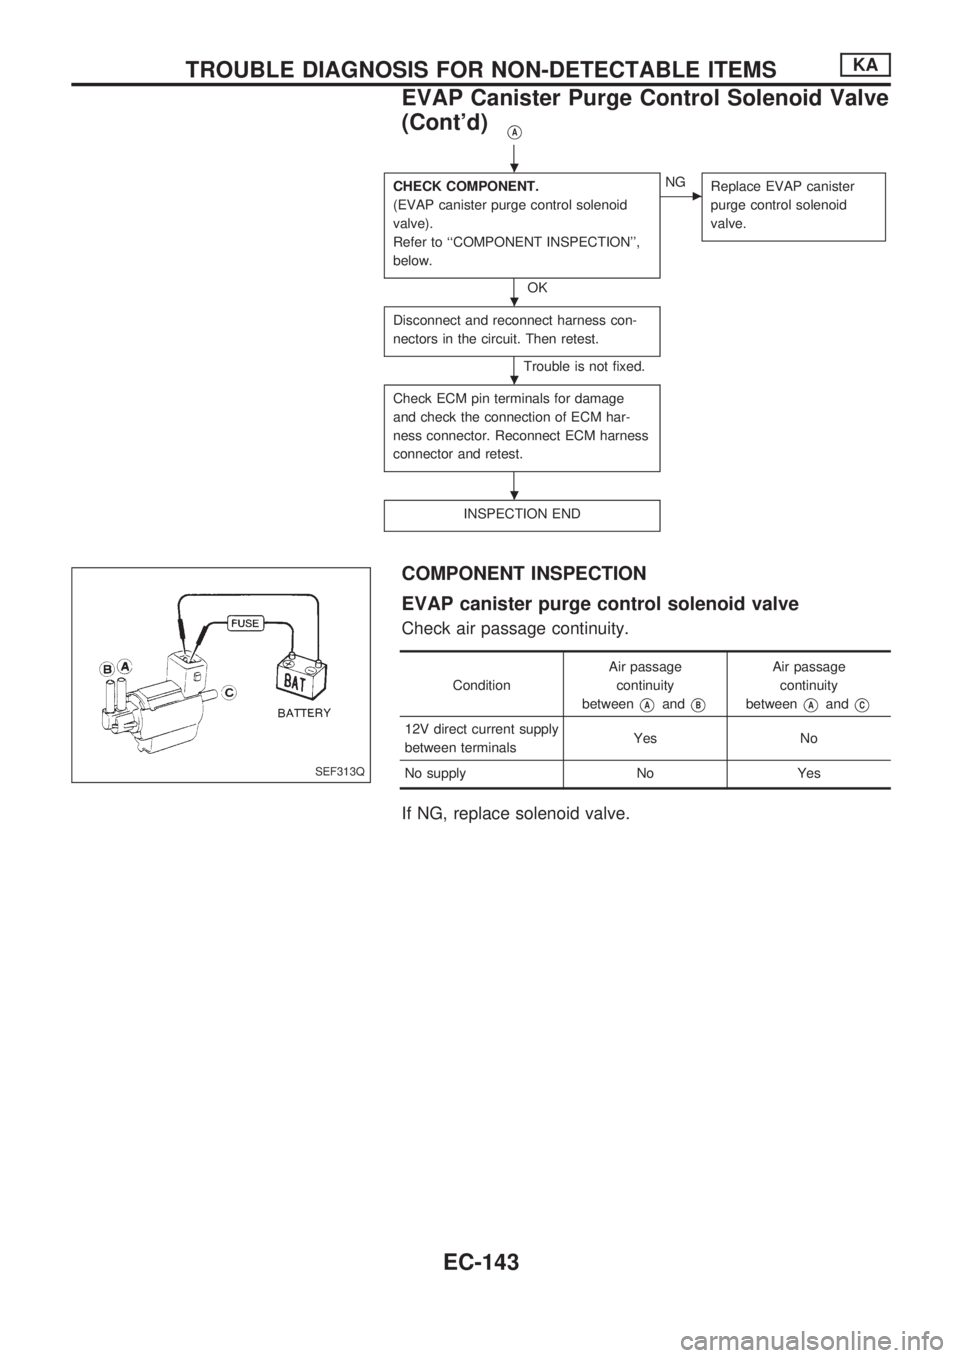
COMPONENT INSPECTION
EVAP canister purge control solenoid valve
Check air passage continuity.
ConditionAir passage
continuity
between
VAandVB
Air passage
continuity
between
VAandVC
12V direct current supply
between terminalsYes No
No supply No Yes
If NG, replace solenoid valve.
SEF313Q
.
.
.
.
TROUBLE DIAGNOSIS FOR NON-DETECTABLE ITEMSKA
EVAP Canister Purge Control Solenoid Valve
(Cont'd)
EC-143