key battery NISSAN PRIMERA 1999 Electronic Owner's Manual
[x] Cancel search | Manufacturer: NISSAN, Model Year: 1999, Model line: PRIMERA, Model: NISSAN PRIMERA 1999Pages: 2267, PDF Size: 35.74 MB
Page 2021 of 2267
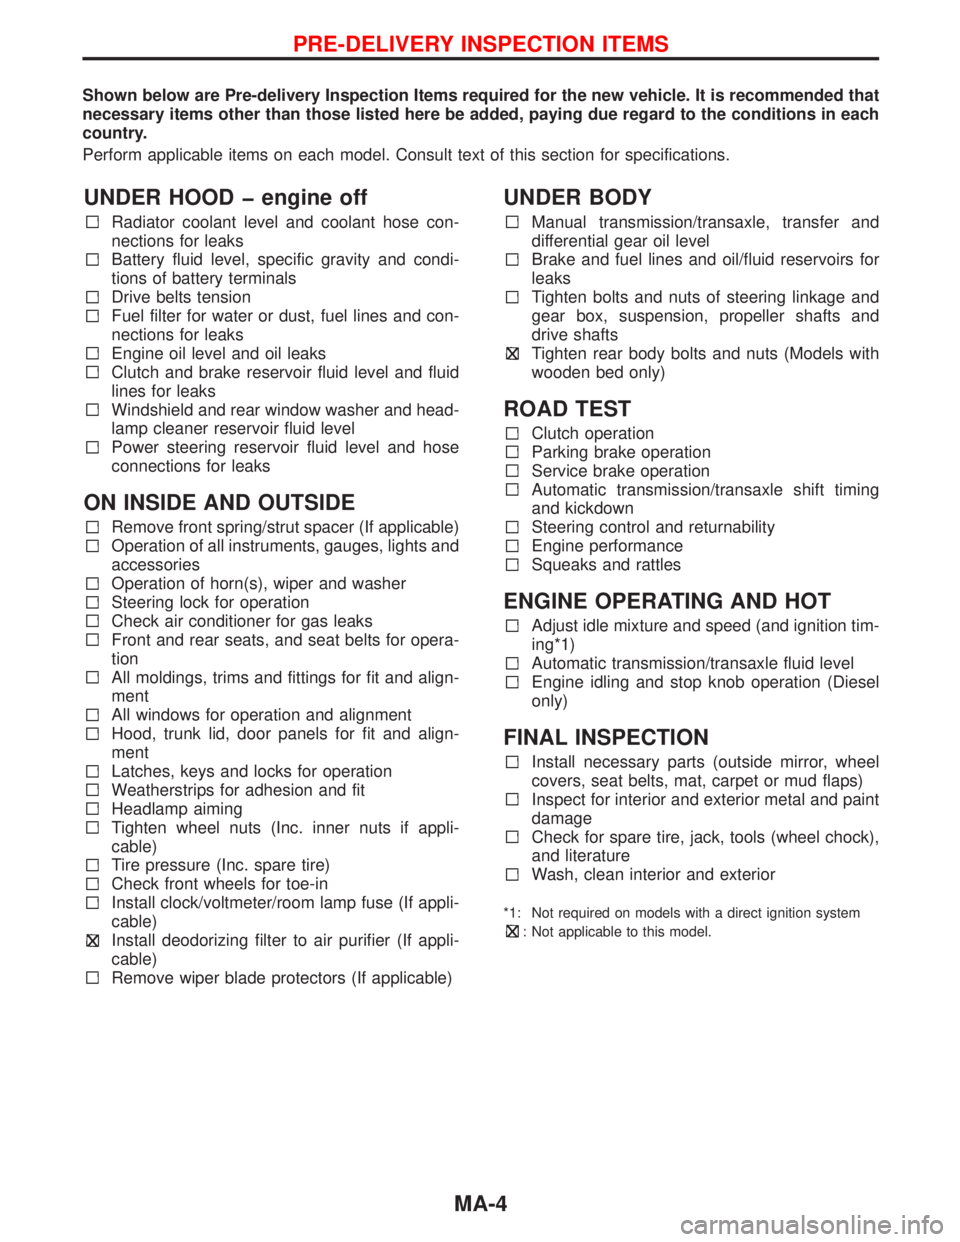
Shown below are Pre-delivery Inspection Items required for the new vehicle. It is recommended that
necessary items other than those listed here be added, paying due regard to the conditions in each
country.
Perform applicable items on each model. Consult text of this section for specifications.
UNDER HOOD engine off
Radiator coolant level and coolant hose con-
nections for leaks
Battery fluid level, specific gravity and condi-
tions of battery terminals
Drive belts tension
Fuel filter for water or dust, fuel lines and con-
nections for leaks
Engine oil level and oil leaks
Clutch and brake reservoir fluid level and fluid
lines for leaks
Windshield and rear window washer and head-
lamp cleaner reservoir fluid level
Power steering reservoir fluid level and hose
connections for leaks
ON INSIDE AND OUTSIDE
Remove front spring/strut spacer (If applicable)
Operation of all instruments, gauges, lights and
accessories
Operation of horn(s), wiper and washer
Steering lock for operation
Check air conditioner for gas leaks
Front and rear seats, and seat belts for opera-
tion
All moldings, trims and fittings for fit and align-
ment
All windows for operation and alignment
Hood, trunk lid, door panels for fit and align-
ment
Latches, keys and locks for operation
Weatherstrips for adhesion and fit
Headlamp aiming
Tighten wheel nuts (Inc. inner nuts if appli-
cable)
Tire pressure (Inc. spare tire)
Check front wheels for toe-in
Install clock/voltmeter/room lamp fuse (If appli-
cable)
Install deodorizing filter to air purifier (If appli-
cable)
Remove wiper blade protectors (If applicable)
UNDER BODY
Manual transmission/transaxle, transfer and
differential gear oil level
Brake and fuel lines and oil/fluid reservoirs for
leaks
Tighten bolts and nuts of steering linkage and
gear box, suspension, propeller shafts and
drive shafts
Tighten rear body bolts and nuts (Models with
wooden bed only)
ROAD TEST
Clutch operation
Parking brake operation
Service brake operation
Automatic transmission/transaxle shift timing
and kickdown
Steering control and returnability
Engine performance
Squeaks and rattles
ENGINE OPERATING AND HOT
Adjust idle mixture and speed (and ignition tim-
ing*1)
Automatic transmission/transaxle fluid level
Engine idling and stop knob operation (Diesel
only)
FINAL INSPECTION
Install necessary parts (outside mirror, wheel
covers, seat belts, mat, carpet or mud flaps)
Inspect for interior and exterior metal and paint
damage
Check for spare tire, jack, tools (wheel chock),
and literature
Wash, clean interior and exterior
*1: Not required on models with a direct ignition system
: Not applicable to this model.
PRE-DELIVERY INSPECTION ITEMS
MA-4
Page 2213 of 2267
![NISSAN PRIMERA 1999 Electronic Owners Manual HOW TO ERASE SELF-DIAGNOSIS RESULTS
With CONSULT-II
lªSELF-DAIG [CURRENT]º
A current Self-diagnosis result is displayed on the CONSULT-II screen in real time. After the malfunction
is repaired compl](/img/5/57377/w960_57377-2212.png "NISSAN PRIMERA 1999 Electronic Owners Manual HOW TO ERASE SELF-DIAGNOSIS RESULTS
With CONSULT-II
lªSELF-DAIG [CURRENT]º
A current Self-diagnosis result is displayed on the CONSULT-II screen in real time. After the malfunction
is repaired compl")
HOW TO ERASE SELF-DIAGNOSIS RESULTS
With CONSULT-II
lªSELF-DAIG [CURRENT]º
A current Self-diagnosis result is displayed on the CONSULT-II screen in real time. After the malfunction
is repaired completely, no malfunction is detected on ªSELF-DIAG [CURRENT]º.
lªSELF-DIAG [PAST]º
Return to the ªSELF-DIAG [CURRENT]º CONSULT-II screen
by pushing ªBACKº key of CONSULT-II and select ªSELF-
DIAG [CURRENT]º in ªSELECT DIAG MODEº. Touch
ªERASEº in ªSELF-DIAG [CURRENT]º mode.
NOTE:
If the memory of the malfunction in ªSELF-DIAG [PAST]º is
not erased, the User mode shows the system malfunction by
the operation of the warning lamp even if the malfunction is
repaired completely.
lªTROUBLE DIAG RECORDº
The memory of ªTROUBLE DIAG RECORDº cannot be erased.
Without CONSULT-II
After a malfunction is repaired, return to User mode from Diagnosis mode by switching the ignition ªOFFº
for at least 1 second, then back ªONº. Diagnosis mode returns to the User mode. At that time, self-diagno-
sis result is cleared.
How to Perform Trouble Diagnoses for Quick
and Accurate Repair
A good understanding of the malfunction conditions can make troubleshooting faster and more accurate. In
general, each customer feels differently about a malfunction. It is important to fully understand the symp-
toms or conditions for a customer complaint.
INFORMATION FROM CUSTOMER
WHAT ....... Vehicle model
WHEN ...... Date, Frequencies
WHERE .... Road conditions
HOW ........ Operating conditions, Symptoms
PRELIMINARY CHECK
Check that the following parts are in good order.
lBattery [Refer to EL section (ªBATTERYº).]
lFuse [Refer to EL section (ªFuseº, ªPOWER SUPPLY ROUTINGº).]
lSystem component-to-harness connections
C2SDC02
TROUBLE DIAGNOSES Ð Supplemental Restraint System (SRS)
Trouble Diagnoses Introduction (Cont'd)
RS-30
Page 2222 of 2267
![NISSAN PRIMERA 1999 Electronic Owners Manual If no malfunction is detected on ªSELF-DIAG [CURRENT]º but
malfunction is indicated by the ªAIR BAGº, warning lamp, go to
DIAGNOSTIC PROCEDURE 4, page RS-43, to diagnose the
following situations:](/img/5/57377/w960_57377-2221.png "NISSAN PRIMERA 1999 Electronic Owners Manual If no malfunction is detected on ªSELF-DIAG [CURRENT]º but
malfunction is indicated by the ªAIR BAGº, warning lamp, go to
DIAGNOSTIC PROCEDURE 4, page RS-43, to diagnose the
following situations:")
If no malfunction is detected on ªSELF-DIAG [CURRENT]º but
malfunction is indicated by the ªAIR BAGº, warning lamp, go to
DIAGNOSTIC PROCEDURE 4, page RS-43, to diagnose the
following situations:
lSelf-diagnostic result ªSELF-DIAG [PAST]º (previously
stored in the memory) might not be erased after repair.
lThe SRS system malfunctions intermittently.
8. Touch ªPRINTº.
9. Compare diagnostic codes to ªCONSULT-II Diagnostic Code
Chartº, page RS-39.
10. Touch ªBACKº key of CONSULT-II until ªSELECT SYSTEM º
appears in order to return to User mode from Diagnosis
mode.
11. Turn ignition switch ªOFFº, then turn off and disconnect CON-
SULT-II and both battery cables.
12. Repair the system as outlined by the ªRepair orderº in ªCON-
SULT-II Diagnostic Code Chartº, that corresponds to the self-
diagnostic result. For replacement procedure of component
parts, refer to RS-13.
13. After repairing the system, go to DIAGNOSTIC PROCE-
DURE 3, page RS-42 for final checking.
CONSULT-II Diagnostic Code Chart
(ªSELF-DIAGNOSISº)
Diagnostic item ExplanationRepair order
Recheck SRS at each
replacement.
NO DTC IS DETECTED. When malfunction is indi-
cated by the ªAIR BAGº
warning lamp in User mode
lLow battery voltage (Less
than 9V).lGo to DIAGNOSTIC PRO-
CEDURE 3 (RS-42) after
charging battery.
lSelf-diagnostic result
ªSELF-DIAG [PAST]º (pre-
viously stored in the
memory) might not be
erased after repair.
lIntermittent malfunction has
been detected in the past.Go to DIAGNOSTIC PROCE-
DURE 4 (RS-43).
No malfunction is detected.
lGo to DIAGNOSTIC PRO-
CEDURE 3 (RS-42).
AIRBAG MODULE
[OPEN]
lDriver's air bag module circuit is open. (including the spiral
cable)1. Visually check the wiring
harness connection.
2. Replace the harness if it
has visible damage.
3. Replace driver's air bag
module.
(Before disposing of it, it
must be deployed.)
4. Replace the spiral cable.
5. Replace the diagnosis
sensor unit.
6. Replace the related har-
ness.
C2SDC02
TROUBLE DIAGNOSES Ð Supplemental Restraint System (SRS)
Trouble Diagnoses with CONSULT-II
(Cont'd)
RS-39
Page 2228 of 2267
![NISSAN PRIMERA 1999 Electronic Owners Manual If no malfunction is detected on ªSELF-DIAG [PAST]º, touch
ªBACKº and go back to ªSELECT DIAG MODEº.
8. Touch ªTROUBLE DIAG RECORDº.
NOTE:
With ªTROUBLE DIAG RECORDº, diagnosis results previ](/img/5/57377/w960_57377-2227.png "NISSAN PRIMERA 1999 Electronic Owners Manual If no malfunction is detected on ªSELF-DIAG [PAST]º, touch
ªBACKº and go back to ªSELECT DIAG MODEº.
8. Touch ªTROUBLE DIAG RECORDº.
NOTE:
With ªTROUBLE DIAG RECORDº, diagnosis results previ")
If no malfunction is detected on ªSELF-DIAG [PAST]º, touch
ªBACKº and go back to ªSELECT DIAG MODEº.
8. Touch ªTROUBLE DIAG RECORDº.
NOTE:
With ªTROUBLE DIAG RECORDº, diagnosis results previ-
ously erased by a reset operation can be displayed.
9. Diagnostic code is displayed on ªTROUBLE DIAG
RECORDº.
10. Touch ªPRINTº.
11. Compare diagnostic codes to ªIntermittent Malfunction Diag-
nostic Code Chartº, page RS-46.
12. Touch ªBACKº key of CONSULT-II until ªSELECT SYSTEMº
appears.
13. Turn ignition switch ªOFFº, then turn off and disconnect
CONSULT-II, and both battery cables.
14. Repair the system as outlined by the ªRepair orderº in ªInter-
mittent Malfunction Diagnostic Code Chartº, that corre-
sponds to the self-diagnostic result. For replacement proce-
dure of component parts, refer to RS-13.
15. Go to DIAGNOSTIC PROCEDURE 3, page RS-42, for final
checking.
C2SDP02
C2SDM02
C2TDR02
TROUBLE DIAGNOSES Ð Supplemental Restraint System (SRS)
Trouble Diagnoses with CONSULT-II
(Cont'd)
RS-45