audio NISSAN PRIMERA 1999 Electronic Repair Manual
[x] Cancel search | Manufacturer: NISSAN, Model Year: 1999, Model line: PRIMERA, Model: NISSAN PRIMERA 1999Pages: 2267, PDF Size: 35.74 MB
Page 126 of 2267
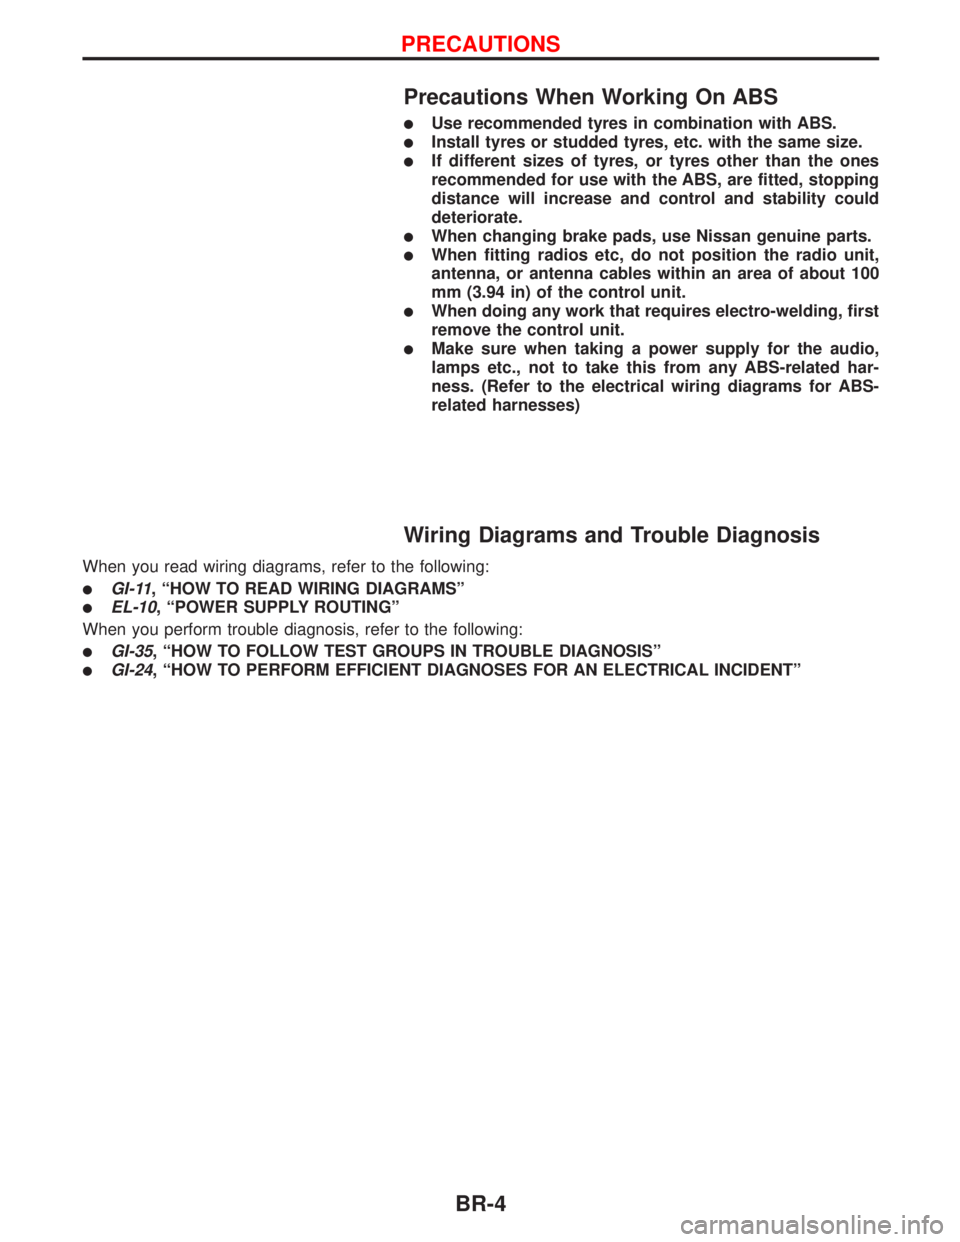
Precautions When Working On ABS
lUse recommended tyres in combination with ABS.
lInstall tyres or studded tyres, etc. with the same size.
lIf different sizes of tyres, or tyres other than the ones
recommended for use with the ABS, are fitted, stopping
distance will increase and control and stability could
deteriorate.
lWhen changing brake pads, use Nissan genuine parts.
lWhen fitting radios etc, do not position the radio unit,
antenna, or antenna cables within an area of about 100
mm (3.94 in) of the control unit.
lWhen doing any work that requires electro-welding, first
remove the control unit.
lMake sure when taking a power supply for the audio,
lamps etc., not to take this from any ABS-related har-
ness. (Refer to the electrical wiring diagrams for ABS-
related harnesses)
Wiring Diagrams and Trouble Diagnosis
When you read wiring diagrams, refer to the following:
lGI-11, ªHOW TO READ WIRING DIAGRAMSº
lEL-10, ªPOWER SUPPLY ROUTINGº
When you perform trouble diagnosis, refer to the following:
lGI-35, ªHOW TO FOLLOW TEST GROUPS IN TROUBLE DIAGNOSISº
lGI-24, ªHOW TO PERFORM EFFICIENT DIAGNOSES FOR AN ELECTRICAL INCIDENTº
PRECAUTIONS
BR-4
Page 229 of 2267
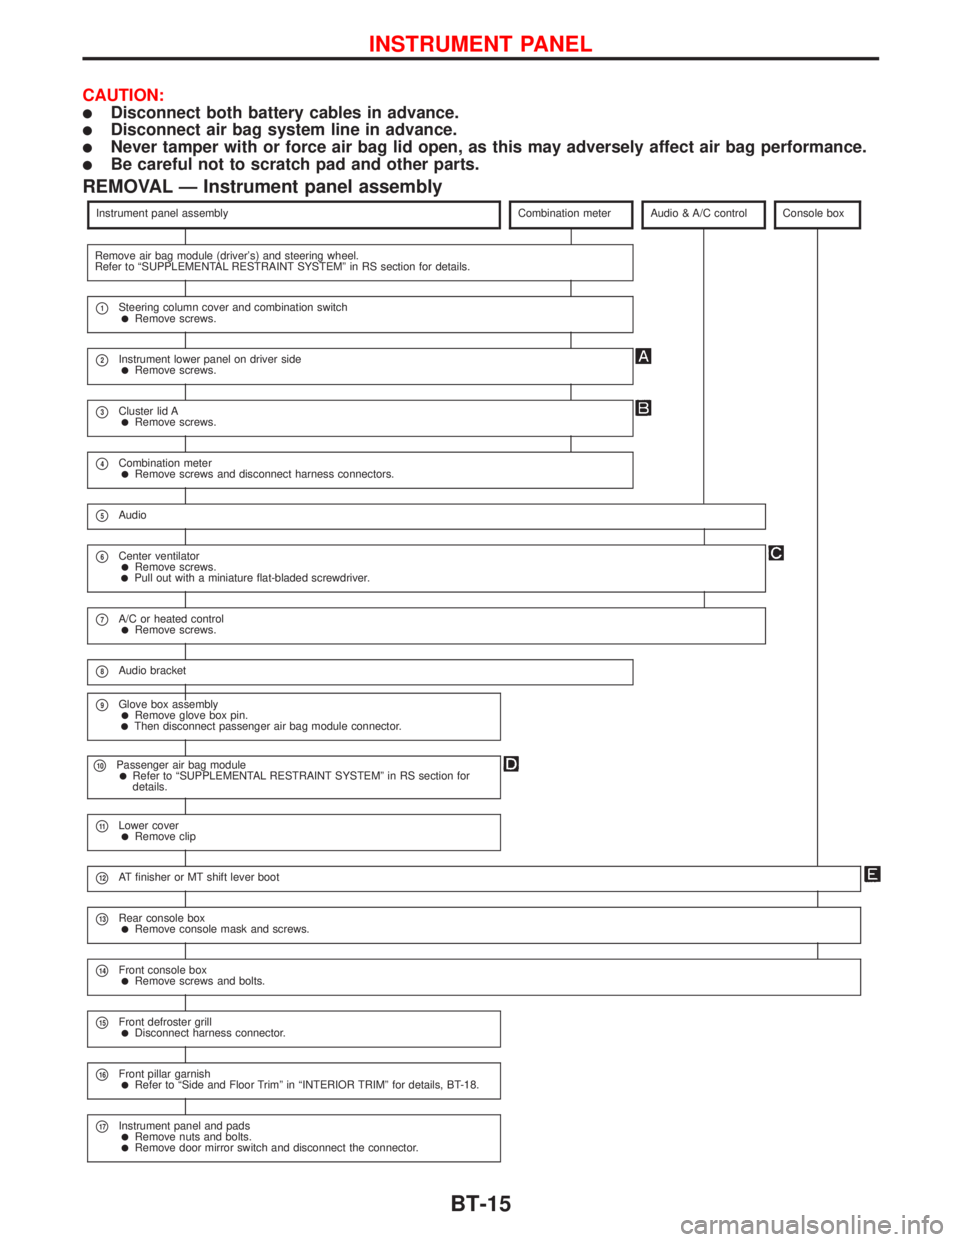
CAUTION:
lDisconnect both battery cables in advance.
lDisconnect air bag system line in advance.
lNever tamper with or force air bag lid open, as this may adversely affect air bag performance.
lBe careful not to scratch pad and other parts.
REMOVAL Ð Instrument panel assembly
Instrument panel assemblyCombination meterAudio & A/C controlConsole box
Remove air bag module (driver's) and steering wheel.
Refer to ªSUPPLEMENTAL RESTRAINT SYSTEMº in RS section for details.
p1Steering column cover and combination switchlRemove screws.
p2Instrument lower panel on driver sidelRemove screws.
p3Cluster lid AlRemove screws.
p4Combination meterlRemove screws and disconnect harness connectors.
p5Audio
p6Center ventilatorlRemove screws.lPull out with a miniature flat-bladed screwdriver.
p7A/C or heated controllRemove screws.
p8Audio bracket
p9Glove box assemblylRemove glove box pin.lThen disconnect passenger air bag module connector.
p10Passenger air bag modulelRefer to ªSUPPLEMENTAL RESTRAINT SYSTEMº in RS section for
details.
p11Lower coverlRemove clip
p12AT finisher or MT shift lever boot
p13Rear console boxlRemove console mask and screws.
p14Front console boxlRemove screws and bolts.
p15Front defroster grilllDisconnect harness connector.
p16Front pillar garnishlRefer to ªSide and Floor Trimº in ªINTERIOR TRIMº for details, BT-18.
p17Instrument panel and padslRemove nuts and bolts.lRemove door mirror switch and disconnect the connector.
INSTRUMENT PANEL
BT-15
Page 713 of 2267
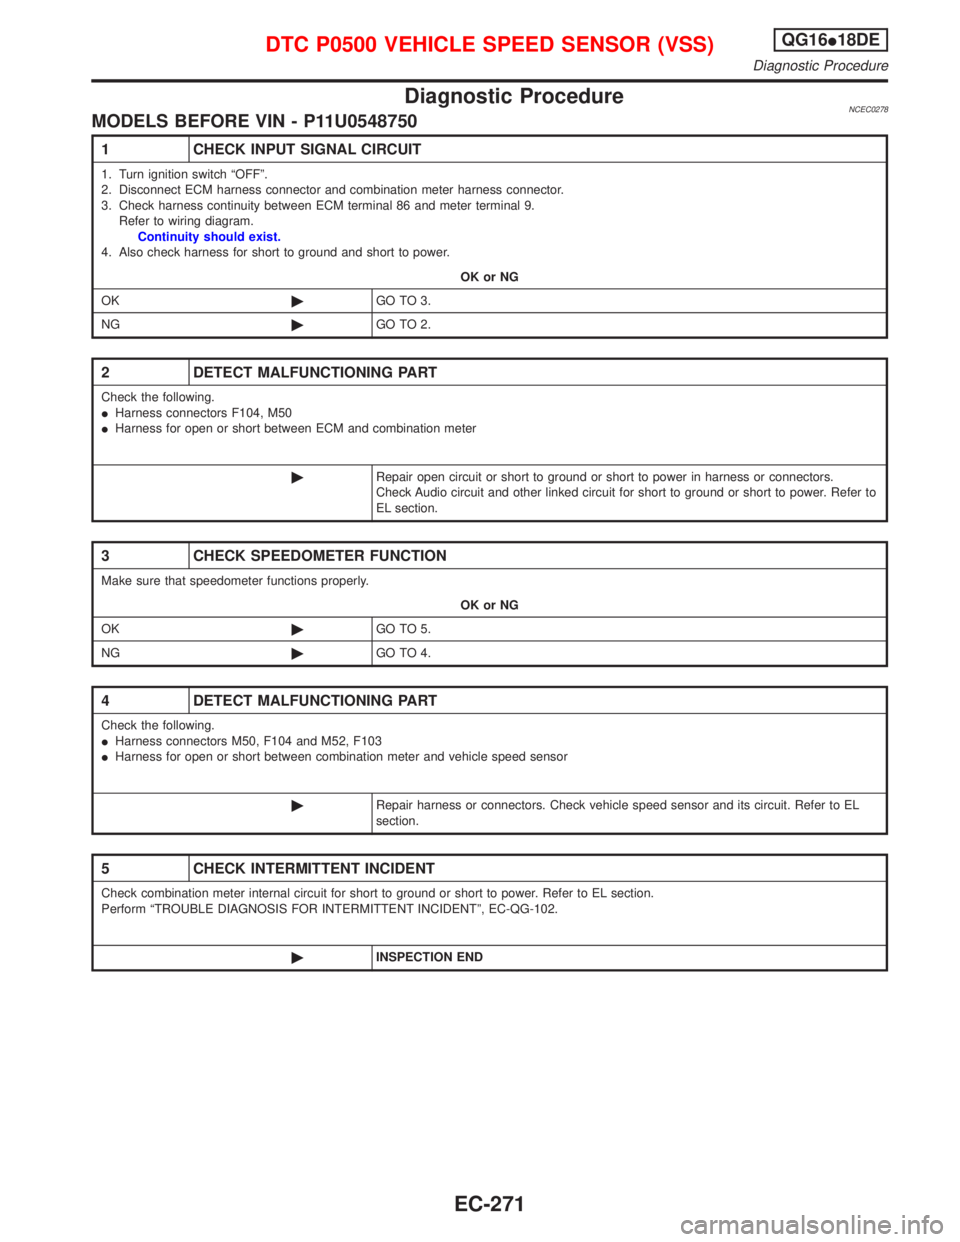
Diagnostic ProcedureNCEC0278MODELS BEFORE VIN - P11U0548750
1 CHECK INPUT SIGNAL CIRCUIT
1. Turn ignition switch ªOFFº.
2. Disconnect ECM harness connector and combination meter harness connector.
3. Check harness continuity between ECM terminal 86 and meter terminal 9.
Refer to wiring diagram.
Continuity should exist.
4. Also check harness for short to ground and short to power.
OK or NG
OK©GO TO 3.
NG©GO TO 2.
2 DETECT MALFUNCTIONING PART
Check the following.
IHarness connectors F104, M50
IHarness for open or short between ECM and combination meter
©Repair open circuit or short to ground or short to power in harness or connectors.
Check Audio circuit and other linked circuit for short to ground or short to power. Refer to
EL section.
3 CHECK SPEEDOMETER FUNCTION
Make sure that speedometer functions properly.
OK or NG
OK©GO TO 5.
NG©GO TO 4.
4 DETECT MALFUNCTIONING PART
Check the following.
IHarness connectors M50, F104 and M52, F103
IHarness for open or short between combination meter and vehicle speed sensor
©Repair harness or connectors. Check vehicle speed sensor and its circuit. Refer to EL
section.
5 CHECK INTERMITTENT INCIDENT
Check combination meter internal circuit for short to ground or short to power. Refer to EL section.
Perform ªTROUBLE DIAGNOSIS FOR INTERMITTENT INCIDENTº, EC-QG-102.
©INSPECTION END
DTC P0500 VEHICLE SPEED SENSOR (VSS)QG16I18DE
Diagnostic Procedure
EC-271
Page 714 of 2267
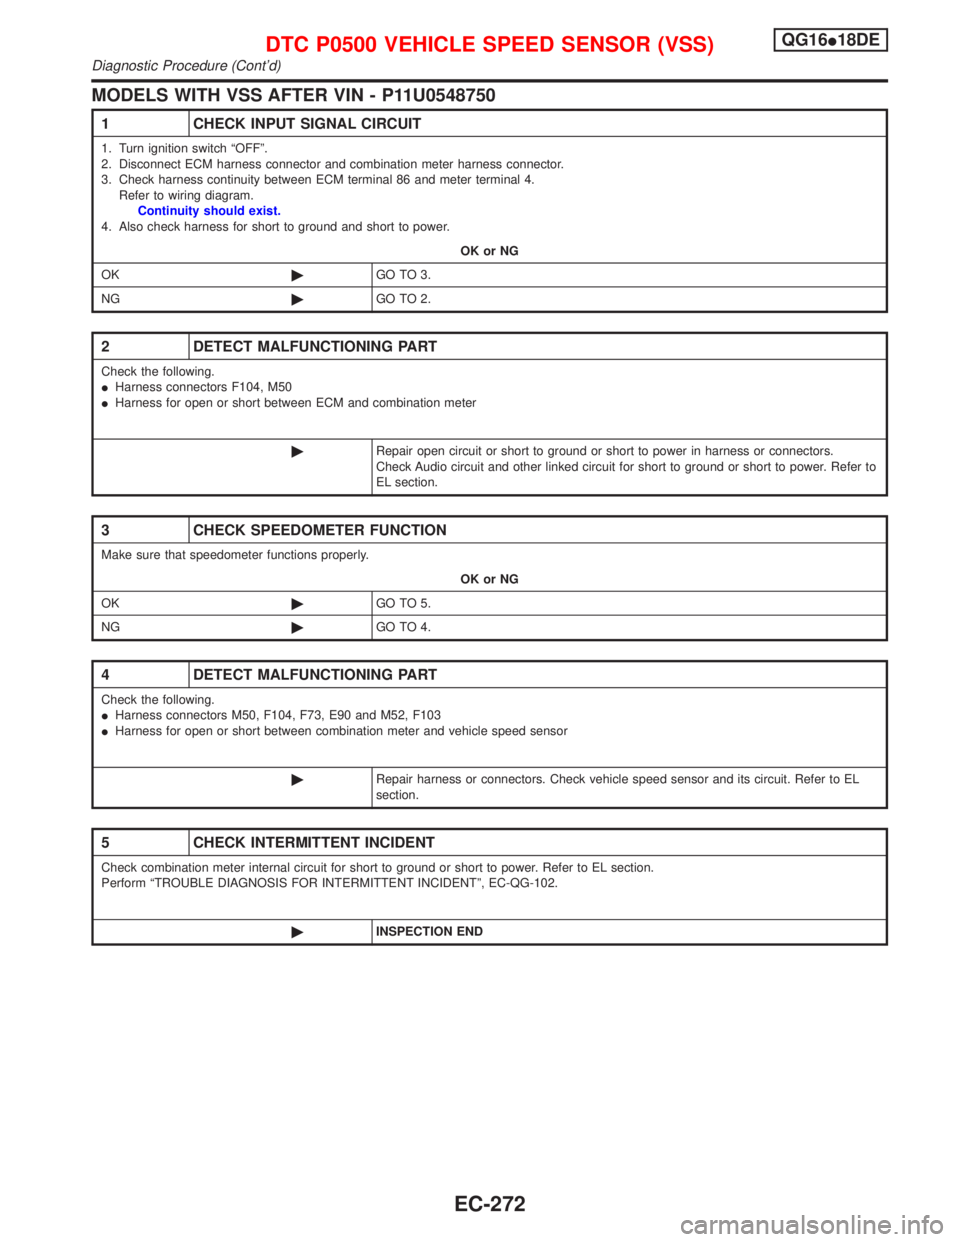
MODELS WITH VSS AFTER VIN - P11U0548750
1 CHECK INPUT SIGNAL CIRCUIT
1. Turn ignition switch ªOFFº.
2. Disconnect ECM harness connector and combination meter harness connector.
3. Check harness continuity between ECM terminal 86 and meter terminal 4.
Refer to wiring diagram.
Continuity should exist.
4. Also check harness for short to ground and short to power.
OK or NG
OK©GO TO 3.
NG©GO TO 2.
2 DETECT MALFUNCTIONING PART
Check the following.
IHarness connectors F104, M50
IHarness for open or short between ECM and combination meter
©Repair open circuit or short to ground or short to power in harness or connectors.
Check Audio circuit and other linked circuit for short to ground or short to power. Refer to
EL section.
3 CHECK SPEEDOMETER FUNCTION
Make sure that speedometer functions properly.
OK or NG
OK©GO TO 5.
NG©GO TO 4.
4 DETECT MALFUNCTIONING PART
Check the following.
IHarness connectors M50, F104, F73, E90 and M52, F103
IHarness for open or short between combination meter and vehicle speed sensor
©Repair harness or connectors. Check vehicle speed sensor and its circuit. Refer to EL
section.
5 CHECK INTERMITTENT INCIDENT
Check combination meter internal circuit for short to ground or short to power. Refer to EL section.
Perform ªTROUBLE DIAGNOSIS FOR INTERMITTENT INCIDENTº, EC-QG-102.
©INSPECTION END
DTC P0500 VEHICLE SPEED SENSOR (VSS)QG16I18DE
Diagnostic Procedure (Cont'd)
EC-272
Page 715 of 2267
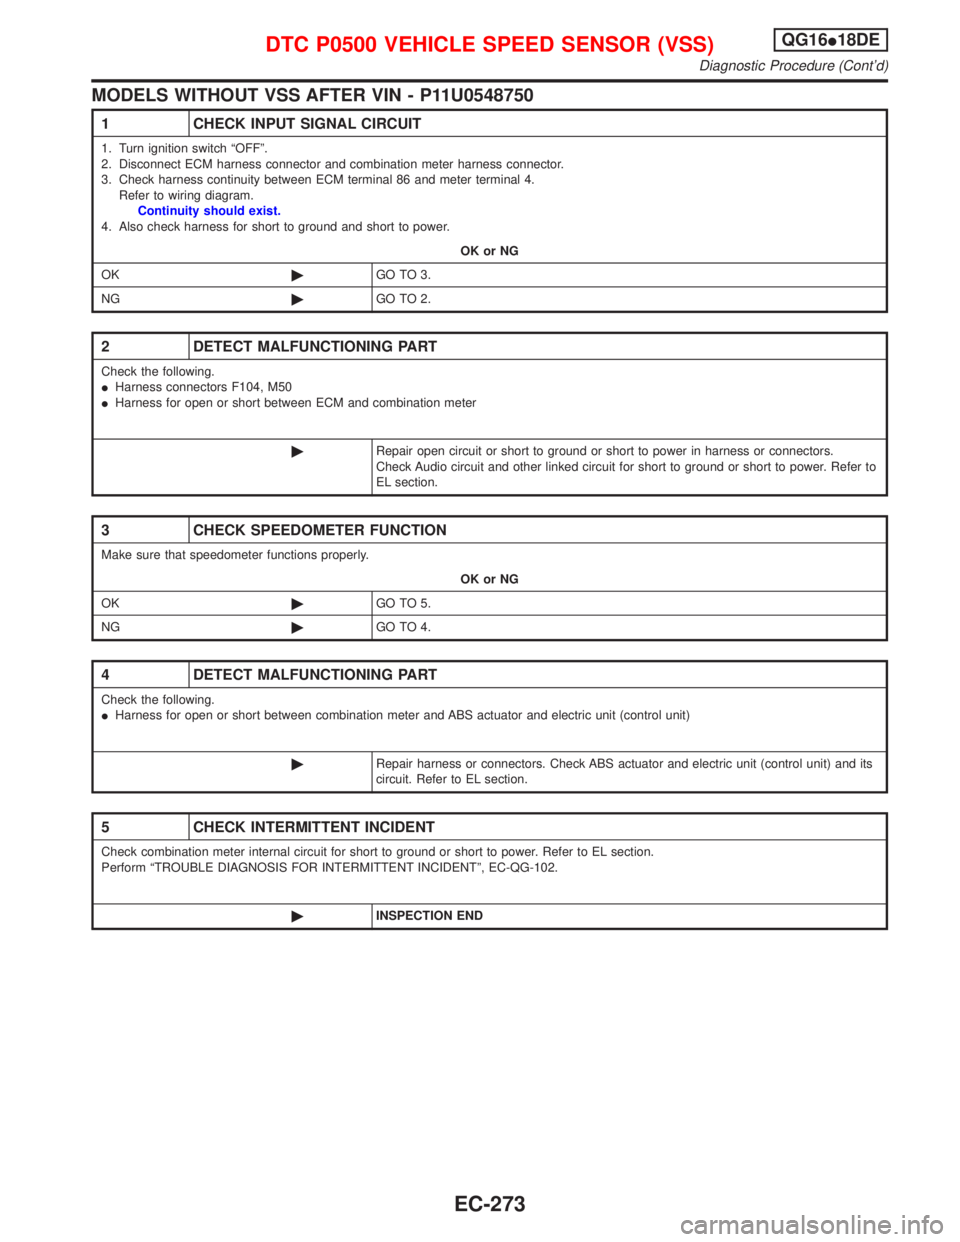
MODELS WITHOUT VSS AFTER VIN - P11U0548750
1 CHECK INPUT SIGNAL CIRCUIT
1. Turn ignition switch ªOFFº.
2. Disconnect ECM harness connector and combination meter harness connector.
3. Check harness continuity between ECM terminal 86 and meter terminal 4.
Refer to wiring diagram.
Continuity should exist.
4. Also check harness for short to ground and short to power.
OK or NG
OK©GO TO 3.
NG©GO TO 2.
2 DETECT MALFUNCTIONING PART
Check the following.
IHarness connectors F104, M50
IHarness for open or short between ECM and combination meter
©Repair open circuit or short to ground or short to power in harness or connectors.
Check Audio circuit and other linked circuit for short to ground or short to power. Refer to
EL section.
3 CHECK SPEEDOMETER FUNCTION
Make sure that speedometer functions properly.
OK or NG
OK©GO TO 5.
NG©GO TO 4.
4 DETECT MALFUNCTIONING PART
Check the following.
IHarness for open or short between combination meter and ABS actuator and electric unit (control unit)
©Repair harness or connectors. Check ABS actuator and electric unit (control unit) and its
circuit. Refer to EL section.
5 CHECK INTERMITTENT INCIDENT
Check combination meter internal circuit for short to ground or short to power. Refer to EL section.
Perform ªTROUBLE DIAGNOSIS FOR INTERMITTENT INCIDENTº, EC-QG-102.
©INSPECTION END
DTC P0500 VEHICLE SPEED SENSOR (VSS)QG16I18DE
Diagnostic Procedure (Cont'd)
EC-273
Page 1060 of 2267
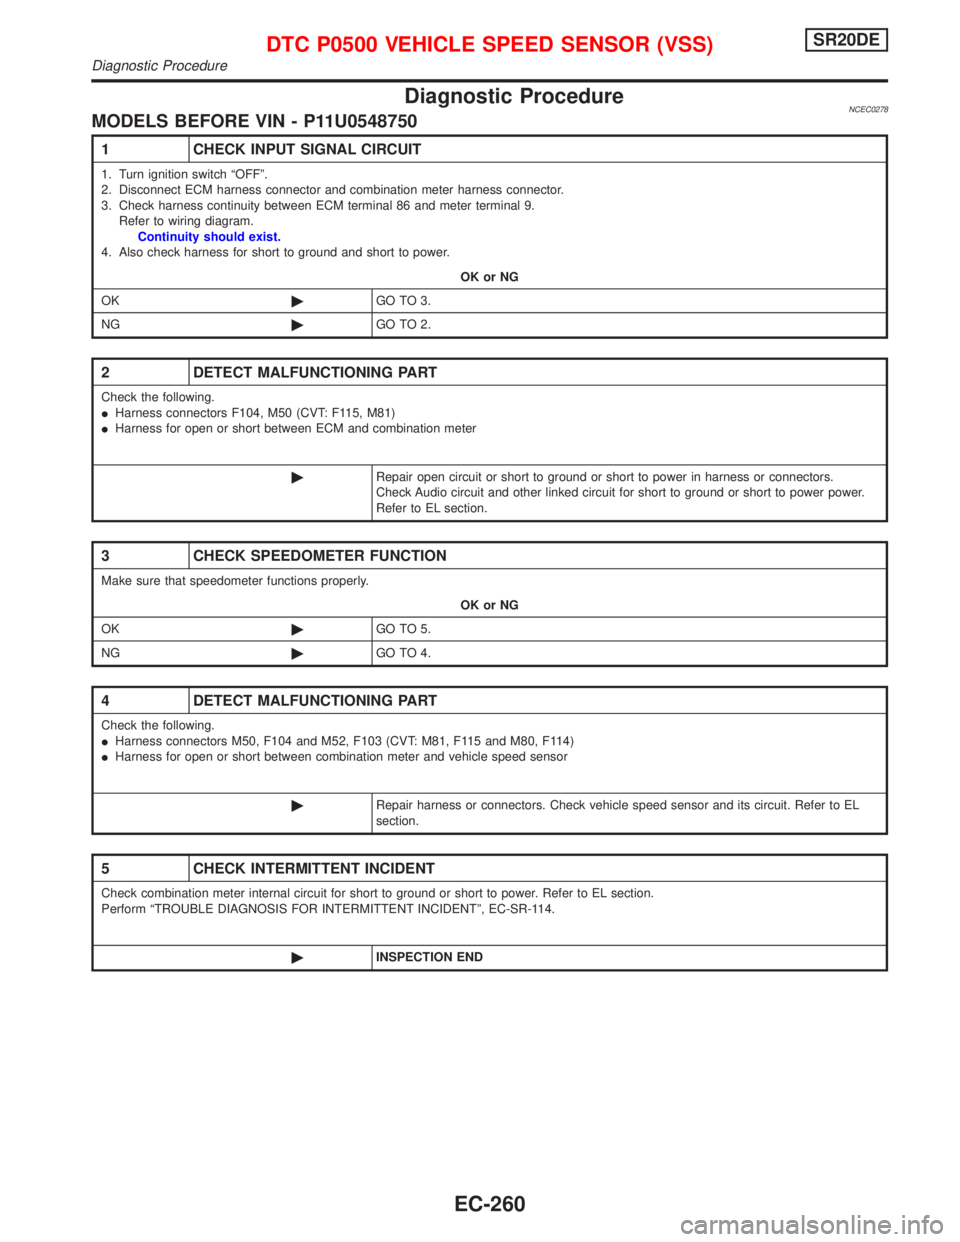
Diagnostic ProcedureNCEC0278MODELS BEFORE VIN - P11U0548750
1 CHECK INPUT SIGNAL CIRCUIT
1. Turn ignition switch ªOFFº.
2. Disconnect ECM harness connector and combination meter harness connector.
3. Check harness continuity between ECM terminal 86 and meter terminal 9.
Refer to wiring diagram.
Continuity should exist.
4. Also check harness for short to ground and short to power.
OK or NG
OK©GO TO 3.
NG©GO TO 2.
2 DETECT MALFUNCTIONING PART
Check the following.
IHarness connectors F104, M50 (CVT: F115, M81)
IHarness for open or short between ECM and combination meter
©Repair open circuit or short to ground or short to power in harness or connectors.
Check Audio circuit and other linked circuit for short to ground or short to power power.
Refer to EL section.
3 CHECK SPEEDOMETER FUNCTION
Make sure that speedometer functions properly.
OK or NG
OK©GO TO 5.
NG©GO TO 4.
4 DETECT MALFUNCTIONING PART
Check the following.
IHarness connectors M50, F104 and M52, F103 (CVT: M81, F115 and M80, F114)
IHarness for open or short between combination meter and vehicle speed sensor
©Repair harness or connectors. Check vehicle speed sensor and its circuit. Refer to EL
section.
5 CHECK INTERMITTENT INCIDENT
Check combination meter internal circuit for short to ground or short to power. Refer to EL section.
Perform ªTROUBLE DIAGNOSIS FOR INTERMITTENT INCIDENTº, EC-SR-114.
©INSPECTION END
DTC P0500 VEHICLE SPEED SENSOR (VSS)SR20DE
Diagnostic Procedure
EC-260
Page 1061 of 2267
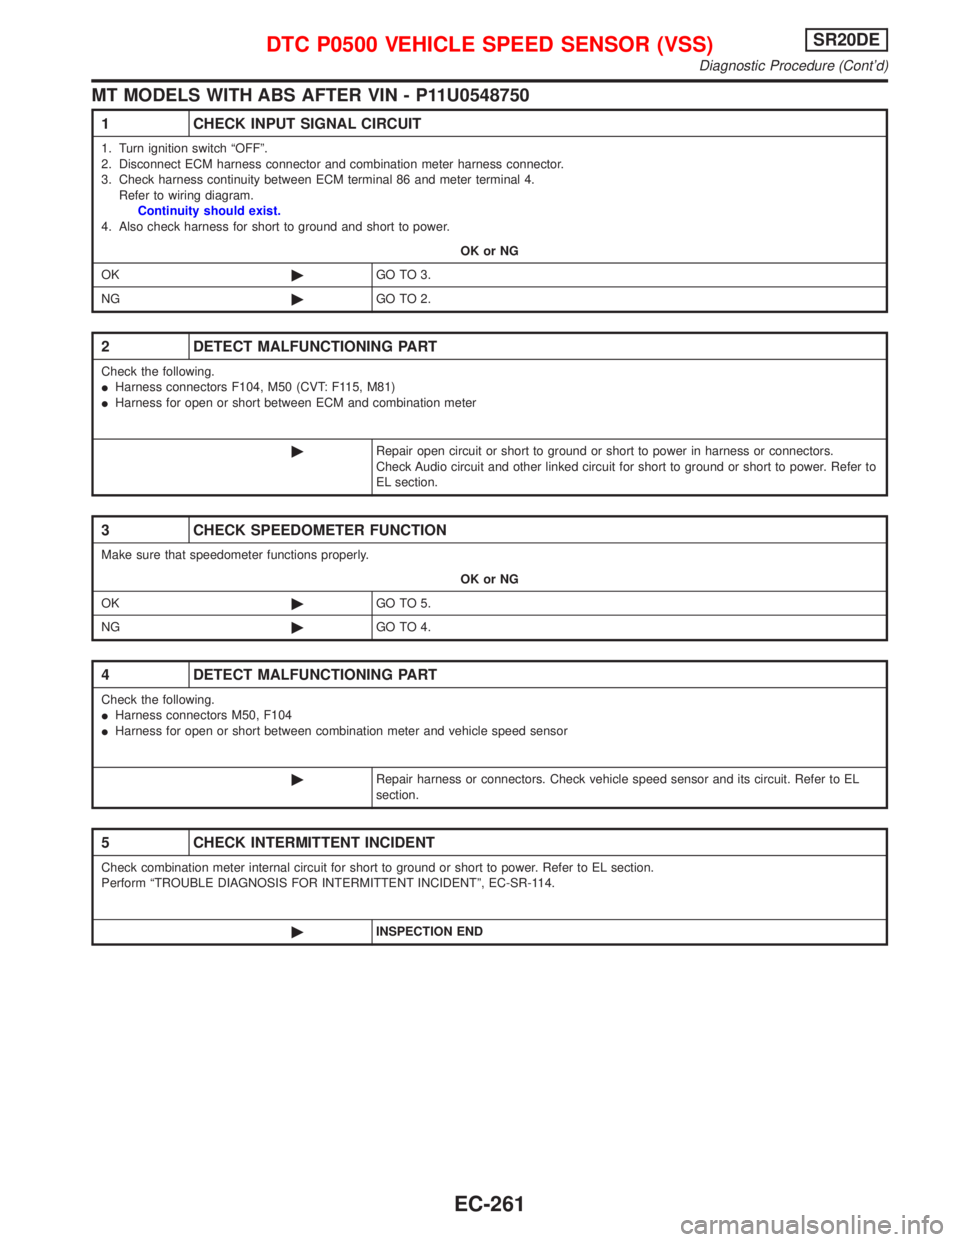
MT MODELS WITH ABS AFTER VIN - P11U0548750
1 CHECK INPUT SIGNAL CIRCUIT
1. Turn ignition switch ªOFFº.
2. Disconnect ECM harness connector and combination meter harness connector.
3. Check harness continuity between ECM terminal 86 and meter terminal 4.
Refer to wiring diagram.
Continuity should exist.
4. Also check harness for short to ground and short to power.
OK or NG
OK©GO TO 3.
NG©GO TO 2.
2 DETECT MALFUNCTIONING PART
Check the following.
IHarness connectors F104, M50 (CVT: F115, M81)
IHarness for open or short between ECM and combination meter
©Repair open circuit or short to ground or short to power in harness or connectors.
Check Audio circuit and other linked circuit for short to ground or short to power. Refer to
EL section.
3 CHECK SPEEDOMETER FUNCTION
Make sure that speedometer functions properly.
OK or NG
OK©GO TO 5.
NG©GO TO 4.
4 DETECT MALFUNCTIONING PART
Check the following.
IHarness connectors M50, F104
IHarness for open or short between combination meter and vehicle speed sensor
©Repair harness or connectors. Check vehicle speed sensor and its circuit. Refer to EL
section.
5 CHECK INTERMITTENT INCIDENT
Check combination meter internal circuit for short to ground or short to power. Refer to EL section.
Perform ªTROUBLE DIAGNOSIS FOR INTERMITTENT INCIDENTº, EC-SR-114.
©INSPECTION END
DTC P0500 VEHICLE SPEED SENSOR (VSS)SR20DE
Diagnostic Procedure (Cont'd)
EC-261
Page 1062 of 2267
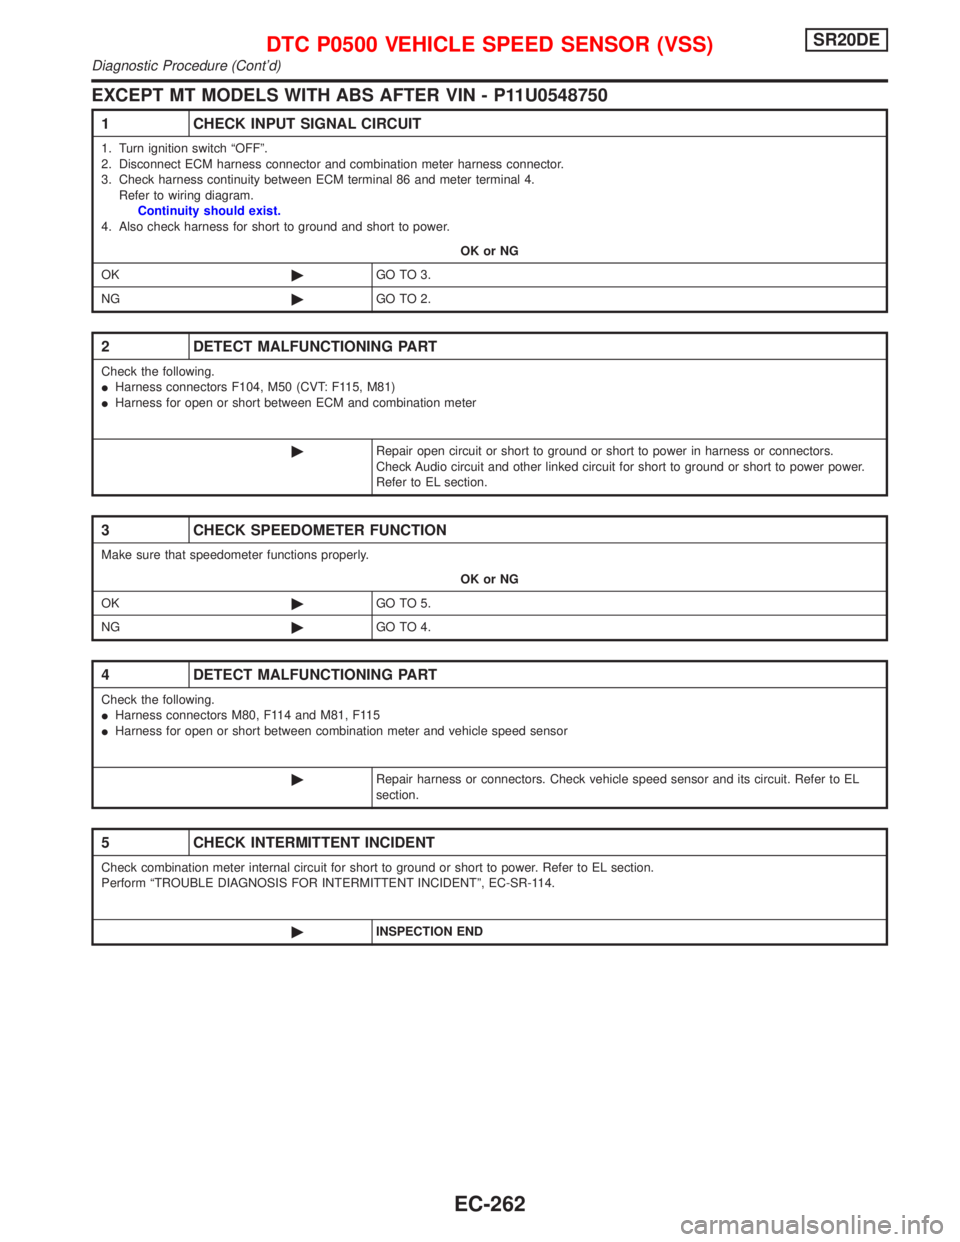
EXCEPT MT MODELS WITH ABS AFTER VIN - P11U0548750
1 CHECK INPUT SIGNAL CIRCUIT
1. Turn ignition switch ªOFFº.
2. Disconnect ECM harness connector and combination meter harness connector.
3. Check harness continuity between ECM terminal 86 and meter terminal 4.
Refer to wiring diagram.
Continuity should exist.
4. Also check harness for short to ground and short to power.
OK or NG
OK©GO TO 3.
NG©GO TO 2.
2 DETECT MALFUNCTIONING PART
Check the following.
IHarness connectors F104, M50 (CVT: F115, M81)
IHarness for open or short between ECM and combination meter
©Repair open circuit or short to ground or short to power in harness or connectors.
Check Audio circuit and other linked circuit for short to ground or short to power power.
Refer to EL section.
3 CHECK SPEEDOMETER FUNCTION
Make sure that speedometer functions properly.
OK or NG
OK©GO TO 5.
NG©GO TO 4.
4 DETECT MALFUNCTIONING PART
Check the following.
IHarness connectors M80, F114 and M81, F115
IHarness for open or short between combination meter and vehicle speed sensor
©Repair harness or connectors. Check vehicle speed sensor and its circuit. Refer to EL
section.
5 CHECK INTERMITTENT INCIDENT
Check combination meter internal circuit for short to ground or short to power. Refer to EL section.
Perform ªTROUBLE DIAGNOSIS FOR INTERMITTENT INCIDENTº, EC-SR-114.
©INSPECTION END
DTC P0500 VEHICLE SPEED SENSOR (VSS)SR20DE
Diagnostic Procedure (Cont'd)
EC-262
Page 1134 of 2267
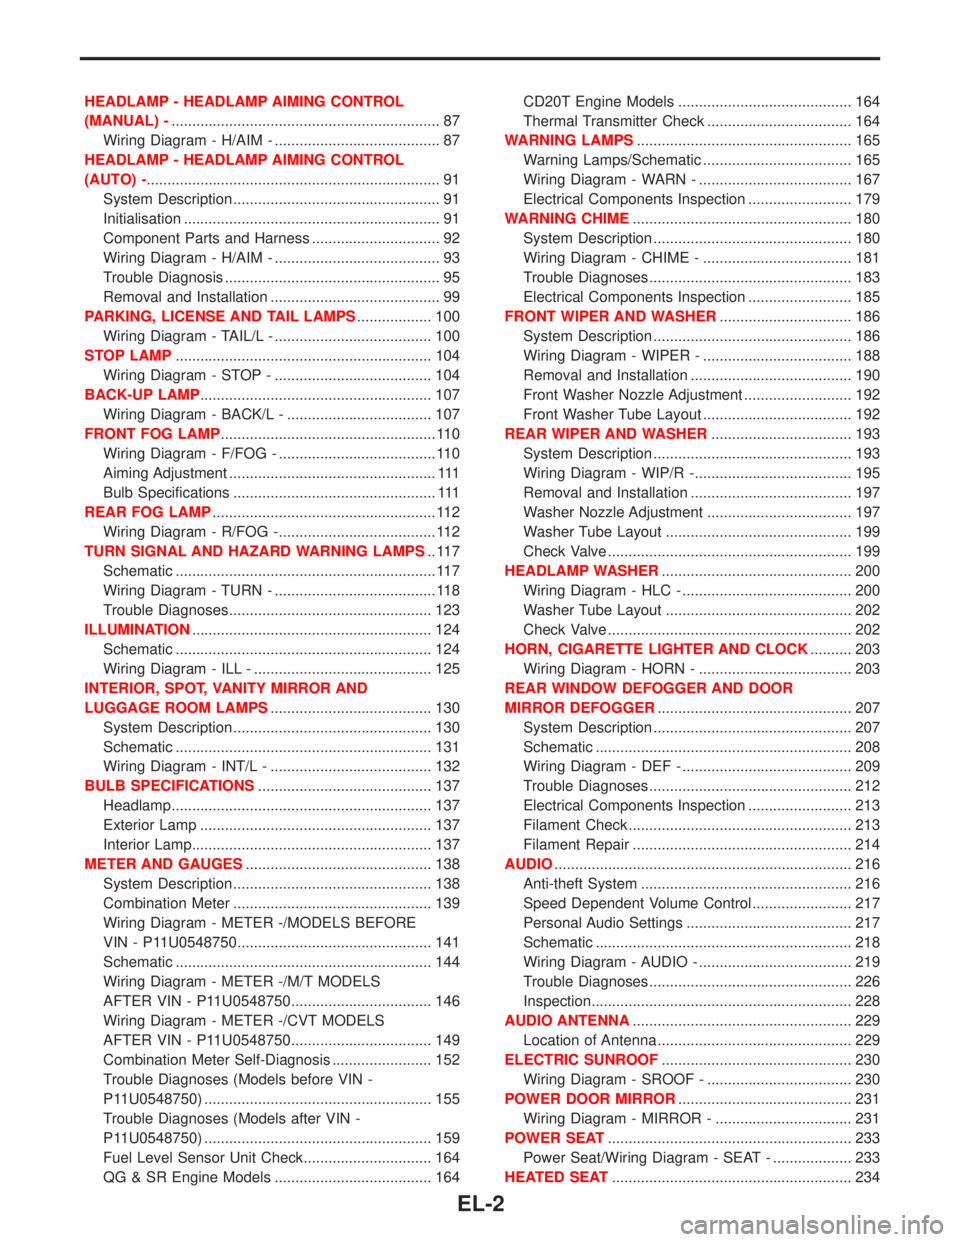
HEADLAMP - HEADLAMP AIMING CONTROL
(MANUAL) -................................................................. 87
Wiring Diagram - H/AIM - ........................................ 87
HEADLAMP - HEADLAMP AIMING CONTROL
(AUTO) -....................................................................... 91
System Description .................................................. 91
Initialisation .............................................................. 91
Component Parts and Harness ............................... 92
Wiring Diagram - H/AIM - ........................................ 93
Trouble Diagnosis .................................................... 95
Removal and Installation ......................................... 99
PARKING, LICENSE AND TAIL LAMPS.................. 100
Wiring Diagram - TAIL/L - ...................................... 100
STOP LAMP.............................................................. 104
Wiring Diagram - STOP - ...................................... 104
BACK-UP LAMP........................................................ 107
Wiring Diagram - BACK/L - ................................... 107
FRONT FOG LAMP.................................................... 110
Wiring Diagram - F/FOG - ...................................... 110
Aiming Adjustment .................................................. 111
Bulb Specifications ................................................. 111
REAR FOG LAMP...................................................... 112
Wiring Diagram - R/FOG -...................................... 112
TURN SIGNAL AND HAZARD WARNING LAMPS.. 117
Schematic ............................................................... 117
Wiring Diagram - TURN - ....................................... 118
Trouble Diagnoses................................................. 123
ILLUMINATION.......................................................... 124
Schematic .............................................................. 124
Wiring Diagram - ILL - ........................................... 125
INTERIOR, SPOT, VANITY MIRROR AND
LUGGAGE ROOM LAMPS....................................... 130
System Description ................................................ 130
Schematic .............................................................. 131
Wiring Diagram - INT/L - ....................................... 132
BULB SPECIFICATIONS.......................................... 137
Headlamp............................................................... 137
Exterior Lamp ........................................................ 137
Interior Lamp.......................................................... 137
METER AND GAUGES............................................. 138
System Description ................................................ 138
Combination Meter ................................................ 139
Wiring Diagram - METER -/MODELS BEFORE
VIN - P11U0548750............................................... 141
Schematic .............................................................. 144
Wiring Diagram - METER -/M/T MODELS
AFTER VIN - P11U0548750.................................. 146
Wiring Diagram - METER -/CVT MODELS
AFTER VIN - P11U0548750.................................. 149
Combination Meter Self-Diagnosis ........................ 152
Trouble Diagnoses (Models before VIN -
P11U0548750) ....................................................... 155
Trouble Diagnoses (Models after VIN -
P11U0548750) ....................................................... 159
Fuel Level Sensor Unit Check............................... 164
QG & SR Engine Models ...................................... 164CD20T Engine Models .......................................... 164
Thermal Transmitter Check ................................... 164
WARNING LAMPS.................................................... 165
Warning Lamps/Schematic .................................... 165
Wiring Diagram - WARN - ..................................... 167
Electrical Components Inspection ......................... 179
WARNING CHIME..................................................... 180
System Description ................................................ 180
Wiring Diagram - CHIME - .................................... 181
Trouble Diagnoses................................................. 183
Electrical Components Inspection ......................... 185
FRONT WIPER AND WASHER................................ 186
System Description ................................................ 186
Wiring Diagram - WIPER - .................................... 188
Removal and Installation ....................................... 190
Front Washer Nozzle Adjustment .......................... 192
Front Washer Tube Layout .................................... 192
REAR WIPER AND WASHER.................................. 193
System Description ................................................ 193
Wiring Diagram - WIP/R -...................................... 195
Removal and Installation ....................................... 197
Washer Nozzle Adjustment ................................... 197
Washer Tube Layout ............................................. 199
Check Valve ........................................................... 199
HEADLAMP WASHER.............................................. 200
Wiring Diagram - HLC - ......................................... 200
Washer Tube Layout ............................................. 202
Check Valve ........................................................... 202
HORN, CIGARETTE LIGHTER AND CLOCK.......... 203
Wiring Diagram - HORN - ..................................... 203
REAR WINDOW DEFOGGER AND DOOR
MIRROR DEFOGGER............................................... 207
System Description ................................................ 207
Schematic .............................................................. 208
Wiring Diagram - DEF - ......................................... 209
Trouble Diagnoses................................................. 212
Electrical Components Inspection ......................... 213
Filament Check ...................................................... 213
Filament Repair ..................................................... 214
AUDIO........................................................................ 216
Anti-theft System ................................................... 216
Speed Dependent Volume Control ........................ 217
Personal Audio Settings ........................................ 217
Schematic .............................................................. 218
Wiring Diagram - AUDIO - ..................................... 219
Trouble Diagnoses................................................. 226
Inspection............................................................... 228
AUDIO ANTENNA..................................................... 229
Location of Antenna ............................................... 229
ELECTRIC SUNROOF.............................................. 230
Wiring Diagram - SROOF - ................................... 230
POWER DOOR MIRROR.......................................... 231
Wiring Diagram - MIRROR - ................................. 231
POWER SEAT........................................................... 233
Power Seat/Wiring Diagram - SEAT - ................... 233
HEATED SEAT.......................................................... 234
EL-2
Page 1149 of 2267

YEL225C
To
EL-POWER-03
DAYTIME
LIGHT
CONTROL
UNIT: With daytime light system
: Without daytime light system
: With glove box lamp
FUSE BLOCK
(J/B)
To
EL-ILLTo
EL-ILLTo
EL-ILL
EL-AUDIOTo
EL-ILL
To
EL-TAIL/L
EL-H/AIM
EL-ILLTo
EL-ILLTo
EL-ILLTo
EL-ILL
REFER TO THE FOLLOWING
FUSE BLOCK - Junction Box (J/B)
FUSE BLOCK - Junction Box (J/B)
FUSE BLOCK - Junction Box (J/B) To
EL-ILL
: This connector is not shown in“HARNESS LAYOUT”of EL section.TIME CON-
TROL UNITTo
EL-TAIL/L
EL-H/AIM
POWER SUPPLY ROUTING
Wiring Diagram—POWER—(Cont’d)
EL-17