bolt pattern NISSAN PULSAR 1987 Workshop Manual
[x] Cancel search | Manufacturer: NISSAN, Model Year: 1987, Model line: PULSAR, Model: NISSAN PULSAR 1987Pages: 238, PDF Size: 28.91 MB
Page 45 of 238

Engine 45
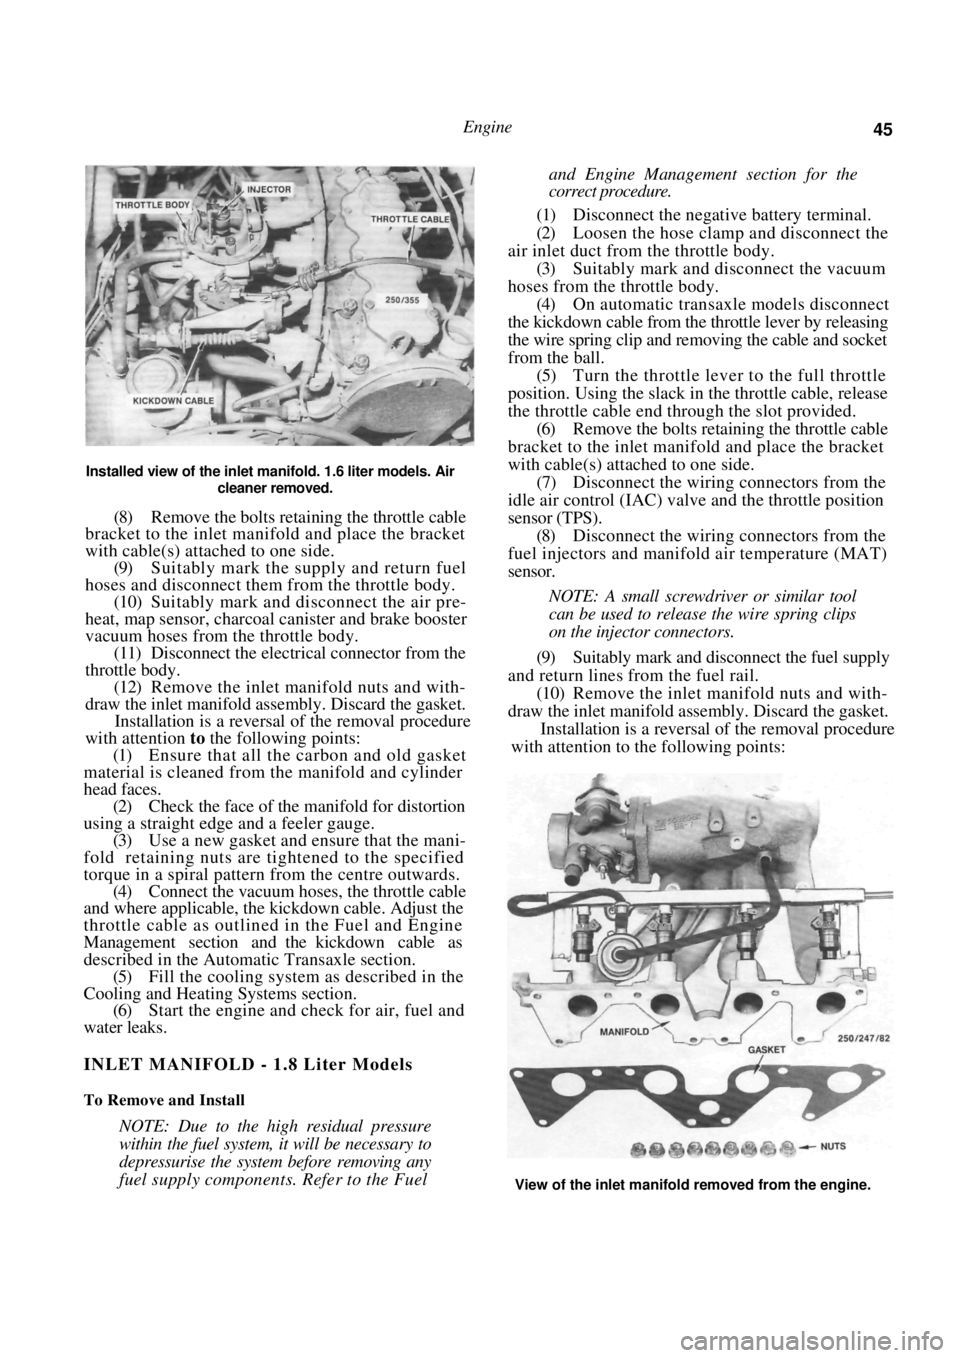
Installed view of the inlet manifold. 1.6 liter models. Air
cleaner removed.
(8) Remove the bolts retaining the throttle cable
bracket to the inlet manifold and place the bracket
with cable(s) attached to one side.
(9) Suitably mark the supply and return fuel
hoses and disconnect them from the throttle body.
(10) Suitably mark and disconnect the air pre-
heat, map sensor, charcoal canister and brake booster
vacuum hoses from the throttle body. (11) Disconnect the electrical connector from the
throttle body. (12) Remove the inlet manifold nuts and with-
draw the inlet manifold assembly. Discard the gasket. Installation is a reversal of the removal procedure
with attention to the following points:
(1) Ensure that all the carbon and old gasket
material is cleaned from the manifold and cylinder
head faces. (2) Check the face of the manifold for distortion
using a straight edge and a feeler gauge. (3) Use a new gasket and ensure that the mani-
fold retaining nuts are tightened to the specified
torque in a spiral pattern from the centre outwards. (4) Connect the vacuum hoses, the throttle cable
and where applicable, the kickdown cable. Adjust the
throttle cable as outlined in the Fuel and Engine
Management section and the kickdown cable as
described in the Automatic Transaxle section. (5) Fill the cooling system as described in the
Cooling and Heating Systems section. (6) Start the engine and check for air, fuel and
water leaks.
INLET MANIFOLD - 1.8 Liter Models
To Remove and Install
NOTE: Due to the high residual pressure
within the fuel system, it will be necessary to
depressurise the system before removing any
fuel supply components. Refer to the Fuel
and Engine Management section for the
correct procedure.
(1) Disconnect the negative battery terminal.
(2) Loosen the hose clamp and disconnect the
air inlet duct from the throttle body. (3) Suitably mark and disconnect the vacuum
hoses from the throttle body. (4) On automatic transaxle models disconnect
the kickdown cable from the throttle lever by releasing
the wire spring clip and re moving the cable and socket
from the ball. (5) Turn the throttle lever to the full throttle
position. Using the slack in the throttle cable, release
the throttle cable end thr ough the slot provided.
(6) Remove the bolts retaining the throttle cable
bracket to the inlet manifold and place the bracket
with cable(s) attached to one side. (7) Disconnect the wiring connectors from the
idle air control (IAC) valve and the throttle position
sensor (TPS).
(8) Disconnect the wiring connectors from the
fuel injectors and manifold air temperature (MAT)
sensor.
NOTE: A small screwdriver or similar tool
can be used to release the wire spring clips
on the injector connectors.
(9) Suitably mark and disconnect the fuel supply
and return lines from the fuel rail. (10) Remove the inlet manifold nuts and with-
draw the inlet manifold assembly. Discard the gasket. Installation is a reversal of the removal procedure
with attention to the following points:
View of the inlet manifold removed from the engine.
Page 46 of 238

46 Engine
(1) Ensure that all carbon and old gasket mate-
rial is cleaned from the manifold and cylinder head
faces. (2) Check the face of the manifold for distortion
using a straight edge and a feeler gauge. (3) Use a new gasket and ensure that the mani-
fold retaining nuts are tightened to the specified
torque in a spiral pattern from the centre outwards. (4) Adjust the throttle cabl e as described in the
Fuel and Engine Management section and the kick-
down cable as described in the Automatic Transaxle
section.
(5) Start the engine and check for air, fuel and
water leaks.
EXHAUST MANIFOLD
To Remove and Install
(1) Bring the engine to operating temperature
and remove the oxygen sensor.
(2) Disconnect the negative battery terminal.
(3) On 1.6 liter models, remove the air cleaner
nuts, disconnect the vacuum hose and withdraw the
air cleaner from the vehicle. (4) Remove the front exhaust pipe flange mount-
ing nuts and separate the exhaust pipe from the
manifold. (5) Remove the heat shield retaining bolts and
withdraw the heat shield from the exhaust manifold. (6) Remove the exhaust manifold to cylinder
head retaining nuts and remove the manifold from the
engine. Discard the manifold gasket. Installation is a reversal of the removal procedure
with attention to the following points:
(1) Ensure that all carbon is cleaned from the
manifold and cylinder head mating surfaces. (2) Check the face of the manifold for distortion
using a straight edge and feeler gauges. (3) Use new gaskets on assembly.
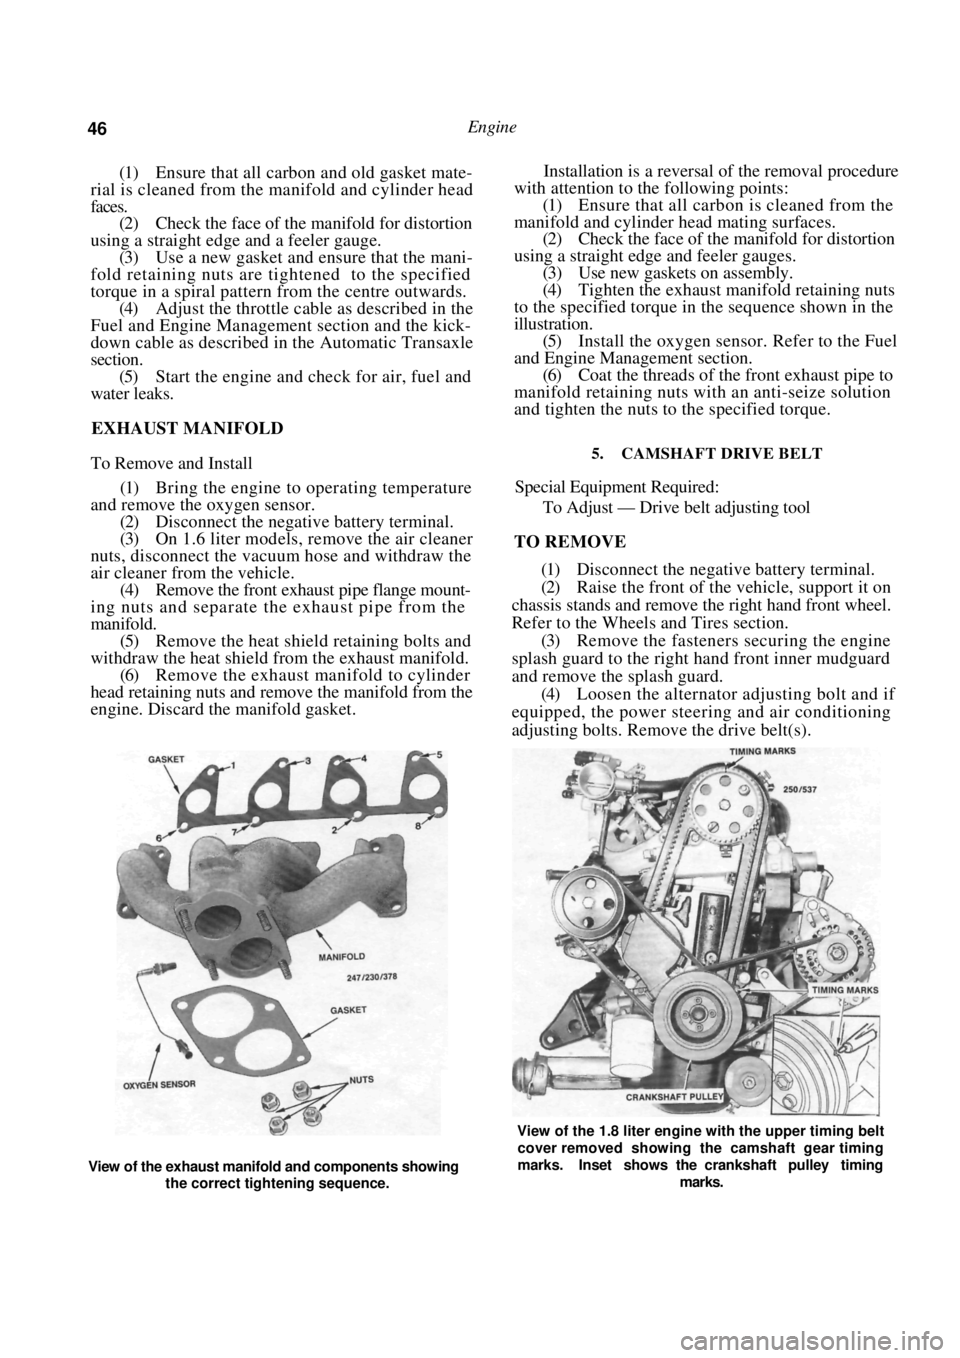
(4) Tighten the exhaust manifold retaining nuts
to the specified torque in the sequence shown in the
illustration. (5) Install the oxygen sensor. Refer to the Fuel
and Engine Management section. (6) Coat the threads of the front exhaust pipe to
manifold retaining nuts with an anti-seize solution
and tighten the nuts to the specified torque.
5. CAMSHAFT DRIVE BELT
Special Equipment Required:
To Adjust — Drive belt adjusting tool
TO REMOVE
(1) Disconnect the negative battery terminal.
(2) Raise the front of the vehicle, support it on
chassis stands and remove the right hand front wheel.
Refer to the Wheels and Tires section. (3) Remove the fasteners securing the engine
splash guard to the right hand front inner mudguard
and remove the splash guard. (4) Loosen the alternator adjusting bolt and if
equipped, the power steering and air conditioning
adjusting bolts. Remove the drive belt(s).
View of the exhaust manifold and components showing
the correct tightening sequence.
View of the 1.8 liter engine with the upper timing belt
cover removed showing the camshaft gear timing
marks. Inset shows the crankshaft pulley timing
marks.
Page 210 of 238

210 Electrical System
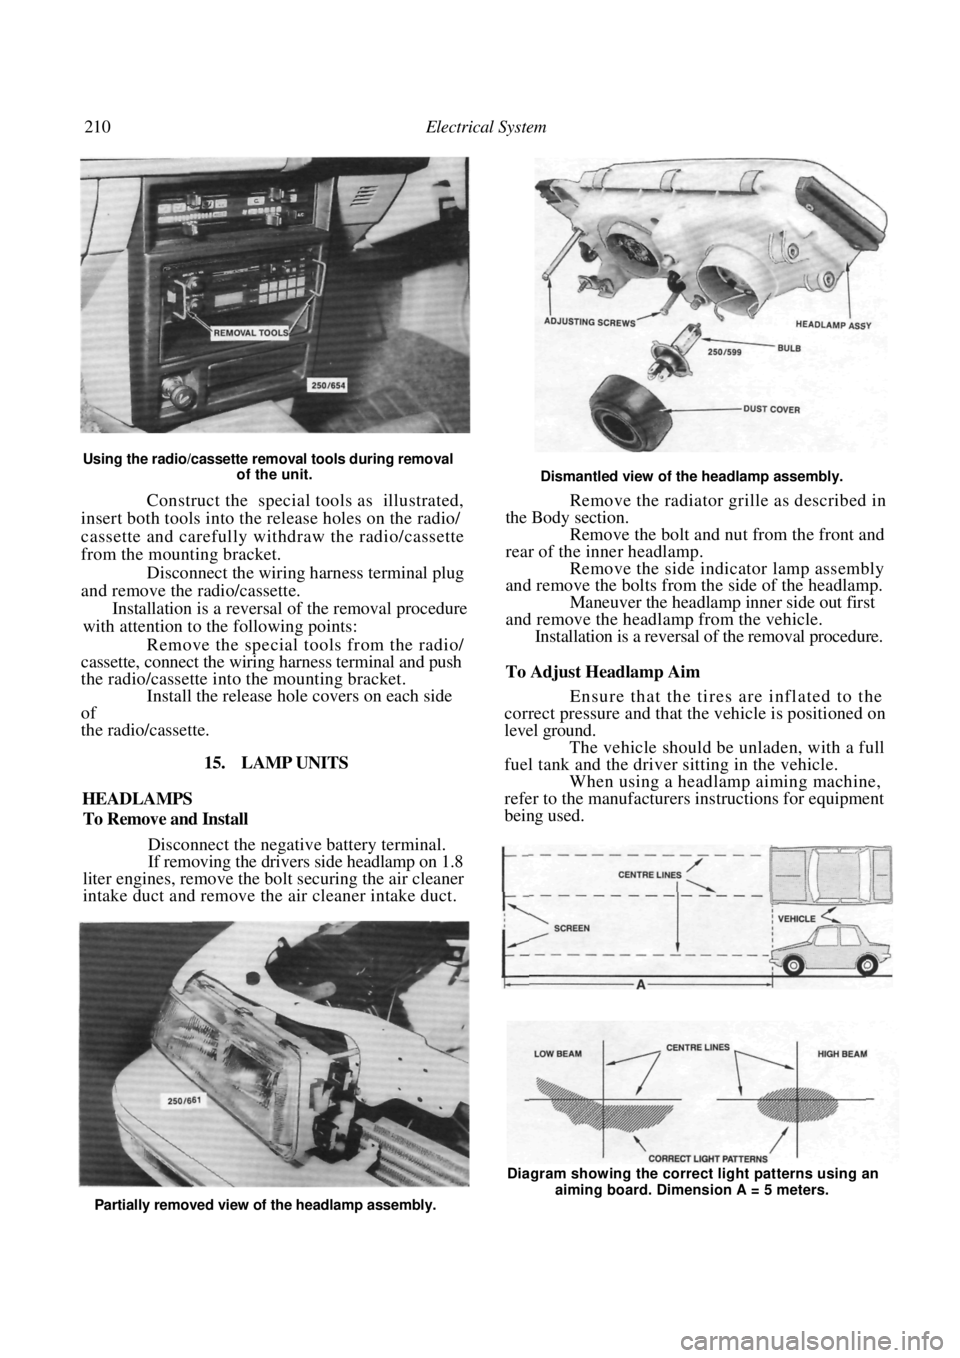
Using the radio/cassette removal tools during removal of the unit.
Construct the special tools as illustrated,
insert both tools into the release holes on the radio/
cassette and carefully withdraw the radio/cassette
from the mounting bracket.
Disconnect the wiring harness terminal plug
and remove the radio/cassette.
Installation is a reversal of the removal procedure
with attention to the following points:
Remove the special tools from the radio/
cassette, connect the wiring harness terminal and push
the radio/cassette into the mounting bracket. Install the release hole covers on each side
of
the radio/cassette.
15. LAMP UNITS
HEADLAMPS
To Remove and Install
Disconnect the negative battery terminal.
If removing the drivers side headlamp on 1.8
liter engines, remove the bo lt securing the air cleaner
intake duct and remove the air cleaner intake duct.
Dismantled view of the headlamp assembly.
Remove the radiator grille as described in
the Body section. Remove the bolt and nut from the front and
rear of the inner headlamp. Remove the side indicator lamp assembly
and remove the bolts from the side of the headlamp.
Maneuver the headlamp inner side out first
and remove the headlamp from the vehicle. Installation is a reversal of the removal procedure.
To Adjust Headlamp Aim
Ensure that the tires are inflated to the
correct pressure and that the vehicle is positioned on
level ground.
The vehicle should be unladen, with a full
fuel tank and the driver sitting in the vehicle. When using a headlamp aiming machine,
refer to the manufacturers instructions for equipment
being used.
Partially removed view of the headlamp assembly. Diagram showing the correct light patterns using an
aiming board. Dimension A = 5 meters.