icon NISSAN QASHQAI 2012 Owners Manual
[x] Cancel search | Manufacturer: NISSAN, Model Year: 2012, Model line: QASHQAI, Model: NISSAN QASHQAI 2012Pages: 297, PDF Size: 4.09 MB
Page 61 of 297
Downloaded from www.Manualslib.com manuals search engine WARNINGS AND ALERTS
The design of the warnings and alerts may differ
depending on the model.
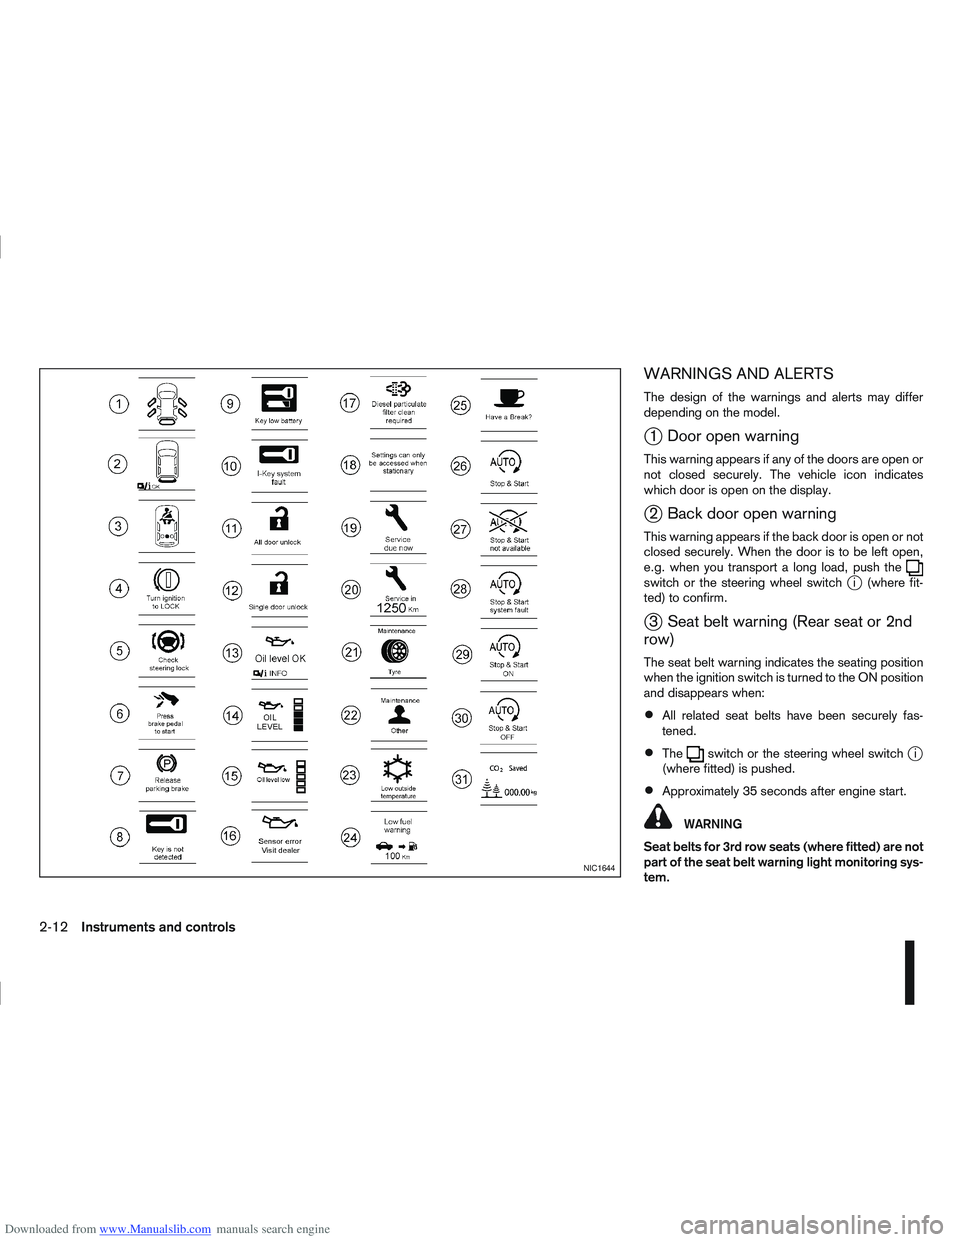
j1 Door open warning
This warning appears if any of the doors are open or
not closed securely. The vehicle icon indicates
which door is open on the display.
j2 Back door open warning
This warning appears if the back door is open or not
closed securely. When the door is to be left open,
e.g. when you transport a long load, push the
switch or the steering wheel switchji (where fit-
ted) to confirm.
j3 Seat belt warning (Rear seat or 2nd
row)
The seat belt warning indicates the seating position
when the ignition switch is turned to the ON position
and disappears when:
All related seat belts have been securely fas-
tened.
Theswitch or the steering wheel switchji
(where fitted) is pushed.
Approximately 35 seconds after engine start.
WARNING
Seat belts for 3rd row seats (where fitted) are not
part of the seat belt warning light monitoring sys-
tem.
NIC1644
2-12Instruments and controls
Page 65 of 297
Downloaded from www.Manualslib.com manuals search engine ODOMETER/TWIN TRIP ODOMETER
The odometer and twin trip odometer are displayed
when the ignition switch is in the ON position.
Odometer
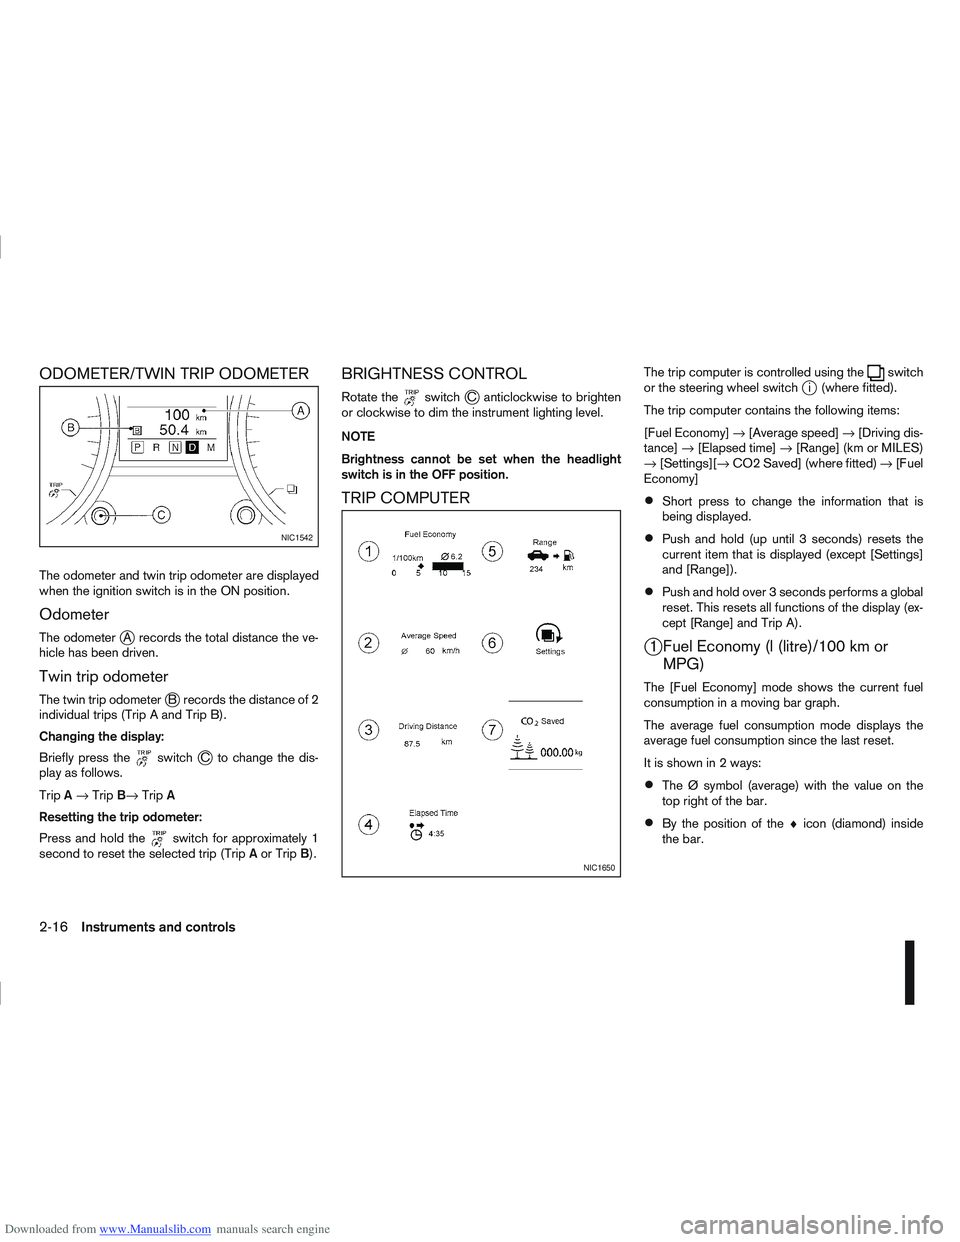
The odometerjA records the total distance the ve-
hicle has been driven.
Twin trip odometer
The twin trip odometerjB records the distance of 2
individual trips (Trip A and Trip B).
Changing the display:
Briefly press the
switchjC to change the dis-
play as follows.
Trip A→ Trip B→ TripA
Resetting the trip odometer:
Press and hold the
switch for approximately 1
second to reset the selected trip (Trip Aor Trip B).
BRIGHTNESS CONTROL
Rotate theswitchjC anticlockwise to brighten
or clockwise to dim the instrument lighting level.
NOTE
Brightness cannot be set when the headlight
switch is in the OFF position.
TRIP COMPUTER
The trip computer is controlled using theswitch
or the steering wheel switchji (where fitted).
The trip computer contains the following items:
[Fuel Economy] →[Average speed] →[Driving dis-
tance] →[Elapsed time] →[Range] (km or MILES)
→ [Settings][→ CO2 Saved] (where fitted) →[Fuel
Economy]
Short press to change the information that is
being displayed.
Push and hold (up until 3 seconds) resets the
current item that is displayed (except [Settings]
and [Range]).
Push and hold over 3 seconds performs a global
reset. This resets all functions of the display (ex-
cept [Range] and Trip A).
j1 Fuel Economy (l (litre)/100 km or MPG)
The [Fuel Economy] mode shows the current fuel
consumption in a moving bar graph.
The average fuel consumption mode displays the
average fuel consumption since the last reset.
It is shown in 2 ways:
The Ø symbol (average) with the value on the
top right of the bar.
By the position of the ♦icon (diamond) inside
the bar.
NIC1542
NIC1650
2-16Instruments and controls
Page 115 of 297
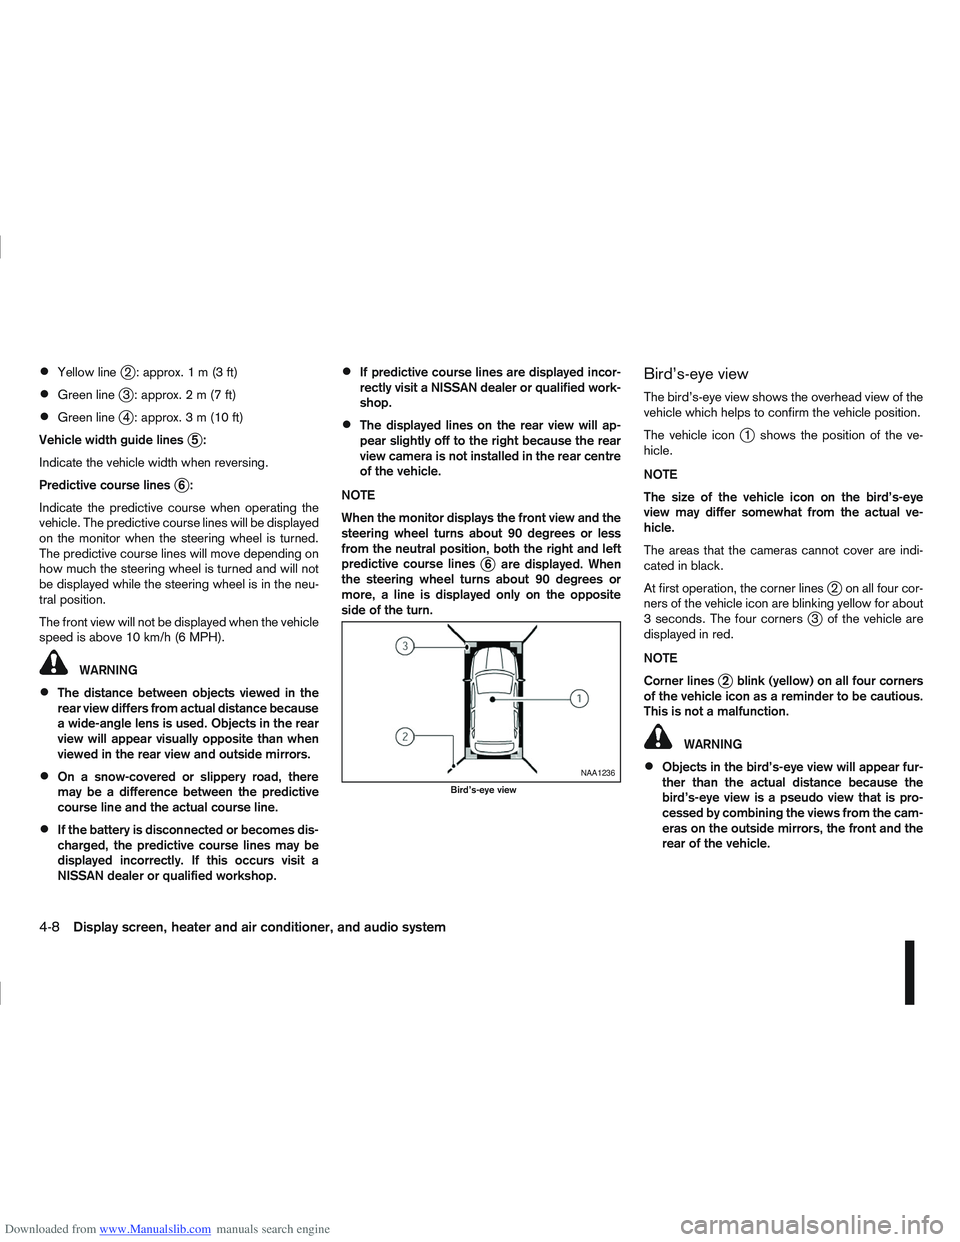
Downloaded from www.Manualslib.com manuals search engine Yellow linej2 :approx.1m(3ft)
Green linej3 :approx.2m(7ft)
Green linej4 :approx.3m(10ft)
Vehicle width guide lines
j5:
Indicate the vehicle width when reversing.
Predictive course lines
j6:
Indicate the predictive course when operating the
vehicle. The predictive course lines will be displayed
on the monitor when the steering wheel is turned.
The predictive course lines will move depending on
how much the steering wheel is turned and will not
be displayed while the steering wheel is in the neu-
tral position.
The front view will not be displayed when the vehicle
speed is above 10 km/h (6 MPH).
WARNING
The distance between objects viewed in the
rear view differs from actual distance because
a wide-angle lens is used. Objects in the rear
view will appear visually opposite than when
viewed in the rear view and outside mirrors.
On a snow-covered or slippery road, there
may be a difference between the predictive
course line and the actual course line.
If the battery is disconnected or becomes dis-
charged, the predictive course lines may be
displayed incorrectly. If this occurs visit a
NISSAN dealer or qualified workshop.
If predictive course lines are displayed incor-
rectly visit a NISSAN dealer or qualified work-
shop.
The displayed lines on the rear view will ap-
pear slightly off to the right because the rear
view camera is not installed in the rear centre
of the vehicle.
NOTE
When the monitor displays the front view and the
steering wheel turns about 90 degrees or less
from the neutral position, both the right and left
predictive course lines
j6 are displayed. When
the steering wheel turns about 90 degrees or
more, a line is displayed only on the opposite
side of the turn.
Bird’s-eye view
The bird’s-eye view shows the overhead view of the
vehicle which helps to confirm the vehicle position.
The vehicle icon
j1 shows the position of the ve-
hicle.
NOTE
The size of the vehicle icon on the bird’s-eye
view may differ somewhat from the actual ve-
hicle.
The areas that the cameras cannot cover are indi-
cated in black.
At first operation, the corner lines
j2 on all four cor-
ners of the vehicle icon are blinking yellow for about
3 seconds. The four corners
j3 of the vehicle are
displayed in red.
NOTE
Corner lines
j2 blink (yellow) on all four corners
of the vehicle icon as a reminder to be cautious.
This is not a malfunction.
WARNING
Objects in the bird’s-eye view will appear fur-
ther than the actual distance because the
bird’s-eye view is a pseudo view that is pro-
cessed by combining the views from the cam-
eras on the outside mirrors, the front and the
rear of the vehicle.NAA1236
Bird’s-eye view
4-8Display screen, heater and air conditioner, and audio system
Page 133 of 297
Downloaded from www.Manualslib.com manuals search engine RDS functions
Programme Service (PS) function (station name
display function):
When an RDS station is tuned in with seek or manual
tuning, the RDS data is received and the PS name
is displayed.
Emergency broadcast interrupt function
(ALARM INTERRUPTION - EBU SPEC FOR
INFO):
When the radio receives PTY code 31 (an emer-
gency broadcast code), the sound is interrupted,
the emergency broadcast is heard, and [ALARM] is
displayed. The volume level at this time is the same
as that for traffic announcements. Once the emer-
gency broadcast is finished, the unit immediately
returns to the previous source.
REG (Regional) mode:
Some local radio stations are linked according to
region because they only offer limited coverage due
a limited number of transmitters. If the signal from
one station of these stations becomes weak while
driving, RDS mode will switch to another local sta-
tion in the region with a stronger signal.
When the REG mode is activated in the FM band
and the radio receiver is tuned to a local radio sta-
tion, it will keep receiving this radio station without
switching to another local station. For activation or
deactivation details, see “MENU button” later in this
section.
TA Traffic announcement
This function operates in both FM (radio) and CD
mode.
Pressing the
mode. The TA indicator is displayed while TA
mode is on.
When the
The mode will be switched off and the TA indica-
tor will disappear from the display.
If the TA mode is not activated ,aTiconwill
appear in the display when the currently received
radio station is capable of broadcasting traffic
announcements. Pressing the
ton will activate TA mode and the indicator will
change from T to TA.
Traffic announcement interrupt function:
When a traffic announcement is received, the an-
nouncement is tuned in.
Once the traffic announcement has finished, the unit
returns to the source that was active before the traf-
fic announcement started. The volume returns to the
previous level.
If the
announcement, the traffic announcement interrupt
mode is cancelled. The TA mode returns to the
standby mode and the audio unit returns to the pre-
vious source. NOTE
TA mode operates regardless of whether the AF
mode is on or off.
NEWS mode
When the NEWS mode is activated and the radio
receives a NEWS code from a FM broadcasting
station, the playing mode will be interrupted. Once
the news broadcast has finished, the audio unit will
return to the previous source. During the interrup-
tion, NEWS and the broadcasting station name will
be displayed.
To enable or disable the NEWS mode, press the
button for more than 2 seconds. When
the NEWS mode is enabled, the NEWS icon will be
displayed.
1. NEWS standby mode
The NEWS standby mode can be activated while
in FM or CD mode.
Pressing the TA NEWS button for more than 2
seconds, the NEWS standby mode will switch
off and the NEWS icon will disappear from the
display.
2. NEWS interruption mode
Pressing the
2 seconds, the NEWS standby mode will switch
off and the NEWS icon will disappear from the
display.
4-26Display screen, heater and air conditioner, and audio system
Page 147 of 297
Downloaded from www.Manualslib.com manuals search engine Audio device without PIN code:
The Bluetooth connection will be automati-
cally connected without any further input.
Audio device with PIN code:
A new screen will appear. Assign the 4 digit
PIN code by turning the
to each code and press the
to confirm. Then select [Validate] and press
made.
The 4–digit PIN code is provided with the
audio device, see the owner’s manual of the
audio device.
3. On Bluetooth® audio/mobile phone devices. 1) Switch on the Bluetooth® connection, if not already switched on.
2) Switch on the search mode for Bluetooth® devices. If the search mode finds a device it
will be shown on the device display.
3) When a device is found use the
to select [My Car].
4) Enter the number code shown on the relevant device with the device’s own keypad, and
press the confirmation key on the device it-
self. Refer to the relevant Bluetooth® device
owner’s manual for further details.
When successfully paired a notification message
will be displayed, then the audio system display will return to the current audio source display.
During connection the following status icons will
be displayed (top left of the display): Signal
strength (), Battery status* () and Blue-
tooth “ON” ().
*: If the low battery message comes on, the
Bluetooth® device must be recharged soon.
The pairing procedure and operation may vary ac-
cording to device type and compatibility. See the
Bluetooth® owner’s manual for further details.
NOTE
For device details, see your audio/mobile
phone Owner’s Manual.
For assistance with the Bluetooth® audio/
mobile phone integration, please visit your lo-
cal NISSAN dealer.
[Select Device]:
The paired device list shows which Bluetooth® au-
dio or mobile phone devices have been paired or
registered with the Bluetooth® audio system. If the
list contains devices then select the appropriate de-
vice to connect to the Bluetooth® audio system.
The following symbols (where fitted) indicate the
capability of the registered device:
: Mobile phone integration
: Audio streaming (A2DP – Advanced Audio
Distribution Profile) [Delete Device]:
A registered device can be removed from the Blue-
tooth audio system. Select a registered device then
press
[On/Off]:
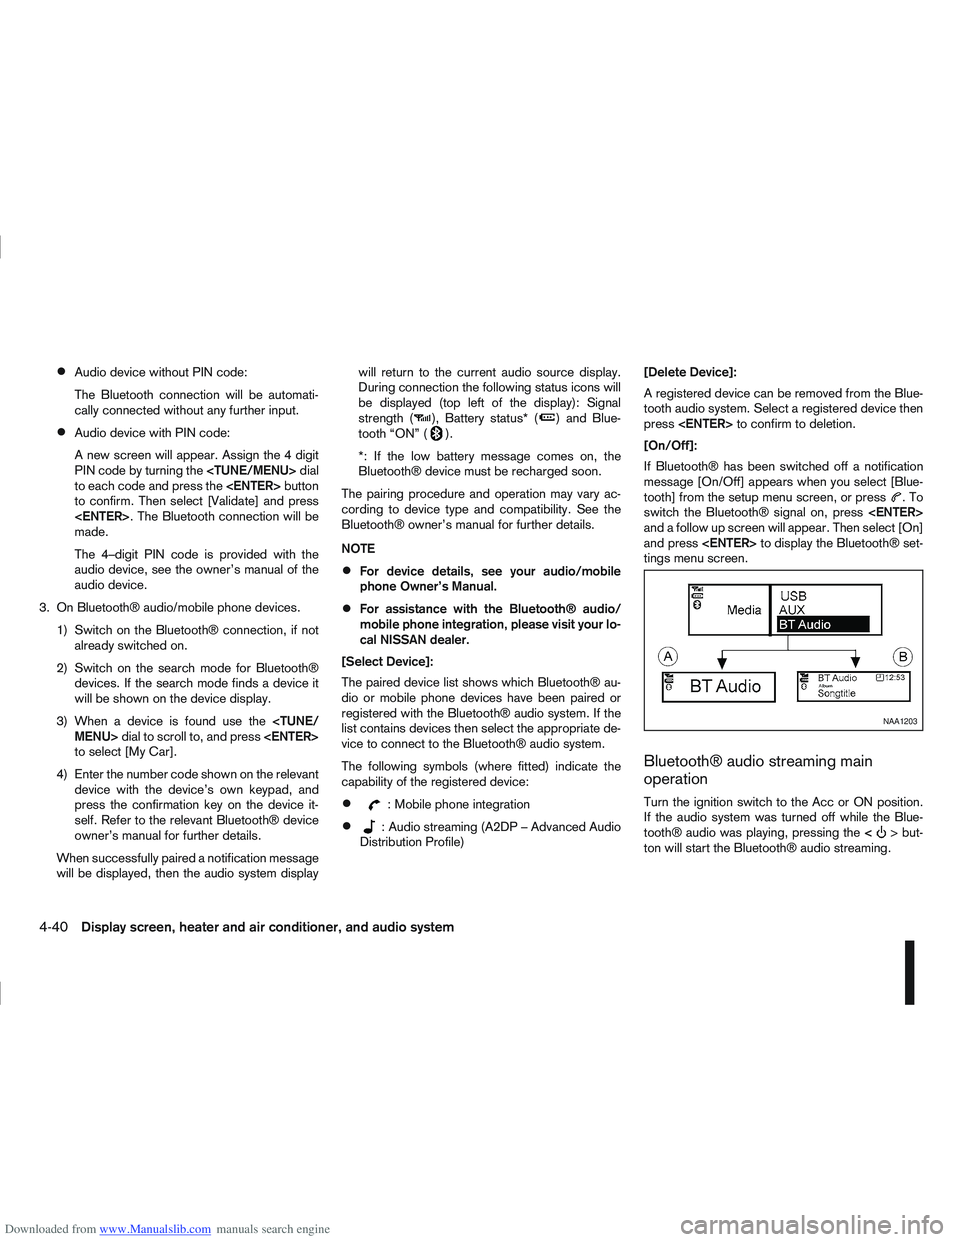
If Bluetooth® has been switched off a notification
message [On/Off] appears when you select [Blue-
tooth] from the setup menu screen, or press
.To
switch the Bluetooth® signal on, press
and a follow up screen will appear. Then select [On]
and press
tings menu screen.
Bluetooth® audio streaming main
operation
Turn the ignition switch to the Acc or ON position.
If the audio system was turned off while the Blue-
tooth® audio was playing, pressing the <
> but-
ton will start the Bluetooth® audio streaming.
NAA1203
4-40Display screen, heater and air conditioner, and audio system
Page 156 of 297
![NISSAN QASHQAI 2012 Owners Manual Downloaded from www.Manualslib.com manuals search engine ActionScreen display
Briefly press
mbutton
↓ [SEARCH]
Turn <MENU/VOL> dial
[
mADD NAME]
↓
Press <ENTER> button [SEND NAME]
↓ *1 *2 [JOE]
NISSAN QASHQAI 2012 Owners Manual Downloaded from www.Manualslib.com manuals search engine ActionScreen display
Briefly press
mbutton
↓ [SEARCH]
Turn <MENU/VOL> dial
[
mADD NAME]
↓
Press <ENTER> button [SEND NAME]
↓ *1 *2 [JOE]](/img/5/56764/w960_56764-155.png)
Downloaded from www.Manualslib.com manuals search engine ActionScreen display
Briefly press
mbutton
↓ [SEARCH]
Turn
Page 160 of 297
Downloaded from www.Manualslib.com manuals search engine BLUETOOTH® settings
To setup the Bluetooth system to pair (connect or
register) your preferred mobile phone, push the
then push the
enter the setup menu directly via the <
> (phone)
button.
The following options can be selected:
[Pair Device]
Bluetooth mobile phones can be paired with the
system. A maximum of 5 Bluetooth mobile
phones can be registered.
[Select Device]
Paired Bluetooth mobile phones (
) are listed
on the display and can be selected for connec-
tion.
[Delete Device]
A registered Bluetooth mobile phone can be de-
leted.
[On]/[Off]
If this setting is turned off, the connection be-
tween the Bluetooth devices and the in-vehicle
Bluetooth module will be cancelled.
For details, see “BLUETOOTH® settings” earlier in
this section.
When successfully paired, a notification message
will be displayed. During the connection the follow-
ing status icons will be displayed (top left of dis- play): Signal strength (
), Battery status (), and
Bluetooth ().
*: If the low battery message comes on, the Blue-
tooth® device must be recharged soon.
HANDS-FREE TELEPHONE
CONTROL
The hands-free mode can be operated using the
telephone <>button on the audio system, or
(where fitted) on the steering wheel.
Initiating a call
A call can be initiated using one of the following
methods:
– Redial
– Phone book
– Manual dialling
– Missed calls
– Dialled calls
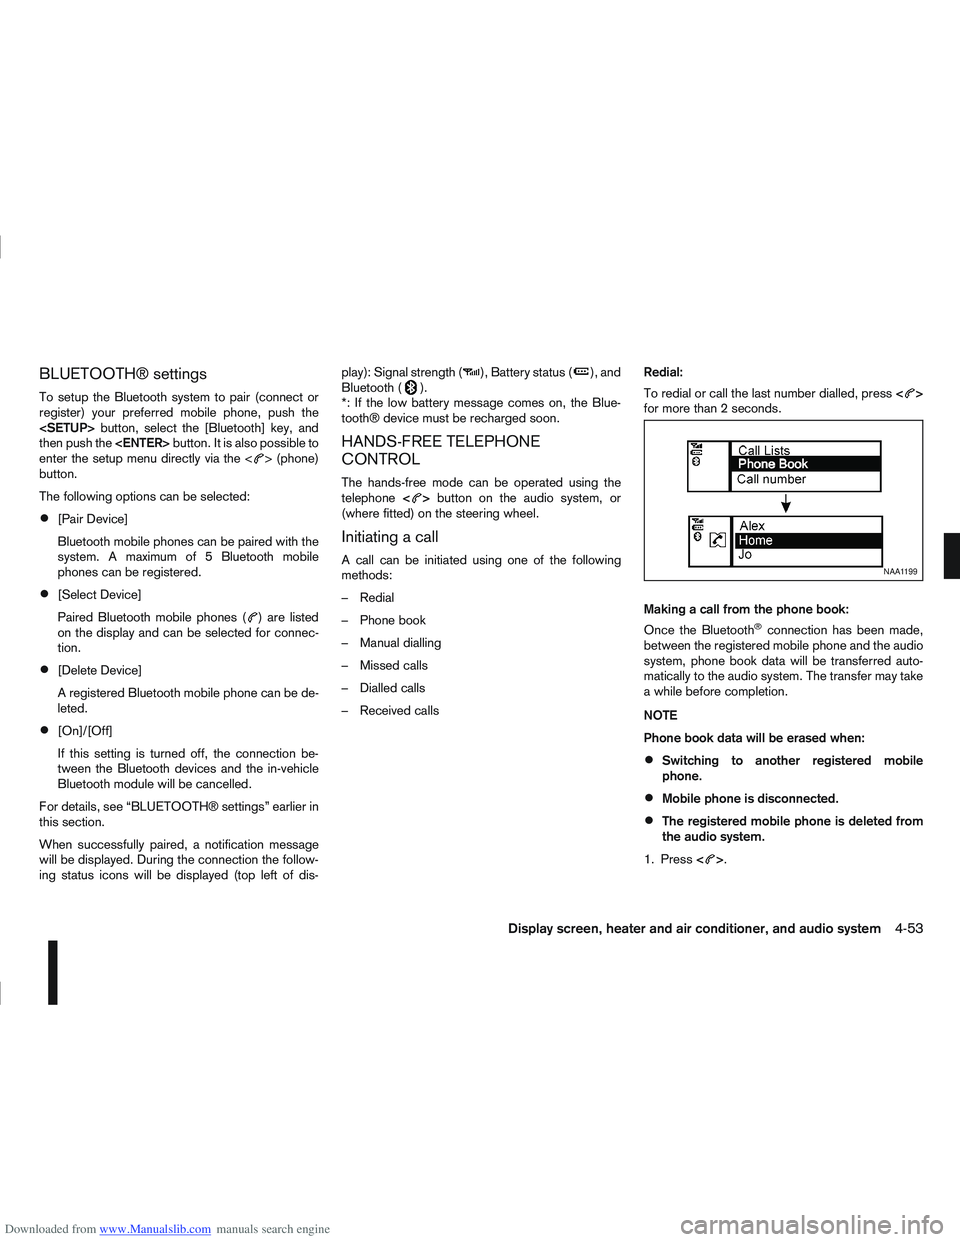
– Received calls Redial:
To redial or call the last number dialled, press
<
>
for more than 2 seconds.
Making a call from the phone book:
Once the Bluetooth
®connection has been made,
between the registered mobile phone and the audio
system, phone book data will be transferred auto-
matically to the audio system. The transfer may take
a while before completion.
NOTE
Phone book data will be erased when:
Switching to another registered mobile
phone.
Mobile phone is disconnected.
The registered mobile phone is deleted from
the audio system.
1. Press <
>.
NAA1199
Display screen, heater and air conditioner, and audio system4-53