lights NISSAN QASHQAI 2012 Owners Manual
[x] Cancel search | Manufacturer: NISSAN, Model Year: 2012, Model line: QASHQAI, Model: NISSAN QASHQAI 2012Pages: 297, PDF Size: 4.09 MB
Page 8 of 297
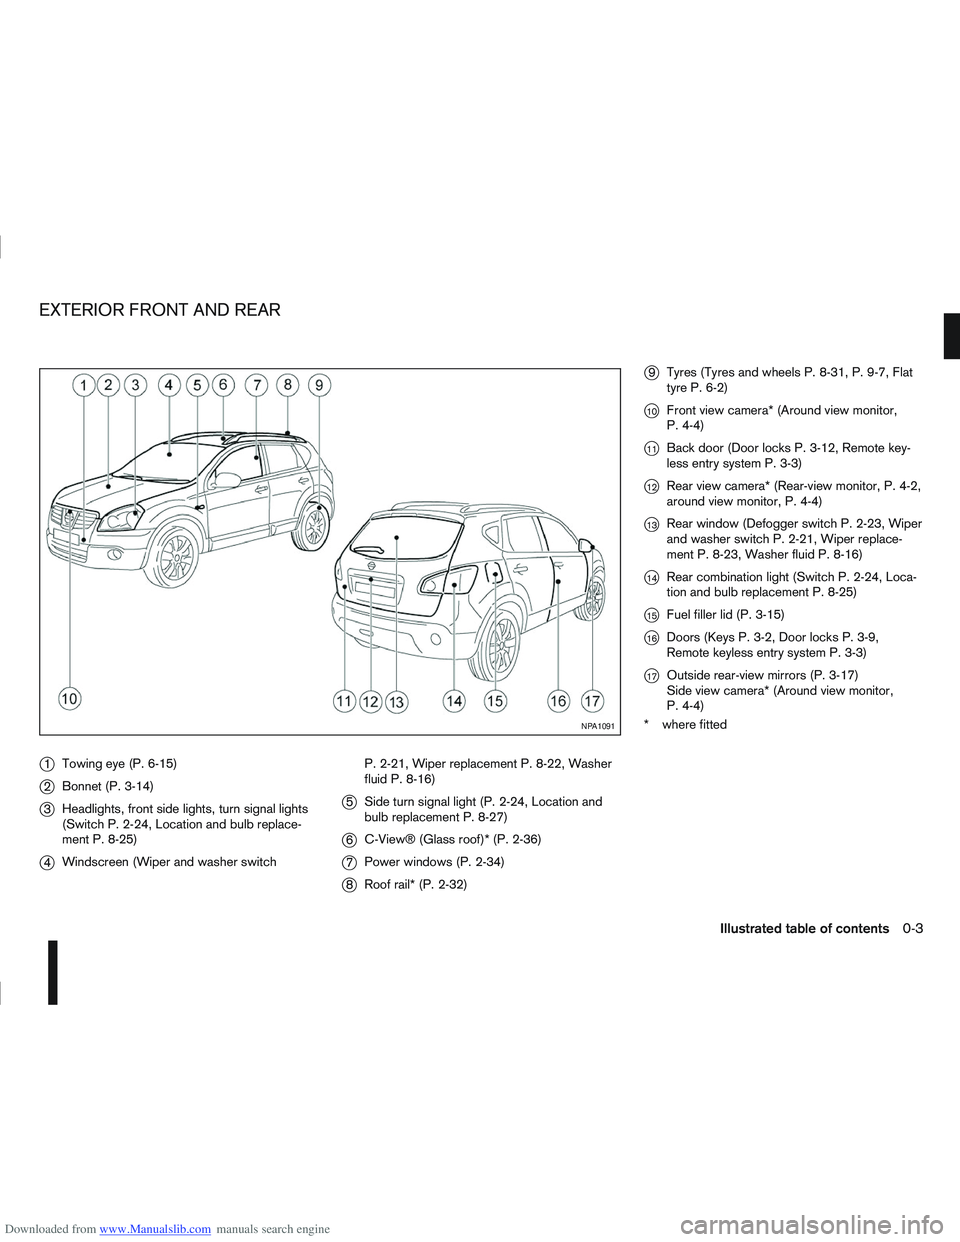
Downloaded from www.Manualslib.com manuals search engine j1Towing eye (P. 6-15)
j2Bonnet (P. 3-14)
j3Headlights, front side lights, turn signal lights
(Switch P. 2-24, Location and bulb replace-
ment P. 8-25)
j4Windscreen (Wiper and washer switch P. 2-21, Wiper replacement P. 8-22, Washer
fluid P. 8-16)
j5
Side turn signal light (P. 2-24, Location and
bulb replacement P. 8-27)
j6C-View® (Glass roof)* (P. 2-36)
j7Power windows (P. 2-34)
j8Roof rail* (P. 2-32)
j9Tyres (Tyres and wheels P. 8-31, P. 9-7, Flat
tyre P. 6-2)
j10Front view camera* (Around view monitor,
P. 4-4)
j11Back door (Door locks P. 3-12, Remote key-
less entry system P. 3-3)
j12Rear view camera* (Rear-view monitor, P. 4-2,
around view monitor, P. 4-4)
j13Rear window (Defogger switch P. 2-23, Wiper
and washer switch P. 2-21, Wiper replace-
ment P. 8-23, Washer fluid P. 8-16)
j14Rear combination light (Switch P. 2-24, Loca-
tion and bulb replacement P. 8-25)
j15Fuel filler lid (P. 3-15)
j16Doors (Keys P. 3-2, Door locks P. 3-9,
Remote keyless entry system P. 3-3)
j17Outside rear-view mirrors (P. 3-17)
Side view camera* (Around view monitor,
P. 4-4)
* where fitted
NPA1091
EXTERIOR FRONT AND REAR
Illustrated table of contents0-3
Page 10 of 297
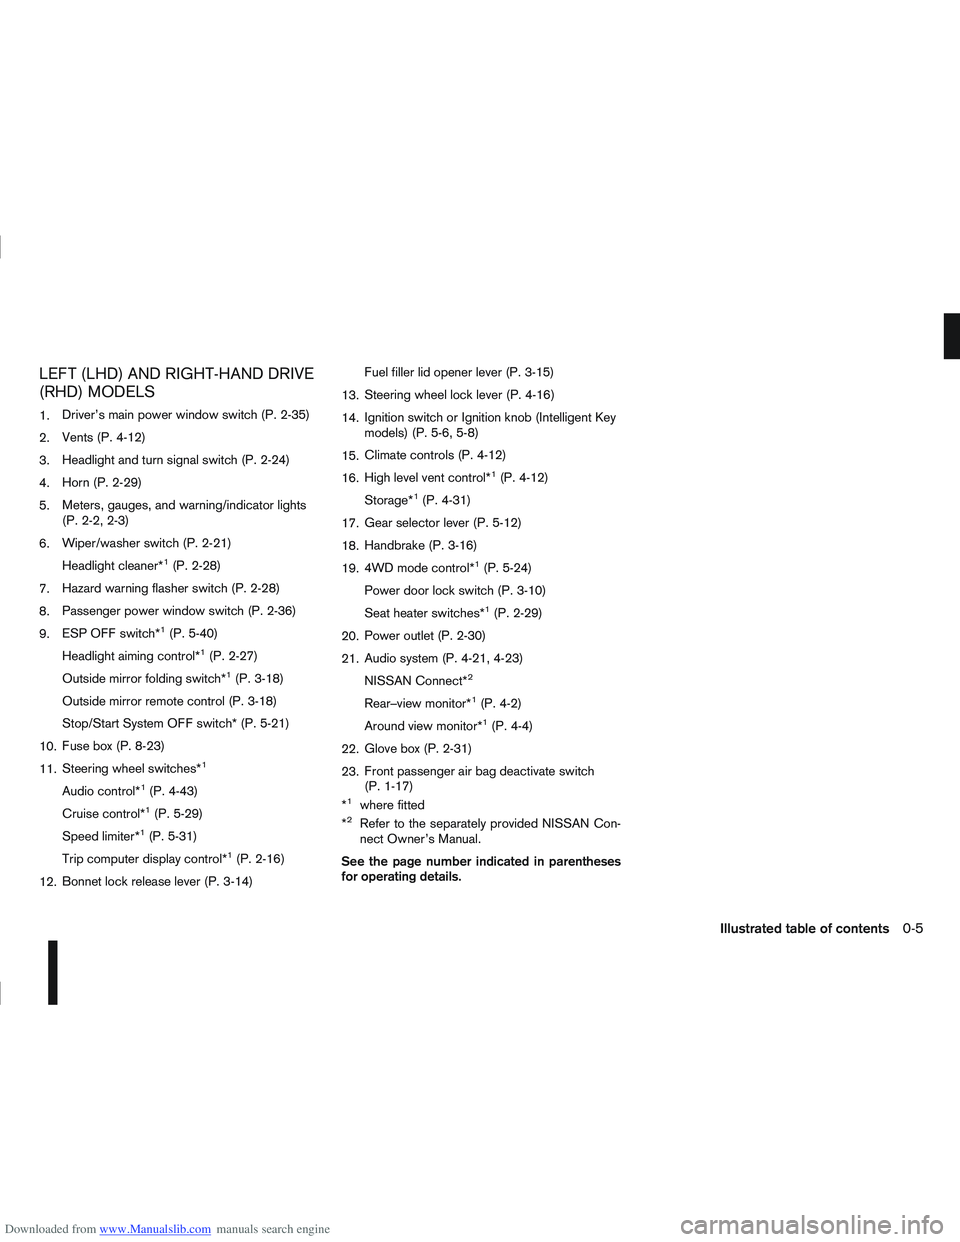
Downloaded from www.Manualslib.com manuals search engine LEFT (LHD) AND RIGHT-HAND DRIVE
(RHD) MODELS
1.Driver’s main power window switch (P. 2-35)
2. Vents (P. 4-12)
3. Headlight and turn signal switch (P. 2-24)
4. Horn (P. 2-29)
5. Meters, gauges, and warning/indicator lights
(P. 2-2, 2-3)
6. Wiper/washer switch (P. 2-21)
Headlight cleaner*
1(P. 2-28)
7. Hazard warning flasher switch (P. 2-28)
8. Passenger power window switch (P. 2-36)
9. ESP OFF switch*
1(P. 5-40)
Headlight aiming control*
1(P. 2-27)
Outside mirror folding switch*
1(P. 3-18)
Outside mirror remote control (P. 3-18)
Stop/Start System OFF switch* (P. 5-21)
10. Fuse box (P. 8-23)
11. Steering wheel switches*
1
Audio control*1(P. 4-43)
Cruise control*
1(P. 5-29)
Speed limiter*
1(P. 5-31)
Trip computer display control*
1(P. 2-16)
12. Bonnet lock release lever (P. 3-14) Fuel filler lid opener lever (P. 3-15)
13. Steering wheel lock lever (P. 4-16)
14. Ignition switch or Ignition knob (Intelligent Key
models) (P. 5-6, 5-8)
15. Climate controls (P. 4-12)
16. High level vent control*
1(P. 4-12)
Storage*
1(P. 4-31)
17. Gear selector lever (P. 5-12)
18. Handbrake (P. 3-16)
19. 4WD mode control*
1(P. 5-24)
Power door lock switch (P. 3-10)
Seat heater switches*
1(P. 2-29)
20. Power outlet (P. 2-30)
21. Audio system (P. 4-21, 4-23)
NISSAN Connect*
2
Rear–view monitor*1(P. 4-2)
Around view monitor*
1(P. 4-4)
22. Glove box (P. 2-31)
23. Front passenger air bag deactivate switch
(P. 1-17)
*
1where fitted
*2Refer to the separately provided NISSAN Con-
nect Owner’s Manual.
See the page number indicated in parentheses
for operating details.
Illustrated table of contents0-5
Page 11 of 297
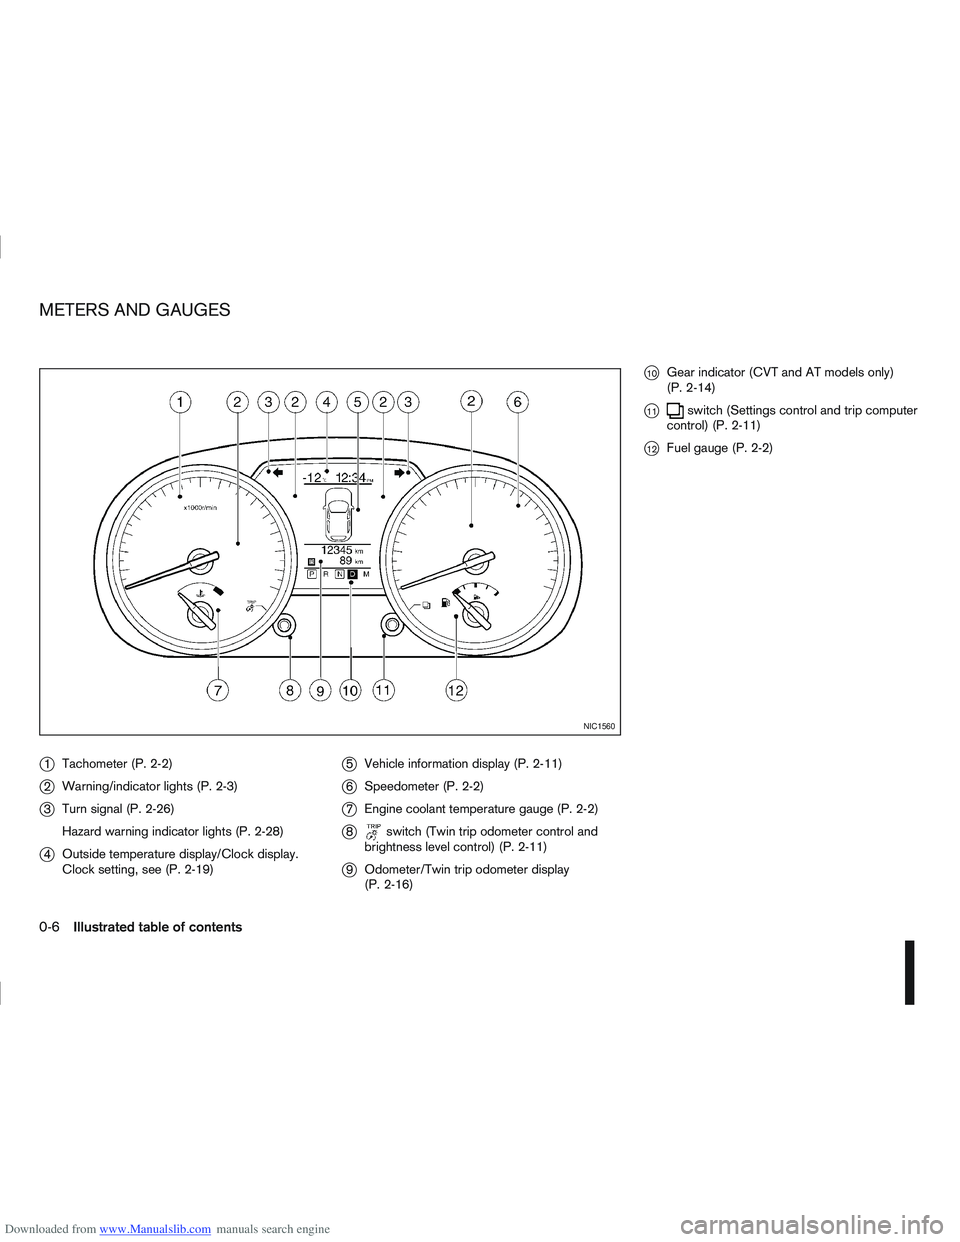
Downloaded from www.Manualslib.com manuals search engine j1Tachometer (P. 2-2)
j2Warning/indicator lights (P. 2-3)
j3Turn signal (P. 2-26)
Hazard warning indicator lights (P. 2-28)
j4Outside temperature display/Clock display.
Clock setting, see (P. 2-19)
j5Vehicle information display (P. 2-11)
j6Speedometer (P. 2-2)
j7Engine coolant temperature gauge (P. 2-2)
j8switch (Twin trip odometer control and
brightness level control) (P. 2-11)
j9 Odometer/Twin trip odometer display
(P. 2-16)
j10Gear indicator (CVT and AT models only)
(P. 2-14)
j11switch (Settings control and trip computer
control) (P. 2-11)
j12Fuel gauge (P. 2-2)
NIC1560
METERS AND GAUGES
0-6Illustrated table of contents
Page 25 of 297
Downloaded from www.Manualslib.com manuals search engine ACTIVE HEAD RESTRAINTS (front
seats)
WARNING
Always adjust the head restraints properly as
specified in the previous section. Failure to do
so can reduce the effectiveness of the active
head restraint.
Active head restraints are designed to supple-
ment other safety systems. Always wear seat
belts. No system can prevent all injuries in an
accident.
Do not attach anything to the head restraint
stalks. Doing so could impair the active head
restraint’s function.
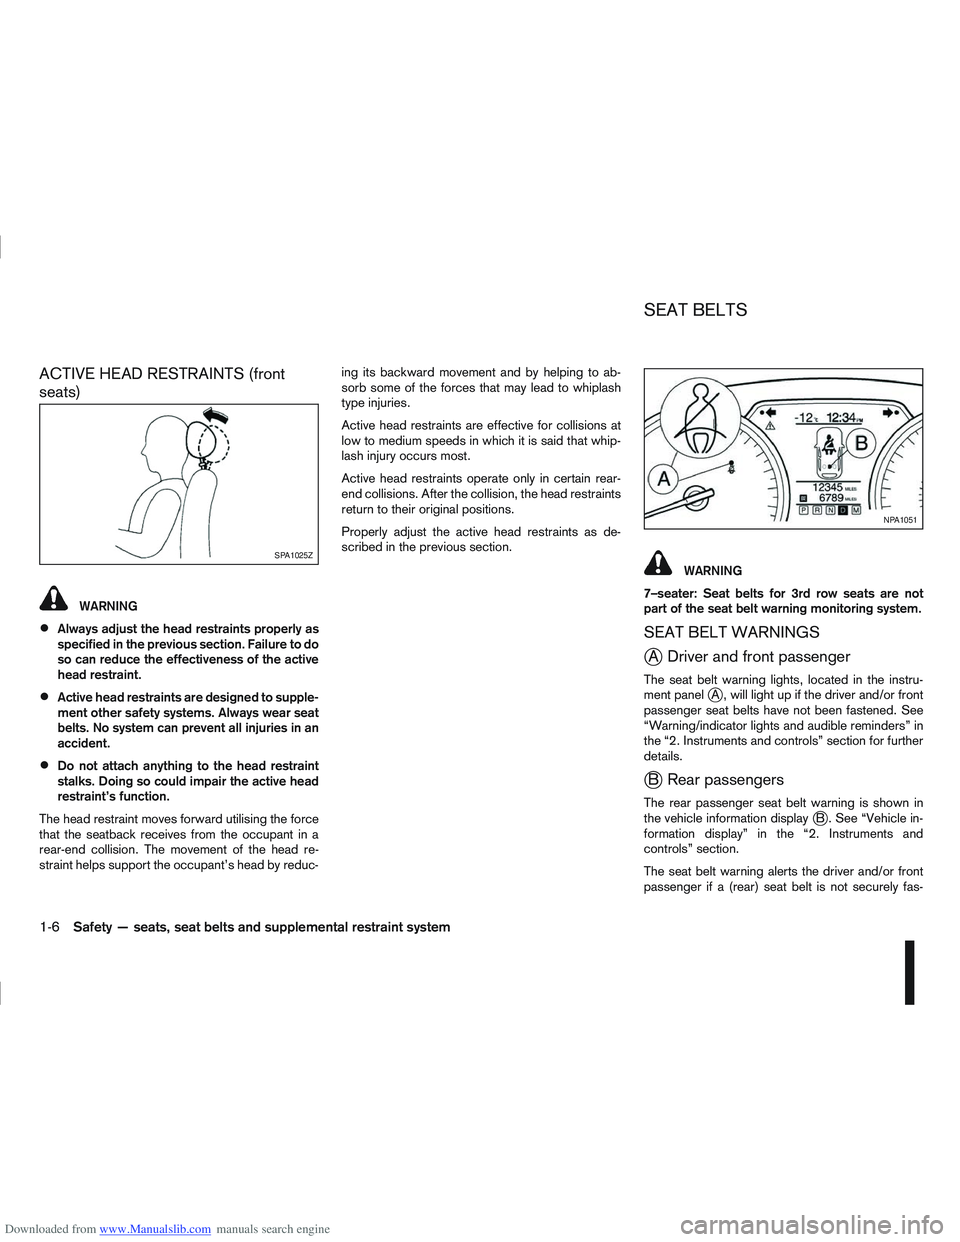
The head restraint moves forward utilising the force
that the seatback receives from the occupant in a
rear-end collision. The movement of the head re-
straint helps support the occupant’s head by reduc- ing its backward movement and by helping to ab-
sorb some of the forces that may lead to whiplash
type injuries.
Active head restraints are effective for collisions at
low to medium speeds in which it is said that whip-
lash injury occurs most.
Active head restraints operate only in certain rear-
end collisions. After the collision, the head restraints
return to their original positions.
Properly adjust the active head restraints as de-
scribed in the previous section.
WARNING
7–seater: Seat belts for 3rd row seats are not
part of the seat belt warning monitoring system.
SEAT BELT WARNINGS
jA Driver and front passenger
The seat belt warning lights, located in the instru-
ment paneljA , will light up if the driver and/or front
passenger seat belts have not been fastened. See
“Warning/indicator lights and audible reminders” in
the “2. Instruments and controls” section for further
details.
jB Rear passengers
The rear passenger seat belt warning is shown in
the vehicle information displayjB . See “Vehicle in-
formation display” in the “2. Instruments and
controls” section.
The seat belt warning alerts the driver and/or front
passenger if a (rear) seat belt is not securely fas-
SPA1025Z
NPA1051
SEAT BELTS
1-6Safety — seats, seat belts and supplemental restraint system
Page 32 of 297
Downloaded from www.Manualslib.com manuals search engine This Supplemental Restraint System (SRS) section
contains important information concerning the driver
and front passenger air bags, side air bags, curtain
air bags and pre-tensioner seat belt system.
Front air bag system:this system can help cushion
the impact force to the face and chest of the driver
and front passenger in certain frontal collisions.
NOTE
For further information about the front passen-
ger air bag deactivation system see “Front pas-
senger air bag deactivation system” later in this
section.
Side air bag system: this system can help cushion
the impact force to the chest area of the driver and
front passenger in certain side impact collisions.
The side air bag is designed to inflate on the side
where the vehicle is impacted.
Curtain air bag system: this system can help cush-
ion the impact force to the head of an occupant in
the front and rear outer seating position. Curtain air
bags are designed to inflate on the side where the
vehicle is impacted.
SRS is designed to supplementthe crash protec-
tion provided by the driver and front passenger seat
belts and is not designed to substitute them. Seat
belts should always be correctly worn and the driver
and front passenger seated a suitable distance away
from the steering wheel, instrument panel and front
door finishers. For additional information, see “Seat
belts” earlier in this section.
After turning the ignition switch to the ON or START position, the air bag warning light will illu-
minate. The air bag warning light will turn off
after approximately 7 seconds if the system is
operational. See “Warning/indicator lights and
audible reminders” in the “2. Instruments and
controls” section
for further details.
The air bag will operate only when the ignition
switch is in the ON or START position.
WARNING
Driver and front passenger air bags:
The air bags ordinarily will not inflate in the
event of a side impact, rear impact, roll over,
or lower severity frontal collision. Always wear
your seat belts to help reduce the risk or se-
verity of injury in various kinds of accidents.
The seat belts and the air bags are most ef-
fective when you are sitting back and upright
in the seat. Air bags inflate with great force. If
you are unrestrained, leaning forward, sitting
sideways or out of position in any way, you
are at greater risk of injury or death in a crash
and may also receive serious or fatal injuries
from the air bag if you are up against it when
it inflates.
WARNING
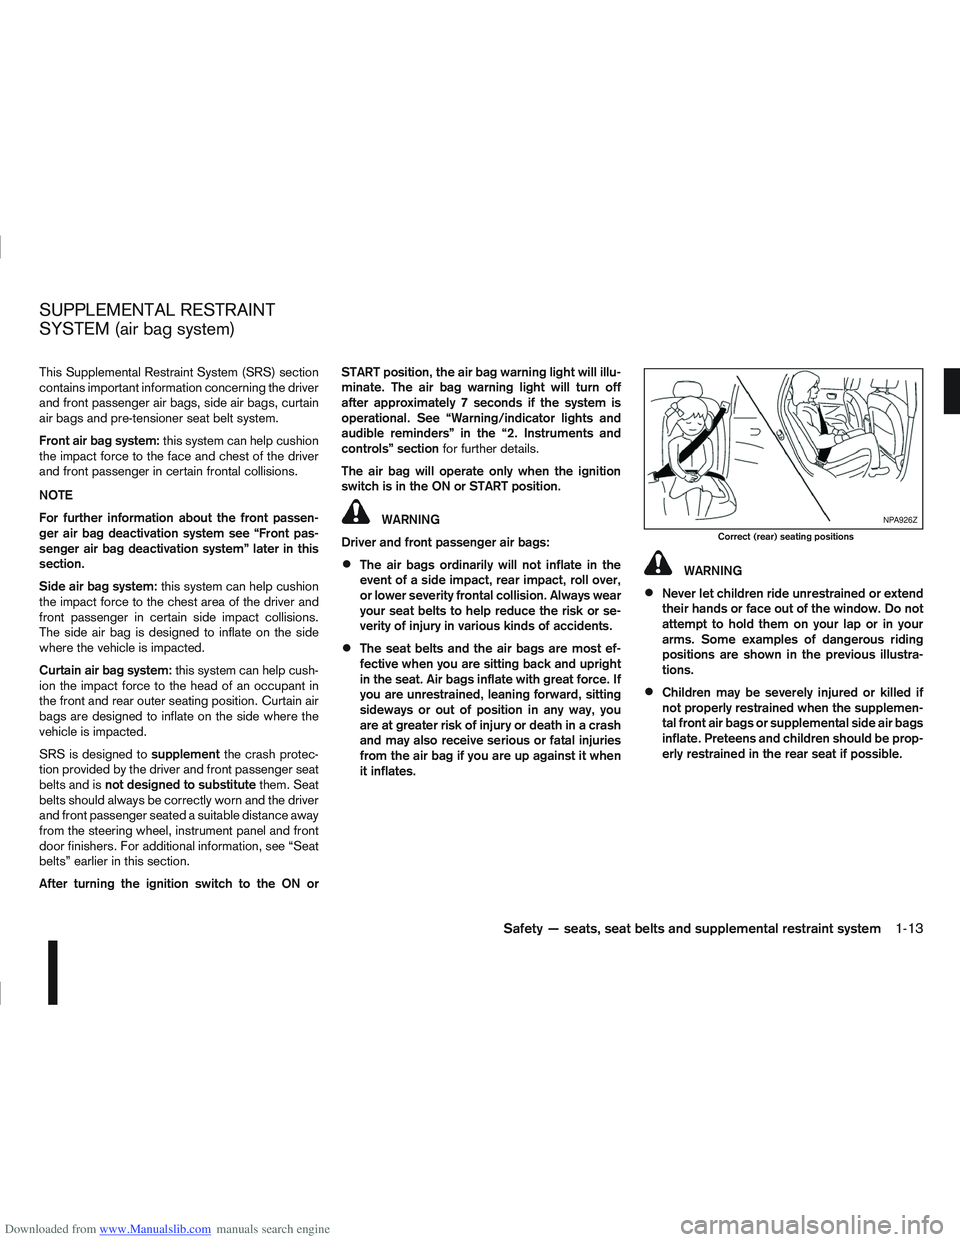
Never let children ride unrestrained or extend
their hands or face out of the window. Do not
attempt to hold them on your lap or in your
arms. Some examples of dangerous riding
positions are shown in the previous illustra-
tions.
Children may be severely injured or killed if
not properly restrained when the supplemen-
tal front air bags or supplemental side air bags
inflate. Preteens and children should be prop-
erly restrained in the rear seat if possible.
NPA926Z
Correct (rear) seating positions
SUPPLEMENTAL RESTRAINT
SYSTEM (air bag system)
Safety — seats, seat belts and supplemental restraint system1-13
Page 49 of 297
Downloaded from www.Manualslib.com manuals search engine 2Instruments and controls
Instruments and controls
Meters and gauges .................................................. 2-2
Speedometer...................................................... 2-2
Fuel gauge ......................................................... 2-2
Tachometer ........................................................ 2-2
Engine coolant temperature gauge ...................... 2-2
Warning/indicator lights and audible reminders ........ 2-3 Checking bulbs .................................................. 2-3
Warning lights .................................................... 2-3
Indicator lights .................................................... 2-7
Audible reminders............................................... 2-9
Vehicle information display ....................................... 2-11 Warnings and alerts............................................ 2-12
Odometer/twin trip odometer .............................. 2-16
Brightness control .............................................. 2-16
Trip computer ..................................................... 2-16
Settings menu .................................................... 2-18
Cruise control/Speed limiter indicator (where
fitted).................................................................. 2-21
Wiper and washer switch ........................................ 2-21 Windscreen ........................................................ 2-22
Rear window ...................................................... 2-23
Defogger switch ...................................................... 2-23 Rear window defogger ....................................... 2-23
Outside mirror defogger (where fitted) ................ 2-24
Headlight and turn signal switch............................... 2-24 Xenon headlights (where fitted) ........................... 2-24
Headlight switch ................................................. 2-24
Turn signal switch ............................................... 2-26
Fog light switch ....................................................... 2-26 Front fog light (where fitted) ................................ 2-26 Rear fog light ...................................................... 2-27
Headlight aiming control .......................................... 2-27 Headlight aiming control switch (where fitted) ..... 2-27
Automatic aiming control (xenon headlights) ........ 2-27
Headlight cleaner (where fitted) ............................... 2-28
Hazard warning flasher switch ................................. 2-28
Horn ........................................................................\
2-29
Seat heating (where fitted) ....................................... 2-29
Power outlet ............................................................ 2-30
Storage ................................................................... 2-31 Storage trays ...................................................... 2-31
Glove box ........................................................... 2-31
Console box ....................................................... 2-32
Cup holders ....................................................... 2-32
Bottle holder ....................................................... 2-32
Map pocket (where fitted) ................................... 2-32
Seat pocket (where fitted)................................... 2-32
Roof rail (where fitted) ........................................ 2-32
Rear parcel shelf (where fitted) ................................ 2-33
Tonneau cover (where fitted).................................... 2-33
Windows ................................................................. 2-34 Power windows .................................................. 2-34
C-View® glass roof (where fitted) ............................ 2-36 Sunshade operation ............................................ 2-36
System reinitialisation.......................................... 2-37
Interior lights ............................................................ 2-37 Front Room light ................................................. 2-37
Map lights (where fitted) ..................................... 2-38
Rear room/reading light ...................................... 2-38
Luggage compartment light ................................ 2-38
Page 52 of 297
Downloaded from www.Manualslib.com manuals search engine Anti-lock Braking System (ABS) warning
light (orange)Seat belt (driver and front passenger) warn-
ing light (red)Low fuel indicator light (orange)
Brake warning light (red)Supplemental Restraint System (SRS) air
bag warning light (red)Slip indicator light (orange)
Charge warning light (red)Water in fuel filter warning light (orange)Front fog light indicator light (green)
Diesel Particulate Filter (DPF) warning light
(orange)4WD warning light (orange)Rear fog light indicator light (orange)
Electronic Power Assisted Steering (EPAS)
warning light (red)Automatic Transmission check indicator light
(AT models) (orange)High beam indicator light (blue)
Engine oil pressure/level warning light (red)Continuously Variable Transmission (CVT)
indicator light (orange)Dipped beam indicator light (green)
Front passenger air bag deactivated (OFF)
warning light (red)Electronic Stability Programme (ESP) OFF
indicator light (orange)Side light and headlight indicator light
(green)
Malfunction warning light (red)
Malfunction Indicator light (orange)4WD mode indicator light (AUTO) (green)SPORT mode indicator light
Master warning light (orange)4WD mode indicator light (LOCK) (orange)Trailer direction indicator light (green)
NATS security warning light (red)Glow plug indicator light (Diesel engine)
(orange)Turn signal/hazard indicator lights (green)
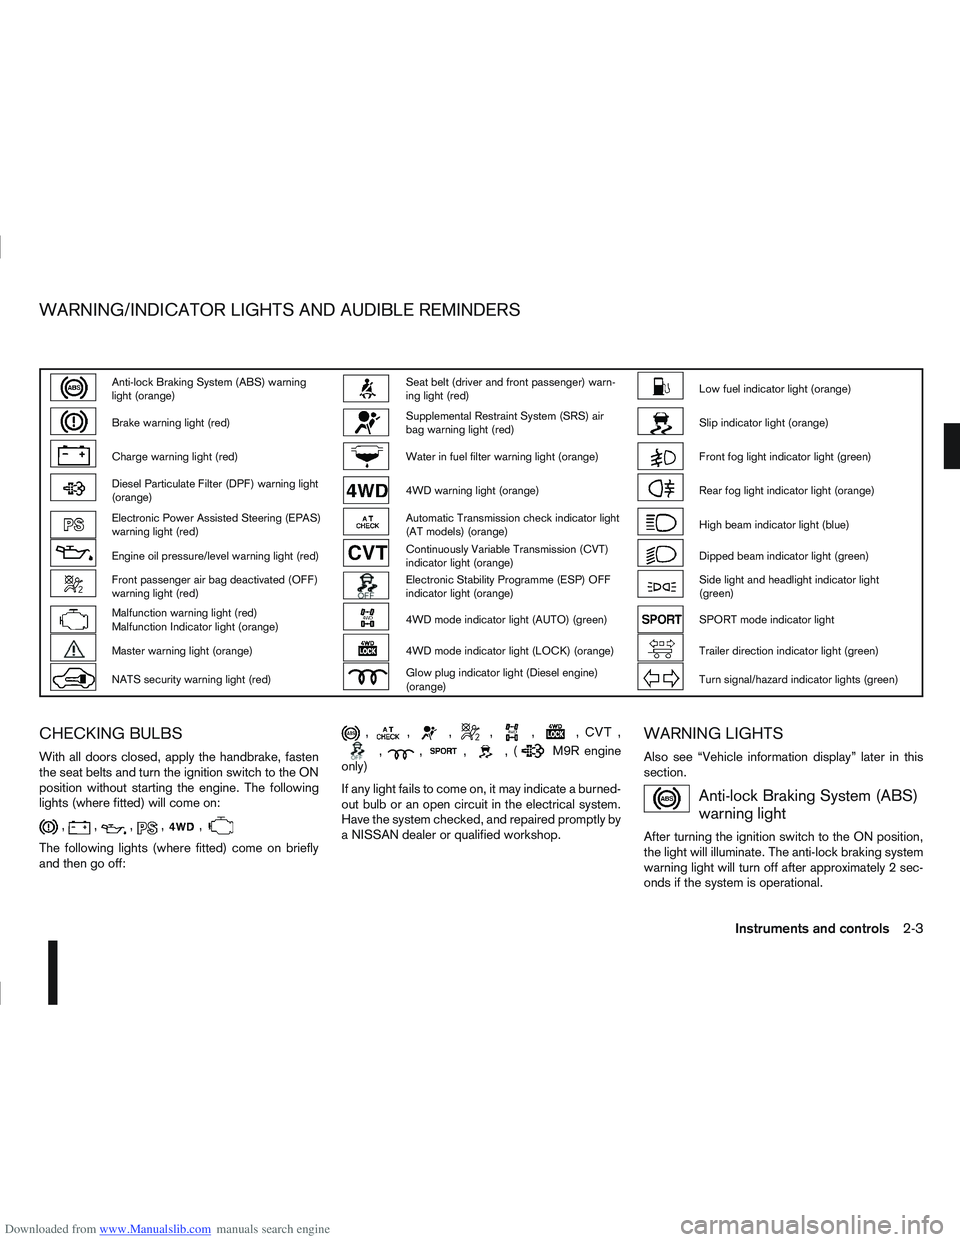
CHECKING BULBS
With all doors closed, apply the handbrake, fasten
the seat belts and turn the ignition switch to the ON
position without starting the engine. The following
lights (where fitted) will come on:
,,,,,
The following lights (where fitted) come on briefly
and then go off:
,,,,,,,
,,,,(M9R engine
only)
If any light fails to come on, it may indicate a burned-
out bulb or an open circuit in the electrical system.
Have the system checked, and repaired promptly by
a NISSAN dealer or qualified workshop.
WARNING LIGHTS
Also see “Vehicle information display” later in this
section.
Anti-lock Braking System (ABS)
warning light
After turning the ignition switch to the ON position,
the light will illuminate. The anti-lock braking system
warning light will turn off after approximately 2 sec-
onds if the system is operational.
WARNING/INDICATOR LIGHTS AND AUDIBLE REMINDERS
Instruments and controls2-3
Page 56 of 297
Downloaded from www.Manualslib.com manuals search engine Do not drive on dry, hard surfaced roads in
the LOCK position.
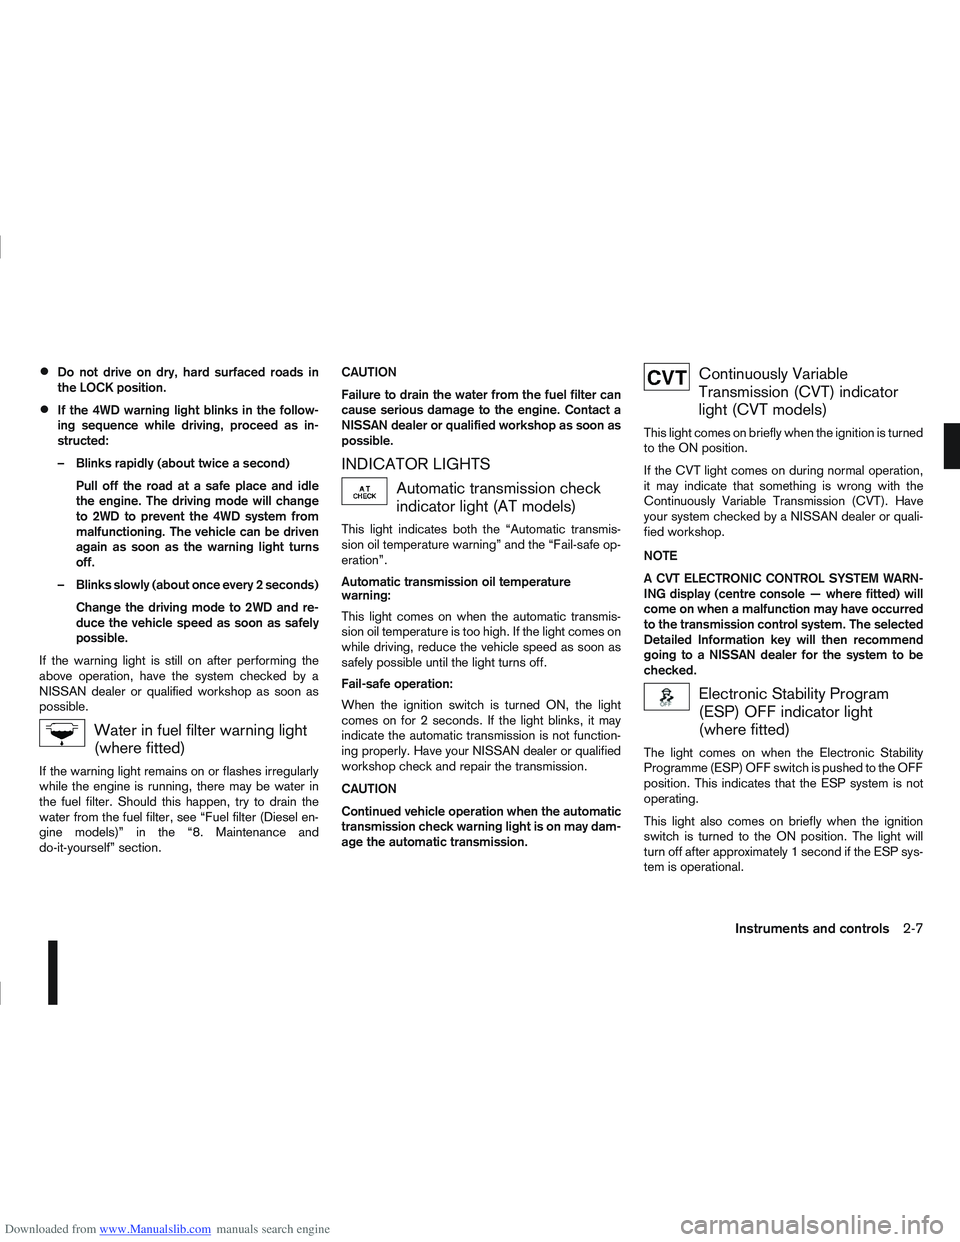
If the 4WD warning light blinks in the follow-
ing sequence while driving, proceed as in-
structed:
– Blinks rapidly (about twice a second)Pull off the road at a safe place and idle
the engine. The driving mode will change
to 2WD to prevent the 4WD system from
malfunctioning. The vehicle can be driven
again as soon as the warning light turns
off.
– Blinks slowly (about once every 2 seconds) Change the driving mode to 2WD and re-
duce the vehicle speed as soon as safely
possible.
If the warning light is still on after performing the
above operation, have the system checked by a
NISSAN dealer or qualified workshop as soon as
possible.
Water in fuel filter warning light
(where fitted)
If the warning light remains on or flashes irregularly
while the engine is running, there may be water in
the fuel filter. Should this happen, try to drain the
water from the fuel filter, see “Fuel filter (Diesel en-
gine models)” in the “8. Maintenance and
do-it-yourself” section. CAUTION
Failure to drain the water from the fuel filter can
cause serious damage to the engine. Contact a
NISSAN dealer or qualified workshop as soon as
possible.
INDICATOR LIGHTS
Automatic transmission check
indicator light (AT models)
This light indicates both the “Automatic transmis-
sion oil temperature warning” and the “Fail-safe op-
eration”.
Automatic transmission oil temperature
warning:
This light comes on when the automatic transmis-
sion oil temperature is too high. If the light comes on
while driving, reduce the vehicle speed as soon as
safely possible until the light turns off.
Fail-safe operation:
When the ignition switch is turned ON, the light
comes on for 2 seconds. If the light blinks, it may
indicate the automatic transmission is not function-
ing properly. Have your NISSAN dealer or qualified
workshop check and repair the transmission.
CAUTION
Continued vehicle operation when the automatic
transmission check warning light is on may dam-
age the automatic transmission.
Continuously Variable
Transmission (CVT) indicator
light (CVT models)
This light comes on briefly when the ignition is turned
to the ON position.
If the CVT light comes on during normal operation,
it may indicate that something is wrong with the
Continuously Variable Transmission (CVT). Have
your system checked by a NISSAN dealer or quali-
fied workshop.
NOTE
A CVT ELECTRONIC CONTROL SYSTEM WARN-
ING display (centre console — where fitted) will
come on when a malfunction may have occurred
to the transmission control system. The selected
Detailed Information key will then recommend
going to a NISSAN dealer for the system to be
checked.
Electronic Stability Program
(ESP) OFF indicator light
(where fitted)
The light comes on when the Electronic Stability
Programme (ESP) OFF switch is pushed to the OFF
position. This indicates that the ESP system is not
operating.
This light also comes on briefly when the ignition
switch is turned to the ON position. The light will
turn off after approximately 1 second if the ESP sys-
tem is operational.
Instruments and controls2-7
Page 58 of 297
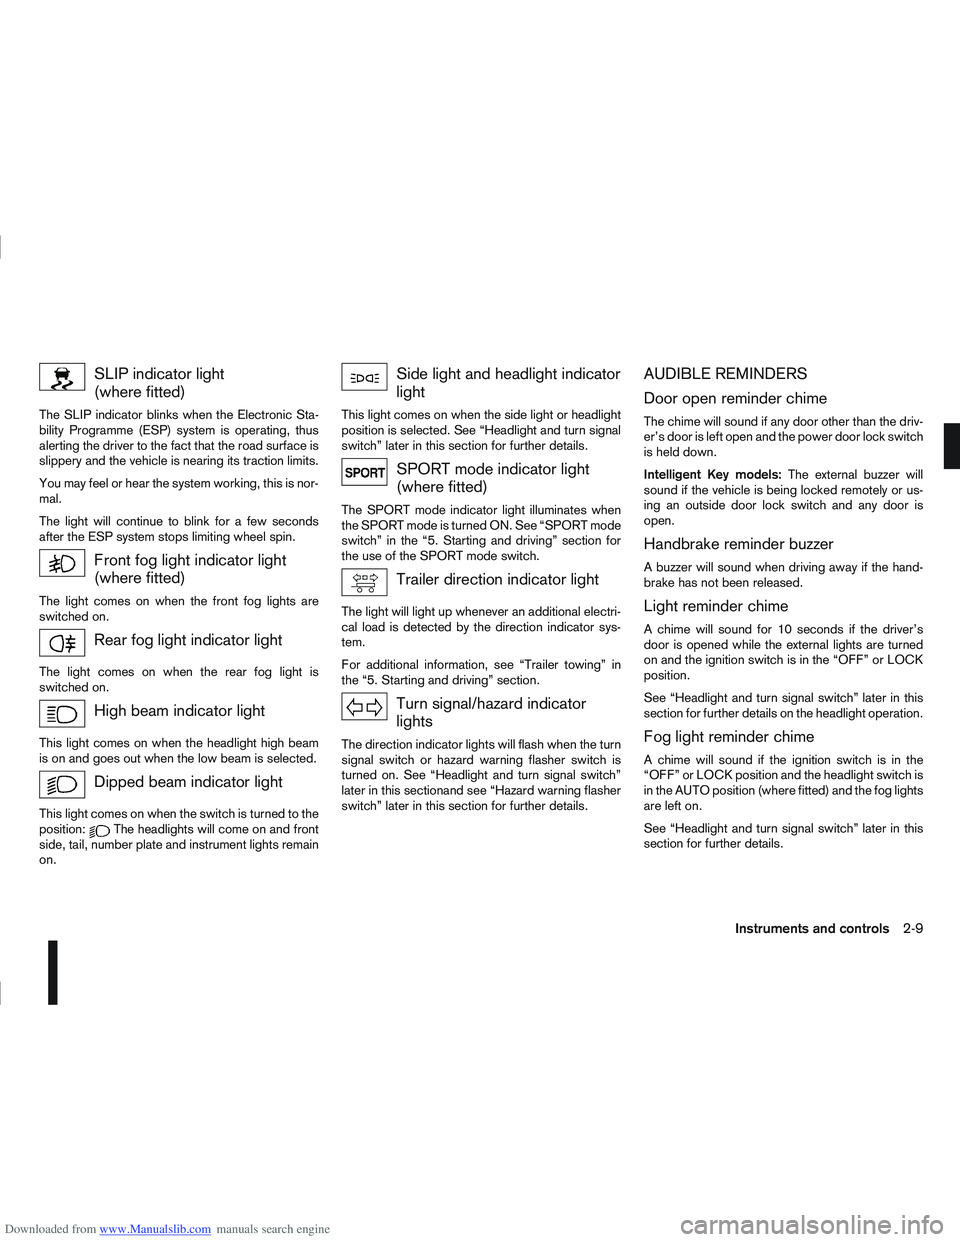
Downloaded from www.Manualslib.com manuals search engine SLIP indicator light
(where fitted)
The SLIP indicator blinks when the Electronic Sta-
bility Programme (ESP) system is operating, thus
alerting the driver to the fact that the road surface is
slippery and the vehicle is nearing its traction limits.
You may feel or hear the system working, this is nor-
mal.
The light will continue to blink for a few seconds
after the ESP system stops limiting wheel spin.
Front fog light indicator light
(where fitted)
The light comes on when the front fog lights are
switched on.
Rear fog light indicator light
The light comes on when the rear fog light is
switched on.
High beam indicator light
This light comes on when the headlight high beam
is on and goes out when the low beam is selected.
Dipped beam indicator light
This light comes on when the switch is turned to the
position:The headlights will come on and front
side, tail, number plate and instrument lights remain
on.
Side light and headlight indicator
light
This light comes on when the side light or headlight
position is selected. See “Headlight and turn signal
switch” later in this section for further details.
SPORT mode indicator light
(where fitted)
The SPORT mode indicator light illuminates when
the SPORT mode is turned ON. See “SPORT mode
switch” in the “5. Starting and driving” section for
the use of the SPORT mode switch.
Trailer direction indicator light
The light will light up whenever an additional electri-
cal load is detected by the direction indicator sys-
tem.
For additional information, see “Trailer towing” in
the “5. Starting and driving” section.
Turn signal/hazard indicator
lights
The direction indicator lights will flash when the turn
signal switch or hazard warning flasher switch is
turned on. See “Headlight and turn signal switch”
later in this sectionand see “Hazard warning flasher
switch” later in this section for further details.
AUDIBLE REMINDERS
Door open reminder chime
The chime will sound if any door other than the driv-
er’s door is left open and the power door lock switch
is held down.
Intelligent Key models: The external buzzer will
sound if the vehicle is being locked remotely or us-
ing an outside door lock switch and any door is
open.
Handbrake reminder buzzer
A buzzer will sound when driving away if the hand-
brake has not been released.
Light reminder chime
A chime will sound for 10 seconds if the driver’s
door is opened while the external lights are turned
on and the ignition switch is in the “OFF” or LOCK
position.
See “Headlight and turn signal switch” later in this
section for further details on the headlight operation.
Fog light reminder chime
A chime will sound if the ignition switch is in the
“OFF” or LOCK position and the headlight switch is
in the AUTO position (where fitted) and the fog lights
are left on.
See “Headlight and turn signal switch” later in this
section for further details.
Instruments and controls2-9
Page 71 of 297
Downloaded from www.Manualslib.com manuals search engine WINDSCREEN
The windscreen wiper and washer can be operated
when the ignition switch is in the ON position.
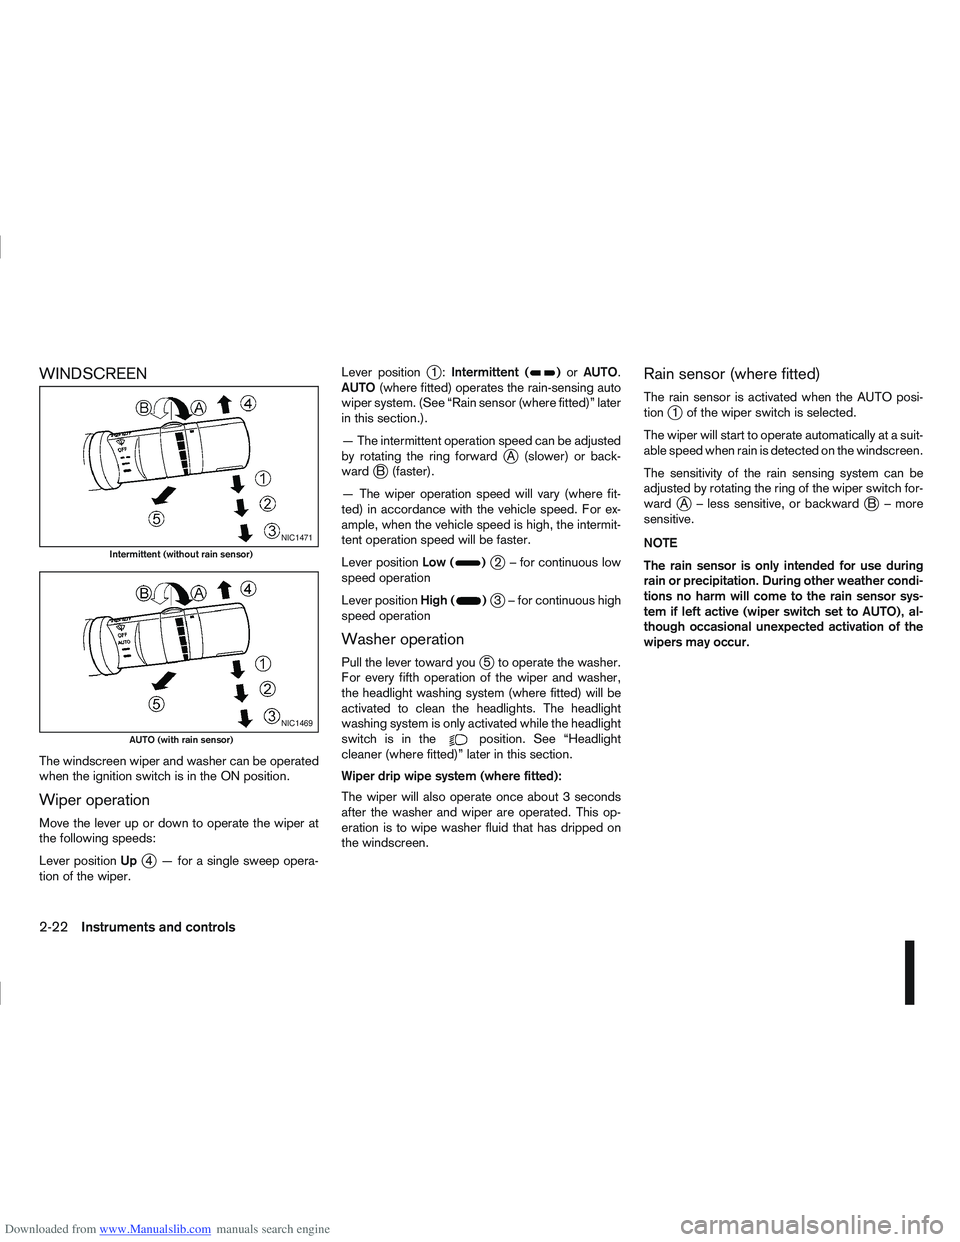
Wiper operation
Move the lever up or down to operate the wiper at
the following speeds:
Lever positionUp
j4 — for a single sweep opera-
tion of the wiper. Lever position
j1:
Intermittent ()or AUTO.
AUTO (where fitted) operates the rain-sensing auto
wiper system. (See “Rain sensor (where fitted)” later
in this section.).
— The intermittent operation speed can be adjusted
by rotating the ring forward
jA (slower) or back-
wardjB (faster).
— The wiper operation speed will vary (where fit-
ted) in accordance with the vehicle speed. For ex-
ample, when the vehicle speed is high, the intermit-
tent operation speed will be faster.
Lever position Low (
)j2 – for continuous low
speed operation
Lever position High (
)j3 – for continuous high
speed operation
Washer operation
Pull the lever toward youj5 to operate the washer.
For every fifth operation of the wiper and washer,
the headlight washing system (where fitted) will be
activated to clean the headlights. The headlight
washing system is only activated while the headlight
switchisinthe
position. See “Headlight
cleaner (where fitted)” later in this section.
Wiper drip wipe system (where fitted):
The wiper will also operate once about 3 seconds
after the washer and wiper are operated. This op-
eration is to wipe washer fluid that has dripped on
the windscreen.
Rain sensor (where fitted)
The rain sensor is activated when the AUTO posi-
tionj1 of the wiper switch is selected.
The wiper will start to operate automatically at a suit-
able speed when rain is detected on the windscreen.
The sensitivity of the rain sensing system can be
adjusted by rotating the ring of the wiper switch for-
ward
jA – less sensitive, or backwardjB – more
sensitive.
NOTE
The rain sensor is only intended for use during
rain or precipitation. During other weather condi-
tions no harm will come to the rain sensor sys-
tem if left active (wiper switch set to AUTO), al-
though occasional unexpected activation of the
wipers may occur.
NIC1471
Intermittent (without rain sensor)
NIC1469
AUTO (with rain sensor)
2-22Instruments and controls