light NISSAN QASHQAI 2017 Owner´s Manual
[x] Cancel search | Manufacturer: NISSAN, Model Year: 2017, Model line: QASHQAI, Model: NISSAN QASHQAI 2017Pages: 508, PDF Size: 2.68 MB
Page 216 of 508
.When the DUAL indicator light is not
illuminated, pushing the DUAL button
(the indicator light will turn on) allows the
user to independently change the driver
and passenger side temperatures with
the corresponding temperature control
dial.
.To cancel the separate temperature
setting, push the DUAL button (the
indicator light will turn off) and the
driver’s side temperature setting will be
applied to both the driver and passenger
sides.
The temperature of the passenger compart-
ment will be maintained automatically. Air
flow distribution and fan speed are also
controlled automatically.
A visible mist may be seen coming from the
ventilators in hot and humid conditions as
the air is cooled rapidly. This does not
indicate a malfunction.
Dehumidified defrosting/defogging:
1. Push the front defroster
button (The
indicator light on the front defroster
button will illuminate) .
2. Turn the temperature control dial to set the
desired temperature..To quickly remove frost from the outside
surface of the windshield, set the tempera-
ture and the fan speed to the maximum
levels.
.After the windshield is cleared, push the
AUTO button (the AUTO indicator light will
turn on).
.When the front defroster
button is
pushed, the air conditioner will turn on when
the outside air temperature is above ap-
proximately 368F(28C) to defog the wind-
shield. The air recirculation mode will
automatically turn off. The outside air circu-
lation mode will be selected to improve the
defogging performance.
Do not set the temperature too low when the
front defroster mode is on (the indicator light is
illuminated) , because doing so may fog up the
windshield.
Manual operation
The manual mode can be used to control the
heater and air conditioner to your desired
settings.
Fan speed control:
Push the fan speed control button (
side orside) to manually control the fan speed.
Push the AUTO button to change the fan speed
to the automatic mode.
Air flow control:
Push the MODE button to select the desired
mode:
— Air flows mainly from the center and side
ventilators.
— Air flows mainly from the center and side
ventilators and foot outlets.
— Air flows mainly from the foot outlet and
partly from the defroster.
— Air flows mainly from the front defroster
outlets and foot outlets.
Temperature control:
Turn the temperature control dial to set the
desired temperature.
.When the DUAL indicator light is not
illuminated, pushing the DUAL button (the
indicator light will turn on) allows the user to
independently change the driver and pas-
senger side temperatures with the corre-
Heater, air conditioner, audio and phone systems4-35
Page 217 of 508

4-36Heater, air conditioner, audio and phone systems
sponding temperature control dial.
Also turning the passenger’s side tempera-
ture control dial changes only the front
passenger’s side temperature. (The DUAL
indicator light will illuminate and DUAL will
appear on the display.)
.To cancel the separate temperature setting,
push the DUAL button (the indicator light
will turn off) and the driver’s side tempera-
ture setting will be applied to both the driver
and passenger sides.
Air intake control:
.Push the air recirculation
button to
recirculate interior air inside the vehicle. The
indicator light on the button will come on.
The air recirculation cannot be activated
when the air conditioner is in the front
defrosting mode.
.Push the outside air circulation
button
to draw outside air into the passenger
compartment. The indicator light on the
button will come on.
.To control the air intake automatically, push
and hold either the air recirculation
button or the outside air circulationbutton (whichever button with the indicator
light illuminated) . The indicator lights (both
air recirculation
and outside air circula-
tionbuttons) will flash twice, and thenthe air intake will switch to automatic control.
When the automatic control is set, the
system automatically alternates between
the outside air circulation and the air
recirculation modes. (The indicator light of
the active mode will turn on.)
NOTE:
Even if the system is manually set to the air
recirculation mode, when both outside
temperature and coolant temperature are
low, the system may automatically switch
to the outside air circulation mode.
To turn the system off:
To turn off the heater and air conditioner, push
the ON·OFF button.
Push the ON·OFF button again, the system will
turn on in the mode which was used immediately
before the system was turned off.
Remote engine start logic (if so
equipped)
When the remote engine start function is
activated, the vehicles equipped with the auto-
matic air conditioner and heater may go into
automatic heating or cooling mode depending
on the outside and cabin temperatures. During
this period, the display and the buttons will be
inoperable until the ignition switch is placed in
the ON position. When the temperature is low,the rear defroster and the heated steering wheel
(if so equipped) may also be activated auto-
matically with the activation of the remote engine
start function. (See “Remote engine start” (P.3-
22) .)
Page 219 of 508
4-38Heater, air conditioner, audio and phone systems
AUDIO OPERATION PRECAUTIONS
Radio
Place the ignition switch in the ACC or ON
position and push the FM·AM button to turn on
the radio. If you listen to the radio with the
engine not running, the ignition switch should be
placed in the ACC position.
Radio reception is affected by station signal
strength, distance from radio transmitter, build-
ings, bridges, mountains and other external
influences. Intermittent changes in reception
quality normally are caused by these external
influences.
Using a cellular phone in or near the
vehicle may influence radio reception
quality.
Radio reception:
Your vehicle radio system is equipped with
state-of-the-art electronic circuits to enhance
radio reception. These circuits are designed to
extend reception range, and to enhance the
quality of that reception.
However there are some general characteristics
of both FM and AM radio signals that can affect
radio reception quality in a moving vehicle, even
when the finest equipment is used. These
characteristics are completely normal in a given
reception area, and do not indicate any mal-function in your vehicle radio system.
Reception conditions will constantly change
because of vehicle movement. Buildings, terrain,
signal distance and interference from other
vehicles can work against ideal reception.
Described below are some of the factors that
can affect your radio reception.
Some cellular phones or other devices may
cause interference or a buzzing noise to come
from the audio system speakers. Storing the
device in a different location may reduce or
eliminate the noise.
SAA0306
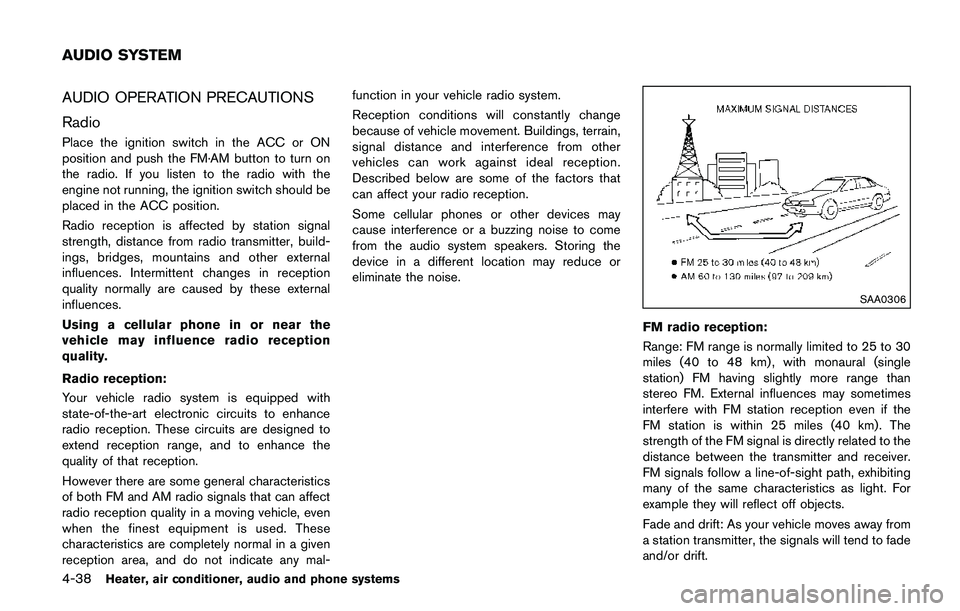
FM radio reception:
Range: FM range is normally limited to 25 to 30
miles (40 to 48 km) , with monaural (single
station) FM having slightly more range than
stereo FM. External influences may sometimes
interfere with FM station reception even if the
FM station is within 25 miles (40 km). The
strength of the FM signal is directly related to the
distance between the transmitter and receiver.
FM signals follow a line-of-sight path, exhibiting
many of the same characteristics as light. For
example they will reflect off objects.
Fade and drift: As your vehicle moves away from
a station transmitter, the signals will tend to fade
and/or drift.
AUDIO SYSTEM
Page 220 of 508
Static and flutter: During signal interference from
buildings, large hills or due to antenna position,
usually in conjunction with increased distance
from the station transmitter, static or flutter can
be heard. This can be reduced by lowering the
treble setting to reduce the treble response.
Multipath reception: Because of the reflective
characteristics of FM signals, direct and re-
flected signals reach the receiver at the same
time. The signals may cancel each other,
resulting in momentary flutter or loss of sound.
AM radio reception:
AM signals, because of their low frequency, can
bend around objects and skip along the ground.
In addition, the signals can be bounced off the
ionosphere and bent back to earth. Because of
these characteristics. AM signals are also
subject to interference as they travel from
transmitter to receiver.
Fading: Occurs while the vehicle is passing
through freeway underpasses or in areas with
many tall buildings. It can also occur for several
seconds during ionospheric turbulence even in
areas where no obstacles exist.
Static: Caused by thunderstorms, electrical
power lines, electric signs and even traffic lights.Satellite radio reception (if so equipped):
When the satellite radio is used for the first time
or the battery has been replaced, the satellite
radio may not work properly. This is not a
malfunction. Wait more than 10 minutes with the
satellite radio ON and the vehicle away from any
metal or large buildings for the satellite radio to
receive all of the necessary data.
The satellite radio mode requires an active
SiriusXM Satellite Radio subscription. The sa-
tellite radio is not available in Alaska, Hawaii and
Guam.
Satellite radio performance may be affected if
cargo carried on the roof blocks the satellite
radio signal.
If possible, do not put cargo near the satellite
antenna.
A buildup of ice on the satellite radio antenna
can affect satellite radio performance. Remove
the ice to restore satellite radio reception.
SAA0480
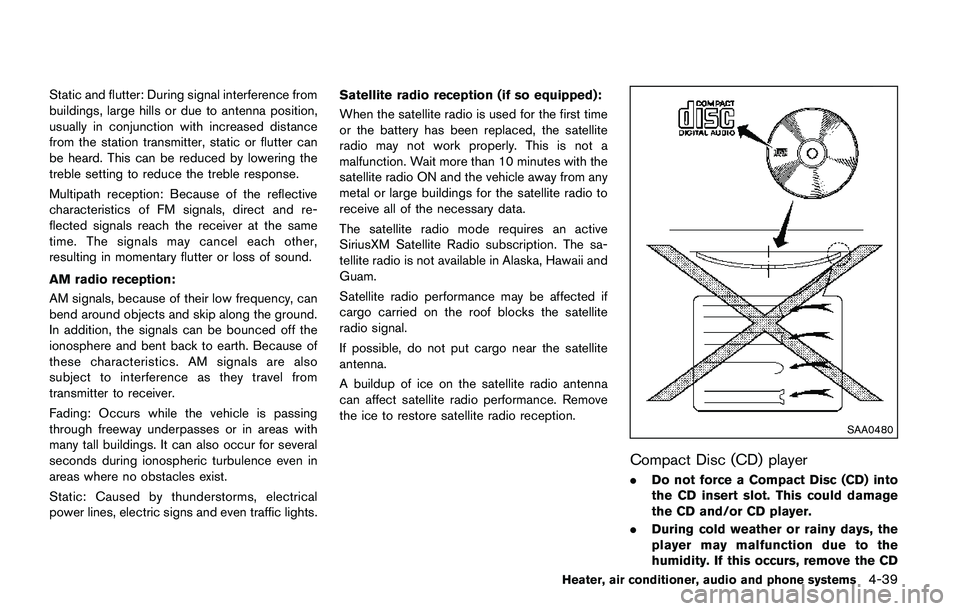
Compact Disc (CD) player
.Do not force a Compact Disc (CD) into
the CD insert slot. This could damage
the CD and/or CD player.
.During cold weather or rainy days, the
player may malfunction due to the
humidity. If this occurs, remove the CD
Heater, air conditioner, audio and phone systems4-39
Page 221 of 508
4-40Heater, air conditioner, audio and phone systems
and dehumidify or ventilate the player
completely.
.The player may skip while driving on
rough roads.
.The CD player sometimes cannot func-
tion when the passenger compartment
temperature is extremely high. De-
crease the temperature before use.
.Only use high quality 4.7 in (12 cm)
round discs that have the “COMPACT
disc DIGITAL AUDIO” logo on the disc
or packaging.
.Do not expose the CD to direct sun-
light.
.CDs that are of poor quality, dirty,
scratched, covered with fingerprints,
or that have pin holes may not work
properly.
.The following CDs may not work prop-
erly:
—Copy Control Compact Discs (CCCD)
—Recordable Compact Discs (CD-R)
—Rewritable Compact Discs (CD-RW)
.Do not use the following CDs as they
may cause the CD player to malfunc-
tion.
—3.1 in (8 cm) discs—CDs that are not round
—CDs with a paper label
—CDs that are warped, scratched, or
have abnormal edges
.This audio system can only play pre-
recorded CDs. It has no capabilities to
record or burn CDs.
.If the CD cannot be played, error
messages as the following examples
will be displayed.
Check Disc:
—Confirm that the CD is inserted
correctly (the label side is facing
up, etc.) .
—Confirm that the CD is not bent or
warped and it is free of scratches.
Push Eject:
This is an error due to the temperature
inside the player is too high. Remove
the CD by pushing the
(CD eject)
button, and after a short time reinsert
the CD. The CD can be played when the
temperature of the player returns to
normal.
Unplayable Track:
The file is unplayable in this audio
system (only MP3 or WMA CD) .
USB (Universal Serial Bus) Connection
Port
WARNING
Do not connect, disconnect or operate
the USB device while driving. Doing so
can be a distraction. If distracted you
could lose control of your vehicle and
cause an accident or serious injury.
CAUTION
.Do not force the USB device into the
USB connection port. Inserting the
USB device tilted or up-side-down
into the port may damage the port.
Make sure that the USB device is
connected correctly into the USB
connection port.
.Do not grab the USB connection
port cover (if so equipped) when
pulling the USB device out of the
port. This could damage the port
and the cover.
.Do not leave the USB cable in a
place where it can be pulled unin-
Page 222 of 508
tentionally. Pulling the cable may
damage the port.
The vehicle is not equipped with a USB device.
USB devices should be purchased separately
as necessary.
This system cannot be used to format USB
devices. To format a USB device, use a personal
computer.
In some states/area, the USB device for the
front seats plays only sound without images for
regulatory reasons, even when the vehicle is
parked.
This system supports various USB memory
devices, USB hard drives and iPod
�Šplayers.
Some USB devices may not be supported by
this system.
.Partitioned USB devices may not be played
correctly.
.Some characters used in other languages
(Chinese, Japanese, etc.) are not displayed
properly on display. Using English language
characters with a USB device is recom-
mended.
General notes for USB use:
Refer to your device manufacturer’s owner
information regarding the proper use and care
of the device.Notes for iPod
�Šuse:
“Made for iPod�Š”, “Made for iPhone�Š”, and
“Made for iPad�Š” mean that an electronic
accessory has been designed to connect
specifically to iPod
�Š, iPhone�Š, or iPad�Š, respec-
tively, and has been certified by the developer to
meet Apple performance standards.
Apple is not responsible for the operation of this
device or its compliance with safety and
regulatory standards.
Please note that the use of this accessory with
iPod
�Š, iPhone�Š, or iPad�Šmay affect wireless
performance.
iPad
�Š, iPhone�Š,iPod�Š, iPod classic�Š,iPod
nano�Š, iPod shuffle�Š, and iPod touch�Šare
trademarks of Apple Inc., registered in the U.S.
and other countries. Lightning is a trademark of
Apple Inc.
.Improperly plugging in the iPod
�Šmay cause
a checkmark to be displayed on and off
(flickering) . Always make sure that the iPod
�Š
is connected properly.
.An iPod nano�Š(1st Generation) may remain
in fast forward or rewind mode if it is
connected during a seek operation. In this
case, please manually reset the iPod
�Š.
.An iPod nano�Š(2nd Generation) will con-
tinue to fast-forward or rewind if it is
disconnected during a seek operation..An incorrect song title may appear when the
Play Mode is changed while using an iPod
nano
�Š(2nd Generation)
.Audiobooks may not play in the same order
as they appear on an iPod
�Š.
.Large video files cause slow responses in an
iPod
�Š. The display may momentarily black
out, but will soon recover.
.If an iPod
�Šautomatically selects large video
files while in the shuffle mode, the display
may momentarily black out, but will soon
recover.
Compressed Audio Files (MP3/WMA)
Explanation of terms:
.MP3 — MP3 is short for Moving Pictures
Experts Group Audio Layer 3. MP3 is the
most well known compressed digital audio
file format. This format allows for near “CD
quality” sound, but at a fraction of the size of
normal audio files. MP3 conversion of an
audio track can reduce the file size by
approximately a 10:1 ratio (Sampling: 44.1
kHz, Bit rate: 128 kbps) with virtually no
perceptible loss in quality. The compression
reduces certain parts of sound that seem
inaudible to most people.
.WMA — Windows Media Audio (WMA) is a
compressed audio format created by Micro-
Heater, air conditioner, audio and phone systems4-41
Page 248 of 508
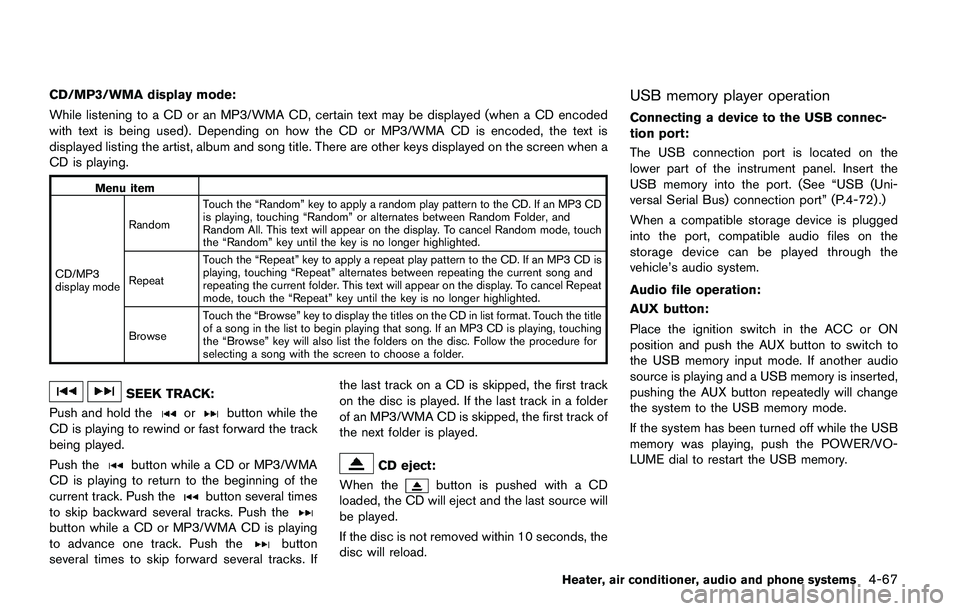
CD/MP3/WMA display mode:
While listening to a CD or an MP3/WMA CD, certain text may be displayed (when a CD encoded
with text is being used) . Depending on how the CD or MP3/WMA CD is encoded, the text is
displayed listing the artist, album and song title. There are other keys displayed on the screen when a
CD is playing.
Menu item
CD/MP3
display modeRandomTouch the “Random” key to apply a random play pattern to the CD. If an MP3 CD
is playing, touching “Random” or alternates between Random Folder, and
Random All. This text will appear on the display. To cancel Random mode, touch
the “Random” key until the key is no longer highlighted.
RepeatTouch the “Repeat” key to apply a repeat play pattern to the CD. If an MP3 CD is
playing, touching “Repeat” alternates between repeating the current song and
repeating the current folder. This text will appear on the display. To cancel Repeat
mode, touch the “Repeat” key until the key is no longer highlighted.
BrowseTouch the “Browse” key to display the titles on the CD in list format. Touch the title
of a song in the list to begin playing that song. If an MP3 CD is playing, touching
the “Browse” key will also list the folders on the disc. Follow the procedure for
selecting a song with the screen to choose a folder.
SEEK TRACK:
Push and hold the
orbutton while the
CD is playing to rewind or fast forward the track
being played.
Push the
button while a CD or MP3/WMA
CD is playing to return to the beginning of the
current track. Push the
button several times
to skip backward several tracks. Push the
button while a CD or MP3/WMA CD is playing
to advance one track. Push thebutton
several times to skip forward several tracks. Ifthe last track on a CD is skipped, the first track
on the disc is played. If the last track in a folder
of an MP3/WMA CD is skipped, the first track of
the next folder is played.
CD eject:
When the
button is pushed with a CD
loaded, the CD will eject and the last source will
be played.
If the disc is not removed within 10 seconds, the
disc will reload.
USB memory player operation
Connecting a device to the USB connec-
tion port:
The USB connection port is located on the
lower part of the instrument panel. Insert the
USB memory into the port. (See “USB (Uni-
versal Serial Bus) connection port” (P.4-72) .)
When a compatible storage device is plugged
into the port, compatible audio files on the
storage device can be played through the
vehicle’s audio system.
Audio file operation:
AUX button:
Place the ignition switch in the ACC or ON
position and push the AUX button to switch to
the USB memory input mode. If another audio
source is playing and a USB memory is inserted,
pushing the AUX button repeatedly will change
the system to the USB memory mode.
If the system has been turned off while the USB
memory was playing, push the POWER/VO-
LUME dial to restart the USB memory.
Heater, air conditioner, audio and phone systems4-67
Page 257 of 508
4-76Heater, air conditioner, audio and phone systems
SAA0451
CD/USB MEMORY CARE AND
CLEANING
CD
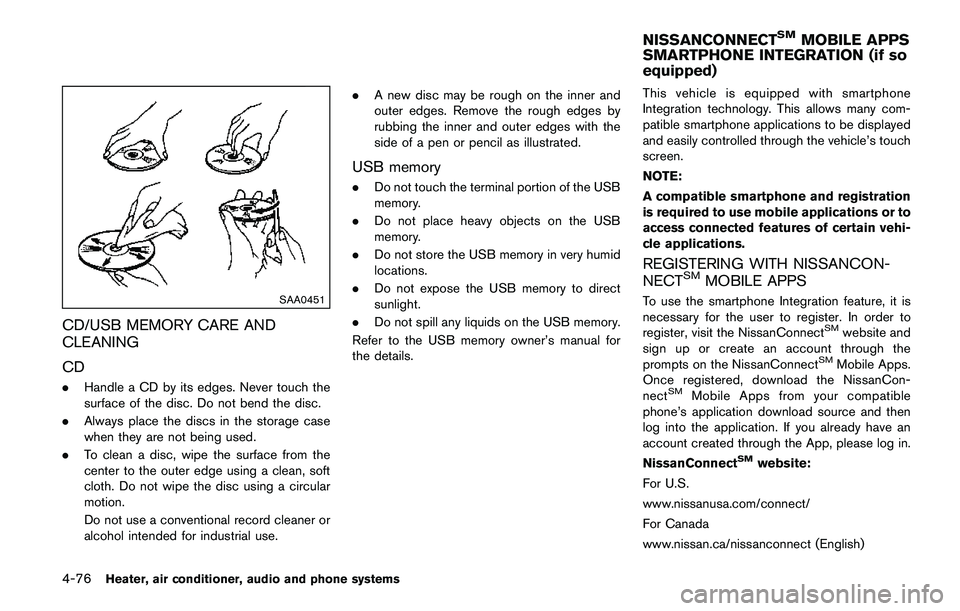
.Handle a CD by its edges. Never touch the
surface of the disc. Do not bend the disc.
.Always place the discs in the storage case
when they are not being used.
.To clean a disc, wipe the surface from the
center to the outer edge using a clean, soft
cloth. Do not wipe the disc using a circular
motion.
Do not use a conventional record cleaner or
alcohol intended for industrial use..A new disc may be rough on the inner and
outer edges. Remove the rough edges by
rubbing the inner and outer edges with the
side of a pen or pencil as illustrated.
USB memory
.Do not touch the terminal portion of the USB
memory.
.Do not place heavy objects on the USB
memory.
.Do not store the USB memory in very humid
locations.
.Do not expose the USB memory to direct
sunlight.
.Do not spill any liquids on the USB memory.
Refer to the USB memory owner’s manual for
the details.This vehicle is equipped with smartphone
Integration technology. This allows many com-
patible smartphone applications to be displayed
and easily controlled through the vehicle’s touch
screen.
NOTE:
A compatible smartphone and registration
is required to use mobile applications or to
access connected features of certain vehi-
cle applications.
REGISTERING WITH NISSANCON-
NECTSMMOBILE APPS
To use the smartphone Integration feature, it is
necessary for the user to register. In order to
register, visit the NissanConnect
SMwebsite and
sign up or create an account through the
prompts on the NissanConnect
SMMobile Apps.
Once registered, download the NissanCon-
nect
SMMobile Apps from your compatible
phone’s application download source and then
log into the application. If you already have an
account created through the App, please log in.
NissanConnect
SMwebsite:
For U.S.
www.nissanusa.com/connect/
For Canada
www.nissan.ca/nissanconnect (English)
NISSANCONNECTSMMOBILE APPS
SMARTPHONE INTEGRATION (if so
equipped)
Page 265 of 508
4-84Heater, air conditioner, audio and phone systems
IC Regulatory information
.Operation is subject to the following two
conditions: (1) this device may not cause
interference, and (2) this device must accept
any interference, including interference that
may cause undesired operation of the
device.
.This Class B digital apparatus meets all
requirements of the Canadian Interference-
Causing Equipment Regulations.
Bluetooth�Štrademark
Bluetooth�Šis a trademark owned
by Bluetooth SIG, Inc., and
licensed to Visteon Corporation.
USING THE SYSTEM
The voice recognition system allows hands-free
operation of the Bluetooth�ŠHands-Free Phone
System.
If the vehicle is in motion, some commands may
not be available so full attention may be given to
vehicle operation.
JVH1627X
Control buttons and microphone
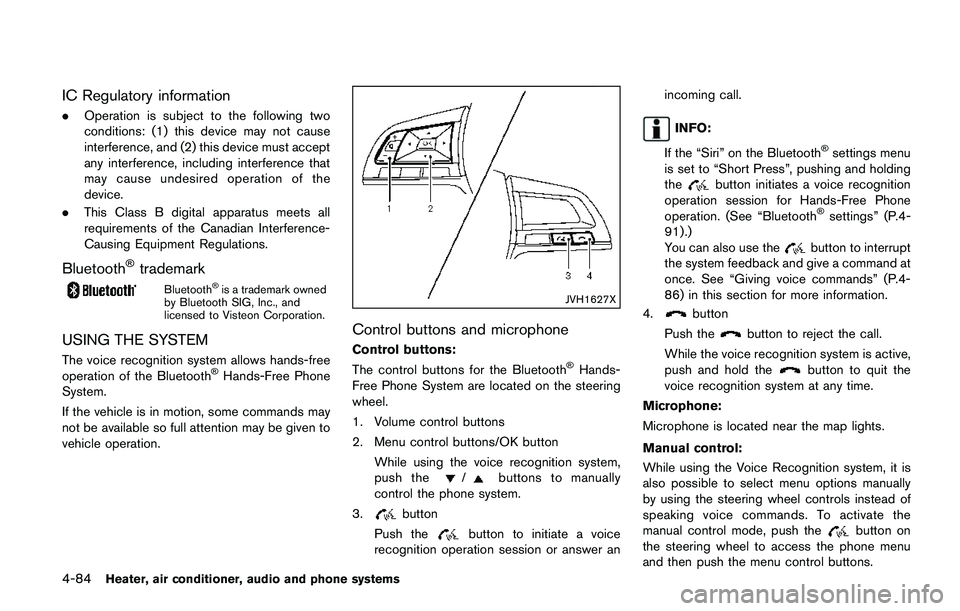
Control buttons:
The control buttons for the Bluetooth�ŠHands-
Free Phone System are located on the steering
wheel.
1. Volume control buttons
2. Menu control buttons/OK button
While using the voice recognition system,
push the
/buttons to manually
control the phone system.
3.
button
Push the
button to initiate a voice
recognition operation session or answer anincoming call.
INFO:
If the “Siri” on the Bluetooth
�Šsettings menu
is set to “Short Press”, pushing and holding
the
button initiates a voice recognition
operation session for Hands-Free Phone
operation. (See “Bluetooth
�Šsettings” (P.4-
91) .)
You can also use the
button to interrupt
the system feedback and give a command at
once. See “Giving voice commands” (P.4-
86) in this section for more information.
4.
button
Push the
button to reject the call.
While the voice recognition system is active,
push and hold the
button to quit the
voice recognition system at any time.
Microphone:
Microphone is located near the map lights.
Manual control:
While using the Voice Recognition system, it is
also possible to select menu options manually
by using the steering wheel controls instead of
speaking voice commands. To activate the
manual control mode, push the
button on
the steering wheel to access the phone menu
and then push the menu control buttons.
Page 275 of 508
4-94Heater, air conditioner, audio and phone systems
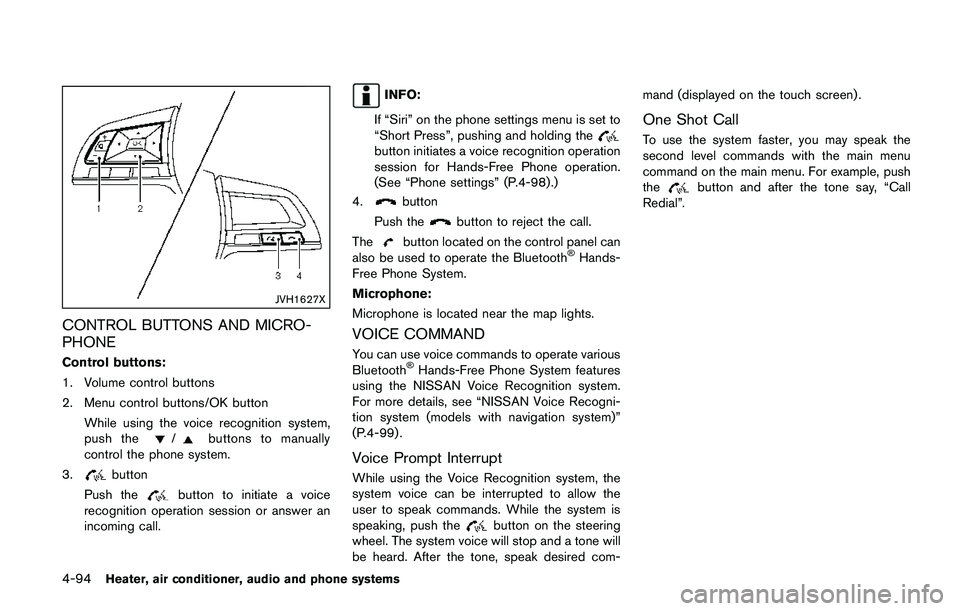
JVH1627X
CONTROL BUTTONS AND MICRO-
PHONE
Control buttons:
1. Volume control buttons
2. Menu control buttons/OK button
While using the voice recognition system,
push the
/buttons to manually
control the phone system.
3.
button
Push the
button to initiate a voice
recognition operation session or answer an
incoming call.
INFO:
If “Siri” on the phone settings menu is set to
“Short Press”, pushing and holding the
button initiates a voice recognition operation
session for Hands-Free Phone operation.
(See “Phone settings” (P.4-98) .)
4.
button
Push the
button to reject the call.
The
button located on the control panel can
also be used to operate the Bluetooth�ŠHands-
Free Phone System.
Microphone:
Microphone is located near the map lights.
VOICE COMMAND
You can use voice commands to operate various
Bluetooth�ŠHands-Free Phone System features
using the NISSAN Voice Recognition system.
For more details, see “NISSAN Voice Recogni-
tion system (models with navigation system)”
(P.4-99) .
Voice Prompt Interrupt
While using the Voice Recognition system, the
system voice can be interrupted to allow the
user to speak commands. While the system is
speaking, push the
button on the steering
wheel. The system voice will stop and a tone will
be heard. After the tone, speak desired com-mand (displayed on the touch screen) .
One Shot Call
To use the system faster, you may speak the
second level commands with the main menu
command on the main menu. For example, push
the
button and after the tone say, “Call
Redial”.