light NISSAN QASHQAI 2017 Owner´s Manual
[x] Cancel search | Manufacturer: NISSAN, Model Year: 2017, Model line: QASHQAI, Model: NISSAN QASHQAI 2017Pages: 508, PDF Size: 2.68 MB
Page 187 of 508
4-6Heater, air conditioner, audio and phone systems
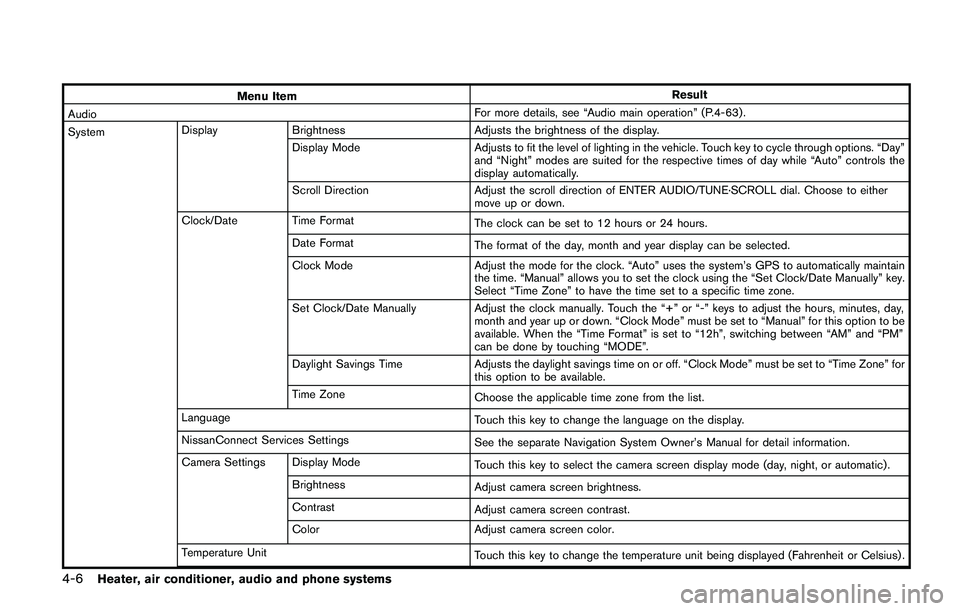
Menu ItemResult
AudioFor more details, see “Audio main operation” (P.4-63) .
SystemDisplay Brightness Adjusts the brightness of the display.
Display Mode Adjusts to fit the level of lighting in the vehicle. Touch key to cycle through options. “Day”
and “Night” modes are suited for the respective times of day while “Auto” controls the
display automatically.
Scroll Direction Adjust the scroll direction of ENTER AUDIO/TUNE·SCROLL dial. Choose to either
move up or down.
Clock/Date Time Format
The clock can be set to 12 hours or 24 hours.
Date Format
The format of the day, month and year display can be selected.
Clock Mode Adjust the mode for the clock. “Auto” uses the system’s GPS to automatically maintain
the time. “Manual” allows you to set the clock using the “Set Clock/Date Manually” key.
Select “Time Zone” to have the time set to a specific time zone.
Set Clock/Date Manually Adjust the clock manually. Touch the “+” or “-” keys to adjust the hours, minutes, day,
month and year up or down. “Clock Mode” must be set to “Manual” for this option to be
available. When the “Time Format” is set to “12h”, switching between “AM” and “PM”
can be done by touching “MODE”.
Daylight Savings Time Adjusts the daylight savings time on or off. “Clock Mode” must be set to “Time Zone” for
this option to be available.
Time Zone
Choose the applicable time zone from the list.
Language
Touch this key to change the language on the display.
NissanConnect Services Settings
See the separate Navigation System Owner’s Manual for detail information.
Camera Settings Display Mode
Touch this key to select the camera screen display mode (day, night, or automatic) .
Brightness
Adjust camera screen brightness.
Contrast
Adjust camera screen contrast.
Color Adjust camera screen color.
Temperature Unit
Touch this key to change the temperature unit being displayed (Fahrenheit or Celsius) .
Page 193 of 508
4-12Heater, air conditioner, audio and phone systems
firmly applied.
REARVIEW MONITOR SYSTEM LIM-
ITATIONS
WARNING
Listed below are the system limitations
for RearView Monitor. Failure to oper-
ate the vehicle in accordance with these
system limitations could result in ser-
ious injury or death.
.The system cannot completely elim-
inate blind spots and may not show
every object.
.Underneath the bumper and the
corner areas of the bumper cannot
be viewed on the RearView Monitor
because of its monitoring range
limitation. The system will not show
small objects below the bumper,
and may not show objects close to
the bumper or on the ground.
.Objects viewed in the RearView
Monitor differ from actual distance
because a wide-angle lens is used.
.Objects in the RearView Monitor
will appear visually opposite com-
pared to when viewed in the rear-view and outside mirrors.
.Use the displayed lines as a refer-
ence. The lines are highly affected
by the number of occupants, fuel
level, vehicle position, road condi-
tions and road grade.
.Make sure that the liftgate is se-
curely closed when backing up.
.Do not put anything on the rearview
camera. The rearview camera is
installed above the license plate.
.When washing the vehicle with
high-pressure water, be sure not to
spray it around the camera. Other-
wise, water may enter the camera
unit causing water condensation on
the lens, a malfunction, fire or an
electric shock.
.Do not strike the camera. It is a
precision instrument. Otherwise, it
may malfunction or cause damage
resulting in a fire or an electric
shock.
The following are operating limitations and do
not represent a system malfunction:
.When the temperature is extremely high or
low, the screen may not clearly displayobjects.
.When strong light directly shines on the
camera, objects may not be displayed
clearly.
.Vertical lines may be seen in objects on the
screen. This is due to strong reflected light
from the bumper.
.The screen may flicker under fluorescent
light.
.The colors of objects on the RearView
Monitor may differ somewhat from the actual
color of objects.
.Objects on the monitor may not be clear in a
dark environment.
.There may be a delay when switching
between views.
.If dirt, rain or snow accumulates on the
camera, the RearView Monitor may not
display objects clearly. Clean the camera.
.Do not use wax on the camera window.
Wipe off any wax with a clean cloth
dampened with mild detergent diluted with
water.
Page 197 of 508
4-16Heater, air conditioner, audio and phone systems
objects viewed in the monitor are
closer than they appear.
.Objects in the monitor will appear
visually opposite compared to when
viewed in the rearview and outside
mirrors.
.Use the mirrors or actually look to
properly judge distances to other
objects.
.The distance between objects
viewed in the rear view differs from
actual distance because a wide-
angle lens is used.
.On a snow-covered or slippery road,
there may be a difference between
the predictive course line and the
actual course line.
.The vehicle width and predictive
course lines are wider than the
actual width and course.
.The displayed lines on the rear view
will appear slightly off to the right
because the rear view camera is not
installed in the rear center of the
vehicle.
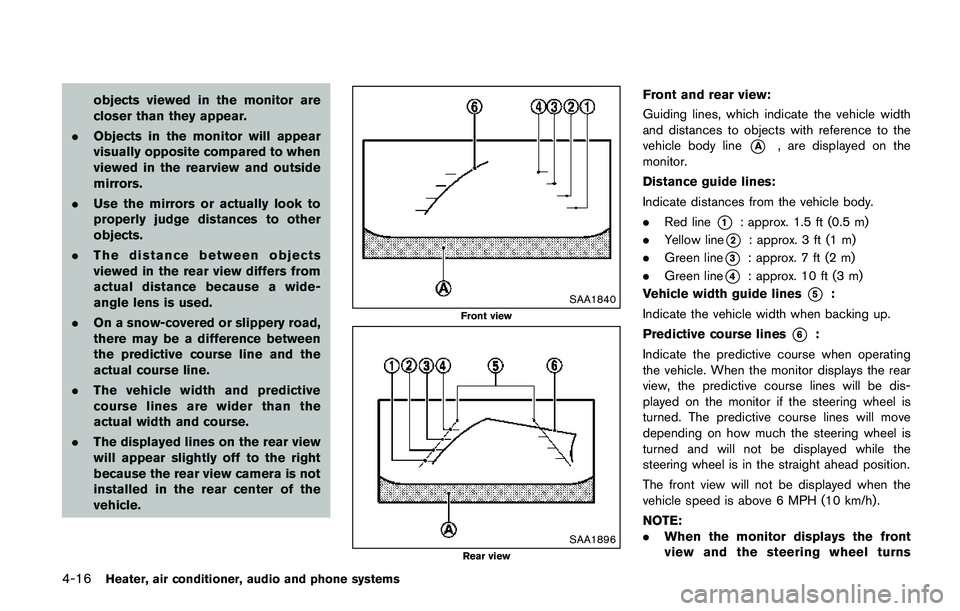
SAA1840
Front view
SAA1896Rear view
Front and rear view:
Guiding lines, which indicate the vehicle width
and distances to objects with reference to the
vehicle body line
*A, are displayed on the
monitor.
Distance guide lines:
Indicate distances from the vehicle body.
.Red line
*1: approx. 1.5 ft (0.5 m)
.Yellow line
*2: approx. 3 ft (1 m)
.Green line
*3: approx. 7 ft (2 m)
.Green line
*4: approx. 10 ft (3 m)
Vehicle width guide lines
*5:
Indicate the vehicle width when backing up.
Predictive course lines
*6:
Indicate the predictive course when operating
the vehicle. When the monitor displays the rear
view, the predictive course lines will be dis-
played on the monitor if the steering wheel is
turned. The predictive course lines will move
depending on how much the steering wheel is
turned and will not be displayed while the
steering wheel is in the straight ahead position.
The front view will not be displayed when the
vehicle speed is above 6 MPH (10 km/h) .
NOTE:
.When the monitor displays the front
view and the steering wheel turns
Page 198 of 508
about 90 degrees or less from the
straight ahead position, both the right
and left predictive course lines
*6are
displayed. When the steering wheel
turns about 90 degrees or more, the
predictive course line is displayed only
on the opposite side of the turn.
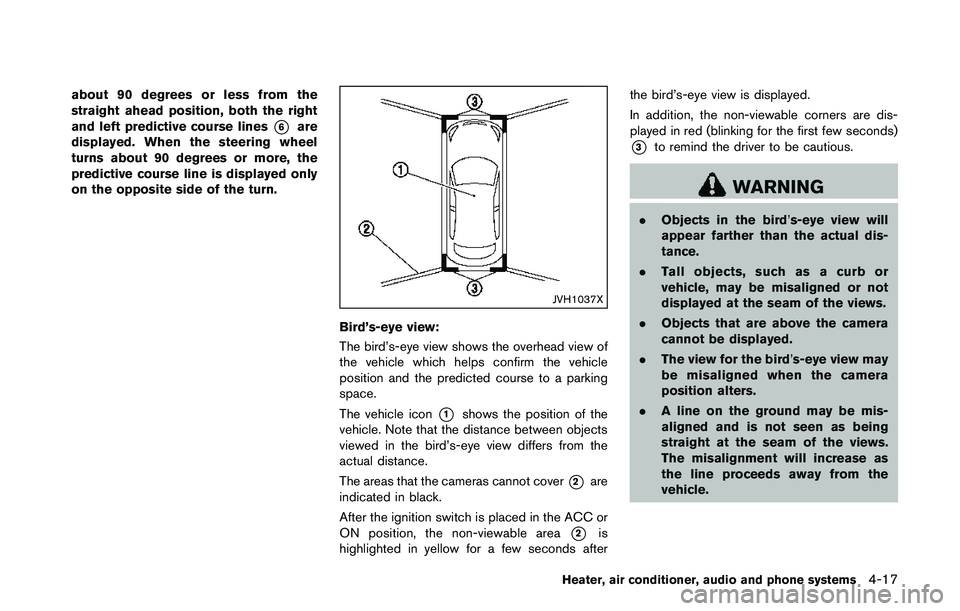
JVH1037X
Bird’s-eye view:
The bird’s-eye view shows the overhead view of
the vehicle which helps confirm the vehicle
position and the predicted course to a parking
space.
The vehicle icon
*1shows the position of the
vehicle. Note that the distance between objects
viewed in the bird’s-eye view differs from the
actual distance.
The areas that the cameras cannot cover
*2are
indicated in black.
After the ignition switch is placed in the ACC or
ON position, the non-viewable area
*2is
highlighted in yellow for a few seconds afterthe bird’s-eye view is displayed.
In addition, the non-viewable corners are dis-
played in red (blinking for the first few seconds)
*3to remind the driver to be cautious.
WARNING
.Objects in the bird’s-eye view will
appear farther than the actual dis-
tance.
.Tall objects, such as a curb or
vehicle, may be misaligned or not
displayed at the seam of the views.
.Objects that are above the camera
cannot be displayed.
.The view for the bird’s-eye view may
be misaligned when the camera
position alters.
.A line on the ground may be mis-
aligned and is not seen as being
straight at the seam of the views.
The misalignment will increase as
the line proceeds away from the
vehicle.
Heater, air conditioner, audio and phone systems4-17
Page 204 of 508
the monitor*2.
The following are operating limitations and do
not represent a system malfunction:
.When the view is switched, the display
images on the screen may be displayed with
some delay.
.When the temperature is extremely high or
low, the screen may not display objects
clearly.
.When strong light is shining directly on the
camera, objects may not be displayed
clearly.
.The screen may flicker under fluorescent
light.
.The colors of objects on the Around View
�Š
Monitor may differ somewhat from the actual
color of objects.
.Objects on the monitor may not be clear and
the color of the object may differ in a dark
environment.
.There may be differences in sharpness
between each camera view of the bird’s-
eye view.
.Do not use wax on the camera lens. Wipe off
any wax with a clean cloth that has been
dampened with a mild detergent diluted with
water.
JVH1053X
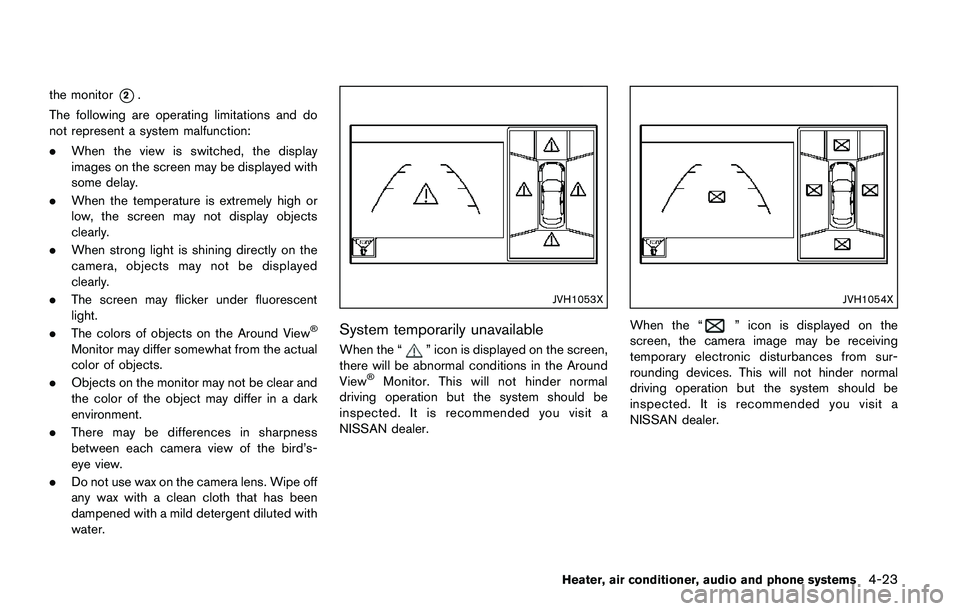
System temporarily unavailable
When the “” icon is displayed on the screen,
there will be abnormal conditions in the Around
View
�ŠMonitor. This will not hinder normal
driving operation but the system should be
inspected. It is recommended you visit a
NISSAN dealer.
JVH1054X
When the “” icon is displayed on the
screen, the camera image may be receiving
temporary electronic disturbances from sur-
rounding devices. This will not hinder normal
driving operation but the system should be
inspected. It is recommended you visit a
NISSAN dealer.
Heater, air conditioner, audio and phone systems4-23
Page 208 of 508
JVH1257X
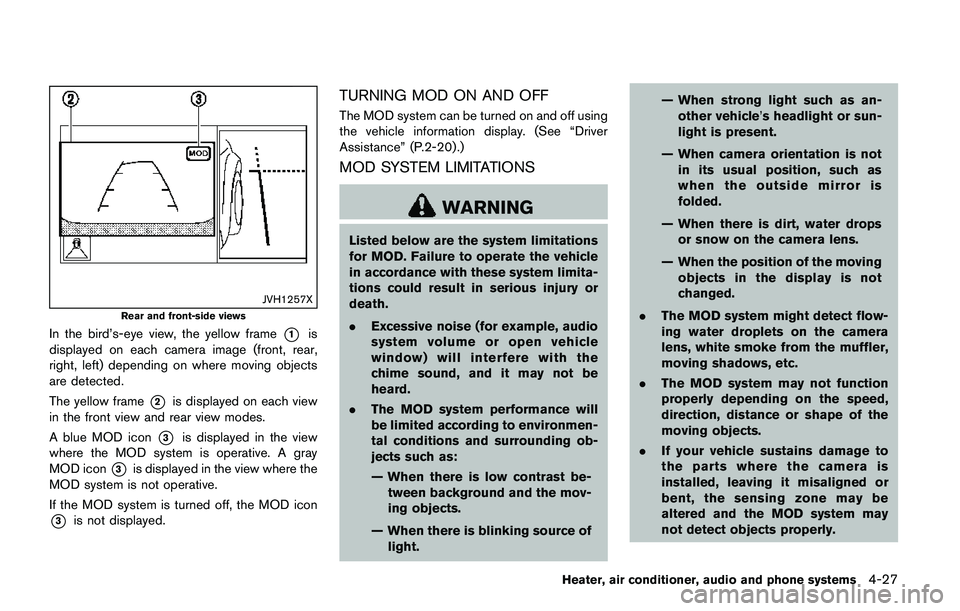
Rear and front-side views
In the bird’s-eye view, the yellow frame*1is
displayed on each camera image (front, rear,
right, left) depending on where moving objects
are detected.
The yellow frame
*2is displayed on each view
in the front view and rear view modes.
A blue MOD icon
*3is displayed in the view
where the MOD system is operative. A gray
MOD icon
*3is displayed in the view where the
MOD system is not operative.
If the MOD system is turned off, the MOD icon
*3is not displayed.
TURNING MOD ON AND OFF
The MOD system can be turned on and off using
the vehicle information display. (See “Driver
Assistance” (P.2-20) .)
MOD SYSTEM LIMITATIONS
WARNING
Listed below are the system limitations
for MOD. Failure to operate the vehicle
in accordance with these system limita-
tions could result in serious injury or
death.
.Excessive noise (for example, audio
system volume or open vehicle
window) will interfere with the
chime sound, and it may not be
heard.
.The MOD system performance will
be limited according to environmen-
tal conditions and surrounding ob-
jects such as:
— When there is low contrast be-
tween background and the mov-
ing objects.
— When there is blinking source of
light.— When strong light such as an-
other vehicle’s headlight or sun-
light is present.
— When camera orientation is not
in its usual position, such as
when the outside mirror is
folded.
— When there is dirt, water drops
or snow on the camera lens.
— When the position of the moving
objects in the display is not
changed.
.The MOD system might detect flow-
ing water droplets on the camera
lens, white smoke from the muffler,
moving shadows, etc.
.The MOD system may not function
properly depending on the speed,
direction, distance or shape of the
moving objects.
.If your vehicle sustains damage to
the parts where the camera is
installed, leaving it misaligned or
bent, the sensing zone may be
altered and the MOD system may
not detect objects properly.
Heater, air conditioner, audio and phone systems4-27
Page 212 of 508
JVH0664X
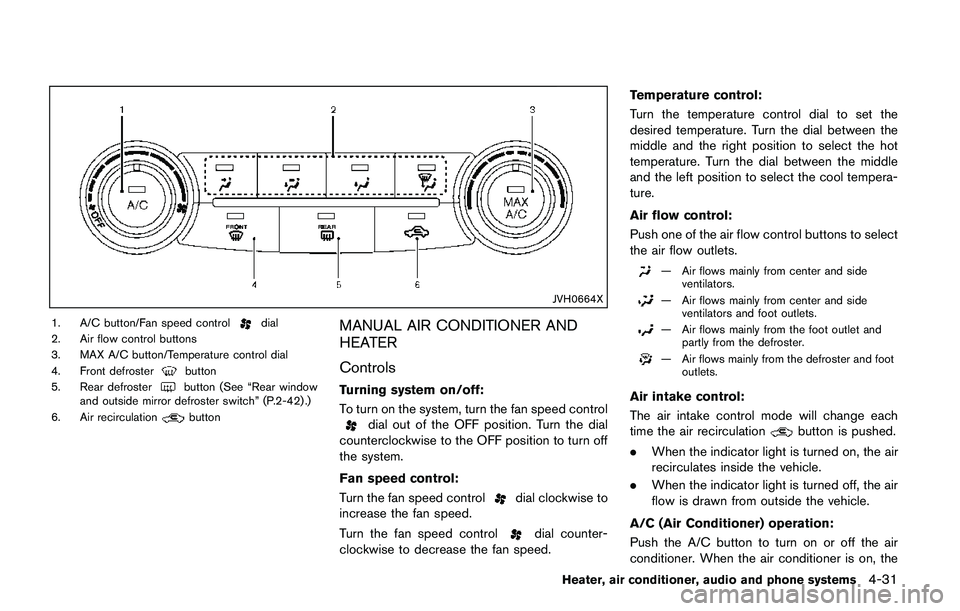
1. A/C button/Fan speed controldial
2. Air flow control buttons
3. MAX A/C button/Temperature control dial
4. Front defroster
button
5. Rear defrosterbutton (See “Rear window
and outside mirror defroster switch” (P.2-42) .)
6. Air recirculation
button
MANUAL AIR CONDITIONER AND
HEATER
Controls
Turning system on/off:
To turn on the system, turn the fan speed control
dial out of the OFF position. Turn the dial
counterclockwise to the OFF position to turn off
the system.
Fan speed control:
Turn the fan speed control
dial clockwise to
increase the fan speed.
Turn the fan speed control
dial counter-
clockwise to decrease the fan speed.Temperature control:
Turn the temperature control dial to set the
desired temperature. Turn the dial between the
middle and the right position to select the hot
temperature. Turn the dial between the middle
and the left position to select the cool tempera-
ture.
Air flow control:
Push one of the air flow control buttons to select
the air flow outlets.
— Air flows mainly from center and side
ventilators.
— Air flows mainly from center and side
ventilators and foot outlets.
— Air flows mainly from the foot outlet and
partly from the defroster.
— Air flows mainly from the defroster and foot
outlets.
Air intake control:
The air intake control mode will change each
time the air recirculation
button is pushed.
.When the indicator light is turned on, the air
recirculates inside the vehicle.
.When the indicator light is turned off, the air
flow is drawn from outside the vehicle.
A/C (Air Conditioner) operation:
Push the A/C button to turn on or off the air
conditioner. When the air conditioner is on, the
Heater, air conditioner, audio and phone systems4-31
Page 213 of 508
4-32Heater, air conditioner, audio and phone systems
A/C indicator light on the button illuminates.
MAX A/C (Quick Air Conditioning) opera-
tion:
Push the MAX A/C button for maximum cooling
and dehumidifying.
When the MAX A/C mode is turned on, the air
flow mode indicator will turn off with the air flow
mode fixed at
.
At the same time, the indicator light on the A/C
button and the air recirculation mode will turn on.
Push the MAX A/C button again to turn off the
MAX A/C mode. When the MAX A/C mode is
turned off, most of the settings will return to the
previous state, while the indicator light on the
A/C button will stay on.
Heater operation
Heating:
This mode is used to direct heated air from the
foot outlets. Some air also flows from the
defroster outlets and the side ventilator outlets.
1. Push the air recirculation
button for
normal heating. (The indicator light will turn
off.)
2. Push the
button. (The indicator light will
turn on.)3. Turn the fan speed control
dial to the
desired position.
4. Turn the temperature control dial to the
desired position between the middle and the
hot (right) position.
Ventilation:
This mode directs outside air from the side and
center ventilators.
1. Push the air recirculation
button. (The
indicator light will turn off.)
2. Push the
button. (The indicator light will
turn on.)
3. Turn the fan speed control
dial to the
desired position.
4. Turn the temperature control dial to the
desired position.
Defrosting or defogging:
This mode directs the air to the defroster outlets
to defrost/defog the windows.
1. Push the front defroster
button. (The
indicator light will turn on.)
2. Turn the fan speed control
dial to the
desired position.
3. Turn the temperature control dial to the
desired position between the middle and the
hot (right) position.To remove frost from the windshield quickly,
turn the temperature control dial to the
maximum hot (right) position and the fan
speed control
dial to the maximum
position.
When the front defroster mode is selected,
the air conditioner automatically turns on if
the outside temperature is more than 368F
(28C) . This dehumidifies the air which helps
defog the windshield. The air recirculation
indicator automatically turns off, allowing
outside air to be drawn into the passenger
compartment to further improve the defog-
ging performance. The recirculation mode
cannot be activated in the front defroster
mode.
Bi-level heating:
The bi-level mode directs warmed air to the side
and center ventilators and to the front and rear
floor outlets.
1. Push the air recirculation
button. (The
indicator light will turn off.)
2. Push the
button. (The indicator light will
turn on.)
3. Turn the fan speed control
dial to the
desired position.
4. Turn the temperature control dial to the
desired position.
Page 214 of 508
Heating and defogging:
This mode heats the interior and defogs the
windows.
1. Push the
button. (The indicator light will
turn on.)
2. Turn the fan speed control
dial to the
desired position.
3. Turn the temperature control dial to the
maximum hot (right) position.
When the
button is pushed, the air
conditioner automatically turns on if the outside
temperature is more than 368F(28C) . This
dehumidifies the air which helps defog the
windshield. The air recirculation indicator auto-
matically turns off, allowing outside air to be
drawn into the passenger compartment to
further improve the defogging performance.
NOTE:
Clear snow and ice from the wiper blades
and air inlet in front of the windshield. This
improves heater operation.
Air conditioner operation
Start the engine, turn the fan speed controldial to the desired position, and push the A/C
button to activate the air conditioner. When the
air conditioner is on, cooling and dehumidifying
functions are added to the heater operation. The
air conditioner cooling function operates only
when the engine is running.
Cooling:
This mode is used to cool and dehumidify the air.
1. Push the
button. (The indicator light will
turn on.)
2. Turn the fan speed control
dial to the
desired position.
3. Push the A/C button. (The indicator light will
turn on.)
4. Turn the temperature control dial to the
desired position between the middle and the
cool (left) position.
For quick cooling, push the MAX A/C button.
When the MAX A/C button is pushed, it will
activate the air recirculation mode. The amount
of air coming through the ventilators is the
highest it can go when in MAX A/C mode
regardless of the position of the fan speed
control
dial.Dehumidified heating:
This mode is used to heat and dehumidify the
air.
1. Push the air recirculation
button. (The
indicator light will turn off.)
2. Push the
button. (The indicator light will
turn on.)
3. Turn the fan speed control
dial to the
desired position.
4. Push the A/C button on. (The indicator light
will turn on.)
5. Turn the temperature control dial to the
desired position between the middle and the
hot (right) position.
Dehumidified defogging:
This mode is used to defog the windows and
dehumidify the air.
1. Push the front defroster
button. (The
indicator light will turn on.)
2. Turn the fan speed control
dial to the
desired position.
3. Turn the temperature control dial to the
desired position.
When the front defroster or
mode is
selected, the air conditioner automatically turns
on if the outside temperature is more than 368F
(28C) . This dehumidifies the air which helps
Heater, air conditioner, audio and phone systems4-33
Page 215 of 508
4-34Heater, air conditioner, audio and phone systems
defog the windshield. The air recirculation mode
automatically turns off, allowing outside air to be
drawn into the passenger compartment to
further improve the defogging performance.
The air conditioner is always on in front defroster
or
mode, regardless of whether the
indicator light is on or off.
NOTE:
.The air conditioner system should be
operated for approximately 10 minutes
at least once a month. This helps
prevent damage to the air conditioner
system due to the lack of lubrication.
.A visible mist may be seen coming
from the ventilators in hot, humid
conditions as the air is cooled rapidly.
This does not indicate a malfunction.
.If the engine coolant temperature be-
comes too high, the air recirculation
mode will be activated and the indica-
tor light will come on automatically.
.If the engine coolant temperature
gauge indicates engine coolant tem-
perature over the normal range, turn
the air conditioner off. (See“If your
vehicle overheats”(P.6-11) .)
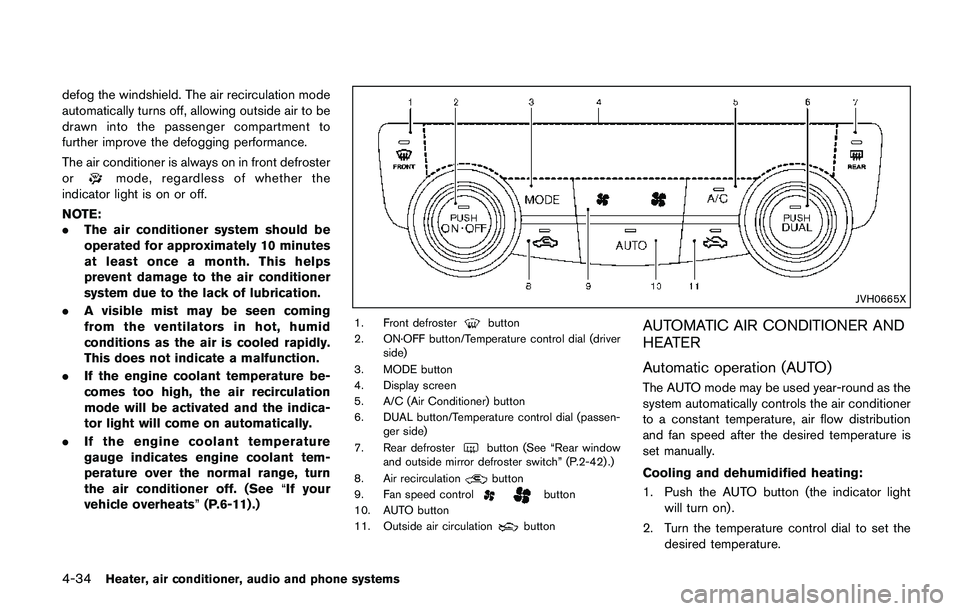
JVH0665X
1. Front defrosterbutton
2. ON·OFF button/Temperature control dial (driver
side)
3. MODE button
4. Display screen
5. A/C (Air Conditioner) button
6. DUAL button/Temperature control dial (passen-
ger side)
7. Rear defroster
button (See “Rear window
and outside mirror defroster switch” (P.2-42) .)
8. Air recirculation
button
9. Fan speed controlbutton
10. AUTO button
11. Outside air circulation
button
AUTOMATIC AIR CONDITIONER AND
HEATER
Automatic operation (AUTO)
The AUTO mode may be used year-round as the
system automatically controls the air conditioner
to a constant temperature, air flow distribution
and fan speed after the desired temperature is
set manually.
Cooling and dehumidified heating:
1. Push the AUTO button (the indicator light
will turn on) .
2. Turn the temperature control dial to set the
desired temperature.