change NISSAN QASHQAI 2017 Owner´s Manual
[x] Cancel search | Manufacturer: NISSAN, Model Year: 2017, Model line: QASHQAI, Model: NISSAN QASHQAI 2017Pages: 508, PDF Size: 2.68 MB
Page 4 of 508
MODIFICATION OF YOUR VEHI-
CLE
This vehicle should not be modified.
Modification could affect its performance,
safety or durability, and may even violate
governmental regulations. In addition,
damage or performance problems result-
ing from modification may not be covered
under NISSAN warranties.
WARNING
Installing an aftermarket On-Board Di-
agnostic (OBD) plug-in device that uses
the port during normal driving, for
example remote insurance company
monitoring, remote vehicle diagnostics,
telematics or engine reprogramming,
may cause interference or damage to
vehicle systems. We do not recommend
or endorse the use of any aftermarket
OBD plug-in devices, unless specifically
approved by NISSAN. The vehicle war-
ranty may not cover damage caused by
any aftermarket plug-in device.
WHEN READING THE MANUAL
This manual includes information for all
features and equipment available on this
model. Features and equipment in your
vehicle may vary depending on model, trim
level, options selected, order, date of
production, region or availability. There-
fore, you may find information about
features or equipment that are not in-
cluded or installed on your vehicle.
All information, specifications and illustrations in
this manual are those in effect at the time of
printing. NISSAN reserves the right to change
specifications, performance, design or compo-
nent suppliers without notice and without
obligation. From time to time, NISSAN may
update or revise this manual to provide Owners
with the most accurate information currently
available. Please carefully read and retain with
this manual all revision updates sent to you by
NISSAN to ensure you have access to accurate
and up-to-date information regarding your ve-
hicle. Current versions of vehicle Owner’s
Manuals and any updates can also be found in
the Owner section of the NISSAN website at
https://owners.nissanusa.com/nowners/naviga-
tion/manualsGuide. If you have questions con-
cerning any information in your Owner’s Manual,
contact NISSAN Consumer Affairs. See the
NISSAN CUSTOMER CARE PROGRAM pagein this Owner’s Manual for contact information.IMPORTANT INFORMATION ABOUT
THIS MANUAL
You will see various symbols in this manual. They
are used in the following ways:
WARNING
This is used to indicate the presence of
a hazard that could cause death or
serious personal injury. To avoid or
reduce the risk, the procedures must
be followed precisely.
CAUTION
This is used to indicate the presence of
a hazard that could cause minor or
moderate personal injury or damage to
your vehicle. To avoid or reduce the risk,
the procedures must be followed care-
fully.
Page 31 of 508
1-12Safety — Seats, seat belts and supplemental restraint system
WARNING
.Every person who drives or rides in
this vehicle should use a seat belt at
all times. Children should be prop-
erly restrained in the rear seat and,
if appropriate, in a child restraint.
.The seat belt should be properly
adjusted to a snug fit. Failure to do
so may reduce the effectiveness of
the entire restraint system and in-
crease the chance or severity of
injury in an accident. Serious injury
or death can occur if the seat belt is
not worn properly.
.Always route the shoulder belt over
your shoulder and across your
chest. Never put the belt behind
your back, under your arm or across
your neck. The belt should be away
from your face and neck, but not
falling off your shoulder.
.Position the lap belt as low and
snug as possible AROUND THE
HIPS, NOT THE WAIST. A lap belt
worn too high could increase the
risk of internal injuries in an acci-
dent..Be sure the seat belt tongue is
securely fastened to the proper
buckle.
.Do not wear the seat belt inside out
or twisted. Doing so may reduce its
effectiveness.
.Do not allow more than one person
to use the same seat belt.
.Never carry more people in the
vehicle than there are seat belts.
.If the seat belt warning light glows
continuously while the ignition is
turned ON with all doors closed and
all seat belts fastened, it may in-
dicate a malfunction in the system.
Have the system checked. It is
recommended you visit a NISSAN
dealer for this service.
.No changes should be made to the
seat belt system. For example, do
not modify the seat belt, add mate-
rial, or install devices that may
change the seat belt routing or
tension. Doing so may affect the
operation of the seat belt system.
Modifying or tampering with the
seat belt system may result in
serious personal injury..Once a seat belt pretensioner has
activated, it cannot be reused and
must be replaced together with the
retractor. It is recommended you
visit a NISSAN dealer for this ser-
vice.
.All seat belt assemblies, including
retractors and attaching hardware,
should be inspected after any colli-
sion. It is recommended you visit a
NISSAN dealer for this service.
NISSAN recommends that all seat
belt assemblies in use during a
collision be replaced unless the
collision was minor and the belts
show no damage and continue to
operate properly. Seat belt assem-
blies not in use during a collision
should also be inspected and re-
placed if either damage or improper
operation is noted.
.All child restraints and attaching
hardware should be inspected after
any collision. Always follow the
restraint manufacturer’s inspection
instructions and replacement re-
commendations. The child restraints
should be replaced if they are
damaged.
Page 50 of 508
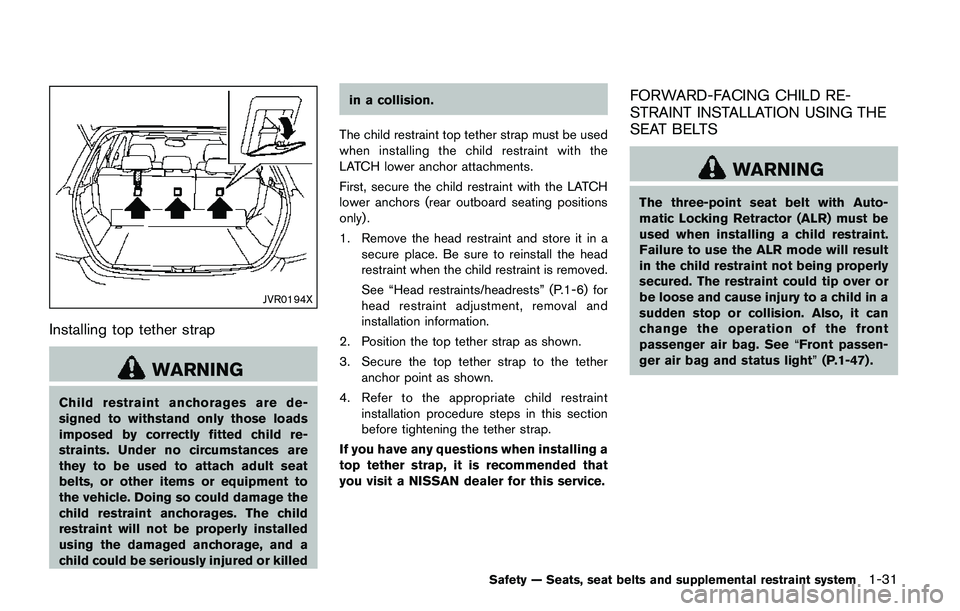
JVR0194X
Installing top tether strap
WARNING
Child restraint anchorages are de-
signed to withstand only those loads
imposed by correctly fitted child re-
straints. Under no circumstances are
they to be used to attach adult seat
belts, or other items or equipment to
the vehicle. Doing so could damage the
child restraint anchorages. The child
restraint will not be properly installed
using the damaged anchorage, and a
child could be seriously injured or killedin a collision.
The child restraint top tether strap must be used
when installing the child restraint with the
LATCH lower anchor attachments.
First, secure the child restraint with the LATCH
lower anchors (rear outboard seating positions
only) .
1. Remove the head restraint and store it in a
secure place. Be sure to reinstall the head
restraint when the child restraint is removed.
See “Head restraints/headrests” (P.1-6) for
head restraint adjustment, removal and
installation information.
2. Position the top tether strap as shown.
3. Secure the top tether strap to the tether
anchor point as shown.
4. Refer to the appropriate child restraint
installation procedure steps in this section
before tightening the tether strap.
If you have any questions when installing a
top tether strap, it is recommended that
you visit a NISSAN dealer for this service.
FORWARD-FACING CHILD RE-
STRAINT INSTALLATION USING THE
SEAT BELTS
WARNING
The three-point seat belt with Auto-
matic Locking Retractor (ALR) must be
used when installing a child restraint.
Failure to use the ALR mode will result
in the child restraint not being properly
secured. The restraint could tip over or
be loose and cause injury to a child in a
sudden stop or collision. Also, it can
change the operation of the front
passenger air bag. See“Front passen-
ger air bag and status light”(P.1-47) .
Safety — Seats, seat belts and supplemental restraint system1-31
Page 68 of 508
however, if the occupant does not sit in the seat
properly (for example, by not sitting upright, by
sitting on an edge of the seat, or by otherwise
being out of position) , this could cause the
sensors to turn the air bag OFF. Always be sure
to be seated and wearing the seat belt properly
for the most effective protection by the seat belt
and supplemental air bag.
NISSAN recommends that pre-teens and chil-
dren be properly restrained in a rear seat.
NISSAN also recommends that appropriate
child restraints and booster seats be properly
installed in a rear seat. If this is not possible, the
occupant classification sensors are designed to
operate as described above to turn the front
passenger air bag OFF for specified child
restraints. Failing to properly secure child
restraints and to use the Automatic Locking
Retractor (ALR) mode (child restraint mode)
may allow the restraint to tip or move in an
accident or sudden stop. This can also result in
the passenger air bag inflating in a crash instead
of being OFF. (See “Child restraints” (P.1-19)
for proper use and installation.)
If the front passenger seat is not occupied, the
passenger air bag is designed not to inflate in a
crash. However, heavy objects placed on the
seat could result in air bag inflation, because of
the object being detected by the occupant
classification sensors. Other conditions couldalso result in air bag inflation, such as if a child is
standing on the seat, or if two children are on the
seat, contrary to the instructions in this manual.
Always be sure that you and all vehicle
occupants are seated and restrained properly.
Using the front passenger air bag status light,
you can monitor when the front passenger air
bag is automatically turned OFF.
If an adult occupant is in the seat but the front
passenger air bag status light is illuminated
(indicating that the air bag is OFF) , it could be
that the person is a small adult, or is not sitting
on the seat properly.
If a child restraint must be used in the front seat,
the front passenger air bag status light may or
may not be illuminated, depending on the size of
the child and the type of child restraint being
used. If the front passenger air bag status light is
not illuminated (indicating that the air bag might
inflate in a crash) , it could be that the child
restraint or seat belt is not being used properly.
Make sure that the child restraint is installed
properly, the seat belt is used properly and the
occupant is positioned properly. If the front
passenger air bag status light is not illuminated,
reposition the occupant or child restraint in a
rear seat.
If the front passenger air bag status light will not
illuminate even though you believe that the childrestraint, the seat belts and the occupant are
properly positioned, it is recommended that you
take your vehicle to a NISSAN dealer. A
NISSAN dealer can check the system status
by using a special tool. However, until you have
confirmed with your dealer that your air bag is
working properly, reposition the occupant or
child restraint in a rear seat.
The NISSAN Advanced Air Bag System and
front passenger air bag status light will take a
few seconds to register a change in the
passenger seat status. This is normal system
operation and does not indicate a malfunction.
If a malfunction occurs in the front passenger air
bag system, the supplemental air bag warning
light
, located in the meters and gauges
area, will illuminate. Have the system checked. It
is recommended you visit a NISSAN dealer for
this service.
Normal operation:
In order for the occupant classification sensor
system to classify the front passenger based on
weight, please follow the precautions and steps
outlined below:
Precautions:
.Make sure that there are no objects weigh-
ing over 9.1 lbs (4 kg) hanging on the seat
or placed in the seatback pocket.
Safety — Seats, seat belts and supplemental restraint system1-49
Page 70 of 508
This may be due to the following conditions that
may be interfering with the weight sensors:
.Small adult or child is not sitting upright,
leaning against the seatback, and centered
on the seat cushion with his/her feet
comfortably extended to the floor.
.The child restraint is not properly installed,
as outlined. (See “Child restraints” (P.1-
19) .)
.An object weighing over 9.1 lbs (4 kg)
hanging on the seat or placed in the
seatback pocket.
.A child restraint or other object pressing
against the rear of the seatback.
.A rear passenger pushing or pulling on the
back of the front passenger seat.
.Forcing the front seat or seatback against an
object on the seat or floor behind it.
.An object placed under the front passenger
seat.
.An object placed between the seat cushion
and center console.
.The front passenger seat head restraint
contacting the roof.
If the vehicle is moving, please come to a stop
when it is safe to do so. Check and correct any
of the above conditions. Restart the vehicle and
wait 1 minute.NOTE:
A system check will be performed during
which the front passenger air bag status
light will remain lit for about 7 seconds
initially.
If the light is still OFF after this, the small adult,
child or child restraint should be repositioned in
the rear seat and it is recommended that the
vehicle should be checked by a NISSAN dealer
as soon as possible.
3. If the light is OFF with no front passenger and no
objects on the front passenger seat, the vehicle
should be checked as soon as possible. It is
recommended you visit a NISSAN dealer for this
service.
Other supplemental front-impact air bag
precautions
WARNING
.Do not place any objects on the
steering wheel pad or on the instru-
ment panel. Also, do not place any
objects between any occupant and
the steering wheel or instrument
panel. Such objects may become
dangerous projectiles and cause
injury if the front air bags inflate..Do not place objects with sharp
edges on the seat. Also, do not
place heavy objects on the seat that
will leave permanent impressions in
the seat. Such objects can damage
the seat or occupant classification
sensors (weight sensors) . This can
affect the operation of the air bag
system and result in serious perso-
nal injury.
.Do not use water or acidic cleaners
(hot steam cleaners) on the seat.
This can damage the seat or occu-
pant classification sensors. This can
also affect the operation of the air
bag system and result in serious
personal injury.
.Immediately after inflation, several
front air bag system components
will be hot. Do not touch them; you
may severely burn yourself.
.No unauthorized changes should be
made to any components or wiring
of the supplemental air bag system.
This is to prevent accidental infla-
tion of the supplemental air bag or
damage to the supplemental air bag
system.
Safety — Seats, seat belts and supplemental restraint system1-51
Page 71 of 508
1-52Safety — Seats, seat belts and supplemental restraint system
.Do not make unauthorized changes
to your vehicle’s electrical system,
suspension system or front end
structure. This could affect proper
operation of the front air bag sys-
tem.
.Tampering with the front air bag
system may result in serious perso-
nal injury. Tampering includes
changes to the steering wheel and
the instrument panel assembly by
placing material over the steering
wheel pad and above the instrument
panel or by installing additional trim
material around the air bag system.
.Removing or modifying the front
passenger seat may affect the func-
tion of the air bag system and result
in serious personal injury.
.Modifying or tampering with the
front passenger seat may result in
serious personal injury. For exam-
ple, do not change the front seats by
placing material on the seat cushion
or by installing additional trim ma-
terial, such as seat covers, on the
seat that is not specifically designed
to assure proper air bag operation.
Additionally, do not stow any ob-jects under the front passenger seat
or the seat cushion and seatback.
Such objects may interfere with the
proper operation of the occupant
classification sensors.
.No unauthorized changes should be
made to any components or wiring
of the seat belt system. This may
affect the front air bag system.
Tampering with the seat belt system
may result in serious personal in-
jury.
.It is recommended you visit a
NISSAN dealer for work on and
around the front air bag. It is also
recommended you visit a NISSAN
dealer for installation of electrical
equipment. The Supplemental Re-
straint System (SRS) wiring har-
nesses* should not be modified or
disconnected. Unauthorized electri-
cal test equipment and probing
devices should not be used on the
air bag system.
.A cracked windshield should be
replaced immediately by a qualified
repair facility. A cracked windshield
could affect the function of thesupplemental air bag system.
*The SRS wiring harness connectors are
yellow and orange for easy identification.
When selling your vehicle, we request that you
inform the buyer about the front air bag system
and guide the buyer to the appropriate sections
in this Owner’s Manual.
Page 73 of 508
1-54Safety — Seats, seat belts and supplemental restraint system
finisher and the front seat. Such
objects may become dangerous
projectiles and cause injury if a side
air bag inflates.
.Right after inflation, several side air
bag and curtain air bag system
components will be hot. Do not
touch them; you may severely burn
yourself.
.No unauthorized changes should be
made to any components or wiring
of the side air bag and curtain air
bag systems. This is to prevent
damage to or accidental inflation
of the side air bag and curtain air
bag systems.
.Do not make unauthorized changes
to your vehicle’s electrical system,
suspension system or side panel.
This could affect proper operation
of the side air bag and curtain air
bag systems.
.Tampering with the side air bag
system may result in serious perso-
nal injury. For example, do not
change the front seats by placing
material near the seatbacks or by
installing additional trim material,
such as seat covers, around the sideair bag.
.Removing or modifying the front
passenger seat may affect the func-
tion of the air bag system and result
in serious personal injury.
.It is recommended you visit a
NISSAN dealer for work on and
around the side air bag and curtain
air bag. It is also recommended you
visit a NISSAN dealer for installa-
tion of electrical equipment. The
Supplemental Restraint System
(SRS) wiring harnesses* should not
be modified or disconnected. Un-
authorized electrical test equipment
and probing devices should not be
used on the side air bag or curtain
air bag systems.
*The SRS wiring harness connectors are
yellow and orange for easy identification.
When selling your vehicle, we request that you
inform the buyer about the side air bag and
curtain air bag systems and guide the buyer to
the appropriate sections in this Owner’s Manual.SEAT BELTS WITH PRETENSIONERS
(front seats)
WARNING
.The pretensioners cannot be reused
after activation. They must be re-
placed together with the retractor
and buckle as a unit.
.If the vehicle becomes involved in a
collision but a pretensioner is not
activated, be sure to have the pre-
tensioner system checked and, if
necessary, repaired. It is recom-
mended you visit a NISSAN dealer
for this service.
.No unauthorized changes should be
made to any components or wiring
of the pretensioner system. This is
to prevent damage to or accidental
activation of the pretensioners.
Tampering with the pretensioner
system may result in serious perso-
nal injury.
.It is recommended you visit a
NISSAN dealer for work on and
around the pretensioner system. It
is also recommended you visit a
NISSAN dealer for installation of
Page 85 of 508
2-6Instruments and controls
JVI1006X
Speedometer
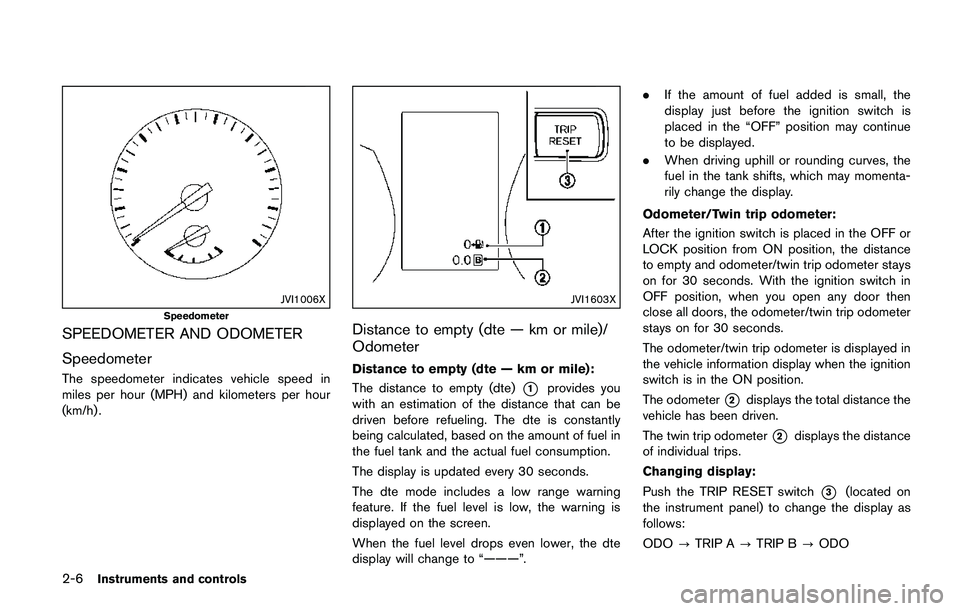
SPEEDOMETER AND ODOMETER
Speedometer
The speedometer indicates vehicle speed in
miles per hour (MPH) and kilometers per hour
(km/h) .
JVI1603X
Distance to empty (dte — km or mile)/
Odometer
Distance to empty (dte — km or mile):
The distance to empty (dte)
*1provides you
with an estimation of the distance that can be
driven before refueling. The dte is constantly
being calculated, based on the amount of fuel in
the fuel tank and the actual fuel consumption.
The display is updated every 30 seconds.
The dte mode includes a low range warning
feature. If the fuel level is low, the warning is
displayed on the screen.
When the fuel level drops even lower, the dte
display will change to “———”..If the amount of fuel added is small, the
display just before the ignition switch is
placed in the “OFF” position may continue
to be displayed.
.When driving uphill or rounding curves, the
fuel in the tank shifts, which may momenta-
rily change the display.
Odometer/Twin trip odometer:
After the ignition switch is placed in the OFF or
LOCK position from ON position, the distance
to empty and odometer/twin trip odometer stays
on for 30 seconds. With the ignition switch in
OFF position, when you open any door then
close all doors, the odometer/twin trip odometer
stays on for 30 seconds.
The odometer/twin trip odometer is displayed in
the vehicle information display when the ignition
switch is in the ON position.
The odometer*2displays the total distance the
vehicle has been driven.
The twin trip odometer
*2displays the distance
of individual trips.
Changing display:
Push the TRIP RESET switch
*3(located on
the instrument panel) to change the display as
follows:
ODO?TRIP A?TRIP B?ODO
Page 98 of 508
.Indicators and warnings
.Tire pressure information
.Chassis Control
.Other information
JVI1566X
HOW TO USE THE VEHICLE INFOR-
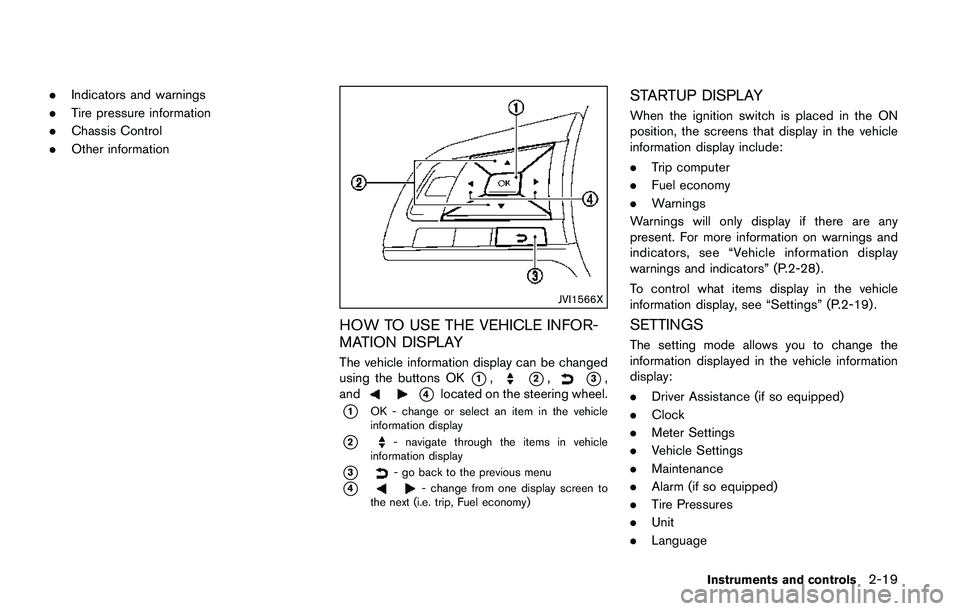
MATION DISPLAY
The vehicle information display can be changed
using the buttons OK
*1,*2,*3,
and
*4located on the steering wheel.
*1OK - change or select an item in the vehicle
information display
*2- navigate through the items in vehicle
information display
*3- go back to the previous menu
*4- change from one display screen to
the next (i.e. trip, Fuel economy)
STARTUP DISPLAY
When the ignition switch is placed in the ON
position, the screens that display in the vehicle
information display include:
.Trip computer
.Fuel economy
.Warnings
Warnings will only display if there are any
present. For more information on warnings and
indicators, see “Vehicle information display
warnings and indicators” (P.2-28) .
To control what items display in the vehicle
information display, see “Settings” (P.2-19) .
SETTINGS
The setting mode allows you to change the
information displayed in the vehicle information
display:
.Driver Assistance (if so equipped)
.Clock
.Meter Settings
.Vehicle Settings
.Maintenance
.Alarm (if so equipped)
.Tire Pressures
.Unit
.Language
Instruments and controls2-19
Page 99 of 508
2-20Instruments and controls
.Factory Reset
Driver Assistance (if so equipped)
To change the status, warnings or turn on or off
any of the systems/warnings displayed in the
“Driver Assistance” menu, use the
buttons
*2to select and the OK*1to change a menu
item:
.Driving Aids (if so equipped)
.Parking Aids (if so equipped)
.Chassis Control (if so equipped)
.Power Steering (if so equipped)
Driving Aids (if so equipped) :
To change the status, warnings or turn on or off
any of the systems/warnings displayed in the
“Driving Aids” menu, use the
buttons*2to
select and the OK
*1to change a menu item:
.Emergency Brake (if so equipped)
— Press the OK
*1to turn the Forward
Emergency Braking (FEB) system ON/
OFF.
.Lane (if so equipped)
— Warning
Press the OK
*1to turn the Lane Departure
Warning (LDW) system ON/OFF.
.Blind Spot (if so equipped)
— Warning
Press the OK
*1to turn the Blind SpotWarning (BSW) system ON/OFF.
For additional information, see “Forward Emer-
gency Braking (FEB)” (P.5-80) , “Forward Emer-
gency Braking (FEB) with pedestrian detection
system” (P.5-86) , “Lane Departure Warning
(LDW)” (P.5-31) and “Blind Spot Warning
(BSW)” (P.5-42).
Parking Aids (if so equipped):
To change the status or turn on or off any of the
systems displayed in the “Parking Aids” menu,
use the
buttons*2to select and the OK
*1to change a menu item:
.Moving Object (if so equipped)
Press the OK
*1to turn the Moving Object
Detection (MOD) ON/OFF.
.Cross Traffic (if so equipped)
Press the OK
*1to turn the Rear Cross
Traffic Alert (RCTA) ON/OFF.
For additional information, see “Moving Object
Detection (MOD)” (P.4-25)and “Rear Cross
Traffic Alert (RCTA)” (P.5-51) .
Chassis Control:
To change the status, warnings or turn on or off
any of the systems/warnings displayed in the
“Chassis Control” menu.
Use the
buttons*2to select and the OK
*1to change a menu item:.Trace Control
— See “Active Trace Control” (P.5-106) for
more information.
.Engine Brake (if so equipped)
— See “Active Engine Brake (Continuously
Variable Transmission (CVT) models)”
(P.5-107) for more information.
Press the OK
*1to turn ON/OFF.
Power Steering:
Use the
buttons*2to select and the OK
*1to change a menu item:
.NORMAL
The NORMAL mode is recommended for
normal driving.
.SPORT
The SPORT mode adjusts the steering to
enhance performance.
Clock
To set the clock, see “Displaying settings menu”
(P.4-5) , “Audio main operation” (P.4-48) or
“Audio main operation” (P.4-63) in this manual
or the separate Navigation System Owner’s
Manual (if so equipped) .