check NISSAN QUEST 2001 V41 / 2.G Repair Manual
[x] Cancel search | Manufacturer: NISSAN, Model Year: 2001, Model line: QUEST, Model: NISSAN QUEST 2001 V41 / 2.GPages: 304, PDF Size: 2.54 MB
Page 219 of 304
following steps to correctly reset the switch:
1. Turn the key in the ignition to OFF.
2. Check under the vehicle for leaking fuel.
3. If you do not see or smell fuel, push down
the red reset button on the inertia fuel
shut-off switch.
4. Turn the ignition key ON for a few sec-
onds, then turn it OFF.
5. Check under the vehicle again for leaking
fuel. If you see or smell fuel, do not start
your vehicle again. If no fuel is detected,
try to start your vehicle again.
WARNING
If you see or smell fuel, do not reset the
switch or try to start your vehicle. You
could injure yourself or others. Have all
the passengers get out of the vehicle
and call the local fire department or a
towing service.When towing your vehicle, all State (Provin-
cial in Canada) and local regulations for
towing must be followed. Incorrect towing
equipment could damage your vehicle.
Towing instructions are available from an
authorized NISSAN dealer. Local service
operators are generally familiar with the
applicable laws and procedures for towing.
To assure proper towing and to prevent
accidental damage to your vehicle, NISSAN
recommends having a service operator tow
your vehicle. It is advisable to have the
service operator carefully read the following
precautions.WARNING
cNever ride in a vehicle that is being
towed.
cNever get under your vehicle after it
has been lifted by a tow truck.
CAUTION
cWhen towing, make sure that the
transmission, axles, steering system
and powertrain are in working con-
dition. If any unit is damaged, dollies
must be used.
cAlways attach safety chains before
towing.
TOWING YOUR VEHICLE
6-12In case of emergency
ZX
Page 225 of 304
FLOOR MATS
The use of genuine NISSAN floor mats can
extend the life of your vehicle carpet and
make it easier to clean the interior.No
matter what mats are used, be sure they
are fitted for your vehicle and are prop-
erly positioned in the footwell to prevent
interference with pedal operation.Mats
should be maintained with regular cleaning
and replaced if they become excessively
worn.
Front floor mat positioning aid
(Driver side only)
This model includes a front floor mat
bracket to act as a floor mat positioning aid.
NISSAN floor mats, specially designed for
your vehicle, incorporate grommets. To in-
stall, simply position the mat using the floor
mat bracket hook through the floor mat
grommet hole while centering the mat in the
footwell.
Periodically check to make certain the mat
is properly positioned.
SEAT BELTS
The seat belts can be cleaned by wiping
them with a sponge dampened in a mildsoap solution. Allow the belts to dry com-
pletely before using them.
WARNING
Do not allow wet seat belts to roll up in
the retractor. NEVER use bleach, dye,
or chemical solvents to clean the seat
belts, since these may severely weaken
the seat belt webbing.
MOST COMMON FACTORS
CONTRIBUTING TO VEHICLE
CORROSION
1. The accumulation of moisture-retaining
dirt and debris in body panel sections,
cavities, and other areas.
2. Damage to paint and other protective
coatings caused by gravel and stone
chips or minor traffic accidents.
ENVIRONMENTAL FACTORS IN-
FLUENCE THE RATE OF COR-
ROSION
Moisture
Accumulation of sand, dirt and water on the
vehicle body underside can accelerate cor-
rosion. Wet floor coverings do not dry com-
pletely inside the vehicle, and should be
removed for drying to avoid floor panel
corrosion.
Relative humidity
Corrosion will be accelerated:
cin areas of high relative humidity.
CORROSION PROTECTION
7-4Appearance and care
ZX
Page 226 of 304
cin areas where the temperatures stay
above freezing.
cwhere atmospheric pollution exists.
cwhere road salt is used.
Temperature
A temperature increase accelerates the rate
of corrosion to those parts which are not
well ventilated.
Air pollution
Industrial pollution, the presence of salt in
the air in coastal areas, or heavy road salt
use accelerates the corrosion process.
Road salt also accelerates the disintegra-
tion of paint surfaces.
TO PROTECT YOUR VEHICLE
FROM CORROSION
cwash and wax your vehicle often to keep
the vehicle clean.
calways check for minor damage to the
paint and repair it as soon as possible.
ckeep drain holes at the bottom of the
doors open to avoid water accumulation.
ccheck the underbody for accumulation ofsand, dirt or salt. If present, wash with
water as soon as possible.
CAUTION
cNEVER remove dirt, sand or other
debris from the passenger compart-
ment by washing it out with a hose.
Remove dirt with a vacuum cleaner
or broom.
cNever allow water or other liquids to
come in contact with electronic com-
ponents inside the vehicle as this
may damage them.
Chemicals used for road surface de-icing
are extremely corrosive. They accelerate
corrosion and deterioration of underbody
components such as the exhaust system,
fuel and brake lines, brake cables, floor pan
and fenders.
In winter, the underbody must be
cleaned periodically.
For additional protection against rust and
corrosion, which may be required in some
areas, consult an authorized NISSAN
dealer.
Appearance and care
7-5
ZX
Page 228 of 304

8 Do-it-yourself
Maintenance precautions .......................................8-2
Engine compartment check locations ....................8-3
Engine cooling system ...........................................8-4
Checking engine coolant level ..........................8-4
Changing engine coolant ..................................8-5
Engine oil ...............................................................8-5
Checking engine oil level ..................................8-5
Changing engine oil ..........................................8-6
Changing engine oil filter...................................8-7
Automatic transmission fluid ..................................8-8
Temperature conditions for checking ................8-8
Power steering fluid................................................8-9
Brake fluid ..............................................................8-9
Window washer fluid ............................................8-10
Battery ..................................................................8-10
Jump starting ...................................................8-11
Drive belts ............................................................8-12
Spark plugs ..........................................................8-12
Replacing spark plugs .....................................8-12
Air cleaner ............................................................8-13
Cabin air filter ..................................................8-14Windshield wiper blades ......................................8-17
Cleaning ..........................................................8-17
Replacing .........................................................8-17
Parking brake and brake pedal ............................8-19
Checking parking brake...................................8-19
Checking brake pedal .....................................8-19
Brake booster ..................................................8-20
Fuses ....................................................................8-20
Engine compartment .......................................8-20
Passenger compartment .................................8-21
Multi-remote controller battery replacement ........8-22
Lights ....................................................................8-23
Headlights ........................................................8-23
Fog lights .........................................................8-24
Exterior and interior lights ...............................8-25
Wheels and tires ..................................................8-29
Tire pressure ...................................................8-29
Types of tires ...................................................8-30
Tire chains .......................................................8-31
Changing tires and wheels ..............................8-31
ZX
Page 230 of 304

ADI1082
ENGINE COMPARTMENT
CHECK LOCATIONS
Do-it-yourself8-3
ZX
Page 231 of 304
The engine cooling system is filled at the
factory with a high-quality, year-round, anti-
freeze coolant solution. The anti-freeze so-
lution contains rust and corrosion inhibitors,
therefore additional engine cooling system
additives are not necessary.
CAUTION
When adding or replacing coolant, be
sure to use only a Genuine Nissan
anti-freeze coolant (green) or equiva-
lent with the proper mixture ratio of
50% anti-freeze and 50% demineralized
or distilled water. The use of other
types of coolant solutions or coolant
colors, such as orange, may damage
the engine cooling system.
Outside tempera-
ture down toGenuine
NISSAN
Anti-freeze
Coolant or
equivalentDemineral-
ized or Dis-
tilled water
ÉC ÉF
þ35 þ30 50% 50%
WARNING
c
Never remove the radiator cap when
the engine is hot. Serious burns
could be caused by high pressure
fluid escaping from the radiator.
cThe radiator is equipped with a pres-
sure cap. To prevent engine damage,
use only a genuine NISSAN radiator
cap.
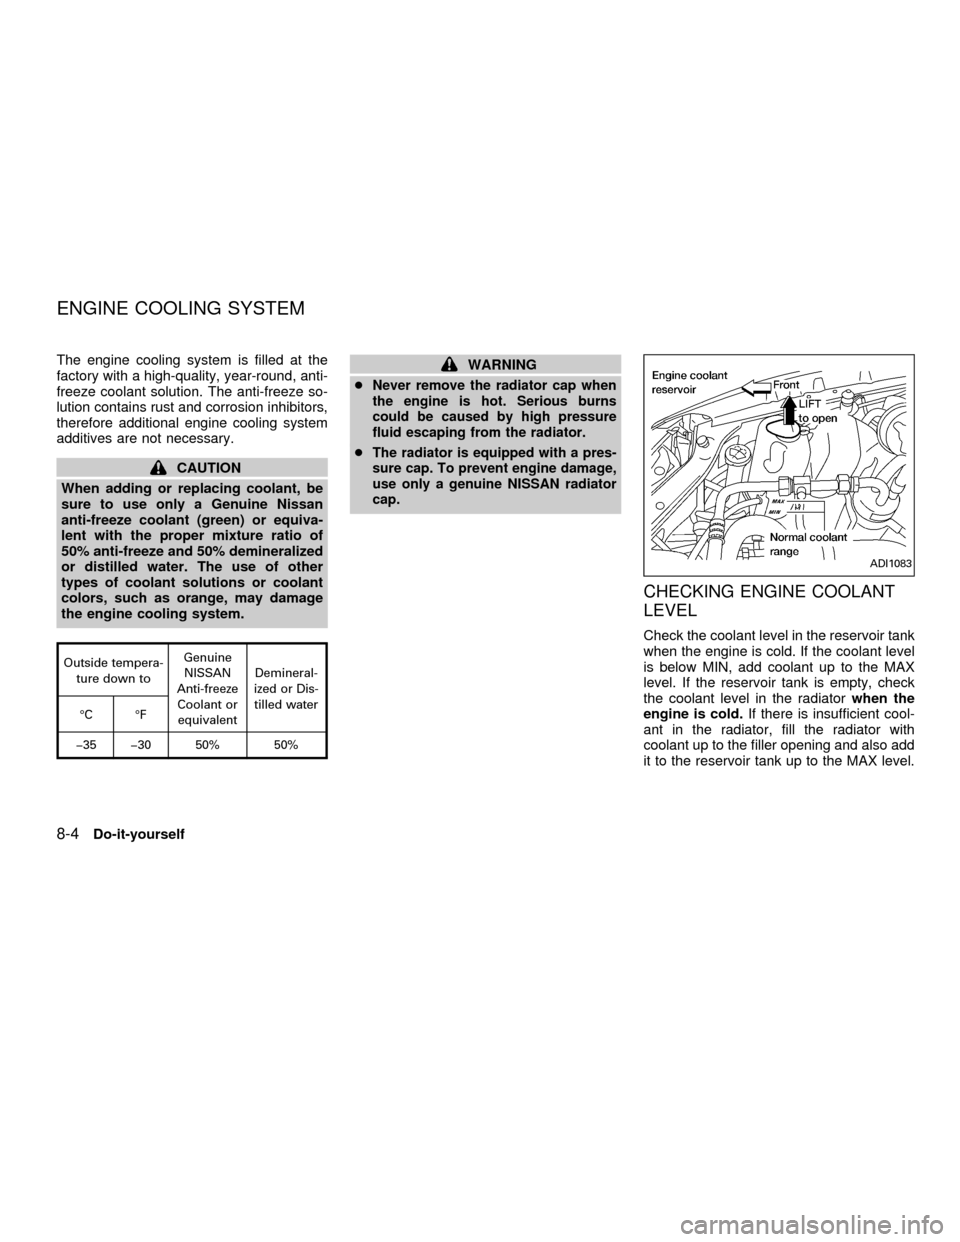
CHECKING ENGINE COOLANT
LEVEL
Check the coolant level in the reservoir tank
when the engine is cold. If the coolant level
is below MIN, add coolant up to the MAX
level. If the reservoir tank is empty, check
the coolant level in the radiatorwhen the
engine is cold.If there is insufficient cool-
ant in the radiator, fill the radiator with
coolant up to the filler opening and also add
it to the reservoir tank up to the MAX level.
ADI1083
ENGINE COOLING SYSTEM
8-4Do-it-yourself
ZX
Page 232 of 304
If the cooling system frequently requires
coolant, have it checked by an autho-
rized NISSAN dealer.
CHANGING ENGINE COOLANT
An authorized NISSAN dealer can change
the engine coolant. The service procedure
is found in NISSAN's service manual.
Improper servicing can result in reduced
heater performance and engine
overheating.
WARNING
cTo avoid danger of being scalded,
never change the coolant when the
engine is hot.
cNever remove the radiator cap when
the engine is hot. Serious burns
could be caused by high pressure
fluid escaping from the radiator.
cAvoid direct skin contact with used
coolant. If skin contact is made,
wash thoroughly with soap or hand
cleaner as soon as possible.
cKeep coolant out of reach of children
and pets.
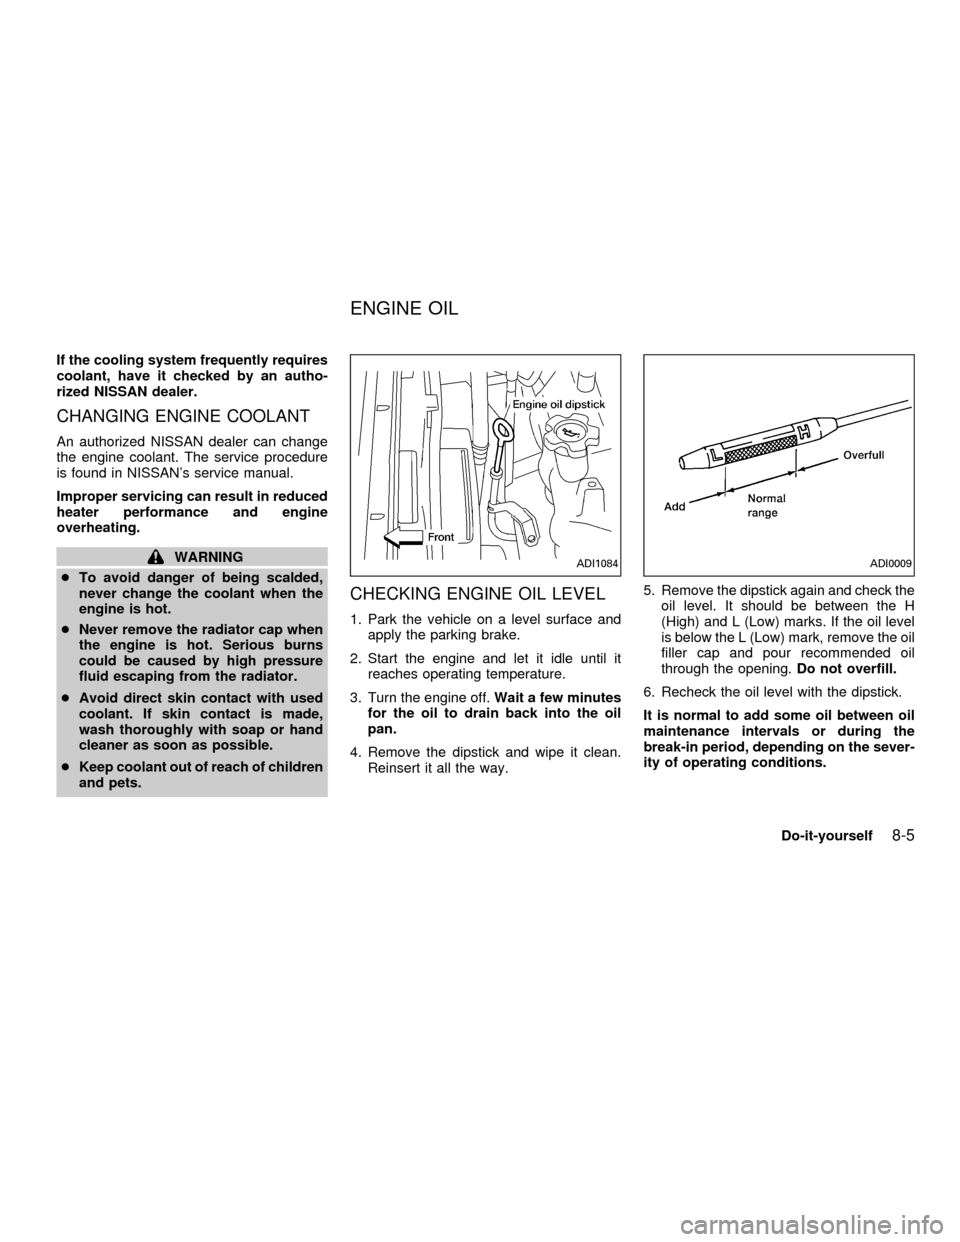
CHECKING ENGINE OIL LEVEL
1. Park the vehicle on a level surface and
apply the parking brake.
2. Start the engine and let it idle until it
reaches operating temperature.
3. Turn the engine off.Wait a few minutes
for the oil to drain back into the oil
pan.
4. Remove the dipstick and wipe it clean.
Reinsert it all the way.5. Remove the dipstick again and check the
oil level. It should be between the H
(High) and L (Low) marks. If the oil level
is below the L (Low) mark, remove the oil
filler cap and pour recommended oil
through the opening.Do not overfill.
6. Recheck the oil level with the dipstick.
It is normal to add some oil between oil
maintenance intervals or during the
break-in period, depending on the sever-
ity of operating conditions.
ADI1084ADI0009
ENGINE OIL
Do-it-yourself8-5
ZX
Page 233 of 304
CAUTION
Oil level should be checked regularly.
Operating with an insufficient amount
of oil can damage the engine, and such
damage is not covered by warranty.
CHANGING ENGINE OIL
1. Park the vehicle on a level surface and
apply the parking brake.
2. Start the engine and let it idle until it
reaches operating temperature, then turn
it off.
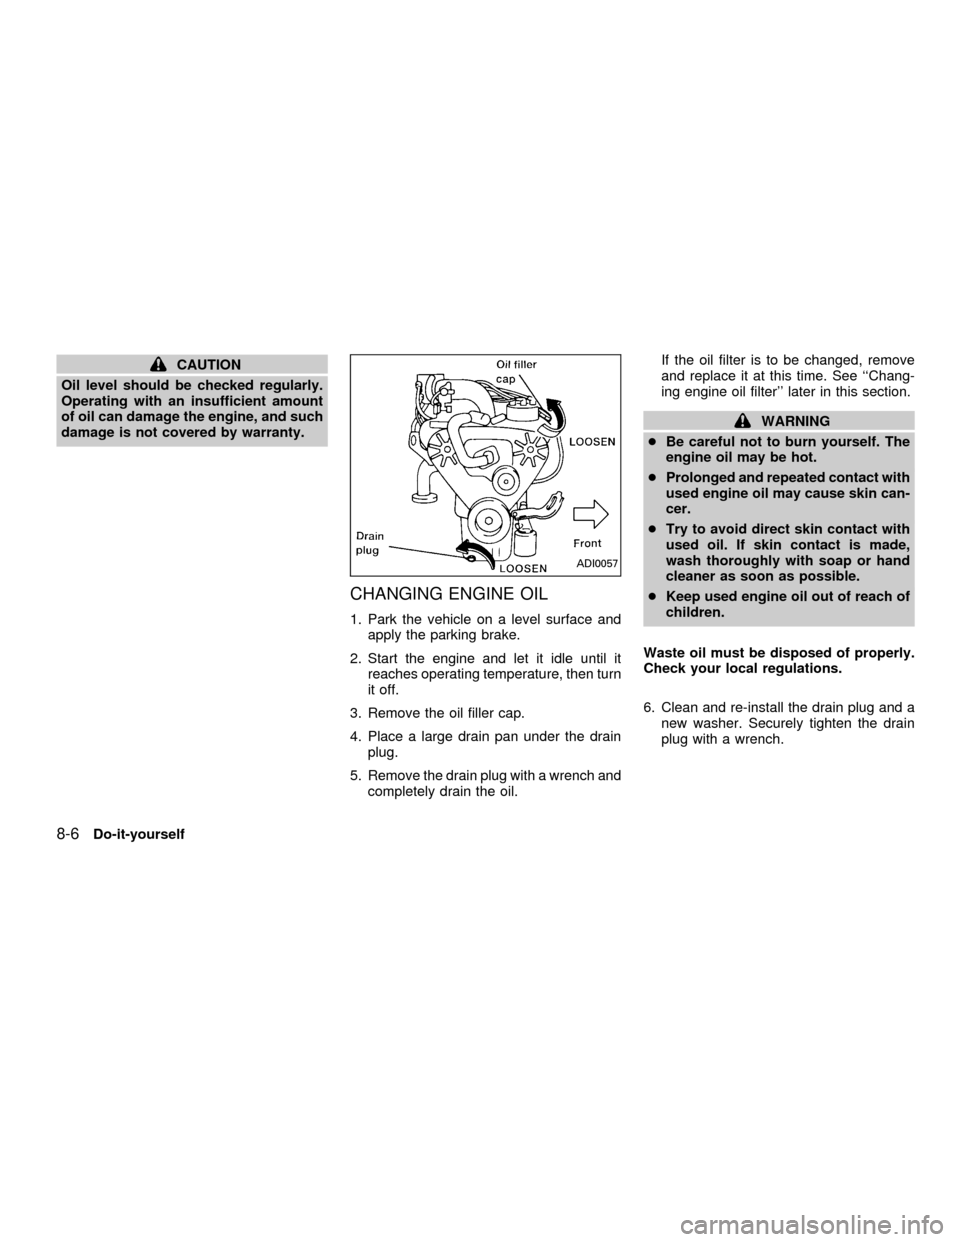
3. Remove the oil filler cap.
4. Place a large drain pan under the drain
plug.
5. Remove the drain plug with a wrench and
completely drain the oil.If the oil filter is to be changed, remove
and replace it at this time. See ``Chang-
ing engine oil filter'' later in this section.
WARNING
cBe careful not to burn yourself. The
engine oil may be hot.
cProlonged and repeated contact with
used engine oil may cause skin can-
cer.
cTry to avoid direct skin contact with
used oil. If skin contact is made,
wash thoroughly with soap or hand
cleaner as soon as possible.
cKeep used engine oil out of reach of
children.
Waste oil must be disposed of properly.
Check your local regulations.
6. Clean and re-install the drain plug and a
new washer. Securely tighten the drain
plug with a wrench.
ADI0057
8-6Do-it-yourself
ZX
Page 234 of 304
Drain plug tightening torque:
22 to 29 ft-lb
(29 to 39 Nzm)
Do not use excessive force.
7. Refill the engine with a recommended oil
through the oil filler opening then install
the oil filler cap securely.
See the ``Technical and consumer infor-
mation'' section for drain and refill capac-
ity.
The drain and refill capacity depends on the
oil temperature and drain time. Use these
specifications for reference only. Always
use the dipstick to determine when the
proper amount of oil is in the engine.
8. Start the engine. Check for leakage
around the drain plug. Correct as re-
quired.
9. Turn the engine off and wait several
minutes. Check the oil level with the
dipstick. Add engine oil if necessary.
CHANGING ENGINE OIL FILTER
1. Park the vehicle on a level surface and
apply the parking brake.
2. Turn the engine off.
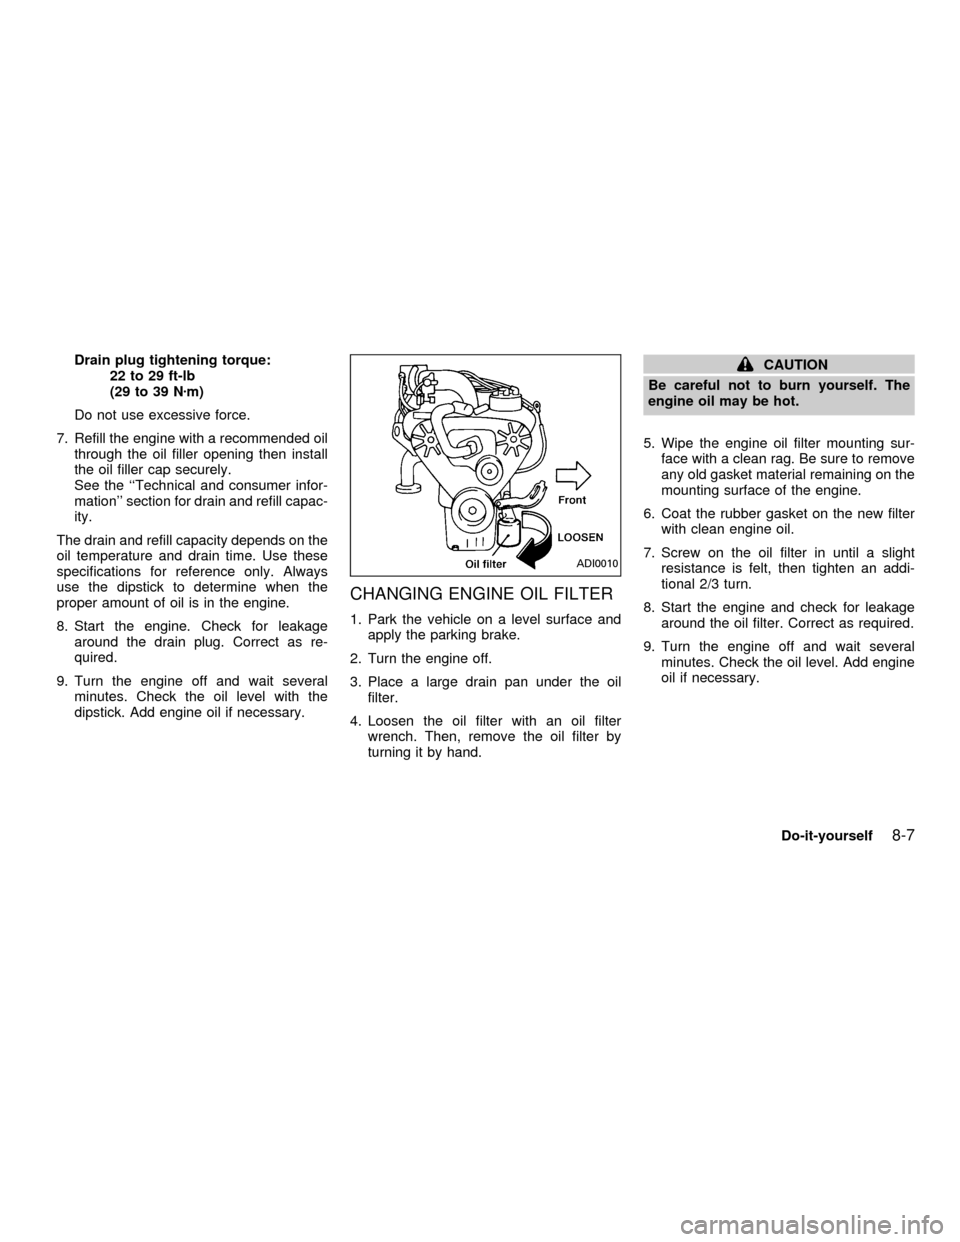
3. Place a large drain pan under the oil
filter.
4. Loosen the oil filter with an oil filter
wrench. Then, remove the oil filter by
turning it by hand.
CAUTION
Be careful not to burn yourself. The
engine oil may be hot.
5. Wipe the engine oil filter mounting sur-
face with a clean rag. Be sure to remove
any old gasket material remaining on the
mounting surface of the engine.
6. Coat the rubber gasket on the new filter
with clean engine oil.
7. Screw on the oil filter in until a slight
resistance is felt, then tighten an addi-
tional 2/3 turn.
8. Start the engine and check for leakage
around the oil filter. Correct as required.
9. Turn the engine off and wait several
minutes. Check the oil level. Add engine
oil if necessary.
ADI0010
Do-it-yourself8-7
ZX
Page 235 of 304
WARNING
cWhen the engine is running, keep
hands, jewelry and clothing away
from any moving parts such as the
cooling fan and drive belts.
cAutomatic transmission fluid is poi-
sonous and should be stored care-
fully in marked containers out of the
reach of children.
TEMPERATURE CONDITIONS
FOR CHECKING
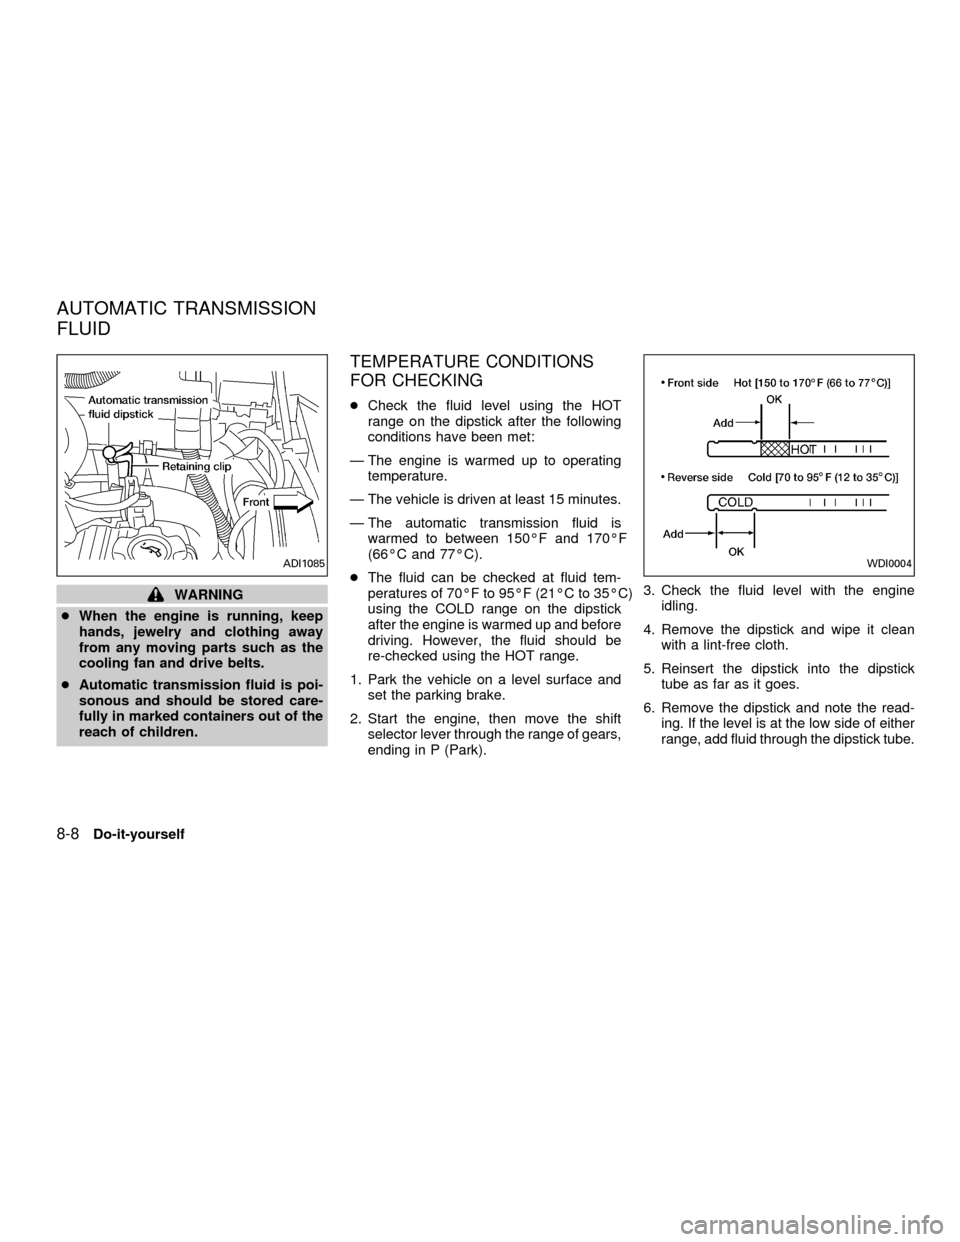
cCheck the fluid level using the HOT
range on the dipstick after the following
conditions have been met:
Ð The engine is warmed up to operating
temperature.
Ð The vehicle is driven at least 15 minutes.
Ð The automatic transmission fluid is
warmed to between 150ÉF and 170ÉF
(66ÉC and 77ÉC).
cThe fluid can be checked at fluid tem-
peratures of 70ÉF to 95ÉF (21ÉC to 35ÉC)
using the COLD range on the dipstick
after the engine is warmed up and before
driving. However, the fluid should be
re-checked using the HOT range.
1. Park the vehicle on a level surface and
set the parking brake.
2. Start the engine, then move the shift
selector lever through the range of gears,
ending in P (Park).3. Check the fluid level with the engine
idling.
4. Remove the dipstick and wipe it clean
with a lint-free cloth.
5. Reinsert the dipstick into the dipstick
tube as far as it goes.
6. Remove the dipstick and note the read-
ing. If the level is at the low side of either
range, add fluid through the dipstick tube.
WDI0004ADI1085
AUTOMATIC TRANSMISSION
FLUID
8-8Do-it-yourself
ZX