lights NISSAN QUEST 2002 V41 / 2.G Owners Manual
[x] Cancel search | Manufacturer: NISSAN, Model Year: 2002, Model line: QUEST, Model: NISSAN QUEST 2002 V41 / 2.GPages: 294, PDF Size: 2.49 MB
Page 89 of 294

2 Instruments and controls
Meters and gauges ................................................2-4
Speedometer and odometer .............................2-5
Tachometer........................................................2-5
Engine coolant temperature gauge ...................2-6
Fuel gauge ........................................................2-6
Message center (if so equipped) ...........................2-7
Warning/indicator lights and audible
reminders................................................................2-8
Checking bulbs ..................................................2-8
Warning lights ....................................................2-8
Indicator lights .................................................2-10
Audible reminders............................................2-12
Vehicle security system (if so equipped) .............2-12
Windshield wiper and washer switch ...................2-15
Rear window wiper and washer switches ............2-16
Rear window defogger switch ..............................2-16
Headlight and turn signal switch ..........................2-16
Headlight control switch ..................................2-16
Autolamp switch (if so equipped) ....................2-18
Turn signal switch............................................2-19
Cornering light .................................................2-19
Hazard warning flasher switch .............................2-19Horn ......................................................................2-20
Heated seats (if so equipped) ..............................2-20
Rear power socket ...............................................2-22
Cigarette lighter and ashtray (accessory) ............2-23
Storage .................................................................2-24
Map pockets ....................................................2-24
Conversation mirror .........................................2-24
Cup holders .....................................................2-25
Glove box ........................................................2-26
Cargo net .........................................................2-27
Parcel shelf (if so equipped) ...........................2-28
Luggage rack ...................................................2-30
Windows ...............................................................2-30
Power windows................................................2-30
Power vent windows (if so equipped) .............2-32
Manual vent windows ......................................2-32
Sunroof (if so equipped).......................................2-33
Interior lights .........................................................2-34
Luggage ...........................................................2-34
Personal reading light ..........................................2-34
Map lights .............................................................2-35
Illuminated entry system ......................................2-35
ZX
Page 97 of 294
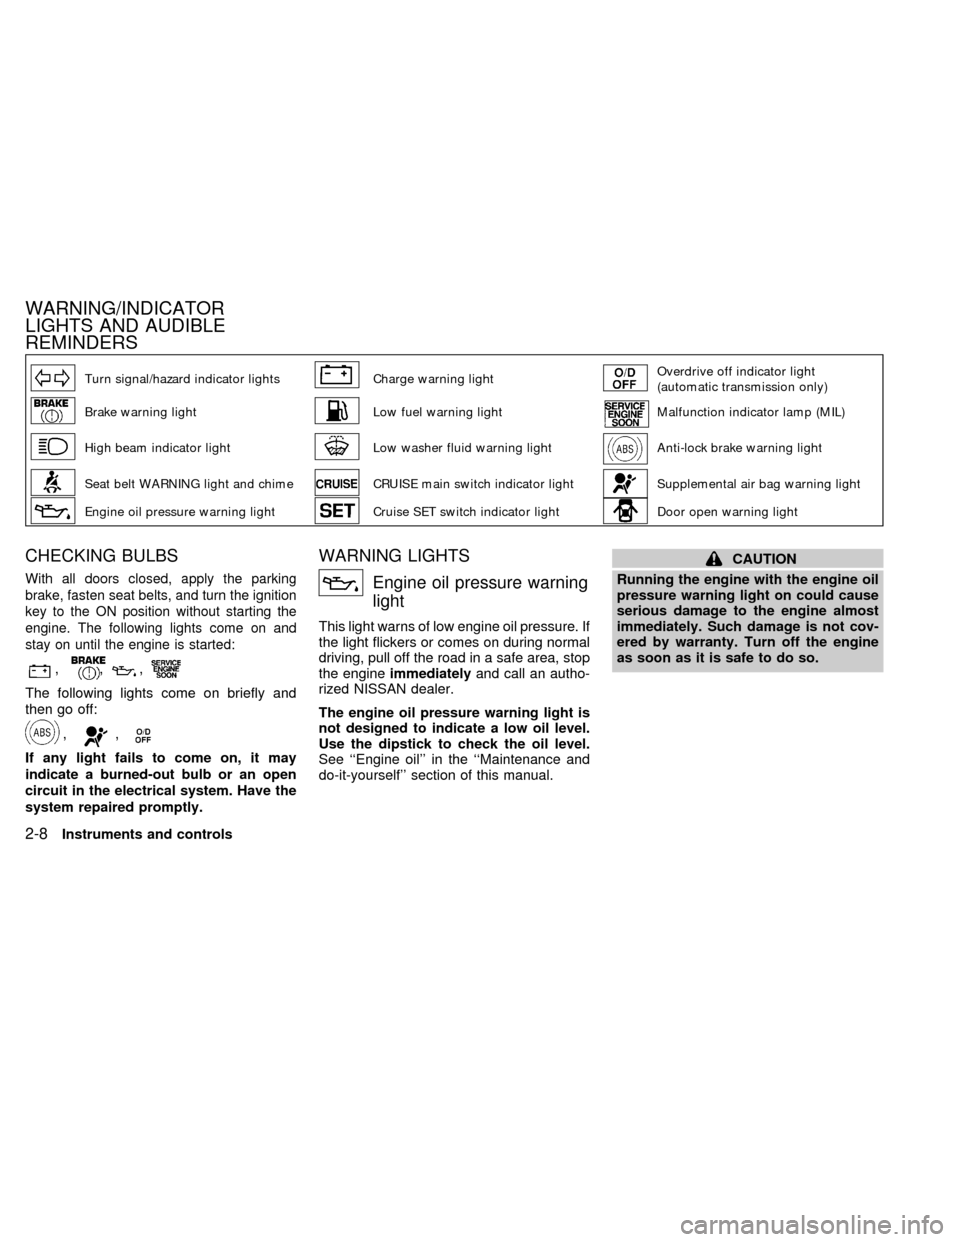
Turn signal/hazard indicator lightsCharge warning lightOverdrive off indicator light
(automatic transmission only)
Brake warning lightLow fuel warning lightMalfunction indicator lamp (MIL)
High beam indicator lightLow washer fluid warning lightAnti-lock brake warning light
Seat belt WARNING light and chimeCRUISE main switch indicator lightSupplemental air bag warning light
Engine oil pressure warning lightCruise SET switch indicator lightDoor open warning light
CHECKING BULBS
With all doors closed, apply the parking
brake, fasten seat belts, and turn the ignition
key to the ON position without starting the
engine. The following lights come on and
stay on until the engine is started:
,,,
The following lights come on briefly and
then go off:
,,
If any light fails to come on, it may
indicate a burned-out bulb or an open
circuit in the electrical system. Have the
system repaired promptly.
WARNING LIGHTS
Engine oil pressure warning
light
This light warns of low engine oil pressure. If
the light flickers or comes on during normal
driving, pull off the road in a safe area, stop
the engineimmediatelyand call an autho-
rized NISSAN dealer.
The engine oil pressure warning light is
not designed to indicate a low oil level.
Use the dipstick to check the oil level.
See ``Engine oil'' in the ``Maintenance and
do-it-yourself'' section of this manual.
CAUTION
Running the engine with the engine oil
pressure warning light on could cause
serious damage to the engine almost
immediately. Such damage is not cov-
ered by warranty. Turn off the engine
as soon as it is safe to do so.
WARNING/INDICATOR
LIGHTS AND AUDIBLE
REMINDERS
2-8Instruments and controls
ZX
Page 99 of 294
applied, stop the vehicle and perform the
following:
1.
Check the brake fluid level. Add brake fluid
as necessary. See ``Brake fluid'' in the
``Maintenance and do-it-yourself'' section
of this manual.
2. If the brake fluid level is correct, have the
warning system checked by an autho-
rized NISSAN dealer.
WARNING
cYour brake system may not be work-
ing properly if the warning light is
on. Driving could be dangerous. If
you judge it to be safe, drive care-
fully to the nearest service station
for repairs. Otherwise, have your ve-
hicle towed because driving it could
be dangerous.
cPressing the brake pedal with the
engine stopped and/or low brake
fluid level may increase your stop-
ping distance and braking will re-
quire greater pedal effort as well as
pedal travel.cIf the brake fluid level is below the
MINIMUM or MIN mark on the brake-
fluid reservoir, do not drive until the
brake system has been checked at a
NISSAN dealer.
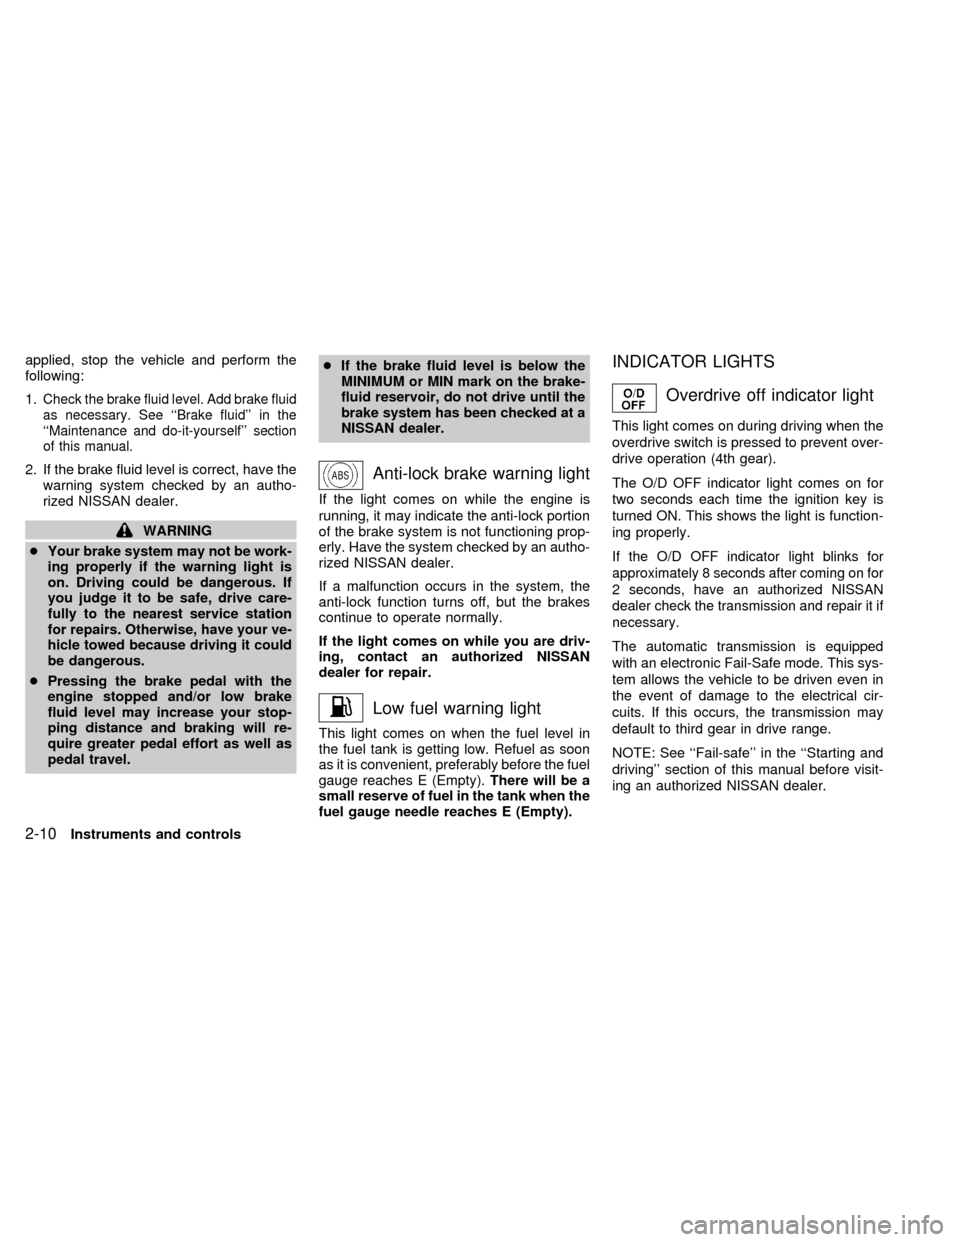
Anti-lock brake warning light
If the light comes on while the engine is
running, it may indicate the anti-lock portion
of the brake system is not functioning prop-
erly. Have the system checked by an autho-
rized NISSAN dealer.
If a malfunction occurs in the system, the
anti-lock function turns off, but the brakes
continue to operate normally.
If the light comes on while you are driv-
ing, contact an authorized NISSAN
dealer for repair.
Low fuel warning light
This light comes on when the fuel level in
the fuel tank is getting low. Refuel as soon
as it is convenient, preferably before the fuel
gauge reaches E (Empty).There will be a
small reserve of fuel in the tank when the
fuel gauge needle reaches E (Empty).
INDICATOR LIGHTS
Overdrive off indicator light
This light comes on during driving when the
overdrive switch is pressed to prevent over-
drive operation (4th gear).
The O/D OFF indicator light comes on for
two seconds each time the ignition key is
turned ON. This shows the light is function-
ing properly.
If the O/D OFF indicator light blinks for
approximately 8 seconds after coming on for
2 seconds, have an authorized NISSAN
dealer check the transmission and repair it if
necessary.
The automatic transmission is equipped
with an electronic Fail-Safe mode. This sys-
tem allows the vehicle to be driven even in
the event of damage to the electrical cir-
cuits. If this occurs, the transmission may
default to third gear in drive range.
NOTE: See ``Fail-safe'' in the ``Starting and
driving'' section of this manual before visit-
ing an authorized NISSAN dealer.
2-10Instruments and controls
ZX
Page 100 of 294

Turn signal/hazard indicator
lights
The appropriate light flashes when the turn
signal lever is activated.
Both lights flash when the hazard switch is
turned on.
High beam indicator light
(Blue)
This light comes on when the headlight high
beam is on and goes out when the low
beam is selected.
Cruise main switch indicator
light
The light comes on when the cruise control
main switch is pushed. The light goes out
when the main switch is pushed again.
While the cruise main switch indicator light
comes on, the cruise control system is
operational.
Cruise set switch indicator
light
The light comes on while the vehicle speed is
controlled by the cruise control system. If the
light blinks while the engine is running, it mayindicate the cruise control system is not
functioning properly. Have the system
checked by your NISSAN dealer.
Malfunction indicator lamp
(MIL)
If this indicator lamp comes on steady or
blinks while the engine is running, it may
indicate a potential emission control mal-
function.
The malfunction indicator lamp may also
come on steady if the fuel filler cap is loose
or missing, or if the vehicle runs out of fuel.
Check to make sure the fuel filler cap is
installed and closed tightly, and that the
vehicle has at least three gallons of fuel in
the fuel tank.
After a few driving trips, the
lamp
should turn off if no other potential emission
control system malfunction exists.
Operation
The malfunction indicator lamp will come on
in one of two ways:
cMalfunction indicator lamp on steady - An
emission control system malfunction has
been detected. Check the fuel filler cap. Ifthe fuel filler cap is loose or missing,
tighten or install the cap and continue to
drive the vehicle. The
lamp should
turn off after a few driving trips. If the
lamp does not turn off after a few
driving trips, have the vehicle inspected
by an authorized NISSAN dealer. You do
not need to have your vehicle towed to
the dealer.
cMalfunction indicator lamp blinking - An
engine misfire has been detected which
may damage the emission control sys-
tem. To reduce or avoid emission control
system damage:
a) do not drive at speeds above 45 MPH
(72 km/h).
b)
avoid hard acceleration or deceleration.c) avoid steep uphill grades.
d) if possible, reduce the amount of
cargo being hauled or towed.
The malfunction indicator lamp may stop
blinking and come on steady. Have the
vehicle inspected by an authorized NISSAN
dealer. You do not need to have your ve-
hicle towed to the dealer.
Instruments and controls
2-11
ZX
Page 102 of 294

Security indicator light
This light will illuminate for the vehicle secu-
rity system.
This light blinks whenever the ignition
switch is in the LOCK, OFF, or ACC posi-
tion. This function indicates the security
system equipped on the vehicle is opera-
tional.
How to activate the vehicle security
system
1. Close all windows.(The system can be
activated even if the windows are
open).
2. Remove the key from the ignition switch.
3. Close all doors and the hood.
4. Push the
button on the keyfob. All
doors lock. The hazard lights flash twice
and the horn beeps once to indicate all
doors are locked.
cWhen the
button is pushed with all
doors locked, the hazard lights flash
twice and the horn beeps once as a
reminder that the doors are already
locked.
The horn may or may not beep once.
Refer to ``silencing the horn beep fea-
ture'' later in this section for details.
5. Confirm that the SECURITY indicator
light comes on. The SECURITY light
glows for about 30 seconds and then
begins to flash once every three seconds.
The system is now activated. If, during
this 30-second time period, the door is
unlocked by the key or the keyfob, or theignition key is turned to ACC or ON, the
system will not activate.
If the key is turned slowly when locking
the door, the system may not activate.
Furthermore, if the key is turned exces-
sively to the unlock position, the system
may be deactivated when the key is re-
moved. If the indicator light fails to glow
for 30 seconds, unlock the door once
and lock it again.
Even when the driver and/or passengers
are in the vehicle, the system will acti-
vate with all doors, hood and rear door
closed with the ignition key in the OFF
position.
Vehicle security system operation
The vehicle security system emits the fol-
lowing alarm:
cThe headlights and tail lights flash and
the horn sounds intermittently. In addi-
tion, the starter motor does not operate.
cThe alarm automatically turns off after
two to three minutes. However, the alarm
reactivates if the vehicle is tampered with
again. The alarm can be shut off by
unlocking a door with the key or by
LIC0004
Instruments and controls2-13
ZX
Page 103 of 294

pressing thebutton on the multi-
remote controller.
The alarm is activated when:
ca door is unlocked or opened without
using the key or the keyfob. This includes
unlocking the doors with the inside door
lock switch.
cthe hood is opened.
cthe ignition is placed into the ACC, ON,
or START position without the key in the
ignition.
How to stop the alarm
The alarm stops only by unlocking a door
with the key or by pressing the
button on
the keyfob.
The alarm does not stop if the ignition
key is turned to the ACC or ON position.
Silencing the horn beep feature
If desired, the horn beep feature can be
deactivated using the keyfob. The instruc-
tions are on the back of the keyfob.
To deactivate:Press and hold the
and
buttonsfor at least two seconds.
The hazard lights will flash three times to
confirm that the horn beep feature has been
deactivated.
To activate:Press and hold the
and
buttonsfor at least two seconds once
more.The hazard lights will flash three times to
confirm that the horn beep feature has been
reactivated.
Deactivating the horn feature does not si-
lence the horn if the alarm is triggered.
If the system does not operate as de-
scribed above, have it checked by an
authorized NISSAN dealer.
AIC1037
2-14Instruments and controls
ZX
Page 105 of 294
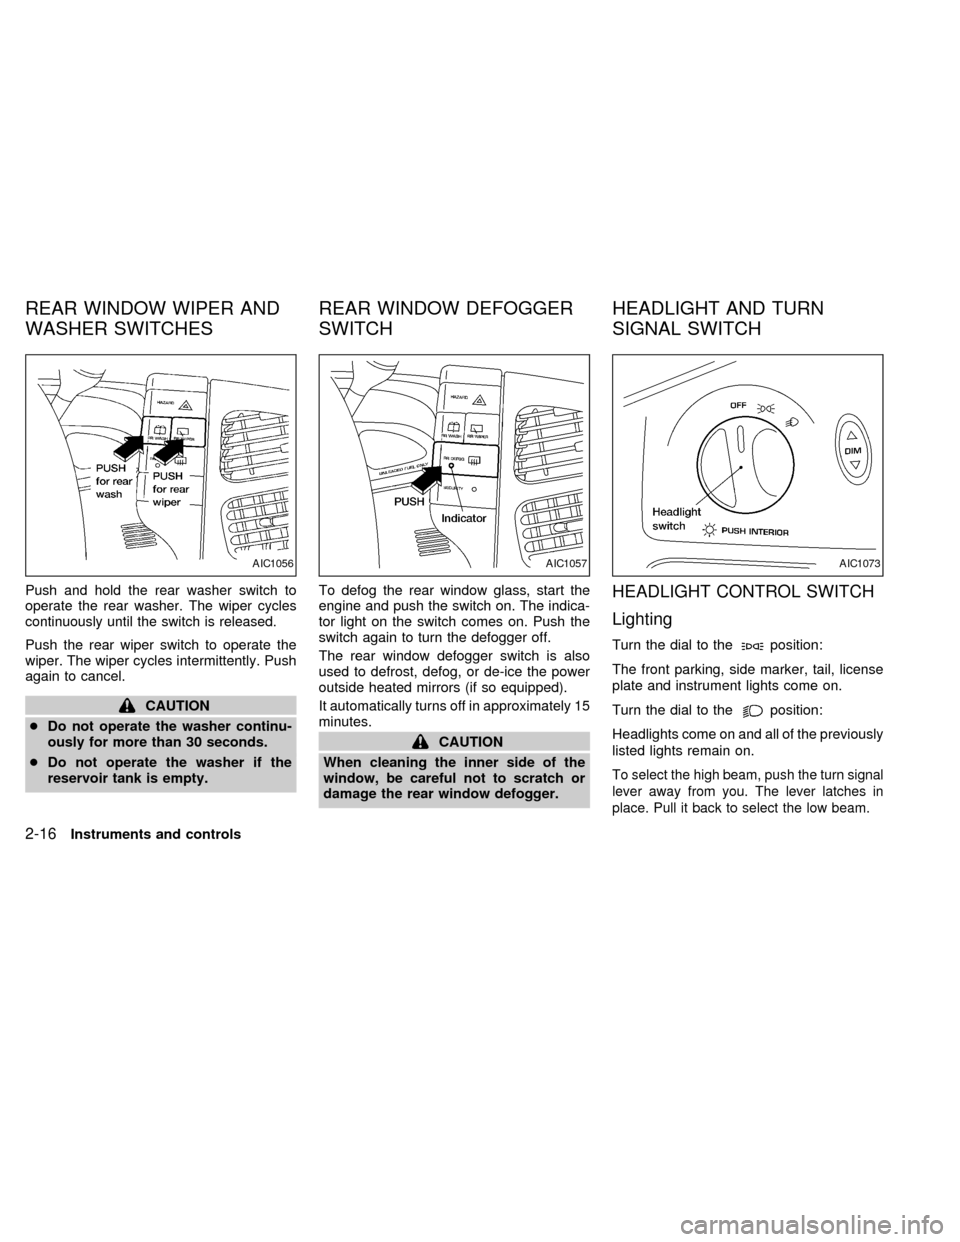
Push and hold the rear washer switch to
operate the rear washer. The wiper cycles
continuously until the switch is released.
Push the rear wiper switch to operate the
wiper. The wiper cycles intermittently. Push
again to cancel.
CAUTION
cDo not operate the washer continu-
ously for more than 30 seconds.
cDo not operate the washer if the
reservoir tank is empty.To defog the rear window glass, start the
engine and push the switch on. The indica-
tor light on the switch comes on. Push the
switch again to turn the defogger off.
The rear window defogger switch is also
used to defrost, defog, or de-ice the power
outside heated mirrors (if so equipped).
It automatically turns off in approximately 15
minutes.
CAUTION
When cleaning the inner side of the
window, be careful not to scratch or
damage the rear window defogger.
HEADLIGHT CONTROL SWITCH
Lighting
Turn the dial to theposition:
The front parking, side marker, tail, license
plate and instrument lights come on.
Turn the dial to the
position:
Headlights come on and all of the previously
listed lights remain on.
To select the high beam, push the turn signal
lever away from you. The lever latches in
place. Pull it back to select the low beam.
AIC1056AIC1057AIC1073
REAR WINDOW WIPER AND
WASHER SWITCHESREAR WINDOW DEFOGGER
SWITCHHEADLIGHT AND TURN
SIGNAL SWITCH
2-16Instruments and controls
ZX
Page 106 of 294
To turn the interior lights on push the head-
light switch. The interior lights come on.
Push the headlight switch again to turn the
interior lights off.
Instrument brightness control
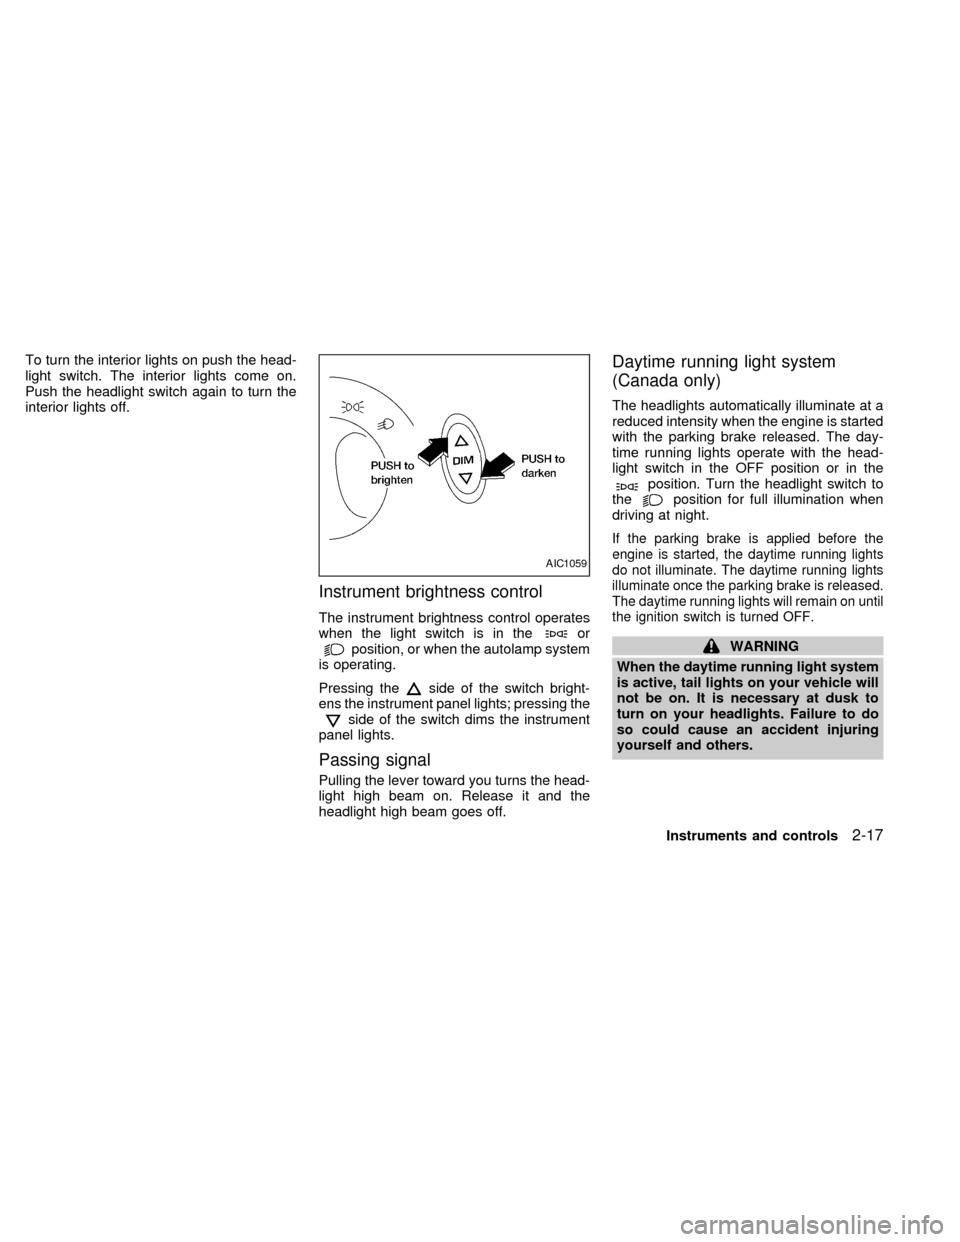
The instrument brightness control operates
when the light switch is in theorposition, or when the autolamp system
is operating.
Pressing the
side of the switch bright-
ens the instrument panel lights; pressing the
side of the switch dims the instrument
panel lights.
Passing signal
Pulling the lever toward you turns the head-
light high beam on. Release it and the
headlight high beam goes off.
Daytime running light system
(Canada only)
The headlights automatically illuminate at a
reduced intensity when the engine is started
with the parking brake released. The day-
time running lights operate with the head-
light switch in the OFF position or in the
position. Turn the headlight switch to
theposition for full illumination when
driving at night.
If the parking brake is applied before the
engine is started, the daytime running lights
do not illuminate. The daytime running lights
illuminate once the parking brake is released.
The daytime running lights will remain on until
the ignition switch is turned OFF.
WARNING
When the daytime running light system
is active, tail lights on your vehicle will
not be on. It is necessary at dusk to
turn on your headlights. Failure to do
so could cause an accident injuring
yourself and others.
AIC1059
Instruments and controls2-17
ZX
Page 107 of 294

AUTOLAMP SWITCH
(if so equipped)
The autolamp system allows the headlights
to be set so they turn on and off automati-
cally. The autolamp system can turn on the
headlights automatically when it is dark,
turn off the headlights when it is light, and
keep the headlights on for up to three
minutes after you turn the key to OFF.
To set the autolamp system:
1. Make sure the headlight switch is in the
AUTO1 or AUTO2 position.2. Turn the ignition key to ON.
3. The autolamp system automatically turns
the headlights on and off.
Shut-off delay
The length of time the headlights stay on
after the ignition is turned to OFF depends
on whether the switch is in the AUTO1 or
AUTO2 position. If the switch is in the
AUTO1 position, then the headlights stay on
for less than 1 minute after the ignition is
turned OFF. If the switch is in the AUTO2
position, the headlights stay on approxi-
mately 3 minutes after the ignition is turned
OFF.
To turn the autolamp system off, turn the
switch to the OFF,
,orposition.Be sure you do not put anything on top
of the photo sensor located in the top left
side of the instrument panel. The photo
sensor controls the autolamp; if it is
covered, the photo sensor reacts as if it
is dark out and the headlights will illumi-
nate.
AIC1058AIC1087
2-18Instruments and controls
ZX
Page 108 of 294
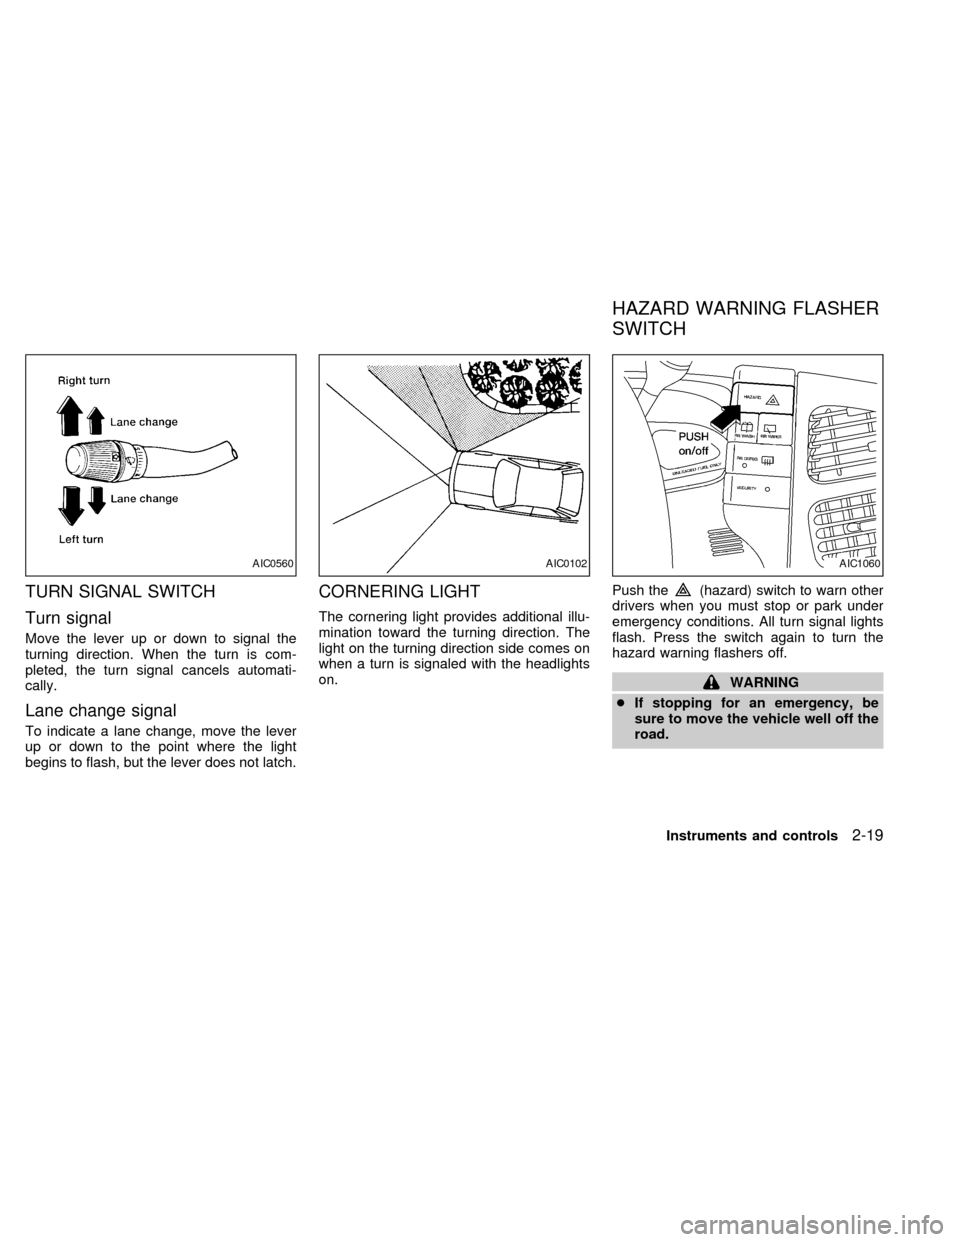
TURN SIGNAL SWITCH
Turn signal
Move the lever up or down to signal the
turning direction. When the turn is com-
pleted, the turn signal cancels automati-
cally.
Lane change signal
To indicate a lane change, move the lever
up or down to the point where the light
begins to flash, but the lever does not latch.
CORNERING LIGHT
The cornering light provides additional illu-
mination toward the turning direction. The
light on the turning direction side comes on
when a turn is signaled with the headlights
on.Push the
(hazard) switch to warn other
drivers when you must stop or park under
emergency conditions. All turn signal lights
flash. Press the switch again to turn the
hazard warning flashers off.
WARNING
cIf stopping for an emergency, be
sure to move the vehicle well off the
road.
AIC0560AIC0102AIC1060
HAZARD WARNING FLASHER
SWITCH
Instruments and controls2-19
ZX