change wheel NISSAN QUEST 2008 V42 / 3.G Owners Manual
[x] Cancel search | Manufacturer: NISSAN, Model Year: 2008, Model line: QUEST, Model: NISSAN QUEST 2008 V42 / 3.GPages: 376, PDF Size: 5.21 MB
Page 78 of 376
the air bag might inflate in a crash) , it could be
that the child restraint or seat belt is not being
used properly. Make sure that the child restraint is
installed properly, the seat belt is used properly
and the occupant is positioned properly. If the air
bag status light is not illuminated, reposition the
occupant or child restraint in a rear seat.
If the passenger air bag status light will not illu-
minate even though you believe that the child
restraint, the seat belts and the occupant are
properly positioned, the system may be sensing
an unoccupied seat (in which case the air bag is
OFF) . Your NISSAN dealer can check that the
system is OFF by using a special tool. However,
until you have confirmed with your dealer that
your air bag is working properly, reposition the
occupant or child restraint in a rear seat.
The air bag system and passenger air bag status
light will take a few seconds to register a change
in the passenger seat status. For example, if a
large adult who is sitting in the front passenger
seat exits the vehicle, the passenger air bag
status light will go from OFF to ON for a few
seconds and then to OFF. This is normal system
operation and does not indicate a malfunction.
If a malfunction occurs in the front passenger air
bag system, the supplemental air bag warning
light
, located in the meter and gauges areain the center of the instrument panel, will blink.
Have the system checked by a NISSAN dealer.
Other supplemental front-impact air bag
precautions
WARNING
cDo not place any objects on the steer-
ing wheel pad or on the instrument
panel. Also, do not place any objects
between any occupant and the steering
wheel or instrument panel. Such ob-
jects may become dangerous projec-
tiles and cause injury if the front air bag
inflates.
cImmediately after inflation, several
front air bag system components will be
hot. Do not touch them; you may se-
verely burn yourself.
cNo unauthorized changes should be
made to any components or wiring of
the supplemental air bag system. This is
to prevent accidental inflation of the
supplemental air bag or damage to the
supplemental air bag system.cDo not make unauthorized changes to
your vehicle’s electrical system, sus-
pension system or front end structure.
This could affect proper operation of
the front air bag system.
cTampering with the front air bag system
may result in serious personal injury.
Tampering includes changes to the
steering wheel and the instrument
panel assembly by placing material
over the steering wheel pad and above
the instrument panel or by installing
additional trim material around the air
bag system.
cModifying or tampering with the front
passenger seat may result in serious
personal injury. For example, do not
change the front seats by placing mate-
rial on the seat cushion or by installing
additional trim material, such as seat
covers, on the seat that are not specifi-
cally designed to assure proper air bag
operation. Additionally, do not stow any
objects under the front passenger seat
or the seat cushion and seatback. Such
objects may interfere with the proper
operation of the occupant classifica-
tion sensor (pressure sensor) .
1-62Safety—Seats, seat belts and supplemental restraint system
ZREVIEW COPYÐ2008 Quest(van)
Owners ManualÐUSA_English(nna)
06/29/07Ðdebbie
X
Page 163 of 376

FM/AM/SAT radio with compact disc (CD)
changer (Type A and B) (if so equipped).........4-56
CD care and cleaning..........................4-61
Steering wheel switch for audio control..........4-62
Rear audio controls (if so equipped).............4-64
Antenna......................................4-65
DVD entertainment system (if so equipped)..........4-65
Digital video disc (DVD) player controls..........4-66
Remote control................................4-67
Flip-down screen..............................4-67
Playing a digital video disc (DVD)...............4-68Care and maintenance.........................4-71
How to handle the DVD........................4-72
Car phone or CB radio............................4-75
BluetoothTHands-Free Phone System
(if so equipped)..................................4-75
Using the system..............................4-77
Control buttons...............................4-79
Getting started................................4-79
List of voice commands........................4-81
Speaker adaptation (SA) mode..................4-86
Troubleshooting guide.........................4-89
ZREVIEW COPYÐ2008 Quest(van)
Owners ManualÐUSA_English(nna)
06/29/07Ðdebbie
X
Page 167 of 376
In case of low tire pressure, a message “LOW
PRESSURE” or “CHECK ALL TIRES” is dis-
played on the screen:
LOW PRESSURE — CHECK ALL TIRES.
WARNING
cWhen a spare tire is mounted or a wheel
is replaced, tire pressure will not be
indicated, the Tire Pressure Monitoring
System (TPMS) will not function and
the low tire pressure warning light will
flash for approximately 1 minute. The
light will remain on after 1 minute. Con-
tact your NISSAN dealer as soon as
possible for tire replacement and/or
system resetting.
cReplacing tires with those not originally
specified by NISSAN could affect the
proper operation of the TPMS.
HOW TO USE THE SETTING
BUTTON
Pressing the SETTING button will change the
settings menu as follows:
Backlight!Day Mode Brightness!Night
Mode Brightness!Clock Adjust HOURS!Clock Adjust MINUTES!Units!Lang!MP3
Disp Type (if so equipped)!Audio or OFF!
Backlight
Backlight
To turn off the screen, select “OFF” of the Back-
light mode by pressing the TUNE button.
The message “Press SETTINGS to resume” will
display for approximately 5 seconds then the
screen will turn off.
To turn on the screen, press the SETTING button
and select “ON” by pressing the TUNE button.
When any button besides SETTING is pressed
with the screen off, the screen turns on for further
operation. The screen will turn off automatically
after the operation is finished.
Day mode brightness
The brightness of the screen during the day can
be changed by pressing the TUNE button.
For additional information, see “
button”
later in this section.
Night mode brightness
The brightness of the screen during the night can
be changed by pressing the TUNE button.
For additional information, see “
button”
later in this section.
Clock operation
The digital clock displays time when the ignition
key is in ACC or ON.
If the power supply is disconnected, the
clock will not indicate the correct time.
Readjust the time.
Clock adjust hours
Press the SETTING button until Clock Adjust
HOURS is shown in the display. Press the TUNE
button up or down to adjust the hour.
Clock adjust minutes
Press the SETTING button again Clock Adjust
Minutes is shown in the display. Press the TUNE
button up or down to adjust the minutes.
To exit the clock adjustment, press the SETTING
button repeatedly. The screen will return to the
audio display if the audio is on. If the audio is not
on, the screen will return to a blank display.
Units
To change the units press the TUNE button to
select “ENGLISH” or “METRIC”.
Unit: US — MI, °F, MPG
Metric — km, °C, L/100 km
Display screen, heater, air conditioner, audio and phone systems4-5
ZREVIEW COPYÐ2008 Quest(van)
Owners ManualÐUSA_English(nna)
06/29/07Ðdebbie
X
Page 224 of 376

1. Volume control switch
2. MODE select switch
3. POWER on/off switch
4. Tuning switch1. Volume control switch
2. Phone operation switch
3. POWER on and MODE select switch
4. Tuning switch
STEERING WHEEL SWITCH FOR
AUDIO CONTROL
The audio system can be operated using the
controls on the steering wheel.
POWER on/off switch
With the ignition key turned to the ACC or ON
position, push the POWER switch to turn the
audio system on or off.If you have the Type B switch, with the ignition key
turned to the ACC or ON position, push the
MODE switch to turn the audio system on.
MODE select switch
Push the MODE select switch to change the
mode in the following sequence: PRESET A!
PRESET B!PRESET C!CD!DVD (if so
equipped)!AUX.
While in one of the preset radio station banks (A,
B or C) , use the tuning switch
orto
select one of the preset radio stations (1-6) .
Volume control switch
Push the volume control switch up or down to
increase or decrease the volume.
Tuning
Memory change (radio):
While in one of the preset radio station banks (A,
B or C) , push the tuning switch
orfor less than 1.5 seconds to change to the next
preset station in memory.
Seek tuning (radio):
Push the tuning switch
orfor more
than 1.5 seconds to seek the next or previous
radio station.
Type A
WHA0640
Type B
WHA0637
4-62Display screen, heater, air conditioner, audio and phone systems
ZREVIEW COPYÐ2008 Quest(van)
Owners ManualÐUSA_English(nna)
06/29/07Ðdebbie
X
Page 241 of 376

CONTROL BUTTONS
The control buttons for the BluetoothTHands-
Free Phone System are located on the steering
wheel.
PHONE/SEND
Press the
button to initiate a VR
session or answer an incoming call.
You can also use the
button to
skip through system feedback and to
enter commands during a call. See “List
of voice commands” and “During a call”
later in this section for more information.
PHONE/END
Press the
button to cancel a VR
session or end a call.
GETTING STARTED
The following procedures will help you get
started using the BluetoothTHands-Free Phone
System with NISSAN Voice Recognition. For ad-
ditional command options, refer to “List of voice
commands” later in this section.
Choosing a language
You can interact with the BluetoothTHands-Free
Phone System using English, Spanish or French.
To change the language, perform the following.
1. Press and hold the
button for more
than 5 seconds.
2. The system announces: “Press the
PHONE/SEND (
) button for the
hands-free phone system to enter the
speaker adaptation mode or press the
PHONE/END (
) button to select a dif-
ferent language.”
3. Press the
button.
For information on speaker adaptation, see
“Speaker adaptation (SA) mode” later in this
section.4. The system announces the current language
and gives you the option to change the lan-
guage to Spanish (in Spanish) or French (in
French) . Use the following chart to select
the language.
NOTE:
You must press the
button or
thebutton within 5 seconds to
change the language.
Current
languagePress(PHONE/SEND)
to selectPress(PHONE/END)
to select
English Spanish French
Spanish English French
French English Spanish
5. If you decide not to change the language, do
not press either button. After 5 seconds, the
VR session will end, and the language will
not be changed.
LHA0639
Display screen, heater, air conditioner, audio and phone systems4-79
ZREVIEW COPYÐ2008 Quest(van)
Owners ManualÐUSA_English(nna)
06/29/07Ðdebbie
X
Page 242 of 376

Pairing procedure
NOTE:
The pairing procedure must be performed
when the vehicle is stationary. If the vehicle
starts moving during the procedure, the
procedure will be cancelled.
Main Menu
“Setup”
sA
“Pair phone”sB
“New phone”sC
Initiate from handsetsD
Name phonesE
Assign prioritysF
Choose ringtonesG
1. Press thebutton on the steering
wheel. The system announces the available
commands.
2. Say: “Setup”
sA. The system acknowledges
the command and announces the next set of
available commands.
3. Say: “Pair phone”
sB. The system acknowl-
edges the command and announces the
next set of available commands.4. Say: “New phone”
sC. The system acknowl-
edges the command and asks you to initiate
pairing from the phone handset
sD.
The pairing procedure of the cellular phone
varies according to each cellular phone
model. See the cellular phone Owner’s
Manual for details. You can also visit
www.nissanusa.com/bluetooth for instruc-
tions on pairing NISSAN recommended cel-
lular phones.
When prompted for a Passkey code, enter
“1234” from the handset. The Passkey code
“1234” has been assigned by NISSAN and
cannot be changed.
5. The system asks you to say a name for the
phone
sE.
If the name is too long or too short, the
system tells you, then prompts you for a
name again.
Also, if more than one phone is paired and
the name sounds too much like a name
already used, the system tells you, then
prompts you for a name again.6. The system asks you to assign a priority level
sF. The priority level determines which
phone is active when more than one paired
BluetoothTphone is in the vehicle. Follow
the instructions provided by the system or
refer to “Setup” later in this section for more
information on changing priorities.
7. The system will ask if you would like to select
a custom ring tone
sG. Follow the instruc-
tions provided by the system or refer to
“Setup” later in this section for more infor-
mation on selecting ringtones.
Making a call by entering a phone
number
Main Menu
“Call”
sA
Number (speak digits)sB
“Dial”sC
1. Press thebutton on steering wheel. A
tone will sound.
2. Say: “Call”
sA. The system acknowledges
the command and announces the next set of
available commands.
4-80Display screen, heater, air conditioner, audio and phone systems
ZREVIEW COPYÐ2008 Quest(van)
Owners ManualÐUSA_English(nna)
06/29/07Ðdebbie
X
Page 279 of 376
WARNING
cMake sure the parking brake is securely
applied and the automatic transmission
is shifted into P (Park) .
cNever change tires when the vehicle is
on a slope, ice or slippery areas. This is
hazardous.
cNever change tires if oncoming traffic is
close to your vehicle. Wait for profes-
sional road assistance.
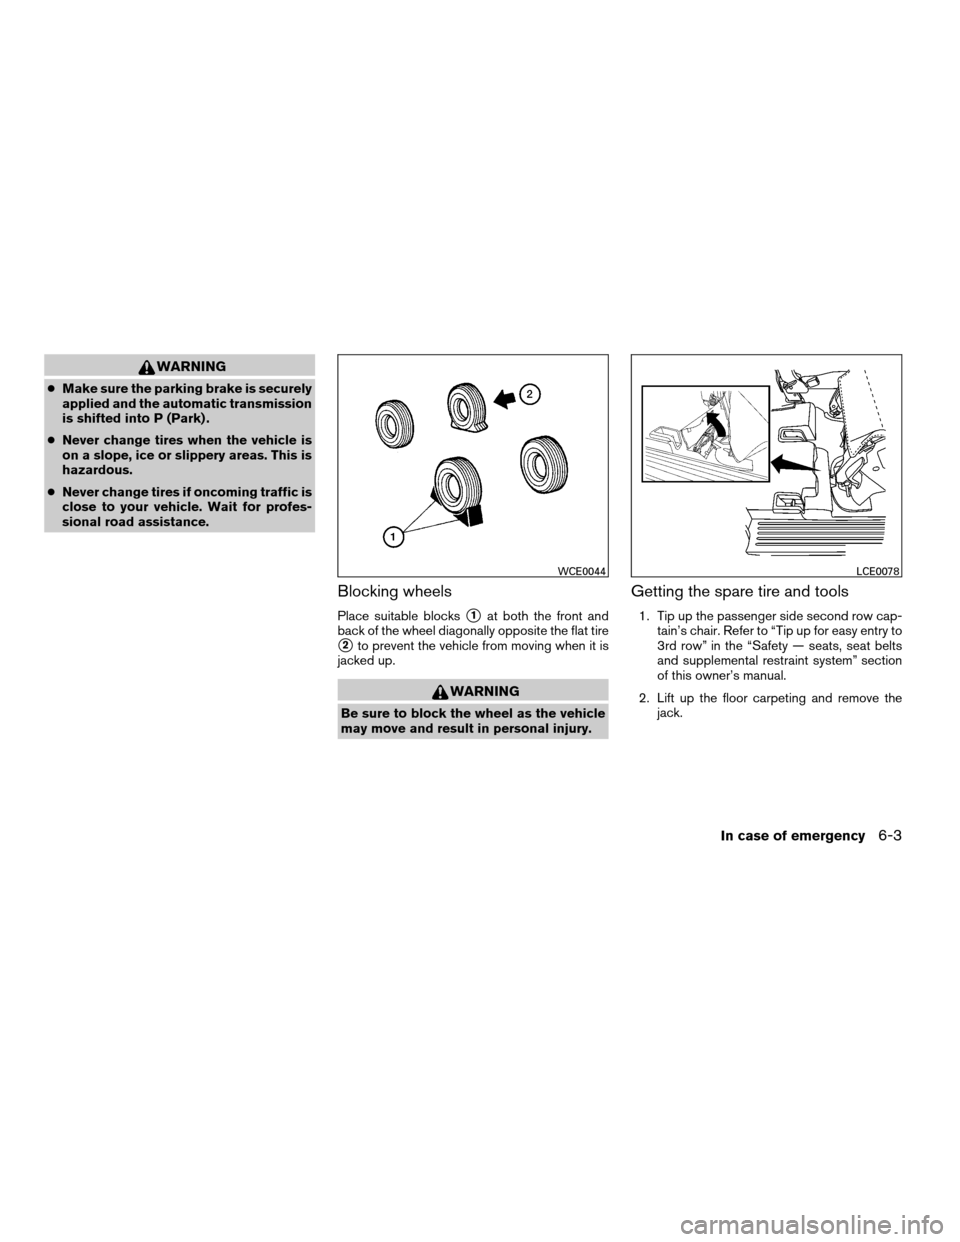
Blocking wheels
Place suitable blockss1at both the front and
back of the wheel diagonally opposite the flat tire
s2to prevent the vehicle from moving when it is
jacked up.
WARNING
Be sure to block the wheel as the vehicle
may move and result in personal injury.
Getting the spare tire and tools
1. Tip up the passenger side second row cap-
tain’s chair. Refer to “Tip up for easy entry to
3rd row” in the “Safety — seats, seat belts
and supplemental restraint system” section
of this owner’s manual.
2. Lift up the floor carpeting and remove the
jack.
WCE0044LCE0078
In case of emergency6-3
ZREVIEW COPYÐ2008 Quest(van)
Owners ManualÐUSA_English(nna)
06/29/07Ðdebbie
X
Page 280 of 376
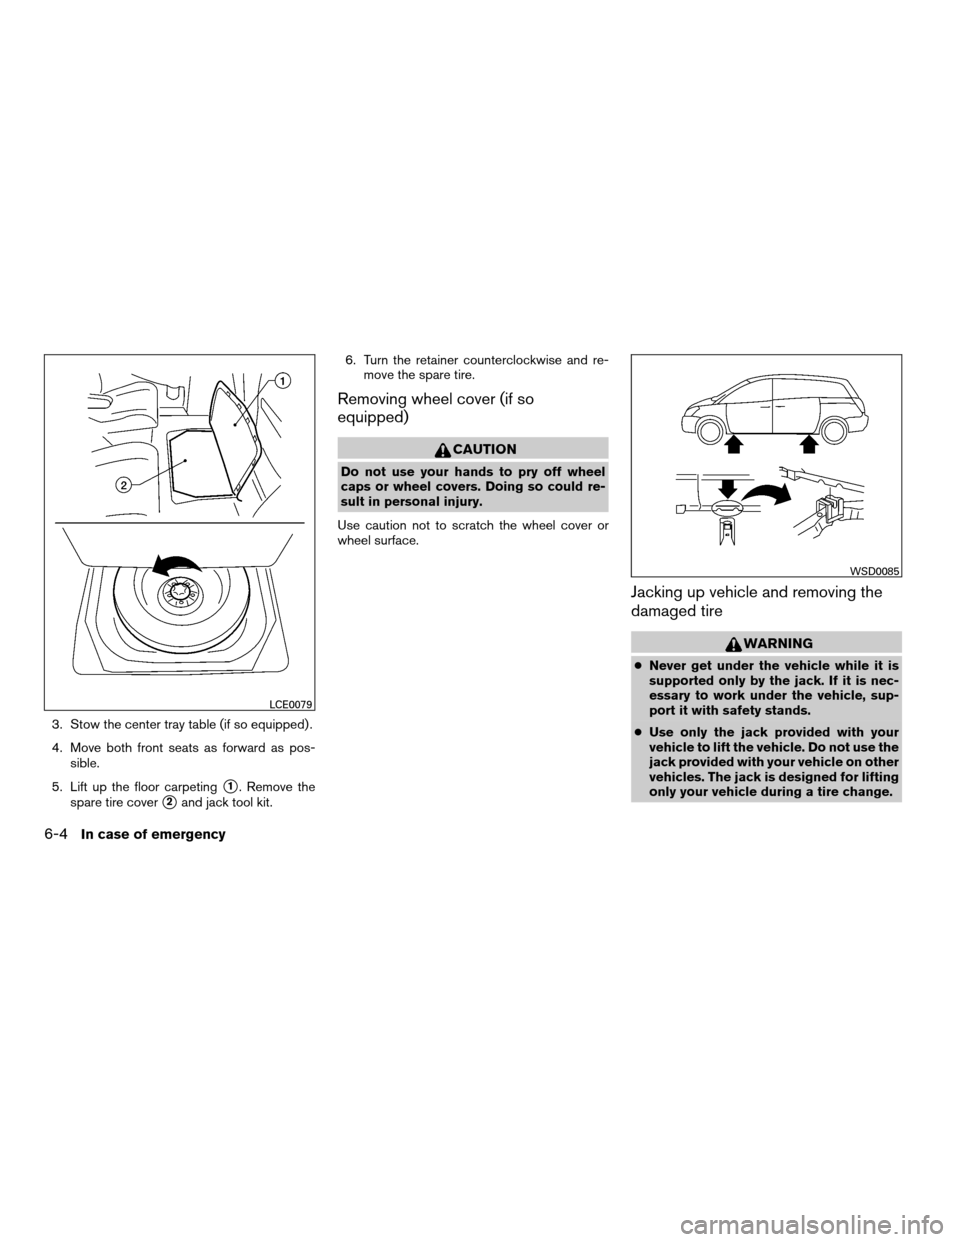
3. Stow the center tray table (if so equipped) .
4. Move both front seats as forward as pos-
sible.
5. Lift up the floor carpeting
s1. Remove the
spare tire cover
s2and jack tool kit.6. Turn the retainer counterclockwise and re-
move the spare tire.
Removing wheel cover (if so
equipped)
CAUTION
Do not use your hands to pry off wheel
caps or wheel covers. Doing so could re-
sult in personal injury.
Use caution not to scratch the wheel cover or
wheel surface.
Jacking up vehicle and removing the
damaged tire
WARNING
cNever get under the vehicle while it is
supported only by the jack. If it is nec-
essary to work under the vehicle, sup-
port it with safety stands.
cUse only the jack provided with your
vehicle to lift the vehicle. Do not use the
jack provided with your vehicle on other
vehicles. The jack is designed for lifting
only your vehicle during a tire change.
LCE0079
WSD0085
6-4In case of emergency
ZREVIEW COPYÐ2008 Quest(van)
Owners ManualÐUSA_English(nna)
06/29/07Ðdebbie
X
Page 298 of 376

Steering wheelCheck for changes in the steer-
ing system, such as excessive freeplay, hard
steering or strange noises.
Warning lights and chimesMake sure all
warning lights and chimes are operating properly.
Windshield wiper and washer*Check that
the wipers and washer operate properly and that
the wipers do not streak.
Windshield defrosterCheck that the air
comes out of the defroster outlets properly and in
sufficient quantity when operating the heater or
air conditioner.
Under the hood and vehicle
The maintenance items listed here should be
checked periodically (for example, each time you
check the engine oil or refuel) .
Battery*Check the fluid level in each cell. It
should be between the MAX and MIN lines. Ve-
hicles operated in high temperatures or under
severe conditions require frequent checks of the
battery fluid level.
Brake fluid levels*Make sure that the brake
fluid level is between the MIN and MAX lines on
the reservoir.
Engine coolant level*Check the coolant level
when the engine is cold.Engine drive belts*Make sure the drive belts
are not frayed, worn, cracked or oily.
Engine oil level*Check the level after parking
the vehicle on a level surface with the engine off.
Wait more than 10 minutes for the oil to drain
back into the oil pan.
Exhaust systemMake sure there are no loose
supports, cracks or holes. If the sound of the
exhaust seems unusual or there is a smell of
exhaust fumes, immediately have the exhaust
system inspected by a NISSAN dealer. See the
carbon monoxide warning in the “Starting and
driving” section of this manual.
Fluid leaksCheck under the vehicle for fuel, oil,
water or other fluid leaks after the vehicle has
been parked for a while. Water dripping from the
air conditioner after use is normal. If you should
notice any leaks or if gasoline fumes are evident,
check for the cause and have it corrected imme-
diately.
Power steering fluid level* and linesCheck
the level when the fluid is cold, with the engine
off. Check the lines for proper attachment, leaks,
cracks, etc.
Radiator and hosesCheck the front of the
radiator and clean off any dirt, insects, leaves,etc., that may have accumulated. Make sure the
hoses have no cracks, deformation, rot or loose
connections.
UnderbodyThe underbody is frequently ex-
posed to corrosive substances such as those
used on icy roads or to control dust. It is very
important to remove these substances from the
underbody, otherwise rust may form on the floor
pan, frame, fuel lines and exhaust system. At the
end of winter, the underbody should be thor-
oughly flushed with plain water, in those areas
where mud and dirt may have accumulated. See
the “Appearance and care” section of this
manual.
Windshield washer fluid*Check that there is
adequate fluid in the reservoir.
8-4Maintenance and do-it-yourself
ZREVIEW COPYÐ2008 Quest(van)
Owners ManualÐUSA_English(nna)
06/29/07Ðdebbie
X
Page 333 of 376
Replacing wheels and tires
When replacing a tire, use the same size, tread
design, speed rating and load carrying capacity
as originally equipped. Recommended types and
sizes are shown in “Wheels and tires” in the
“Technical and consumer information” section of
this manual.
WARNING
cThe use of tires other than those recom-
mended or the mixed use of tires of
different brands, construction (bias,
bias-belted or radial) , or tread patterns
can adversely affect the ride, braking,
handling, ground clearance, body-to-
tire clearance, tire chain clearance,
speedometer calibration, headlight aim
and bumper height. Some of these ef-
fects may lead to accidents and could
result in serious personal injury.cIf the wheels are changed for any rea-
son, always replace with wheels which
have the same off-set dimension.
Wheels of a different off-set could
cause premature tire wear, degrade ve-
hicle handling characteristics and/or
interference with the brake
discs/drums. Such interference can
lead to decreased braking efficiency
and/or early brake pad/shoe wear. Re-
fer to “Wheels and tires” in the “Techni-
cal and consumer information” section
of this manual for wheel off-set
dimensions.
cWhen a spare tire is mounted or a wheel
is replaced, tire pressure will not be
indicated, the TPMS will not function
and the low tire pressure warning light
will flash for approximately 1 minute.
The light will remain on after 1 minute.
Contact your NISSAN dealer as soon as
possible for tire replacement and/or
system resetting.
cReplacing tires with those not originally
specified by NISSAN could affect the
proper operation of the TPMS.cDo not install a damaged or deformed
wheel or tire even if it has been re-
paired. Such wheels or tires could have
structural damage and could fail with-
out warning.
cThe use of retread tires is not
recommended.
cFor additional information regarding
tires, refer to “Important Tire Safety In-
formation” (US) or “Tire Safety Informa-
tion” (Canada) in the Warranty Informa-
tion Booklet.
Wheel balance
Unbalanced wheels may affect vehicle handling
and tire life. Even with regular use, wheels can get
out of balance. Therefore, they should be bal-
anced as required.
Wheel balance service should be per-
formed with the wheels off the vehicle.
Spin balancing the wheels on the vehicle
could lead to mechanical damage.
cFor additional information regarding
tires, refer to “Important Tire Safety
Information” (US) or “Tire Safety Infor-
mation” (Canada) in the Warranty In-
formation Booklet .
Maintenance and do-it-yourself8-39
ZREVIEW COPYÐ2008 Quest(van)
Owners ManualÐUSA_English(nna)
06/29/07Ðdebbie
X